-
Cisco CallManager Features and Services Guide, Release 4.1(2)
-
Index
-
Preface
-
Cisco CallManager Extension Mobility
-
Cisco IP Manager Assistant With Proxy Line Support
-
Cisco IP Manager Assistant With Shared Line Support
-
Cisco Call Back
-
Client Matter Codes and Forced Authorization Codes
-
Music On Hold
-
Cisco CallManager AutoAttendant
-
Barge and Privacy
-
Call Park
-
Immediate Divert
-
Malicious Call Identification
-
Multilevel Precedence and Preemption
-
Custom Phone Rings
-
Cisco WebDialer
-
Cisco CallManager Attendant Console
-
Call Display Restrictions
-
Quality Report Tool
-
External Call Transfer Restrictions
-
Troubleshooting Features and Services
-
 Feedback
Table Of Contents
Cisco IP Manager Assistant With Shared Line Support
Cisco IPMA Architecture Overview
Cisco IPMA Database and Directory Access Architecture
Manager Assistant Administration Interface
System Requirements for Cisco IPMA With Shared Line Support
Multilevel Precedence and Preemption (MLPP)
Installing and Activating Cisco IPMA
Configuring Cisco IPMA With Shared Line Support
Configuration Checklist for Cisco IPMA With Shared Line Support
Setting the Service Parameters for Cisco IPMA
Starting the Cisco IPMA Service
Manager and Assistant Phone Configuration
Nonmanager and Nonassistant Phones
Manager and Assistant Configuration
Configuring a Manager and Assigning an Assistant for Shared Line Mode
Deleting Cisco IPMA Information for the Manager
Updating the Manager Cisco IPMA Configuration
Configuring Shared and Incoming Intercom Lines for the Assistant
Deleting the Cisco IPMA Information for the Assistant
Updating the Assistant Cisco IPMA Configuration
Configuring the LDAPConfig.ini File for Corporate Directory Use
Providing Information to Cisco IPMA Managers and Assistants
Installing the Assistant Console Application
Where to Find More Information
Cisco IP Manager Assistant With Shared Line Support
The Cisco IP Manager Assistant (Cisco IPMA) feature enables managers and their assistants to work together more effectively. Cisco IPMA supports two modes of operation: proxy line support and shared line support. The Cisco IPMA service supports both proxy line and shared line support in a cluster.
The feature comprises enhancements to phone capabilities for the manager and desktop interfaces that are primarily used by the assistant.
Cisco CallManager users comprise managers and assistants. An assistant user handles calls on behalf of a manager. Cisco IPMA comprises features for managers and features for assistants.
This chapter provides the following information about Cisco IPMA:
•
System Requirements for Cisco IPMA With Shared Line Support
•
•
•
•
•
•
Introducing Cisco IPMA
The following sections provide information about the Cisco IPMA feature:
•
•
•
Cisco IPMA Architecture Overview
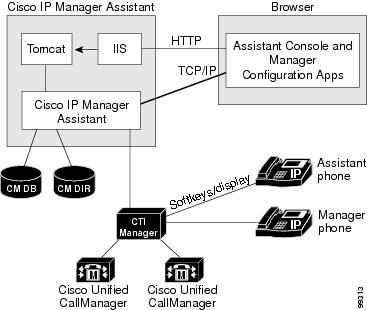
The Cisco IPMA feature architecture comprises the Cisco IPMA service, the desktop interfaces, and the Cisco IP Phone interfaces. See Figure 3-1.
Related Topics
Figure 3-1 Cisco IPMA Architecture
Cisco IPMA Service
Cisco Tomcat loads the Cisco IPMA service, a servlet. Cisco Tomcat, an NT service, gets installed at Cisco CallManager installation.
The Cisco IPMA service gets installed on all Cisco CallManager servers in a cluster. When started, the IPMA service checks to see whether the clusterwide service parameter, Cisco IPMA Server (Primary) IP Address, is set to the server that is defined in the service parameter. If it is, the IPMA service attempts to become the active Cisco IPMA service. Currently, a Cisco CallManager cluster supports only one active Cisco IPMA service.
The Cisco IPMA service performs the following tasks:
•
•
•
•
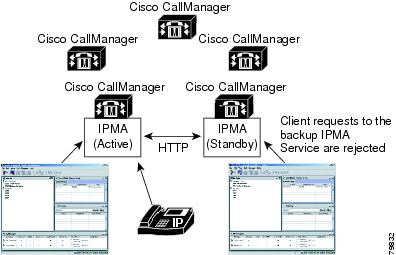
Cisco CallManager supports redundancy of the Cisco IPMA service. To achieve redundancy, you must configure a second Cisco IPMA service in the same cluster.
IPMA implements redundancy by using an active/standby server model. At any time, only one IPMA server remains active and servicing all desktop applications and phones. The other server stays in a standby mode and will detect failures on the active server. When the backup server detects a failure, it takes over and becomes the active server. All connections that were active get restored on the new server, and service continues uninterrupted to the users.
If the active server fails, the Assistant Console application fails over automatically to the backup server. The desktop heartbeat interval service parameter (see the "Setting the Service Parameters for Cisco IPMA" section) determines the time that the application takes to detect failure. A shorter heartbeat interval leads to faster failover. See Figure 3-2.
Figure 3-2 Cisco IPMA Redundancy
The Cisco IPMA service includes built-in security to help prevent unauthorized access to its services. The user ID and password that are collected at the desktop get encrypted before they are sent over the network. The Assistant Console blocks nonauthorized users who are posing as assistants.
Desktop Interface
Cisco IPMA supports the following desktop interfaces for managers and assistants:
•
•
Administrators use Cisco CallManager Administration, User Information windows, to configure Cisco IPMA parameters for managers and assistants. See "Manager Assistant Administration Interface" section.
Cisco CallManager makes the Cisco IPMA manager features Immediate Divert and Transfer to Voice Mail available through the Cisco IP Phone. Use a desktop browser to access Manager configuration. Assistants use the Cisco IP Phone and a desktop application. See "Manager Interfaces" section and "Assistant Interfaces" section.
For more information about how to use the Cisco IPMA desktop features, refer to the Cisco IP Manager Assistant User Guide.
Cisco IP Phone Interface
Assistants and managers use soft keys to access Cisco IPMA features. For more information about how to use the Cisco IPMA Phone features, refer to the Cisco IP Manager Assistant User Guide.
See "Manager Interfaces" section and "Assistant Interfaces" section.
Cisco IPMA Database and Directory Access Architecture
The database stores all dynamic data (such as login status and selected assistant). Storing dynamic data in the database means that the backup service (in standby mode) can access state information and serve the phone from the state that it was in when the active server became inactive. The directory stores static data (such as configuration information for the manager and the assistant, divert destinations, language).
When the manager or assistant logs in, the IPMA service retrieves all data that is related to the manager or assistant from the directory and database and stores it in memory.
Manager Interfaces
The manager phone makes available the manager features with the exception of Manager Configuration. Cisco IPMA automatically logs a manager into the IPMA service when the Cisco IPMA service starts.
The manager accesses the Cisco IPMA features Do Not Disturb, Immediate Divert, and Transfer to Voice Mail from the Cisco IP Phone soft keys.
The state of the Do Not Disturb feature displays in the Status Window on the Cisco IP Phone.
Refer to the Cisco IP Manager Assistant User Guide for more information.
Assistant Interfaces
The assistant accesses the Cisco IPMA features by using the Assistant Console application and the Cisco IP Phone. The Assistant Console, a desktop application, provides call-control functions such as answer, divert, transfer, and hold. The assistant uses the Assistant Console to log on and log off, to set up assistant preferences, and to display the manager configuration window that is used to configure manager preferences.
The Assistant Console displays the assistant lines and the manager shared lines. Assistants access the shared lines to manage calls that are intended for a manager.
You can access Intercom and Distinctive Ringing on the assistant Cisco IP Phone. When the assistant logs in from the Assistant Console, the soft keys Immediate Divert and Transfer to Voice Mail become active for the shared lines. Refer to the Cisco IP Manager Assistant User Guide for more information.
Softkeys
The Cisco IPMA feature supports softkeys such as Immediate Divert, Transfer to Voice Mail, and Do Not Disturb on the Cisco IP Phone. Softkeys only appear in their appropriate call state; for example, Transfer to Voice Mail does not appear if no active calls exist.
Cisco IPMA supports the following softkey templates:
•
•
•
Additionally, the system makes call-processing (such as hold and dial) softkeys available with the Standard User template. The administrator configures the appropriate softkey template for the devices that managers and assistants use.
Note
Administrators can create custom softkey templates in addition to using the standard softkey templates that are included in Cisco CallManager. Use Softkey Template configuration in Cisco CallManager Administration to associate softkey templates with Cisco IPMA devices and to create custom softkey templates. See Softkey Template Configuration in the Cisco CallManager Administration Guide.
Manager Assistant Administration Interface
The administrator uses the User menu options of Cisco CallManager Administration to configure the manager and assistant. The administrator chooses the device for the manager and assistant and optionally chooses an incoming intercom line for the manager and assistant. The administrator sets up the shared line for the manager, which gets configured for the assistant.
See the "Manager and Assistant Configuration" section.
System Requirements for Cisco IPMA With Shared Line Support
Cisco IPMA with shared line support requires the following software components to operate:
•
•
•
–
–
–
–
The following phones support Cisco IPMA:
•
•
•
Note
Because Cisco IPMA is installed automatically on the same server with Cisco CallManager, you do not require an additional server.
Interactions and Restrictions
The following sections describe the interactions and restrictions for Cisco IPMA:
Interactions
The following sections describe how Cisco IPMA interacts with Cisco CallManager applications:
•
Bulk Administration Tool
The administrator can use the Bulk Administration Tool (BAT) to add many users (managers and assistants) at once instead of adding users individually. Refer to the Bulk Administration Tool User Guide for Cisco CallManager for more information.
Related Topics
•
•
Extension Mobility
A manager who uses the Cisco CallManager Extension Mobility feature can simultaneously use Cisco IPMA. The manager logs into the Cisco IP Phone by using Extension Mobility and then chooses the Cisco IPMA service. When the IPMA service starts, the manager can access assistants and IPMA features (such as Do Not Disturb).
To have access to Cisco CallManager Extension Mobility with IPMA, the administrator checks the Mobile Manager check box in the User Information for Cisco IPMA window in Cisco CallManager Administration. See the "Configuring a Manager and Assigning an Assistant for Shared Line Mode" section. For more information about configuring device profiles, see Adding a New User Device Profile in the Cisco CallManager Administration Guide. For more information about Cisco CallManager Extension Mobility, see "Cisco CallManager Extension Mobility."
Reporting Tools
Cisco IPMA provides statistical information in the CDR Analysis and Reporting (CAR) tool and provides a summary of changes to configurations in a change log. The following sections describe these reporting tools.
CDR Analysis and Reporting
Cisco IPMA supports call-completion statistics for managers and assistants and inventory reporting for managers and assistants. The CDR Analysis and Reporting (CAR) tool supports call-completion statistics. Cisco CallManager Serviceability supports inventory reporting. Refer to the Cisco CallManager Serviceability System Guide and the Cisco CallManager Serviceability Administration Guide for more information.
IPMAChangeLog*.txt
The administrator can view a summary of changes that are made to the Manager or Assistant Configurations. A manager can change defaults by accessing the Manager Configuration from a URL.
An assistant can change the manager defaults from the Assistant Console.
Note
When changes are made, the information gets sent to a log file that is called IPMAChangeLog.txt. The log file resides on the server that runs the IPMA service at the following location:
c:\Program Files\Cisco\Trace\IPMA\IPMAChangeLog.txt
The administrator can change the name of this log file.
The log file contains the following fields:
•
•
•
•
•
•
•
•
•
Because the information in the log file is comma delimited, the administrator can open the log file by using a spreadsheet application such as Microsoft Excel. Use the following procedure to save the log file contents to the Microsoft Excel application.
Procedure
Step 1
Step 2
Step 3
Step 4
Step 5
Multilevel Precedence and Preemption (MLPP)
The following points describe the interactions between Cisco IPMA with shared line support and MLPP:
•
•
Restrictions
The following restrictions apply to Cisco IPMA:
•
•
•
•
•
•
Installing and Activating Cisco IPMA
Install and activate Cisco IPMA in identical way for shared line mode and proxy line mode. The following steps apply:
•
•
•
See the "Installing and Activating Cisco IPMA" section for details.
Note
Configuring Cisco IPMA With Shared Line Support
For successful configuration of Cisco IPMA, review the steps in the configuration checklist, perform the user and device configuration requirements, and configure the managers and assistants.
Note
The following sections provide configuration information:
•
•
•
•
•
Configuration Checklist for Cisco IPMA With Shared Line Support
Table 3-1 shows the logical steps for configuring the Cisco IP Manager Assistant with shared line support in Cisco CallManager.
Before You Begin
The information in the checklist assumes that you have already configured the phones and the users and have associated the devices to the users. Additionally, for shared line appearances between managers and assistants, you must configure the same directory number on the manager primary line and assistant secondary line. Refer to Adding a User, Associating Devices to a User, Adding a Phone, and Configuring Directory Numbers in the Cisco CallManager Administration Guide.
Table 3-1 Cisco IP Manager Assistant Configuration Checklist With shared Line Support
Step 1
Using the Cisco CallManager Serviceability tool, Service Activation, activate Cisco IP Manager Assistant service.
Cisco CallManager Serviceability Administration Guide
Step 2
Configure IPMA service parameters for shared line support.
Setting the Service Parameters for Cisco IPMA
Service Parameters Configuration, Cisco CallManager Administration Guide
Step 3
Using the Tomcat Manager window, stop and start the Cisco IPMA service.
Step 4
Add Cisco IP Phone model 7960 or 7970 phone button template.
Adding Phone Button Templates, Cisco CallManager Administration Guide
Step 5
Configure manager and assistant Cisco IP Phone parameters:
•
•
Configuring Cisco IP Phones, Cisco CallManager Administration Guide
Step 6
Configure manager phone settings:
•
•
•
•
•
•
•
TipManager and Assistant Phone Configuration
Finding a Phone, Cisco CallManager Administration Guide
Updating a Phone, Cisco CallManager Administration Guide
Adding a Directory Number, Cisco CallManager Administration Guide
Updating a Directory Number, Cisco CallManager Administration Guide
Configuring Speed-Dial Buttons, Cisco CallManager Administration Guide
Resetting a Phone, Cisco CallManager Administration Guide
Step 7
Configure assistant phone settings:
•
•
•
•
•
•
•
•
•
TipManager and Assistant Phone Configuration
Finding a Phone, Cisco CallManager Administration Guide
Updating a Phone, Cisco CallManager Administration Guide
Adding a Directory Number, Cisco CallManager Administration Guide
Configuring Speed-Dial Buttons, Cisco CallManager Administration Guide
Resetting a Phone, Cisco CallManager Administration Guide
Step 8
Configure Cisco IP Manager Assistant:
•
•
•
•
•
Configuring a Manager and Assigning an Assistant for Shared Line Mode
Deleting Cisco IPMA Information for the Manager
Configuring Shared and Incoming Intercom Lines for the Assistant
Step 9
Configure the dial rules for the assistant.
Adding a Dial Rule, Cisco CallManager Administration Guide
Step 10
If the assistant will be using the corporate directory for placing calls, configure the LDAPConfig.ini file.
Configuring the LDAPConfig.ini File for Corporate Directory Use
Step 11
Install the Assistant Console application.
Step 12
Configure the manager and assistant desktop applications.
Cisco IP Manager Assistant User Guide
Setting the Service Parameters for Cisco IPMA
Service Parameters for the Cisco IPMA service comprise three categories: general, clusterwide, and clusterwide parameters that must be configured if you want to use the IPMA automatic configuration for managers and assistants. Specify clusterwide parameters once for all Cisco IPMA services. Specify general parameters for each Cisco IPMA service that is installed.
Set the Cisco IPMA service parameters by using Cisco CallManager Administration to access the service parameters (Service > Service Parameters). Choose the server where the Cisco IPMA application resides and then choose the Cisco IP Manager Assistant service.
Cisco IPMA includes the following service parameters that must be configured:
•
–
–
–
–
–
–
–
•
–
–
–
Cisco IPMA includes the following clusterwide parameters that must be configured if you want to use the IPMA automatic configuration for managers and assistants:
•
–
–
–
•
•
•
Starting the Cisco IPMA Service
Cisco IPMA Service runs as an application on Cisco Tomcat. To start or stop the Cisco IPMA service, log in to the Tomcat Manager window using administrator privileges. The URL to the Tomcat Manager web page is
http://<IPMA server>/manager/list
where
IPMA server specifies the IP address of the server that has the IPMA service running on it.
Manager and Assistant Phone Configuration
You must configure and associate devices for each IPMA manager and assistant. Before you begin, complete the following tasks, depending on the phone type.
Cisco IP Phone Model 7960 and Model 7970
•
–
–
–
•
Cisco IP Phone Model 7940
You can use the Model 7940 for IPMA, but certain restrictions apply:
•
–
–
–
•
–
–
–
Note
After you complete these tasks, configure the phones as described in the following sections:
•
Manager Phones
The following section describes the IPMA requirements and tips for configuring a manager phone.
Manager Phone Configuration
Configure the manager Cisco IP Phones with the following settings:
•
•
•
•
•
•
•
You can automate some of these settings by choosing the Automatic Configuration check box on the User Information window when you configure the manager. For step-by-step instructions, see the "Configuring a Manager and Assigning an Assistant for Shared Line Mode" section.
Automatic Configuration sets the following items for the manager device or device profile:
•
•
IPMA supports the Cisco IP Phone Model 7940. For more information, see the "Cisco IP Phone Model 7940" section.
Assistant Phones
The following section describes the IPMA requirements for configuring an assistant phone and provides tips on configuring an assistant phone. For step-by-step instructions, see the "Configuring Shared and Incoming Intercom Lines for the Assistant" section.
Assistant Phone Configuration
Configure the assistant Cisco IP Phones with the following settings:
•
•
•
•
•
•
•
•
IPMA supports the Cisco IP Phone Model 7940. For more information, see the "Cisco IP Phone Model 7940" section.
Nonmanager and Nonassistant Phones
In addition to configuring manager and assistant devices, configure all other users in the Cisco CallManager cluster. Proper configuration allows managers and assistants to make calls to and receive calls from all other users in the cluster. No special configuration requirements exists in shared line support for nonmanager and nonassistant user phones.
Manager and Assistant Configuration
From the Cisco CallManager User Information window, configure the settings for the managers and assistants who use the Cisco IPMA feature. From this window, perform the following functions:
•
•
•
•
Note
•
The following sections provide details about configuring the manager and assistant settings:
•
•
•
•
Configuring a Manager and Assigning an Assistant for Shared Line Mode
Perform the following procedure to configure a Cisco IPMA manager and assign an assistant to the manager. To configure a new user and associate the device to the user, see "Adding a New User" in the Cisco CallManager Administration Guide. To configure the same directory number for the manager primary line and assistant secondary line, see "Configuring Directory Numbers" in the Cisco CallManager Administration Guide.
Tip
Procedure
Step 1
Step 2
Step 3
The User Configuration window displays.
Step 4
Step 5
The User Configuration window redisplays and contains Manager Configuration information such as device name/profile, IPMA-controlled lines, and intercom line.
Tip
Step 6
Step 7
The Assign Assistants windows displays.
Step 8
A list of available assistants displays in the window.
Step 9
A manager can have a maximum of 10 assigned assistants.
Step 10
The User Configuration window displays the manager configuration, and the assistant that you configured displays in the Assigned Assistants list.
Step 11
Note
Step 12
Step 13
To remove a line from the Selected Lines selection box and from Cisco IPMA control, click the left arrow.
Note
Step 14
Step 15
The update takes effect immediately.
If you checked the Automatic Configuration check box and the service parameters are invalid, an error message displays.
Upon successful completion of the automatic configuration, the manager device resets. If you configured a device profile, the manager must log out and log in to the device for settings to take effect.
Note
Related Topics
•
•
•
Deleting Cisco IPMA Information for the Manager
Perform the following procedure to delete Cisco IPMA information for a manager. To delete non-IPMA information for a manager, see the "Adding a User" section in the Cisco CallManager Administration Guide.
Procedure
Step 1
Step 2
A list of configured users displays in the User Configuration window.
Step 3
Step 4
The User Configuration window redisplays and contains IPMA manager configuration information.
Step 5
The update takes effect immediately.
Related Topics
•
•
Updating the Manager Cisco IPMA Configuration
Perform the following procedure to update Cisco IPMA information for a manager. To update non-IPMA information for a manager, see the "Adding a User" section in the Cisco CallManager Administration Guide.
Procedure
Step 1
Step 2
A list of configured users displays in the User Configuration window.
Step 3
The User Configuration window redisplays and contains IPMA manager configuration information.
Step 4
Note
Step 5
The update takes effect immediately.
Note
Related Topics
•
•
Configuring Shared and Incoming Intercom Lines for the Assistant
Use the Cisco IPMA Assistant Configuration of the User Configuration window to configure the following items:
•
•
•
Administrators can set up one or more lines with a shared line appearance. The Cisco CallManager system considers a directory number to be a shared line if it appears on more than one device in the same partition.
In a shared line appearance, for example, you can set up a shared line, so a directory number appears on line 1 of a manager phone and also on line 2 of an assistant phone.
Perform the following procedure to configure the manager shared line and incoming intercom line appearances for an assistant. To configure a new user and associate devices, see the "Adding a User" section in the Cisco CallManager Administration Guide.
Tip
Procedure
Step 1
Step 2
Step 3
The User Configuration window displays.
Step 4
Step 5
Step 6
Step 7
Tip
In the Associated Manager field, the name of the previously configured IPMA manager displays.
Note
Step 8
Step 9
The update takes effect immediately. If you chose automatic configuration, the assistant device automatically resets.
Related Topic
•
Deleting the Cisco IPMA Information for the Assistant
Perform the following procedure to delete Cisco IPMA information for an assistant. To delete non-IPMA information for an assistant, see the "Adding a User" section in the Cisco CallManager Administration Guide.
Procedure
Step 1
Step 2
A list of configured users displays in the User Configuration window.
Step 3
The User Configuration window redisplays and contains assistant configuration information.
Step 4
The update takes effect immediately.
Note
Related Topics
•
•
•
Updating the Assistant Cisco IPMA Configuration
Perform the following procedure to update Cisco IPMA information for an assistant. To update non-IPMA information for an assistant, see the "Adding a User" section in the Cisco CallManager Administration Guide.
Procedure
Step 1
Step 2
A list of configured users displays in the User Configuration window.
Step 3
The User Configuration window redisplays and contains assistant configuration information.
Step 4
Note
Step 5
The update takes effect immediately.
Note
Related Topics
•
•
•
Dial Rules Configuration
The administrator uses dial rules configuration to add and sort the priority of dialing rules. Dial rules for Cisco IPMA automatically strip numbers from or add numbers to telephone numbers that the assistant dials. For example, a dial rule can automatically add the digit 9 in front of a 7-digit telephone number to provide access to an outside line.
The following sections provide additional information on application dial rules:
•
•
•
Configuring the LDAPConfig.ini File for Corporate Directory Use
Cisco CallManager provides a default directory that the assistant accesses from the Assistant Console. If the assistant needs access to a corporate directory (accessing Cisco CallManager interclusters), you must update the LDAPConfig.ini file and store it on the primary and backup IPMA servers.
Perform the following procedure to configure the LDAPConfig.ini file to access a corporate directory.
Procedure
Step 1
C:\Program Files\Cisco\MA\LDAPConfig.ini
Step 2
To access the corporate directory, you must update the following fields in the LDAPConfig.ini file:
•
•
•
•
•
Providing Information to Cisco IPMA Managers and Assistants
Install the assistant console application for Cisco IPMA by accessing a URL. The administrator sends the URL, in the "Installing the Assistant Console Application" section, to the assistant.
Note
Installing the Assistant Console Application
Begin the installation by accessing the following URL:
http://<IPMA server>/ma/Install/IPMAConsoleInstall.jsp
where
IPMA server specifies the IP address of the server that has the IPMA service running on it.
Tip
The assistant console installation package for Cisco IPMA resides in the directory C:\Program Files\Cisco\Tomcat\webapps\ma\Install\Package. The installation package contains a script file, installscript.txt, which controls the installation. To change the behavior of the assistant console installation for Cisco IPMA, the administrator may modify the script file.
Note
Script File Parameters
You can change the following parameters:
•
•
•
•
•
Manager Configuration
Managers can customize their feature preferences from the Manager Configuration window by using the following URL:
http://<IPMA server>/ma/desktop/maLogin.jsp
where
IPMA server specifies the IP address of the server that has the Cisco IPMA service running on it.
Note
The administrator must send this URL to the manager.
Troubleshooting Cisco IPMA
Cisco IPMA provides troubleshooting tools for the administrator. Tools include performance counters and alarms, which are part of Cisco CallManager Serviceability. For more information about performance counters and alarms, refer to the Cisco CallManager Serviceability System Guide and the Cisco CallManager Serviceability Administration Guide.
For information about troubleshooting tools, error messages, and how to recover from Cisco IPMA problems, see "Troubleshooting Features and Services."
Where to Find More Information
Related Topic
•
•
•
•
Additional Cisco Documentation
•
•
•
•
•
•