-
Cisco CallManager Features and Services Guide, Release 4.1(2)
-
Index
-
Preface
-
Cisco CallManager Extension Mobility
-
Cisco IP Manager Assistant With Proxy Line Support
-
Cisco IP Manager Assistant With Shared Line Support
-
Cisco Call Back
-
Client Matter Codes and Forced Authorization Codes
-
Music On Hold
-
Cisco CallManager AutoAttendant
-
Barge and Privacy
-
Call Park
-
Immediate Divert
-
Malicious Call Identification
-
Multilevel Precedence and Preemption
-
Custom Phone Rings
-
Cisco WebDialer
-
Cisco CallManager Attendant Console
-
Call Display Restrictions
-
Quality Report Tool
-
External Call Transfer Restrictions
-
Troubleshooting Features and Services
-
 Feedback
Table Of Contents
Cisco CallManager Attendant Console
Introducing Cisco CallManager Attendant Console
Understanding Cisco CallManager Attendant Console Users
Understanding Pilot Points and Hunt Groups
Understanding Linked Hunt Groups
Understanding Circular Hunt Groups
Understanding Broadcast Hunting
Understanding the Cisco CallManager Attendant Console Directory
Understanding the Cisco Telephony Call Dispatcher
Cisco CallManager Attendant Console Redundancy
System Requirements for Cisco CallManager Attendant Console
Cisco IP Phone and Voice Messaging Requirements for Use with the Attendant Console
Cisco CallManager Extension Mobility
Installing and Activating Cisco CallManager Attendant Console
Configuring Cisco CallManager Attendant Console
Configuration Checklist for Cisco CallManager Attendant Console
Configuring Cisco CallManager Attendant Console Users
Finding an Attendant Console User
Adding an Attendant Console User
Updating or Deleting an Attendant Console User
Cisco CallManager Attendant Console User Configuration Settings
Updating or Deleting a Pilot Point
Pilot Point Configuration Settings
Associating Devices and Pilot Points with the ac User
Configuring Linked Hunt Groups
Updating or Deleting Hunt Group Members
Hunt Group Configuration Settings
Cisco CallManager Attendant Console Server Configuration
Creating Cisco CallManager Attendant Console Dial Rules
Creating the CorporateDirectory.txt File
Installing the Cisco CallManager Attendant Console Plug-in on an Attendant PC
Configuring Cisco CallManager Attendant Console Settings
Attendant Console Configuration Settings
Using the Attendant Console Configuration Tool
Attendant Console Configuration Tool Configuration Settings
Troubleshooting Cisco CallManager Attendant Console
Where to Find More Information
Cisco CallManager Attendant Console
Cisco CallManager Attendant Console, a client-server application, allows you to set up Cisco IP Phones as attendant consoles. Employing a graphical user interface, the attendant console uses speed-dial buttons and quick directory access to look up phone numbers, monitor line status, and direct calls. A receptionist or administrative assistant can use the attendant console to handle calls for a department or company, or another employee can use it to manage his own telephone calls.
The attendant console installs on a PC with IP connectivity to the Cisco CallManager system. The attendant console works with a Cisco IP Phone that is registered to a Cisco CallManager system. Multiple attendant consoles can connect to a single Cisco CallManager system. When a server fails, the attendant console automatically connects to another server in the cluster.
The application registers with and receives call-dispatching, login, line state, and directory services from the Cisco Telephony Call Dispatcher (TCD) service on the Cisco CallManager server. Cisco TCD receives calls that are made to a virtual directory number that is called a pilot point and directs calls to a list of destinations in a hunt group. You can configure the order in which members of the hunt group receive calls and whether Cisco TCD queues calls when all attendants are busy.
This section contains the following topics:
•
Introducing Cisco CallManager Attendant Console
•
•
•
•
•
•
Introducing Cisco CallManager Attendant Console
The following sections provide information about the Cisco CallManager Attendant Console feature:
•
•
•
•
•
Understanding Cisco CallManager Attendant Console Users
Before a user can log in to an attendant console to answer and direct calls, you must add the user as an attendant console user and optionally assign a password to the user. You can add or delete attendant console users and modify user IDs and password information in the Cisco CallManager Attendant Console User Configuration window in Cisco CallManager Administration.
Note
If a user cannot log in to the attendant console, make sure that Cisco CallManager and Cisco TCD are both running. Verify that the user has been added in the Cisco CallManager Attendant Console User Configuration area of Cisco CallManager Administration and that the correct user name and password are specified in the attendant console Settings dialog box.
In addition to configuring Cisco CallManager Attendant Console users, you must configure one directory user who is named "ac" and associate the attendant phones and the pilot points with the user. If you do not configure this user, the attendant console cannot interact with CTIManager. For information on setting up the ac user in Cisco CallManager Administration, see the "Configuring the ac User" section.
Understanding Pilot Points and Hunt Groups
A pilot point, a virtual directory number that is never busy, alerts the Cisco Telephony Call Dispatcher (TCD) to receive and direct calls to hunt group members. A hunt group comprises a list of destinations that determine the call redirection order.
Note
For Cisco TCD to function properly, make sure that the pilot point number is unique throughout the system (it cannot be a shared line appearance). When configuring the pilot point, you must choose one of the following routing options:
•
•
If the voice-mail number is the longest idle member of the group, Cisco TCD routes the call to a voice-messaging system without checking the other members of the group first.
•
•
Note
Make sure that you configure the ac user and associate all pilot point numbers with the ac user.
When you update a pilot point, make sure that you reset the pilot point. Call processing continues to occur when you reset it.When a call comes into a pilot point, Cisco TCD uses the hunt group list and the selected call routing method for that pilot point to determine the call destination. During hunt group configuration, you must specify one of the following options for each hunt group member:
•
If a directory number is specified, Cisco TCD only checks whether the line is available (not busy) before routing the call.
•
When you specify a user and line number, the user can log in to and receive calls on any Cisco IP Phone in the cluster that the attendant console controls.
If a user and line number are specified, Cisco TCD confirms the following details before routing the call:
–
–
–
The attendant can only answer calls on the line number that you specify if that line number is configured on the phone that the attendant used to log in to the attendant console.
Caution
You can also handle overflow conditions by enabling call queuing. For more information about call queuing, see "Understanding Call Queuing" section.
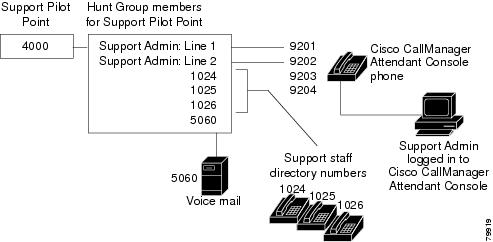
Example 1 Pilot Points and Hunt Groups Working Together
Assume a pilot point named Support exists at directory number 4000. The hunt group for the Support pilot point contains the following members:
•
•
•
Figure 15-1 Pilot Point and Hunt Group Example
As shown in Figure 15-1, the following example describes a simple call-routing scenario where the user chose First Available Hunt Member during the configuration of the pilot point:
1.
2.
3.
Understanding Linked Hunt Groups
Linking hunt groups together allows the Cisco TCD to search through more than one hunt group when routing calls. When configured properly, pilot points create a link between hunt groups. Cisco TCD searches each hunt group according to the call-routing method that was chosen during configuration.
Consider the following guidelines when you are linking hunt groups together:
•
•
•
•
Caution
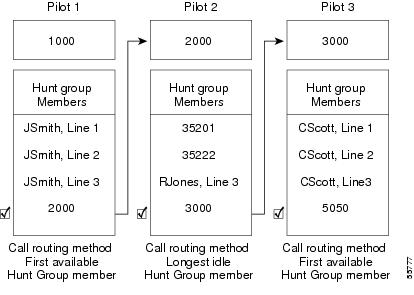
Example 2 Linked Hunt Groups Working Together
Consider the following information that is shown in Figure 15-2:
•
•
•
•
•
•
•
Figure 15-2 Linked Hunt Group Example
As represented in Figure 15-2, the following example describes a simple call- routing scenario for linked hunt groups:
1.
2.
3.
4.
Understanding Circular Hunt Groups
Circular hunt groups enable Cisco TCD to route calls on the basis of last hunt group member to receive a call. Each hunt group maintains a record of which hunt group member receives a call. When a new call arrives, Cisco TCD dispatches the call to the next hunt group member in the hunt group. In other words, Cisco TCD routes the first call to a hunt group to the first hunt group member, the second call to the second hunt group member, and so on. After the last hunt group member receives a call, Cisco TCD routes calls beginning with the first hunt group member again.
To set up circular hunt groups, use the Cisco CallManager Attendant Console configuration tool that is located in C:\Program Files\Cisco\CallManagerAttendant\bin on the Cisco CallManager Attendant Console server. If you want to use circular hunting for linked hunt groups, set each of the pilot points of the linked hunt groups to circular hunting.
For information on the configuration tool, see the "Using the Attendant Console Configuration Tool" section.
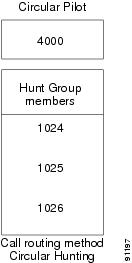
Example 3 Circular Hunting
Assume a pilot point that is named Circular exists at directory number 4000 and that you chose the Circular Hunting routing algorithm in the Cisco CallManager Attendant Console configuration tool for the Circular pilot point.
The hunt group for this pilot point contains the three directory numbers; that is, 1024, 1025, and 1026, listed in the hunt group in that order. Because the Always Route check box is not checked for any of the hunt group members, Cisco TCD determines whether the directory number is busy before routing the call.
Figure 15-3 Circular Hunting Example
As shown in Figure 15-3, the following example describes a simple call-routing scenario where the user configured a Circular pilot point:
1.
2.
3.
4.
5.
6.
7.
Understanding Broadcast Hunting
Broadcast hunting enables Cisco Cisco CallManager Attendant Console to answer calls and place them into a queue. The attendant console displays the queued calls to all available attendants after inserting the calls into the queue and to all attendants that become available while the call is in the queue.
Note
The queued calls appear in the Broadcast Calls window on the attendant PC. While in the queue, the callers receive music on hold if you have chosen an audio source from the Network Hold Audio Source and the User Hold MOH Audio Source drop-down list boxes in the Device Pool window.
Any attendant in the hunt group that is online can answer the queued calls. Cisco TCD does not automatically send the calls to an attendant. When an attendant answers a call, Cisco TCD removes the call from the Broadcast Calls window and displays it in the Call Control window of the attendant who answered the call.
You configure broadcast hunting for a pilot point by using the Attendant Console Configuration Tool. You can specify the following values for each broadcast hunting pilot point:
•
•
For information on the configuration tool, see the "Using the Attendant Console Configuration Tool" section.
Example 15-4 Broadcast Hunting Example
Assume a pilot point named Service exists at directory number 1000 and supports broadcast hunting. The hunt group for this pilot contains the following members:
•
•
The following example describes a simple call-routing scenario where the user chose Broadcast Hunting during the configuration of the pilot point:
1.
2.
3.
4.
Understanding Call Queuing
You can configure a pilot point to support call queuing, so when a call comes to pilot point and all hunt groups members are busy, Cisco CallManager Attendant Console sends calls to a queue. While in the queue, the callers receive music on hold if you have chosen an audio source from the Network Hold Audio Source and the User Hold MOH Audio Source drop-down list boxes in the Device Pool window. The attendants cannot view the queued calls. When a hunt group member becomes available, Cisco TCD redirects the call to that hunt group member.
You enable queuing for a pilot point by choosing the pilot point in the Attendant Console Configuration Tool and checking the Enable Queuing check box. You must also enter a value in the Queue Size field and the Hold Time (in Seconds) field. The queue size specifies the number of calls that are allowed in the queue. If the queue is full, Cisco TCD routes calls to the "always route" hunt group member that is specified on the Hunt Group Configuration window. If you do not specify an always route member, Cisco TCD drops the call when the queue size limit is reached. The hold time specifies the maximum time (in seconds) that Cisco TCD keeps a call in the queue. If the call is in the queue for longer than the "HoldTime," the call gets redirected to "AlwaysRoute" member. If the "AlwaysRoute" member is not configured, no action occurs.
For more information on accessing the Attendant Console Configuration Tool in the "Using the Attendant Console Configuration Tool" section.
Understanding the Cisco CallManager Attendant Console Directory
The attendant console server reads and caches directory entries at startup. After an initial handshake determines whether the directory entries changed since the previous log in, the attendant console downloads the directory user list. The attendant console also downloads the user list when the interval in the Directory Reload Interval field in the Attendant Settings dialog box expires or when the user clicks the Reload button in the Directory window.
The attendant console searches the following files (in order) for the user list:
•
•
Note
•
To modify the Directory Sync Period service parameter, choose Service > Service Parameters. Choose the appropriate server from the Server drop-down list box and choose the Cisco Telephony Call Dispatcher Service from the Service drop-down list box.
The user list file exists in comma separate value (CSV) format and contains the following information:
•
•
•
•
Note
The attendant console server also stores per-attendant information such as speed-dial groups/entries and window positions in the directory, which ensures that each attendant can use the per-attendant settings from any PC that the attendant logs into.
Related Topics
•
•
Understanding the Cisco Telephony Call Dispatcher
The attendant console application registers with and receives call-dispatching services from the Cisco Telephony Call Dispatcher (TCD). The Cisco TCD, a Cisco CallManager service, provides communication among Cisco CallManager servers, attendant consoles, and the Cisco IP Phones that are used with the attendant consoles.
Note
Cisco TCD handles attendant console requests for the following items:
•
•
•
Note
Cisco CallManager Attendant Console Redundancy
Every time that the attendant opens the Cisco CallManager Attendant Console, the following events occur:
•
•
•
•
If a Cisco CallManager service fails, the following events occur:
•
•
•
Note
To ensure redundancy for the Cisco CallManager Attendant Console application, perform one of the following tasks:
•
•
Note
System Requirements for Cisco CallManager Attendant Console
See the following sections for PC requirements and Cisco IP Phone requirements for using the attendant console:
•
Attendant PC Requirements
The following list provides PC requirements for the attendant console:
•
•
Cisco IP Phone and Voice Messaging Requirements for Use with the Attendant Console
The attendant console works in conjunction with a Cisco IP Phone. Configure the attendant console to connect the Cisco IP Phone to its registered Cisco CallManager server. To configure the attendant console, make sure that the IP Address or Host Name field in the Attendant Console Settings dialog box specifies the address of the Cisco CallManager server to which the Cisco IP Phone is normally registered.
Cisco IP Phones that are used with the attendant console must meet the following guidelines:
•
•
•
•
•
•
•
•
Interactions and Restrictions
The following sections describe the interactions and restrictions for Cisco CallManager Attendant Console:
Interactions
The following sections describe how Cisco CallManager Attendant Console interacts with Cisco CallManager applications:
•
Cisco CallManager Extension Mobility
If a user logs in to or logs off the Cisco IP Phone by using Cisco CallManager Extension Mobility while logged in to Cisco CallManager Attendant Console, the Cisco IP Phone resets and the call-control status of the attendant console goes down. Cisco CallManager Attendant Console displays a message that indicates that the attendant needs to log out and log back in if the directory numbers of the phone have changed. The user must log out of the Cisco CallManager Attendant Console. When logging back into the Cisco CallManager Attendant Console, the attendant must specify the current directory number of the phone in the Directory Number of Your Phone field of the Settings dialog box.
For more information on entering a directory number in the Cisco CallManager Attendant Console, see "Configuring Cisco CallManager Attendant Console Settings" section.
Music On Hold
If you have chosen an audio source from the Network Hold Audio Source and the User Hold MOH Audio Source drop-down list boxes in the Device Pool window, queued callers receive music on hold while in the queue.
Restrictions
The following restrictions apply to Cisco CallManager Attendant Console:
•
•
•
•
•
•
–
–
Installing and Activating Cisco CallManager Attendant Console
1.
2.
3.
4.
Configuring Cisco CallManager Attendant Console
For successful configuration of Cisco CallManager Attendant Console, perform the steps in the configuration checklist. The following sections provide configuration information:
•
•
•
•
•
•
•
•
•
Configuration Checklist for Cisco CallManager Attendant Console
Perform the steps in Table 15-1 to set up the attendant console.
Table 15-1 Attendant Console Configuration Checklist
Step 1
Add attendant console users in Cisco CallManager Administration.
Step 2
Set up pilot points and hunt groups in Cisco CallManager Administration.
Understanding Pilot Points and Hunt Groups
Step 3
Create the ac user and associate all pilot point devices with the user.
Step 4
Verify that the Cisco Telephony Call Dispatcher (TCD) service activates and runs on all servers that are running the Cisco CallManager service.
Verify that the CTIManager service activates and runs on one server in the cluster.
Cisco CallManager Serviceability Administration Guide
Step 5
Make sure that each attendant Cisco IP Phone is set up correctly for use with the attendant console.
Cisco IP Phone and Voice Messaging Requirements for Use with the Attendant Console
Step 6
Make sure that the attendant console PC is set up correctly for use with the attendant console.
Step 7
Make sure to create the appropriate dial rules and directory lookup rules in the DialRules.xml file and copy the file to each Cisco CallManager server in the cluster.
Step 8
If your user list is located on a directory server that is separate from the Cisco CallManager server, you can create the CorporateDirectory.txt file.
Step 9
Install and configure the attendant console on each attendant console user PC.
Installing the Cisco CallManager Attendant Console Plug-in on an Attendant PC
Configuring Cisco CallManager Attendant Console Users
This section covers the following procedures:
•
•
•
Related Topic
Configuration Checklist for Cisco CallManager Attendant Console
Finding an Attendant Console User
Procedure
Step 1
The Find and List window displays.
Step 2
•
•
•
•
•
•
Step 3
Tip
A list of attendant console users displays by Name.
Related Topics
•
•
•
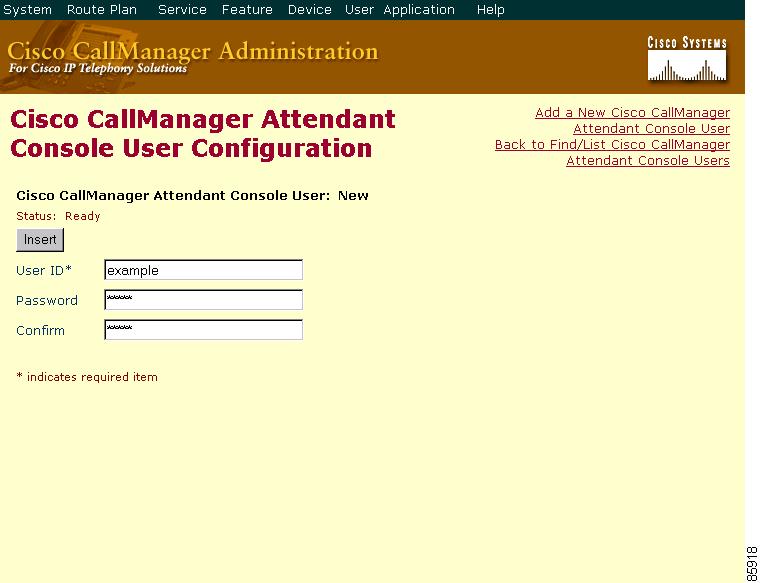
Adding an Attendant Console User
This section describes how to add an attendant console user. You must add users through the Cisco CallManager Attendant Console User Configuration window in Cisco CallManager Administration before the users can log in to an attendant console.
Note
Procedure
Step 1
Step 2
The Cisco CallManager Attendant Console User Configuration window displays, as shown in Figure 15-4.
Figure 15-4 Cisco CallManager Attendant Console User Configuration Window
Step 3
Step 4
Step 5
Related Topics
•
•
•
Updating or Deleting an Attendant Console User
This section describes how to view, update, or delete a Cisco attendant console user.
Before You Begin
To find out which hunt groups are using the attendant console user, click the Dependency Records link from the Cisco CallManager Attendant Console User Configuration window. If the dependency records are not enabled for the system, the dependency records summary window displays a message. For more information about dependency records, refer to the "Accessing Dependency Records" section in the Cisco CallManager Administration Guide. If you try to delete an attendant console user that is in use, Cisco CallManager displays a message. To delete an attendant console user that is currently in use, you must perform either or both of the following tasks:
•
•
Procedure
Step 1
Step 2
Step 3
Tip
Step 4
Related Topics
•
•
•
•
•
Cisco CallManager Attendant Console User Configuration Settings
Table 15-2 describes Cisco CallManager Attendant Console user configuration settings.
Related Topics
•
•
•
•
Configuring the ac User
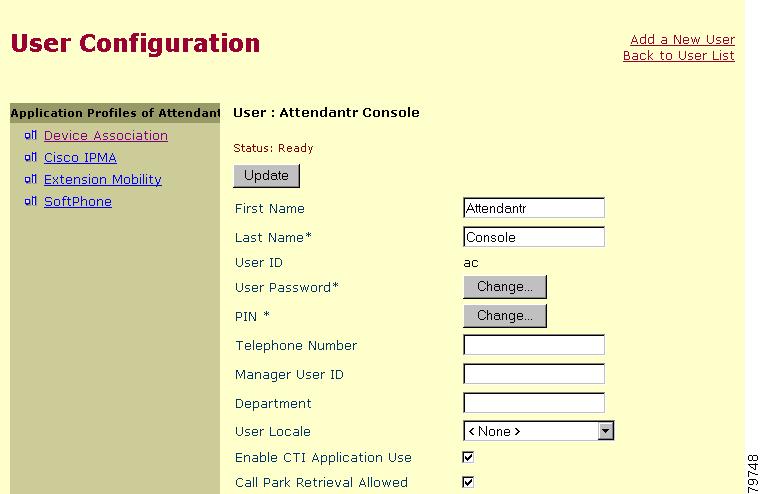
You must configure one user named "ac" and associate the attendant phones and the pilot points with the user. If you do not configure this user, the attendant console cannot interact with CTIManager, and the attendant cannot receive calls.
Perform the following procedure to configure the ac user.
Procedure
Step 1
The User Information window displays, as shown in Figure 15-5.
Figure 15-5 User Information Window
Step 2
Step 3
Step 4
Step 5
Step 6
Step 7
Step 8
If you forget to check the check box, a message displays when the attendant attempts to log in to the attendant PC.
Step 9
Step 10
Related Topics
•
•
•
Configuring Pilot Points
Before the Cisco Telephony Call Dispatcher (TCD) can route calls, you must configure pilot points and hunt groups through Cisco CallManager Administration.
Note
This section contains the following topics:
•
•
•
Related Topic
Configuration Checklist for Cisco CallManager Attendant Console
Finding a Pilot Point
This section describes how to find a pilot point.
Procedure
Step 1
The Find and List window displays.
Step 2
•
•
•
•
•
•
Step 3
Tip
A list of pilot points displays.
Related Topics
•
•
•
•
•
Adding a Pilot Point
This section describes how to add a pilot point.
Procedure
Step 1
Step 2
Step 3
Now that the pilot point is created, the Pilot Point Configuration window refreshes to display the name of the new pilot point in the list on the left. The new pilot point and its settings display.
After the pilot point is created, you must configure a hunt group to specify how the calls that come in to the pilot point are redirected.
Tip
Related Topics
•
•
•
•
•
Updating or Deleting a Pilot Point
This section describes how to view, update, or delete a pilot point.
Before You Begin
To find out which virtual directory numbers are using the pilot point, click the Dependency Records link from the Pilot Point Configuration window. If the dependency records are not enabled for the system, the dependency records summary window displays a message. For more information about dependency records, refer to the "Accessing Dependency Records" section in the Cisco CallManager Administration Guide. If you try to delete a pilot point that is in use, Cisco CallManager displays a message. To delete a pilot point that is currently in use, you must delete the virtual directory numbers that are using the pilot point. See Step 4.
Note
Procedure
Step 1
Step 2
Step 3
Approximately 10 minutes after you delete a pilot point, Cisco TCD stops directing calls to any hunt group members that are associated with that pilot point.
Tip
Step 4
Step 5
Related Topics
•
•
•
•
Resetting a Pilot Point
You must reset the pilot point after you update pilot point configuration settings. When you reset the pilot point, the Cisco CallManager service continues to run, and call processing continues to occur. Perform the following procedure to reset the pilot point:
Procedure
Step 1
The Pilot Point Configuration window displays, and the list on the left side of the window shows all currently configured pilot points.
Step 2
Step 3
Step 4
Step 5
The Reset window displays.
Step 6
•
•
•
Related Topics
•
•
•
•
•
Pilot Point Configuration Settings
Table 15-3 describes pilot point configuration settings.
Table 15-3 Pilot Point Configuration Settings
Pilot Name
Enter up to 50 alphanumeric characters, including spaces, to specify a descriptive name for the pilot point.
Device Pool
The device pool comprises a group of Cisco CallManagers in prioritized order. The first Cisco CallManager in the list represents the primary Cisco CallManager for the pilot point.
Partition
Choose the partition to which the pilot point belongs. Make sure that the pilot point that you enter in the Pilot Number field is unique within the partition that you choose. If you do not want to restrict access to the pilot number, choose <None> for the partition.
You can configure the number of partitions that display in this drop-down list box by using the Max List Box Items enterprise parameter. If more partitions exist than the Max List Box Items enterprise parameter specifies, the ellipsis button (...) displays next to the drop-down list box. Click the ... button to display the Select Partition window. Enter a partial partition name in the List items where Name contains field. Click the desired partition name in the list of partitions that displays in the Select item to use box and click OK.
Note
Calling Search Space
To designate the partitions that the pilot point searches when it attempts to route a call, choose a calling search space from the drop-down list.
You can configure the number of calling search spaces that display in this drop-down list box by using the Max List Box Items enterprise parameter. If more calling search spaces exist than the Max List Box Items enterprise parameter specifies, the ellipsis button (...) displays next to the drop-down list box. Click the ... button to display the Select Calling Search Space window. Enter a partial calling search space name in the List items where Name contains field. Click the desired calling search space name in the list of calling search spaces that displays in the Select item to use box and click OK.
Note
Pilot Number (DirN)
Enter a directory number in this field to designate a directory number for this pilot point.
Make sure that this number is unique throughout the system (that is, it cannot be a shared line appearance).
Route Calls To
From the drop-down list, choose the First Available Hunt Group Member option to route incoming calls to the first available member of a hunt group.
From the drop-down list, choose the Longest Idle Hunt Group Member option to order members based on the time that each directory number or line remains idle.
If the voice-messaging number is the longest idle member of the group, Cisco TCD will route the call to voice-messaging system without first checking the other members of the group.
If you want to use the Circular Hunting or Broadcast Hunting routing options, use the Attendant Console Configuration Tool as described in the "Using the Attendant Console Configuration Tool" section.
Related Topics
•
•
•
Associating Devices and Pilot Points with the ac User
Before the attendant uses the attendant console, you must associate the attendant console phones and pilot points to the ac user. Perform the following procedure:
Procedure
Step 1
Step 2
Step 3
a.
b.
•
•
•
•
Step 4
Step 5
Related Topics
•
•
Configuring Hunt Groups
After you configure the pilot point, you must configure the hunt group. A hunt group comprises a list of destinations (either directory numbers or attendant console user/line numbers) that determine the call redirection order.
This section covers the following procedures:
•
•
•
Related Topic
Configuration Checklist for Cisco CallManager Attendant Console
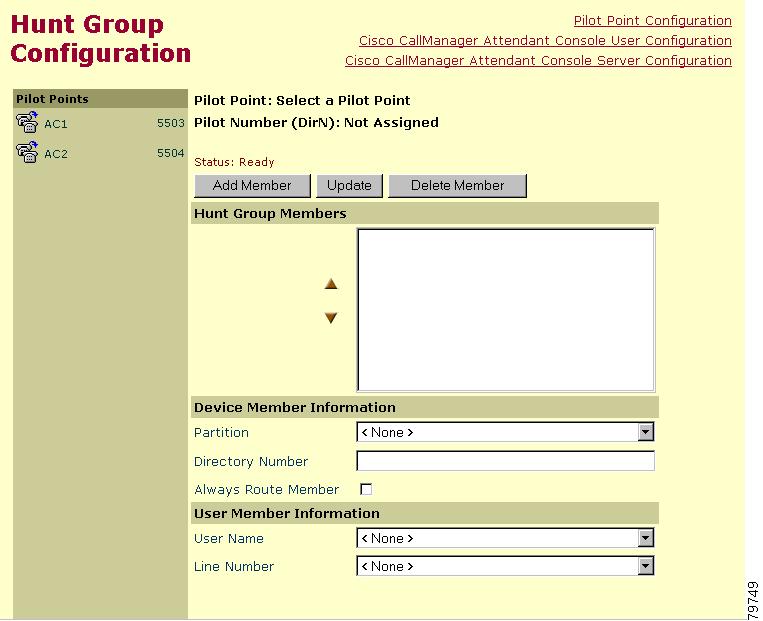
Adding Hunt Group Members
This section describes how to add hunt group members.
Procedure
Step 1
The Hunt Group Configuration window displays.
Figure 15-6 shows an example of the Hunt Group Configuration window.
Figure 15-6 Hunt Group Configuration Window
Step 2
Step 3
Step 4
•
Note
•
Step 5
•
•
Note
As you make selections, the Hunt Group Members list box reflects the information that you choose. The Hunt Group Members list displays either the device directory number or the attendant console user name and line number; for example:
#1 Call directory number 35201 (directory number example)
#2 Direct Call to Mary Brown, Line 1 (user and line number example)
Step 6
Tip
Step 7
Related Topics
•
•
•
•
•
Configuring Linked Hunt Groups
This section describes how to configure linked hunt groups.
Procedure
Step 1
•
Caution
•
•
Step 2
Caution
Step 3
Related Topics
•
•
•
•
•
Updating or Deleting Hunt Group Members
This section describes how to view, update, or delete hunt group members.
Procedure
Step 1
The Hunt Group Configuration window displays.
Step 2
The Hunt Group Configuration window displays information for the chosen pilot point.
Step 3
•
•
•
•
Step 4
Related Topics
•
•
•
•
•
Hunt Group Configuration Settings
Table 15-4 describes hunt group configuration settings.
Related Topics
•
•
•
Cisco CallManager Attendant Console Server Configuration
The Cisco CallManager Attendant Console Server Configuration window lists service parameters and enables you to configure trace parameters for the Cisco Telephony Call Dispatcher (TCD). You obtain information about the parameters by clicking the "i" button help icon in the upper, right corner of the Cisco CallManager Attendant Console Server Configuration window.
Caution
Perform the following steps to update Cisco TCD service parameters.
Procedure
Step 1
The Cisco CallManager Attendant Console Server Configuration window displays.
Step 2
Note
The window refreshes and displays all configured service parameters for the Cisco TCD. Figure 15-7 shows an example of the Cisco CallManager Attendant Console Server Configuration window.
Figure 15-7 Cisco CallManager Attendant Console Server Configuration Window Example
Note
Step 3
To view a list of parameters and their descriptions, click the i button in the upper, right corner of the window. To view the list with a particular parameter at the top, click that parameter in the Cisco CallManager Attendant Console Server Configuration window.
Step 4
The window refreshes, and Cisco CallManager updates the service parameter with your changes.
Related Topic
Configuration Checklist for Cisco CallManager Attendant Console
Creating Cisco CallManager Attendant Console Dial Rules
You can create dial rules and directory lookup rules for Cisco CallManager Attendant Console to transform directory numbers and caller IDs. Dial rules transform directory numbers to create a dialable pattern. Directory lookup rules transform caller IDs to numbers that can be looked up in the directory. Each rule specifies which numbers to transform based on the beginning digits and length of the number.
For example, you can create a dial rule that automatically removes the area code and prefix digits from a 10-digit telephone number beginning with 408525 and adds 89 to the beginning of the telephone number to provide access to an outside line. In this case, the number 4085256666 becomes 8956666.
To create this dial rule, create the following entry in the DialRules.xml file:
<DialRules><DialRule BeginsWith="408525" NumDigits="10" DigitsToRemove="5" PrefixWith="89"/></DialRules>You can also create a directory lookup rule that automatically adds 40852 to 5-digit numbers beginning with 5. In this case, the number 56666 becomes 4085256666.
To create this directory lookup rule, create the following entry in the DialRules.xml file:
<DirectoryLookupRules><DirectoryLookupRule BeginsWith="5" NumDigits="5" DigitsToRemove="" PrefixWith="40852"/></DirectoryLookupRules>
Step 1
Step 2
The following examples show the appropriate format for the dial rules and directory lookup rules.
<DialRules><DialRule BeginsWith="408525" NumDigits="10" DigitsToRemove="5" PrefixWith="89"/></DialRules><DirectoryLookupRules><DirectoryLookupRule BeginsWith="5" NumDigits="5" DigitsToRemove="" PrefixWith="40852"/></DirectoryLookupRules>Step 3
Step 4
Related Topic
•
Creating the CorporateDirectory.txt File
You can create the CorporateDirectory.txt file if your user list is located on a directory server that is separate from the Cisco CallManager server. To create a CorporateDirectory.txt file, perform the following procedure:
Procedure
Step 1
Step 2
Step 3
Step 4
•
•
•
•
•
•
For example
builddir -url ldap://ldap.cisco.com -searchBase "ou=people,
o=cisco.com"
Step 5
Related Topics
•
•
Installing the Cisco CallManager Attendant Console Plug-in on an Attendant PC
You access and the Cisco CallManager Attendant Console plug-in from the Cisco CallManager Application Plugin Installation window. This section describes how to install the attendant console on a user PC.
Procedure
Step 1
Step 2
Tip
Step 3
Step 4
The Cisco CallManager Attendant Console installation wizard runs.
Step 5
Step 6
Step 7
Step 8
Step 9
Step 10
After you install the application, you can configure or update any attendant console settings that you did not configure during the installation process.
Tip
Related Topics
•
•
•
Configuring Cisco CallManager Attendant Console Settings
Configure each attendant console to meet the following criteria:
•
•
After you install the attendant console, you must configure the attendant console before a user can log in to the console. Use the procedure in this section to configure settings that are not specified during installation, to view current settings, or to update the attendant console configuration.
After it is configured, the attendant console operates with the specified settings until the administrator changes them.
Note
Procedure
Step 1
Step 2
Step 3
Step 4
Related Topics
•
•
•
Attendant Console Configuration Settings
Table 15-5 describes Cisco CallManager Attendant Console configuration settings.
Related Topics
•
•
Configuring Held Icon Timers
The color of the held icons on the attendant console indicates how long a call has been on hold. The WaitTimeMedium parameter indicates the time before the held icon turns yellow. The WaitTimeLong parameter indicates the time before the held icon turns red. By default, the held icon turns yellow when a call remains on hold for 60 seconds and turns red when the call remains on hold for 120 seconds. To configure the duration after which the held icons change color, perform the following procedure.
Note
Procedure
Step 1
Step 2
Step 3
Step 4
Related Topic
Configuration Checklist for Cisco CallManager Attendant Console
Using the Attendant Console Configuration Tool
This section describes how to use the Attendant Console Configuration Tool. The Attendant Console Configuration Tool enables you to perform the following tasks:
•
•
•
•
Before You Begin
Before you create circular or broadcast hunt groups, create the pilot points as described in the "Configuring Pilot Points" section.
Procedure
Step 1
Step 2
Step 3
Related Topics
•
•
•
Attendant Console Configuration Tool Configuration Settings
Table 15-6 describes Attendant Console Configuration Tool configuration settings. Use the fields on the Basic tab to enter JTAPI and directory information. Use the fields on the Advanced tab to enable call queuing and to configure circular and broadcast hunt groups.
Related Topics
•
•
Dependency Records
To find directory numbers that a specific pilot point is using or hunt groups that a specific Cisco CallManager Attendant Console User is using, click the Dependency Records link that is provided on Cisco CallManager Administration, Cisco CallManager Attendant Console User, or Pilot Point Configuration windows. The Dependency Records Summary window displays information about directory numbers that are using the pilot point or hunt groups for the user. To find out more information about the directory number or hunt group, click the directory number or hunt group, and the Dependency Records Details window displays. If the dependency records are not enabled for the system, the dependency records summary window displays a message.
For more information about Dependency Records, refer to the "Accessing Dependency Records" section in the Cisco CallManager Administration Guide, "Updating or Deleting an Attendant Console User" section and the "Updating or Deleting a Pilot Point" section.
Troubleshooting Cisco CallManager Attendant Console
Microsoft Performance Monitor counters for Cisco CallManager Attendant Console allow you to monitor the amount of time Cisco TCD has been running, the amount of time since the Cisco TCD has been started, the number of calls that have occurred, the number of calls that have been redirected, the number of attendants that are registered, the number of pilot points, and the number of registered clients.
The CcmLineLinkState performance monitor for the attendant console provides a quick way to check whether the attendant console is functioning correctly:
•
•
is 0, a problem may exist with the CTI or the directory.•
Note
For more information about performance monitor counters and alarms, refer to the Cisco CallManager Serviceability System Guide and the Cisco CallManager Serviceability Administration Guide.
For information about system messages and how to recover from Cisco CallManager Attendant Console problems, see "Troubleshooting Cisco CallManager AutoAttendant" section.
Where to Find More Information
Related Topics
•
•
•
•
Additional Cisco Documentation
•
•
•