-
Cisco CallManager Administration Guide, Release 4.1(2)
-
PDF Version of Entire Book
-
Index
-
Preface (Revised 08/25/2005)
-
Introduction
-
Server Configuration
-
Cisco CallManager Configuration
-
Cisco CallManager Group Configuration
-
Date/Time Group Configuration
-
Device Defaults Configuration
-
Region Configuration
-
Device Pool Configuration
-
Enterprise Parameters Configuration
-
Location Configuration
-
Auto-Registration Configuration
-
Survivable Remote Site Telephony Configuration
-
Automated Alternate Routing Group Configuration
-
Application Dial Rules Configuration
-
Route Filter Configuration
-
Time Period Configuration
-
Time Schedule Configuration
-
Partition Configuration
-
Calling Search Space Configuration
-
Route Group Configuration
-
Route List Configuration
-
Route Pattern Configuration
-
Line Group Configuration
-
Hunt List Configuration
-
Hunt Pilot Configuration
-
Translation Pattern Configuration
-
External Route Plan Wizard
-
Route Plan Report
-
Cisco IPMA Configuration Wizard
-
Cisco CallManager Attendant Console Configuration
-
Annunciator Configuration
-
Conference Bridge Configuration
-
Media Termination Point Configuration
-
Music On Hold Audio Source Configuration
-
Music On Hold Server Configuration
-
Transcoder Configuration
-
Media Resource Group Configuration
-
Media Resource Group List Configuration
-
Service Parameters Configuration
-
Call Park
-
Call Pickup and Group Call Pickup Configuration
-
Cisco IP Phone Services Configuration
-
Client Matter Codes (CMC)
-
Forced Authorization Codes (FAC)
-
Meet-Me Number/Pattern Configuration
-
Cisco Voice-Mail Port Configuration
-
Cisco Voice Mail Port Wizard
-
Message Waiting Configuration
-
Cisco Voice-Mail Pilot Configuration
-
Voice-Mail Profile Configuration
-
Device Configuration
-
CTI Route Point Configuration
-
Device Profile Configuration
-
Device Profile Default Configuration
-
Gatekeeper Configuration
-
Gateway Configuration (Revised 08/25/2005)
-
Cisco IP Phone Configuration
-
Trunk Configuration
-
Phone Button Template Configuration
-
Softkey Template Configuration
-
Generating a CAPF Report
-
Adding a New User
-
Searching the Global Directory
-
Multilevel Administration Access Configuration
-
Plugin Configuration
-
Dependency Records
-
Removing a Subscriber Server from Cisco CallManager
-
Cisco Unity Voice-Mail Port Adjustments
-
 Feedback
Table Of Contents
Displaying the MAC Address of a Phone
Configuring Speed-Dial Buttons
Speed-Dial Configuration Settings
Configuring Cisco IP Phone Services
Configuring Service URL Buttons
Updating the Service URL Buttons
Removing a Directory Number from a Phone
Creating a Cisco Unity Voice Mailbox
Directory Number Configuration Settings
Cisco IP Phone Configuration
Cisco IP Phones as full-featured telephones can plug directly into your IP network. You use the Cisco CallManager Administration Phone Configuration window to configure the following Cisco IP Phones and devices:
•
Cisco IP Phone 7900 family
•
•
•
•
•
•
•
Note
After you add a Cisco IP Phone to Cisco CallManager Administration, information from the RIS Data Collector service displays in the Phone Configuration window. When available, the IP address of the device and the name of the Cisco CallManager with which the device registered display.
The following topics provide information about working with and configuring Cisco IP Phones in Cisco CallManager Administration:
•
•
•
Configuring Cisco IP Phones
You can automatically add phones to the Cisco CallManager database by using auto-registration, manually add phones by using the phone configuration windows, or add phones in groups with the Cisco Bulk Administration Tool (BAT).
By enabling auto-registration, you can automatically add a Cisco IP Phone to the Cisco CallManager database when you connect the phone to your IP telephony network. During auto-registration, Cisco CallManager assigns the next available sequential directory number to the phone. In many cases, you might not want to use auto-registration; for example, if you want to assign a specific directory number to a phone.
Note
If you configure the clusterwide security mode to secure mode, Cisco CallManager disables auto-registration.If you do not use auto-registration, you must manually add phones to the Cisco CallManager database or use BAT. BAT, a plug-in application, makes it possible for system administrators to perform batch add, modify, and delete operations on large numbers of Cisco IP Phones. Refer to the Bulk Administration Tool Guide for Cisco CallManager for detailed instructions on using BAT.
After you add a Cisco IP Phone to Cisco CallManager Administration, the RIS Data Collector service displays the device name, registration status, and the IP address of the Cisco CallManager to which the phone is registered in the Phone Configuration window.
For information on how to configure phones as well as H.323 clients, CTI ports, and other devices from Cisco CallManager Administration, see the following topics:
•
•
•
•
•
•
Displaying the MAC Address of a Phone
The Media Access Control (MAC) address comprises a unique, 12-character, hexadecimal number that identifies a Cisco IP Phone or other hardware device. Locate the number on a label on the bottom of the phone (for example, 000B6A409C405 for Cisco IP Phone 7900 family models or SS-00-0B-64-09-C4-05 for Cisco IP Phone models SP 12+ and 30 VIP). Cisco CallManager makes the MAC address a required field for Cisco IP Phone device configuration. When entering the MAC address in Cisco CallManager fields, do not use spaces or dashes and do not include the "SS" that may precede the MAC address on the label.
For more information on displaying the MAC Address or additional configuration settings on Cisco IP Phones, refer to the Cisco IP Phone Administration Guide for Cisco CallManager that supports the phone model. To display the MAC address for the Cisco IP Phone model 12 Series and Cisco IP Phone model 30 Series phones or the Cisco VG248 Gateway, perform the following tasks:
•
•
•
IRelated Topics
•
•
•
Adding a Phone
Before a Cisco IP Phone can be used, you must use this procedure to add the phone to Cisco CallManager. You can also use this procedure to configure H.323 clients, CTI ports, the Cisco ATA 186 and Cisco ATA 188 telephone adapters, or the Cisco IP Communicator. H.323 clients can be Microsoft NetMeeting clients. CTI ports designate virtual devices that Cisco CallManager applications such as Cisco SoftPhone and Cisco AutoAttendant use.
Note
Timesaver
Procedure
Step 1
The Add a New Device window displays.
Step 2
The Add a New Phone window displays.
Step 3
The Phone Configuration window displays.
Step 4
Only the settings that are appropriate to the chosen phone type appear in the window.
Step 5
Step 6
A message displays stating that the phone has been added to the database.
Step 7
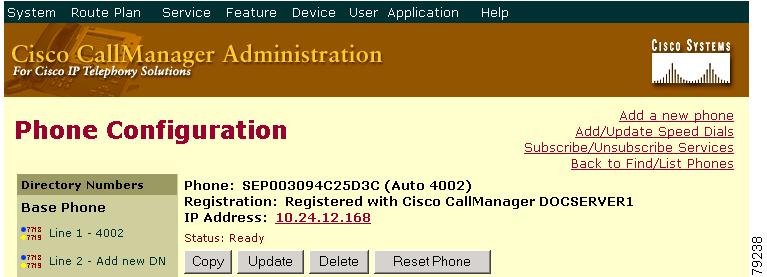
After you add a Cisco IP Phone to Cisco CallManager Administration, information from the RIS Data Collector service displays in the Phone Configuration window. When available, the IP address of the device and the name of the Cisco CallManager with which the device registered display as illustrated in Figure 57-1.
Figure 57-1 Phone Configuration Window
Step 8
Next Steps
To configure speed-dial buttons on this phone, see the "Configuring Speed-Dial Buttons" section. To configure services for this phone, see the "Configuring Cisco IP Phone Services" section. To configure service URL buttons for this phone, see the "Adding a Cisco IP Phone Service to a Phone Button" section.
Related Topics
•
•
•
Copying an Existing Phone
If you want to manually add several similar phones to the Cisco CallManager database, you can add one and then copy its basic settings to apply to another phone. You must change at least the Media Access Control (MAC) address before inserting the new phone into the database.
To copy phone settings, perform the following procedure.
Procedure
Step 1
The Find and List Phones window displays.
Step 2
A list of phones that match the search criteria appears.
Step 3
The Phone Configuration window displays.
Step 4
Note
Step 5
Step 6
A message displays that states that the phone has been added to the database.
Step 7
Related Topics
•
•
•
Resetting a Phone
You do not have to reset a Cisco IP Phone after you add a directory number or update its settings for your changes to take effect. Cisco CallManager automatically performs the reset; however, you can reset a Cisco IP Phone at any time by using the following procedure.
Note
Procedure
Step 1
The Find and List Phones window displays.
Step 2
A list of phones that match the search criteria displays as illustrated in Figure 57-2.
Figure 57-2 Find and List Phones Window
Step 3
Step 4
The Reset Device window displays.
Step 5
•
•
•
Related Topics
•
•
Updating a Phone
To update a Cisco IP Phone by using Cisco CallManager Administration, perform the following procedure.
Procedure
Step 1
The Find and List Phones window displays.
Step 2
A list of phones that match the search criteria displays.
Step 3
The Phone Configuration window displays.
Step 4
Step 5
Updates get automatically added to the phone unless the phone is connected (on a call); then, the reset takes effect only when the call gets disconnected. For more information, see the "Resetting a Phone" section.
Related Topics
•
•
•
•
Deleting a Phone
To delete a Cisco IP Phone by using Cisco CallManager Administration, perform the following procedure.
Before You Begin
Before deleting the phone, determine whether the directory number that is associated with the phone needs to be removed or deleted. To remove the directory number before deleting the phone, see the "Removing a Directory Number from a Phone" section; otherwise, the directory number remains in the Cisco CallManager database when the phone gets deleted. To delete a directory number from the database, see the "Deleting Unassigned Directory Numbers" section.
You can view the directory numbers that are assigned to the phone from the Directory Numbers area of the Phone Configuration window. You can also click the Dependency Records link from the Phone Configuration window. If the dependency records are not enabled for the system, the dependency records summary window displays a message. For more information about dependency records, see the "Accessing Dependency Records" section on page A-3.
Procedure
Step 1
The Find and List Phones window displays.
Step 2
A list of phones that match the search criteria displays as illustrated in Figure 57-3.
Figure 57-3 Find and List Phones Window
Step 3
•
•
•
A confirmation dialog displays.
Step 4
Related Topics
•
•
Phone Configuration Settings
Table 57-1 describes the available settings in the Phone Configuration window.
Note
To view field descriptions and help for product-specific configuration items, click the "i" information icon to the right of the Product Specific Configuration heading to display help in a popup window.
If you need more information, refer to the documentation for the specific phone that you are configuring or contact the manufacturer.
Table 57-1 Phone Configuration Settings
MAC Address
Enter the Media Access Control (MAC) address that identifies Cisco IP Phones (hardware phones only). Make sure that the value comprises 12 hexadecimal characters.
For information on how to access the MAC address for your phone, refer to the Cisco IP Phone Administration Guide for Cisco CallManager that supports your phone model.
Cisco VG248 Analog Phone Gateway
The MAC address for the Cisco VG248 gateway specifies the endpoint from the Gateway Configuration window of Cisco CallManager Administration. See the "Gateway Configuration" section for configuration information.
Only one MAC address exists for the Cisco VG248 Analog Phone Gateway. All 48 ports share the same MAC address. Cisco CallManager requires unique MAC addresses for all devices.
Cisco CallManager converts the MAC Address for each device by
•
•
•
EXAMPLEMAC Address for the Cisco VG248 is000039A44218the MAC address for registered port 12 in theCisco CallManager is0039A4421812Device Name
Enter a name to identify software-based telephones, H.323 clients, and CTI ports. The value can include 1 to 15 characters, including alphanumeric, dot, dash, and underscores.
Description
Identify the purpose of the device. You can enter the user name (such as John Smith) or the phone location (such as Lobby) in this field.
For Cisco VG248 gateways, begin the description with VGC<mac address>.
Owner User ID
Enter the user ID of the person who is assigned to this phone. For a list of user IDs, click the Select User ID link. The user ID gets recorded in the call detail record (CDR) for calls that are made from this device.
Note
Device Pool
Choose the device pool to which you want this phone assigned. The device pool defines sets of common characteristics for devices, such as region, date/time group, softkey template, and MLPP information.
To see the settings of the device pool, click the View Details link.
Calling Search Space
From the drop-down list box, choose the appropriate calling search space (CSS). A calling search space comprises a collection of partitions that are searched to determine how a dialed number should be routed. The calling search space for the device and the calling search space for the directory number get used together. The directory number CSS takes precedence over the device CSS. For more information, refer to Partitions and Calling Search Spaces in the Cisco CallManager System Guide.
For configuration information about calling search space for phones, see the "Calling Search Space" section.
AAR Calling Search Space
Choose the appropriate calling search space for the device to use when it performs automated alternate routing (AAR). The AAR calling search space specifies the collection of route partitions that are searched to determine how to route a collected (originating) number that is otherwise blocked due to insufficient bandwidth. For configuration information about calling search space for phones, see the "Calling Search Space" section.
Media Resource Group List
Choose the appropriate Media Resource Group List. A Media Resource Group List comprises a prioritized grouping of media resource groups. An application chooses the required media resource, such as a Music On Hold server, from the available media resources according to the priority order that is defined in a Media Resource Group List.
If you choose <none>, Cisco CallManager uses the Media Resource Group that is defined in the device pool.
For more information, see the "Media Resource Management" section in the Cisco CallManager System Guide.
User Hold Audio Source
To specify the audio source that plays when a user initiates a hold action, click the drop-down arrow and choose an audio source from the list that displays.
If you do not choose an audio source, Cisco CallManager uses the audio source that is defined in the device pool or the system default if the device pool does not specify an audio source ID.
Note
Network Hold Audio Source
To specify the audio source that is played when the network initiates a hold action, click the drop-down arrow and choose an audio source from the list that displays.
If you do not choose an audio source, Cisco CallManager uses the audio source that is defined in the device pool or the system default if the device pool does not specify an audio source ID.
Note
Location
Choose the appropriate location for this Cisco IP Phone. The location specifies the total bandwidth that is available for calls to and from this location. A location setting of None means that the locations feature does not keep track of the bandwidth that this Cisco IP Phone consumes.
User Locale
From the drop-down list box, choose the locale that is associated with the phone user interface. The user locale identifies a set of detailed information to support users, including language and font.
Cisco CallManager makes this field available only for phone models that support localization.
Note
Note
Network Locale
From the drop-down list box, choose the locale that is associated with the phone. The network locale contains a definition of the tones and cadences that the phone in a specific geographic area uses.
Cisco CallManager makes this field available only for phone models that support localization.
Note
Note
Device Security Mode
This field displays only if the phone model supports authentication or encryption. From the drop-down list box, choose the mode that you want to set for the device:
•
•
•
•
TipSignal Packet Capture Mode
This setting exists for troubleshooting encryption only; packet capturing may cause high CPU usage or call-processing interruptions. Choose one of the following options from the drop-down list box:
•
This mode eliminates sniffing over the network.
•
TipPacket Capture Duration
This setting exists for troubleshooting encryption only; packet capturing may cause high CPU usage or call-processing interruptions.
This field specifies the maximum number of minutes that is allotted for one session of packet capturing. The default equals 60.
Built In Bridge
Enable or disable the built-in conference bridge for the barge feature by using the Built In Bridge drop-down list box (choose On, Off, or Default). For more configuration information, refer to Barge and Privacy in the Cisco CallManager Features and Services Guide.
Privacy
For each phone that wants Privacy, choose On in the Privacy drop-down list box. For more configuration information, refer to Barge and Privacy in the Cisco CallManager Features and Services Guide.
Signaling Port
This field applies only to H.323 devices. The value designates the H.225 signaling port that this device uses.
Default value specifies 1720. Valid values range from 1 to 65535.
Retry Video Call as Audio
This check box applies only to video endpoints that receive a call. If this phone receives a call that does not connect as video, the call tries to connect as an audio call.
By default, the system checks this check box to specify that this device should immediately retry a video call as an audio call (if it cannot connect as a video call) prior to sending the call to call control for rerouting.
If you uncheck this check box, a video call that fails to connect as video does not try to establish as an audio call. The call then fails to call control, and call control routes the call via Automatic Alternate Routing (AAR) and/or route/hunt list.
Video Capabilities Enabled/disabled
This check box turns video capabilities on and off.
Ignore Presentation Indicators (internal calls only)
Check this check box to configure call display restrictions on a call-by-call basis. When this check box is checked, Cisco CallManager ignores any presentation restriction that is received for internal calls.
Use this configuration in combination with the calling line ID presentation and connected line ID presentation configuration at the translation pattern level. Together, these settings allow you to configure call display restrictions to selectively present or block calling and/or connected line display information for each call.
See Table 26-1 in the "Translation Pattern Configuration Settings" section for more information about the calling line ID presentation and the connected line ID presentation parameters.
For more information about call display restrictions, refer to the Call Display Restrictions chapter in the Cisco CallManager Features and Services Guide.
Wait for Far End H.245 Terminal Capability Set
This field applies only to H.323 devices.
This check box specifies that Cisco CallManager waits to receive the far-end H.245 Terminal Capability Set before it sends its H.245 Terminal Capability Set. By default, the system checks this box. To specify that Cisco CallManager should initiate capabilities exchange, uncheck this box.
Phone Button Template
Choose the appropriate phone button template. The phone button template determines the configuration of buttons on a phone and identifies which feature (line, speed dial, and so on) is used for each button.
Cisco CallManager does not make this field available for H.323 clients or CTI ports.
Softkey Template
Choose the appropriate softkey template. The softkey template determines the configuration of the softkeys on Cisco IP Phones. Leave this field blank if the device pool contains the assigned softkey template.
Module 1
Choose the appropriate expansion module or none.
Module 2
Choose the appropriate expansion module or none.
Phone Load Name
Enter the custom software for the Cisco IP Phone.
The value that you enter overrides the default value for the current model. For more information, see the "Device Defaults Configuration" section.
For more information about Cisco IP Phone software and configuration, refer to the Cisco IP Phone Administration Guide for Cisco CallManager 4.1, which is specific to the phone model.
Module 1 Load Name
Enter the custom software for the appropriate expansion module, if applicable.
The value that you enter overrides the default value for the current model. Ensure the firmware load matches the module load.
Module 2 Load Name
Enter the custom software for the second expansion module, if applicable.
The value that you enter overrides the default value for the current model. Ensure the firmware load matches the module load.
Information
Enter the location (URL) of the help text for the information (i) button. Leave this field blank to accept the default setting.
Directory
Enter the server from which the phone obtains directory information. Leave this field blank to accept the default setting.
Messages
Leave this field blank (not used by Cisco CallManager).
Services
Enter the location (URL) for Cisco IP Phone Services.
Authentication Server
Enter the URL that the phone uses to validate requests that are made to the phone web server. If you do not provide an authentication URL, the advanced features on the Cisco IP Phone that require authentication will not function.
By default, this URL accesses a Cisco IP Phone User Options window that was configured during installation.
Leave this field blank to accept the default setting.
Proxy Server
Enter the host and port (for example, proxy.cisco.com:80) that are used to proxy HTTP requests for access to non-local host addresses from the phone HTTP client.
If the phone receives a URL such as www.cisco.com in a service and the phone is not configured in the cisco.com domain, the phone uses the proxy server to access the URL. If the phone is configured in cisco.com domain, the phone accesses the URL without using the proxy because the phone is in the same domain as the URL.
If you do not configure this URL, the phone attempts to connect directly to the URL.
Leave this field blank to accept the default setting.
Idle
Enter the URL that displays on the Cisco IP Phone display when the phone has not been used for the time that is specified in Idle Timer field. For example, you can display a logo on the LCD when the phone has not been used for 5 minutes.
Leave this field blank to accept the default setting.
Idle Timer (seconds)
Enter the time (in seconds) that you want to elapse before the URL that is specified in the Idle field displays.
Leave this field blank to accept the value of the Idle URL Timer enterprise parameter.
Enable Extension Mobility Feature
Check this check box if this phone supports extension mobility.
Log Out Profile
This field specifies the device profile that the device uses when no one is logged into the device by using Cisco CallManager Extension Mobility. Choose an option from the drop-down selection box. Options include Use Current Device Settings and Select a User Device Profile. When you choose Select a User Device Profile, a configuration window displays for you to choose the user device profile that was already configured.
Log In User ID
This field remains blank until a user logs in. When a user logs in to the device by using Cisco CallManager Extension Mobility, the userid displays in this field.
Log In Time
This field remains blank until a user logs in. When a user logs in to the device by using Extension Mobility, the time at which the user logged in displays in this field.
Log Out Time
This field remains blank until a user logs in. When a user logs in to the device by using Cisco CallManager Extension Mobility, the time at which the system will log out the user displays in this field.
Logout
This button displays when a user logs in to the device by using Cisco CallManager Extension Mobility. Click the button to manually log out the user.
Certificate Operation
From the drop-down list box, choose one of the following options:
•
•
•
•
By choosing the Troubleshooting option, you can verify that a LSC or MIC exists in the phone.
Authentication Mode
This field allows you to choose the method in which you want the phone to authenticate with CAPF. Use this field if you want to install/upgrade, delete, or troubleshoot a locally significant certificate or authenticate by a manufacture installed certificate. From the drop-down list box, choose one of the following options:
•
•
•
•
TipAuthentication String
If you chose the By Authentication String option in the Authentication Mode drop-down list box, this field applies. Manually enter a string or generate a string by clicking the Generate String button. Ensure that the string contains 4 to 10 digits.
To install, upgrade, delete, or troubleshoot a locally significant certificate, the phone user or administrator must enter the authentication string on the phone.
Generate String
If you want CAPF to automatically generate an authentication string, click this button. The 4-to-10 digit authentication string displays in the Authentication String field.
Key Size (bits)
From the drop-down list box, choose the key size for the certificate. The default setting equals 1024. Other options include 512 and 2048.
Operation Completes by**
This field, which supports the Install/Upgrade, Delete, and Troubleshoot Certificate Operation options, specifies the date and time in which you must complete the operation.
The values that display are for the publisher database server.
Certificate Operation Status
This field displays the progress of the certificate operation; for example, <operation type> pending, failed, or successful, where operating type equals the Install/Upgrade, Delete, or Troubleshoot Certificate Operation options. You cannot change the information that displays in this field.
Outgoing Caller ID Pattern
For incoming calls to the phone, enter the pattern, from 0 to 24 digits, that you want to use for caller ID.
Calling Party Selection
Choose the directory number that is sent on an outbound call on a gateway.
The following options specify which directory number is sent:
•
•
•
•
•
Calling Party Presentation
Choose whether the Cisco CallManager transmits or blocks caller ID.
Choose Allowed if you want the Cisco CallManager to send caller ID.
Choose Restricted if you do not want the Cisco CallManager to send caller ID.
Display IE Delivery
This check box enables delivery of the display information element (IE) in SETUP and CONNECT messages for the calling and called party name delivery service.
The default setting checks this check box.
Redirecting Number IE Delivery - Outbound
Check this check box to include the Redirecting Number IE in the outgoing SETUP message from the Cisco CallManager to indicate the first redirecting number and the redirecting reason of the call when the call is forwarded.
Uncheck the check box to exclude the first redirecting number and the redirecting reason from the outgoing SETUP message.
You use Redirecting Number IE for voice-messaging integration only. If your configured voice-messaging system supports Redirecting Number IE, you should check the check box.
Note
Redirecting Number IE Delivery - Inbound
Check this check box to accept the Redirecting Number IE in the incoming SETUP message to the Cisco CallManager.
Uncheck the check box to exclude the Redirecting Number IE in the incoming SETUP message to the Cisco CallManager.
You use Redirecting Number IE for voice-messaging integration only. If your configured voice-messaging system supports Redirecting Number IE, you should check the check box.
Note
Media Termination Point Required
Indicate whether a media termination point (MTP) is used to implement features that H.323 does not support (such as hold and transfer).
Check the Media Termination Point Required check box if you want to use a media termination point to implement features. Uncheck the Media Termination Point Required check box if you do not want to use a media termination point to implement features.
Use this check box only for H.323 clients and those H.323 devices that do not support the H.245 empty capabilities set or if you want media streaming to terminate through a single source.
If you check this box to require an MTP and this device becomes the endpoint of a video call, the call will be audio only.
MLPP Domain (e.g., "0000FF")
Enter a hexadecimal value between 0 and FFFFFF for the MLPP domain that is associated with this device. If you leave this field blank, this device inherits its MLPP domain from the value set for the device's device pool. If the device pool does not have an MLPP domain setting, this device inherits its MLPP domain from the value set for the MLPP Domain Identifier enterprise parameter.
MLPP Indication
If available, this setting specifies whether a device that is capable of playing precedence tones will use the capability when it places an MLPP precedence call.
From the drop-down list box, choose a setting to assign to this device from the following options:
•
•
•
Note
Note
MLPP Preemption
If available, this setting specifies whether a device that is capable of preempting calls in progress will use the capability when it places an MLPP precedence call.
From the drop-down list box, choose a setting to assign to this device from the following options:
•
•
•
Note
Gatekeeper Name
This field specifies the name of the gatekeeper that controls the H.323 client. Ensure the gatekeeper is configured in Cisco CallManager before an H.323 client is allowed to specify the gatekeeper in its configuration. Default specifies empty.
E.164
Always use a unique E.164 number. Do not use null value.
Technology Prefix
This field specifies a number ending with the # sign that describes the capability of an endpoint in a zone. This field has no impact if via Zone configuration can be used. Default specifies 1#*. Do not use null value.
Zone
This field specifies the zone name of the zone that the gatekeeper manages. Do not use the following values: same zone name for the H.323 client and trunk; null.
Gatekeeper Controlled H.323 Client
This check box enables the gatekeeper control of the H.323 client.
Model-specific configuration fields that the device manufacturer defines
To view field descriptions and help for product-specific configuration items, click the "i" information icon to the right of the Product Specific Configuration heading to display help in a popup dialog box.
If you need more information, refer to the documentation for the specific device that you are configuring or contact the manufacturer.
Searching for User ID
To search for a user ID, choose the Select Login User ID link.
Procedure
Step 1
The User ID Lookup window displays.
Step 2
All user IDs that match the pattern that you entered display in the User IDs found field.
Step 3
Tip
The configuration window displays, and the user ID that you chose displays in the field.
Configuring Speed-Dial Buttons
You use Cisco CallManager Administration to configure speed-dial buttons for phones if you want to provide speed-dial buttons for users or if you are configuring phones that do not have a specific user who is assigned to them. Users use the Cisco IP Phone User Options Menu to change the speed-dial buttons on their phones.
Procedure
Step 1
Note
Step 2
Step 3
Related Topics
•
•
•
Speed-Dial Configuration Settings
Table 57-2 describes the speed-dial button configuration settings. The Configure Speed-Dial Setting dialog box has two sections: speed-dial settings on the phone and speed-dial settings that are not associated with a button. The descriptions in Table 57-2 apply to both sections.
Speed Dial Settings on the Phone
Configure these settings for the physical buttons on the phone.
Speed Dial Settings not Associated with a Button
Configure these settings for the speed-dial numbers that you access with abbreviated dialing. The system provides a total of 99 speed-dial buttons.
Note
Character Set
Choose the character set (alphabet and characters) that the language uses to display on the speed-dial button.
Related Topics
•
•
•
•
Configuring Cisco IP Phone Services
From a Cisco IP Phone 7970, 7960, and 7940, users can access information services, such as weather, stock quotes, or other services that are available to them. Using Cisco CallManager Administration, you can set up the available services for phones. Users use the Cisco IP Phone User Options Menu to modify the services. For information about the Cisco IP Phone User Options Menu, refer to the Cisco IP Phone User Guide that is specific to your phone model. For more information on maintaining services in Cisco CallManager Administration, see the "Cisco IP Phone Services Configuration" section.
Subscribing to a Service
To subscribe to new services for a phone, perform the following steps.
Before You Begin
Add the services to Cisco CallManager. For more information, see the "Adding a Cisco IP Phone Service" section.
Procedure
Step 1
The Find and List Phones window displays.
Step 2
A list of phones that match the search criteria displays.
Step 3
The Phone Configuration window displays.
Step 4
Step 5
Step 6
The window displays with the service that you chose. If you want to choose a different service, click Back and repeat Step 5.
Step 7
Step 8
The service displays in the Subscribed Services list.
Related Topics
•
•
Updating Services
Perform the following steps to update a service. You can update the service name and service parameter values, if necessary.
Procedure
Step 1
The Find and List Phones window displays.
Step 2
A list of phones that match the search criteria displays.
Step 3
The Phone Configuration window displays.
Step 4
Step 5
Step 6
Related Topics
•
•
Unsubscribing from a Service
To unsubscribe from a service, perform the following steps.
Procedure
Step 1
The Find and List Phones window displays.
Step 2
A list of phones that match the search criteria displays.
Step 3
The Phone Configuration window displays.
Step 4
Step 5
Step 6
A warning message verifies that you want to unsubscribe from the service.
Step 7
Related Topics
•
•
Configuring Service URL Buttons
From a Cisco IP Phone 7970, 7960, and 7940, users can access information services, such as weather, stock quotes, or other services that are available to them. Using Cisco CallManager Administration, you can configure services to be available on a phone button and then configure that button for the phone. Users use the Cisco IP Phone User Options Menu to modify the services. For information about the Cisco IP Phone User Options Menu, refer to the Cisco IP Phone User Guide that is specific for your phone model. For more information on maintaining services in Cisco CallManager Administration, see the "Cisco IP Phone Services Configuration" section.
Adding a Service URL Button
To configure the service URL buttons for a phone, perform the following steps.
Before You Begin
Before you begin, perform the following configurations:
•
•
•
Procedure
Step 1
The Find and List Phones window displays.
Step 2
A list of phones that match the search criteria displays.
Step 3
The Phone Configuration window displays.
Step 4
Step 5
Step 6
Related Topics
•
•
Updating the Service URL Buttons
Perform the following steps to update a service URL button.
Procedure
Step 1
The Find and List Phones window displays.
Step 2
A list of phones that match the search criteria displays.
Step 3
The Phone Configuration window displays.
Step 4
Step 5
Step 6
Related Topics
•
•
Finding a Phone
Because you might have thousands of Cisco IP Phones in your network, Cisco CallManager lets you search for phones on the basis of specified criteria. Follow these steps to search for a specific Cisco IP Phone in the Cisco CallManager database.
Note
Tip
Note
Procedure
Step 1
The Find and List Phones window displays.
Step 2
Note
Step 3
Step 4
Step 5
Note
Step 6
A list of devices that match the criteria displays. The field that you chose in Step 2 determines how the devices in the list are sorted.
This window also lists the total number of devices in this window.
Step 7
Note
Related Topics
•
•
Configuring Directory Numbers
Using Cisco CallManager Administration, configure and modify directory numbers that are assigned to specific phones. These sections provide instructions for working with directory numbers.
Use the Directory Number Configuration window to perform the following tasks:
•
•
•
•
•
Related Topics
•
•
•
•
Adding a Directory Number
Follow these instructions to add a directory number to a specific phone. You can configure the call forward, call pickup, and MLPP phone features while you are adding the directory number.
Before You Begin
You must add a Cisco IP Phone to Cisco CallManager before adding a directory number. See the "Adding a Phone" section for details.
Tip
Procedure
Step 1
The Find and List Phones window displays.
Step 2
A list of phones that match the search criteria displays.
Step 3
The Phone Configuration window displays.
Step 4
The Directory Number Configuration window displays.
Tip
Step 5
Step 6
A message displays that states that the directory number has been added to the database and assigned to the device.
Step 7
Step 8
Note
Related Topics
•
•
•
•
•
•
Updating a Directory Number
Follow these instructions to update a directory number that is assigned to a specific phone.
Procedure
Step 1
The Find and List Phones window displays.
Step 2
A list of phones that match the search criteria displays.
Step 3
The Phone Configuration window displays.
Step 4
The Directory Number Configuration window displays.
Step 5
Step 6
Step 7
Note
Related Topics
•
•
•
•
•
•
Removing a Directory Number from a Phone
Perform the following procedure to remove a directory number from a specific phone.
Before You Begin
If you try to remove a directory number that is in use, Cisco CallManager displays a warning message. To find out which line groups are using the directory number, click the Dependency Records link from the Directory Number Configuration window. If the dependency records are not enabled for the system, the dependency records summary window displays a message. For more information about dependency records, see the "Accessing Dependency Records" section on page A-3.
When you remove a directory number from a phone, the number still exists within Cisco CallManager. To see a list of directory numbers that are not associated with phones, use the Route Plan Report menu option. For more information, see the "Deleting Unassigned Directory Numbers" section.
Procedure
Step 1
The Find and List Phones window displays.
Step 2
A list of phones that match the search criteria displays.
Step 3
The Phone Configuration window displays.
Step 4
The Directory Number Configuration window displays.
Step 5
A message displays to verify that you want to remove the directory number from the phone.
Step 6
The Phone Configuration window displays with the directory number removed. The change gets automatically applied to the phone; however, you can click Reset Phone. For more information, see the "Resetting a Phone" section.
Related Topics
•
•
•
Creating a Cisco Unity Voice Mailbox
The Create Voice Mailbox link on the Directory Number Configuration window allows administrators to create individual Cisco Unity voice mailboxes from Cisco CallManager Administration.
Before You Begin
•
•
•
•
•
•
Note
Procedure
Step 1
The Configure Cisco Unity Voice Mailbox dialog box appears.
Step 2
Related Topics
•
•
Directory Number Configuration Settings
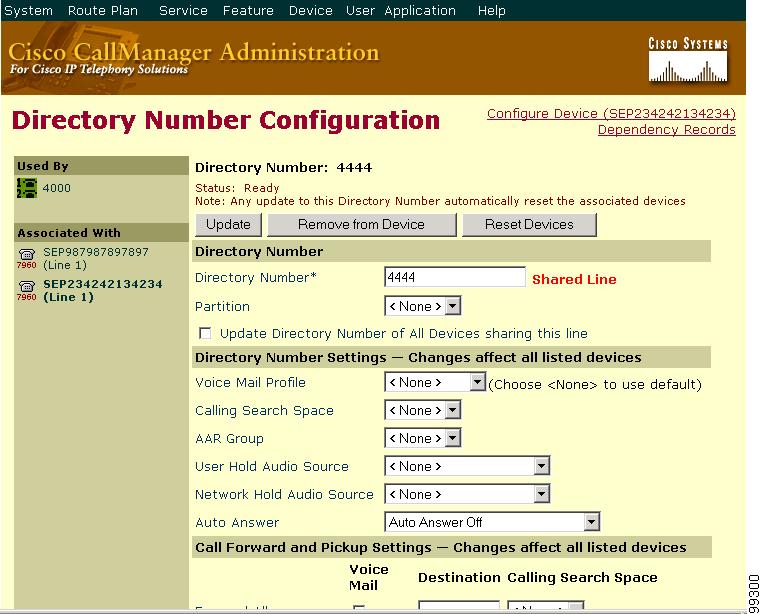
Table 57-3 describes the fields that are available in the Directory Number Configuration window. Table 57-4 describes the directory number status area on the Directory Number Configuration window (see Figure 57-4).
Table 57-3 Directory Number Configuration Settings
Directory Number
Enter a dialable phone number. Values can include numeric characters and route pattern wildcards and special characters except for (.) and (@).
Note
The directory number that you enter can appear in more than one partition.
Note
Shared Line next to the directory number means that the directory number appears on more than one device in the same partition. Refer to "Directory Numbers" in the Cisco CallManager System Guide for more information.
Partition
Choose the partition to which the directory number belongs. Make sure that the directory number that you enter in the Directory Number field is unique within the partition that you choose. If you do not want to restrict access to the directory number, choose <None> for the partition.
You can configure the number of partitions that display in this drop-down list box by using the Max List Box Items enterprise parameter. If more partitions exist than the Max List Box Items enterprise parameter specifies, the ellipsis button (...) displays next to the drop-down list box. Click the ... button to display the Select Partition window. Enter a partial partition name in the List items where Name contains field. Click the desired partition name in the list of partitions that displays in the Select item to use box and click OK.
Note
Active
To view this check box on the Directory Number Configuration window, access an unassigned directory number from the Route Plan Report window. Checking this check box allows calls to this DN to be forwarded (if forwarding is configured). If check box is not checked, Cisco CallManager ignores the DN.
Update Directory Number of All Devices Sharing This Line
This check box displays for shared line directory numbers only. Check this check box to change the directory number of all devices that share this directory number. Leave this check box unchecked to only change the directory number or partition for this device (the other devices that share this directory number will remain unchanged).
Voice Mail Profile
Choose from list of Voice Mail Profiles that are defined in the Voice Mail Profile Configuration.
The first option specifies <None>, which is the current default Voice Mail Profile that is configured in the Voice Mail Profile Configuration.
Calling Search Space
From the drop-down list box, choose the appropriate calling search space. A calling search space comprises a collection of partitions that are searched for numbers that are called from this directory number. The value that you choose applies to all devices that are using this directory number. For configuration information about calling search space for directory numbers, see the "Calling Search Space" section.
Changes result in an update of the numbers that are listed in the Call Pickup Group field.
You can configure calling search space for Forward All, Forward Busy, Forward No Answer, and Forward on Failure directory numbers. The value that you choose applies to all devices that are using this directory number.
If you set the Forward All Calling Search Space field to <None>, Cisco CallManager uses the calling search spaces of the line and the phone when the user forwards calls by using the Cisco IP Phone User Options windows or the CFwdAll softkey on the phone. If you want to restrict users from forwarding calls on their phones, you must choose a restrictive calling search space from the Forward All Calling Search Space field; for example, you have two calling search spaces: Building and PSTN. The Building calling search space only allows users to call within the building, while the PSTN calling search space allows users to call within and outside the building. You assign the phone to the Building calling search space and the line on your phone to the PSTN calling search space. If you set the Call Forward All calling search space to <None>, Cisco CallManager can forward calls to any number within the PSTN or building calling search spaces. To prevent the user from forwarding calls to numbers outside the building, set the Call Forward All calling search space to Building.
For more information, refer to Partitions and Calling Search Spaces, in the Cisco CallManager System Guide.
AAR Group
Choose the automated alternate routing (AAR) group for this device. The AAR group provides the prefix digits that are used to route calls that are otherwise blocked due to insufficient bandwidth. An AAR group setting of None specifies that no rerouting of blocked calls will be attempted.
User Hold Audio Source
Choose the audio source that plays when a user initiates a hold action.
Network Hold Audio Source
Choose the audio source that plays when the network initiates a hold action.
Auto Answer
Choose one of the following options to activate the Auto Answer feature for this directory number:
•
•
•
Note
Note
Forward All
The settings in this row of fields specify the forwarding treatment for calls to this directory number if the directory number is set to forward all calls.
Specify the following values:
•
Note
•
•
Forward Busy Internal
The settings in this row of fields specify the forwarding treatment for internal calls to this directory number if the directory number is busy.
Specify the following values:
•
Note
Note
•
Note
•
Note
Forward Busy External
The settings in this row of fields specify the forwarding treatment for external calls to this directory number if the directory number is busy.
Specify the following values:
•
Note
Note
•
Note
•
Note
Forward No Answer Internal
The settings in this row of fields specify the forwarding treatment for internal calls to this directory number if the directory number does not answer. Specify the following values:
•
Note
Note
•
Note
•
Note
Forward No Answer External
The settings in this row of fields specify the forwarding treatment for external calls to this directory number if the directory number does not answer. Specify the following values:
•
Note
Note
•
Note
•
Note
Forward No Coverage Internal
This field applies only to CTI route points and CTI ports. The settings in this row specify the forwarding treatment for internal calls to this CTI route point or CTI port if the CTI route point or CTI port has no coverage. Specify the following values:
•
Note
•
Note
•
Note
Forward No Coverage External
This field applies only to CTI route points and CTI ports. The settings in this row specify the forwarding treatment for external calls to this CTI route point or CTI port if the CTI route point or CTI port has no coverage. Specify the following values:
•
Note
•
Note
•
Note
No Answer Ring Duration (seconds)
Used in conjunction with Call Forward No Answer Destination, this field sets the timer for how long the phone will ring before it gets forwarded. Leave this setting blank to use the value that is set in the Cisco CallManager service parameter, Forward No Answer Timer.
Caution
Call Pickup Group
Choose the number that can be dialed to answer calls to this directory number (in the specified partition).
Target (Destination)
Enter the number to which MLPP precedence calls should be directed if this directory number receives a precedence call and neither this number nor its call-forward destination answers the precedence call.
Values can include numeric characters and octothorpe (#) and asterisk (*).
Calling Search Space
From the drop-down list box, choose the calling search space to associate with the alternate party target (destination) number. For configuration information about calling search space for directory numbers, see the "Calling Search Space" section.
No Answer Ring Duration
Enter the number of seconds (between 4 and 60) after which an MLPP precedence call will be directed to this directory number's alternate party if this directory number and its call-forwarding destination have not answered the precedence call.
Leave this setting blank to use the value that is set in the Cisco CallManager enterprise parameter, Precedence Alternate Party Timeout.
Alerting Name
Enter a name that you want to display on the phone of the caller.
This setting, which supports the Identification Services for the QSIG protocol, applies to shared and nonshared directory numbers. If you configure an alerting name for a directory number with shared-line appearances, when the phone rings at the terminating PINX, the system performs the following tasks:
•
•
If you do not configure an alerting name, "Name Not Available" may display on the caller phone. If you do not enter a name for the Display (Internal Caller ID) field, the information in the Alerting Name field displays in the Display (Internal Caller ID) field.
Display (Internal Caller ID)
Leave this field blank to have the system display the extension.
Use a maximum of 30 alphanumeric characters. Typically, use the user name or the directory number (if using the directory number, the person receiving the call may not see the proper identity of the caller).
Setting applies only to the current device unless you check the check box at right and click the Propagate selected button. (The check box at right displays only if other devices share this directory number.)
Line Text Label
Use this field only if you do not want the directory number to show on the line appearance. Enter text that identifies this directory number for a line/phone combination.
Suggested entries include boss's name, department's name, or other appropriate information to identify multiple directory numbers to secretary/assistant who monitors multiple directory numbers.
Setting applies only to the current device unless you check the check box at right (called Update Shared Device Settings) and click the Propagate selected button. (The check box at right displays only if other devices share this directory number.)
External Phone Number Mask
Indicate phone number (or mask) that is used to send Caller ID information when a call is placed from this line.
You can enter a maximum of 24 number and "X" characters. The Xs represent the directory number and must appear at the end of the pattern. For example, if you specify a mask of 972813XXXX, an external call from extension 1234 displays a caller ID number of 9728131234.
Setting applies only to the current device unless you check the check box at right (called Update Shared Device Settings) and click the Propagate selected button. (The check box at right displays only if other devices share this directory number.)
Message Waiting Lamp Policy
Use this field to configure the handset lamp illumination policy. Choose one of the following options:
•
•
•
•
•
Setting applies only to the current device unless you check the check box at right (called Update Shared Device Settings) and click the Propagate selected button. (The check box at right displays only if other devices share this directory number.)
Ring Setting (Phone Idle)
Use this field to configure the ring setting for the line appearance when an incoming call is received and no other active calls exist on that device. Choose one of the following options:
•
•
•
•
•
Setting applies only to the current device unless you check the check box at right (called Update Shared Device Settings) and click the Propagate selected button. (The check box at right displays only if other devices share this directory number.)
Note
Ring Setting (Phone Active)
From the drop-down list box, choose the ring setting that is used when this phone has another active call on a different line. Choose one of the following options:
•
•
•
•
•
•
Setting applies only to the current device unless you check the check box at right (called Update Shared Device Settings) and click the Propagate selected button. (The check box at right displays only if other devices share this directory number.)
Note
Maximum Number of Calls
You can configure up to 200 calls for a line on a device, with the limiting factor being the total number of calls that are configured on the device. As you configure the number of calls for one line, the calls that are available for another line decrease.
The default specifies 4. If the phone does not allow multiple calls for each line, the default specifies 2.
For CTI route points, you can configure up to 10,000 calls for each port. The default specifies 5000 calls. Use this field in conjunction with the Busy Trigger field.
TipBusy Trigger
This setting, which works in conjunction with Maximum Number of Calls and Call Forward Busy, determines the maximum number of calls to be presented at the line. If maximum number of calls is set for 50 and the busy trigger is set to 40, then incoming call 41 gets rejected with a busy cause (and will get forwarded if Call Forward Busy is set). If this line is shared, all the lines must be busy before incoming calls get rejected.
Use this field in conjunction with Maximum Number of Calls for CTI route points. The default specifies 4500 calls.
TipCaller Name
Checking this check box will cause the caller name to display upon call forward.
Redirected Number
Checking this check box will cause the number that was redirected to display upon call forward.
Caller Number
Checking this check box will cause the caller number to display upon call forward.
Dialed Number
Checking this check box will cause the original dialed number to display upon call forward.
Character Set
Choose the character set (alphabet and characters) for the language that is used to display settings on the directory number.
Calling Search Space
You can configure the number of calling search spaces that display in this drop-down list box by using the Max List Box Items enterprise parameter. If more calling search spaces exist than the Max List Box Items enterprise parameter specifies, the ellipsis button (...) displays next to the drop-down list box. Click the ... button to display the Select Calling Search Space window. Enter a partial calling search space name in the List items where Name contains field. Click the desired calling search space name in the list of calling search spaces that displays in the Select item to use box and click OK.
Note
Directory Number Status
Table 57-4 describes the directory number status area on the Directory Number Configuration window (see Figure 57-4).
Figure 57-4 Directory Number Configuration Window
Related Topics
•
•
•
•