-
Configuring Remote Serviceability for Cisco CallManager, Release 3.0
-
Index
-
About this Guide
-
Introduction to Remote Serviceability
-
Cisco Bridged Telnet
-
The Show Command Interface
-
Using the Performance Console
-
Using the Message Translator
-
Managing with CiscoWorks2000
-
The Path Analysis Interface
-
System Log Management
-
SNMP Instrumentation
-
Cisco Discovery Protocol Support
-
 Feedback
Table Of Contents
Cisco Bridged Telnet Structure
Cisco Bridged Telnet Components
Cisco Bridged Telnet Applications
Cisco Bridged Telnet Executables
Command Line Syntax for tndconnect
Telnet Connector Program Structure
Terminating a Cisco Bridged Telnet Session
Connecting with the Telnet Daemon
Planning for a Windows NT Telnet Daemon
Cisco Bridged Telnet Usage Scenario
Cisco Bridged Telnet
Cisco Bridged Telnet offers Cisco Service Engineers (CSEs) transparent firewall access to Cisco CallManager servers on your site.
Cisco Bridged Telnet works by enabling a Telnet client inside the Cisco Systems firewall to connect to a Telnet daemon behind your firewall. This secure connection allows remote monitoring and maintenance of your Cisco CallManager servers—without requiring firewall modifications.
Note
This service is provided only with your permission. A network administrator must be available at your site to help initiate the process.
System Design
The Cisco Bridged Telnet system design provides the basis for communication with any Cisco CallManager installations on your site.
Each of the components and applications is described here, along with a scenario outlining how you can use them.
Remote Access Methodology
CSEs can use techniques other than Cisco Bridged Telnet to provide remote connectivity to a customer site, but using other methods may impose unacceptable conditions.
Dial-in access requires installation of a dedicated phone line and modem at your site, so it may be impractical. Using Telnet directly can establish a Transmission Control Protocol/Internet Protocol (TCP/IP) connection, but it requires opening your firewall, which can compromise security and cause delays in service.
Firewall Protection
Virtually all internal networks use firewall applications to restrict outside access to internal host systems. These applications protect your network by restricting IP connections between the network and the public internet.
Firewalls work by automatically blocking TCP/IP connections initiated from the outside, unless the software is reconfigured to allow such access.
Corporate networks normally permit communication with the public internet, but only if connections directed to outside hosts originate from inside the firewall.
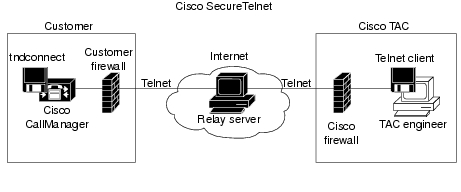
Cisco Bridged Telnet Design
Cisco Bridged Telnet takes advantage of the fact that Telnet connections can easily be initiated from behind a firewall. Using an external proxy machine, the system relays TCP/IP communications from behind your firewall to a host behind another firewall at the Cisco Technical Assistance Center (TAC).
Using this relay server maintains the integrity of both firewalls, yet supports secure communication between each of the shielded remote systems. (See Figure 2-1).
Figure 2-1 Cisco Bridged Telnet System
Cisco Bridged Telnet Structure
The external relay server establishes the connection between your network and Cisco Systems by building a Telnet tunnel. This enables you to transmit the IP address and password identifier of your Cisco CallManager server to your CSE.
Note
Your administrator starts the process by initiating the Telnet tunnel, which establishes a TCP connection from inside your firewall out to the relay server on the public internet. The Telnet tunnel then establishes another connection to your local Telnet server, creating a two-way link between the entities.
Note
Once the Cisco CallManager at your site accepts the password, the Telnet client running at the Cisco TAC connects to the Telnet daemon running behind your firewall. The resulting connection is transparent, allowing the same access as if the machine were being used locally.
Once the Telnet connection is stable, the CSE can implement all of the Remote Serviceability functionality to perform maintenance, diagnostic and troubleshooting tasks on your Cisco CallManager server.
You can view the commands sent by the CSE and the responses issued by your Cisco CallManager server, but the commands and responses may not always be completely formatted. See the "Telnet Server" section for more information.
Cisco Bridged Telnet Components
The Relay Server
The Cisco relay server runs on the Windows NT platform. It is a node on the public internet which is configured as a multi-user system. Any Cisco customer using the Cisco Bridged Telnet service can access it freely.
The relay server may be a dedicated device or, during a pilot period, it may be attached on an ad hoc basis when the need arises.
The relay server resides outside of the Cisco Systems firewall, but it is a secure and controlled system which is owned, managed and operated by Cisco Systems.
Note
Telnet Client
The Telnet client runs at the Cisco site on a UNIX host or Windows NT system. It provides terminal emulation over TCP/IP, providing a remote shell allowing entry into the server at your site.
The Telnet client provides command line access to the Cisco CallManager host through the Cisco relay server.
Telnet Server
The Telnet server resides on your network and runs on the Cisco CallManager server. The Windows 2000 operating system runs on this server and supports execution of the text-based commands used on the local system.
The Telnet proxy, tndconnect, runs on this server and links your Telnet server to the Cisco relay server.
Note
Cisco Bridged Telnet Applications
The Cisco Bridged Telnet system is built from four software components.
1.
2.
3.
4.
Cisco Bridged Telnet Executables
The tndconnect program is a command-line executable which is invoked from a Windows 2000 command prompt window.
Remote Serviceability users invoke the tndconnect program from a command window on the Cisco CallManager server. This program contacts the relayapp application on the relay server, which resides on the public internet.
After you invoke tndconnect at your site, the CSE uses Telnet to reach relayapp to gain access to your system. Logging into that system maps the Telnet sessions together, allowing technical support access to the your site.
Each of the executables has command line parameters which control the operating characteristics of each program, such as passwords and TCP ports.
Telnet Proxy
The tndconnect program acts as a proxy that provides the connection from your site to an external application residing on the relay server.
If you use this connector program, you must specify certain command line parameters, as listed below. Some of these parameters are optional.
Command Line Syntax for tndconnect
The tndconnect program resides on your Cisco CallManager server at C:\Program Files\Cisco\Bin. It is invoked on a command line, e.g.:
tndconnect -host relayservername -password cisco -file connect.log -port 80
-verbose -noecho
Note
Each of these parameters is defined below.
-host <relay hostname>You must use the host argument because it defines the Domain Name System (DNS) name of target relay server. The CSE supplies you with that host name during the initial call.
-password <any 4+ character string>You must use the password argument because it allows access to the relay server. The password is also given by the CSE during the initial call.
-file <logfile name>All Telnet exchanges generate logs, allowing for later review. The -file parameter provides an opportunity to name the log files which provide an audit trail of start-up and console activity. All activity is also logged to the command window.
If the -file argument is not used, the filename defaults to tndconnect.log.
-port <optional port number>The port argument allows selection of a port on the relay server other than Telnet port 23, which is the default. This option is needed in case the firewall at your site has blocked the Telnet port. For example, some servers might allow only HTTP transmissions through the firewall, in which case -port 80 could be used.
-verboseUse the verbose option if connectivity problems are anticipated. This parameter logs debug messages and program trace details to the log file as well as to the console window.
-target <optional DNS name of Cisco CallManager system>Use this parameter only if tndconnect resides on a system other than the Cisco CallManager server—e.g., a Telnet server at your site.
In this case, you would have to specify the DNS name of the Cisco CallManager system. If you do not use this argument, its value defaults to localhost.
-noechoDisable the echo of the relayed data to the console
Display All Options
The tndconnect program can be invoked with the /? argument on a command line to give information on the entire system.
tndconnect /?
This command returns information on all of the command line options.
Telnet Connector Program Structure
The tndconnect program performs the tasks which provide the CSE with the ability to log in to your Cisco CallManager system.
Note
When the tndconnect program starts, the command parser sets the values specified in the command line. If no specific parameters are set in the command line, default values are used, except for the -host
and -passwordparameters. Those values must be entered each time tndconnect is run.When the CSE connects to the relay application, a signal instructs the tndconnect program to create TCP/IP structures and connect to the local Telnet daemon.
If the -target option is not used, tndconnect defaults to your local Telnet server.
Note
hostnameto the file C:\WINNT\system32\drivers\etc\hosts to provide that hostname.The tndconnect program sends the information to the Cisco relay server, where the CSE logs in. The CSE then provides the IP address and password of the Cisco CallManager and enters a return
,which prompts the appearance of a login screen. The CSE then logs into the Cisco CallManager system using the password provided by the customer.Terminating a Cisco Bridged Telnet Session
Once a connection is established, a timer starts which eventually terminates the connection if no traffic is observed. The tunnel to your site established by tndconnect is automatically terminated after 30 minutes of inactivity. If you deliberately disconnect, you must manually restart the Telnet Connector program each time you use it.
The session can also be terminated by any socket failure, or by closing the connection from either Cisco or the customer site. A close can occur when the CSE disconnects, the relay program ends, or if the Telnet daemon terminates. Termination may also occur if TCP detects connection failure, if either of the Telnet sessions closes, or if you terminate the tndconnect program by pressing Control-C.
When the connection terminates, the program terminates and the tunnel constructed between the Cisco CallManager Telnet server and the relay server is taken down.
Connecting with the Telnet Daemon
Under the Cisco Bridged Telnet system, the Telnet client and daemon are standard, unmodified components and exchange data just as they would if they were connected directly.
Any system running the Cisco CallManager must run the standard Windows 2000 Telnet daemon service. Since this program expects clients to connect into it, an additional software component, tndconnect, is needed to both connect to the Telnet daemon and establish a connection out of the corporate network and into the Telnet relay program. The Telnet daemon and tndconnect work together to provide an end-to-end connection through which Telnet session traffic may flow.
The Telnet server component can be run as a service in the background on the Cisco CallManager Windows 2000 system. The primary function of the daemon is to respond to a connection request. Once a Telnet session is established, you can execute command line programs.
All of these considerations affect the choice of Telnet daemon software.
Planning for a Windows NT Telnet Daemon
Since both Telnet daemon and File Transfer Protocol (FTP) servers are part of Windows 2000 standard features, it is logical to use these connectivity methods for Remote Serviceability.
Cisco Bridged Telnet Usage Scenario
You may want to activate Cisco Bridged Telnet to call in problems that require diagnosis of a remote Cisco CallManager server by a CSE. The following sequence of events represents a common scenario.
Step 1
Note
Step 2
Step 3
Step 4
Note
Step 5
When transmission is complete, your system is set up for Cisco TAC diagnostics. If you wish, you may observe the support engineer's commands and responses in the tndconnect window.
When the Cisco TAC engineer disconnects, the tndconnect program will terminate.