-
Cisco MDS 9020 Fabric Switch Configuration Guide and Command Reference, Release 2.x
-
Index
-
Preface
-
Product Overview
-
Before You Begin
-
Initial Configuration
-
Software Images
-
Managing System Hardware
-
Configuring Interfaces
-
Configuring and Managing Zones
-
Managing FLOGI and FDMI
-
Configuring Switch Security
-
Configuring SNMP
-
Configuring Fibre Channel Routing Services and Protocols
-
Configuring IP Services
-
Configuring Domain Parameters
-
Configuring System Message Logging
-
Advanced Features and Concepts
-
Monitoring System Processes and Logs
-
Cisco SAN-OS Features Supported in CiscoFabricWare
-
Command Reference
-
 Feedback
Table Of Contents
Authentication and Authorization Process
Displaying Role-Based Information
Displaying User Account Information
Configuring Accounting Services
Generating the SSH Server Key Pair
Displaying SSH Protocol Status
Recovering the Administrator Password
Configuring Cisco Access Control Server
Configuring Switch Security
The authentication, authorization, and accounting (AAA) mechanism verifies the identity of, grants access to, and tracks the actions of users managing a switch. The Cisco MDS 9020 Fabric Switch uses Remote Access Dial-In User Service (RADIUS) protocols to provide solutions using remote AAA servers.
Based on the user ID and password combination provided, switches perform local authentication or authorization using the local database or remote authentication or authorization using AAA server(s). A preshared secret key provides security for communication between the switch and AAA servers. This secret key can be configured for all AAA servers or for only a specific AAA server. This security mechanism provides a central management capability for AAA servers.
This chapter includes the following sections:
•
Authentication and Authorization Process
•
•
•
Switch Management Security
Management security in the Cisco MDS 9020 Fabric Switch provides security to all management access methods including the command-line interface (CLI) or Simple Network Management Protocol (SNMP).
CLI Security Options
You can access the CLI using the console (serial connection), Telnet, or Secure Shell (SSH). For each management path (console or Telnet and SSH), you can configure one or more of the following security control options: local or remote (RADIUS).
•
•
SNMP Security Options
The SNMP agent supports security features for SNMP v1 and SNMP v2c. Normal SNMP security mechanisms apply to all applications that use SNMP (for example, Cisco MDS 9000 Family Fabric Manager).
CLI security options also apply to the Cisco MDS Fabric Manager and Device Manager. (See "Configuring SNMP".)
Refer to the Cisco MDS 9000 Family Fabric Manager Configuration Guide for information on the Cisco Fabric or Device Managers.
Switch AAA Functionalities
Using the CLI or an SNMP application, you can configure authentication, authorization, and accounting (AAA) switch functionalities in the Cisco MDS 9020 Fabric Switch.
Authentication
Authentication is the process of verifying the identity of the person managing the switch. This identity verification is based on the user ID and password combination provided by the person trying to manage the switch. The Cisco MDS 9020 Fabric Switch allows you to perform local authentication (using the local lookup database) or remote authentication (using one or more RADIUS servers).
Authorization
Two roles exist in all Cisco MDS switches:
•
•
Accounting
The accounting feature tracks and maintains a log of every management session used to access the switch. This information can be used to generate reports for troubleshooting and auditing purposes. Accounting logs are stored locally.
Configuring RADIUS
The Cisco MDS 9020 Fabric Switch can use the RADIUS protocol to communicate with remote AAA servers. You can configure multiple RADIUS servers and set timeout and retry counts. This section defines the RADIUS operation, identifies its network environments, and describes its configuration possibilities. RADIUS is a distributed client/server protocol that secures networks against unauthorized access. In the Cisco implementation, RADIUS clients run on the switch and send authentication requests to a central RADIUS server that contains all user authentication and network service access information.
You can add up to five RADIUS servers. RADIUS keys are always stored in encrypted form in persistent storage. The running configuration also displays encrypted keys. To specify the host RADIUS server address and the options, perform this task:
Local AAA Services
The system maintains the user name and password locally and stores the password information in encrypted form. You are authenticated based on the locally stored user information.
Use the username command to configure local users and their roles. (See the "Creating or Updating Users" section.)
Use the show accounting log command to view the local accounting log. (See Example 9-1.)
Example 9-1 Displays the Accounting Log Information
switch# show accounting log[1][Thu Jan 20 21:30:20.599 UTC 2005][AU][0000.00FF][None][Zoning Default Zone changed in Config default to False][2][Thu Jan 20 21:30:35.119 UTC 2005][AU][0000.0001][None][IP Unknown User snmp@IB-session1 User Login][3][Thu Jan 20 21:30:35.122 UTC 2005][AU][0000.0001][None][IP Unknown User snmp@OB-session2 User Login][4][Thu Jan 20 21:30:50.409 UTC 2005][AU][0000.0001][None][IP 10.0.0.254 User admin@OB-session3 User Login][5][Thu Jan 20 21:31:14.514 UTC 2005][AU][0000.0001][None][IP 10.0.0.254 User maint@OB-session4 User Login]...Authentication and Authorization Process
Authentication is the process of verifying the identity of the person managing the switch. This identity verification is based on the user ID and password combination provided by the person trying to manage the switch. The Cisco MDS 9020 Fabric Switch allows you to perform local authentication (using the lookup database) or remote authentication (using one or more RADIUS servers).
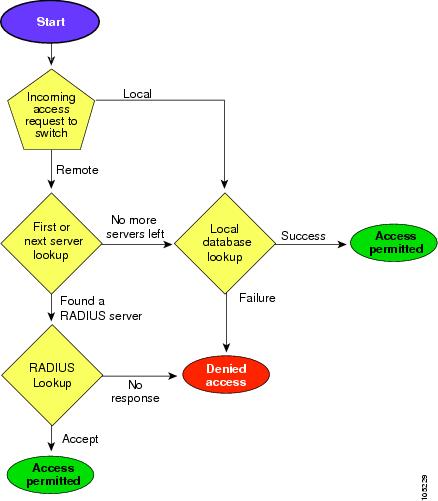
The following steps explain the authorization and authentication process. Figure 9-1 shows a flow chart of the process.
Step 1
Step 2
•
•
Step 3
Step 4
Figure 9-1 Switch Authorization and Authentication Flow
Role-Based Authorization
The Cisco MDS 9020 Fabric Switch performs authentication based on roles. The Cisco MDS 9020 Fabric Switch supports two roles: network-administrator and network operator. Role-based authorization limits access to switch operations by assigning users to roles. When you execute a command, perform command completion, or obtain context sensitive help, the switch software allows the operation to progress if you have permission to access that command.
Note
Displaying Role-Based Information
Use the show role command to display rules configured on the switch. (See Example 9-2.)
Example 9-2 Displays Information for All Roles
switch# show roleRole: network-adminDescription: Predefined Network Admin group. This role cannot be modifiedAccess to all the switch commandsRole: network-operatorDescription: Predefined Network Operator group. This role cannot be modifiedAccess to Show commands and selected Exec commandsConfiguring User Accounts
Every Cisco MDS 9020 Fabric Switch user has the account information stored by the system. Your authentication information, user name, user password, password expiration date, and role membership are stored in your user profile.
The tasks explained in this section enable you to create users and modify the profile of an existing user. These tasks are restricted to privileged users as determined by your administrator.
Creating or Updating Users
By default, the user account does not expire unless you explicitly configure it to expire. The expire option determines the date on which the user account is disabled. The date is specified in the YYYY-MM-DD format.
Tip
Note
Tip
To configure a new user or to modify the profile of an existing user, perform this task:
Displaying User Account Information
Use the show user-account command to display configured information about user accounts. (See Examples 9-3 to 9-4.)
Example 9-3 Displays Information for a Specified User
switch# show user-account user1user:user1this user account has no expiry dateroles:network-operatorno password set. Local login not allowedRemote login through RADIUS is possibleExample 9-4 Displays Information for All Users
switch# show user-accountshow user-accountuser:adminthis user account has no expiry dateroles:network-adminuser:usamexpires on Sat May 28 00:00:00 2005roles:network-admin network-operatoruser:msamthis user account has no expiry dateroles:network-operatoruser:user1this user account has no expiry dateroles:network-operatorno password set. local login not allowedRemote login through RADIUS is possibleConfiguring Accounting Services
Accounting refers to the log information that is kept for each management session in a switch. This information may be used to generate reports for troubleshooting and auditing purposes. Accounting can be implemented locally or remotely (using RADIUS).
Tip
Note
Displaying the Accounting Log
The show accounting log command displays the contents of the accounting log. (See Example 9-5.) To display the size of the local accounting log, use the show accounting logsize command.
Example 9-5 Displays the Entire Log File
switch# show accounting log[1][Mon Apr 25 11:01:59.888 UTC 2005][AU][0000.00FF][None][Zoning Default Zone changed in Config default to False][2][Mon Apr 25 11:02:03.228 UTC 2005][AU][0000.0001][None][IP Unknown User admin@OB-session1 User Login][3][Mon Apr 25 11:02:07.376 UTC 2005][AU][0000.0001][None][IP Unknown User snmp@IB-session2 User Login][4][Mon Apr 25 11:02:07.379 UTC 2005][AU][0000.0001][None][IP Unknown User snmp@OB-session3 User Login][5][Mon Apr 25 15:58:40.548 UTC 2005][AU][0000.0001][None][IP 10.20.33.160 User admin@OB-session4 User Login][6][Mon Apr 25 16:08:38.188 UTC 2005][AU][0000.0001][None][IP 10.20.32.70 User admin@OB-session5 User Login][7][Mon Apr 25 16:38:23.054 UTC 2005][AU][0000.0001][None][IP 10.20.32.70 User admin@OB-session6 User Login][8][Mon Apr 25 20:02:43.211 UTC 2005][AU][0000.0001][None][IP 10.20.32.70 User admin@OB-session7 User Login][9][Tue Apr 26 13:49:28.317 UTC 2005][AU][0000.0001][None][IP 10.20.32.70 User admin@OB-session8 User Login][10][Tue Apr 26 18:47:00.064 UTC 2005][AU][0000.0001][None][IP 10.20.32.70 User admin@OB-session9 User Login]...Configuring SSH Services
The Telnet service is enabled by default on the Cisco MDS 9020 Fabric Switch. Before enabling the SSH service, generate a server key pair. (See the "Generating the SSH Server Key Pair" section.)
Use the ssh key command to generate a server key.
Generating the SSH Server Key Pair
Be sure to have an SSH server key pair with the appropriate version before enabling the SSH service. Generate the SSH server key pair according to the SSH client version used. The number of bits specified for each key pair ranges from 768 to 2048. The rsa option generates the RSA key pair for the SSH version 2 protocol.
Caution
To generate the SSH server key pair, perform this task:
Enabling SSH Service
By default, the SSH service is disabled.
To enable or disable the SSH service, perform this task:
Caution
Displaying SSH Protocol Status
Use the show ssh server command to display the status of the SSH protocol (enabled or disabled). (See Example 9-6.)
Example 9-6 Displays SSH Protocol Status
switch# show ssh server
ssh service is enabled
Recovering the Administrator Password
To recover the administrator password, you must restore the factory account name password using maintenance mode. This restores the password for the Admin account name to the default (admin123) and removes all other user accounts from the switch. To reset the switch password, follow these steps:
Step 1
Step 2
a.
–
–
–
–
–
b.
Step 3
Step 4
Switch login: prom
Password:xxxx
Step 5
0)  Exit
1)  Image Unpack
2)  Reset Network Config
3)  Reset User Accounts to Default
4)  Copy Log Files
5)  Remove Switch Config
6)  Remake Filesystem
7)  Reset Switch
8)  Update Boot Loader
Option: 3
Step 6
0)  Exit
1)  Image Unpack
2)  Reset Network Config
3)  Reset User Accounts to Default
4)  Copy Log Files
5)  Remove Switch Config
6)  Remake Filesystem
7)  Reset Switch
8)  Update Boot Loader
Option: 7
Step 7
Configuring Cisco Access Control Server
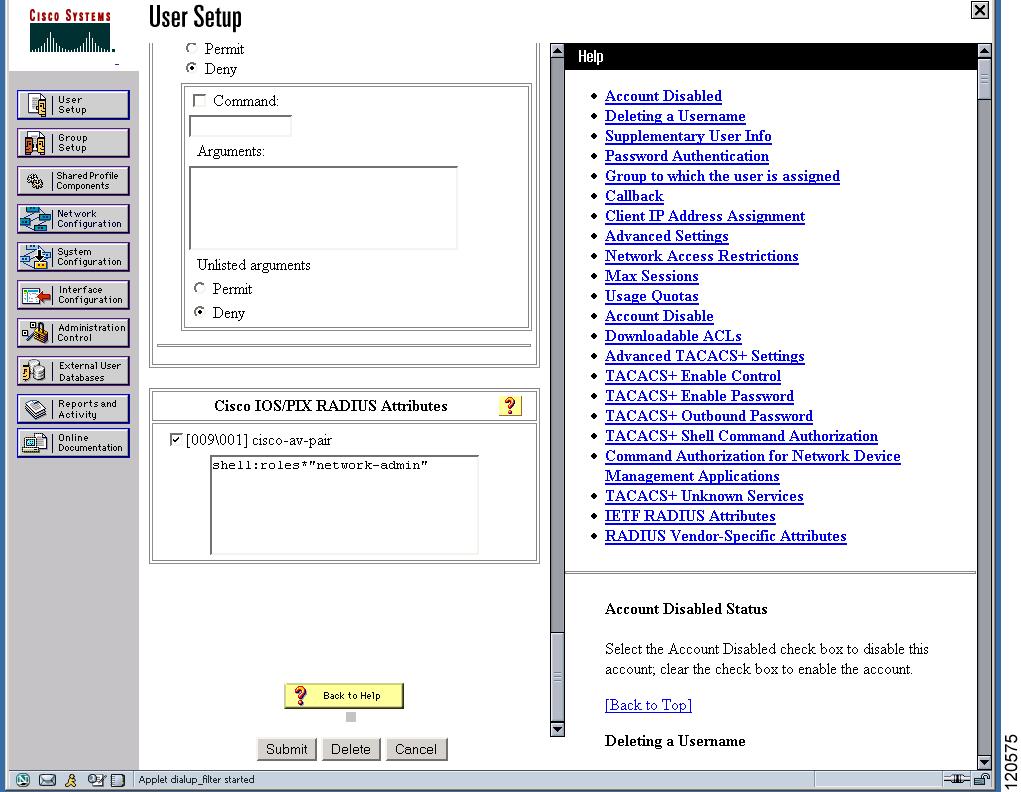
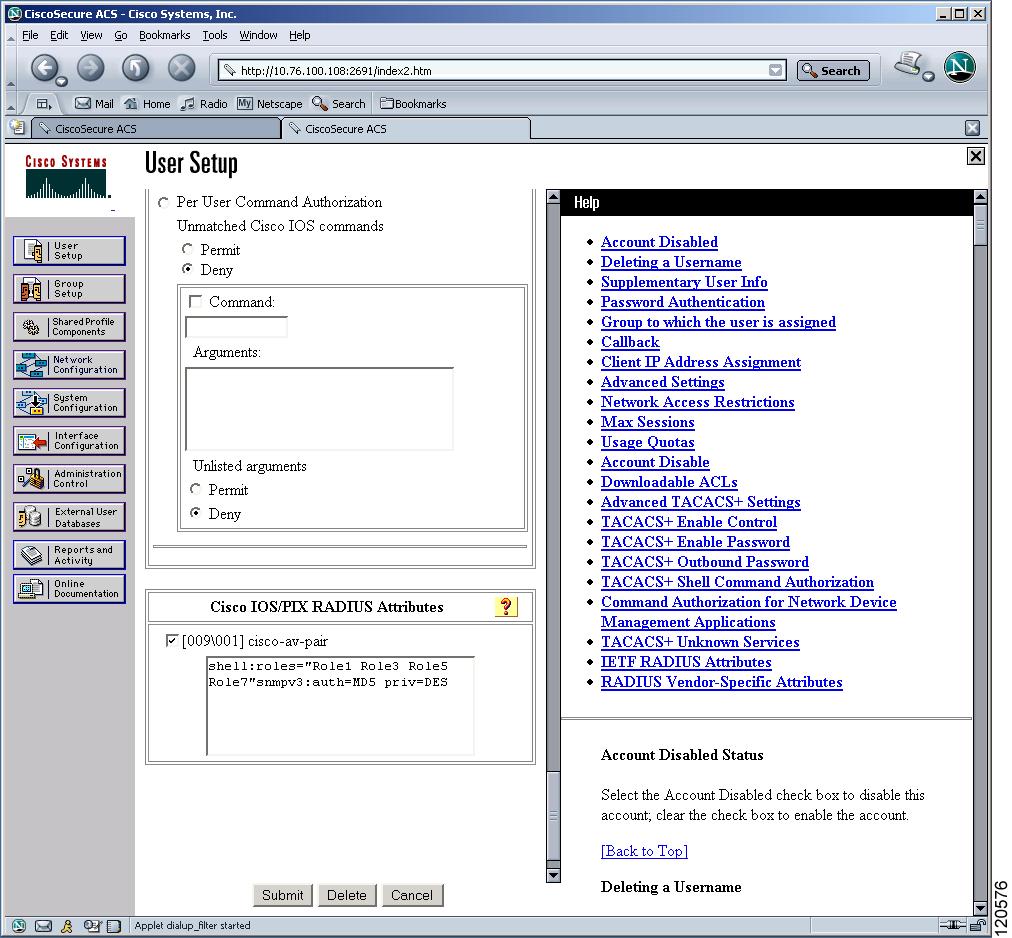
The Cisco Access Control Server (ACS) uses RADIUS protocols to provide AAA services that ensure a secure environment. When using the AAA server, user management is normally done using Cisco ACS. Figure 9-2 and Figure 9-3 display ACS server user setup configurations for network-administsrator roles and multiple roles using RADIUS.
Figure 9-2 Configuring the network-admin Role When Using RADIUS
Figure 9-3 Configuring Multiple Roles with SNMPv3 Attributes When Using RADIUS
Default Settings
Table 9-1 lists the default settings for all switch security features in any switch.