-
Cisco MDS 9020 Fabric Switch Configuration Guide and Command Reference, Release 2.x
-
Index
-
Preface
-
Product Overview
-
Before You Begin
-
Initial Configuration
-
Software Images
-
Managing System Hardware
-
Configuring Interfaces
-
Configuring and Managing Zones
-
Managing FLOGI and FDMI
-
Configuring Switch Security
-
Configuring SNMP
-
Configuring Fibre Channel Routing Services and Protocols
-
Configuring IP Services
-
Configuring Domain Parameters
-
Configuring System Message Logging
-
Advanced Features and Concepts
-
Monitoring System Processes and Logs
-
Cisco SAN-OS Features Supported in CiscoFabricWare
-
Command Reference
-
 Feedback
Table Of Contents
Configuration Mode Commands and Submodes
The no and Default Forms of Commands
CLI Command Configuration Options
Displaying the Switch Configuration
Setting the Current File System
Listing the Files in a File System
Executing Commands Specified in a Script
Before You Begin
This chapter prepares you to configure switches from the CLI. It also lists the information that you need before you begin, and it describes the CLI command modes.
This chapter includes the following sections:
About the Switch Prompt
Note
Refer to the Cisco MDS 9020 Fabric Switch Hardware Installation Guide for installation and connection instructions.
When the switch is powered on successfully, you see the default switch prompt (switch#), as shown in Example 2-1.
Example 2-1 Output When Switch Boots Up
INIT: Switching to runlevel: 6Stopping sshd:[ OK ]Stopping xinetd: [ OK ]Saving random seed: [ OK ]Shutting down kernel logger: [ OK ]Shutting down system logger: [ OK ]Starting killall: [ OK ]Sending all processes the TERM signal...Sending all processes the KILL signal...Unmounting loopback filesystems: umount: /dev/loop0: not mountedUnmounting loopback filesystems (retry):Unmounting file systems:Please stand by while rebooting the system...Restarting system.U-Boot 0.2.0 Revision 1.3.0.08 (Mar 8 2005 - 10:21:12)Kernel Source Revision 2.4.18_mvl30-amazon-0034CPU: MPC8245 Revision 1.4 at 249.999 MHz: 16 kB I-Cache 16 kB D-CacheBoard: Amazon-8245I2C: readyDRAM: 256 MBFLASH: 1 MBEnv: defaultIn: serialOut: serialErr: serialNet: DP83815NAND device: Manufacture ID: 0x98, Chip ID: 0x79 (Toshiba NAND 128MiB 3,3V)Creating 2 MTD partitions on "NAND 128MiB 3,3V":Partition 0: 0x00000000-0x05000000 : "Amazon Image Partition"Partition 1: 0x05000000-0x08000000 : "Amazon Config Partition"Mounting partition '0' offset 0x0 size 80MB### YAFFS booting: kernel=kernel.1 root=ramdisk.1 args="ramdisk=38056"### YAFFS loading 'kernel.1' to 0x1000000### YAFFS loading 'ramdisk.1' to 0x1100000helper entry, hp @ 0x0x1000000, data @ 0x0x100025c, magic num 0x27051956## Booting image at 01000000 ...Image Name: Linux-2.4.18_mvl30-amazonImage Type: PowerPC Linux Kernel Image (gzip compressed)Data Size: 638540 Bytes = 623.6 kBLoad Address: 00000000Entry Point: 00000000Verifying Checksum ... OKUncompressing Kernel Image ... OK## Loading RAMDisk Image at 01100000 ...Image Name: Amazon RAMDiskImage Type: PowerPC Linux RAMDisk Image (gzip compressed)Data Size: 12874182 Bytes = 12.3 MBLoad Address: 00000000Entry Point: 00000000Verifying Checksum ... OKLoading Ramdisk to 0f258000, end 0fe9f1c6 ... OKMemory BAT mapping: BAT2=256Mb, BAT3=0Mb, residual: 0MbLinux version 2.4.18_mvl30-amazon (builds@gotham) (gcc version 3.2.1 20020930 (MontaVista)) #1 Tue Feb 8 12:50:15 CST 2005Amazon platformOn node 0 totalpages: 65536zone(0): 65536 pages.zone(1): 0 pages.zone(2): 0 pages.Kernel command line: ramdisk=38056OpenPIC Version 1.2 (1 CPUs and 26 IRQ sources) at fc040000time_init: decrementer frequency = 25.011598 MHzCalibrating delay loop... 166.29 BogoMIPSMemory: 243920k available (1100k kernel code, 376k data, 60k init, 0k highmem)Dentry-cache hash table entries: 32768 (order: 6, 262144 bytes)Inode-cache hash table entries: 16384 (order: 5, 131072 bytes)Mount-cache hash table entries: 4096 (order: 3, 32768 bytes)Buffer-cache hash table entries: 16384 (order: 4, 65536 bytes)Page-cache hash table entries: 65536 (order: 6, 262144 bytes)POSIX conformance testing by UNIFIXPCI: Probing PCI hardwareLinux NET4.0 for Linux 2.4Based upon Swansea University Computer Society NET3.039Initializing RT netlink socketStarting kswapdDisabling the Out Of Memory Killeri2c-core.o: i2c core module version 2.6.2 (20011118)i2c-dev.o: i2c /dev entries driver module version 2.6.2 (20011118)i2c-proc.o version 2.6.2 (20011118)pty: 256 Unix98 ptys configuredadm1021.o version 2.6.2 (20011118)adm9240.o version 2.6.2 (20011118)eeprom.o version 2.6.2 (20011118)ds1339.o version 2.6.2 (20011118)mic74.o version 2.6.2 (20011118)Serial driver version 5.05c (2001-07-08) with MANY_PORTS SHARE_IRQ SERIAL_PCI enabledttyS00 at 0xfc004500 (irq = 137) is a 16550AGeneric RTC Driver v1.07block: 128 slots per queue, batch=32RAMDISK driver initialized: 16 RAM disks of 38056K size 1024 blocksizeloop: loaded (max 8 devices)natsemi.c:v1.07 1/9/2001 Written by Donald Becker <becker@scyld.com>http://www.scyld.com/network/natsemi.html(unofficial 2.4.x kernel port, version 1.07+LK1.0.14, Nov 27, 2001 Jeff Garzik, Tjeerd Mulder)eth0: NatSemi DP8381[56] at 0xd1000000, 00:c0:dd:07:12:9f, IRQ 16.Amazon Boot Flash: Probing for AMD compatible flash...Amazon Boot Flash: Found 1 x 1MiB AMD AM29LV800BB at 0x0Creating 1 MTD partitions on "Amazon Boot Flash":0x00000000-0x00100000 : "BootFlash"NAND device: Manufacture ID: 0x98, Chip ID: 0x79 (Toshiba NAND 128MiB 3,3V)Creating 2 MTD partitions on "NAND 128MiB 3,3V":0x00000000-0x05000000 : "Amazon Image Partition"0x05000000-0x08000000 : "Amazon Config Partition"MPC10x I2C - interrupt vector 129NET4: Linux TCP/IP 1.0 for NET4.0IP Protocols: ICMP, UDP, TCP, IGMPIP: routing cache hash table of 2048 buckets, 16KbytesTCP: Hash tables configured (established 16384 bind 32768)NET4: Unix domain sockets 1.0/SMP for Linux NET4.0.RAMDISK: Compressed image found at block 0Freeing initrd memory: 12572k freedVFS: Mounted root (ext2 filesystem).Freeing unused kernel memory: 60k initINIT:version 2.78 bootin Welcome to Red Hat LinuxMounting proc filesystem: [ OK ]Configuring kernel parameters: [ OK ]Setting hostname switch: [ OK ]Finding module dependencies: [ OK ]mke2fs 1.23, 15-Aug-2001 for EXT2 FS 0.5b, 95/08/09Filesystem label=OS type: LinuxBlock size=1024 (log=0)Fragment size=1024 (log=0)9520 inodes, 38056 blocks1902 blocks (5.00%) reserved for the super userFirst data block=15 block groups8192 blocks per group, 8192 fragments per group1904 inodes per groupSuperblock backups stored on blocks:8193, 24577Writing inode tables: 0/51/52/53/54/5doneWriting superblocks and filesystem accounting information: doneThis filesystem will be automatically checked every 33 mounts or180 days, whichever comes first. Use tune2fs -c or -i to override.Mounting local filesystems: [ OK ]Running logRotate...Enabling swap space: [ OK ]INIT: Entering runlevel: 3Initializing random number generator: [ OK ]Starting system logger: [ OK ]Starting kernel logger: [ OK ]Starting xinetd: [ OK ]Starting fcswitch: [ OK ]switch login: adminPassword:Cisco MDS 9000 FabricWareCopyright (C) 2002-2005, by Cisco Systems, Inc.and its suppliers. All rights reserved.Copyrights to certain works contained herein are owned bythird parties, and used and distributed under license.Portions of this software are governed by the GNU Public License,which is available at http://www.gnu.org/licenses/gpl.html.---- Basic System Configuration Dialog ----This setup utility will guide you through the basic configuration ofthe system. Setup configures only enough connectivity for managementof the system.*Note: setup is mainly used for configuring the system initially,when no configuration is present. So setup always assumes systemdefaults and not the current system configuration values.Press Enter if you want to skip any dialog. Use ctrl-c at anytimeto skip all remaining dialogs.Would you like to enter the basic configuration dialog (yes/no): yCreate another login account (yes/no) [n]: nConfigure read-only SNMP community string (yes/no) [n]: ySNMP community string: publicConfigure read-write SNMP community string (yes/no) [n]: ySNMP community string: privateEnter the switch name: rtp-9020-topContinue with Out-of-band (mgmt0) management configuration? (yes/no) [y]: yMgmt0 IP address: 172.18.172.160Mgmt0 IP netmask: 255255.255.255.0Configure the default gateway? (yes/no) [y]: yIP address of the default gateway: 172.18.172.1Enable the telnet service? (yes/no) [y]: yEnable SSH service? (yes/no) [n]: yConfigure ntp server? (yes/no) [n]: nConfigure default switchport interface state (shut/noshut) [shut]:Configure default zone policy (permit/deny) [deny]:The following configuration will be applied:snmp-server community public rosnmp-server community private rwswitchname rtp-9020-topinterface mgmt0ip address 172.18.172.160 255.255.255.0ip default-gateway 172.18.172.1telnet server enablessh server enablesystem default switchport shutdownno zone default-zone permitWould you like to edit the configuration? (yes/no) [n]:Use this configuration and save it? (yes/no) [y]:[########################################] 100%You can perform embedded CLI operations, access command histories, and use command parsing functions at this prompt. The switch gathers the command string upon detecting an Enter (CR) and accepts commands from a terminal.
Default Switch Roles
The following roles are available in all switches:
•
•
When you execute a command, perform command completion, or obtain context sensitive help, the switch software allows the operation to progress if you have the correct permission as specified in the description of the command. (See "Configuring Switch Security.")
About the CLI Command Modes
Switches in the Cisco MDS 9020 Fabric Switch have two main command modes: user EXEC mode and configuration mode. The commands available to you depend on the mode you are in. To obtain a list of available commands in either mode, type a question mark (?) at the system prompt.
Table 2-1 lists and describes the two commonly used modes, how to enter the modes, and the resulting system prompts. The system prompt helps you to identify which mode you are in and which commands are available to you.
Table 2-1 Frequently Used Switch Command Modes
EXEC
Enables you to temporarily change terminal settings, perform basic tests, and display system information.
Note
At the switch prompt, enter the required EXEC mode command.
Configuration mode
Enables you to configure features that affect the system as a whole.
Note
From EXEC mode, enter the config terminal command.
You can abbreviate commands and keywords by entering just enough characters to make the command unique from other commands. For example, you can abbreviate the config terminal command to conf t.
Note
CLI Command Hierarchy
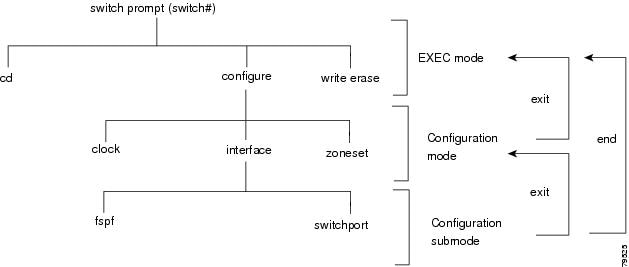
The CLI commands are organized hierarchically, with commands that perform similar functions grouped under the same level. For example, all commands that display information about the system, configuration, or hardware are grouped under the show command, and all commands that allow you to configure the switch are grouped under the config terminal command. Figure 2-1 illustrates a portion of the config terminal command hierarchy.
Figure 2-1 CLI Command Hierarchy Example
To execute a command, you enter the command by starting at the top level of the hierarchy. For example, to configure a Fibre Channel interface, use the config terminal command. When you are in configuration mode, enter the interface command. When you are in the interface submode, you can query the available commands there.
The following example shows how to query the available commands in the interface submode:
switch# config tEnter configuration commands, one per line.switch(config)# interface fc1/1switch(config-if)# ?do EXEC commandend Exit from configure modeexit Exit from this submodefspf Configure fspfhelp Press '?' key to display available commandsno Negate a command or set its defaultsshutdown Enable/disable an interfaceswitchport Configure switchport parametersEXEC Mode Options
When you start a session on the switch, you begin in EXEC mode. Based on the role or group to which you belong, you have access to limited commands or to all commands. (See the "Role-Based Authorization" section.) From EXEC mode, you can enter configuration mode. Most of the EXEC commands are one-time commands, such as show commands, which display the current configuration status. Here is a list of EXEC mode commands:
switch# ?cd Change current directoryclear Reset functionsclock Manage the system clockconfig Enter configuration modecopy Copy from one file to anotherdelete Delete a filedir List files in a directoryexit Exit from the EXEChelp Press '?' key to display available commandsinstall Upgrade softwaremove Move filesping Send echo messagesreload Reboot the entire boxrun-script Run shell scriptssetup Run the basic SETUP command facilityshow Show running system informationsleep Sleep for the specified number of secondssystem System management commandsterminal Set terminal line parameterswrite Write current configurationzone Execute zone server commandszoneset Execute zoneset commandsConfiguration Mode
In configuration mode, you can make changes to the existing configuration. When you save the configuration, these commands are preserved across switch reboots. When you are in configuration mode, you can enter interface configuration mode, zone configuration mode, and a variety of protocol-specific modes. Configuration mode is the starting point for all configuration commands. When you are in configuration mode, the switch expects configuration commands from the user.
The following example shows output from the config terminal command:
switch# config terminalEnter configuration commands, one per line. End with CNTL/Z.switch(config)#Configuration Mode Commands and Submodes
Here is a list of configuration mode commands:
switch# config tEnter configuration commands, one per line. End with CNTL/Z.switch(config)# ?clock Configure time-of-day clockdo EXEC commandend Exit from configure modeexit Exit from configure modefcalias Fcalias configuration commandsfcdomain Enter the fcdomain configuration modefctimer Configure fibre channel timershelp Press '?' key to display available commandsinterface Select an interface to configureip Configure IP featureslogging Modify message logging facilitiesno Negate a command or set its defaultsntp NTP Configurationsnmp-server Configure snmp serverssh Configure SSH parametersswitchname Configure system's network nametelnet Enable telnetusername Configure user information.zone Zone configuration commandszoneset Zoneset configuration commandsConfiguration mode, also known as terminal configuration mode, has several submodes. Each of these submodes places you deeper in the prompt hierarchy. When you type exit, the switch backs out one level and returns you to the previous level. When you type end, the switch backs out to the user EXEC level.
You can execute an EXEC mode command from a configuration mode or submode prompt. You can enter this command from any submode within the configuration mode. When in configuration mode (or in any submode), enter the do command along with the required EXEC mode command. The entered command is executed at the EXEC level, and the prompt resumes its current mode level.
switch(config)# do terminal session-timeout 0switch(config)#In this example, terminal session-timeout is an EXEC mode command—you are entering an EXEC mode command using the configuration mode do command.
The do command applies to all EXEC mode commands other than the end and exit commands. You can also use the help (?) and command completion (Tab) features for EXEC commands when entering a do command along with the EXEC command.
Table 2-2 lists some useful command keys that can be used in both EXEC and configuration modes:
CLI Command Navigation
To redisplay a command that you previously entered, press the Up Arrow key. You can continue to press the Up Arrow key to see more previously entered commands. Similarly, you can press the Down Arrow, Right Arrow, Left Arrow, and Delete keys to navigate through the command history and to modify an existing command string.
Getting Help
In any command mode, you can get a list of available commands by entering a question mark (?).
switch# ?To obtain a list of commands that begin with a particular character sequence, type in those characters followed immediately by the question mark (?). Do not include a space.
switch# co?configure copyTo list keywords or arguments, enter a question mark in place of a keyword or argument. Include a space before the question mark. This form of help is called command syntax help because it reminds you which keywords or arguments are applicable based on the commands, keywords, and arguments you have already entered.
switch# config ?terminal Configure the system from the terminal
Tip
Command Completion
In any command mode, you can begin a particular command sequence and immediately press the Tab key to complete the rest of the command.
switch(config)# sh<Tab>switch(config)# show in<tab>switch(config)# show interfaceThis form of help is called command completion because it completes a word for you. If several options are available for the typed letters, all options that match those letters are presented:
switch(config)# fc<Tab><Tab>fcalias fcdomain fctimerswitch(config)# fcdo<Tab>switch(config)# fcdomainFile System Completion
You can use the Tab key to complete schemes, servers, and file names that are available in the file system, as shown in this example.
switch# dir b<Tab>switch# dir bootflash:962 May 2 19:42:32 2005 running-config26 May 1 20:16:45 2005 startup-configUsage for bootflash://15360 bytes used2667520 bytes free2682880 bytes totalThe no and Default Forms of Commands
You can enter the no form of any command to perform the following actions:
•
If you enter the zone member command, you can undo the results as shown in the following example:
switch(config)# zone name testswitch(config-zone)# member pwwn 12:12:12:12:12:12:12:12switch(config-zone)# no member pwwn 12:12:12:12:12:12:12:12WARNING: Zone is empty. Deleting zone test. Exit the submode.switch(config-zone)#•
If you want to delete a zone that you created, enter the no zone name command, as shown in the following example:
switch(config)# zone name testswitch(config-zone)# exitswitch(config)# no zone name testswitch(config)#You cannot delete a zone facility called test while residing in it. You must first exit the zone submode and return to configuration mode.
CLI Command Configuration Options
You can configure the software in one of two ways:
•
•
Displaying the Switch Configuration
You can view the ASCII form of the configuration file when required. To view the current configuration tree from the EXEC prompt, enter the show running-config command. If the running configuration is different from the startup configuration, enter the show startup-config command to view the ASCII version of the current startup configuration that was used to boot the switch if a copy run start command was not entered after the reboot. Use the show startup command to view the contents of the current startup configuration.
You can also gather specific information on the entire switch configuration by entering the relevant show commands. Configurations are displayed based on a specified feature, interface, or module. Available show commands for each feature are briefly described in this section and listed at the end of each chapter.
Examples 2-2 to 2-5 display show command examples.
Example 2-2 Displays Details on the Specified Interface
switch# show interface fc1/1fc1/1 is Down (Administratively down)Hardware is Fibre Channel, SFP is long wave laserPort WWN is 20:00:00:0d:ec:19:cb:0eAdmin port mode is autoReceive data field Size is 2112Beacon is turned off5 minutes input rate 0 bits/sec, 0 bytes/sec, 0 frames/sec5 minutes output rate 0 bits/sec, 0 bytes/sec, 0 frames/sec0 frames input, 0 bytes0 discards, 0 errors0 CRC0 too long, 0 too short0 frames output, 0 bytes0 errors0 input OLS, 0 LRR, 0 loop inits5 output OLS, 0 LRR, 1 loop initsExample 2-3 Displays the Software and Hardware Version
switch# show versionCisco MDS 9000 FabricWareCopyright (C) 2002-2005, by Cisco Systems, Inc.and its suppliers. All rights reserved.Copyrights to certain works contained herein are owned bythird parties, and used and distributed under license.Portions of this software are governed by the GNU Public License,which is available at http://www.gnu.org/licenses/gpl.html.Softwaresystem: 2.1(2)system compile time: Thu Apr 21 12:48:49 2005Hardwareswitch uptime is 0 days 11 hours 34 minute(s) 3 second(s)Last reset at 41643 usecs after Mon Apr 25 11:01:12 2005Reason: PowerUpExample 2-4 Displays the Running Configuration
switch# show runningip default-gateway 10.20.83.1logging level fcdomain 2logging level fspf 2logging level fcns 2logging level fcs 2logging level port 2logging level zone 2logging level auth 2logging level ipconf 2logging level module 2logging level ntp 2logging level sysmgr 2interface mgmt0ip address 10.20.83.122 255.255.255.0interface fc1/1interface fc1/2interface fc1/3interface fc1/4interface fc1/5interface fc1/6interface fc1/7interface fc1/8interface fc1/9interface fc1/10interface fc1/11interface fc1/12interface fc1/13interface fc1/14interface fc1/15interface fc1/16interface fc1/17interface fc1/18interface fc1/19interface fc1/20Example 2-5 Displays the Difference Between the Running and Startup Configuration
switch# show running diffswitchname rtp-9020-topip default-gateway 172.18.172.1ssh server enablelogging level fcdomain 2logging level fspf 2logging level fcns 2logging level fcs 2logging level port 2logging level zone 2logging level auth 2logging level ipconf 2logging level module 2logging level ntp 2logging level sysmgr 2snmp-server community public rosnmp-server community private rwinterface mgmt0ip address 172.18.172.160 255.255.255.0no shutdowninterface fc1/1+ no shutdowninterface fc1/2interface fc1/3interface fc1/4interface fc1/5interface fc1/6interface fc1/7interface fc1/8interface fc1/9interface fc1/10interface fc1/11interface fc1/12interface fc1/13interface fc1/14interface fc1/15interface fc1/16interface fc1/17interface fc1/18interface fc1/19interface fc1/20Saving a Configuration
Use the copy running-config startup-config command to save the new configuration into nonvolatile storage. When this command is entered, the running and the startup copies of the configuration are identical.
See the "Copying Files" section.
Clearing a Configuration
Use the write erase command to clear a startup configuration. When this command is entered, the switch's startup configuration reverts to factory defaults. The running configuration is not affected.
Caution
The write erase boot command erases the startup configuration and any configuration that affects the loader functionality. The loader functionality configuration includes the boot variables and the mgmt0 IP configuration information (IP address, netmask, and default gateway).
switch# write erase bootThis command will erase the boot variables and the ip configuration of interface mgmt 0Displaying Users
Use the show users command to display all users currently accessing the switch.
switch# show userssnmp@IB-session2 Mon Apr 25 11:02:07 2005 (Unknown)snmp@OB-session3 Mon Apr 25 11:02:07 2005 (Unknown)admin@OB-session11 Wed Apr 27 13:50:49 2005 (10.20.32.70)Using the ping Command
Use the ping command to verify the connectivity of a remote host or server by sending echo messages.
The syntax for this command is ping host or ip-address.
switch# ping 10.20.83.107PING 10.20.83.107 (10.20.83.107): 10 data bytes18 bytes from 10.20.83.107: icmp_seq=0 ttl=64 time=0.5 ms--- 10.20.83.107 ping statistics ---1 packets transmitted, 1 packets received, 0% packet lossround-trip min/avg/max = 0.5/0.5/0.5 msSetting the Terminal Timeout
Use the terminal session-timeout command in EXEC mode to configure the automatic logout time for the current terminal session on that switch. When the time limit configured by this command is exceeded, the switch closes that session and exits.
The syntax for this command from is terminal session-timeout minutes.
The default is 30 minutes. You can set the terminal session-timeout value to 0 to disable this feature so the terminal remains active until you choose to exit the switch. This change is not saved in the configuration file.
switch# terminal session-timeout 600Specifies the terminal timeout to be 600 minutes for the current session.
Setting the Terminal Length
Use the terminal length command in EXEC mode to set the terminal screen length for the current session. This command is specific to only the console port. Telnet and SSH sessions set the length automatically.
The syntax for this command is terminal length lines.
switch# terminal length 20Sets the screen length for the current session to 20 lines for the current terminal session. The default is 20 lines.
Displaying Terminal Settings
Use the show terminal command to display the terminal settings for the current session:
switch# show terminalLength: 10 linesSession Timeout: 0 minutesInternal bootflash:
The Cisco MDS 9020 Fabric Switch has two locations within the internal bootflash: file system.
•
•
Using the File System
The switch provides the following useful functions to help you manage software image files and configuration files:
•
•
•
Setting the Current File System
The cd command changes the current file system to a specified file system. CLI defaults to the volatile: file system. This command requires a file system name input.
Tip
The syntax for this command is cd file system.
This example changes the current file system to the volatile: file system:
switch# cd volatile:Listing the Files in a File System
The dir command displays the contents of the current file system. The syntax for this command is dir filesystem.
This example shows how to list the files on the volatile: file system:
switch# dir bootflash:962 May 5 15:26:49 2005 running-config26 May 1 20:16:45 2005 startup-configUsage for bootflash://15360 bytes used2667520 bytes free2682880 bytes totalMoving Files
The move command removes a file from the source location and places it in the destination location. If a file with the same name already exists in the destination location, that file is overwritten by the moved file.
This example moves the file called latest_mpc from the bootflash: file system to the volatile: file system:
switch# move bootflash:latest_mpc volatile:latest_mpcCopying Files
The copy command copies a file. (See the "Copying Files" section.)
This example saves your configuration to the startup configuration:
switch# copy running-config startup-configThe following example saves a copy of the startup configuration on a remote host:
switch# copy startup-config ftp://10.20.102.98/configs/q100-startupDeleting Files
The delete command deletes a specified file. (See the "Deleting Files" section.)
This example shows how to delete a file from the current working directory:
switch# delete dns_config.cfgThis example deletes the my-file file from the bootflash: file system:
switch# delete bootflash:my-file
Caution
Executing Commands Specified in a Script
The run-script command executes the commands specified in a file. To use this command, be sure to create the file and specify commands in the required order.
Note
The syntax for this command is run-script file_name
The file, testfile, contains the following commands.
conf tinterface fc 1/1no shutdownendsh interface fc1/1This file output is in response to the run-script command executing the contents in the testfile file:
switch# run-script testfile'conf t'Enter configuration commands, one per line.'interface fc1/1''no shutdown''end''sh interface fc1/1'fc1/1 is Up (Link failure or not connected)Hardware is Fibre Channel, SFP is long wave laserPort WWN is 20:00:00:0d:ec:19:cb:0eAdmin port mode is autoPort mode is Unknown, FCID is 0x690000Speed is AutoReceive data field Size is 2112Beacon is turned off5 minutes input rate 0 bits/sec, 0 bytes/sec, 0 frames/sec5 minutes output rate 0 bits/sec, 0 bytes/sec, 0 frames/sec0 frames input, 0 bytes0 discards, 154096 errors0 CRC0 too long, 0 too short0 frames output, 0 bytes0 errors1 input OLS, 1 LRR, 11 loop inits13 output OLS, 4 LRR, 11 loop inits...Setting the Delay Time
The sleep command delays an action by a specified number of seconds.
The syntax for this command is sleep <seconds>
switch# sleep 30You will see the switch prompt return after 30 seconds.
This command is useful within scripts. For example, consider a script called test-script with the following contents:
clear counters interface allsleep 5show interface counters briefWhen you execute the test-script, the switch software executes the clear counters interface all command and then waits for 5 seconds before executing the show interface counters brief command.
switch# run-script test-script