Security

Data Datagram Transport Layer Security

A data Datagram Transport Layer Security (DTLS) is a security protocol that

  • encrypts CAPWAP data packets sent between an access point and a controller

  • uses separate UDP ports for control (5246) and data (5247) packets,

  • is a standards-track IETF protocol that can encrypt both control and data packets based on TLS, and

  • supports v1.2 as the latest version available.

Feature history for data DTLS

Feature name

Release information

Feature description

Data Datagram Transport Layer Security

Cisco IOS XE Gibraltar 16.7.1

The data Datagram Transport Layer Security (DTLS) is a standards-track IETF protocol that can encrypt both control and data packets based on TLS.

CAPWAP control and data packets

CAPWAP control packets are management packets that are exchanged between a controller and an AP. CAPWAP data packets encapsulate forwarded wireless frames.

If an AP does not support DTLS data encryption, DTLS is enabled only for the control plane, and a DTLS session for the data plane is not established.

DTLS handshake

If an AP supports Data DTLS

  • It enables data DTLS after receiving the new configuration from the controller

  • The AP performs a DTLS handshake on port 5247 and after successfully establishing the DTLS session, and

  • All the data traffic (from the access point to the controller and the controller to the access point) is encrypted.


Note


The throughput is affected for some APs that have data encryption enabled.


The controller does not perform a DTLS handshake immediately after processing client-hello with a cookie, if the following incorrect settings are configured:

  • ECDHE-ECDSA cipher in ap dtls-cipher and RSA-based certificate in “wireless management trustpoint”.

  • RSA cipher in ap dtls-cipher and EC-based certificate in “wireless management trustpoint”.

This is applicable when you move from CC > FIPS > non-FIPS mode.


Note


If the DHCP lease time of the AP is less and the DHCP pool is small, the AP join may fail or a failure in establishing the Data Datagram Transport Layer Security (DTLS) session may occur. In such scenarios, associate the AP with a named site-tag and increase the DHCP lease time for at least eight days.


Configure data DTLS (GUI)

Complete this task to enable DTLS data encryption for the APs on the controller.

Procedure


Step 1

Click Configuration > Tags and Profile > AP Join.

Step 2

Click Add to create a new AP Join Profile or click an existing profile to edit it.

Step 3

Click CAPWAP > Advanced.

Step 4

Check Enable Data Encryption check box to enable Datagram Transport Layer Security (DTLS) data encryption.

Step 5

Click Update & Apply to Device.


The DTLS data encryption for the APs on the controller is enabled.

Configure data DTLS (CLI)

Complete this task to enable DTLS data encryption for the access points on the controller.

Procedure


Step 1

Enter the global configuration mode.

Example:

Device# configure terminal

Step 2

Configure an AP profile and enter AP profile configuration mode.

Example:

Device(config)# ap profile ap-profile-name

Note


Use the default AP profile (default-ap-profile) or create a named AP profile, as shown in the example.

Step 3

Enable link encryption on your profile.

Example:

Device(config-ap-profile)# link-encryption

Answer Yes, when the system prompts you with this message:

Enabling link-encryption will reboot the APs with link-encryption.
                        Are you sure you want to continue? (y/n)[y]:

Note


If you set stats-timer as zero (0) under the AP profile, then the AP will not send the link encryption statistics.

Step 4

Return to privileged EXEC mode.end

Example:

Device(config-ap-profile)# end

Step 5

(Optional) Display the DTLS session established for the AP that has joined this controller.

Example:

Device# show wireless dtls connections

Step 6

(Optional) Display the link encryption-related statistics (whether link encryption is enabled or disabled) counter received from the AP.

Example:

Device# show ap link-encryption

The DTLS data encryption for the access points on the controller is now enabled.

Device# configure terminal
Device(config)# ap profile ap-profile-name
Device(config-ap-profile)# link-encryption
Device(config-ap-profile)# end
Device# show wireless dtls connections
Device# show ap link-encryption

802.1X authentication

IEEE 802.1X port-based authentication is a network security protocol that

  • prevents unauthorized devices from accessing the network

  • utilizes EAP authentication models to ensure secure communication, and

  • integrates with devices like routers, switches, and access points based on configuration.

Feature history

Table 1. Feature history for 802.1X authentication

Feature name

Release information

Feature description

802.1X authentication

Cisco IOS XE 16.9.1

IEEE 802.1X port-based authentication is a network security protocol that utilizes EAP authentication models to ensure secure communication, and integrates with devices like routers, switches, and access points based on configuration.

Access ports with dual port authentication

Cisco IOS XE 17.17.1

The access ports with dual port authentication feature supports dual Ethernet ports on Cisco Catalyst 9136 APs and Cisco Wireless 9178I APs.

Currently, Cisco Wave 2 and Wi-Fi 6 (802.11AX) APs support 802.1X authentication with switch ports for EAP-FAST, EAP-TLS, and EAP-PEAP methods. Configuration and credential provision to APs can be done through the controller.


Note


If the AP is dot1x EAP-FAST, upon reboot, it should perform an anonymous PAC provision using ADH cipher suites to establish an authenticated tunnel. Authentication will fail if RADIUS servers do not support ADH cipher suites.

EAP-FAST protocol

In the EAP-FAST protocol developed by Cisco, to establish a secured TLS tunnel with RADIUS, the AP requires a strong shared key (PAC), provided via in-band or manual out-band provisioning.

  • The EAP-FAST type configuration requires 802.1x credentials configuration for AP, since AP will use EAP-FAST with MSCHAP Version 2 method.

  • Cisco 7925 phones do not support Local EAP.

  • In Cisco Wave 2 APs, for 802.1x authentication using EAP-FAST after PAC provisioning (caused by the initial connection or after AP reload), ensure that you configure the switch port to trigger re-authentication using authentication timer restart num or authentication timer reauthenticate num.

  • Starting from Cisco IOS XE Amsterdam 17.1.1, TLS 1.2 is supported in the EAP-FAST authentication protocol that requires strong security measures.

EAP-TLS/EAP-PEAP Protocol

The EAP-TLS protocol or EAP-PEAP protocol provides certificate based mutual EAP authentication.

In EAP-TLS, both the server and the client side certificates are required, where the secured shared key is derived for the particular session to encrypt or decrypt data. In EAP-PEAP, only the server-side certificate is required, and the client authenticates using a password-based protocol in a secured channel.

The EAP-PEAP type configuration requires Dot1x credentials configuration for the AP, and the AP also needs to go through LSC provisioning. AP uses the PEAP protocol with MSCHAP Version 2 method.

Access ports with dual port authentication

The access ports with dual port authentication feature supports dual Ethernet ports on Cisco Catalyst 9136 APs and Cisco Wireless 9178I APs.

The access ports with dual port authentication feature

  • Enhances network security and provides redundancy through 802.1x and MAC Authentication Bypass (MAB).

  • Ensures high-availability and minimizes downtime.

  • Supports authentication methods including EAP-FAST, EAP-PEAP, and EAP-TLS.

  • Handles certificate distribution for secure connections on both ports.

Prerequisites for access ports with dual authentication

Prerequisites for access ports with dual authentication support include:

  • To support dual port for all dual port APs, configure multi-host host mode on the switch port.

  • All dual port APs needs to be configured with multi-host host mode even when single port is connected.

  • Enable dot1x on the switch port whenever dot1x credentials are configured on the controller. Ensure that dot1x credentials are configured on the controller and also on the switch port.

  • Clear the user credentials to propagate the correct configuration on the AP,when dot1x is disabled.

  • Modify the configuration on the controller, and then on the switch port, to avoid configuration mismatch on the AP when dot1x is enabled or disabled. Use the AP dot1x command for recovery.

802.1X authentication limitations

The 802.1X authentication limitations are:

  • An AP loses its 802.1X credentials and configuration when migrating from a Cisco AireOS controller to a Cisco Catalyst 9800 controller. To rest ore them, the AP must join the new Catalyst 9800 controller. The controller pushes the necessary credentials and configuration for authentication on the switchport. You can either temporarily disable 802.1X authentication on the switchport to allow the AP to connect and receive its configuration, or use MAC Authentication Bypass (MAB) to provide network access to the AP for staging. After staging, you need to reload the AP or restart 802.1X authentication on the switch to complete the setup.

  • 802.1X is not supported on dynamic ports or Ethernet Channel ports.

  • 802.1X is not supported in a mesh AP scenario.

  • There is no recovery from the controller on credential mismatch or the expiry/invalidity of the certificate on AP. The 802.1X authentication has to be disabled on the switch port to connect the AP back to fix the configurations.

  • There are no certificate revocation checks implemented on the certificates installed in AP.

  • You can provision only one Locally Significant Certificate (LSC) for the AP. Use the same certificate for both CAPWAP DTLS session establishment and 802.1X authentication with the switch. If you disable the global LSC configuration on the controller, the AP deletes the already provisioned LSC.

  • If the AP has clear configurations applied, it will lose the 802.1X EAP Type configuration and the LSC Certificates. The AP should undergo the staging process again if 802.1X is required.

  • 802.1X for trunk port APs on multi-host authentication mode is supported. Network Edge Authentication Topology (NEAT) is not supported on COS APs.

  • The DHCP requests are sent in incremental periodic value of: "2, 3, 4, 6, 8, 11, 15, 20, 27, 30, 30, 30, 30, 30...". The Cisco Catalyst 9100 Access Points perform an interface reset after a 100-second timeout, which in turn resets the timers on the associated switch port to which they are connected.

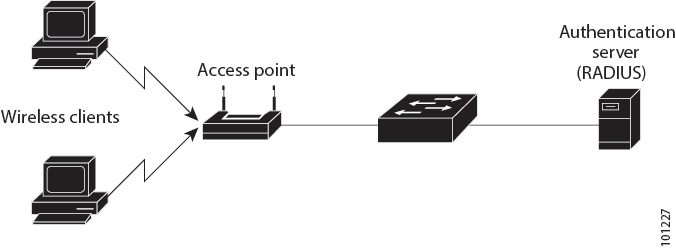
Topology

This topic explains how an AP acts as an 802.1X supplicant and how a switch uses a RADIUS server that supports EAP-FAST, EAP-TLS, and EAP-PEAP to authenticate it.

Summary

When dot1x authentication is enabled on a switch port, the connected device must authenticate itself to send and receive data other than 802.1X traffic.

  • For EAP-FAST authentication, configure the RADIUS server's credentials at the controller and pass them to the AP through a configuration update request.

  • For EAP-TLS or EAP-PEAP, the APs use certificates provided by the local CA server.

Workflow

Figure 1. Topology for 802.1X authentication

Configuring 802.1X authentication type and LSC AP authentication type (GUI)

Complete this task to configure 802.1X authentication type and LSC AP authentication type.

Procedure


Step 1

Choose Configuration > Tags & Profiles > AP Join.

Step 2

On the AP Join Profile page, click Add.

The Add AP Join Profile page is displayed.

Step 3

In the AP > General tab, navigate to AP EAP Auth Configuration.

Step 4

From the EAP Type drop-down list, choose the EAP type as EAP-FAST, EAP-TLS, or EAP-PEAP to configure the dot1x authentication type.

Step 5

From the AP Authorization Type drop-down list, choose either CAPWAP DTLS + or CAPWAP DTLS.

Step 6

Click Save & Apply to Device.


The 802.1X authentication type and LSC AP authentication type are configured.

Configure 802.1X authentication type and LSC AP authentication type (CLI)

Complete this task to configure 802.1X authentication type and LSC AP authentication type.

Procedure


Step 1

Enter the global configuration mode.

Example:

Device# configure terminal

Step 2

Specify a profile name.

Example:

Device(config)# ap profile ap-profile-name

Step 3

Configure the dot1x authentication type.

Example:

Device(config-ap-profile)# dot1x {max-sessions | username | eap-type | lsc-ap-auth-state}

Here

  • max-sessions: Configures the maximum 802.1X sessions initiated per AP.

  • username: Configures the 802.1X username for all APs.

  • eap-type:: Configures the dot1x authentication type with the switch port.

  • lsc-ap-auth-state: Configures the LSC authentication state on the AP.

Step 4

Configure the dot1x authentication type as EAP-FAST, EAP-TLS, or EAP-PEAP.

Example:

Device(config-ap-profile)# dot1x eap-type {EAP-FAST | EAP-TLS | EAP-PEAP} 

Step 5

Configure the LSC authentication state on the AP.

Example:

Device(config-ap-profile)# dot1x lsc-ap-auth-state {CAPWAP-DTLS | Dot1x-port-auth | Both}

Here

  • CAPWAP-DTLS: Uses LSC only for CAPWAP DTLS.

  • Dot1x-port-auth: Uses LSC only for dot1x authentication with port.

  • Both: Uses LSC for both CAPWAP-DTLS and Dot1x authentication with port.

Step 6

Exit the AP profile configuration mode and enter the privileged EXEC mode.

Example:

Device(config-ap-profile)# end

The 802.1X authentication type and LSC AP authentication type have been configured.

Device# configure terminal
Device(config)# ap profile ap-profile-name
Device(config-ap-profile)# dot1x eap-type
Device(config-ap-profile)# dot1x eap-type EAP-TLS
Device(config-ap-profile)# dot1x lsc-ap-auth-state Dot1x-port-auth 
Device(config-ap-profile)# end 

Configure the 802.1X username and password (CLI)

Complete these steps to configure the 802.1X username and password.

Procedure


Step 1

Choose Configuration > Tags & Profiles > AP Join.

Step 2

On the AP Join page, click the name of the AP Join profile or click Add to create a new one.

Step 3

Click the Management tab and then click Credentials.

Step 4

Enter the local username, password details, and choose the appropriate local password type.

Step 5

Enter 802.1X username and password details.

Step 6

Choose the appropriate 802.1X password type.

Step 7

Enter the time in seconds after which the session should expire.

Step 8

Enable local credentials or 802.1X credentials, or both, as required.

Step 9

Click Update & Apply to Device.


The configuration of the 802.1X username and password is complete.

Configure the 802.1X username and password (CLI)

Complete these steps to configure the 802.1X username and password.

Procedure


Step 1

Enter the global configuration mode.

Example:

Device# configure terminal

Step 2

Specify a profile name for the AP.

Example:

Device(config)# ap profile ap-profile-name

Step 3

Configure the dot1x authentication type.

Example:

Device(config-ap-profile)# dot1x {max-sessions | username | eap-type | lsc-ap-auth-state}

Here

  • max-sessions: Configures the maximum 802.1X sessions initiated per AP.

  • username: Configures the 802.1X username for all APs

  • eap-type:: Configures the dot1x authentication type with the switch port.

  • lsc-ap-auth-state: Configures the LSC authentication state on the AP.

Step 4

Configure the dot1x password for all the APs.

Example:

Device(config-ap-profile)# dot1x username username password {0 | 8} password 

Here

  • 0: Specifies an unencrypted password will follow.

  • 8: Specifies an AES encrypted password will follow.


The configuration of the 802.1X username and password is complete.

Device# configure terminal
Device(config)# ap profile ap-profile-name
Device(config-ap-profile)# dot1x eap-type
Device(config-ap-profile)# dot1x username username password 0 password

Enable 802.1X on the switch port (CLI)

Complete these steps to enable 802.1X on the switch port.

Procedure


Step 1

Enter the global configuration mode.

Example:

Device# configure terminal

Step 2

Enable AAA.

Example:

Device(config)# aaa new-model

Step 3

Create authentication methods to determine user privilege for accessing the privileged command level, enabling the device to communicate with the AAA server.

Example:

Device(config)# aaa authentication dot1x {default | listname} method1[method2...]

Step 4

Enable AAA authorization for network services on 802.1X.

Example:

Device(config)# aaa authorization network group

Step 5

Enable 802.1X port-based authentication, globally.

Example:

Device(config)# dot1x system-auth-control

Step 6

Enter the interface configuration mode and specify the interface to be enabled for 802.1X authentication.

Example:

Device(config)# interface type slot/port

Step 7

Enable 802.1X port-based authentication on the interface.

Example:

Device(config-if)# authentication port-control {auto | force-authorized | force-unauthorized}

Here are the options:

  • auto: Enables IEEE 802.1X authentication and causes the port to begin in the unauthorized state, allowing only EAPOL frames to be sent and received through the port. The authentication process begins when the link state of the port changes from down to up or when an EAPOL-start frame is received. The Device requests the identity of the supplicant and begins relaying authentication messages between the supplicant and the authentication server. Each supplicant attempting to access the network is uniquely identified by the Device by using the supplicant MAC address.

  • force-authorized: Disables IEEE 802.1X authentication and causes the port to change to the authorized state without any authentication exchange required. The port sends and receives normal traffic without IEEE 802.1X-based authentication of the client. This is the default setting.

  • force-unauthorized: Causes the port to remain in the unauthorized state, ignoring all attempts by the supplicant to authenticate. The Device cannot provide authentication services to the supplicant through the port.

Step 8

Enable 802.1X authentication on the port with default parameters.

Example:

Device(config-if)# dot1x pae [supplicant | authenticator | both]

Step 9

Enter the privileged EXEC mode.

Example:

Device(config-if)# end

802.1X is enabled on the switch port.

Device# configure terminal
Device(config)# aaa new-model
Device(config)# aaa authentication dot1x default group radius
Device(config)# aaa authorization network group
Device(config)# dot1x system-auth-control
Device(config)# interface fastethernet2/1
Device(config-if)# authentication port-control auto
Device(config-if)# dot1x pae authenticator
Device(config-if)# end

Verify 802.1X on the switch port

To display the authentication state of 802.1X on the switch port, use the following command:
Device# show dot1x all
Sysauthcontrol             Enabled
Dot1x Protocol Version     2
Dot1x Info for FastEthernet1
-----------------------------------
PAE                       = AUTHENTICATOR
PortControl               = AUTO
ControlDirection          = Both 
HostMode                  = MULTI_HOST
ReAuthentication          = Disabled
QuietPeriod               = 60
ServerTimeout             = 30
SuppTimeout               = 30
ReAuthPeriod              = 3600 (Locally configured)
ReAuthMax                 = 2
MaxReq                    = 2
TxPeriod                  = 30
RateLimitPeriod           = 0

Verify the authentication type

To display the authentication state of an AP profile, use the following command:
Device#show ap profile default-ap-profile detailed
        AP Profile Name        : default-ap-profile
        Description            : default ap profile
        …
        Dot1x EAP Method       : [EAP-FAST/EAP-TLS/EAP-PEAP/Not-Configured]
        LSC AP AUTH STATE      : [CAPWAP DTLS / DOT1x port auth / CAPWAP DTLS + DOT1x port auth
      

Verify access ports dual port authentication

Verify access ports dual port authentication

To verify access ports dual port authentication, use the following commands:

Device# show ap profile name default-ap-profile detailed
AP Profile Name               : default-ap-profile
Description                   : default ap profile
Country code                  : Not configured
Stats Timer                   : 180
Link Latency                  : DISABLED
Data Encryption               : DISABLED
LED State                     : ENABLED
NTP server                    : 0.0.0.0
NTP Authentication            : DISABLED
Jumbo MTU                     : DISABLED
24ghz Report Interval         : 90
5ghz Report Interval          : 90
bssid stats status            : DISABLED
bssid stats frqncy interval   : 30
bssid neighbor stats status   : DISABLED
bssid neighbor stats interval : 180
CAPWAP Control Aggregation    : DISABLED
NSI Ports State               : DISABLED
POE :
  PreStandard 802.3af Switch  : DISABLED
  Power Injector State        : DISABLED
  Power Injector Selection    : Unknown
  Injector Switch Mac         : Not Configured
Device Management :
  Telnet                      : DISABLED
  SSH                         : ENABLED
  Serial Console              : ENABLED
User Management :
  Username                    : lab
TCP MSS :
  Adjust MSS                  : ENABLED
  TCP Adjust MSS              : 1250
CAPWAP Timer :
  Heartbeat Timeout           : 30
  Discovery Timeout           : 10
  Fast Heartbeat Timeout      : 0
  Primary Discovery Timeout   : 120
  Primed Join Timeout         : 0
Retransmit Timer :
  Count                       : 5
  Interval                    : 3
Login Credentials :
  Local Username              : 
  Dot1x Username              : cisco
Ap eap auth info :
  Dot1x EAP Method            : EAP-FAST
  LSC AP AUTH STATE           : CAPWAP DTLS
Syslog :
  Facility Value              : FACILITY_KERN
  Host                        : 255.255.255.255
  Log Level                   : SYSLOG_LEVEL_INFORMATION
  Secured                     : DISABLED
Proxy :
  Hostname                    : Not Configured
  Proxy Port                  : Not Configured
  NO_PROXY list               : Not Configured
  Username                    : Not Configured
Backup Controllers :
  Fallback                    : ENABLED
  Primary Backup Name         : Not Configured
  Primary Backup IP           :
  Secondary Backup Name       : Not Configured
  Secondary Backup IP         :
Hyperlocation :
  Admin State                 : DISABLED
  PAK RSSI Threshold Detection: -100
  PAK RSSI Threshold Trigger  : 10
  PAK RSSI Threshold Reset    : 8
Halo BLE Beacon :
  Interval                    : 
  TX Power                    : 
  Enabled                     : Unknown
  Apply Global                : Unknown
Group NAS Id                  : Not Configured
CDP                           : ENABLED
TFTP Downgrade :
  IP Address                  : 0.0.0.0
  Filename                    : Not Configured
Time Limit                    : 0
Capwap window size            : 1
AP packet capture profile     : Not Configured
AP trace profile              : Not Configured
Mesh profile name             : default-mesh-profile
Urwb profile name             : Not Configured
Power profile name            : Not Configured
Calendar Profile
Method-list  name             : Not Configured
Packet Sequence Jump DELBA    : ENABLED
Lag status                    : DISABLED
Extended Module               : DISABLED
USB Module                    : ENABLED
Persistent SSID Broadcast     : DISABLED
DHCP server                   : DISABLED
Preferred Mode                : DISABLED
CAPWAP UDP-Lite               : DISABLED
AWIPS                         : DISABLED
AWIPS Forensic                : DISABLED
Fallback to DHCP              : ENABLED
DTLS server preference        : ENABLED
Maximum client limit          : 0
Location Configuration :
  FTM                         : ENABLED
  FTM initiator burst size    : 16
  FTM initiator burst duration: 32ms
  UWB                         : ENABLED
  UWB initiator burst size    : 32
  UWB initiator burst duration: 10
Kernel core dump : 
  Kernel core dump limit        : 5
  Kernel core dump type         : Disabled
  Kernel core dump dir-limit    : 15
Client RSSI Statistics
  Reporting                   : ENABLED
  Reporting Interval          : 30 seconds
Traffic Distribution Stats    : ENABLED
Traffic Distribution Stats Interval(sec): 300
OEAP Mode Config
  Link Encryption              : ENABLED
  Rogue Detection              : DISABLED
  Local Access                 : ENABLED
  Provisioning SSID            : ENABLED
AP broken antenna detection :
  Status                      : DISABLED
RLAN Configurations : 
  Fast Switching               : DISABLED
Onboarding configuration      : Unicast
Pressure sensor :
.
.
.
Device# show ap name cisco-ap-name config general
Cisco AP Name   : APXXXD.BXXC.1XXX
=================================================

Cisco AP Identifier                             : 687d.b45f.2ae0
Country Code                                    : Multiple Countries : US,VN
Regulatory Domain Allowed by Country            : 802.11bg:-AE^   802.11a:-ABES^   802.11 6GHz:-B
Radio Authority IDs                             : FCC:LDKMU6CR2417
AP Country Code                                 : US  - United States
AP Regulatory Domain
  802.11bg                                      : -A
  802.11a                                       : -B
  802.11 6GHz                                   : -B
License Type                                    : AIR
License State                                   : --
Non Compliance Reason                           : --
MAC Address                                     : 687d.b45c.1900
IP Address Configuration                        : DHCP
IP Address                                      : 198.51.100.1
IP Netmask                                      : 255.255.0.0
Gateway IP Address                              : 203.0.113.1
CAPWAP Path MTU                                 : 1485
Capwap Active Window Size                       : 1
Telnet State                                    : Disabled
CPU Type                                        :  ARMv8 Processor rev 4 (v8l)
Memory Type                                     : DDR4
Memory Size                                     : 1775616 KB
SSH State                                       : Enabled
Serial Console State                            : Enabled
Cisco AP Location                               : default location
AP Floor ID                                     : 0
AP Location Mode                                : Unknown
Site Tag Name                                   : ST-Flex
RF Tag Name                                     : default-rf-tag
Policy Tag Name                                 : PT-Flex-Local
AP join Profile                                 : default-ap-profile
Flex Profile                                    : default-flex-profile
Primary Cisco Controller Name                   : Not Configured
Primary Cisco Controller IP Address             : 0.0.0.0
Secondary Cisco Controller Name                 : Not Configured
Secondary Cisco Controller IP Address           : 0.0.0.0
Tertiary Cisco Controller Name                  : Not Configured
Tertiary Cisco Controller IP Address            : 0.0.0.0
Administrative State                            : Enabled
Operation State                                 : Registered
NAT External IP Address                         : 198.51.100.1
AP Certificate type                             : Manufacturer Installed Certificate
AP Certificate Expiry-time                      : 08/09/2099 20:58:26
AP Certificate issuer common-name               : High Assurance SUDI CA
AP Certificate Policy                           : Default
AP CAPWAP-DTLS LSC Status
    Certificate status                          : Not Available
AP 802.1x LSC Status
    Certificate status                          : Not Available
AP LSC authentication state                     : CAPWAP-DTLS
AP Mode                                         : FlexConnect
AP VLAN tagging state                           : Disabled
AP VLAN tag                                     : 0
CAPWAP Preferred mode                           : IPv4
CAPWAP UDP-Lite                                 : Not Configured
AP Submode                                      : Not Configured
Office Extend Mode                              : Disabled
Link-Encryption                                 : Disabled
Dhcp Server                                     : Disabled
Remote AP Debug                                 : Disabled
Logging Trap Severity Level                     : information
Logging Syslog facility                         : kern
Software Version                                : 17.18.0.33
Boot Version                                    : 1.1.2.4
Mini IOS Version                                : 0.0.0.0
Stats Reporting Period                          : 180
LED State                                       : Enabled
MDNS Group Id                                   : 0
MDNS Rule Name                                  : 
MDNS Group Method                               : None
PoE Pre-Standard Switch                         : Disabled
PoE Power Injector MAC Address                  : Disabled
Power Type/Mode                                 : PoE/Full Power
Number of Slots                                 : 4
AP Model                                        : C9136I-B
IOS Version                                     : 17.18.0.33
Reset Button                                    : Disabled
AP Serial Number                                : FOC25322JK8
Management Frame Validation                     : Capable
Management Frame Protection                     : Not capable
AP User Name                                    : lab
AP 802.1X User Mode                             : Global
AP 802.1X User Name                             : cisco
Cisco AP System Logging Host                    : 255.255.255.255
Cisco AP Secured Logging TLS mode               : Disabled
AP Up Time                                      : 4 days 21 hours 17 minutes 34 seconds 
AP CAPWAP Up Time                               : 4 days 21 hours 14 minutes 42 seconds 
Join Date and Time                              : 04/10/2025 20:13:36
Join Taken Time                                 : 2 minutes 51 seconds 
Join Priority                                   : 1
AP Link Latency                                 : Disable
AP Lag Configuration Status                     : Disabled
Lag Support for AP                              : Yes
Rogue Detection                                 : Enabled
Rogue Containment auto-rate                     : Disabled
Rogue PMF Denial                           : Disabled
Rogue Containment of standalone flexconnect APs : Disabled
Rogue Detection Report Interval                 : 10
Rogue AP minimum RSSI                           : -90
Rogue AP minimum transient time                 : 0
AP TCP MSS Adjust                               : Enabled
AP TCP MSS Size                                 : 1250
AP IPv6 TCP MSS Adjust                          : Enabled
AP IPv6 TCP MSS Size                            : 1250
Hyperlocation Admin Status                      : Disabled
Retransmit count                                : 5
Retransmit interval                             : 3
Kernel core dump :                               
  Configured limit                            : 5
  Kernel core dumps collected on AP           : 0
  Kernel core dump type                       : Disabled
  Kernel core dump directory limit            : 15
AP dual port authentication :                    
  Port                                        : 0
  Status                                      : Authorized
  EAP status code                             : Success
AP dual port authentication :                    
  Port                                        : 1
  Status                                      : Authorized
  EAP status code                             : Success
MLO Capability                                  : Not Capable
Fabric status                                   : Disabled
FIPS status                                     : Disabled
WLANCC status                                   : Disabled
USB Module Type                                 : USB Module
USB Module State                                : Enabled
USB Module Connected                            : No
USB Operational State Reason                    : Not Detected
USB Override                                    : Disabled
GAS rate limit Admin status                     : Disabled
WPA3 Capability                                 : Enabled
EWC-AP Capability                               : Disabled
AWIPS Capability                                : Enabled
AID Management Capability                       : Enabled
Proxy Hostname                                  : Not Configured
Proxy Port                                      : Not Configured
Proxy NO_PROXY list                             : Not Configured
Proxy Username                                  : Not Configured
GRPC server status                              : Disabled
Unencrypted Data Keep Alive                     : Enabled
Local DHCP Server                               : Disabled
Traffic Distribution Statistics Capability      : Enabled
Dual DFS Statistics                             : Disabled
AP Upgrade Out-Of-Band Capability               : Enabled 
AP statistics                                   : Disabled
AP power derate Capability                      : Enabled
AP PMK Propagation Capability                   : Enabled 
AP FTM Responder Capability                     : Enabled 
AP FTM Initiator Capability                     : Enabled 
AP UWB Responder Capability                     : Disabled 
AP UWB Initiator Capability                     : Disabled 
AP Client FTM capability                        : Enabled 
URWB Capability                                 : Capable
6GHz Standard-Power mode                        : Not Allowed
Mesh DCA Run Status                             : N/A
Last Mesh DCA Run                               : 
Meraki Capable AP                               : No
Radio Reset Reason Statistics
Slot 0
  Unknown Reason                                                         : 1         
  AP software interface coming up                                        : 1         
  State change of HE param to UP                                         : 1         
  State change of HE param to DOWN                                       : 1         
Slot 1
  Unknown Reason                                                         : 1         
  AP software interface coming up                                        : 1         
  State change of DFS channel to UP                                      : 1         
  State change of DFS channel to DOWN                                    : 1         
  State change of HE param to UP                                         : 2         
  State change of HE param to DOWN                                       : 2         
  Hardware mode change                                                   : 3         
Slot 2
  Unknown Reason                                                         : 1         
Slot 3    
  Unknown Reason                                                         : 1         
  AP software interface coming up                                        : 1         
  State change of DFS channel to UP                                      : 1         
  State change of DFS channel to DOWN                                    : 1         
  State change of HE param to UP                                         : 1         
  State change of HE param to DOWN                                       : 1         

Radio Failure Reason Statistics
Slot 0
Slot 1
Slot 2
Slot 3
AP image integrity
  Time                                          : 04/10/2025 20:09:46
  Alterative image loaded                       : No
  Backup image status
    Version                                     : 17.18.0.33
    Partition                                   : part2
    Kernel                                      : Good
    Root FS                                     : Good
    IOX                                         : Good
  Primary image status
    Version                                     : 17.18.0.33
    Partition                                   : part1
    Kernel                                      : Good
    Root FS                                     : Good
    IOX                                         : Good

Feature History for Access Point Client ACL Counter

This table provides release and related information about the feature explained in this section.

This feature is also available in all the releases subsequent to the one in which they are introduced in, unless noted otherwise.

Table 2. Feature History for Access Point Client ACL Counter

Release

Feature

Feature Information

Cisco IOS XE Dublin 17.13.1

Access Point Client ACL Counter

The AP Client ACL Counter feature provides a statistical count for client ACL rules. This feature allows you to count the number of packets that hit a specific rule in the client ACL.

Information About Access Point Client ACL Counter

From the Cisco IOS XE Dublin 17.13.1 release, the AP Client ACL Counter feature provides a statistical count for client ACL rules. Until the Cisco IOS XE Dublin 17.12.1 release, there was no per-rule counter to determine which rule was passing or dropping the packets.

Use this feature to enable the counter in the AP to count the number of packets that hit a specific rule in the client ACL, using the following AP commands:

  • [no] debug flexconnect access-list counter [all | vlan-acl | client-acl]

  • [no] debug flexconnect access-list event [all | vlan-acl | client-acl]

  • To clear ACL counters use the following command:

    • clear counters access-list client <MAC> all

AP Client ACL Counter is supported in the FlexConnect mode and local switching central authentication sub-mode.

Feature history for AP MAC authorization

This table provides release and related information for the feature explained in this module.

This feature is also available in all the releases subsequent to the one in which they are introduced in, unless noted otherwise.

Table 3. Feature history for access point upgrade management enhancements

Release

Feature Information

Cisco IOS XE 17.18.1

AP MAC authorization enables APs to gain support for MAC address authorization using various delimiter formats. The feature improves the controller's support for this security feature.

To enable this functionality for wireless AP join cases, the mac-delimiter and subscriber mac-filtering security-mode configurations under the AAA group server RADIUS are utilized.

AP MAC authorization

AP MAC authorization is a security feature that:

  • ensures only authorized APs can associate with the controller,

  • requires registration of the AP's Ethernet MAC address, and

  • it is configured locally on the controller or on an external RADIUS server.

With the Cisco IOS-XE 17.18 release, APs support MAC address authorization using different delimiter formats to enhance the controller’s support, which previously did not accept any delimiter.

IOS AAA config mac-delimiter and subscriber mac-filtering security-mode <> under AAA group server RADIUS is enabled for this feature for wireless AP join cases.


Note


To authenticate an AP using its MAC address:

  • Set the mac-filter flag to yes. This setting configures AAA to send the username with the specified delimiter and sets the MAC filter flag.

  • Configure AAA server groups that include the IP addresses of the selected server hosts. This configuration allows you to group existing server hosts, select a subset of the configured server hosts, and use them for a particular service.

  • By arranging server groups and configuring them using the global server-host list, you can manage services with a more structured and secure approach.


Create a AAA RADIUS server (GUI)

Configure a AAA RADIUS server using the GUI.

Procedure


Step 1

Choose Configuration > Security > AAA > Server Groups > RADIUS.

Step 2

Click the Add button.

The Create AAA Radius Server Group dialog box is displayed.

Step 3

Enter a name for the RADIUS server in the Name field.

Step 4

Enter the IPv4/IPv6 server address in the Server Address.

Step 5

(Optional) Choose Clear Text from the Key Type drop-down list.

Step 6

Add Key.

Note


If global encryption is enabled, then all keys or passwords are encrypted.

Step 7

Match the Key with the Confirm Key field.

Step 8

Click Apply to Device.


Configure a AAA RADIUS server (CLI)

Configure a AAA RADIUS server using the CLI.

Procedure


Step 1

Enter the global configuration mode.

Example:

Device# configure terminal

Step 2

Configure the RADIUS server name to enter the RADIUS server configuration mode.

Example:

Device(config)# radius server ISE

ISE is the user-defined string.

  1. Specify the RADIUS server parameters.

    Example:

    Device(config-radius-server)# address ipv4 209.165.201.1 auth-port 1812 acct-port 1813

    For auth-port port number, specify the UDP destination port for authentication requests. The range is from 0 to 65536 and the default is 1812.

    For acct-port port number, specify the UDP destination port for accounting requests. The default is 1813.

  2. Configure the RADIUS per-server encryption key.

    Example:

    Device(config-radius-server)#  key rad123

Step 3

Save the configuration, exit configuration mode, and return to privileged EXEC mode.

Example:

Device(config-sg-radius)# end

Create a AAA Group configuration (GUI)

Create a new AAA group using the GUI.

Procedure


Step 1

Choose Configuration > Security > AAA > Server Groups > RADIUS > Server Groups.

Step 2

Click the Add button.

The Create AAA Radius Server Group dialog box is displayed.

Step 3

Enter a name for the RADIUS server in the Name field.

Step 4

Add RADIUS as Group Type.

Step 5

Select a MAC-Delimiter from the drop-down list.

The available options are colon, hyphen, single-hyphen, and none.

Step 6

Select MAC-Filtering from the drop-down list.

The available options are mac, key, and none. The option none is supported only when both MAC-Delimiter and MAC-Filtering are set to the same value.

Step 7

Add the newly created AAA group from Available Servers to Assigned Servers.

Step 8

Click Apply to Device.


Configure a AAA Group configuration (CLI)

Configure a AAA group configuration using the CLI.

Procedure


Step 1

Enter the global configuration mode.

Example:

Device# configure terminal

Step 2

Configure the RADIUS server group name and server group configuration.

Example:

Device(config)# aaa group server radius MY-SERVER-GROUP

Step 3

Re-format the delimiter of the username attribute.

Example:

Device(config-sg-radius)# mac-delimiter {colon | hyphen | none | single-hyphen}

The options are:

  1. colon : Sets the delimiter to colon (for example, xx:xx:xx:xx:xx:xx).

  2. hyphen : Sets the delimiter to hyphen (for example, xxxxxxxxxxxx).

  3. none : Sets the delimiter to none (for example, xx-xx-xx-xx-xx-xx).

  4. single-hyphen : Sets the delimiter to single-hyphen (for example, xxxxxx-xxxxxx).

Note


The default delimiter is none . If nothing is configured, none is set to the username, that is, the MAC address goes without any delimiter to the respective RADIUS server.

Step 4

Set the MAC address as the password.

Example:

Device(config-sg-radius)#subscriber mac-filtering security-mode {mac | none | shared secret}

The options are:

  1. mac : The delimiter format of the MAC address in the RADIUS user password attribute is same as that of the MAC address string in the RADIUS username attribute.

  2. none : MAC address string without any delimiter is sent as RADIUS user password.

  3. shared-secret : The shared-secret option is not supported for the AP join use case.

Note


The default delimiter is none . If nothing is configured, the user password attribute is sent as the MAC address without delimiter. If mac is configured as the delimiter, then the delimiter format of the username attribute is applied to the MAC address string of the user password attribute.

Step 5

Associate the RADIUS server to the server group.

Example:

Device(config-sg-radius)# server name ISE

Step 6

Configure the authorization method list with the named RADIUS server group.

Example:

Device(config)# aaa authorization credential-download MY-METHOD-LIST group MY-SERVER-GROUP

Step 7

Save the configuration, exit configuration mode, and return to privileged EXEC mode.

Example:

Device(config-sg-radius)# end

Create a AAA Group Server configuration (GUI)

Create a AAA Group My Server configuration using the GUI.

Procedure


Step 1

Choose Configuration > Security > AAA > AAA Method List > Authorization.

Step 2

Click the Add button.

The Quick Setup: AAA Authorization dialog box is displayed.

Step 3

Enter a name in the Method List Name field.

Step 4

Select Type as Credential-Download from the drop-down list.

Step 5

Select Group Type as Group from the drop-down list.

Step 6

Add the newly created AAA group from Available Server Groups to Assigned Server Groups.

Step 7

Click Apply to Device.


Create a AAA Group Method List configuration (GUI)

Create a AAA group method Method List configuration using the GUI.

Procedure


Step 1

Choose Configuration > Security > AAA > AAA Advanced > AP Policy.

Step 2

Use the toggle button to enable Authorize APs against MAC and configure ap auth-list authorize-mac on your controller.

Step 3

Select AP-MAC-Method for Authorization Method List from the drop-down list to configure ap auth-list method-list MY-METHOD-LIST on your controller.

Step 4

Click Apply.


Configure AP MAC authorization (CLI)

Configure AP MAC authorization using the CLI.

Procedure


Step 1

Enter the global configuration mode.

Example:

Device# configure terminal

Step 2

Configure AP authorization list.

Example:

Device(config)# ap auth-list {authorize-mac | method-list method-list-name}

The options are:

  • authorize-mac : Sets AP authorization policy with MAC.

  • method-list : Sets AP authorization method-list.

Step 3

Enter the method-list to be used for AP MAC authorization.

Example:

Device(config)# ap auth-list method-list MY-METHOD-LIST mac

Step 4

Save the configuration and return to privileged EXEC mode.

Example:

Device(config-ap-auth-list)# exit

Verify MAC authorization details

Verify AP authentication list

To verify if the controller has enabled the AP authentication list, run the show ap auth-list command.

Device# show ap auth-list

Authorize APs against MAC : Disabled
Authorize APs against Serial Num : Enabled
Authorization Method List : <auth-list-name>

Verify AP status summary

To verify the status summary of all Cisco lightweight APs attached to the device, run the show ap summary command.

Device# show ap summary

Number of APs: 1

Global AP User Name: Cisco
Global AP Dot1x User Name: Not configured

AP Name                           AP Model  Ethernet MAC    Radio MAC       State         
----------------------------------------------------------------------------------------
3602a                             3502I     003a.99eb.3fa8  d0c2.8267.8b00  Registered