使交换机能够支持标准 Web 身份验证
请确保在交换机配置中包含以下命令,以为思科 ISE 启用标准 Web 身份验证功能,包括身份验证后的 URL 重定向调配:
ip classless


ip route 0.0.0.0 0.0.0.0 10.1.2.3


ip http server

! Must enable HTTP/HTTPS for URL-redirection on port 80/443

ip http secure-server 此产品的文档集力求使用非歧视性语言。在本文档集中,非歧视性语言是指不隐含针对年龄、残障、性别、种族身份、族群身份、性取向、社会经济地位和交叉性的歧视的语言。由于产品软件的用户界面中使用的硬编码语言、基于 RFP 文档使用的语言或引用的第三方产品使用的语言,文档中可能无法确保完全使用非歧视性语言。 深入了解思科如何使用包容性语言。
思科可能会在某些地方提供本内容的当地语言翻译版本。请注意,翻译版本仅供参考,如有任何不一致之处,以本内容的英文版本为准。
以下各节介绍交换机和无线控制器上支持思科 ISE 功能所需的配置。
请确保在交换机配置中包含以下命令,以为思科 ISE 启用标准 Web 身份验证功能,包括身份验证后的 URL 重定向调配:
ip classless
ip route 0.0.0.0 0.0.0.0 10.1.2.3
ip http server
! Must enable HTTP/HTTPS for URL-redirection on port 80/443
ip http secure-server 输入以下命令以使交换机像该网络的 RADIUS 一样与思科 ISE 节点通信:
username test-radius password 0 abcde123 输入以下命令,确保在交换机上指定的 NTP 服务器与思科 ISE 中的设置相同:
ntp server <IP_address>|<domain_name> 在交换机上输入以下命令可启用交换机与思科 ISE 之间的各种 AAA 功能,包括 802.1X 和 MAB 身份验证功能:
aaa new-model

! Creates an 802.1X port-based authentication method list

aaa authentication dot1x default group radius

! Required for VLAN/ACL assignment

aaa authorization network default group radius

! Authentication & authorization for webauth transactions

aaa authorization auth-proxy default group radius

! Enables accounting for 802.1X and MAB authentications

aaa accounting dot1x default start-stop group radius

!

aaa session-id common

!

aaa accounting update periodic 5


! Update AAA accounting information periodically every 5 minutes


aaa accounting system default start-stop group radius

!
输入以下命令,将交换机配置为与用作 RADIUS 源服务器的思科 ISE 进行互操作:
!
radius-server <ISE Name>

! ISE Name is the name of the ISE PSN

address ipv4 <ip address> auth-port 1812 acct-port 1813

! IP address is the address of the PSN. This example uses the standard RADIUS ports.

key <passwd>

! passwd is the secret password confiugured in Cisco ISE

exit
 注 |
我们建议将死亡标准时间配置为 30 秒,期间允许 3 次重试,为使用 Active Directory 进行身份验证的 RADIUS 请求提供更长的响应时间。 |
请通过输入以下命令,指定设置以确保交换机能够相应地处理 RADIUS CoA,支持思科 ISE 的安全状态功能:
aaa server radius dynamic-author

client <ISE-IP> server-key 0 abcde123
注 |
|
! Optional

ip dhcp snooping

! Required!

! Configure Device Tracking Policy!
device-tracking policy <DT_POLICY_NAME>
no protocol ndp
tracking enable

! Bind it to interface!
interface <interface_id>
device-tracking attach-policy<DT_POLICY_NAME>
在 RADIUS 记帐中,即便已启用 DHCP 监听,DHCP 属性也不会通过 IOS 传感器发送到思科 ISE。在这种情况下,则应启用 VLAN 的 DHCP 监听使 DHCP 成为活动状态。
使用以下命令启用 VLAN 的 DHCP 监听:
ip dhcp snooping ip dhcp snooping vlan 1-100 输入以下命令可为交换机端口全局开启 802.1X 身份验证:
dot1x system-auth-control
要支持局域网上的请求方身份验证请求,请输入以下命令,为临界身份验证(不可访问的身份验证绕行)启用 EAP:
dot1x critical eapol 当发生关键身份验证恢复事件时,通过输入以下命令,您可以配置交换机自动引入延迟(以毫秒为单位)以确保思科 ISE 能够在恢复后再次启动服务:
authentication critical recovery delay 1000 输入以下命令,根据网络中已知的实施状态,定义 VLAN 名称、编号和虚拟交换机接口 (SVI)。创建单独的 VLAN 接口,实现网络间路由。对于处理来自终端(如 PC、笔记本电脑)和终端通过其连接到网络的 IP 电话等在同一网段上传递的多个流量源,这特别有帮助。
vlan <VLAN_number>

name ACCESS!

vlan <VLAN_number>

name VOICE

!

interface <VLAN_number>

description ACCESS

ip address 10.1.2.3 255.255.255.0

ip helper-address <DHCP_Server_IP_address>

ip helper-address <Cisco_ISE_IP_address>

!

interface <VLAN_number>

description VOICE

ip address 10.2.3.4 255.255.255.0

ip helper-address <DHCP_Server_IP_address>
通过输入以下命令,在较低版本的交换机(使用低于 12.2(55)SE 版本的思科 IOS 软件的交换机)上启用这些功能,确保思科 ISE 能够执行进行身份验证和授权所需的动态 ACL 更新。
ip access-list extended ACL-ALLOW

 permit ip any any

!

ip access-list extended ACL-DEFAULT

  remark DHCP

  permit udp any eq bootpc any eq bootps

  remark DNS

  permit udp any any eq domain

  remark Ping

  permit icmp any any

  remark Ping

  permit icmp any any

  remark PXE / TFTP

  permit udp any any eq tftp

  remark Allow HTTP/S to ISE and WebAuth portal


permit tcp any host <Cisco_ISE_IP_address> eq www


permit tcp any host <Cisco_ISE_IP_address> eq 443


permit tcp any host <Cisco_ISE_IP_address> eq 8443


permit tcp any host <Cisco_ISE_IP_address> eq 8905


permit udp any host <Cisco_ISE_IP_address> eq 8905


permit udp any host <Cisco_ISE_IP_address> eq 8906


permit tcp any host <Cisco_ISE_IP_address> eq 8080


permit udp any host <Cisco_ISE_IP_address> eq 9996


remark Drop all the rest

  deny ip any any log


!

! The ACL to allow URL-redirection for WebAuth

ip access-list extended ACL-WEBAUTH-REDIRECT

 permit tcp any any eq www

 permit tcp any any eq 443
注 |
无线控制器上的这种配置可以提高 CPU 使用率,但是也会提高系统不稳定的风险。这是 IOS 问题,不会对思科 ISE 产生不利影响。 |
要为 802.1X 和 MAB 启用交换机端口,请执行以下操作:
| 步骤 1 |
使所有接入交换机端口进入接口配置模式: |
||||
| 步骤 2 |
启用交换机端口的接入模式(而不是中继模式): |
||||
| 步骤 3 |
静态配置接入 VLAN。这样,即可在本地调配接入 VLAN,这也是开放模式身份验证所要求的: |
||||
| 步骤 4 |
静态配置语音 VLAN: |
||||
| 步骤 5 |
启用开放模式身份验证。身份验证完成之前,开放模式允许将流量桥接至数据和语音 VLAN。我们强烈建议您在生产环境中使用基于端口的 ACL,以防止进行未经授权的访问。 |
||||
| 步骤 6 |
应用基于端口的 ACL,确定默认情况下应将哪些流量从未经授权的终端桥接至接入 VLAN。由于您应首先允许所有访问,然后再实施策略,因此您应当应用 ACL-ALLOW,以允许所有流量都流经交换机端口。您已创建默认的思科 ISE 授权,允许到目前为止的所有流量,这是因为我们希望实现完全可见性,并且不希望影响到现有最终用户的体验。
|
||||
| 步骤 7 |
启用多身份验证主机模式。多身份验证可以说是多域身份验证 (MDA) 的超集。MDA 只允许数据域中有一个终端。当配置多身份验证时,语音域中只允许有一个身份验证电话(和 MDA 一样),但在数据域中却可以对不限数量的数据设备进行身份验证。
|
||||
| 步骤 8 |
通过以下命令启用各种身份验证方式的选项: |
||||
| 步骤 9 |
在交换机端口上启用 802.1X 端口控制: |
||||
| 步骤 10 |
启用 MAC 身份验证绕行 (MAB): |
||||
| 步骤 11 |
在交换机端口上启用 802.1X: |
||||
| 步骤 12 |
将重传时间设置为 10 秒:
|
||||
| 步骤 13 |
启用 portfast 功能: |
以下示例显示一项控制策略,该策略可配置为允许使用 802.1X、MAB 和 Web 身份验证的顺序身份验证方法。
class-map type control subscriber match-all DOT1X
 match method dot1x
!
class-map type control subscriber match-all DOT1X_FAILED
 match method dot1x
 match result-type method dot1x authoritative
!
class-map type control subscriber match-all DOT1X_NO_RESP
 match method dot1x
 match result-type method dot1x agent-not-found
!
class-map type control subscriber match-all MAB
 match method mab
!
class-map type control subscriber match-all MAB_FAILED
 match method mab
 match result-type method mab authoritative
!
!


policy-map type control subscriber DOT1XMAB
 event session-started match-all
  10 class always do-until-failure
   10 authenticate using dot1x retries 2 retry-time 0 priority 10
 event authentication-failure match-first
  10 class DOT1X_NO_RESP do-until-failure
   10 terminate dot1x
   20 authenticate using mab priority 20
  20 class DOT1X_FAILED do-until-failure
   10 terminate dot1x
   20 authenticate using mab priority 20
   30 authorize
  40 class always do-until-failure
   10 terminate dot1x
   20 terminate mab
   30 authentication-restart 60
 event agent-found match-all
  10 class always do-until-failure
   10 terminate mab
   20 authenticate using dot1x retries 2 retry-time 0 priority 10
!
以下示例显示一项控制策略,该策略可配置为允许使用 MAB、802.1X 和 Web 身份验证的顺序身份验证方法。
policy-map type control subscriber MABDOT1X
 event session-started match-all
  10 class always do-until-failure
   10 authenticate using mab priority 20
   20 authenticate using dot1x priority 10
 event authentication-failure match-first
  10 class ALL_FAILED do-until-failure
   10 authentication-restart 60
 event authentication-success match-all
  10 class DOT1X do-until-failure
   10 terminate mab
 event agent-found match-all
  10 class always do-until-failure
   10 authenticate using dot1x priority 10
在接口上应用服务策略:
interface GigabitEthernet1/0/4
 switchport mode access
 device-tracking attach-policy pol1
 ip access-group sample in
 authentication timer reauthenticate server
 access-session port-control auto
 mab
 dot1x pae authenticator
 dot1x timeout tx-period 10
 dot1x timeout auth-period 10
 spanning-tree portfast
service-policy type control subscriber DOT1XMAB在交换机上设置标准日志记录功能,以支持对思科 ISE 功能进行可能的故障排除和记录:
epm logging 确保交换机能够通过网段中的适当 VLAN,从思科 ISE 接收 SNMP 陷阱传输:
snmp-server community public RO


snmp-server trap-source <VLAN_number> 使用以下命令来配置交换机,确保按预期执行 SNMP v3 轮询以支持思科 ISE 分析服务。在此之前,请在SNMP 设置 (SNMP Settings) 窗口的思科 ISE GUI 中配置 SNMP 设置。 要查看此处窗口,请单击菜单 图标 (![]() ),然后选择。
),然后选择。
Snmp-server user <name> <group> v3 auth md5 <string> priv des <string>


snmp-server group  <group> v3 priv


snmp-server group <group> v3 priv contextvlan-1
注 |
必须为每个情景配置 snmp-server group <group> v3 priv context vlan-1 命令。snmp show context 命令会列出所有上下文信息。 |
如果 SNMP 请求超时并且不存在连接问题,则可以提高超时值。
配置您的交换机以传送适当的 MAC 通知陷阱,这样思科 ISE 分析器功能就可以收集网络终端上的信息:
mac address-table notification change


mac address-table notification mac-move


snmp trap mac-notification change added


snmp trap mac-notification change removed 要在交换机上配置 RADIUS 空闲超时,请使用以下命令:
Switch(config-if)# authentication timer inactivity 其中 inactivity 是以秒为单位的非活动时间间隔,这个时间之后,客户端活动将被视为未授权。
在思科 ISE 中,可以为这类会话非活动计时器应用到的任何授权策略启用此选项。 在思科 ISE GUI 中,单击菜单 图标 (![]() ),然后选择 。
),然后选择 。
要支持基于 Apple iOS 的设备(iPhone 或 iPad)从一个 SSID 切换至同一无线接入点的另一个 SSID,请将无限控制器配置为启用 FAST SSID change 功能。此功能有助于确保基于 IOS 的设备能够在 SSID 之间快速切换。
必须启用快速 SSID 以支持双 SSID BYOD。启用快速 SSID 更改后,无线控制器允许客户端在 SSID 间更快速移动。启用快速 SSID 时,不会清除客户端条目,也不会强制执行延迟。有关在思科无线控制器上配置快速 SSID 的详细信息,请参阅《Cisco Wireless Controller 配置指南》。
WLC (config)# FAST SSID change 当您尝试在某些基于 Apple iOS 的设备中连接无线网络时,您可以会看到以下错误信息:
Could not scan for Wireless Networks.
您可以忽略该错误消息,因为这不会影响设备的身份验证。
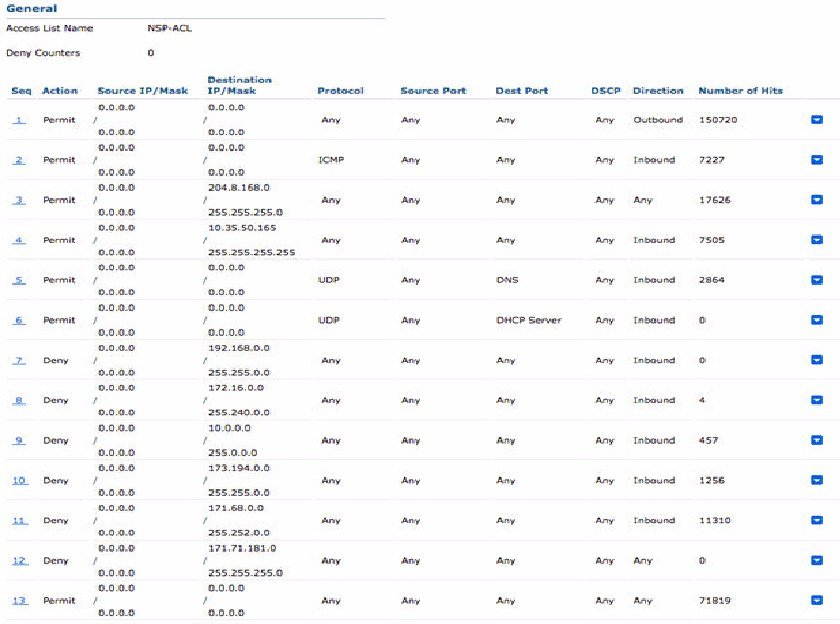
必须在无线控制器上配置 ACL 以用于授权策略,从而重定向未注册的设备和证书调配。ACL 必须采用以下顺序。
| 步骤 1 |
允许所有从服务器到客户端的出站流量。 |
| 步骤 2 |
(可选)允许从客户端到服务器的 ICMP 入站流量以进行故障排除。 |
| 步骤 3 |
允许未注册和不合规设备访问 MDM 服务器,以下载 MDM 代理和执行合规检查。 |
| 步骤 4 |
允许从客户端到服务器再到 ISE 的所有入站流量以执行 Web 门户和请求方以及证书调配流程。 |
| 步骤 5 |
允许从客户端到服务器的入站 DNS 流量以进行名称解析。 |
| 步骤 6 |
允许从客户端到服务器的入站 DHCP 流量以获取 IP 地址。 |
| 步骤 7 |
拒绝所有从客户端到服务器再到企业资源的入站流量,以重定向至思科 ISE(根据公司策略)。 |
| 步骤 8 |
(可选)允许其余流量。 |
以下示例显示的 ACL 用于将未注册的设备重定向至 BYOD 流程。在本例中,思科 ISE IP 地址为 10.35.50.165,内部企业网络 IP 地址为 192.168.0.0 和 172.16.0.0(重定向),MDM 服务器子网为 204.8.168.0。
 反馈
反馈