ファイアウォールのケーブル接続と登録

ファイアウォールをケーブル接続し、ファイアウォールを Management Center に登録します。

ファイアウォールのケーブル接続

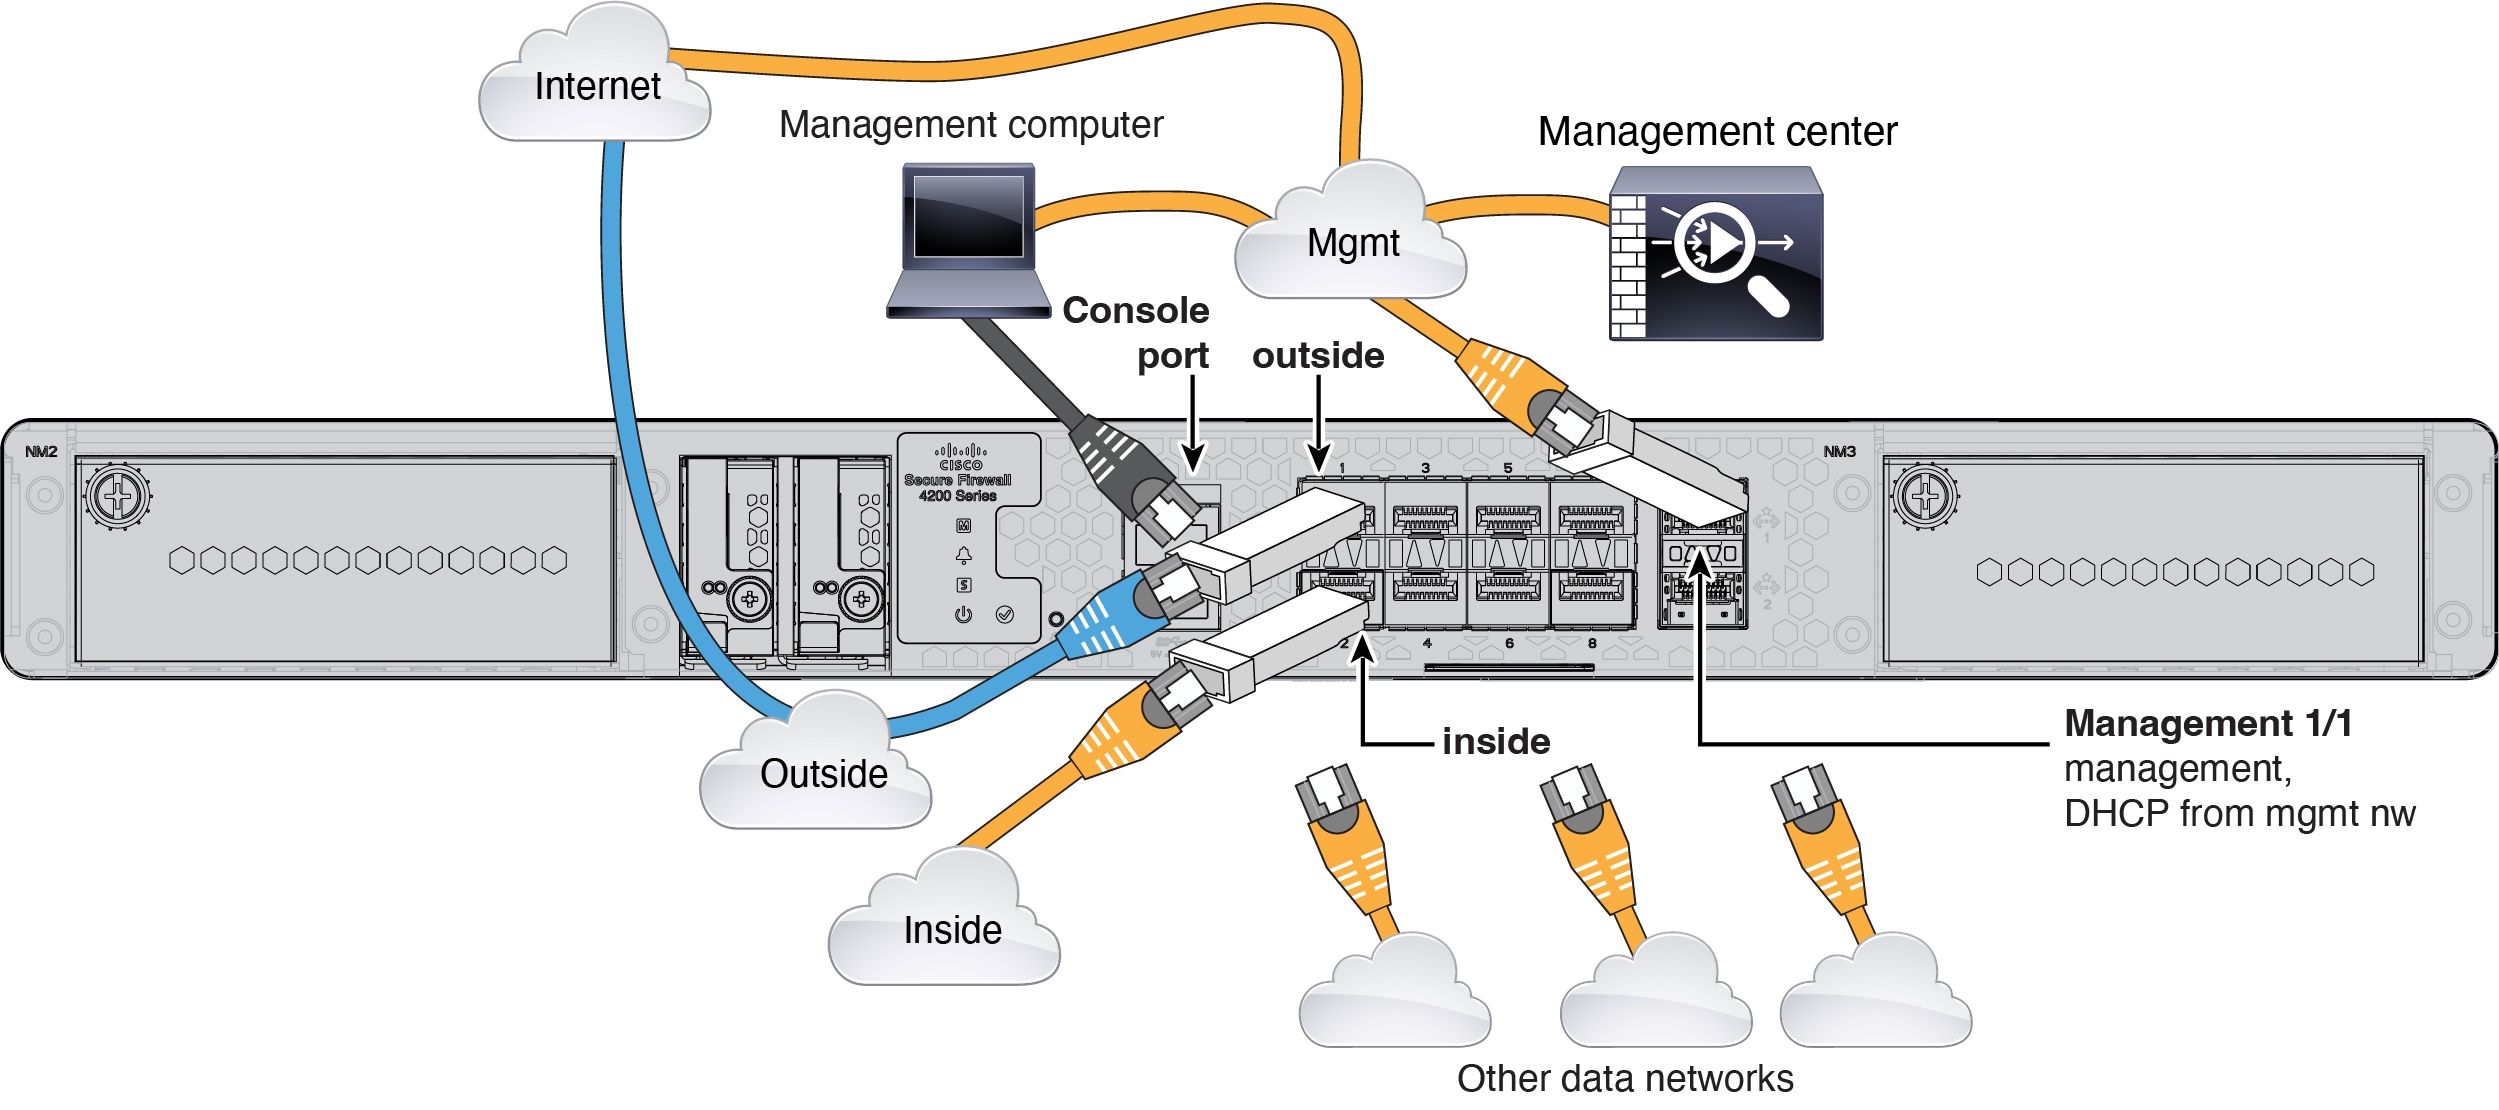
Management Center を専用の管理 1/1 インターフェイスに接続します。管理ネットワークには、更新のためのインターネットへのアクセスが必要です。たとえば、ファイアウォール自体を介して(たとえば、内部ネットワークに接続することによって)管理ネットワークをインターネットに接続できます。

  • コンソールケーブルを入手します。デフォルトではファイアウォールにコンソールケーブルが付属していないため、サードパーティの USB-to-RJ-45 シリアルケーブルなどを購入する必要があります。

  • データ インターフェイス ポートに SFP を取り付けます。組み込みポートは、SFP/SFP+/SFP28 モジュールを必要とする 1/10/25 Gb SFP28 ポートです。

  • 詳細については、ハードウェア設置ガイドを参照してください。

管理ネットワークのケーブル配線

初期設定:CLI

CLI セットアップスクリプトを使用して、専用の管理 IP アドレス、ゲートウェイ、およびその他の基本ネットワーク設定を行います。

手順


ステップ 1

コンソールポートに接続して Threat Defense CLI にアクセスします。Threat Defense CLI へのアクセスを参照してください。

ステップ 2

管理インターフェイスの設定用の CLI セットアップスクリプトを完了します。

(注)  


設定をクリア(たとえば、イメージを再作成することにより)しないかぎり、CLI セットアップスクリプトを繰り返すことはできません。ただし、これらの設定すべては、後から CLI で configure network コマンドを使用して変更できます。Cisco Secure Firewall Threat Defense コマンドリファレンスを参照してください。


You must accept the EULA to continue.
Press <ENTER> to display the EULA:                 
Cisco General Terms
[...]

Please enter 'YES' or press <ENTER> to AGREE to the EULA:

System initialization in progress.  Please stand by.
You must configure the network to continue.
Configure at least one of IPv4 or IPv6 unless managing via data interfaces.
Do you want to configure IPv4? (y/n) [y]:
Do you want to configure IPv6? (y/n) [y]: n

ガイダンス:これらのタイプのアドレスの少なくとも 1 つについて y を入力します。

Configure IPv4 via DHCP or manually? (dhcp/manual) [manual]:
Enter an IPv4 address for the management interface [192.168.45.61]: 10.89.5.17
Enter an IPv4 netmask for the management interface [255.255.255.0]: 255.255.255.192

Enter the IPv4 default gateway for the management interface [data-interfaces]: 10.10.10.1
Enter a fully qualified hostname for this system [firepower]: 1010-3
Enter a comma-separated list of DNS servers or 'none' [208.67.222.222,208.67.220.220,2620:119:35::35]:
Enter a comma-separated list of search domains or 'none' []: cisco.com
If your networking information has changed, you will need to reconnect.
Disabling IPv6 configuration: management0
Setting DNS servers: 208.67.222.222,208.67.220.220,2620:119:35::35
Setting DNS domains:cisco.com
Setting hostname as 1010-3
Setting static IPv4: 10.89.5.17 netmask: 255.255.255.192 gateway: data on management0
Updating routing tables, please wait...
All configurations applied to the system. Took 3 Seconds.
Saving a copy of running network configuration to local disk.
For HTTP Proxy configuration, run 'configure network http-proxy'
Configuring firewall mode ...


Device is in OffBox mode - disabling/removing port 443 from iptables.
Update policy deployment information
    - add device configuration
    - add network discovery
    - add system policy

You can register the sensor to a Firepower Management Center and use the
Firepower Management Center to manage it. Note that registering the sensor
to a Firepower Management Center disables on-sensor Firepower Services
management capabilities.

When registering the sensor to a Firepower Management Center, a unique
alphanumeric registration key is always required.  In most cases, to register
a sensor to a Firepower Management Center, you must provide the hostname or
the IP address along with the registration key.
'configure manager add [hostname | ip address ] [registration key ]'

However, if the sensor and the Firepower Management Center are separated by a
NAT device, you must enter a unique NAT ID, along with the unique registration
key.
'configure manager add DONTRESOLVE [registration key ] [ NAT ID ]'

Later, using the web interface on the Firepower Management Center, you must
use the same registration key and, if necessary, the same NAT ID when you add
this sensor to the Firepower Management Center.
>
ステップ 3

Management Center を指定します。

configure manager add {hostname | IPv4_address | IPv6_address | DONTRESOLVE} reg_key nat_id

  • {hostname | IPv4_address | IPv6_address | DONTRESOLVE}—Specifies either the FQDN or IP address of the Management Center.Management Center を直接アドレス指定できない場合は、DONTRESOLVE を使用します。この場合は、ファイアウォールが、到達可能な IP アドレスまたはホスト名を持っている必要があります。

  • reg_key:Threat Defense を登録するときに Management Center でも指定する任意のワンタイム登録キーを指定します。登録キーは 37 文字以下にする必要があります。有効な文字には、英数字(A~Z、a~z、0~9)、およびハイフン(-)などがあります。

  • nat_idManagement Center でも指定する、任意で一意の 1 回限りの文字列を指定します。NAT ID は 37 文字以下にする必要があります。有効な文字には、英数字(A~Z、a~z、0~9)、およびハイフン(-)などがあります。この ID は、Management Center に登録する他のデバイスには使用できません。

例:


> configure manager add fmc-1.example.com regk3y78 natid56
Manager successfully configured.

Management Center へのファイアウォールの登録

ファイアウォールを Management Center に登録します。

手順


ステップ 1

Management Center にログインします。

  1. 次の URL を入力します。

    https://fmc_ip_address

  2. ユーザー名とパスワードを入力します。

  3. [ログイン(Log In)] をクリックします。

ステップ 2

[デバイス(Devices)] > [デバイス管理(Device Management)] の順に選択します。

ステップ 3

[追加(Add)] ドロップダウン リストから、[デバイスの追加(Add Device)] を選択します。

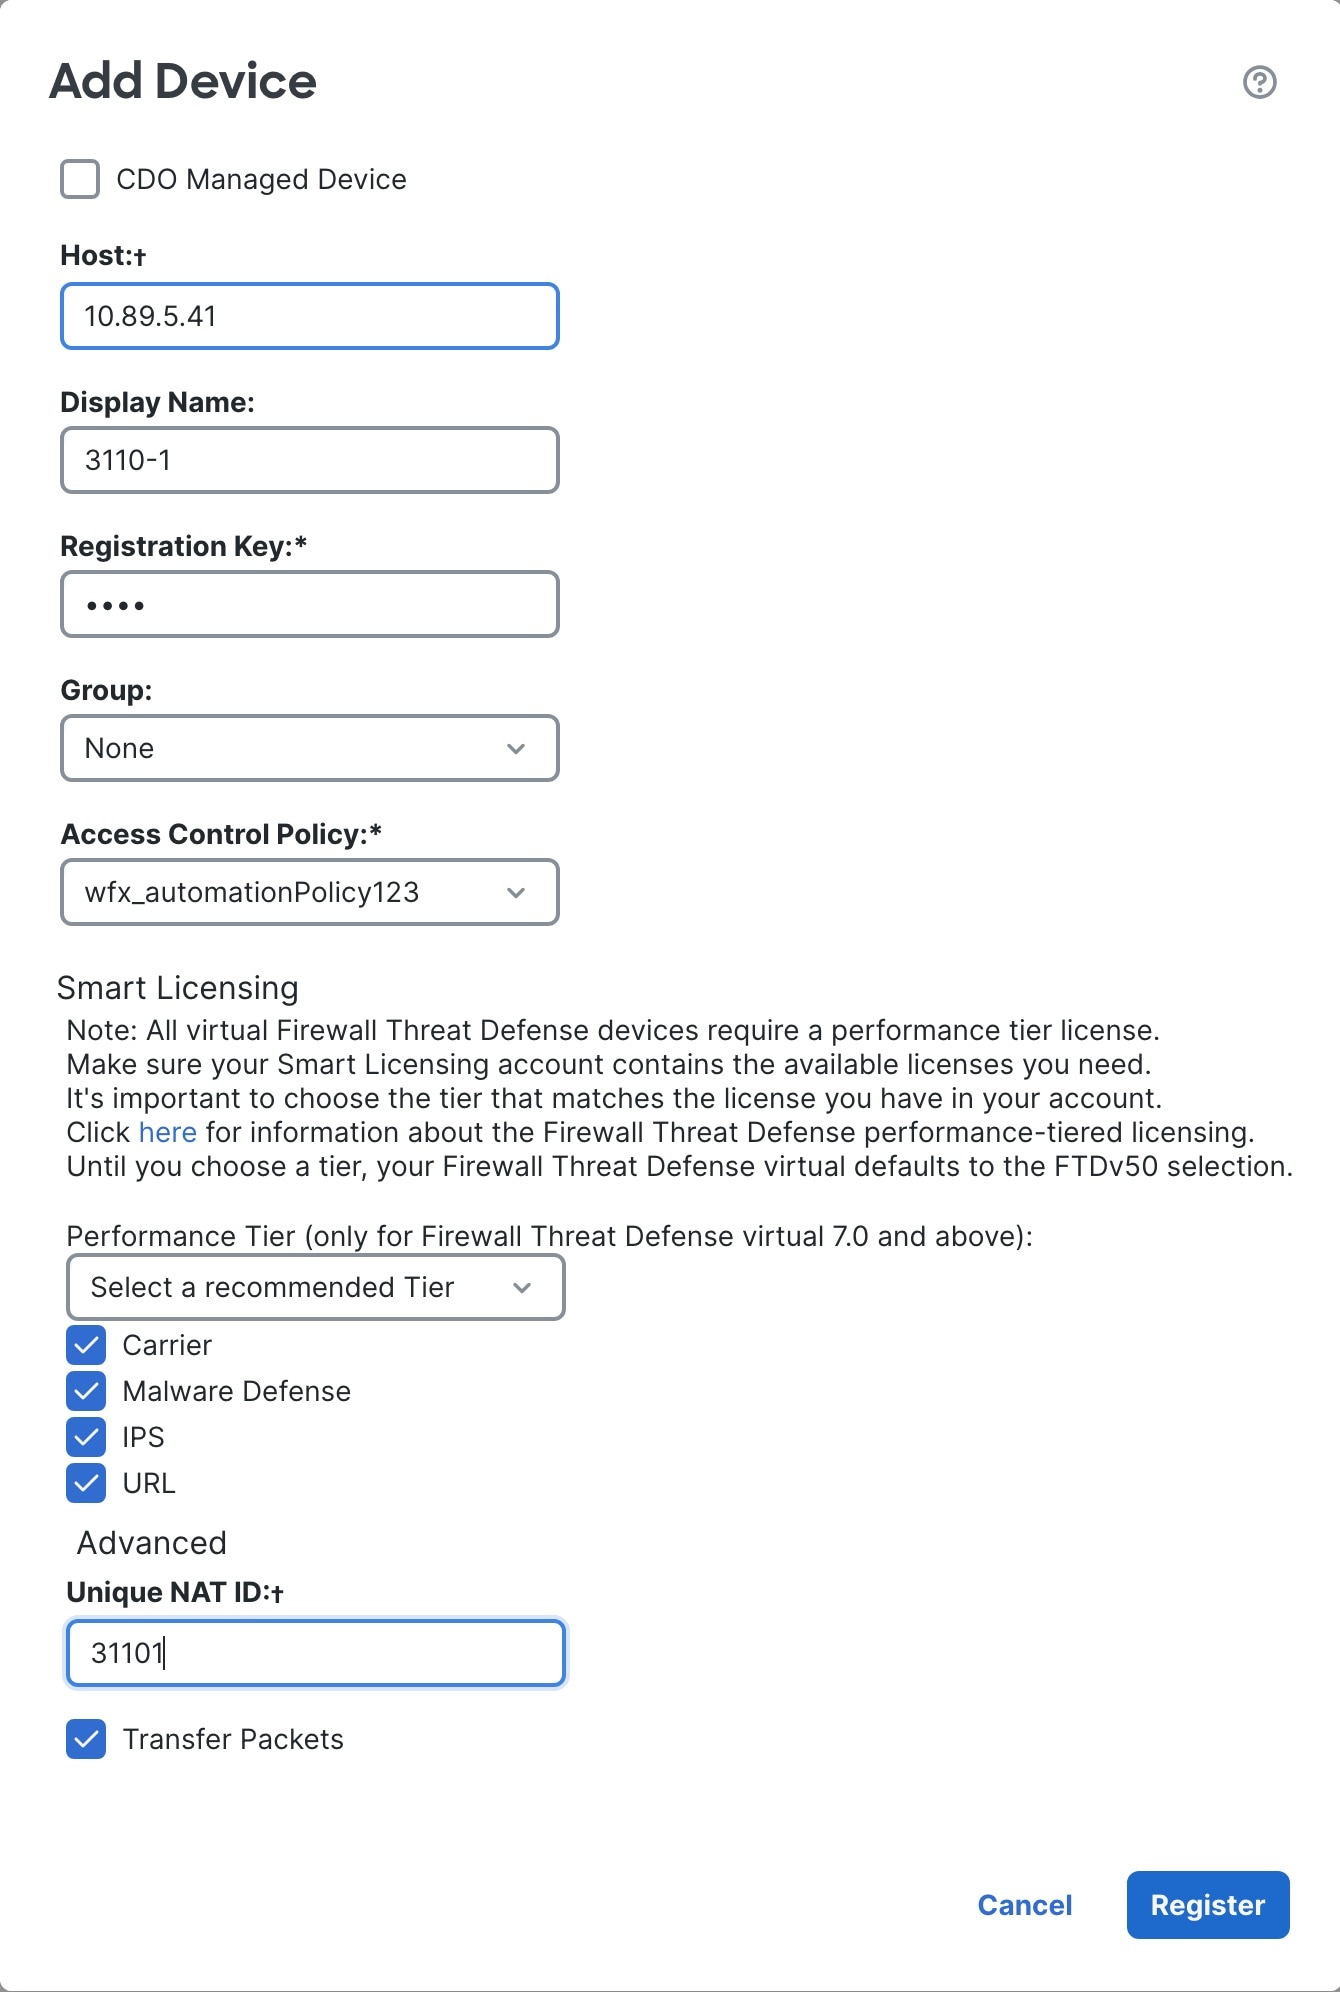
図 1. 登録キーを使用したデバイスの追加
登録キーを使用したデバイスの追加

次のパラメータを設定します。

  • [ホスト(Host)]:追加するファイアウォールの IP アドレスまたはホスト名を入力します(使用可能な場合)。使用できない場合は、このフィールドを空白のままにします。

  • [表示名(Display Name)]:Management Center に表示するファイアウォールの名前を入力します。この名前は変更できません。

  • [登録キー(Registration key)]:ファイアウォールの初期設定で指定したものと同じ登録キーを入力します。

  • [ドメイン(Domain)]:マルチドメイン環境を使用している場合は、デバイスをリーフドメインに割り当てます。

  • [グループ(Group)]:グループを使用している場合は、デバイスグループに割り当てます。

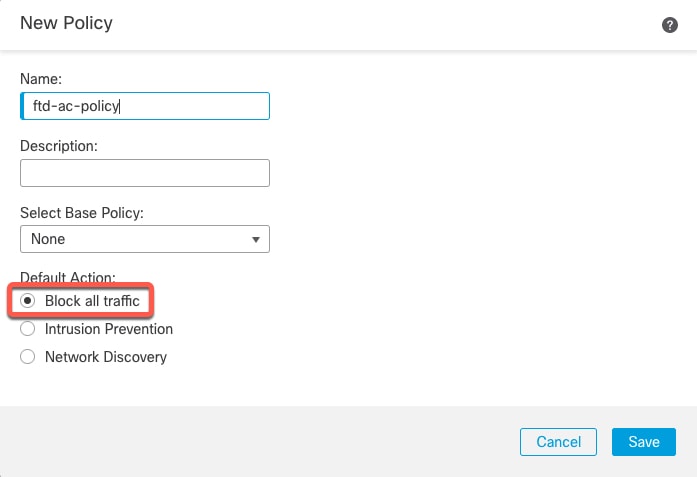
  • [アクセスコントロールポリシー(Access Control Policy)]:初期ポリシーを選択します。使用する必要があることがわかっているカスタマイズ済みのポリシーがすでにある場合を除いて、[新しいポリシーの作成(Create new policy)] を選択し、[すべてのトラフィックをブロック(Block all traffic)] を選択します。後でこれを変更してトラフィックを許可することができます。「アクセス制御ルールの設定」を参照してください。

    図 2. 新しいポリシー
    新しいポリシー
  • スマートライセンス:展開する機能に必要なスマートライセンスを割り当てます。注:デバイスを追加した後、[システム(System)] > [ライセンス(Licenses)] > [スマートライセンス(Smart Licenses)] ページから セキュアクライアント リモートアクセス VPN のライセンスを適用できます。

  • [一意のNAT ID(Unique NAT ID)]:ファイアウォールの初期設定で指定した NAT ID を指定します。

  • [パケットの転送(Transfer Packets)]:[パケットの転送(Transfer Packets)] チェックボックスをオンにして、侵入イベントごとに、デバイスが検査のためにパケットを Management Center に転送するようにします。

    このオプションは、デフォルトで有効です。侵入イベントごとに、デバイスは、イベント情報とイベントをトリガーしたパケットを検査のために Management Center に送信します。このオプションを無効にした場合は、イベント情報だけが Management Center に送信され、パケットは送信されません。

ステップ 4

[登録(Register)] をクリックします。

Threat Defense が登録に失敗した場合は、次の項目を確認してください。

  • ping:Threat Defense CLI(Threat Defense CLI へのアクセスを参照)にアクセスし、次のコマンドを使用して Management Center IP アドレスへの ping を実行します。

    ping system fmc_ip_address

    ping が成功しない場合は、show network コマンドを使用してネットワーク設定を確認します。ファイアウォールの管理 IP アドレスを変更するには、configure network {ipv4 | ipv6} manual コマンドを使用します。

  • 登録キー、NAT ID、および Management Center IP アドレス:両方のデバイスで同じ登録キーおよび NAT ID を使用していることを確認します。configure manager add コマンドを使用して、ファイアウォールで登録キーと NAT ID を設定することができます。

トラブルシューティングの詳細については、https://cisco.com/go/fmc-reg-error を参照してください。