ファイアウォールのケーブル接続と登録

ファイアウォールをケーブル接続し、ファイアウォールを Firewall Management Center に登録します。

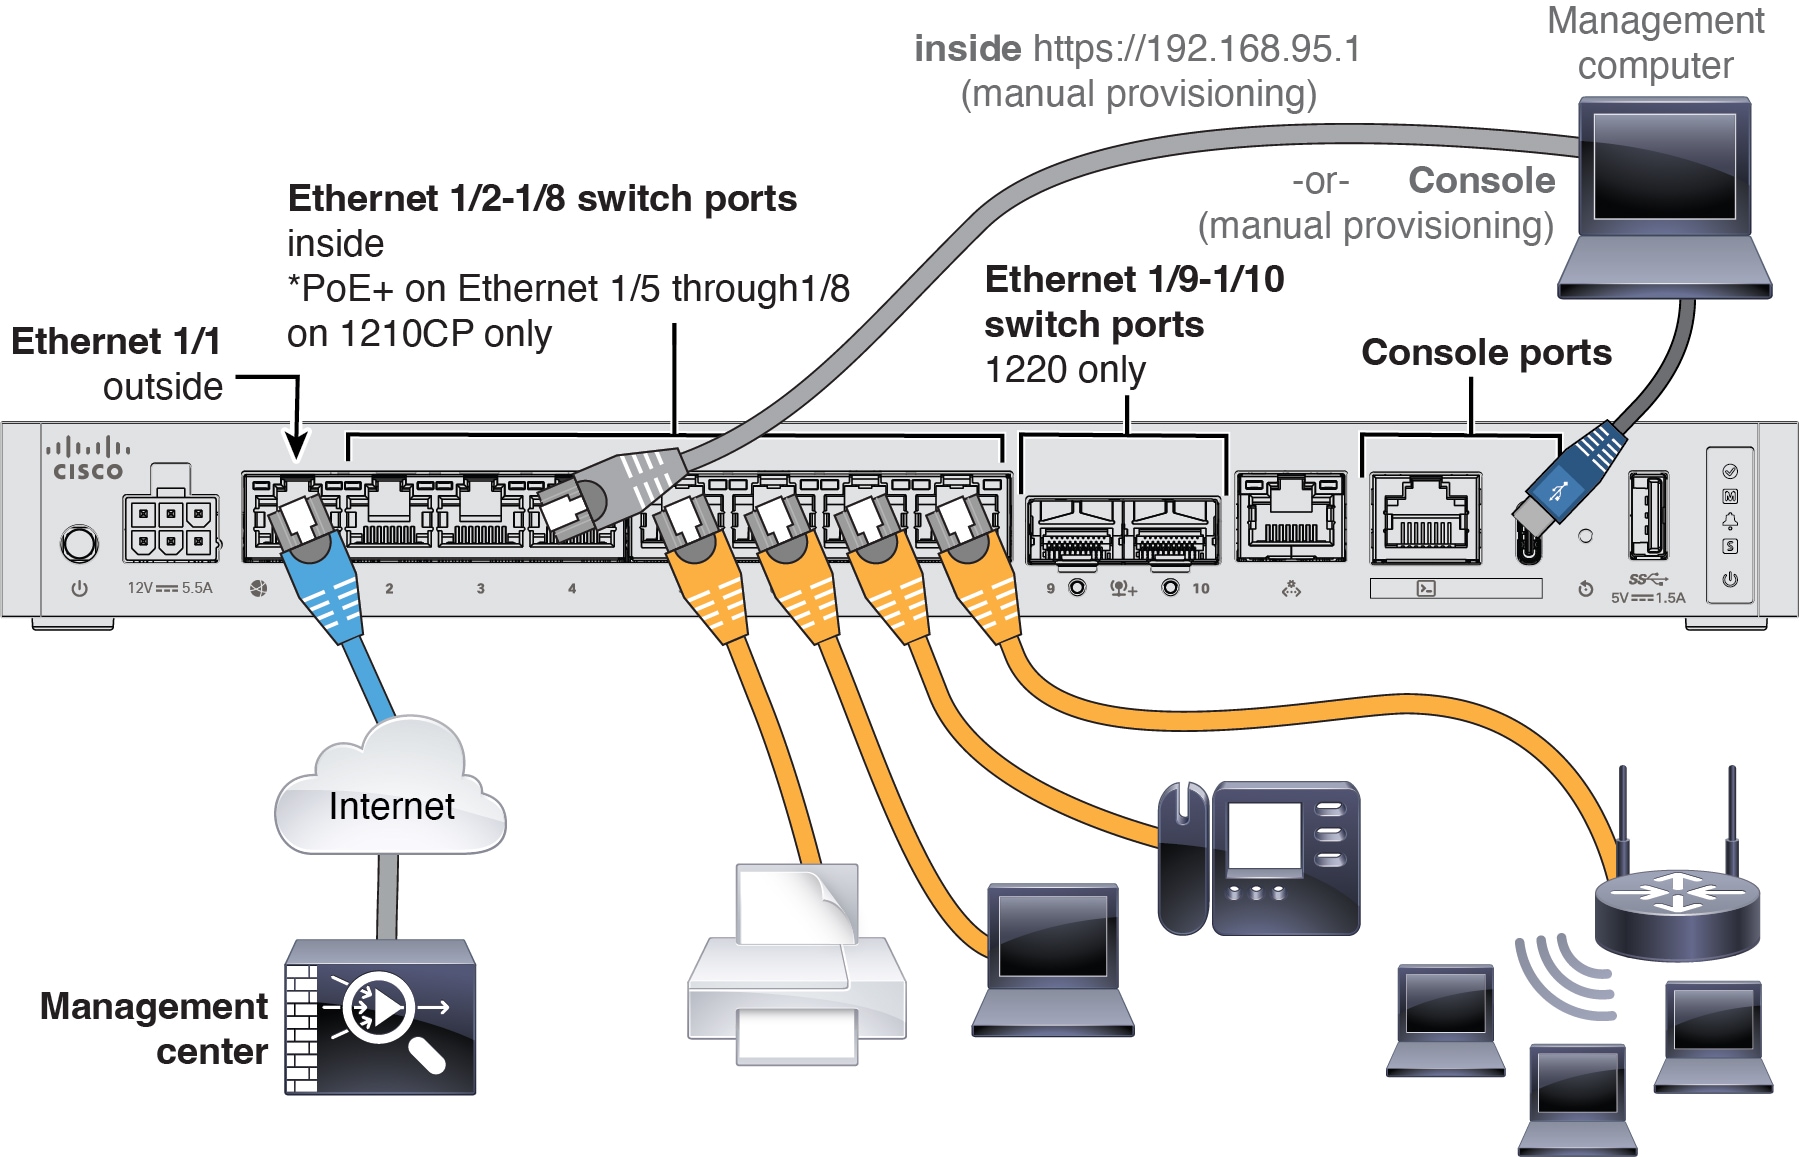
ファイアウォールのケーブル接続

  • Cisco Secure Firewall 1220 の場合、SFP をイーサネット 1/9 および 1/10 に取り付けます。これらは SFP/SFP+ モジュールを必要とする 1/10 Gb SFP+ ポートです。

  • 詳細については、ハードウェア設置ガイドを参照してください。

  • ゼロタッチプロビジョニングを使用する場合は、外部インターフェイスと管理インターフェイスの両方をケーブル接続しないでください。このガイドは外部インターフェイスでの管理について説明していますが、高可用性を備えた管理でゼロタッチプロビジョニングを使用することもできます。外部でゼロタッチプロビジョニングを使用して高可用性を使用する場合は、登録後に外部 IP アドレスを静的アドレスに変更する必要があります。

中央本部にある Management Center のケーブル配線

初期設定の実行(手動プロビジョニングのみ)

手動でプロビジョニングを行う場合は、Cisco Secure Firewall Device Manager または CLI を使用して、ファイアウォールの初期設定を実行します。

初期設定:Firewall Device Manager

この方法を使用すると、ファイアウォールを登録した後、管理インターフェイスに加えて次のインターフェイスが事前設定されます。

  • イーサネット 1/1:「外部」、DHCP からの IP アドレス、IPv6 自動設定

  • VLAN1:「内部」、192.168.95.1/24

  • デフォルトルート:外部インターフェイスで DHCP を介して取得

  • 追加インターフェイス:Firewall Device Manager からのインターフェイス設定はすべて保持されます。

他の設定(内部の DHCP サーバー、アクセス コントロール ポリシー、セキュリティゾーンなど)は保持されません。

手順


ステップ 1

コンピュータを内部インターフェイス(Ethernet 1/2 ~ 1/8 または Cisco Secure Firewall 1220 の場合は 1/2 ~ 1/10に接続します。

ステップ 2

Firewall Device Manager にログインします。

  1. https://192.168.95.1に進みます。

  2. ユーザー名 admin とデフォルトパスワード Admin123 を使用してログインします。

  3. 一般規約を読んで同意し、管理者パスワードを変更するように求められます。

ステップ 3

セットアップウィザードを使用します。

図 1. [デバイスの設定(Device Setup)]
[デバイスの設定(Device Setup)]

(注)  


正確なポート設定は、モデルによって異なります。

  1. 外部インターフェイスと管理インターフェイスを設定します。

    図 2. インターネットへのファイアウォールの接続
    インターネットへのファイアウォールの接続
    1. [外部インターフェイスアドレス(Outside Interface Address)]:高可用性の実装を予定している場合は、静的 IP アドレスを使用します。セットアップウィザードを使用して PPPoE を設定することはできません。ウィザードの完了後に PPPoE を設定できます。

    2. [管理インターフェイス(Management Interface)]:外部インターフェイスでマネージャアクセスを使用している場合でも、管理インターフェイスの設定が使用されます。たとえば、外部インターフェイスを介してバックプレーン経由で回送される管理トラフィックは、外部インターフェイスの DNS サーバーではなく、これらの管理インターフェイスの DNS サーバーを使用して FQDN を解決します。

      [DNSサーバ(DNS Servers)]:システムの管理アドレス用の DNS サーバ。デフォルトは OpenDNS パブリック DNS サーバです。これらは、両方とも外部インターフェイスからアクセスされるため、後で設定する外部インターフェイスの DNS サーバーと一致する可能性があります。

      ファイアウォールのホスト名

  2. [時刻設定(NTP)(Time Setting (NTP))] を設定し、[次へ(Next)] をクリックします。

    図 3. 時刻設定(NTP)
    インターネットへのファイアウォールの接続
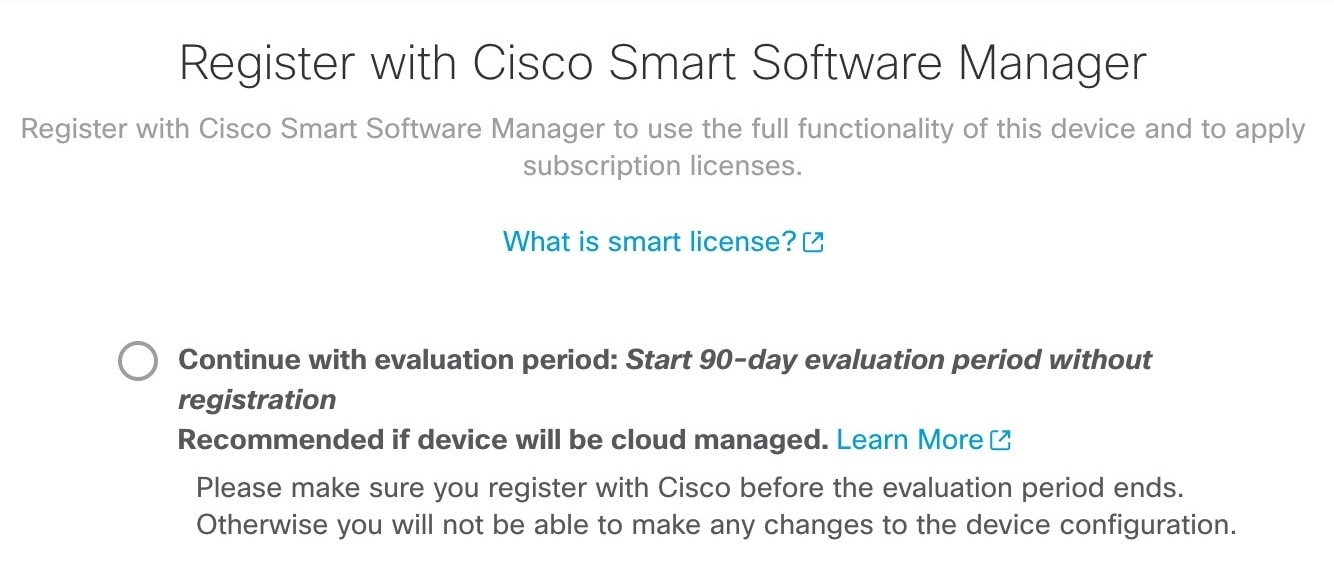
  3. [登録せずに 90 日間の評価期間を開始(Start 90 day evaluation period without registration)] を選択します。

    インターネットへのファイアウォールの接続

    Firewall Threat Defense を Smart Software Manager に登録「しない」でください。すべてのライセンスは Firewall Management CenterSecurity Cloud Control で実行されます。

  4. [終了(Finish)] をクリックします。

    図 4. 次のステップ
    インターネットへのファイアウォールの接続
  5. [スタンドアロンデバイス(Standalone Device)] を選択し、[了解(Got It)] を選択します。

ステップ 4

追加のインターフェイスを設定する場合は、[デバイス(Device)] を選択し、[インターフェイス(Interface)] のサマリーにあるリンクをクリックします。

ステップ 5

[デバイス(Device)] > [システム設定(System Settings)] > [集中管理(Central Management)] の順に選択し、[続行(Proceed)] をクリックして Firewall Management CenterSecurity Cloud Control に登録します。

[Management Center/SCC/Details] を設定します。

(注)  


古いバージョンでは、「SCC」の代わりに「CDO」と表示されることがあります。

図 5. Management Center/SCC の詳細
Management Center/CDO の詳細
  1. [Do you know the Management Center/SCC Hostname or IP address] に対し、IP アドレスまたはホスト名を使用して Firewall Management Center に到達できる場合は [Yes] をFirewall Management Center が NAT の内側にあるか、パブリック IP アドレスまたはホスト名がない場合は [No] をクリックします

  2. [Yes] を選択した場合は、[Management Center/SCC Hostname/IP Address] に入力します。

  3. [Management Center/SCC Registration Key] を指定します。

    このキーは、ファイアウォールを登録するときに Firewall Management Center でも指定する任意の 1 回限りの登録キーです。登録キーは 2 ~ 36 文字である必要があります。有効な文字には、英数字(A~Z、a~z、0~9)、およびハイフン(-)などがあります。この ID は、Firewall Management Center に登録する複数のファイアウォールに使用できます。

  4. [NAT ID] を指定します。

    この識別子は、Firewall Management Center でも指定する任意の 1 回限りの文字列です。両方のデバイスの IP アドレスがわかっている場合でも、NAT ID を指定することを推奨します。NAT ID は 2 ~ 36 文字である必要があります。有効な文字には、英数字(A~Z、a~z、0~9)、およびハイフン(-)などがあります。この ID は、Firewall Management Center に登録する他のファイアウォールには使用「できません」。NAT ID は、正しいデバイスからの接続であることを確認するために IP アドレスと組み合わせて使用されます。 IP アドレス/NAT ID の認証後にのみ、登録キーがチェックされます。

ステップ 6

[接続の設定(Connectivity Configuration)] を設定します。

  1. [Threat Defenseのホスト名(Threat Defense Hostname)] を指定します。

    この FQDN は外部インターフェイスに使用されます。

  2. [DNSサーバーグループ(DNS Server Group)] を指定します。

    既存のグループを選択するか、新しいグループを作成します。デフォルトの DNS グループは CiscoUmbrellaDNSServerGroup と呼ばれ、OpenDNS サーバーが含まれます。

    登録後に外部 DNS サーバー設定を保持するには、Firewall Management Center で DNS プラットフォーム設定を再設定する必要があります。

  3. [Management Center/SCC Access Interface] で [Data Interface] をクリックし、次に [outside] を選択します。

ステップ 7

(任意) [ダイナミックDNS(DDNS)方式の追加(Add a Dynamic DNS (DDNS) method)] をクリックします。

DDNS は、Firewall Threat Defense の IP アドレスが変更された場合に Firewall Management Center が FQDN で Firewall Threat Defense に到達できるようにします。

ステップ 8

[接続(Connect)] をクリックします。

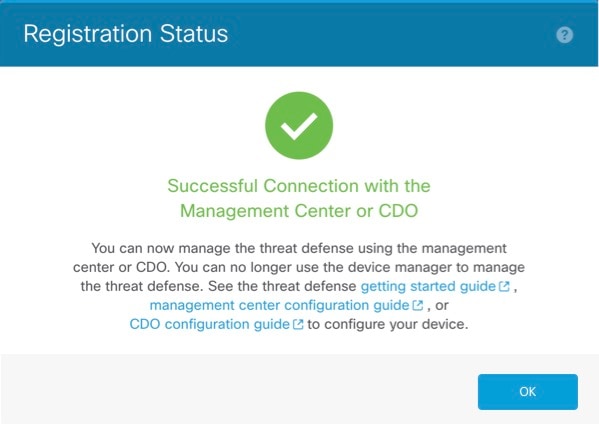
[登録ステータス(Registration Status)] ダイアログボックスに、Firewall Management CenterSecurity Cloud Control 登録の現在のステータスが表示されます。

図 6. 正常接続
正常接続

ステップ 9

ステータス画面で [Saving Management Center/ Registration Settings] の手順を実行したら Firewall Management CenterSecurity Cloud Control に移動し、ファイアウォールを追加します。を参照してください[手動プロビジョニングを使用したファイアウォールの追加(Add a firewall Using Manual Provisioning)]


初期設定:CLI

CLI セットアップスクリプトを使用して、専用の管理 IP アドレス、ゲートウェイ、およびその他の基本ネットワーク設定を行います。

手順


ステップ 1

コンソールポートに接続して Firewall Threat Defense CLI にアクセスします。Firewall Threat Defense CLI へのアクセスを参照してください。

ステップ 2

管理インターフェイスの設定用の CLI セットアップスクリプトを完了します。

(注)  


設定をクリア(たとえば、イメージを再作成することにより)しないかぎり、CLI セットアップスクリプトを繰り返すことはできません。ただし、これらの設定すべては、後から CLI で configure network コマンドを使用して変更できます。Cisco Secure Firewall Threat Defense コマンドリファレンスを参照してください。


You must accept the EULA to continue.
Press <ENTER> to display the EULA:                 
Cisco General Terms
[...]

Please enter 'YES' or press <ENTER> to AGREE to the EULA:

System initialization in progress.  Please stand by.
You must configure the network to continue.
Configure at least one of IPv4 or IPv6 unless managing via data interfaces.
Do you want to configure IPv4? (y/n) [y]:
Do you want to configure IPv6? (y/n) [y]: n

ガイダンス:これらのタイプのアドレスの少なくとも 1 つについて y を入力します。管理インターフェイスを使用する予定がない場合でも、プライベートアドレスなどの IP アドレスを設定する必要があります。

Configure IPv4 via DHCP or manually? (dhcp/manual) [manual]:

ガイダンス:[手動(manual)] を選択します。マネージャアクセスに外部インターフェイスを使用する場合、DHCP はサポートされません。ルーティングの問題を防ぐために、このインターフェイスがマネージャ アクセス インターフェイスとは異なるサブネット上にあることを確認してください。

Enter an IPv4 address for the management interface [192.168.45.61]: 10.89.5.17
Enter an IPv4 netmask for the management interface [255.255.255.0]: 255.255.255.192
Enter the IPv4 default gateway for the management interface [data-interfaces]:

ガイダンス:ゲートウェイを data-interfaces に設定します。この設定は、外部インターフェイスを通じてルーティングできるように、バックプレーンを介して管理トラフィックを転送します。

Enter a fully qualified hostname for this system [firepower]: 1010-3
Enter a comma-separated list of DNS servers or 'none' [208.67.222.222,208.67.220.220,2620:119:35::35]:
Enter a comma-separated list of search domains or 'none' []: cisco.com
If your networking information has changed, you will need to reconnect.
Disabling IPv6 configuration: management0
Setting DNS servers: 208.67.222.222,208.67.220.220,2620:119:35::35
Setting DNS domains:cisco.com

ガイダンス:管理インターフェイスの DNS サーバーを設定します。これらは、両方とも外部インターフェイスからアクセスされるため、後で設定する外部インターフェイスの DNS サーバーと一致する可能性があります。

Setting hostname as 1010-3
Setting static IPv4: 10.89.5.17 netmask: 255.255.255.192 gateway: data on management0
Updating routing tables, please wait...
All configurations applied to the system. Took 3 Seconds.
Saving a copy of running network configuration to local disk.
For HTTP Proxy configuration, run 'configure network http-proxy'

Manage the device locally? (yes/no) [yes]: no

ガイダンス:no」と入力すると、Firewall Management Center が使用されます。

Setting hostname as 1010-3
Setting static IPv4: 10.89.5.17 netmask: 255.255.255.192 gateway: data on management0
Updating routing tables, please wait...
All configurations applied to the system. Took 3 Seconds.
Saving a copy of running network configuration to local disk.
For HTTP Proxy configuration, run 'configure network http-proxy'

ガイダンス:routed と入力します。外部マネージャアクセスは、ルーテッド ファイアウォール モードでのみサポートされています。

Configuring firewall mode ...


Device is in OffBox mode - disabling/removing port 443 from iptables.
Update policy deployment information
    - add device configuration
    - add network discovery
    - add system policy

You can register the sensor to a Firepower Management Center and use the
Firepower Management Center to manage it. Note that registering the sensor
to a Firepower Management Center disables on-sensor Firepower Services
management capabilities.

When registering the sensor to a Firepower Management Center, a unique
alphanumeric registration key is always required.  In most cases, to register
a sensor to a Firepower Management Center, you must provide the hostname or
the IP address along with the registration key.
'configure manager add [hostname | ip address ] [registration key ]'

However, if the sensor and the Firepower Management Center are separated by a
NAT device, you must enter a unique NAT ID, along with the unique registration
key.
'configure manager add DONTRESOLVE [registration key ] [ NAT ID ]'

Later, using the web interface on the Firepower Management Center, you must
use the same registration key and, if necessary, the same NAT ID when you add
this sensor to the Firepower Management Center.
>
ステップ 3

マネージャアクセス用の外部インターフェイスを設定します。

configure network management-data-interface

Enter を押すと、外部インターフェイスの基本的なネットワーク設定を行うように求められます。

手動 IP アドレス


> configure network management-data-interface
Data interface to use for management: ethernet1/1
Specify a name for the interface [outside]: internet
IP address (manual / dhcp) [dhcp]: manual
IPv4/IPv6 address: 10.10.6.7
Netmask/IPv6 Prefix: 255.255.255.0
Default Gateway: 10.10.6.1
Comma-separated list of DNS servers [none]: 208.67.222.222,208.67.220.220

ガイダンス:登録後に外部 DNS サーバーを保持するには、Firewall Management Center で DNS プラットフォーム設定を再設定する必要があります。


DDNS server update URL [none]:
Do you wish to clear all the device configuration before applying ? (y/n) [n]:

Configuration done with option to allow manager access from any network, if you wish to change the manager access network
use the 'client' option in the command 'configure network management-data-interface'.

Setting IPv4 network configuration.
Network settings changed.

>

DHCP からの IP アドレス


> configure network management-data-interface
Data interface to use for management: ethernet1/1
Specify a name for the interface [outside]:
IP address (manual / dhcp) [dhcp]:  
DDNS server update URL [none]: https://dwinchester:pa$$w0rd17@domains.example.com/nic/update?hostname=<h>&myip=<a>
Do you wish to clear all the device configuration before applying ? (y/n) [n]:

Configuration done with option to allow manager access from any network, if you wish to change the manager access network 
use the 'client' option in the command 'configure network management-data-interface'.

Setting IPv4 network configuration.
Network settings changed.

> 

ステップ 4

Firewall Management Center を指定します。

configure manager add {hostname | IPv4_address | IPv6_address | DONTRESOLVE} reg_key nat_id

  • {hostname | IPv4_address | IPv6_address | DONTRESOLVE}—Specifies either the FQDN or IP address of the Firewall Management Center.Firewall Management Center を直接アドレス指定できない場合は、DONTRESOLVE を使用します。この場合は、ファイアウォールが、到達可能な IP アドレスまたはホスト名を持っている必要があります。

  • reg_key:Firewall Threat Defense を登録するときに Firewall Management Center でも指定する任意のワンタイム登録キーを指定します。登録キーは 2 ~ 36 文字である必要があります。有効な文字には、英数字(A~Z、a~z、0~9)、およびハイフン(-)などがあります。

  • nat_idFirewall Management Center でも指定する、任意で一意の 1 回限りの文字列を指定します。NAT ID は 2 ~ 36 文字である必要があります。有効な文字には、英数字(A~Z、a~z、0~9)、およびハイフン(-)などがあります。この ID は、Firewall Management Center に登録する他のデバイスには使用できません。

例:


> configure manager add fmc-1.example.com regk3y78 natid56
Manager successfully configured.

ステップ 5

デバイスをリモート支社に送信できるように Firewall Threat Defense をシャットダウンします。

システムを適切にシャットダウンすることが重要です。単純に電源プラグを抜いたり、電源スイッチを押したりすると、重大なファイル システムの損傷を引き起こすことがあります。バックグラウンドでは常に多数のプロセスが実行されており、電源プラグを抜いたり、電源を切断したりすると、システムをグレースフルシャットダウンできないことを覚えておいてください。

  1. shutdown コマンドを入力します。

  2. 電源 LED とステータス LED を観察して、シャーシの電源が切断されていることを確認します(LED が消灯)。

  3. シャーシの電源が正常に切断されたら、必要に応じて電源プラグを抜き、シャーシから物理的に電源を取り外すことができます。


Firewall Management Center へのファイアウォールの登録

使用している展開方法に応じてファイアウォールを Firewall Management Center に登録します。

Add a firewall using the serial number (zero-touch provisioning)

ゼロ タッチ プロビジョニング lets you register devices to the Firewall Management Center by serial number without having to perform any initial setup on the device. The Firewall Management Center integrates with Security Cloud Control for this functionality.


(注)  


For Firewall Management Center version 7.4, you need to add the device using Security Cloud Control ; see the 7.4 guide for more information. The native Firewall Management Center workflow was added in 7.6. Also, for cloud integration in 7.4, see the SecureX Integration page in the Firewall Management Center .


Default Configuration After Registration:

When you use ゼロタッチプロビジョニング , the following interfaces are preconfigured. Note that other settings, such as the DHCP server on inside, access control policy, or security zones, are not configured.

  • Ethernet 1/1—"outside", IP address from DHCP, IPv6 autoconfiguration

  • Ethernet 1/2 (or for the 1210 / / 1220 , the VLAN1 interface)— "inside", 192.168.95.1/24

  • Default route—Obtained through DHCP on the outside interface

Requirements:

When you use the outside interface for manager access, it uses DHCP by default. Before you can enable high availability, you need to change the IP address to a static address. Alternatively, you can use the Management interface instead; DHCP is supported on Management with high availability.

Before you begin

  • If the device does not have a public IP address or FQDN , set a public IP address/FQDN for the Firewall Management Center (for example, if it is behind NAT), so the device can initiate the management connection. See [管理(Administration)] > [設定(Configuration)] > [マネージャリモートアクセス(Manager Remote Access)] .

  • DHCP server for either Management or Ethernet 1/1 that provides an IP address and default gateway.

  • Network access to the OpenDNS public DNS servers. IPv4: 208.67.220.220 and 208.67.222.222; IPv6: 2620:119:35::35. DNS servers obtained from DHCP are never used.

    The following names need to be resolved:

    表 1. FQDNs for zero-touch provisioning

    FQDNs

    *.cisco.com (many FQDNs)

    *.defenseorchestrator.com (many FQDNs)

    *.defenseorchestrator.eu (for the EU, many FQDNs)

    0.sourcefire.pool.ntp.org, 1.sourcefire.pool.ntp.org, 2.sourcefire.pool.ntp.org

    1.200.159.162.in-addr.arpa

    60.19.239.178.in-addr.arpa

    connected.by.freedominter.net

    time.cloudflare.com

    udc.neo4j.org

手順

手順の概要

  1. The first time you add a device using a serial number, integrate the Firewall Management Center with Security Cloud Control .
  2. Obtain your device's serial number.
  3. Check your LEDs to make sure the firewall is ready for registration.
  4. Choose [デバイス(Devices)] > [デバイス管理(Device Management)] .
  5. From the Add drop-down menu, choose Device .
  6. Click Serial Number , click Basic , and then click Next .
  7. Configure the device details and click Next .
  8. Configure the initial device configuration.
  9. Click Add device .

手順の詳細


ステップ 1

The first time you add a device using a serial number, integrate the Firewall Management Center with Security Cloud Control .

(注)  


For a Firewall Management Center high-availability pair, you also need to integrate the secondary Firewall Management Center with Security Cloud Control .

  1. Choose [統合(Integrations)] > [Security Cloud Control] .

  2. Click Enable Security Cloud Control to open a separate browser tab to log you into your Security Cloud Control account and confirm the displayed code.

    Make sure this page is not blocked by a pop-up blocker. If you do not already have a Security Cloud Control account, you can add one during this procedure.

    For detailed information about this integration, see the "System Configuration" chapter in the Cisco Secure Firewall Management Center アドミニストレーション ガイド .

    Security Cloud Control onboards the on-prem Firewall Management Center after you integrate the Firewall Management Center with Security Cloud Control . Security Cloud Control needs the Firewall Management Center in its inventory for ゼロタッチプロビジョニング to operate. However, you do not need to use Security Cloud Control directly. If you do use Security Cloud Control , its Firewall Management Center support is limited to device onboarding, viewing its managed devices, viewing objects associated with the Firewall Management Center , and cross-launching the Firewall Management Center .

  3. Make sure Enable Zero-Touch Provisioning is checked.

  4. Click Save .

ステップ 2

Obtain your device's serial number.

The device includes two serial numbers: the chassis serial number and the PCB (circuit board) serial number. Either serial number should work.

  • If you have the shipping box, you can see the chassis serial number on the label.

  • The chassis serial number is on the compliance label on the back .

  • The PCB serial number is on a label on the chassis called "S/N."

  • You can view the serial numbers using the following CLI commands:

    • FXOS— show chassis detail shows both serial numbers.

    • Firewall Threat Defense show inventory shows the chassis serial number. show serial-number shows the PCB serial number.

ステップ 3

Check your LEDs to make sure the firewall is ready for registration.

表 2. ゼロ タッチ プロビジョニング:管理対象(M)LED の動作

M LED

説明

ファイアウォールの電源を入れた後の時間(分:秒)

緑色で低速点滅

Cisco Cloud に接続され、オンボーディングの準備ができています

15:00 ~ 30:00

緑色とオレンジ色で交互に点滅

(エラー条件)

Cisco Cloud に接続できませんでした

15:00 ~ 30:00

緑色で点灯

オンボード済み

20:00 ~ 45:00

ステップ 4

Choose [デバイス(Devices)] > [デバイス管理(Device Management)] .

ステップ 5

From the Add drop-down menu, choose Device .

ステップ 6

Click Serial Number , click Basic , and then click Next .

図 7. Device Registration Method
Device Registration Method

ステップ 7

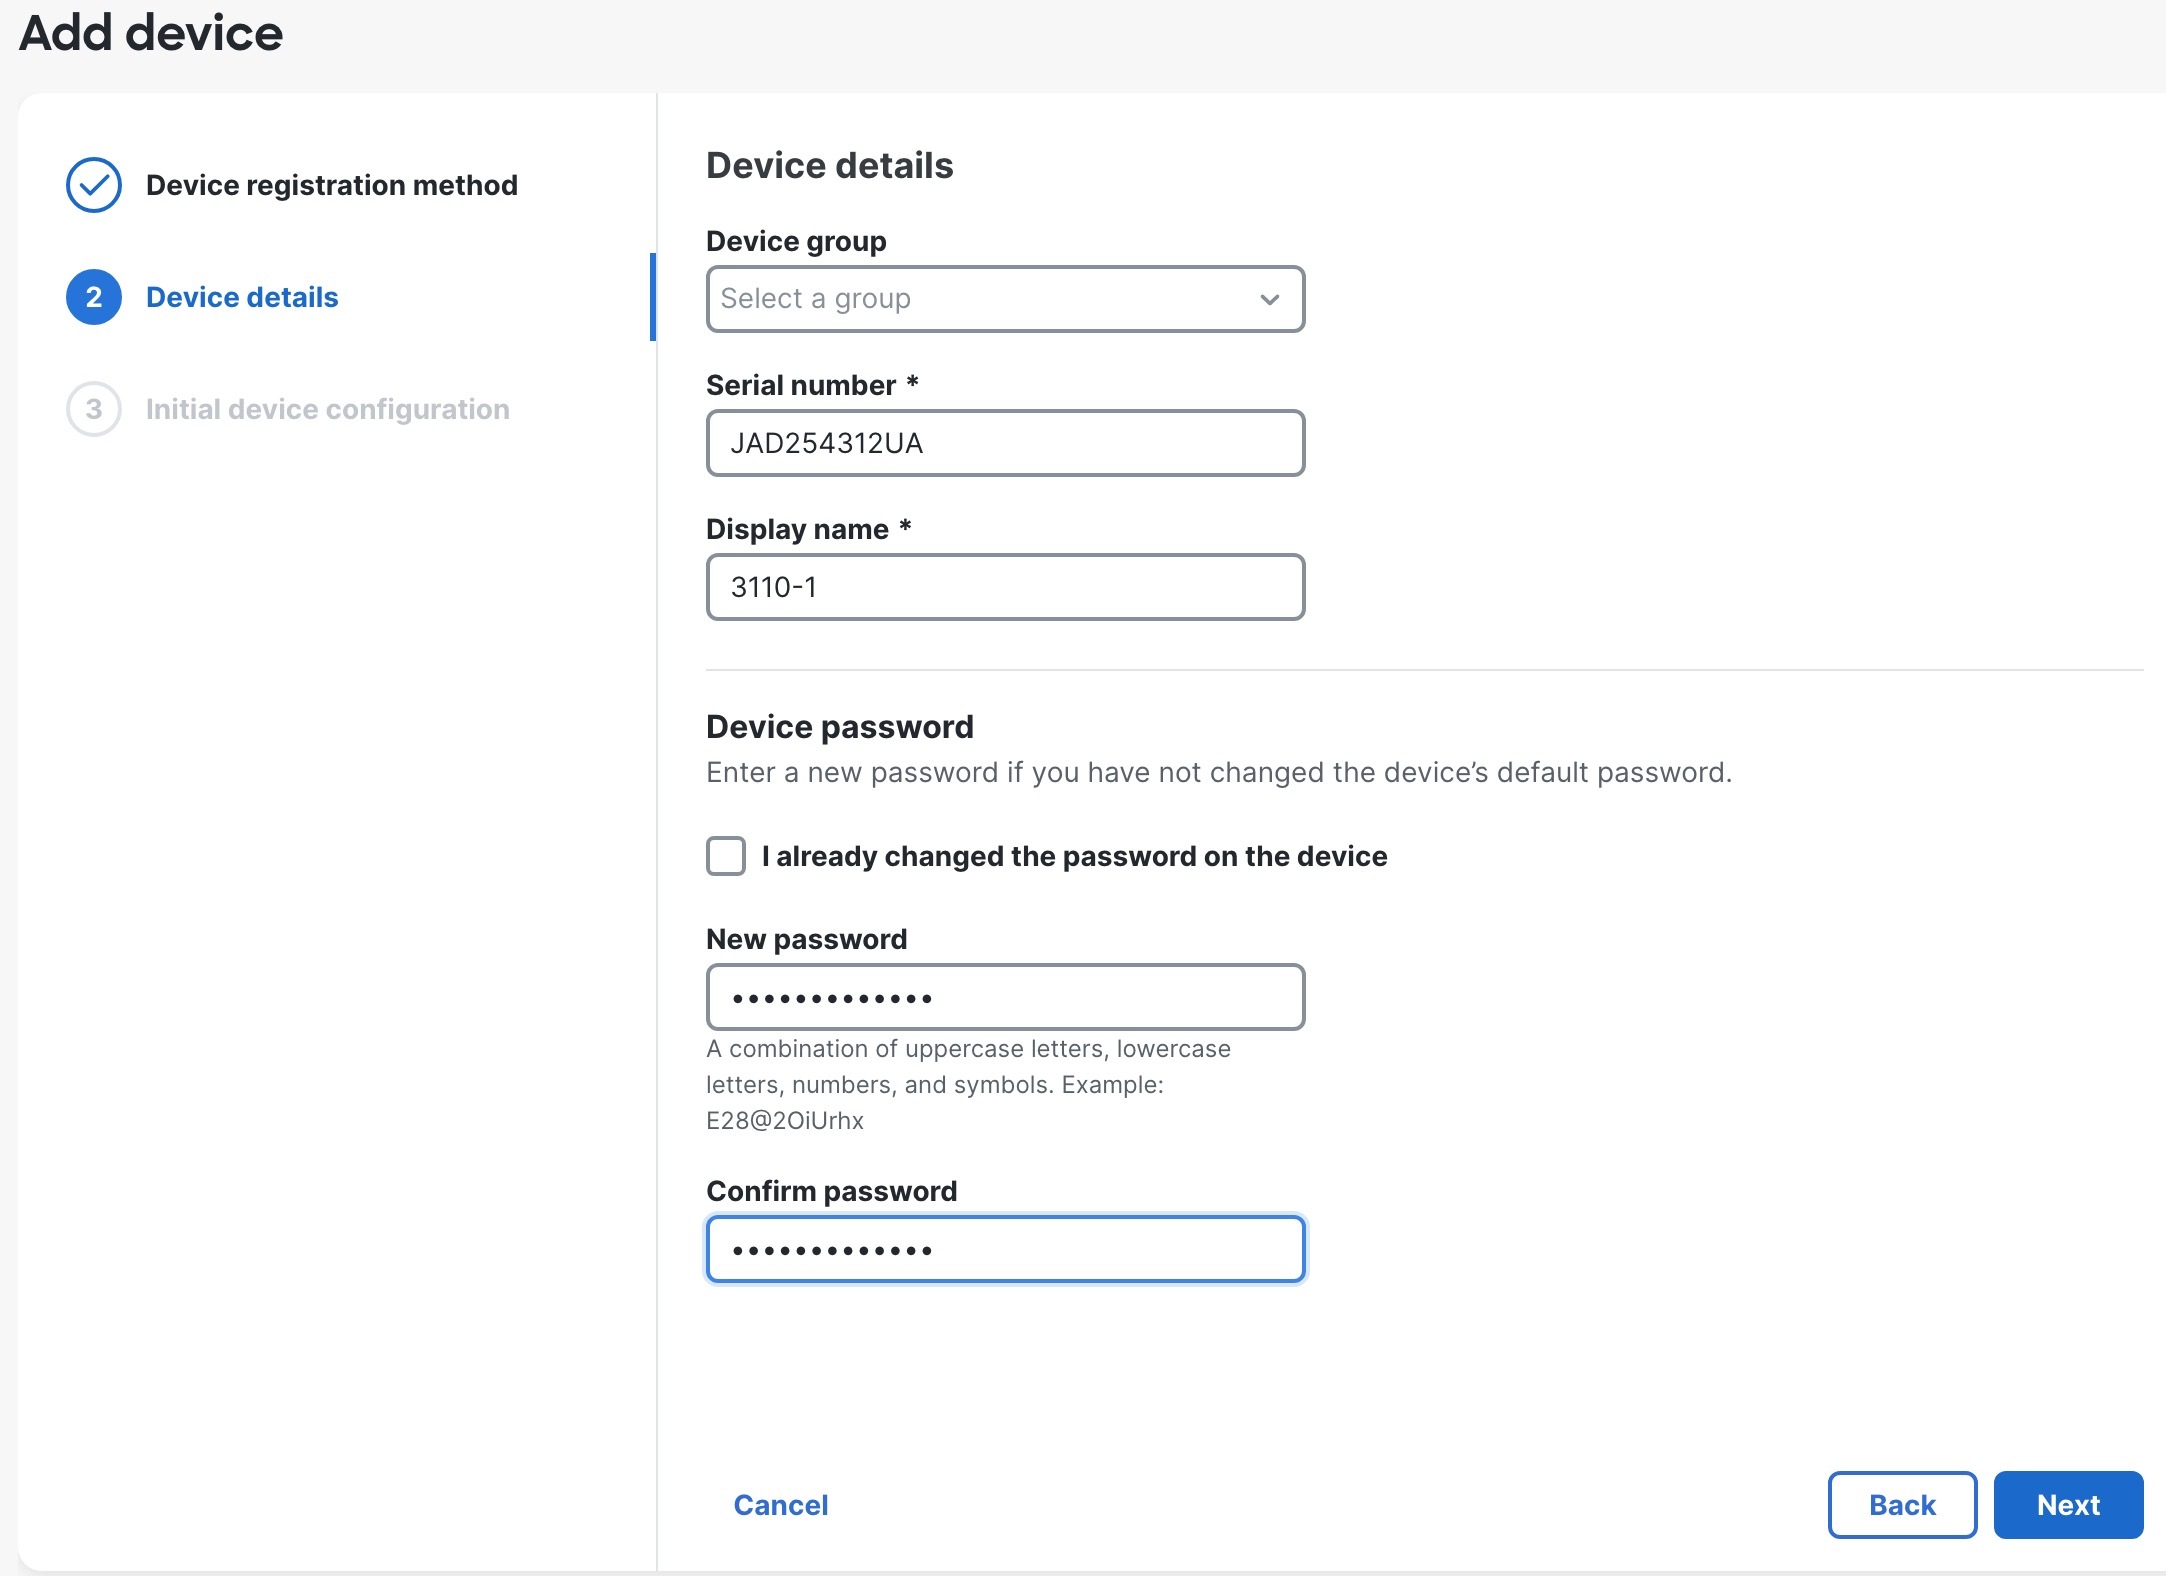
Configure the device details and click Next .

図 8. Device Details
Domain
  • Domain —In a multidomain environment, choose the leaf domain.

  • Device group —In a single domain environment, add the device to a Device group .

  • Serial number —Enter the IP address or the hostname of the device you want to add. Leave this field blank if you don't know the device IP address (for example, it's behind NAT).

  • Display name —Enter a name for the device as you want it to display in the Firewall Management Center . You cannot change this name later.

  • Device password —If this device is unconfigured or a fresh install, then you need to set a New Password and confirm the password.

    Check I already changed the password on the device only if you already logged in and changed the password. Otherwise, registration will fail.

ステップ 8

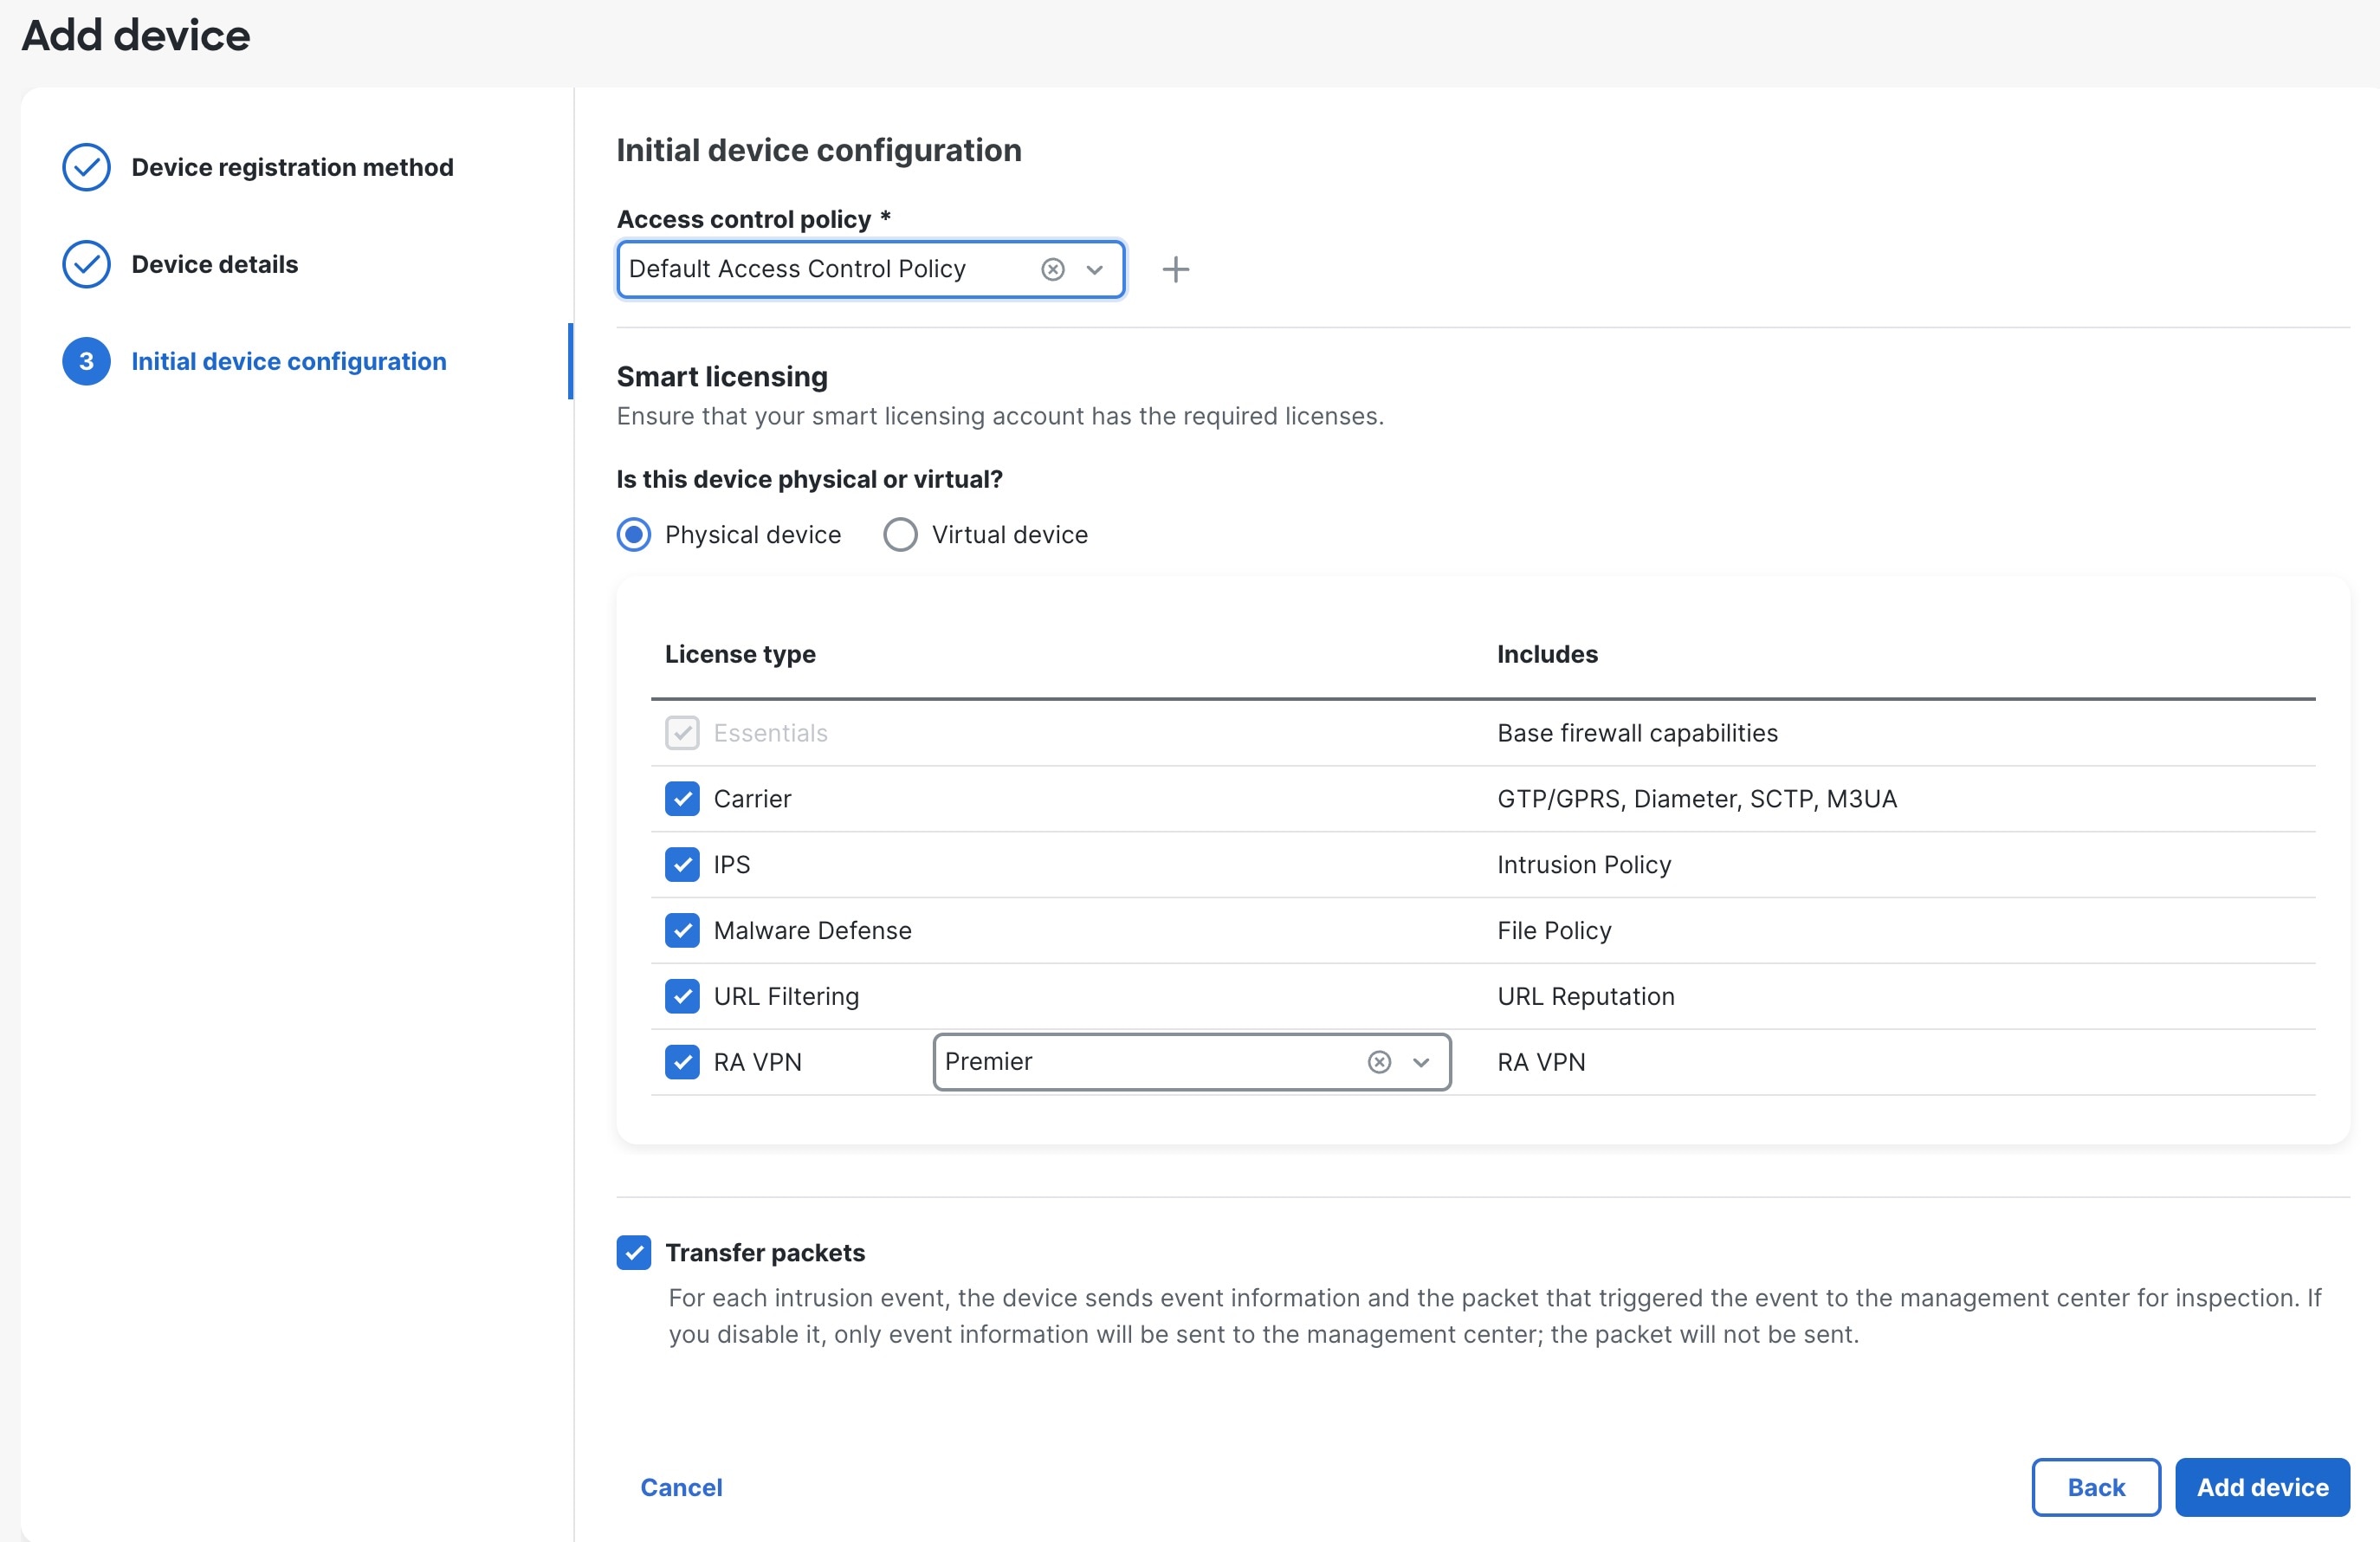
Configure the initial device configuration.

図 9. Initial Device Configuration
Initial Device Configuration
  • Access control policy —Choose an initial policy to deploy to the device at registration, or create a new policy. Unless you already have a customized policy you know you need to use, choose [追加(Add)] (追加アイコン) , and choose Block all traffic . You can change this later to allow traffic.

  • Smart licensing —Choose your licenses.

    • Is this device physical or virtual? —Choose Physical device

    • License type —Check each license type to assign to the device.

    You can also apply licenses after you add the device .

  • Transfer packets —Enable this option so that for each intrusion event, the device transfers the packet to the Firewall Management Center for inspection.

    For each intrusion event, the device sends event information and the packet that triggered the event to the Firewall Management Center for inspection. If you disable it, only event information will be sent to the Firewall Management Center ; the packet will not be sent.

ステップ 9

Click Add device .

It may take up to two minutes for the Firewall Management Center to verify the device’s heartbeat and establish communication.

When using ゼロタッチプロビジョニング on the outside interface, Security Cloud Control acts as a DDNS provider and does the following:

  • Enables DDNS on outside using the FMC Only method. This method is only supported for ゼロタッチプロビジョニング devices.

  • Maps the outside IP address with the following hostname: serial-number .local .

  • Provides the IP address/hostname mapping to the Firewall Management Center so it can resolve the hostname to the correct IP address.

  • Informs the Firewall Management Center if the IP address ever changes, for example, if the DHCP lease renews.

If you use ゼロタッチプロビジョニング on the Management interface, DDNS is not supported. The Firewall Management Center must be publicly reachable so the device can initiate the management connection.

You can continue to use Security Cloud Control as the DDNS provider, or you can later change the DDNS configuration in the Firewall Management Center to a different method.


[手動プロビジョニングを使用したファイアウォールの追加(Add a firewall Using Manual Provisioning)]

デバイスの IP アドレスまたはホスト名と登録キーを使用して、手動でファイアウォールを Firewall Management Center に登録します。

手順


ステップ 1

Firewall Management Center にログインします。

  1. 次の URL を入力します。

    https://fmc_ip_address

  2. ユーザー名とパスワードを入力します。

  3. [ログイン(Log In)] をクリックします。

ステップ 2

Choose [デバイス(Devices)] > [デバイス管理(Device Management)] .

ステップ 3

From the Add drop-down menu, choose Device .

ステップ 4

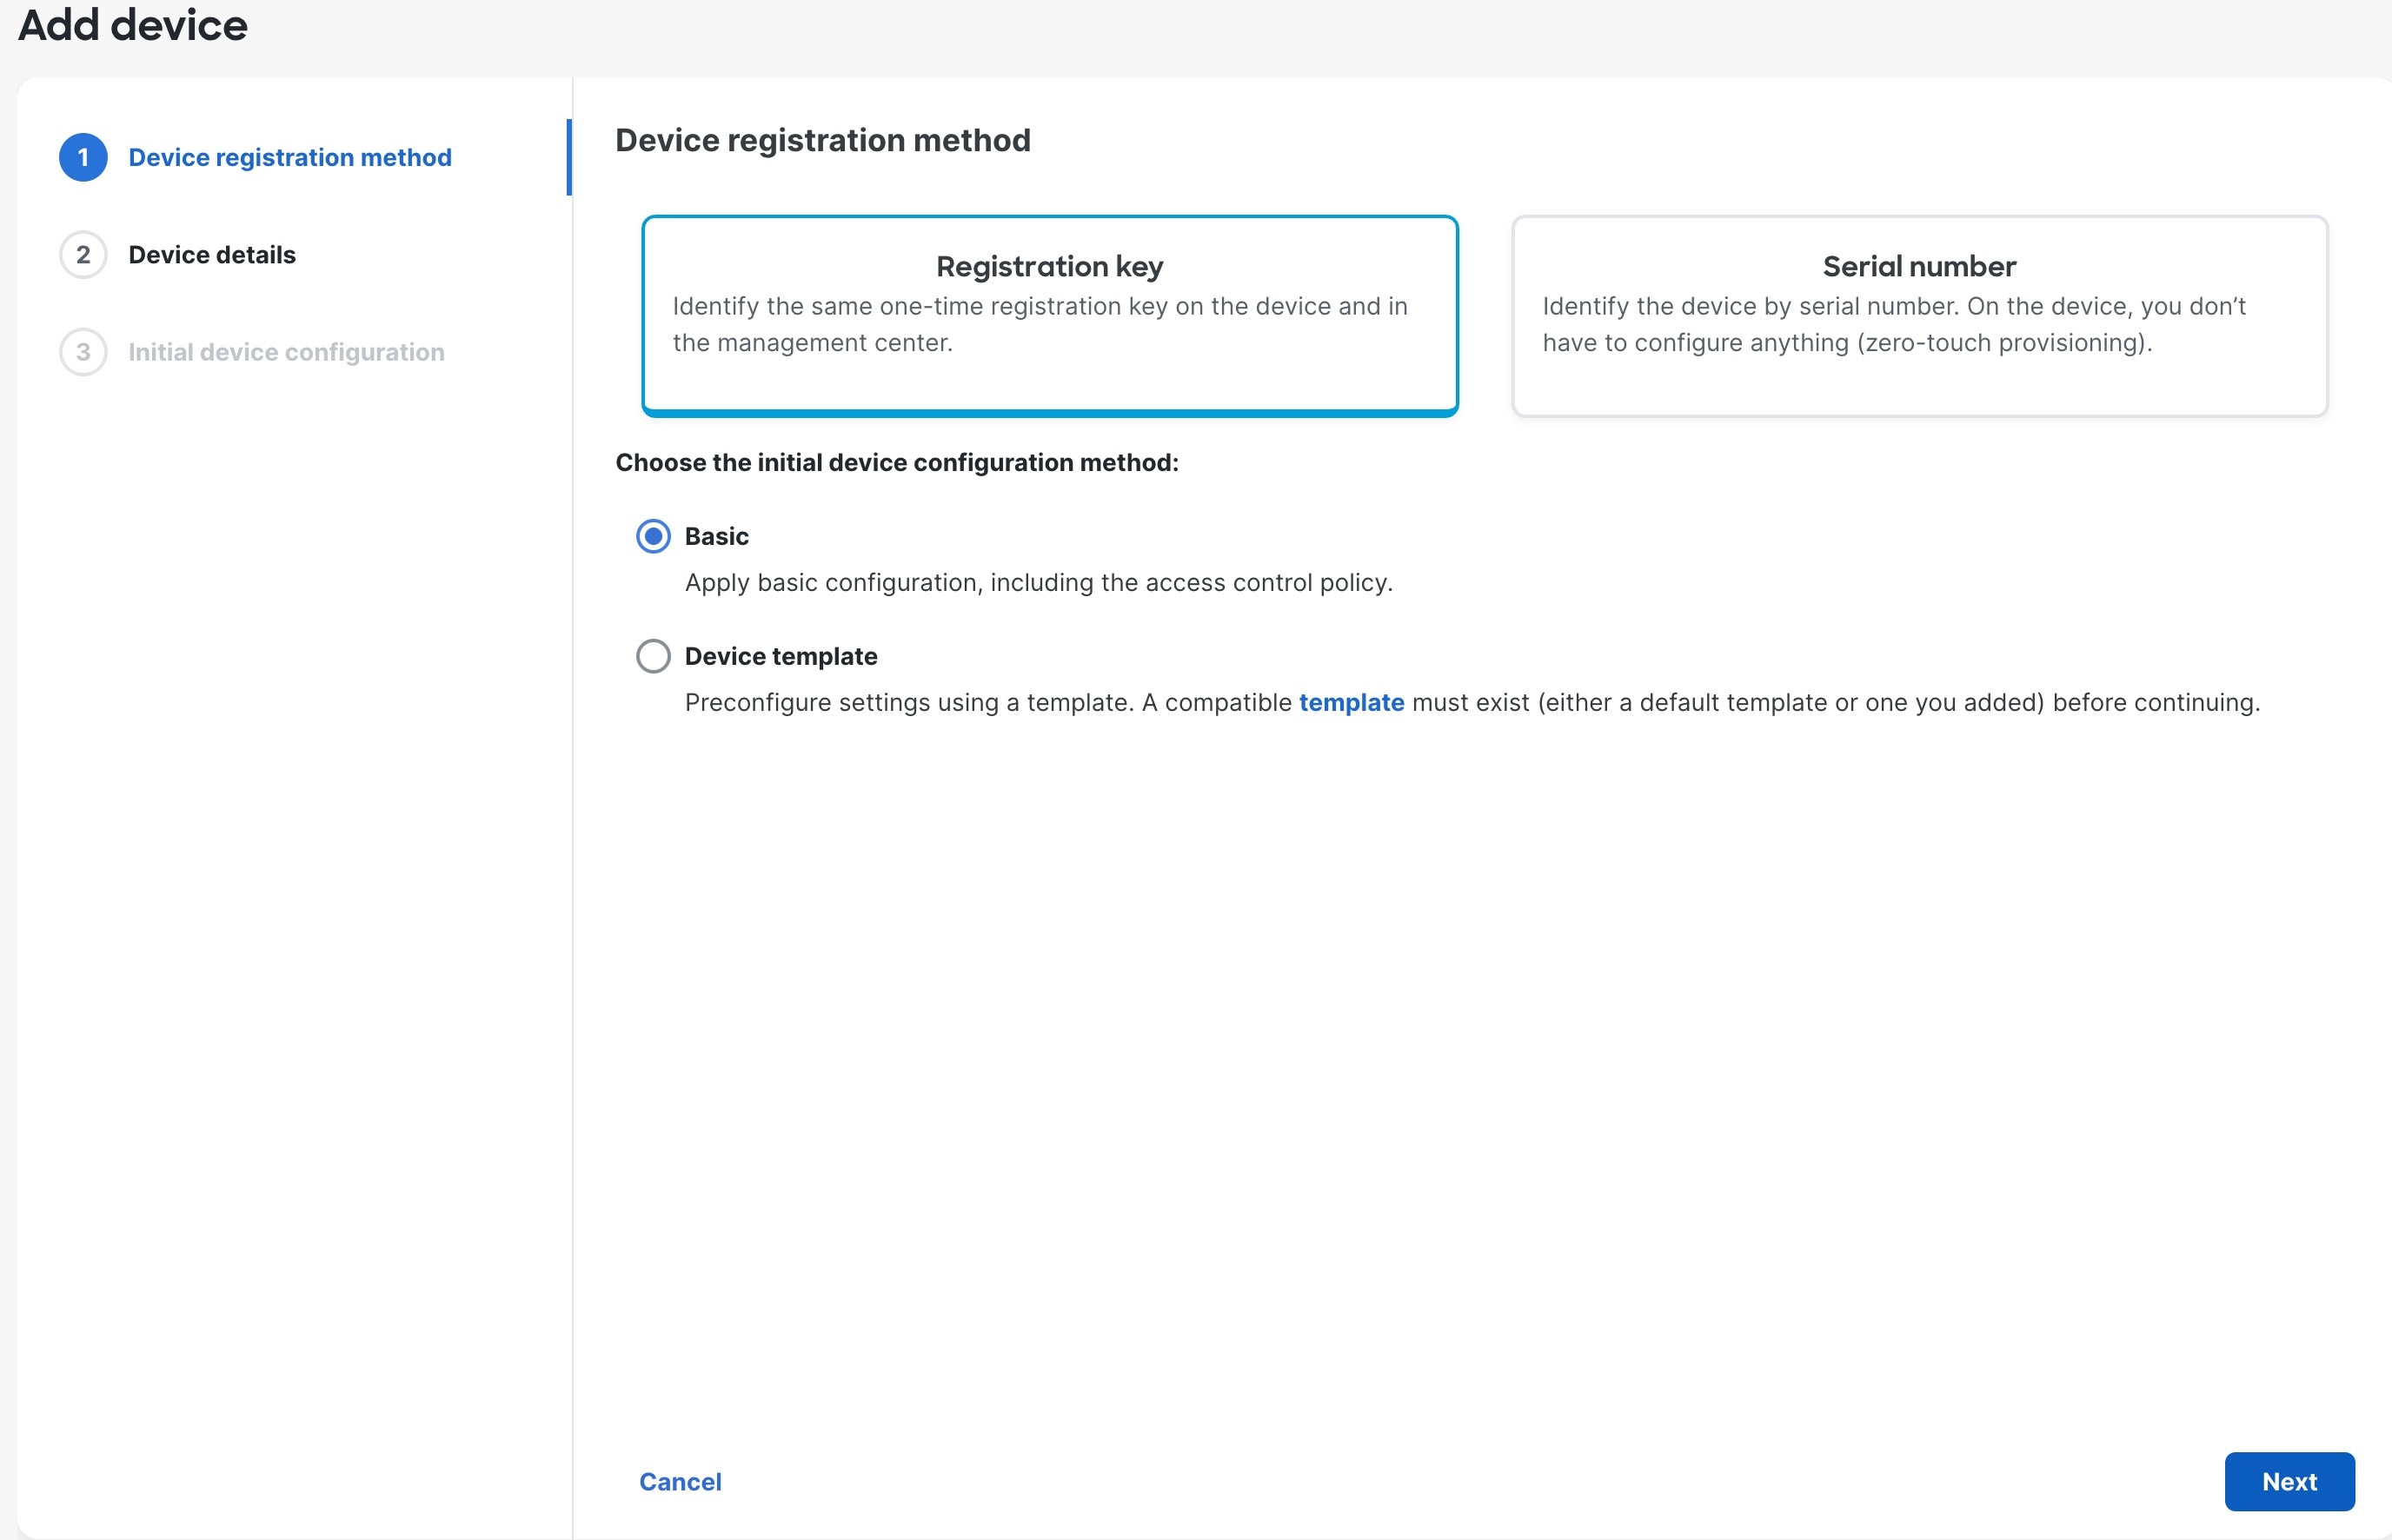
[Registration Key]、[Basic]、[Next] の順にクリックします。

図 10. デバイスの登録方法
デバイスの登録方法

ステップ 5

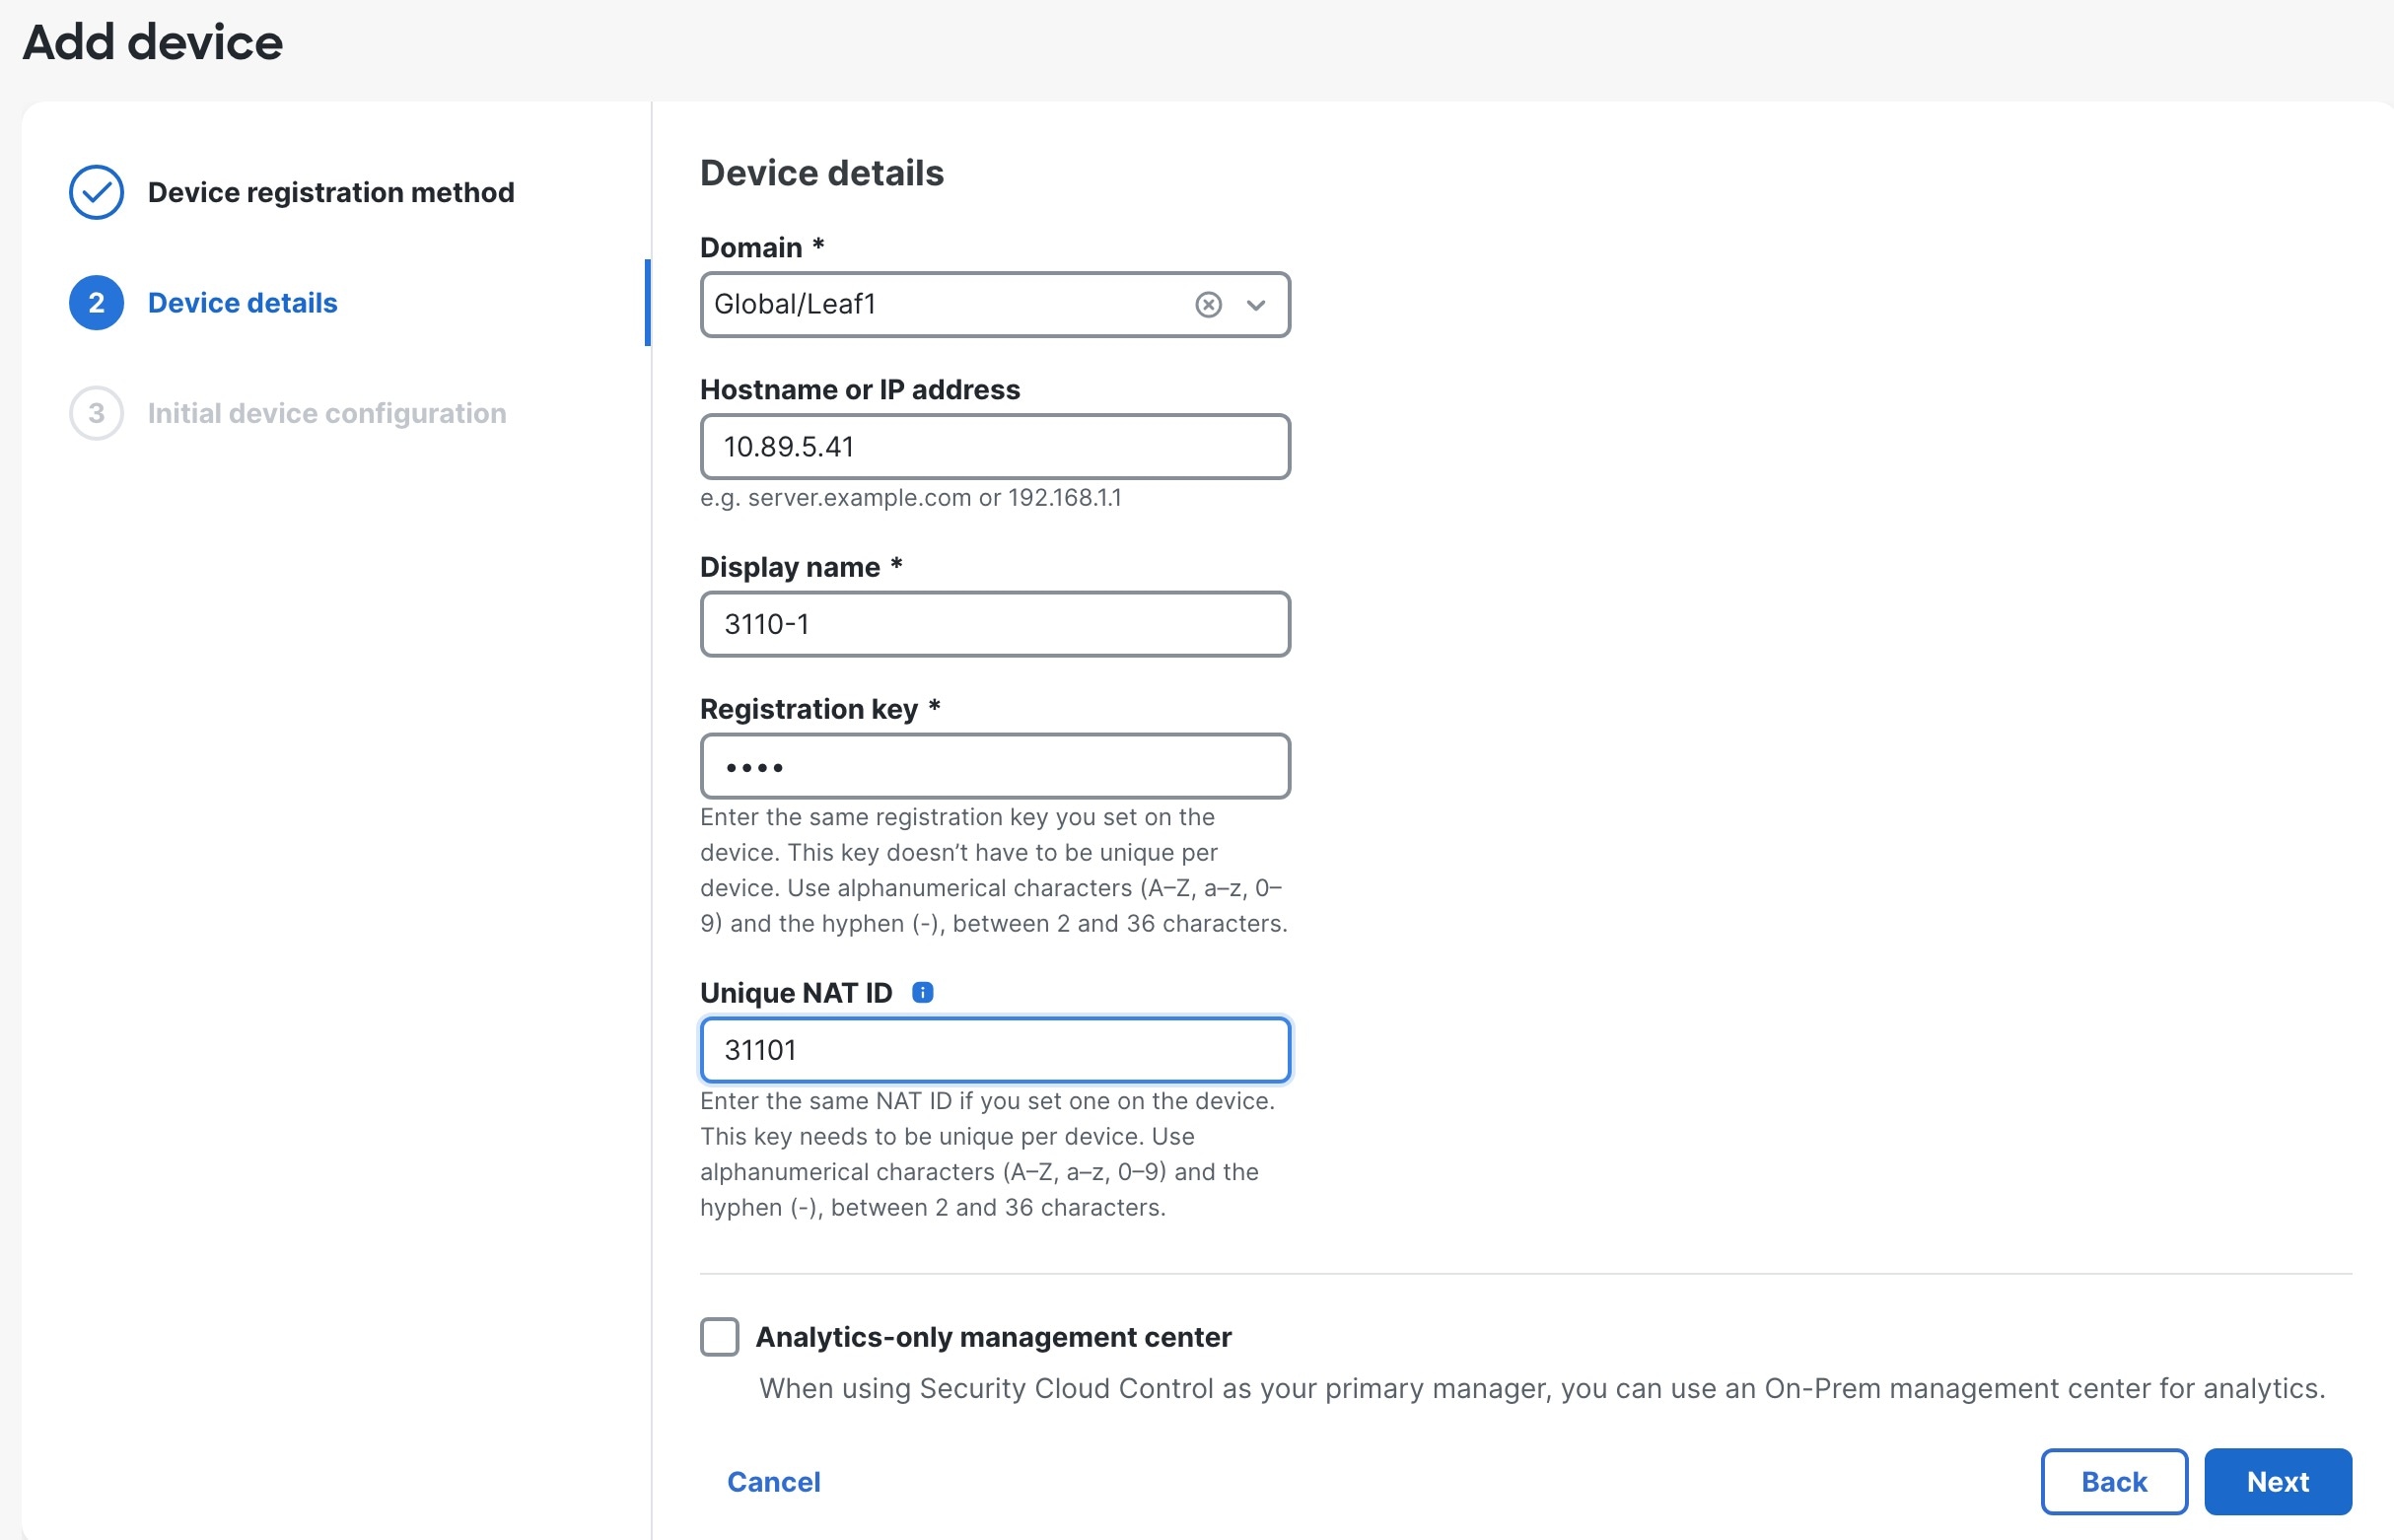
デバイスの詳細を設定して [Next] をクリックします。

図 11. デバイスの詳細(Device Details)
ドメイン
  • [Domain]:マルチドメイン環境で、リーフドメインを選択します。

  • [Device group]:単一ドメイン環境で、デバイスを [Device group] に追加します。

  • [Hostname or IP address]:追加するデバイスの IP アドレスまたはホスト名を入力します。デバイスの IP アドレスが不明な場合は(NAT の背後にある場合など)、このフィードを空欄のままにします。

  • [Display name]:Firewall Management Center に表示するデバイスの名前を入力します。この名前は変更できません。

  • [Registration key]:初期構成と同じ登録キーを入力します。

  • [Unique NAT ID]:初期設定と同じ識別子を入力します。

  • [Analytics-only management center]:

ステップ 6

Configure the initial device configuration.

図 12. Initial Device Configuration
Initial Device Configuration
  • Access control policy —Choose an initial policy to deploy to the device at registration, or create a new policy. Unless you already have a customized policy you know you need to use, choose [追加(Add)] (追加アイコン) , and choose Block all traffic . You can change this later to allow traffic.

  • Smart licensing —Choose your licenses.

    • Is this device physical or virtual? —Choose Physical device

    • License type —Check each license type to assign to the device.

    You can also apply licenses after you add the device .

  • Transfer packets —Enable this option so that for each intrusion event, the device transfers the packet to the Firewall Management Center for inspection.

    For each intrusion event, the device sends event information and the packet that triggered the event to the Firewall Management Center for inspection. If you disable it, only event information will be sent to the Firewall Management Center ; the packet will not be sent.

ステップ 7

[Add device] をクリックします。

Firewall Management Center がデバイスのハートビートを確認して通信を確立するまでに、最大 2 分かかる場合があります。登録が成功すると、デバイスがリストに追加されます。失敗した場合は、エラーメッセージが表示されます。デバイスの登録に失敗した場合は、次の項目を確認してください。

  • ping:デバイスの CLI にアクセスし、次のコマンドを使用して Firewall Management Center の IP アドレスへの ping を実行します。

    ping system ip_address

    ping が成功しない場合は、show network コマンドを使用してネットワーク設定を確認します。デバイスの IP アドレスを変更する必要がある場合は、configure network {ipv4 | ipv6} manual コマンドを使用します。

  • 登録キー、NAT ID、および Firewall Management Center IP アドレス:両方のデバイスで同じ登録キーを使用していることを確認し、使用している場合は NAT ID を使用していることを確認します。configure manager add コマンドを使用して、デバイスで登録キーと NAT ID を設定することができます。

トラブルシューティングの詳細については、https://cisco.com/go/fmc-reg-error を参照してください。