Cisco Identity Services Engine リリース 2.3 管理者ガイド
偏向のない言語
この製品のマニュアルセットは、偏向のない言語を使用するように配慮されています。このマニュアルセットでの偏向のない言語とは、年齢、障害、性別、人種的アイデンティティ、民族的アイデンティティ、性的指向、社会経済的地位、およびインターセクショナリティに基づく差別を意味しない言語として定義されています。製品ソフトウェアのユーザーインターフェイスにハードコードされている言語、RFP のドキュメントに基づいて使用されている言語、または参照されているサードパーティ製品で使用されている言語によりドキュメントに例外が存在する場合があります。シスコのインクルーシブランゲージに対する取り組みの詳細は、こちらをご覧ください。
翻訳について
このドキュメントは、米国シスコ発行ドキュメントの参考和訳です。リンク情報につきましては、日本語版掲載時点で、英語版にアップデートがあり、リンク先のページが移動/変更されている場合がありますことをご了承ください。あくまでも参考和訳となりますので、正式な内容については米国サイトのドキュメントを参照ください。
- Updated:
- 2017年11月9日木曜日
章のタイトル: Cisco TrustSec ポリシーの設定
- TrustSec アーキテクチャ
- TrustSec ダッシュボード
- TrustSec のグローバル設定
- TrustSec マトリックスの設定
- TrustSec デバイスの設定
- TrustSec AAA サーバの設定
- セキュリティ グループの設定
- 出力ポリシー(Egress Policy)
- ワーク プロセスの設定
- [マトリックス登録(Matrices Listing)] ページ
- TrustSec マトリックス ワークフロー プロセス
- 出力ポリシー テーブル セルの設定
- 出力ポリシーの SGT の設定
- モニタ モード
- [プッシュ(Push)] ボタン
Cisco TrustSec ポリシーの設定
TrustSec アーキテクチャ
Cisco TrustSec ソリューションでは、信頼ネットワーク デバイスのクラウドを確立して、セキュアなネットワークを構築します。Cisco TrustSec クラウド内の個々のデバイスは、そのネイバー(ピア)によって認証されます。TrustSec クラウド内のデバイス間の通信は、暗号化、メッセージ整合性検査、データパス リプレイ防止メカニズムを組み合わせたセキュリティで保護されます。TrustSec ソリューションでは、認証中に取得したデバイスおよびユーザ ID 情報を使用して、ネットワークに入ってきたパケットを分類(色付け)します。このパケット分類は、パケットが TrustSec ネットワークに入ってきたときに、そのパケットにタグ付けすることによって維持されます。これにより、パケットはデータ パス全体で正しく識別され、セキュリティおよびその他のポリシー基準が適用されるようになります。このタグは、セキュリティ グループ タグ(SGT)と呼ばれることもあります。エンドポイント デバイスで SGT に応じてトラフィックをフィルタリングできるようにすることにより、Cisco ISE でアクセス コントロール ポリシーを適用できるようになります。
次の図に、TrustSec ネットワーク クラウドの例を示します。

|
Cisco TrustSec を使用してネットワーク セグメンテーションを簡素化、セキュリティを強化する方法については、「Simplify Network Segmentation with Cisco TrustSec」と「Policy-Based Software Defined Segmentation and Cisco TrustSec Improve Security White Paper」を参照してください。 Cisco TrustSec プラットフォーム サポート マトリックスのリストについては、「Cisco TrustSec Platform Support Matrix」を参照してください。 利用可能な TrustSec のサポート ドキュメントのリストについては、「Cisco TrustSec」を参照してください。 TrustSec コミュニティ リソースのリストについては、TrustSec Communityを参照してください。 |
TrustSec のコンポーネント
主な TrustSec のコンポーネント:
-
ネットワーク デバイス アドミッション コントロール(NDAC):信頼ネットワークでは、認証中に、TrustSec クラウド内にある各ネットワーク デバイス(イーサネット スイッチなど)のクレデンシャルおよび信頼性が、そのピア デバイスによって検証されます。NDAC は IEEE 802.1X ポートベース認証を使用し、その拡張認証プロトコル(EAP)方式として Extensible Authentication Protocol-Flexible Authentication via Secure Tunneling(EAP-FAST)を使用します。NDAC プロセスの認証および許可が成功すると、IEEE 802.1AE 暗号化のセキュリティ アソシエーション プロトコル ネゴシエーションが実行されます。
-
エンドポイント アドミッション コントロール(EAC):TrustSec クラウドに接続しているエンドポイント ユーザまたはデバイスの認証プロセス。EAC は一般的にアクセス レベル スイッチで実行されます。EAC プロセスの認証および許可が成功すると、ユーザまたはデバイスに対する SGT 割り当てが実行されます。認証および許可の EAC アクセス方法には次のものがあります。
-
セキュリティ グループ(SG):アクセス コントロール ポリシーを共有するユーザ、エンドポイント デバイス、およびリソースのグループ。SG は、管理者が Cisco ISE で定義します。新規ユーザおよびデバイスが TrustSec ドメインに追加されると、Cisco ISE では、これらの新規エントリを適切なセキュリティ グループに割り当てます。
-
セキュリティ グループ タグ(SGT):TrustSec サービスは各セキュリティ グループに、その範囲が TrustSec ドメイン内でグローバルな一意のセキュリティ グループ番号(16 ビット)を割り当てます。スイッチ内のセキュリティ グループの数は、認証されたネットワーク エンティティの数に制限されます。セキュリティ グループ番号を手動で設定する必要はありません。これらは自動的に生成されますが、IP と SGT とのマッピング用に SGT の範囲を予約しておくことができます。
-
セキュリティ グループ アクセス コントロール リスト(SGACL):SGACL では、割り当てられている SGT に基づいてアクセスおよび権限を制御できます。権限をロールにまとめることにより、セキュリティ ポリシーの管理が容易になります。デバイスを追加するときに、1 つ以上のセキュリティ グループを割り当てるだけで、即座に適切な権限が付与されます。セキュリティ グループを変更することにより、新しい権限を追加したり、現在の権限を制限することもできます。
-
セキュリティ交換プロトコル(SXP):SGT 交換プロトコル(SXP)は、TrustSec サービス用に開発されたプロトコルで、SGT 対応ハードウェアをサポートしていないネットワーク デバイス間で、SGT/SGACL をサポートしているハードウェアに IP-SGT バインディングを伝播します。
-
環境データのダウンロード:TrustSec デバイスは、初めて信頼ネットワークに参加するときに、その環境データを Cisco ISE から取得します。デバイス上の一部のデータは、手動で設定することもできます。デバイスでは、期限切れになる前に環境データを更新する必要があります。TrustSec デバイスは、次の環境データを Cisco ISE から取得します。
-
ID とポートとのマッピング:エンドポイントの接続先のポートでスイッチが ID を定義するための方法で、この ID を使用して Cisco ISE サーバ内の特定の SGT 値が検索されます。
TrustSec の用語
次の表は、TrustSec ソリューションで使用される一般的な用語の一部と、TrustSec 環境でのその意味を示しています。
TrustSec のサポートされるスイッチと必要なコンポーネント
Cisco TrustSec ソリューションが有効になった Cisco ISE ネットワークを設定するには、TrustSec ソリューションおよび他のコンポーネントをサポートするスイッチが必要です。スイッチ以外に、IEEE 802.1X プロトコルを使用した ID ベースのユーザ アクセス コントロールには、その他のコンポーネントも必要です。TrustSec をサポートするシスコ スイッチのプラットフォームおよび必要なコンポーネントの完全な最新のリストについては、「Cisco TrustSec-Enabled Infrastructure」を参照してください。
TrustSec ダッシュボード
TrustSec ダッシュボードは、TrustSec ネットワークの一元化されたモニタリング ツールです。TrustSec ダッシュボードには次のダッシュレットが含まれています。
メトリック
このセクションには、TrustSec ネットワークの動作に関する統計情報が表示されます。タイム フレーム(たとえば、過去 2 時間、過去 2 日 など)とチャート タイプ(たとえば、棒、折れ線、スプラインなど)を選択できます。
最新のバー値がグラフに表示されます。また、前のバーからのパーセンテージの変化も表示されます。バー値に増加がある場合、プラス記号付きの緑色で表示されます。値に減少がある場合、マイナス記号付きの赤色で表示されます。
値が計算された時刻とその正確な値を <Value:xxxx Date/Time: xxx> 形式で表示するには、グラフのバーにカーソルを置きます。
次のメトリックを表示できます。
|
SGTセッション(SGT sessions) |
選択された時間内に作成された SGT セッションの総数が表示されます。
|
||
|
使用中のSGT(SGTs in use) |
選択された時間内に使用された固有の SGT の総数が表示されます。たとえば、1 時間で 200 の TrustSec セッションがあったが、ISE が認証応答で 6 つのタイプの SGT でしか応答しなかった場合、グラフにはこの時間に値 6 が表示されます。 |
||
|
アラーム |
選択された時間内に発生したアラームおよびエラーの総数が表示されます。エラーは赤色で表示され、アラームは黄色で表示されます。 |
||
|
使用中のNAD(NADs in use) |
選択された時間内に TrustSec 認証に参加した固有の NAD の数が表示されます。 |
現在のネットワーク ステータス
このダッシュボードの中間部分には、TrustSec ネットワークの現在のステータスに関する情報が表示されます。グラフに表示される値は、ページがロードされると更新され、[ダッシュボードの更新(Refresh Dashboard)] オプションを使用して更新できます。
アクティブな SGT セッション
このダッシュレットには、ネットワークで現在アクティブな SGT セッションが表示されます。上位 10 個の最もよく使用されている SGT または最も使用頻度の低い SGT を表示できます。X 軸には SGT 使用率が表示され、Y 軸には SGT の名前が表示されます。
SGT の TrustSec セッションの詳細を表示するには、その SGT に対応するバーをクリックします。その SGT に関連する TrustSec セッションの詳細が [ライブログ(Live Log)] ダッシュレットに表示されます。
アラーム
このダッシュレットには、TrustSec セッション関連のアラームが表示されます。次の詳細情報を表示できます。
クイック ビュー
[クイックビュー(Quick View)] ダッシュレットには、NAD の TrustSec 関連情報が表示されます。SGT の TrustSec 関連情報を表示することもできます。
NAD クイック ビュー
[検索(Search)] ボックスに詳細を表示する TrustSec ネットワーク デバイスの名前を入力し、Enter を押します。検索ボックスには自動入力機能があり、ユーザがテキスト ボックスに入力すると、ドロップ ダウンに一致するデバイス名がフィルタされ表示されます。
次の詳細情報が表示されます。
-
[NDG(NDGs)]:このネットワーク デバイスが属するネットワーク デバイス グループ(NDG)がリストされます。
-
[IPアドレス(IP Address)]:ネットワーク デバイスの IP アドレス。[ライブログ(Live Logs)] ダッシュレットに NAD アクティビティの詳細を表示するには、このリンクをクリックします。
-
[アクティブセッション(Active sessions)]:このデバイスに接続されているアクティブな TrustSec セッションの数。
-
[PACの有効期限(PAC expiry)]:PAC の失効日。
-
[最後のポリシー更新(Last Policy Refresh)]:ポリシーを最後にダウンロードした日付。
-
[最後の認証(Last Authentication)]:このデバイスの最後の認証レポートのタイムスタンプ。
-
[アクティブSGT(Active SGTs)]:このネットワーク デバイスに関連するアクティブ セッションで使用されている SGT がリストされます。カッコ内に表示される数字は、現在この SGT を使用しているセッションの数を示します。[ライブ ログ(Live Log)] ダッシュレットに TrustSec セッションの詳細を表示するには、SGT のリンクをクリックします。
[最新ログの表示(Show Latest Logs)] オプションを使用して、デバイスの NAD アクティビティのライブ ログを表示できます。
SGT クイック ビュー
[検索(Search)] ボックスに詳細を表示する SGT の名前を入力し、Enter を押します。
次の情報がこのダッシュレットに表示されます。
ライブ ログ
アクティブな TrustSec セッション(応答の一部として SGT があるセッション)を表示するには [TrustSecセッション(TrustSec Sessions)] リンクをクリックします。
NAD から Cisco ISE への TrustSec プロトコル データ要求と応答に関する情報を表示するには、[NADアクティビティ(NAD Activity)] リンクをクリックします。
TrustSec のグローバル設定
Cisco ISE が TrustSec サーバとして機能して TrustSec サービスを提供するには、いくつかのグローバル TrustSec 設定を定義する必要があります。
-
TrustSec グローバル設定を設定する前に、グローバル EAP-FAST 設定が定義されていることを確認します( を選択)。
[機関識別情報の説明(Authority Identity Info Description)] を Cisco ISE サーバ名に変更することができます。この説明は、クレデンシャルをエンドポイント クライアントに送信する Cisco ISE サーバを説明したわかりやすい文字列にします。Cisco TrustSec アーキテクチャのクライアントには、IEEE 802.1X 認証の EAP 方式として EAP-FAST を実行するエンドポイント、または Network Device Access Control(NDAC)を実行するサプリカント ネットワーク デバイスのいずれも使用できます。クライアントは、この文字列を Protected Access Credentials(PAC)Type-Length-Value(TLV)情報で認識できます。デフォルト値は、Identity Services Engine です。NDAC 認証時に、ネットワーク デバイスで Cisco ISE PAC 情報が一意に識別されるように、この値を変更する必要があります。
次の作業
TrustSec マトリックスの設定
次のタスクを実行するには、スーパー管理者またはシステム管理者である必要があります。
TrustSec デバイスの設定
Cisco ISE で TrustSec 対応デバイスからの要求を処理するには、これらの TrustSec 対応デバイスを Cisco ISE で定義しておく必要があります。
OOB TrustSec PAC
すべての TrustSec ネットワーク デバイスで、EAP-FAST プロトコルの一部として TrustSec PAC が保持されています。これはセキュアな RADIUS プロトコルでも使用され、ここでは RADIUS 共有秘密が PAC で伝送されるパラメータから作成されます。これらのパラメータの 1 つである発信側 ID には、TrustSec ネットワーク デバイス ID、つまりデバイス ID が保持されます。
デバイスが TrustSec PAC を使用して識別される場合、Cisco ISE でそのデバイス用に設定されているデバイス ID と、PAC の発信側 ID が一致していない場合、認証に失敗します。
一部の TrustSec デバイス(Cisco ASA ファイアウォールなど)では EAP-FAST プロトコルをサポートしていません。したがって、Cisco ISE ではこれらのデバイスを EAP-FAST を介した TrustSec PAC でプロビジョニングできません。代わりに、TrustSec PAC は Cisco ISE 上で生成され、手動でデバイスにコピーされます。そのため、これをアウトオブバンド(OOB)TrustSec PAC 生成と呼びます。
- [設定(Settings)] 画面からの TrustSec PAC の生成
- [ネットワーク デバイス(Network Devices)] 画面からの TrustSec PAC の生成
- [ネットワーク デバイス リスト(Network Devices List)] 画面からの TrustSec PAC の生成
[設定(Settings)] 画面からの TrustSec PAC の生成
[ネットワーク デバイス(Network Devices)] 画面からの TrustSec PAC の生成
[ネットワーク デバイス リスト(Network Devices List)] 画面からの TrustSec PAC の生成
[ネットワーク デバイス リスト(Network Devices list)] 画面から TrustSec PAC を生成できます。
[プッシュ(Push)] ボタン
出力ポリシーの [プッシュ(Push)] オプションは CoA 通知を開始します。この通知は、Cisco ISE からの出力ポリシー設定変更に関する更新を、ただちに要求するよう TrustSec デバイスに伝えます。
TrustSec AAA サーバの設定
展開内の Cisco ISE サーバのリストを AAA サーバ リストに設定して、これらの任意のサーバに対して TrustSec デバイスの認証が行われるようにできます。このリストに Cisco ISE サーバを追加すると、これらすべてのサーバの詳細が TrustSec デバイスにダウンロードされます。TrustSec デバイスは、認証を試行するときに、このリストから Cisco ISE サーバを選択します。最初のサーバがダウン状態またはビジー状態の場合、TrustSec デバイスはこのリストにある別の任意のサーバに対して自分自身の認証を行うことができます。デフォルトでは、プライマリ Cisco ISE サーバは、TrustSec AAA サーバです。1 台のサーバがビジー状態の場合、AAA サーバ リストの別のサーバが TrustSec 要求を処理できるように、AAA サーバ リストで追加の Cisco ISE サーバを設定することを推奨します。
このページには、TrustSec AAA サーバとして設定した展開内の Cisco ISE サーバがリストされます。
[プッシュ(Push)] ボタンをクリックすると、複数の TrustSec AAA サーバを設定した後に、環境 CoA 通知を開始できます。この環境 CoA 通知は、すべての TrustSec ネットワーク デバイスに送信され、変更されたすべての TrustSec AAA サーバの更新を提供します。
次の作業
セキュリティ グループの設定
セキュリティ グループ(SG)またはセキュリティ グループ タグ(SGT)は、TrustSec ポリシー設定で使用される要素です。SGT は、パケットが信頼ネットワーク内を移動する場合に付加されます。これらのパケットは、信頼ネットワークに入ったとき(入力)にタグ付けされ、信頼ネットワークから離れるとき(出力)にタグ解除されます。
SGT は順次的な方法で生成されますが、IP と SGT とのマッピング用に SGT の範囲を予約しておくことができます。Cisco ISE は、SGT の生成時に予約済みの番号をスキップします。
TrustSec サービスはこれらの SGT を使用して、出力時に TrustSec ポリシーを適用します。
管理者ポータルで次のページからセキュリティ グループを設定できます。
[プッシュ(Push)] ボタンをクリックすると、複数の SGT を更新した後に、環境 CoA 通知を開始できます。この環境 CoA 通知はすべての TrustSec ネットワーク デバイスに送信され、ポリシー/データ リフレッシュ要求を開始することを強制します。
- セキュリティ グループの追加
- Cisco ISE へのセキュリティ グループのインポート
- Cisco ISE からのセキュリティ グループのエクスポート
- IP SGT スタティック マッピングの追加
- Cisco ISE への IP SGT スタティック マッピングのインポート
- Cisco ISE からの IP SGT スタティック マッピングのエクスポート
- SGT マッピング グループの追加
- セキュリティ グループ アクセス コントロール リストの追加
セキュリティ グループの追加
TrustSec ソリューション内の個々のセキュリティ グループに一意の SGT を割り当てる必要があります。Cisco ISE では 65,535 SGT までサポートされていますが、SGT の数を少なくすると、TrustSec ソリューションをより簡単に展開および管理できるようになります。最大で 4,000 SGT までにすることを推奨します。
次の作業
セキュリティ グループ アクセス コントロール リストの設定
Cisco ISE へのセキュリティ グループのインポート
カンマ区切り形式(CSV)ファイルを使用して Cisco ISE ノードにセキュリティ グループをインポートできます。Cisco ISE にセキュリティ グループをインポートする前に、テンプレートを更新する必要があります。同じリソース タイプのインポートを同時に実行できません。たとえば、2 つの異なるインポート ファイルから同時にセキュリティ グループをインポートできません。
管理者ポータルから CSV テンプレートをダウンロードし、テンプレートにセキュリティ グループの詳細を入力し、Cisco ISE にインポート可能な CSV ファイルとしてテンプレートを保存できます。
セキュリティ グループのインポート中、Cisco ISE で最初のエラーが発生した場合、インポート プロセスを停止できます。
Cisco ISE からのセキュリティ グループのエクスポート
Cisco ISE で設定されたセキュリティ グループを CSV ファイル形式でエクスポートし、これを使用して別の Cisco ISE ノードにそれらのセキュリティ グループをインポートできます。
IP SGT スタティック マッピングの追加
IP-SGT スタティック マッピングを使用して、TrustSec デバイスと SXP ドメインに統一された方法でマッピングを展開することができます。新しい IP-SGT スタティック マッピングを作成するときに、このマッピングを展開する SXP ドメインとデバイスを指定できます。また、IP-SGT マッピングをマッピング グループに関連付けることもできます。
Cisco ISE への IP SGT スタティック マッピングのインポート
CSV ファイルを使用して IP SGT マッピングをインポートできます。
また、管理者ポータルから CSV テンプレートをダウンロードし、マッピングの詳細を入力し、CSV ファイルとしてテンプレートを保存して、Cisco ISE にインポートすることができます。
Cisco ISE からの IP SGT スタティック マッピングのエクスポート
IP SGT マッピングを CSV ファイルの形式でエクスポートできます。このファイルを使用して、これらのマッピングを別の Cisco ISE ノードにインポートできます。
SGT マッピング グループの追加
次のタスクを実行するには、スーパー管理者またはシステム管理者である必要があります。
あるマッピング グループから別のマッピング グループに IP SGT マッピングを移動できます。
また、マッピングおよびマッピング グループを更新または削除できます。マッピングまたはマッピング グループを更新するには、更新するマッピングまたはマッピング グループの横にあるチェック ボックスにマークを付けてから、[編集(Edit)] をクリックします。マッピングまたはマッピング グループを削除するには、削除するマッピングまたはマッピング グループの横にあるチェック ボックスにマークを付けてから、[ごみ箱(Trash)] > [選択済み(Selected)] の順にクリックします。マッピング グループが削除されると、そのグループ内の IP SGT マッピングも削除されます。
セキュリティ グループ アクセス コントロール リストの追加
| ステップ 1 | [ワークセンター(Work Centers)] > [TrustSec] > [コンポーネント(Components)] > [セキュリティグループACL(Security Group ACLs)] を選択します。 |
| ステップ 2 | [追加(Add)] をクリックして新規セキュリティ グループ ACL を作成します。 |
| ステップ 3 | 次の情報を入力します。 |
| ステップ 4 | [送信(Submit)] をクリックします。 |
出力ポリシー(Egress Policy)
出力テーブルには、送信元 SGT および宛先 SGT が、予約済みのものもそうでないものもあわせてリストされます。また、このページでは、出力テーブルをフィルタリングして特定のポリシーを表示することや、これらのプリセット フィルタを保存することもできます。送信元 SGT から宛先 SGT に到達しようとすると、TrustSec 対応デバイスは、出力ポリシーで定義されている TrustSec ポリシーに基づいて SGACL を適用します。Cisco ISE はポリシーを作成してプロビジョニングします。
TrustSec ポリシーの作成に必要な基本的構築ブロックである SGT および SGACL を作成した後に、SGACL を送信元 SGT および宛先 SGT に割り当てることによって、それらの関係を確立できます。
送信元 SGT と宛先 SGT のそれぞれの組み合わせが、出力ポリシーのセルになります。
出力ポリシーは、[ワークセンター(Work Centers)] > [TrustSec] > [TrustSecポリシー(TrustSec Policy)] > [出力ポリシー(Egress Policy)] ページで表示できます。
- 送信元ツリー ビュー
- 宛先ツリー ビュー
- マトリクス ビュー
- ワーク プロセスの設定
- [マトリックス登録(Matrices Listing)] ページ
- TrustSec マトリックス ワークフロー プロセス
- 出力ポリシー テーブル セルの設定
- 出力ポリシーの SGT の設定
- モニタ モード
- [プッシュ(Push)] ボタン
送信元ツリー ビュー
送信元ツリー ビューには、簡潔で組織化された送信元 SGT のビューが折りたたまれた状態で表示されます。送信元 SGT を展開すると、選択した送信元 SGT に関連するすべての情報が含まれた内部テーブルを表示できます。このビューには、宛先 SGT にマッピングされている送信元 SGT のみが表示されます。特定の送信元 SGT を展開すると、この送信元 SGT にマッピングされているすべての宛先 SGT とその対応するポリシー(SGACL)がテーブルに表示されます。
一部のフィールドの隣に 3 個のドット(...)が表示されます。これは、セルにより多くの情報が含まれていることを示しています。カーソルを 3 個のドットの上に置くと、クイック ビュー ポップアップに残りの情報が表示されます。カーソルを SGT 名または SGACL 名の上に置くと、クイック ビュー ポップアップが開き、その特定の SGT または SGACL の内容が表示されます。
宛先ツリー ビュー
宛先ツリー ビューには、簡潔で組織化された宛先 SGT のビューが折りたたまれた状態で表示されます。宛先 SGT を展開すると、選択した宛先 SGT に関連するすべての情報が含まれた内部テーブルを表示できます。このビューには、送信元 SGT にマッピングされている宛先 SGT のみが表示されます。特定の宛先 SGT を展開すると、この宛先 SGT にマッピングされているすべての送信元 SGT と対応するポリシー(SGACL)が表に示されます。
一部のフィールドの隣に 3 個のドット(...)が表示されます。これは、セルにより多くの情報が含まれていることを示しています。カーソルを 3 個のドットの上に置くと、クイック ビュー ポップアップに残りの情報が表示されます。カーソルを SGT 名または SGACL 名の上に置くと、クイック ビュー ポップアップが開き、その特定の SGT または SGACL の内容が表示されます。
マトリクス ビュー
出力ポリシーのマトリクス ビューは、スプレッドシートに似ています。ここには 2 つの軸があります。
送信元 SGT と宛先 SGT のマッピングが、セルとして示されます。セルにデータが含まれている場合、対応する送信元 SGT と宛先 SGT 間にマッピングがあるということになります。マトリクス ビューには 2 つのタイプのセルがあります。
-
マッピングされたセル:送信元 SGT と宛先 SGT のペアが、順序付けされた SGACL のセットに関連付けられ、特定のステータスになっている場合。
-
マッピングされていないセル:送信元 SGT と宛先 SGT のペアが、SGACL に関連付けられてなく、特定のステータスになっていない場合。
出力ポリシー セルには、送信元 SGT、宛先 SGT、最終的な catch-all ルールが 1 つのリストとして SGACL の下にカンマで区切られて表示されます。最終的な catch-all ルールは、[なし(None)] に設定されている場合には表示されません。マトリクス内の空のセルは、マッピングされていないセルを示します。
出力ポリシーのマトリクス ビューでは、マトリクスをスクロールして目的のセルのセットを表示できます。ブラウザがマトリクス データ全体を一度にロードすることはありません。ブラウザは、ユーザがスクロールした領域に移入されるデータをサーバに要求します。これにより、メモリのオーバーフローとパフォーマンスの問題が回避されます。
[表示(View)] ドロップダウン リストで次のオプションを使用して、マトリックス ビューを変更できます。
-
[SGACL名ありで簡易設定(Condensed with SGACL names)]:このオプションを選択すると、空のセルは非表示になり、SGACL 名がセルに表示されます。
-
[SGACL名なしで簡易設定(Condensed without SGACL names)]:空のセルは非表示になり、SGACL 名はセルに表示されません。このビューは、より多くのマトリックス セルを表示し、色、パターンおよびアイコン(セルのステータス)を使用して、セルの内容を区別する場合に便利です。
-
[SGACL名ありでフル(Full with SGACL names)]:このオプションを選択すると、左側と上側のメニューは非表示になり、SGACL 名がセルに表示されます。
-
[SGACL名なしでフル(Full without SGACL names)]:このオプションを選択すると、マトリックスは全画面モードで表示され、SGACL 名はセルに表示されません。
ISE では、カスタム ビューを作成し、名前を付け、保存できます。カスタム ビューを作成するには、[表示(Show)] > [カスタムビューの作成(Create Custom View)] の順に選択します。また、ビューの条件を更新したり、未使用のビューを削除することもできます。
[マトリックス(Matrix)] ビューは、[ソース(Source)] ビューおよび [送信先(Destination)] ビューと同じ GUI 要素を持っています。ただし、次の追加要素を含みます。
マトリクスの次元
次元ビューの [次元(Dimension)] ドロップダウン リストでは、マトリクスの次元を設定することができます。
マトリクスのインポート/エクスポート
[インポート(Import)] および [エクスポート(Export)] ボタンを使用すると、マトリクスをインポートまたはエクスポートできます。
カスタム ビューの作成
次のタスクを実行するには、スーパー管理者またはシステム管理者である必要があります。
| ステップ 1 | [マトリックスビュー(Matrix View)] ページで、[表示(Show)] ドロップダウン リストから [カスタムビューの作成(Create Custom View)] オプションを選択します。 |
| ステップ 2 | [ビューの編集(Edit View)] ダイアログボックスで、次の詳細情報を入力します。
|
| ステップ 3 | [保存(Save)] をクリックします。 |
マトリクス操作
マトリクスでの移動
カーソルでマトリクス コンテンツ領域をドラッグするか、または水平および垂直スクロール バーを使用して、マトリクス内を移動できます。セルをクリックしたままにし、マトリクス コンテンツ全体を任意の方向にドラッグできます。送信元および宛先のバーがセルと一緒に移動します。セルを選択すると、マトリクス ビューによってそのセルと対応する行(送信元 SGT)およびカラム(宛先 SGT)が強調表示されます。選択したセルの座標(送信元 SGT および宛先 SGT)がマトリクス コンテンツ領域の下に表示されます。
マトリクスでのセルの選択
マトリクス ビューでセルを選択するには、該当のセルをクリックします。選択したセルが別の色で表示され、送信元 SGT および宛先 SGT が強調表示されます。セルをもう一度クリックするか、または別のセルを選択することで、セルの選択を解除できます。複数セルの選択は、マトリクス ビューでは許可されていません。セルをダブルクリックして、セルの設定を編集します。
出力ポリシーの SGACL の設定
| ステップ 1 | [ワークセンター(Work Centers)] > [TrustSec] > [TrustSecポリシー(TrustSec Policy)] > [出力ポリシー(Egress Policy)] の順に選択します。 |
| ステップ 2 | [送信元ツリービュー(Source Tree View)] または [宛先ツリービュー(Destination Tree View)] ページから、[設定(Configure)] > [新しいセキュリティグループACLの作成(Create New Security Group ACL)] を選択します。 |
| ステップ 3 | 必要な詳細を入力し、[送信(Submit)] をクリックします。 |
ワーク プロセスの設定
次のタスクを実行するには、スーパー管理者である必要があります。
| ステップ 1 | [ワーク センター(Work Centers)] > [TrustSec] > [設定(Settings)] > [ワーク プロセスの設定(Work Process Settings)] の順に選択します。 | ||
| ステップ 2 | 次のオプションのいずれかを選択します。
| ||
| ステップ 3 | DEFCON マトリックスを作成する場合は、[DEFCON を使用する(Use DEFCONS)] チェックボックスをオンにします。
DEFCONS マトリックスは、ネットワーク セキュリティ侵害の発生時に簡単に展開できるスタンバイ ポリシー マトリックスです。 重大度レベル [重大(Critical)]、[深刻(Severe)]、[実質的(Substantial)]、および [適度(Moderate)] の DEFCON マトリックスを作成できます。 DEFCON マトリックスがアクティブになると、対応する DEFCON ポリシーがすべての TrustSec ネットワーク デバイスにすぐに展開されます。ネットワーク デバイスから DEFCON ポリシーを削除するには、非アクティブ化オプションを使用できます。 | ||
| ステップ 4 | [保存(Save)] をクリックします。 |
[マトリックス登録(Matrices Listing)] ページ
TrustSec ポリシー マトリックスと DEFCON マトリックスは、[マトリックス登録(Matrices Listing)] ページに表示されます([ワークセンター(Work Centers)] > [TrustSec] > [TrustSec ポリシー(TrustSec Policy)] > [出力ポリシー(Egress Policy)] > [マトリックス登録(Matrices List)])。各マトリックスに割り当てられているデバイスの数を確認することもできます。
 (注) | [マトリックス登録(Matrices Listing)] ページは、単一マトリックス モードが有効であり、DEFCON マトリックス オプションが無効な場合は表示されません。 |
[マトリックス登録(Matrices Listing)] ページからは、次のことが行えます。
デバイスをマトリックスに割り当てたら、[プッシュ(Push)] をクリックし、TrustSec の設定変更を該当するネットワーク デバイスに通知します。
[マトリックス登録(Matrices Listing)] ページで作業を行うときは、次の点に注意してください。
-
デフォルトのマトリックスを編集、削除、名前変更することはできません。
-
新しいマトリックスを作成する際は、空のマトリックスから開始することや、既存のマトリックスからポリシーをコピーすることができます。
-
マトリックスを削除すると、そのマトリックスに割り当てられている NAD が自動的にデフォルトのマトリックスに移動します。
-
既存のマトリックスをコピーするとマトリックスのコピーが作成されますが、デバイスはコピーされたマトリックスに自動的に割り当てられません。
-
複数マトリックス モードでは、すべてのデバイスが初期段階でデフォルトのマトリックスに割り当てられます。
-
複数マトリックス モードでは、一部の SGACL がマトリックス間で共有されることがあります。この場合、SGACL コンテンツを変更すると、セルにその SGACL が含まれているすべてのマトリックスに影響します。
-
複数マトリックスは、ステージングが進行中のときに有効にすることはできません。
-
複数マトリックス モードから単一マトリックス モードに変更すると、すべての NAD が自動的にデフォルトのマトリックスに割り当てられます。
-
現在有効になっている場合は、DEFCON マトリックスを削除することはできません。
TrustSec マトリックス ワークフロー プロセス
マトリクスのワークフロー機能は、すべてのネットワーク デバイスにポリシーを導入する前に、このマトリックスのドラフト版(ステージング マトリックスとも呼ばれます)を使用して、デバイスの制限されたセットで新しいポリシーをテストできます。承認のためのステージング ポリシーを送信し、承認されると、選択したネットワーク デバイスにステージング ポリシーを導入できます。この機能により、必要に応じて、デバイスの制限されたセットへの新しいポリシーの導入、適切に機能しているかの確認、変更を行うことができます。次の一連のデバイスまたはすべてのデバイスにポリシーを適用し続けることもできます。ステージング ポリシーがすべてのネットワーク デバイスに導入されると、ステージング マトリックスは新たな実稼働マトリックスとして設定できます。
ワークフロー モードを有効にすると、エディタ ロールに割り当てられたユーザは、ステージング マトリクスを作成し、マトリクス セルを編集できます。ステージング マトリックスは、TrustSec ネットワークに現在展開されている実稼働マトリックスのコピーです。エディタは、ステージング ポリシーを展開し、承認のために承認者にステージング ポリシーを送信するデバイスを選択できます。承認者ロールが割り当てられたユーザは、ステージング ポリシーを確認し、要求を承認または拒否することができます。ステージング ポリシーが承認者によって確認され、承認された後でのみ、ステージング ポリシーを選択したネットワーク デバイスに展開できます。
次の図で、ワークフロー プロセスについて説明します。
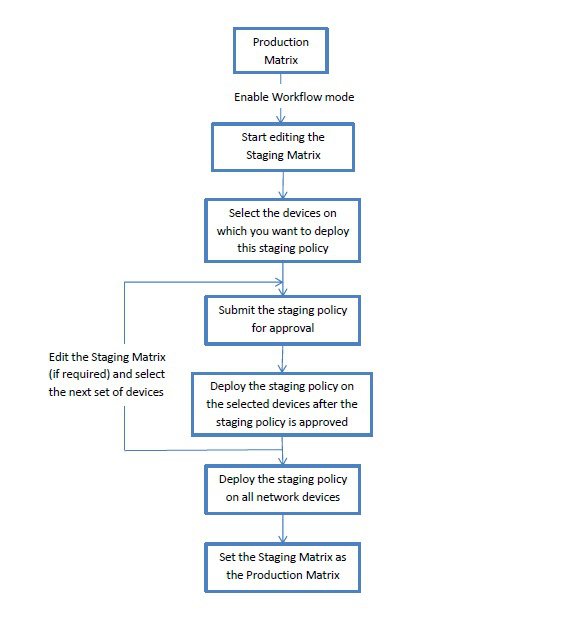
上級管理ユーザは、ワークフロー プロセスの設定ページ([ワーク センター(Work Centers)] > [TrustSec] > [設定(Settings)] > [ワークフロー プロセス(Workflow Process)])で、エディタおよび承認者ロールに割り当てられたユーザを選択できます。
ステージング ポリシーが選択されたデバイスに導入された後では、SGT および SGACL を編集できませんが、マトリクス セルは編集できます。設定の差分レポートを使用して、実稼働マトリックスとステージング マトリックスの違いを追跡できます。また、ステージング処理中にそのセルへの変更を表示するには、セルで [デルタ(Delta)] アイコンをクリックします。
次の表では、ワークフローのさまざまな段階を説明します。
|
ステージ |
説明 |
|---|---|
|
ステージングを編集中(Staging in Edit) |
エディタがステージング マトリックスの編集を開始すると、マトリックスは [ステージングを編集中(Staging in Edit)] 状態に移行します。ステージング マトリックスを編集したら、エディタは、新しいステージング ポリシーを導入するデバイスを選択できます。 |
|
ステージングの承認待ち(Staging Awaiting Approval) |
マトリックスの編集後、エディタは確認および承認を受けるために承認者にステージング マトリックスを送信します。 承認のためにステージング マトリックスを送信する時に、エディタは承認者に送信される電子メールにコメントを追加できます。 承認者は、ステージング ポリシーを確認し、要求を承認または拒否することができます。承認者は、選択したネットワーク デバイスと設定の差分レポートを表示できます。要求の承認または拒否時に、承認者はエディタに送信される電子メールにコメントを追加できます。 エディタはステージング ポリシーがどのネットワーク デバイスにも導入されていなければ承認リクエストをキャンセルできます。 |
|
展開の承認取得済み(Deploy Approved) |
承認者が要求を承認すると、ステージング マトリックスは [展開の承認取得済み(Deploy Approved)] 状態に移行します。要求が拒否された場合、マトリックスは [ステージングを編集中(Staging in Edit)] 状態に戻されます。 エディタはステージング ポリシーが承認者によって承認された後でのみ、ステージング ポリシーを選択したネットワーク デバイスに導入できます。 |
|
一部展開済み(Partially deployed) |
ステージング マトリックスが選択したデバイスに展開された後、マトリックスは [一部展開済み(Partially deployed)] 状態に移行します。マトリックスは、ステージング ポリシーがすべてのネットワーク デバイスに導入されるまで、[一部展開済み(Partially deployed)] ステージのままです。 このステージでは、SGT および SGACL を編集できませんが、マトリクス セルは編集できます。 最新のポリシーが導入されていないデバイス(同期していないデバイス)は、[ネットワーク デバイスの導入(Network Device Deployment)] ウィンドウにオレンジ色(イタリック体)で表示されます。このステータスは、導入の進捗状況のステータス バーにも表示されます。エディタはこれらのデバイスを選択し、さまざまな導入サイクルで更新されたデバイスを同期するように承認を要求できます。 |
|
完全に展開済み(Fully deployed) |
上記の手順は、ステージング ポリシーがすべてのネットワーク デバイスに展開されるまで繰り返されます。ステージング マトリックスをすべてのネットワーク デバイスに展開する場合、承認者はステージング マトリックスを実稼働マトリックスとして設定できます。 実稼働マトリックスをステージング マトリックスに置き換えた後では、実稼働マトリックスの以前のバージョンへのロールバックはできないため、新たな実稼働マトリクスとしてステージング マトリクスを設定する前に実稼働マトリクスのコピーを取得しておくことをお勧めします。 |
[ワークフロー(Workflow)] ドロップダウン リストに表示されるオプションは、ワークフローの状態とユーザ ロール(エディタまたは承認者)によって異なります。次の表に、エディタおよび承認者に表示されるメニュー オプションを示します。
|
ワークフローの状態 |
エディタに表示されるメニュー |
承認者に表示されるメニュー |
|---|---|---|
|
ステージングを編集中(Staging in Edit) |
|
|
|
ステージングの承認待ち(Staging Awaiting Approval) |
|
|
|
承認済み:展開の準備完了(Approved - ready to deploy) |
|
|
|
一部展開済み(Partially deployed) |
|
|
|
完全に展開済み(Fully deployed) |
|
|
ワークフロー オプションは、[送信元ツリービュー(Source Tree View)] と [宛先ツリービュー(Destination Tree View)] でも使用できます。
TrustSec ポリシーのダウンロード レポート([ワーク センター(Work Centers)] > [TrustSec] > [レポート(Reports)])を使用して、ステージング/実稼働ポリシーをダウンロードしたデバイスのリストを表示できます。TrustSec ポリシーのダウンロードは、ポリシー(SGT/SGACL)のダウンロードのために、ネットワーク デバイスによって送信された要求と ISE によって送信された詳細を示します。ワークフロー モードを有効にしている場合、要求を実稼働マトリックスまたはステージング マトリックスに対してフィルタ処理することができます。
出力ポリシー テーブル セルの設定
Cisco ISE では、ツールバーで使用可能なさまざまなオプションを使用して、セルを設定できます。Cisco ISE では、選択した送信元 SGT および宛先 SGT がマッピングされたセルと同一である場合には、セルを設定できません。
出力ポリシー セルのマッピングの追加
[ポリシー(Policy)] ページから出力ポリシーのマッピング セルを追加できます。
出力ポリシーのエクスポート
| ステップ 1 | [ワーク センター(Work Centers)] > [TrustSec] > [TrustSec ポリシー(TrustSec Policy)] > [出力ポリシー(Egress Policy)] > [マトリックス(Matrix)] > [エクスポート(Export)] の順に選択します。 | ||
| ステップ 2 | エクスポートしたファイルに空のセル(SGACL が設定されていないセル)を含める場合は、[空のセルを含める(Include Empty Cells)] チェック ボックスにマークを付けます。
このオプションが有効になっている場合、マトリックス全体がエクスポートされ、空のセルは [SGACL] 列に「空(Empty)」キーワードでマークされます。
| ||
| ステップ 3 | 次のオプションのいずれかを選択します。
| ||
| ステップ 4 | [エクスポート(Export)] をクリックします。 |
出力ポリシーのインポート
出力ポリシーをオフラインで作成し、Cisco ISE にインポートすることができます。セキュリティ グループ タグの数が多い場合、セキュリティ グループ ACL マッピングを 1 つずつ作成すると、時間がかかることがあります。代わりに、出力ポリシーをオフラインで作成し、Cisco ISE にインポートすることにより、時間を節約できます。インポート中、Cisco ISE は CSV ファイルのエントリを出力ポリシー マトリクスに追加し、データは上書きしません。
次の場合、出力ポリシーのインポートは失敗します。
| ステップ 1 | [ワークセンター(Work Centers)] > [TrustSec] > [TrustSecポリシー(TrustSec Policy)] > [出力ポリシー(Egress Policy)] > [マトリックス(Matrix)] > [インポート(Import)] の順に選択します。 |
| ステップ 2 | [テンプレートの生成(Generate a Template)] をクリックします。 |
| ステップ 3 | [出力ポリシー(Egress Policy)] ページからテンプレート(CSV ファイル)をダウンロードし、CSV ファイルに次の情報を入力します。 |
| ステップ 4 | インポートするポリシーで既存のポリシーが上書きされるようにする場合は、[新しいデータで既存のデータを上書き(Overwrite Existing Data with New Data)] チェックボックスをオンにします。空セル(「Empty」キーワードでマークされた、[SGACL] 列のセル)がインポートされたファイルに含まれていると、対応するマトリックスのセルの既存のポリシーが削除されます。
イーグレス ポリシーをエクスポートする際に空セルを含めるには、[空のセルを含める(Include Empty Cells)] チェックボックスをオンにします。詳細については、出力ポリシーのエクスポートを参照してください。 |
| ステップ 5 | [ファイルの検証(Validate File)] をクリックして、インポートされたファイルを検証します。Cisco ISE は、ファイルをインポートする前に CSV 構造、SGT 名、SGACL、およびファイル サイズを検証します。 |
| ステップ 6 | エラーが発生した場合にインポートを中止するには、[最初のエラーでインポートを停止(Stop Import on First Error)] チェックボックスをオンにします。 |
| ステップ 7 | [インポート(Import)] をクリックします。 |
出力ポリシーの SGT の設定
| ステップ 1 | [ワークセンター(Work Centers)] > [TrustSec] > [TrustSecポリシー(TrustSec Policy)] > [出力ポリシー(Egress Policy)] の順に選択します。 |
| ステップ 2 | [送信元ツリービュー(Source Tree View)] または [宛先ツリービュー(Destination Tree View)] ページから、[設定(Configure)] > [新しいセキュリティグループの作成(Create New Security Group)] を選択します。 |
| ステップ 3 | 必要な詳細を入力し、[送信(Submit)] をクリックします。 |
モニタ モード
出力ポリシーの [すべてをモニタ(Monitor All)] オプションを使用すると、出力ポリシー設定ステータス全体を 1 回のクリックでモニタ モードに変更できます。[出力ポリシー(egress policy)] ページの [すべてをモニタ(Monitor All)] チェックボックスをオンにして、すべてのセルの出力ポリシー設定ステータスをモニタ モードに変更します。[すべてをモニタ(Monitor All)] チェックボックスをオンにすると、設定ステータスが次のように変更されます。
[すべてをモニタ(Monitor All)] チェックボックスをオフにすると、元の設定ステータスに戻ります。データベース内の実際のセルのステータスは変更されません。[すべてをモニタ(Monitor All)] をオフにすると、出力ポリシーのそれぞれのセルが元の設定ステータスに戻ります。
モニタ モードの機能
不明セキュリティ グループ
不明セキュリティ グループは事前に設定されているセキュリティ グループで、変更不可能であり、タグ値 0 の TrustSec を表します。
Cisco セキュリティ グループのネットワーク デバイスは、送信元または宛先のいずれかの SGT がない場合に不明 SGT を参照するセルを要求します。送信元のみが不明の場合、要求は <不明, 宛先 SGT> セルに適用されます。宛先のみが不明の場合、要求は <送信元 SGT, 不明> セルに適用されます。送信元および宛先の両方が不明の場合、要求は <不明, 不明> セルに適用されます。
デフォルト ポリシー
デフォルト ポリシーは、<ANY,ANY> セルを参照します。任意の送信元 SGT が任意の宛先 SGT にマッピングされています。ここでは、ANY SGT は変更不可能であり、送信元 SGT にも宛先 SGT にも表示されません。ANY SGT は ANY SGT とのみペアにできます。他の SGT とはペアにできません。TrustSec ネットワーク デバイスでは、デフォルト ポリシーを特定セルのポリシーの最後に付加します。
Cisco ISE では、セル ポリシーおよびデフォルト ポリシーは 2 つの別々の SGACL セットになり、デバイスは 2 つの別々のポリシー クエリーの応答としてこれらのセットを取得します。
[プッシュ(Push)] ボタン
出力ポリシーの [プッシュ(Push)] オプションは CoA 通知を開始します。この通知は、Cisco ISE からの出力ポリシー設定変更に関する更新を、ただちに要求するよう TrustSec デバイスに伝えます。
SGT の割り当て
Cisco ISE では、デバイスのホスト名または IP アドレスがわかっている場合に、TrustSec デバイスに SGT を割り当てることができます。特定のホスト名または IP アドレスを持つデバイスがネットワークに参加すると、Cisco ISE によって認証前に SGT が割り当てられます。
次の SGT がデフォルトで作成されています。
- SGT_TrustSecDevices
-
SGT_NetworkServices
-
SGT_Employee
-
SGT_Contractor
-
SGT_Guest
-
SGT_ProductionUser
-
SGT_Developer
-
SGT_Auditor
-
SGT_PointofSale
-
SGT_ProductionServers
-
SGT_DevelopmentServers
-
SGT_TestServers
-
SGT_PCIServers
-
SGT_BYOD
-
SGT_Quarantine
セキュリティ グループ タグをエンドポイントにマップするようにデバイスを手動で設定する必要がある場合もあります。このマッピングは [セキュリティ グループ マッピング(Security Group Mappings)] ページから作成できます。この操作を実行する前に、SGT の範囲が予約済みであることを確認します。
ISE では、最大 10,000 の IP-to-SGT マッピングを作成できます。IP-to-SGT マッピング グループを作成して、このような大規模なマッピングを論理的にグループ化することができます。各 IP-to-SGT マッピング グループには、IP アドレスのリスト、マップ先の単一のセキュリティ グループ、およびこれらのマッピングの展開対象であるネットワーク デバイスまたはネットワーク デバイス グループが含まれています。
NDAC 許可
デバイスに SGT を割り当てることで TrustSec ポリシーを設定できます。TrustSec デバイスの ID 属性に基づいて、デバイスにセキュリティ グループを割り当てることができます。
NDAC 許可の設定
| ステップ 1 | [ワークセンター(Work Centers)] > [TrustSec] > [TrustSecポリシー(TrustSec Policy)] > [ネットワークデバイス許可(Network Device Authorization)] の順に選択します。 |
| ステップ 2 | [デフォルト ルール(Default Rule)] 行の右側にある [操作(Action)] アイコンをクリックし、[新規行を上に挿入(Insert New Row Above)] をクリックします。 |
| ステップ 3 | このルールの名前を入力します。 |
| ステップ 4 | [条件(Conditions)] の隣にあるプラス記号(+)をクリックして、ポリシー条件を追加します。 |
| ステップ 5 | [新しい条件の作成(高度なオプション)(Create New Condition (Advance Option))] をクリックすると、新しい条件を作成できます。 |
| ステップ 6 | [セキュリティ グループ(Security Group)] ドロップダウン リストから、この条件の評価が true になった場合に割り当てる SGT を選択します。 |
| ステップ 7 | この行の [操作(Action)] アイコンをクリックして、現在のルールの上または下に、デバイス属性に基づいた別のルールを追加します。このプロセスを繰り返して、TrustSec ポリシーに必要なすべてのルールを作成できます。ルールをドラッグ アンド ドロップし、 評価が true になる最初のルールによって、評価の結果が決まります。いずれのルールも一致しなかった場合、デフォルト ルールが適用されます。デフォルト ルールを編集して、いずれのルールも一致しなかった場合にデバイスに適用される SGT を指定できます。 |
| ステップ 8 | [保存(Save)] をクリックして TrustSec ポリシーを保存します。
ネットワーク デバイス ポリシーを設定した後に、TrustSec デバイスで認証を行おうとすると、デバイスはその SGT およびそのピアの SGT を取得し、関連するすべての詳細をダウンロードできるようになります。 |
エンドユーザの許可の設定
Cisco ISE では、許可ポリシー評価の結果としてセキュリティ グループを割り当てることができます。このオプションを使用すると、ユーザおよびエンドポイントにセキュリティ グループを割り当てることができます。
TrustSec の設定およびポリシー プッシュ
Cisco ISE では、許可変更(CoA)がサポートされています。これを使用すると、Cisco ISE で TrustSec の設定およびポリシーの変更を TrustSec デバイスに通知でき、デバイスでは関連データの取得要求でこれに応答できるようになります。
CoA 通知では、TrustSec ネットワーク デバイスをトリガーし、環境 CoA またはポリシー CoA のいずれかを送信できます。
また、基本的に TrustSec CoA 機能をサポートしないデバイスに設定変更をプッシュできます。
- CoA でサポートされるネットワーク デバイス
- 非 CoA サポート デバイスへの設定変更のプッシュ
- 環境 CoA 通知のフロー
- SGACL コンテンツ更新のフロー
- ポリシーの更新 CoA 通知のフロー
- SGT マトリクスの更新 CoA のフロー
- TrustSec CoA の概要
CoA でサポートされるネットワーク デバイス
Cisco ISE は次のネットワーク デバイスに CoA 通知を送信します。
複数のセカンダリが存在する分散環境に Cisco ISE が展開されており、これらのセカンダリがそれぞれ異なるデバイス セットと相互運用している場合、CoA 要求は Cisco ISE プライマリ ノードからすべてのネットワーク デバイスに送信されます。そのため、TrustSec ネットワーク デバイスは、Cisco ISE プライマリ ノードで CoA クライアントとして設定されている必要があります。
デバイスは、Cisco ISE プライマリ ノードに CoA NAK または ACK を返します。ただし、ネットワーク デバイスからの次の TrustSec セッションは、ネットワーク デバイスが他の AAA 要求をすべて送信する Cisco ISE ノードに送信され、必ずしもプライマリ ノードに送信されるわけではありません。
非 CoA サポート デバイスへの設定変更のプッシュ
一部のプラットフォームでは、許可変更(CoA)について Cisco ISE の「プッシュ」機能はサポートされていません。例:Nexus ネットワーク デバイスの一部のバージョン。この場合、ISE はネットワーク デバイスに接続し、ISE に対して更新された設定要求をデバイスがトリガーするようにします。これを行うために、ISE はネットワーク デバイスへの SSHv2 トンネルを開き、TrustSec ポリシー マトリクスのリフレッシュをトリガーするコマンドを送信します。この方法は、CoA プッシュをサポートするネットワーク プラットフォームでも実行できます。
| ステップ 1 | の順に選択します。 |
| ステップ 2 | 必要なネットワーク デバイスの横にあるチェックボックスをオンにし、[編集(Edit)] をクリックします。
ネットワーク デバイスの名前、IP アドレス、RADIUS および TrustSec 設定が正しく設定されていることを確認します。 |
| ステップ 3 | [高度な TrustSec 設定(Advanced TrustSec Settings)] まで下にスクロールし、[TrustSec 通知および更新(TrustSec Notifications and Updates)] セクションで、[デバイスに設定変更を送信(Send configuration changes to device)] チェックボックスをオンにして [CLI(SSH)(CLI (SSH))] オプション ボタンをクリックします。 |
| ステップ 4 | (任意) SSH キーを指定します。 |
| ステップ 5 | デバイス インターフェイスのクレデンシャルを使用して IP-SGT マッピングを取得するには、この SGA デバイスに対して [セキュリティ グループ タグ マッピングの展開時にこのデバイスを含める(Include This Device When Deploying Security Group Tag Mapping Updates)] チェックボックスをオンにします。 |
| ステップ 6 | EXEC モードでデバイス設定を編集する権限を持つユーザのユーザ名とパスワードを入力します。 |
| ステップ 7 | (任意) 設定を編集できるデバイスの EXEC モード パスワードを有効にするためのパスワードを入力します。[表示(Show)] をクリックして、このデバイスにすでに設定されている EXEC モード パスワードを表示できます。 |
| ステップ 8 | ページの下部にある [送信(Submit)] をクリックします。 |
ネットワーク デバイスは、TrustSec の変更をプッシュするように設定されました。Cisco ISE ポリシーを変更した後で、ネットワーク デバイスに新規設定を反映させるには、[プッシュ(Push)] をクリックします。
SSH キーの検証
SSH キーを使用してセキュリティを強化することもできます。Cisco ISE では、SSH キー検証機能によってこれをサポートします。
この機能を使用するには、Cisco ISE からネットワーク デバイスに SSHv2 トンネルを開いて、ネットワーク デバイスの独自の CLI を使用して SSH キーを取得します。このキーをコピーし、検証のために Cisco ISE に貼り付けます。SSH キーが誤っている場合、Cisco ISE は接続を終了します。
制限:現在、Cisco ISE が検証できるのは 1 つの IP のみです(IP の範囲、または IP 内のサブネットは検証できません)
次のものが必要です。
(Cisco ISE とセキュアに通信できるようにするネットワーク デバイスのもの)
| ステップ 1 | ネットワーク デバイス上: |
| ステップ 2 | Cisco ISE ユーザ インターフェイスから、次の手順を実行します。
|
ネットワーク デバイスは、SSH キー検証を使用して Cisco ISE と通信するようになりました。
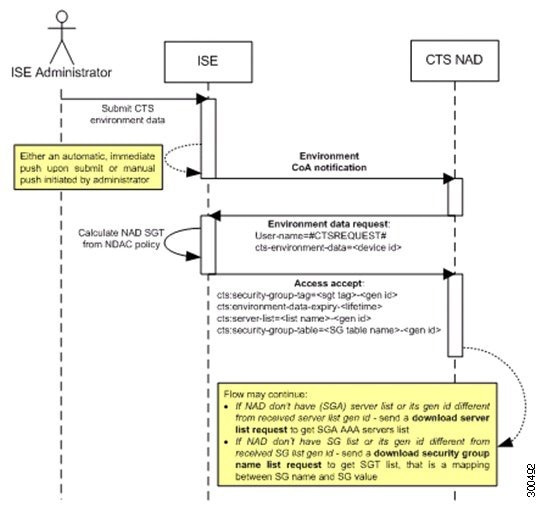
環境 CoA 通知のフロー
-
環境データ要求への応答で、Cisco ISE は次の情報を返します。
要求を送信したデバイスの環境データ:これには、(NDAC ポリシーから推測される)TrustSec デバイスの SGT およびダウンロード環境 TTL が含まれます。
TrustSec AAA サーバ リストの名前および生成 ID。
(複数の可能性がある)SGT テーブルの名前および生成 ID:これらのテーブルには SGT 名と SGT 値がリストされ、一緒に SGT の完全リストも保持されます。
-
デバイスが TrustSec AAA サーバ リストを保持していない場合、または生成 ID が受信した生成 ID と異なる場合、デバイスは別の要求を送信して、AAA サーバ リストの内容を取得します。
-
デバイスが応答にリストされている SGT テーブルを保持していない場合、または生成 ID が受信した生成 ID と異なる場合、デバイスは別の要求を送信して、その SGT テーブルの内容を取得します。
環境 CoA トリガー
ネットワーク デバイスの環境 CoA のトリガー
| ステップ 1 | [管理(Administration)] > [ネットワーク リソース(Network Resources)] > [ネットワーク デバイス(Network Devices)] を選択します。 |
| ステップ 2 | ネットワーク デバイスを追加または編集します。 |
| ステップ 3 | [高度な TrustSec 設定(Advanced TrustSec Settings)] セクションで、[TrustSec 通知および更新(TrustSec Notifications and Updates)] パラメータを更新します。
環境属性の変更は、変更が発生した特定の TrustSec ネットワーク デバイスにのみ通知されます。 単一のデバイスのみが影響を受けるため、環境 CoA 通知は送信直後に送信されます。結果として、そのデバイスの環境属性が更新されます。 |
セキュリティ グループの環境 CoA のトリガー
| ステップ 1 | [ワークセンター(Work Centers)] > [TrustSec] > [コンポーネント(Components)] > [セキュリティグループ(Security Groups)] を選択します。 |
| ステップ 2 | [セキュリティ グループ(Security Group)] ページで、SGT の名前を変更します。これにより、その SGT のマッピング値の名前が変更されます。これで環境変更がトリガーされます。 |
| ステップ 3 | 複数の SGT の名前を変更した後、[プッシュ(Push)] ボタンをクリックして、環境 CoA 通知を開始します。この環境 CoA 通知は、すべての TrustSec ネットワーク デバイスに送信され、変更されたすべての SGT の更新が提供されます。 |
TrustSec AAA サーバの環境 CoA のトリガー
| ステップ 1 | [ワークセンター(Work Centers)] > [TrustSec] > [コンポーネント(Components)] > [TrustSec AAAサーバ(TrustSec AAA Servers)] を選択します。 |
| ステップ 2 | [TrustSec AAA サーバ(TrustSec AAA Servers)] ページで、TrustSec AAA サーバの設定を作成、削除、または更新します。これで環境変更がトリガーされます。 |
| ステップ 3 | 複数の TrustSec AAA サーバを設定した後、[プッシュ(Push)] ボタンをクリックして、環境 CoA 通知を開始します。この環境 CoA 通知は、すべての TrustSec ネットワーク デバイスに送信され、変更されたすべての TrustSec AAA サーバの更新を提供します。 |
NDAC ポリシーの環境 CoA のトリガー
| ステップ 1 | [ワークセンター(Work Centers)] > [TrustSec] > [ポリシー(Policy)] > [ネットワークデバイス許可(Network Device Authorization)] の順に選択します。
[NDAC ポリシー(NDAC policy)] ページで、NDAC ポリシーのルールを作成、削除、または更新できます。これらの環境変更は、すべてのネットワーク デバイスに通知されます。 |
| ステップ 2 | [ワークセンター(Work Centers)] > [TrustSec] > [TrustSecポリシー(TrustSec Policy)] > [ネットワークデバイス許可(Network Device Authorization)] の順に選択します。
[NDAC ポリシー(NDAC policy)] ページで、NDAC ポリシーのルールを作成、削除、または更新できます。これらの環境変更は、すべてのネットワーク デバイスに通知されます。 |
| ステップ 3 | [NDAC ポリシー(NDAC policy)] ページで [プッシュ(Push)] ボタンをクリックすることで、環境 CoA 通知を開始できます。この環境 CoA 通知は、すべての TrustSec ネットワーク デバイスに送信され、ネットワーク デバイス自体の SGT の更新を提供します。 |
SGACL コンテンツ更新のフロー
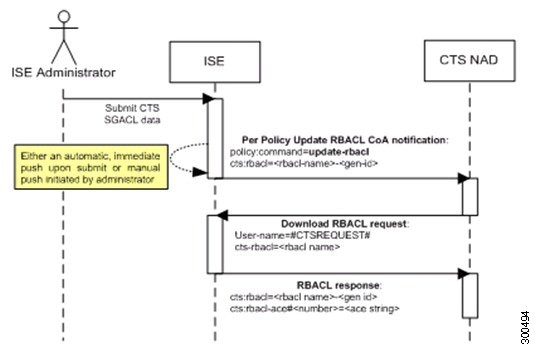
SGACL 名前付きリストの更新 CoA の開始
| ステップ 1 | [ワークセンター(Work Centers)] > [TrustSec] > [コンポーネント(Components)] > [セキュリティグループACL(Security Group ACLs)] を選択します。 |
| ステップ 2 | SGACL のコンテンツを変更します。SGACL を送信すると、SGACL の生成 ID が変更されます。 |
| ステップ 3 | 複数の SGACL のコンテンツを変更した後、[プッシュ(Push)] ボタンをクリックして、SGACL 名前付きリストの更新 CoA 通知を開始します。この通知は、すべての TrustSec ネットワーク デバイスに送信され、関連するデバイスのその SGACL コンテンツの更新が提供されます。
SGACL の名前または IP バージョンを変更しても、その生成 ID は変更されません。そのため、SGACL 名前付きリストの更新 CoA 通知を送信する必要はありません。 ただし、出力ポリシーで使用中の SGACL の名前または IP バージョンを変更することは、その SGACL を含むセルが変更されることを意味するため、この変更でそのセルの宛先 SGT の生成 ID が変更されます。 |
ポリシーの更新 CoA 通知のフロー
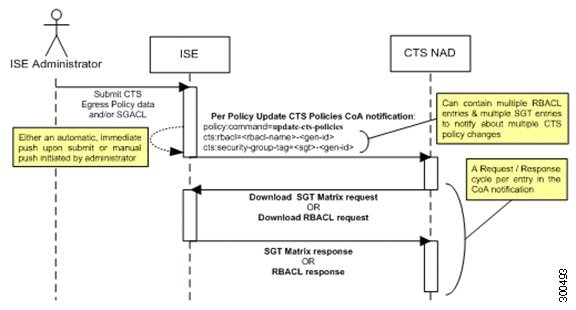
SGT マトリクスの更新 CoA のフロー
次の図に、SGT マトリクスの更新 CoA のフローを示します。
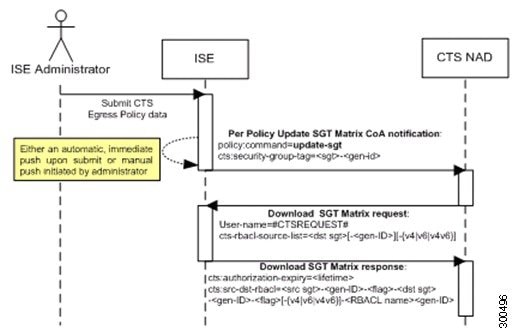
-
Cisco ISE は、TrustSec ネットワーク デバイスに SGT マトリクスの更新 CoA 通知を送信します。通知には、SGT 値と生成 ID が含まれます。
-
デバイスは、次の両方の条件が満たされた場合に、SGT データ要求で応答できます。
SGT がネイバー デバイスまたはエンドポイントの SGT である場合。デバイスは、ネイバー デバイスおよびエンドポイントの SGT に関連するセルをダウンロードして保持します(宛先 SGT)。
-
SGT データ要求に対する応答で、Cisco ISE は、送信元および宛先 SGT、セルのステータス、そのセルに設定されている SGACL 名の順序リストなど、すべての出力セルのデータを返します。
出力ポリシーからの、SGT マトリクスの更新 CoA の開始
| ステップ 1 | [ワークセンター(Work Centers)] > [TrustSec] > [TrustSecポリシー(TrustSec Policy)] > [出力ポリシー(Egress Policy)] の順に選択します。 |
| ステップ 2 | [出力ポリシー(Egress Policy)] ページで、セルの内容(ステータス、SGACL)を変更します。 |
| ステップ 3 | 変更を送信すると、そのセルの宛先 SGT の生成 ID が変更されます。 |
| ステップ 4 | 複数の出力セルの内容を変更した後、[プッシュ(Push)] ボタンをクリックして、SGT マトリクスの更新 CoA 通知を開始します。この通知は、すべての TrustSec ネットワーク デバイスに送信され、関連するデバイスのセルの内容の更新が提供されます。 |
TrustSec CoA の概要
次の表に、TrustSec CoA の開始を要求するさまざまなシナリオ、各シナリオで使用される CoA のタイプ、および関連する UI ページの概要を示します。
|
[TrustSec AAA サーバ(TrustSec AAA servers)] リスト ページの [プッシュ(Push)] ボタンをクリックすると、累積された変更をプッシュできます。 |
||||
|
[NDAC ポリシー(NDAC policy)] ページの [プッシュ(Push)] ボタンをクリックすると、累積された変更をプッシュできます。 |
||||
|
[SGACL] リスト ページの [プッシュ(Push)] ボタンまたは出力テーブルのポリシー プッシュ ボタンをクリックすると、累積された変更をプッシュできます。 |
||||
|
[出力ポリシー(egress policy)] ページの [プッシュ(Push)] ボタンをクリックすると、累積された変更をプッシュできます。 |
セキュリティ グループ タグの交換プロトコル
セキュリティ グループ タグ(SGT)の交換プロトコル(SXP)は、TrustSec のハードウェア サポートがないネットワーク デバイスに SGT を伝播するために使用されます。SXP は、ある SGT 対応ネットワーク デバイスから別のデバイスに IP アドレスとともにエンドポイントの SGT を転送するために使用されます。SXP が転送するデータは、IP-SGT マッピングと呼ばれます。エンドポイントが属する SGT は静的または動的に割り当てることができ、SGT はネットワーク ポリシーで分類子として使用できます。
SXP はトランスポート プロトコルとして TCP を使用して、2 つの個別のネットワーク デバイス間に SXP 接続をセットアップします。各 SXP 接続には、SXP スピーカーとして指定されたピアと、SXP リスナーとして指定されたピアがあります。ピアは双方向モードで設定することもでき、そのモードでは、それぞれがスピーカーとリスナーの両方として機能します。接続はいずれかのピアによって開始できますが、マッピング情報は常にスピーカーからリスナーに伝播されます。
(注) | セッションのバインディングは常にデフォルトの SXP ドメインに伝播されます。 |
次の表には、SXP 環境で使用される一般的な用語のいくつかを示しています。
|
IP-SGT マッピング |
SXP 接続を介して交換される SGT マッピングへの IP アドレス。 SXP デバイスで学習されたすべてのマッピング(スタティック マッピングおよびセッション マッピングを含む)を表示するには、[ワークセンター(Work Centers)] > [TrustSec] > [SXP] > [すべてのSXPマッピング(All SXP Mappings)] の順に選択します。 |
|
SXP スピーカー |
SXP 接続を介して IP-SGT マッピングを送信するピア。 |
|
SXP リスナー |
SXP 接続を介して IP-SGT マッピングを受信するピア。 |
Cisco ISE に追加された SXP ピア デバイスを表示するには、[ワークセンター(Work centers)] > [TrustSec] > [SXP] > [SXPデバイス(SXP Devices)] の順に選択します。
(注) | SXP サービスはスタンドアロン ノードで実行することを推奨します。 |
SXP デバイスの追加
次のタスクを実行するには、スーパー管理者またはシステム管理者である必要があります。
| ステップ 1 | [ワークセンター(Work Centers)] > [TrustSec] > [SXP] > [SXPデバイス(SXP Devices)] の順に選択します。 |
| ステップ 2 | [追加(Add)] をクリックします。 |
| ステップ 3 | デバイスの詳細を入力します。
|
| ステップ 4 | (任意)[詳細設定(Advanced Settings)] をクリックし、次の詳細を入力します。 |
| ステップ 5 | [保存(Save)] をクリックします。 |
SXP ドメイン フィルタの追加
SXP デバイスで学習されたすべてのマッピング(スタティック マッピングおよびセッション マッピングを含む)は、[ワークセンター(Work Centers)] > [TrustSec] > [SXP] > [すべての SXP マッピング(All SXP Mappings)] ページで表示できます。
デフォルトでは、ネットワーク デバイスから学習されたセッション マッピングは、デフォルトの VPN グループにのみ送信されます。SXP ドメイン フィルタを作成して、異なる SXP ドメイン(VPN)にマッピングを送信できます。
SXP ドメイン フィルタを追加するには、次の手順を実行します。
次のタスクを実行するには、スーパー管理者またはシステム管理者である必要があります。
| ステップ 1 | [ワーク センター(Work Centers)] > [TrustSec] > [SXP] > [すべての SXP マッピング(All SXP Mappings)] の順に選択します。 |
| ステップ 2 | [SXP ドメイン フィルタの追加(Add SXP Domain Filter)] をクリックします。 |
| ステップ 3 | 次の手順を実行します。
|
| ステップ 4 | [保存(Save)] をクリックします。 |
SXP ドメイン フィルタを更新または削除することもできます。フィルタを更新するには、[SXP ドメイン フィルタの管理(Manage SXP Domain Filter)] をクリックし、更新するフィルタの横にあるチェックボックスをオンにして、[編集(Edit)] をクリックします。フィルタを削除するには、削除するフィルタの横にあるチェックボックスをオンにして、[ごみ箱(Trash)] > [選択済み(Selected)] をクリックします。
SXP の設定
次のタスクを実行するには、スーパー管理者またはシステム管理者である必要があります。
| ステップ 1 | [ワークセンター(Work Centers)] > [TrustSec] > [設定(Settings)] > [SXP設定(SXP Settings)] の順に選択します。 | ||
| ステップ 2 | [SXP設定(SXP Settings)] ページに必要な詳細を入力します。
[SXP バインディングを PxGrid で公開(Publish SXP Bindings on PxGrid)] チェックボックスをオフにすると、IP-SGT マッピングはネットワーク デバイス全体に伝達されません。 | ||
| ステップ 3 | [保存(Save)] をクリックします。
|
TrustSec-ACI 統合
Cisco ISE では、SGT および SXP マッピングを内部エンドポイント グループ(IEPG)、外部エンドポイント グループ(EEPG)、シスコ アプリケーション セントリック インフラストラクチャ(ACI)のエンドポイント(EP)設定と同期することができます。
(注) | 読み取り専用 SGT は、IP-SGT マッピング、マッピング グループ、および SXP ローカル マッピングでは使用できません。 |
ACI に伝播される SGT を選択できます。セキュリティ グループを追加する際には、[ACI に伝播(Propagate to ACI)] オプションを使用して、SGT を ACI に伝播する必要があるかどうかを指定できます。このオプションを有効にすると、この SGT に関連する SXP マッピングは、([ACI の設定(ACI Settings)] ページで)[ポリシー プレーン(Policy Plane)] オプションが選択され、SXP デバイスが [ACI の設定(ACI Settings)] ページで選択した VPN に属する場合に ACI に伝播されます。
ACI は SGT を同期して関連する EEPG を作成することで、ACI ドメインから TrustSec ドメインに着信するパケットをサポートします。ACI は Cisco ISE から伝播された SXP マッピングに基づいて EEPG でサブネットを作成します。これらのサブネットは、対応する SXP マッピングが Cisco ISE で削除されるときに、ACI から削除されません。
IEPG が ACI で更新されると、対応する SGT 設定が Cisco ISE で更新されます。SGT が Cisco ISE に追加されると、新しい EEPG が ACI に作成されます。SGT が削除されると、対応する EEPG が ACI で削除されます。エンドポイントが ACI で更新されると、対応する SXP マッピングは Cisco ISE で更新されます。
ACI サーバとの接続が失われると、接続が再確立されるときに、Cisco ISE は再びデータを再同期します。
(注) | ACI の統合機能を使用するには、SXP サービスを有効にする必要があります。 |
ACI の設定
次のタスクを実行するには、スーパー管理者またはシステム管理者である必要があります。
| ステップ 1 | 信頼できる証明書ストアに ACI 証明書をインポートします。[管理(Administration)] > [システム(System)] > [証明書(Certificates)] > [信頼できる証明書(Trusted Certificates)] > [インポート(Import)] の順に選択し、証明書をインポートします。 | ||
| ステップ 2 | [ワークセンター(Work Centers)] > [TrustSec] > [設定(Settings)] > [ACI の設定(ACI Settings)] の順に選択します。 | ||
| ステップ 3 | [TrustSec-ACI ポリシー要素の交換(TrustSec-ACI Policy Element Exchange)] チェックボックスをオンにして、SGT および SXP マッピングと ACI の IEPG、EEPG、エンドポイントの設定とを同期します。 | ||
| ステップ 4 | 次のオプションのいずれかを選択します。
| ||
| ステップ 5 | [ポリシー プレーン(Policy Plane)] オプションを選択した場合は、次の詳細を入力してください。
| ||
| ステップ 6 | [データ プレーン(Data Plane)] オプションを選択した場合は、次の詳細を入力してください。
| ||
| ステップ 7 | [保存(Save)] をクリックします。 |
ユーザ レポート別上位 N 個の RBACL ドロップの実行
ユーザ レポート別上位 N 個の RBACL ドロップを実行して、特定のユーザによるポリシー違反(パケット ドロップに基づく)を表示できます。
| ステップ 1 | [操作(Operations)] > [レポート(Reports)] > [TrustSec] を選択します。 |
| ステップ 2 | [ユーザ別上位 N 個の RBACL ドロップ(Top N RBACL Drops by User)] をクリックします。 |
| ステップ 3 | [フィルタ(Filters)] ドロップダウン メニューから、必要なモニタ モードを追加します。 |
| ステップ 4 | 選択したパラメータの値をこれに応じて入力します。[強制モード(Enforcement mode)] ドロップダウン リストから、[強制(Enforce)]、[モニタ(Monitor)]、または [両方(Both)] としてモードを指定できます。 |
| ステップ 5 | [時間範囲(Time Range)] ドロップダウン メニューから、レポート データを収集する期間を選択します。 |
| ステップ 6 | [実行(Run)] をクリックして、選択したパラメータとともに特定の期間のレポートを実行します。 |
 フィードバック