- Preface
- Overview
- Preparing for Installation
- Installing the Client Adapter
- Using the Client Adapter
- Security Features
- Advanced Configuration
- Performing Diagnostics
- Routine Procedures
- Troubleshooting
- Technical Specifications
- Translated Safety Warnings
- Declarations of Conformity and Regulatory Information
- Channels, Power Levels, and Antenna Gains
- Glossary
- Index
Cisco Aironet Wireless LAN Client Adapters Installation and Configuration Guide for Mac OS, OL-1377-03
Bias-Free Language
The documentation set for this product strives to use bias-free language. For the purposes of this documentation set, bias-free is defined as language that does not imply discrimination based on age, disability, gender, racial identity, ethnic identity, sexual orientation, socioeconomic status, and intersectionality. Exceptions may be present in the documentation due to language that is hardcoded in the user interfaces of the product software, language used based on RFP documentation, or language that is used by a referenced third-party product. Learn more about how Cisco is using Inclusive Language.
- Updated:
- May 4, 2007
Chapter: Security Features
Security Features
This chapter describes the security features of your client adapter and provides instructions for enabling WEP key and LEAP security.
The following topics are covered in this section:
•![]() Overview of Security Features
Overview of Security Features
•![]() Verifying Security Configurations
Verifying Security Configurations
Overview of Security Features
When you use your client adapter with the Mac OS operating system, you can protect your data as it is transmitted through your wireless network by encrypting it through the use of Wired Equivalent Privacy (WEP) encryption keys. With WEP encryption, the transmitting device encrypts each packet with a WEP key, and the receiving device uses that same key to decrypt each packet.
The WEP keys used to encrypt and decrypt transmitted data can be statically associated with your adapter or dynamically created as part of the LEAP authentication process. The information in the sections below can help you to decide which type of WEP keys you want to use. Dynamic WEP keys with LEAP offer a higher degree of security than static WEP keys.
WEP keys, whether static or dynamic, are either 40 or 128 bits in length. The 128-bit WEP keys contain more characters than the 40-bit keys and, therefore, offer a greater level of security.
Message integrity check (MIC) is a security protection feature supported by your client adapter in conjunction with an access point (see the "MIC" section).
Static WEP Keys
Each device (or profile) within your wireless network can be assigned up to four static WEP keys. If a device receives a packet that is not encrypted with the appropriate key (as the WEP keys must match in all devices that are to communicate with each other), the device discards the packet.
For the Mac OS X, the Static WEP keys are stored in an encrypted format (for security reasons) in your Macintosh. When the driver loads and reads the client adapter's parameters, it also finds the static WEP keys, decrypts them, and stores them in volatile memory on the client adapter. The WEP keys in the client adapter are temporary and they are lost when power to the adapter is removed or the Macintosh is rebooted. Although the keys in the client adapter are temporary, you do not need to re-enter them when you restore power or reboot because the keys are stored in your Macintosh.
For the Mac OS 9, the Static WEP keys can be permanently or temporarily stored in your client adapter. If the keys are temporarily stored in volatile memory, the keys will be lost when power is removed from your client adapter.
Use the client utility to enable or disable static WEP key security and to add or change WEP key values.
Dynamic WEP Keys with EAP
The new standard for wireless LAN security, as defined by the Institute of Electrical and Electronics Engineers (IEEE), is called 802.1X for 802.11, or simply 802.1X. An access point that supports 802.1X and its protocol, Extensible Authentication Protocol (EAP), acts as the interface between a wireless client and an authentication server, such as a Remote Authentication Dial-In User Service (RADIUS) server, to which the access point communicates over the wired network.
The use of an 802.1X authentication type, which is supported by the client and the authentication server, causes the following to occur:
•![]() After associating to the access point, the client does not gain access to the network until mutual authentication between the client and the authentication server is successful.
After associating to the access point, the client does not gain access to the network until mutual authentication between the client and the authentication server is successful.
•![]() The client and authentication server derive the same dynamic WEP key.
The client and authentication server derive the same dynamic WEP key.
•![]() The authentication server sends the dynamic WEP key to the access point.
The authentication server sends the dynamic WEP key to the access point.
•![]() For the length of a session, or time period, the access point and the client use the dynamic WEP key to encrypt and decrypt all unicast packets that travel between the access point and the client.
For the length of a session, or time period, the access point and the client use the dynamic WEP key to encrypt and decrypt all unicast packets that travel between the access point and the client.
Cisco Aironet client adapters supports EAP-Cisco Wireless (or LEAP) security.
EAP-Cisco Wireless or LEAP
Support for EAP-Cisco Wireless or LEAP is provided in a Cisco Aironet client adapter's firmware and the Cisco software that supports it. The RADIUS servers that support LEAP include Cisco Secure ACS version 2.6 and above and Cisco Access Registrar version 1.7 and above.
You enable or disable LEAP using the client utility. When LEAP is enabled, the client adapter uses your LEAP username and password to perform mutual authentication with the RADIUS server through the access point. Unless you save your LEAP username and password in the Mac OS X keychain, they are lost when the radio is turned off, the client adapter is removed, or the Macintosh is powered down. The client adapter prompts for a LEAP username or password when it attempts authentication and cannot retrieve the username and password from the keychain or client adapter volatile memory.
When you enable Network-EAP on your access point and LEAP on your client adapter, authentication to the network occurs in the following sequence:
1. ![]() The client adapter associates to an access point and begins the authentication process.
The client adapter associates to an access point and begins the authentication process.

Note ![]() The client adapter does not gain access to the network until the mutual authentication with the authentication server is successful.
The client adapter does not gain access to the network until the mutual authentication with the authentication server is successful.
2. ![]() Communicating through the access point, the client adapter and the authentication server complete a mutual authentication process, with the password being the shared secret for authentication. The password is never transmitted during the process.
Communicating through the access point, the client adapter and the authentication server complete a mutual authentication process, with the password being the shared secret for authentication. The password is never transmitted during the process.
3. ![]() If mutual authentication is successful, the client adapter and the authentication server derive a dynamic, session-based WEP key that is unique.
If mutual authentication is successful, the client adapter and the authentication server derive a dynamic, session-based WEP key that is unique.
4. ![]() The authentication server transmits the key to the access point using a secure channel on the wired LAN.
The authentication server transmits the key to the access point using a secure channel on the wired LAN.
5. ![]() For the length of a session, or a time period, the access point and the client adapter use this key to encrypt or decrypt all unicast packets that travel between them.
For the length of a session, or a time period, the access point and the client adapter use this key to encrypt or decrypt all unicast packets that travel between them.
Note ![]() Refer to the IEEE 802.11 Standard for more information on 802.1X authentication and to the following URL for additional information on RADIUS servers: http://www.cisco.com/univercd/cc/td/doc/product/software/ios120/12cgcr/secur_c/scprt2/scrad.htm
Refer to the IEEE 802.11 Standard for more information on 802.1X authentication and to the following URL for additional information on RADIUS servers: http://www.cisco.com/univercd/cc/td/doc/product/software/ios120/12cgcr/secur_c/scprt2/scrad.htm
MIC
Your client adapter, in conjunction with a Cisco Aironet Access Point, supports message integrity check (MIC) to protect against bit-flip attacks on encrypted packets. During a bit-flip attack, an intruder intercepts an encrypted message, alters it slightly, and retransmits it, and the receiver accepts the retransmitted message as legitimate. The following drivers support MIC:
•![]() Mac OS 9—version 1.0.3 or greater
Mac OS 9—version 1.0.3 or greater
•![]() Mac OS X—version 1.0.1 or greater
Mac OS X—version 1.0.1 or greater
MIC is used only if it is enabled on the access point.
Note ![]() If the access point is using MIC, your client adapter's driver and firmware must support MIC; otherwise, the client cannot associate. MIC operation on your client adapter is automatic when the feature is enabled on the access point.
If the access point is using MIC, your client adapter's driver and firmware must support MIC; otherwise, the client cannot associate. MIC operation on your client adapter is automatic when the feature is enabled on the access point.
Opening the Client Utility
The easiest way to open the ACU is to click the Aironet icon on the menu bar (Mac OS X), or Aironet control module (Mac OS 9), and select Open Aironet Client Utility. Refer to the "Desktop Controls" section.
As an alternative, you can open the ACU as an application. To open the client utility, follow the steps below.
The client utility screen appears, and the computer searches for the client adapter radio. When the radio is found, the basic properties screen appears.
Configuring WEP Key Security
Use the client utility to select WEP key security, configure WEP keys, and set the authentication type. To use static WEP key security, all client adapters and the access points that communicate with one another must be configured with the same WEP keys in the same key numbers (1-4). This procedure explains how to configure WEP keys for the client adapters.
Step 1 ![]() If the client utility is not active on your desktop, open it. The basic properties screen appears (see Figure 5-1).
If the client utility is not active on your desktop, open it. The basic properties screen appears (see Figure 5-1).
Figure 5-1 Client Utility Basic Properties Screen for WEP Key Security
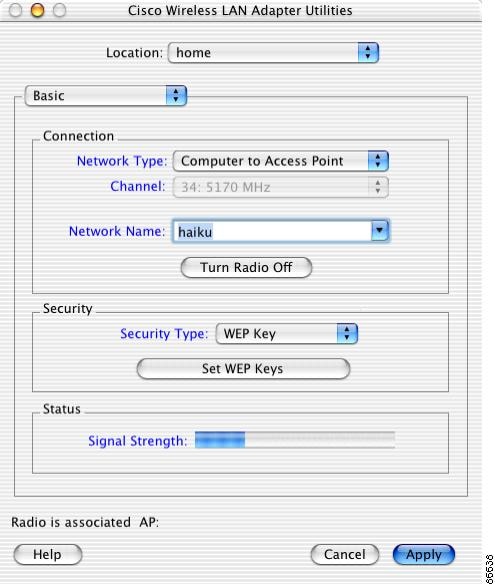
Step 2 ![]() Select WEP Key from the Security Type pop-up menu. The security button changes to Set WEP Keys.
Select WEP Key from the Security Type pop-up menu. The security button changes to Set WEP Keys.
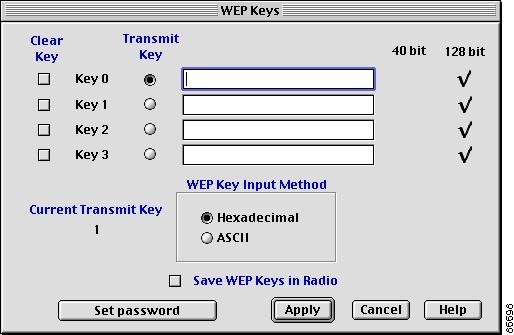
Step 3 ![]() Click Set WEP Keys. The WEP Keys Screen appears.
Click Set WEP Keys. The WEP Keys Screen appears.
Figure 5-2 WEP Keys Screen
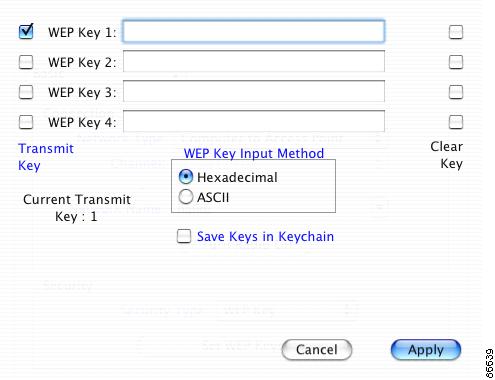
Step 4 ![]() Under WEP Key Input Method, select whether the WEP keys are entered in hexadecimal characters (0-9, A-F, and a-f) or ASCII text.
Under WEP Key Input Method, select whether the WEP keys are entered in hexadecimal characters (0-9, A-F, and a-f) or ASCII text.
Step 5 ![]() Enter WEP keys in the blank fields for the keys you are adding. Follow the guidelines below when choosing a WEP key:
Enter WEP keys in the blank fields for the keys you are adding. Follow the guidelines below when choosing a WEP key:
•![]() Your client adapter's WEP key must match the WEP key used by the access point or clients with which you are planning to communicate.
Your client adapter's WEP key must match the WEP key used by the access point or clients with which you are planning to communicate.
•![]() When setting more than one WEP key, the WEP keys must be assigned to the same WEP key numbers (1 to 4) for all devices.
When setting more than one WEP key, the WEP keys must be assigned to the same WEP key numbers (1 to 4) for all devices.
•![]() WEP keys can be comprised of ASCII text or hexadecimal characters, depending on the option you selected in Step 3.
WEP keys can be comprised of ASCII text or hexadecimal characters, depending on the option you selected in Step 3.
•![]() WEP keys must contain the following number of characters
WEP keys must contain the following number of characters
–![]() For 128-bit ASCII WEP keys, use 13 ASCII characters
For 128-bit ASCII WEP keys, use 13 ASCII characters
–![]() For 128-bit hexadecimal WEP keys, use 26 hexadecimal characters
For 128-bit hexadecimal WEP keys, use 26 hexadecimal characters
–![]() For 40-bit ASCII WEP keys, use 5 ASCII characters
For 40-bit ASCII WEP keys, use 5 ASCII characters
–![]() For 40-bit hexadecimal WEP keys, use 10 hexadecimal characters
For 40-bit hexadecimal WEP keys, use 10 hexadecimal characters
Note ![]() You must enter the number of characters shown above because the client utility does not fill the WEP key with zeros or nulls. The client utility also uses the number of characters entered to determine 40-bit or 128-bit WEP keys.
You must enter the number of characters shown above because the client utility does not fill the WEP key with zeros or nulls. The client utility also uses the number of characters entered to determine 40-bit or 128-bit WEP keys.
Step 6 ![]() Optionally, save the WEP keys in non-volatile memory:
Optionally, save the WEP keys in non-volatile memory:
•![]() Mac OS X—Check Save Keys in Keychain.
Mac OS X—Check Save Keys in Keychain.
•![]() Mac OS 9—Check Save WEP Keys in Radio.
Mac OS 9—Check Save WEP Keys in Radio.
Step 7 ![]() Click Transmit Key next to the key you want to use to transmit packets.
Click Transmit Key next to the key you want to use to transmit packets.
Note ![]() Only one WEP key can be selected as the transmit key.
Only one WEP key can be selected as the transmit key.
Step 8 ![]() Click Apply when you have finished entering WEP keys.
Click Apply when you have finished entering WEP keys.
Step 9 ![]() Click Apply on the basic screen.
Click Apply on the basic screen.
Setting the Authentication Type
The client adapter can associate with access points using either open or shared key authentication. Open authentication, when used with WEP key or LEAP security, provides the highest level of security. Change this setting to Shared Key Authentication only if your access point requires shared keys to associate.
Step 1 ![]() If the client utility is not active on your desktop, open it. The basic properties screen appears (see Figure 5-1).
If the client utility is not active on your desktop, open it. The basic properties screen appears (see Figure 5-1).
Step 2 ![]() Select Advanced from the drop-down menu.
Select Advanced from the drop-down menu.
Step 3 ![]() On the Advanced Properties screen, click the RF Settings tab (see Figure 5-3).
On the Advanced Properties screen, click the RF Settings tab (see Figure 5-3).
Figure 5-3 Client Utility Advanced RF Settings Screen
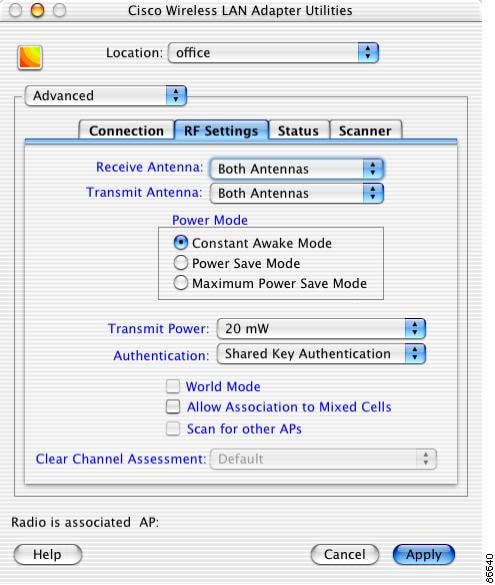
Step 4 ![]() Select an authentication type from the Authentication menu.
Select an authentication type from the Authentication menu.
|
|
|
|---|---|
Open Authentication |
Allows your client adapter to associate with an access point regardless of the WEP settings. Successful association does not automatically grant network access. The client adapter must subsequently satisfy the requirements of WEP key or LEAP security, when enabled. |
Shared Key Authentication |
Allows your client adapter to communicate only with access points that have the same WEP keys. The access point sends a known unencrypted "challenge packet" to the client adapter, which encrypts the packet and sends it back to the access point. The access point attempts to decrypt the encrypted packet and sends an authentication response packet indicating the success or failure of the decryption. Because the challenge packet is not encrypted, this authentication type is less secure than Open Authentication used with WEP key security. Use this setting only if your access point requires shared keys to associate with clients. |
Note Note |
|
Step 5 ![]() Click Apply.
Click Apply.
Changing WEP Keys
If you want your client adapter to use an existing WEP key, or want to change a key value, follow the steps below.
Step 1 ![]() If the client utility is not active on your desktop perform, open it. The basic properties screen appears (see Figure 5-1).
If the client utility is not active on your desktop perform, open it. The basic properties screen appears (see Figure 5-1).
Step 2 ![]() On the Client Utility Basic Properties screen, click Set WEP Keys (see Figure 5-1), or type the Apple Command-K keyboard equivalent.
On the Client Utility Basic Properties screen, click Set WEP Keys (see Figure 5-1), or type the Apple Command-K keyboard equivalent.
The WEP key screen appears (see Figure 5-4 and Figure 5-5).
Figure 5-4 WEP Keys Screen (Mac OS X)
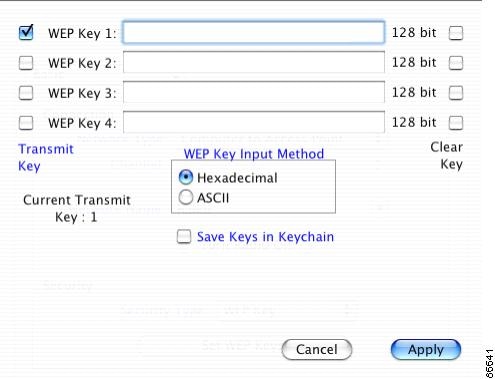
Figure 5-5 WEP Keys Screen (Mac OS 9)
The WEP Keys screen displays the following information about existing keys:
Step 3 ![]() To use a different WEP key, click the Transmit Key check box (or radio button) next to the key you want to use to transmit packets.
To use a different WEP key, click the Transmit Key check box (or radio button) next to the key you want to use to transmit packets.
Step 4 ![]() To change a WEP key value, select the input method and enter the new value.
To change a WEP key value, select the input method and enter the new value.
Note ![]() You can delete a WEP key by selecting the Clear Key check box to the right of the key.
You can delete a WEP key by selecting the Clear Key check box to the right of the key.
Step 5 ![]() Optionally, save the changed WEP keys in nonvolatile memory:
Optionally, save the changed WEP keys in nonvolatile memory:
•![]() Mac OS X—Check Save Keys in Keychain.
Mac OS X—Check Save Keys in Keychain.
•![]() Mac OS 9—Check Save WEP Keys in Radio.
Mac OS 9—Check Save WEP Keys in Radio.
Step 6 ![]() Click Apply.
Click Apply.
Password Protecting WEP Keys (Mac OS 9 only)
If you password protect the WEP Keys, the client utility prompts for the password before displaying WEP Key screen. This procedure assumes that WEP Key authentication is already configured.
Step 1 ![]() If the client utility is not active on your desktop, open it. The basic properties screen appears (see Figure 5-1).
If the client utility is not active on your desktop, open it. The basic properties screen appears (see Figure 5-1).
Step 2 ![]() Click Set WEP Keys.
Click Set WEP Keys.
Step 3 ![]() Click the Set Password button. The Set Password screen appears (see Figure 5-6).
Click the Set Password button. The Set Password screen appears (see Figure 5-6).
Figure 5-6 Set Password Screen (Mac OS 9)
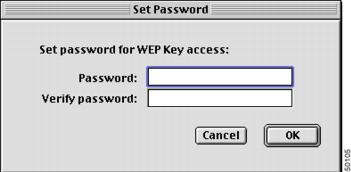
Step 4 ![]() Enter a password in the Password field.
Enter a password in the Password field.
Note ![]() Passwords are case sensitive and must contain at least eight characters.
Passwords are case sensitive and must contain at least eight characters.
Step 5 ![]() Re-enter the password in the Verify Password field.
Re-enter the password in the Verify Password field.
Step 6 ![]() Click OK to set the password protection.
Click OK to set the password protection.
Note ![]() The next time you attempt to enter the WEP Keys screen you will be prompted to enter the correct password. After you enter the screen, the password can be changed using the Change Password button. If you leave the fields blank in the Change Password screen, the password is cleared.
The next time you attempt to enter the WEP Keys screen you will be prompted to enter the correct password. After you enter the screen, the password can be changed using the Change Password button. If you leave the fields blank in the Change Password screen, the password is cleared.
Configuring LEAP Security
Use the client utility to select LEAP security and to set the LEAP username and password.
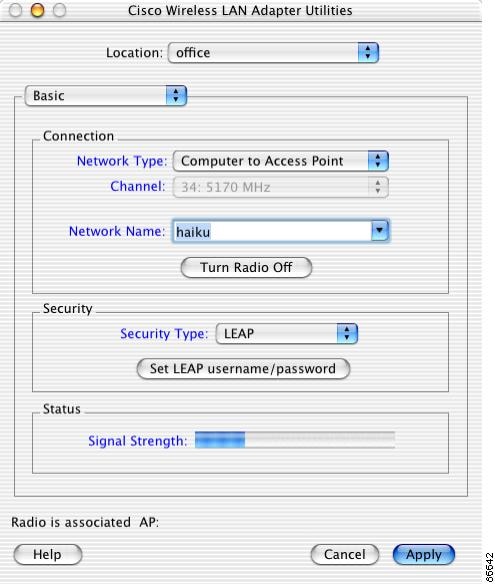
Step 1 ![]() If the client utility is not active on your desktop, open it. The basic properties screen appears (see Figure 5-7).
If the client utility is not active on your desktop, open it. The basic properties screen appears (see Figure 5-7).
Step 2 ![]() Select LEAP from the Security Type pop-up menu. The security button changes to Set LEAP Username/Password.
Select LEAP from the Security Type pop-up menu. The security button changes to Set LEAP Username/Password.
Figure 5-7 Client Utility Basic Properties Screen for LEAP Key Security
Step 3 ![]() Click Set LEAP Username/Password. The LEAP username and password screen appears (see Figure 5-8).
Click Set LEAP Username/Password. The LEAP username and password screen appears (see Figure 5-8).
Figure 5-8 LEAP Username and Password Screen
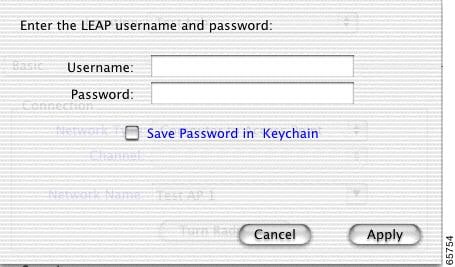
Step 4 ![]() Type your LEAP username and password in the corresponding fields.
Type your LEAP username and password in the corresponding fields.
Note ![]() If you work in an environment with multiple domains and want your login domain to be passed to the RADIUS server along with your username, you must append the domain name to your username; for example: domain\username.
If you work in an environment with multiple domains and want your login domain to be passed to the RADIUS server along with your username, you must append the domain name to your username; for example: domain\username.
Step 5 ![]() For Mac OS X systems, click Save Password in Keychain, if you want to save your LEAP password in your Macintosh keychain. When saved, your LEAP password is stored (in an encrypted format) and will be automatically entered into the password field.
For Mac OS X systems, click Save Password in Keychain, if you want to save your LEAP password in your Macintosh keychain. When saved, your LEAP password is stored (in an encrypted format) and will be automatically entered into the password field.
Step 6 ![]() Click Apply when you have finished entering your username and password.
Click Apply when you have finished entering your username and password.
After LEAP is enabled, your client adapter authenticates to the RADIUS server using your LEAP username and password and receives a session-based WEP key.
Verifying Security Configurations
If the security configuration is correct, the software detects the client adapter radio, the client adapter associates to an access point, and the Aironet desktop control changes to an image that indicates successful association. For more information, refer to the "Desktop Controls" section. Alternatively, you can use the client utility to verify successful association.
To verify that you have correctly configured security, perform the following steps:
Step 1 ![]() If the client utility is not already active on your desktop, open it. The basic properties screen appears.
If the client utility is not already active on your desktop, open it. The basic properties screen appears.
Step 2 ![]() Check the status at the bottom of the client utility basic properties screen.
Check the status at the bottom of the client utility basic properties screen.
A successful authentication displays radio is associated followed by the access point's IP address.
Note ![]() If your configuration was unsuccessful or you experienced problems during or after driver installation, refer to "Troubleshooting."
If your configuration was unsuccessful or you experienced problems during or after driver installation, refer to "Troubleshooting."
 Feedback