- Preface
- Overview
- Preparing for Installation
- Installing the Client Adapter
- Using the Client Adapter
- Security Features
- Advanced Configuration
- Performing Diagnostics
- Routine Procedures
- Troubleshooting
- Technical Specifications
- Translated Safety Warnings
- Declarations of Conformity and Regulatory Information
- Channels, Power Levels, and Antenna Gains
- Glossary
- Index
Cisco Aironet Wireless LAN Client Adapters Installation and Configuration Guide for Mac OS, OL-1377-03
Bias-Free Language
The documentation set for this product strives to use bias-free language. For the purposes of this documentation set, bias-free is defined as language that does not imply discrimination based on age, disability, gender, racial identity, ethnic identity, sexual orientation, socioeconomic status, and intersectionality. Exceptions may be present in the documentation due to language that is hardcoded in the user interfaces of the product software, language used based on RFP documentation, or language that is used by a referenced third-party product. Learn more about how Cisco is using Inclusive Language.
- Updated:
- May 4, 2007
Chapter: Troubleshooting
Troubleshooting
This chapter provides general information for diagnosing and correcting common problems encountered when installing or operating a Cisco Aironet Wireless LAN Adapter.
The following topics are covered in this section:
•![]() Accessing the Latest Troubleshooting Tips
Accessing the Latest Troubleshooting Tips
•![]() Interpreting the Indicator LEDs
Interpreting the Indicator LEDs
•![]() Problems after Installing the Driver
Problems after Installing the Driver
•![]() Client Adapter Recognition Problems
Client Adapter Recognition Problems
•![]() Problems Associating to the Access Point
Problems Associating to the Access Point
•![]() Problems Connecting to the Network
Problems Connecting to the Network
•![]() Running the Troubleshooting Tool
Running the Troubleshooting Tool
Accessing the Latest Troubleshooting Tips
This chapter provides basic troubleshooting tips for your client adapter. For more up-to-date and complex troubleshooting information, refer to the TAC web site at http://www.cisco.com/tac. For example, you can select Wireless Troubleshooting Center under Tools and Utilities.
Interpreting the Indicator LEDs
The client adapter shows messages and error conditions through its two LEDs:
•![]() Link Integrity/Power LED (green)—This LED lights when the client adapter is receiving power and blinks slowly when the adapter is linked with the network.
Link Integrity/Power LED (green)—This LED lights when the client adapter is receiving power and blinks slowly when the adapter is linked with the network.
•![]() Link Activity LED (amber)—This LED blinks quickly when the client adapter is receiving or transmitting data and blinks in a repeating pattern to indicate an error condition.
Link Activity LED (amber)—This LED blinks quickly when the client adapter is receiving or transmitting data and blinks in a repeating pattern to indicate an error condition.
Table 9-1 interprets the LED messages during normal operation. Table 9-2 interprets the LED error condition messages.
|
|
|
|
|---|---|---|
Off |
Off |
Client adapter is not receiving power or an error has occurred. |
Off |
1 blink at 2-second rate |
RAM failure. Refer to the "Obtaining Technical Assistance" section for technical support information. |
Off |
2 fast blinks, 1-second pause, 1 blink, 2-second pause |
A configuration error has occurred (for example, WEP is enabled in ACU but the client adapter has not been programmed with a valid WEP key). Recheck your client adapter's configuration settings in ACU. |
Off |
2 fast blinks, 2-second pause |
Flash boot block checksum failure. Refer to the "Obtaining Technical Assistance" section for technical support information. |
Off |
3 fast blinks, 2-second pause |
Firmware checksum failure. Reload the firmware. |
Off |
4 fast blinks, 2-second pause |
MAC address error (error reading MAC chip). Reload the firmware. |
Off |
5 fast blinks, 2-second pause |
Physical layer (PHY) access error. Refer to the "Obtaining Technical Assistance" section for technical support information. |
Off |
6 fast blinks, 2-second pause |
Incompatible firmware. Load the correct firmware version. |
Problems after Installing the Driver

Note ![]() If you experience problems during driver installation, you may want to restart the installation process. Go to the "Removing the Driver and Client Utility" section to start with a clean installation.
If you experience problems during driver installation, you may want to restart the installation process. Go to the "Removing the Driver and Client Utility" section to start with a clean installation.
Follow the instructions in this section if you experience difficulty with your client adapter after installing the driver (for instance, your computer does not display the network login screen, the green LED does not blink to indicate that the adapter is active, and so on).
Radio Not Found
If your computer's operating system is Mac OS X and a client utility message indicates that the radio cannot be found, verify that the CiscoPCCardRadio.kext driver or the CiscoPCIRadio.kext driver (depending on your client adapter) is installed in the /System/Library/Extensions folder.
•![]() If you cannot find the driver, re-install the package and restart your computer.
If you cannot find the driver, re-install the package and restart your computer.
•![]() If you find the driver, try removing and re-inserting the client adapter in your computer. Wait a few seconds before reinserting the client adapter. Restart your computer.
If you find the driver, try removing and re-inserting the client adapter in your computer. Wait a few seconds before reinserting the client adapter. Restart your computer.
Client Adapter Recognition Problems
If your computer's operating system is Mac OS 9, verify that the driver (pcm3x0) and enablers (pcm3x0Enabler) are installed. They should be in the Extensions folder of the System folder.
•![]() If you cannot find the driver, reinstall it and restart the computer.
If you cannot find the driver, reinstall it and restart the computer.
•![]() If the driver is properly installed, eject the client adapter and reinsert it. Wait a few seconds before reinserting the client adapter.
If the driver is properly installed, eject the client adapter and reinsert it. Wait a few seconds before reinserting the client adapter.
Problems Associating to the Access Point
Follow the instructions below if your client adapter fails to associate to the access point:
•![]() If possible, move your Macintosh a few feet closer to the access point and try again.
If possible, move your Macintosh a few feet closer to the access point and try again.
•![]() Make sure the client adapter is securely inserted in your's PC card slot or PCI slot.
Make sure the client adapter is securely inserted in your's PC card slot or PCI slot.
•![]() If you are using a PCI client adapter, make sure the antenna is securely attached.
If you are using a PCI client adapter, make sure the antenna is securely attached.
•![]() Make sure the access point is turned on and operating.
Make sure the access point is turned on and operating.
•![]() Check that all parameters are set properly for both the client adapter and the access point. These include the network name or SSID, network type and channel, WEP activation, and LEAP activation.
Check that all parameters are set properly for both the client adapter and the access point. These include the network name or SSID, network type and channel, WEP activation, and LEAP activation.
•![]() If the client adapter still fails to establish contact, refer to the "Obtaining Technical Assistance" section for technical support information.
If the client adapter still fails to establish contact, refer to the "Obtaining Technical Assistance" section for technical support information.
•![]() Try increasing the transmit power level for the client adapter.
Try increasing the transmit power level for the client adapter.
Problems Authenticating
Follow the instructions below if your client adapter fails to authenticate:
•![]() If possible, move your Macintosh a few feet closer to the access point and try again.
If possible, move your Macintosh a few feet closer to the access point and try again.
•![]() Make sure the client adapter is securely inserted in your's PC card slot or PCI slot.
Make sure the client adapter is securely inserted in your's PC card slot or PCI slot.
•![]() If you are using a PCI client adapter, make sure the antenna is securely attached.
If you are using a PCI client adapter, make sure the antenna is securely attached.
•![]() Make sure the access point is turned on and operating.
Make sure the access point is turned on and operating.
•![]() Check that all parameters are set properly for both the client adapter and the access point. These include the network name or SSID, network type and channel, WEP activation, LEAP activation, WEP password, and LEAP username and password.
Check that all parameters are set properly for both the client adapter and the access point. These include the network name or SSID, network type and channel, WEP activation, LEAP activation, WEP password, and LEAP username and password.
•![]() If your client adapter is a 40-bit card and LEAP is enabled, the adapter can associate to but not authenticate to access points using 128-bit encryption. To authenticate to an access point using 128-bit encryption, you have two possible options:
If your client adapter is a 40-bit card and LEAP is enabled, the adapter can associate to but not authenticate to access points using 128-bit encryption. To authenticate to an access point using 128-bit encryption, you have two possible options:
–![]() Purchase a 128-bit client adapter. This is the most secure option.
Purchase a 128-bit client adapter. This is the most secure option.
–![]() Disable WEP for the client adapter and configure the adapter and the access point to associate to mixed cells. This option presents a security risk because your data is not encrypted as it is sent over the RF network.
Disable WEP for the client adapter and configure the adapter and the access point to associate to mixed cells. This option presents a security risk because your data is not encrypted as it is sent over the RF network.
•![]() If the client adapter still fails to authenticate, refer to the "Obtaining Technical Assistance" section for technical support information.
If the client adapter still fails to authenticate, refer to the "Obtaining Technical Assistance" section for technical support information.
•![]() Try increasing the transmit power level for the client adapter.
Try increasing the transmit power level for the client adapter.
Problems Connecting to the Network
Follow the instructions below if your client adapter is unable to connect to the network:
•![]() Verify that the client adapter is enabled for your Macintosh Network Preferences panel.
Verify that the client adapter is enabled for your Macintosh Network Preferences panel.
•![]() Verify that the Macintosh Network TCP/IP settings are set properly for the client adapter.
Verify that the Macintosh Network TCP/IP settings are set properly for the client adapter.
•![]() If the client adapter still fails to authenticate, refer to the "Obtaining Technical Assistance" section for technical support information. Proxy server, network protocols, and further authentication information might be needed to connect to the network.
If the client adapter still fails to authenticate, refer to the "Obtaining Technical Assistance" section for technical support information. Proxy server, network protocols, and further authentication information might be needed to connect to the network.
Running the Troubleshooting Tool
The client utility provides a troubleshooting tool to assist you in identifying and resolving configuration and association problems with your client adapter.
To run the troubleshooting tool perform the following steps:
Step 1 ![]() Click the up and down arrows to the right of the basic or advanced properties field.
Click the up and down arrows to the right of the basic or advanced properties field.
Step 2 ![]() Select Troubleshooting on the drop-down menu and the troubleshooting screen appears (see Figure 9-1).
Select Troubleshooting on the drop-down menu and the troubleshooting screen appears (see Figure 9-1).
Figure 9-1 Client Utility Troubleshooting Screen
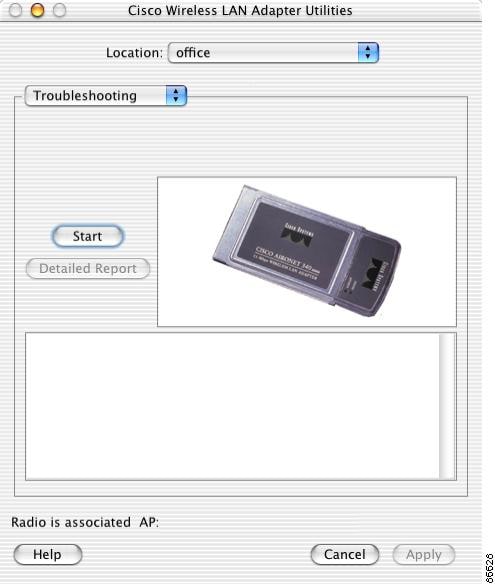
Step 3 ![]() Click Start to activate the troubleshooting tool. The troubleshooting tool performs a series of tests to check the operation of the client adapter and presents the results on the troubleshooting screen (see Figure 9-2).
Click Start to activate the troubleshooting tool. The troubleshooting tool performs a series of tests to check the operation of the client adapter and presents the results on the troubleshooting screen (see Figure 9-2).
Figure 9-2 Client Utility Troubleshooting Test Results Screen
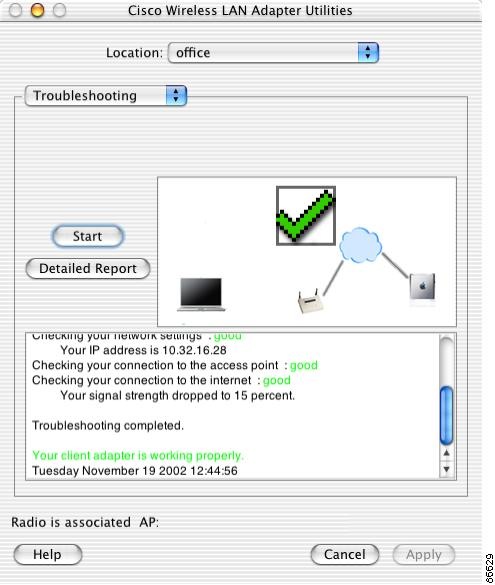
The troubleshooting test results screen indicates the progress of various tests and their results. The troubleshooting tool displays good to indicate a test completed successfully, such as Checking radio: good or Checking association with the access point: good. If a test fails, the troubleshooting tool indicates error next to the test. You can scroll through the tests results by clicking the scroll bar on the right side of the screen.
Note ![]() You can stop the troubleshooting test at any time by clicking Stop.
You can stop the troubleshooting test at any time by clicking Stop.
Step 4 ![]() If you want to view a detailed report of the troubleshooting test results, click Detailed Report and the detailed report screen appears (see Figure 9-3).
If you want to view a detailed report of the troubleshooting test results, click Detailed Report and the detailed report screen appears (see Figure 9-3).
Figure 9-3 Client Utility Troubleshooting Detailed Report Screen
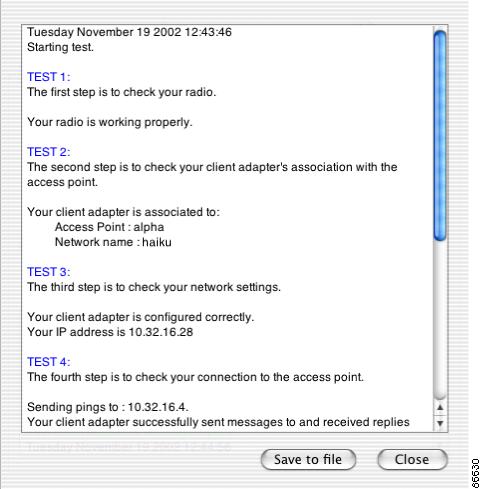
When a troubleshooting test fails, the troubleshooting tool lists possible repair options. You should carefully follow the repair suggestions and run the troubleshooting test again.
Note ![]() The detailed report contains valuable information that can be used by the technical support organization to analyze your problems. You can save the detailed report to a file on your hard disk by clicking Save to File.
The detailed report contains valuable information that can be used by the technical support organization to analyze your problems. You can save the detailed report to a file on your hard disk by clicking Save to File.
Step 5 ![]() Click Close when you have finished reviewing the test results.
Click Close when you have finished reviewing the test results.
Step 6 ![]() When you have finished running the troubleshooting tests, click the up and down arrows to the right of the troubleshooting field and select basic or advanced properties.
When you have finished running the troubleshooting tests, click the up and down arrows to the right of the troubleshooting field and select basic or advanced properties.
 Feedback