- Preface
- Overview
- Preparing for Installation
- Installing the Client Adapter
- Using the Client Adapter
- Security Features
- Advanced Configuration
- Performing Diagnostics
- Routine Procedures
- Troubleshooting
- Technical Specifications
- Translated Safety Warnings
- Declarations of Conformity and Regulatory Information
- Channels, Power Levels, and Antenna Gains
- Glossary
- Index
Cisco Aironet Wireless LAN Client Adapters Installation and Configuration Guide for Mac OS, OL-1377-03
Bias-Free Language
The documentation set for this product strives to use bias-free language. For the purposes of this documentation set, bias-free is defined as language that does not imply discrimination based on age, disability, gender, racial identity, ethnic identity, sexual orientation, socioeconomic status, and intersectionality. Exceptions may be present in the documentation due to language that is hardcoded in the user interfaces of the product software, language used based on RFP documentation, or language that is used by a referenced third-party product. Learn more about how Cisco is using Inclusive Language.
- Updated:
- May 4, 2007
Chapter: Routine Procedures
Routine Procedures
This chapter describes routine maintenance tasks for your client adapter.
The following topics are covered in this chapter:
•![]() Updating Client Adapter Software
Updating Client Adapter Software
Updating Client Adapter Software
Updating software is a three-step process:
1. ![]() Determine your current software version
Determine your current software version
2. ![]() Download a new software installer
Download a new software installer
3. ![]() Install the new ACU and driver software
Install the new ACU and driver software
Determining the Driver and Client Utility Versions
To determine the driver and client utility versions that your client adapter is currently using follow the procedures for your operating system:
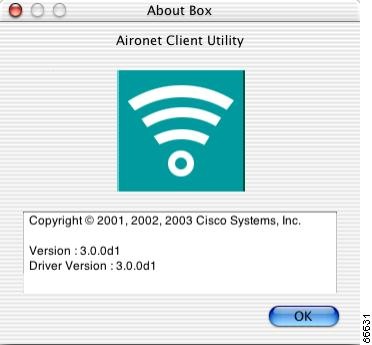
•![]() If you are using Mac OS X, select About Aironet Client Utility from the Aironet Client Utility menu on the main menu bar. The Client Utility About screen (see Figure 8-1) displays the client utility and driver version number.
If you are using Mac OS X, select About Aironet Client Utility from the Aironet Client Utility menu on the main menu bar. The Client Utility About screen (see Figure 8-1) displays the client utility and driver version number.
Figure 8-1 Mac OS X Client Utility About Screen
•![]() If you are using Mac OS 9, select Get Info from the File drop-down menu in the Macintosh client utility. The client utility and driver versions are displayed on the Info screen (see Figure 8-2).
If you are using Mac OS 9, select Get Info from the File drop-down menu in the Macintosh client utility. The client utility and driver versions are displayed on the Info screen (see Figure 8-2).
Figure 8-2 Mac OS 9 Client Utility Info Screen
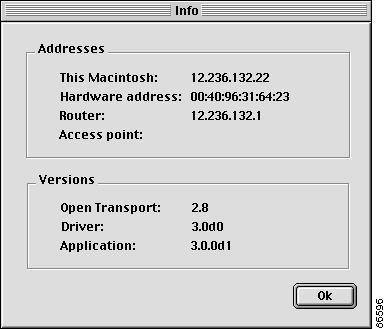
The bottom of the Info screen displays the version of the open transport software that is used with the driver, the version of the client adapter driver, and the version of the ACU application.
Downloading New Software
The current version of the software is displayed on the About screen (See the "Determining the Driver and Client Utility Versions" section). The latest software version for your client adapter is available for download at the Cisco Software Center web site. A single software installer supports both Mac OS 9 and Mac OS X.
To obtain the latest client adapter software from the Cisco Web site, follow these steps:
Step 1 ![]() Use your web browser to access the Cisco Software Center at the following URL:
Use your web browser to access the Cisco Software Center at the following URL:
http://www.cisco.com/public/sw-center/sw-wireless.shtml
Step 2 ![]() Using the onscreen instructions, navigate to the current release for your client adapter. For example, use the Aironet Wireless Software Selector to locate the files for your client adapter.
Using the onscreen instructions, navigate to the current release for your client adapter. For example, use the Aironet Wireless Software Selector to locate the files for your client adapter.
Step 3 ![]() Click on the softrware file name, such as MACOSInstallv3x.sit. The 3x identifies the software package version number.
Click on the softrware file name, such as MACOSInstallv3x.sit. The 3x identifies the software package version number.

Note ![]() Make sure to select a software release that is compatible with your client adapter hardware and computer operating system. Each software version includes a description with compatibility information.
Make sure to select a software release that is compatible with your client adapter hardware and computer operating system. Each software version includes a description with compatibility information.
Step 4 ![]() Read and accept the terms and conditions of the Software License Agreement.
Read and accept the terms and conditions of the Software License Agreement.
Step 5 ![]() Click on the filename in the Software Download page.
Click on the filename in the Software Download page.
Step 6 ![]() Save the file to your hard drive then exit the web browser.
Save the file to your hard drive then exit the web browser.
Step 7 ![]() Double-click the utility installer (.sit) file to expand (uncompress) it.
Double-click the utility installer (.sit) file to expand (uncompress) it.
Step 8 ![]() Go to the "Updating the Driver and Client Utility" section.
Go to the "Updating the Driver and Client Utility" section.
Updating the Driver and Client Utility
Follow the instructions below to update the version of the client utilities and the client adapter driver for both the Mac OS 9 and the Mac OS X operating systems.
Note ![]() If a power failure occurs while you are loading new software, your client adapter can become inoperable. If this occurs, start the procedure again.
If a power failure occurs while you are loading new software, your client adapter can become inoperable. If this occurs, start the procedure again.
Step 1 ![]() Double-click Cisco WLAN Install to activate the installer.
Double-click Cisco WLAN Install to activate the installer.
Note ![]() You should keep the Cisco WLAN Install file. You can use it later to uninstall your client utility and driver for a clean install.
You should keep the Cisco WLAN Install file. You can use it later to uninstall your client utility and driver for a clean install.
Step 2 ![]() For Mac OS X, when the Authenticate screen appears, enter your password in the Password field. Your Macintosh username appears in the Name field. Click OK.
For Mac OS X, when the Authenticate screen appears, enter your password in the Password field. Your Macintosh username appears in the Name field. Click OK.
Note ![]() For Mac OS X, you must have administrator privileges to install an updated client utility and driver.
For Mac OS X, you must have administrator privileges to install an updated client utility and driver.
Step 3 ![]() When the Cisco Aironet Wireless LAN Adapter Software screen appears, click Continue.
When the Cisco Aironet Wireless LAN Adapter Software screen appears, click Continue.
Step 4 ![]() Read the terms and conditions of the Software License Agreement and click Accept or Decline. If you decline the license agreement, the client utility installation ends.
Read the terms and conditions of the Software License Agreement and click Accept or Decline. If you decline the license agreement, the client utility installation ends.
Note ![]() You can print or save the software license agreement by clicking Print or Save As.
You can print or save the software license agreement by clicking Print or Save As.
Step 5 ![]() Read the Read Me screen information and click Continue.
Read the Read Me screen information and click Continue.
Note ![]() You can print or save the read-me information by clicking Print or Save As.
You can print or save the read-me information by clicking Print or Save As.
The Cisco WLAN Installer detects your computer operating system and displays the appropriate install screen (See Figure 8-3 for Mac OS X).
Figure 8-3 Mac OS X Install Screen
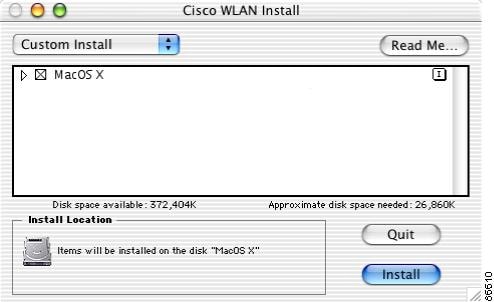
Step 6 ![]() When the Cisco WLAN Install screen appears, perform the following operations:
When the Cisco WLAN Install screen appears, perform the following operations:
a. ![]() Expand the software component list by clicking the right triangle to the left of name.
Expand the software component list by clicking the right triangle to the left of name.
Note ![]() Both the PCI and PC Card drivers are normally installed by the installer. You can deselect one of the drivers by clicking the selection box to remove the X; for example, you can deselect the PCI driver when using a PowerBook, or you can deselect the PC Card driver when using a PowerMac.
Both the PCI and PC Card drivers are normally installed by the installer. You can deselect one of the drivers by clicking the selection box to remove the X; for example, you can deselect the PCI driver when using a PowerBook, or you can deselect the PC Card driver when using a PowerMac.
b. ![]() Click Install to begin the installation process.
Click Install to begin the installation process.
Step 7 ![]() When a screen appears indicating that you must restart your computer after installing the software, click Continue.
When a screen appears indicating that you must restart your computer after installing the software, click Continue.
Note ![]() You can click Cancel to terminate the installation process.
You can click Cancel to terminate the installation process.
Step 8 ![]() A message appears indicating "One moment please..." then a screen appears that shows the installation progress. After the files are copied to the designated folder on the Macintosh hard disk, a screen appears:
A message appears indicating "One moment please..." then a screen appears that shows the installation progress. After the files are copied to the designated folder on the Macintosh hard disk, a screen appears:
Step 9 ![]() If a message appears indicating that the installation was successful, click Restart to restart your computer and finish the client utility installation.
If a message appears indicating that the installation was successful, click Restart to restart your computer and finish the client utility installation.
Note ![]() The client utility, the help files, and the driver are installed by the installer.
The client utility, the help files, and the driver are installed by the installer.
Step 10 ![]() If a message appears indicating that the installation is not necessary, click Quit. The installer has detected that your installed software is the same version as the software to be installed. To force the installer to install the new software, uninstall the current software and then repeat this procedure.
If a message appears indicating that the installation is not necessary, click Quit. The installer has detected that your installed software is the same version as the software to be installed. To force the installer to install the new software, uninstall the current software and then repeat this procedure.
Removing the Driver and Client Utility
This section provides instructions for removing the driver and the client utility from your computer. The following procedure removes the driver and the client utility for both Mac OS 9 and Mac OS X.
Step 1 ![]() Locate the client utility installer (Cisco WLAN Install) on your hard drive.
Locate the client utility installer (Cisco WLAN Install) on your hard drive.
Step 2 ![]() Double-click Cisco WLAN Install.
Double-click Cisco WLAN Install.
Step 3 ![]() For Mac OS X, when the Authenticate screen appears, enter your password in the Password field. Your Macintosh username will appear in the Name field. Click OK.
For Mac OS X, when the Authenticate screen appears, enter your password in the Password field. Your Macintosh username will appear in the Name field. Click OK.
Note ![]() To uninstall the client utility on Mac OS X, you must have administrator privileges for the Macintosh.
To uninstall the client utility on Mac OS X, you must have administrator privileges for the Macintosh.
Step 4 ![]() When the Cisco Aironet Wireless LAN Adapter Software screen appears, click Continue.
When the Cisco Aironet Wireless LAN Adapter Software screen appears, click Continue.
Step 5 ![]() When the Software License Agreement appears, click Accept.
When the Software License Agreement appears, click Accept.
Step 6 ![]() When the Read the Read Me screen appears, click Continue.
When the Read the Read Me screen appears, click Continue.
The Cisco WLAN Installer detects your computer operating system and displays the appropriate install screen (see Figure 8-4 for Mac OS X).
Figure 8-4 Mac OS X Uninstall Screen
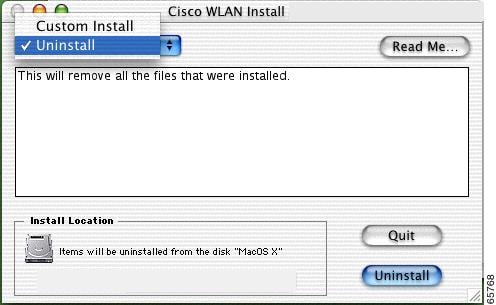
Step 7 ![]() When the Cisco WLAN Install screen appears, follow these steps:
When the Cisco WLAN Install screen appears, follow these steps:
a. ![]() Select Uninstall by clicking the up and down arrows on the top left of the screen (see Figure 8-4).
Select Uninstall by clicking the up and down arrows on the top left of the screen (see Figure 8-4).
b. ![]() Click Uninstall to begin the removal process.
Click Uninstall to begin the removal process.
Step 8 ![]() When a screen appears indicating that the removal cannot occur with other applications running, click Continue.
When a screen appears indicating that the removal cannot occur with other applications running, click Continue.
Step 9 ![]() When a message appears that indicates the removal was successful, click OK.
When a message appears that indicates the removal was successful, click OK.
Step 10 ![]() When the Uninstall screen reappears, click Quit.
When the Uninstall screen reappears, click Quit.
Step 11 ![]() For Mac OS 9, remove the client adapter from the computer desktop by clicking on the Cisco Wireless LAN Adapter icon and dragging it to the trash.
For Mac OS 9, remove the client adapter from the computer desktop by clicking on the Cisco Wireless LAN Adapter icon and dragging it to the trash.
Step 12 ![]() Reboot the computer. This removes any loaded drivers.
Reboot the computer. This removes any loaded drivers.
Step 13 ![]() If the uninstall process is not successful, manually remove the following files and folders by dragging them to the Trash icon. For Mac OS X, you must have root access.
If the uninstall process is not successful, manually remove the following files and folders by dragging them to the Trash icon. For Mac OS X, you must have root access.
The following table lists the Mac OS 9 files and folders to remove:
The following table lists the Mac OS X files and folders to remove:
Note ![]() To remove your client adapter, follow the instructions in the Removing the Client Adapter section.
To remove your client adapter, follow the instructions in the Removing the Client Adapter section.
Updating the Radio Firmware
Updating firmware is a three-step process:
1. ![]() Determine your current firmware version
Determine your current firmware version
2. ![]() Download a newer firmware image
Download a newer firmware image
3. ![]() Update the client adapter firmware
Update the client adapter firmware
Determining the Radio Firmware Version Number
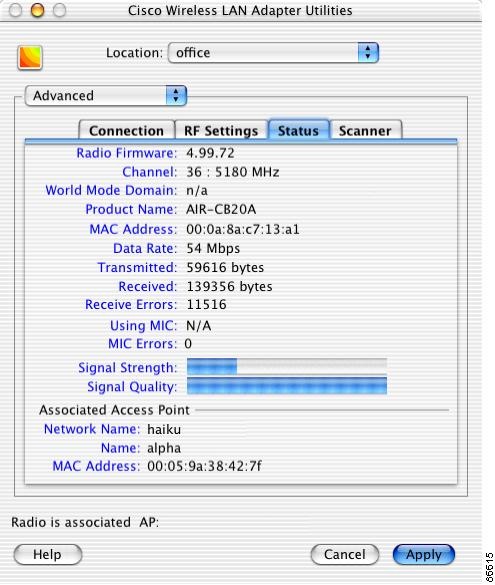
To obtain your radio firmware version, click the Status tab on the advanced properties screen. The status screen (see Figure 8-5) appears and displays your client adapter radio firmware version number and other status information.
Figure 8-5 Client Utility Advanced Properties Status Screen
Downloading New Radio Firmware
The current version of the firmware is displayed on the Status screen (See "Determining the Radio Firmware Version Number" section). The latest firmware version for your client adapter is available for download at the Cisco Software Center web site.
Note ![]() If a power failure occurs while you are loading new firmware, your client adapter can become inoperable. If this occurs, start the procedure again.
If a power failure occurs while you are loading new firmware, your client adapter can become inoperable. If this occurs, start the procedure again.
To obtain the latest client adapter radio firmware from the Cisco Web site, follow these steps:
Step 1 ![]() Use your web browser to access the Cisco Software Center at the following URL:
Use your web browser to access the Cisco Software Center at the following URL:
http://www.cisco.com/public/sw-center/sw-wireless.shtml
Step 2 ![]() Using the onscreen instructions, navigate to the current release for your client adapter. Because the firmware does not depend on the operating system, you may prefer to select the radio firmware from the Aironet Wireless Software Display tables.
Using the onscreen instructions, navigate to the current release for your client adapter. Because the firmware does not depend on the operating system, you may prefer to select the radio firmware from the Aironet Wireless Software Display tables.
Step 3 ![]() Click on the firmware filename, such as 340-PCMCIA-LMC-PCI-v42530.exe or CB-20A-v50102.exe. The 42530 and 50102 identify the version number; the prefix identifies the client adapter type. For example 340-PCMCIA-LMC-PCI refers to the 340 series PCMCIA, LMC, and PCI client adapters. CB-20A refers to the 5-GHz client adapter.
Click on the firmware filename, such as 340-PCMCIA-LMC-PCI-v42530.exe or CB-20A-v50102.exe. The 42530 and 50102 identify the version number; the prefix identifies the client adapter type. For example 340-PCMCIA-LMC-PCI refers to the 340 series PCMCIA, LMC, and PCI client adapters. CB-20A refers to the 5-GHz client adapter.
Note ![]() The firmware image file (*.exe) is a compressed file. Use the Stuffit Expander to expand (uncompress) this file.
The firmware image file (*.exe) is a compressed file. Use the Stuffit Expander to expand (uncompress) this file.
Note ![]() Make sure to select a firmware release that is compatible with your client adapter hardware. Each firmware version includes a description with compatibility information.
Make sure to select a firmware release that is compatible with your client adapter hardware. Each firmware version includes a description with compatibility information.
Note ![]() To support the message integrity check (MIC) feature on the 2.4-GHz client adapters, you must use firmware version 4.25.23 or later.
To support the message integrity check (MIC) feature on the 2.4-GHz client adapters, you must use firmware version 4.25.23 or later.
Step 4 ![]() Read and accept the terms and conditions of the Software License Agreement.
Read and accept the terms and conditions of the Software License Agreement.
Step 5 ![]() Click on the filename in the Software Download page.
Click on the filename in the Software Download page.
Step 6 ![]() Save the file to your hard drive then exit the web browser.
Save the file to your hard drive then exit the web browser.
Step 7 ![]() Locate and use the Stuffit Expander program on your hard drive to expand (uncompress) the radio firmware image file (*.exe) you copied to your hard drive. This creates an image file (filename.img) in the folder where the compressed file is located.
Locate and use the Stuffit Expander program on your hard drive to expand (uncompress) the radio firmware image file (*.exe) you copied to your hard drive. This creates an image file (filename.img) in the folder where the compressed file is located.
Loading New Radio Firmware (Mac OS X)
Your client adapter firmware is contained in the adapter's Flash memory, where it can be easily updated.
Step 1 ![]() If you have not already done so, download the new firmware from the Cisco website.
If you have not already done so, download the new firmware from the Cisco website.
Step 2 ![]() Make sure your client adapter is installed in your computer (refer to the "Inserting the Client Adapter into a Computing Device" section).
Make sure your client adapter is installed in your computer (refer to the "Inserting the Client Adapter into a Computing Device" section).
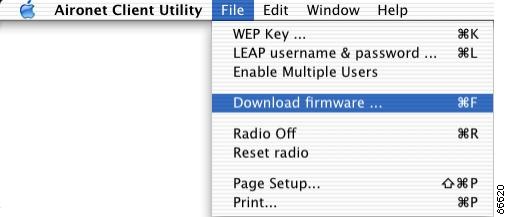
Step 3 ![]() Select Download firmware from the File drop-down menu (see Figure 8-6). The file location screen appears.
Select Download firmware from the File drop-down menu (see Figure 8-6). The file location screen appears.
Figure 8-6 File Drop-Down Menu
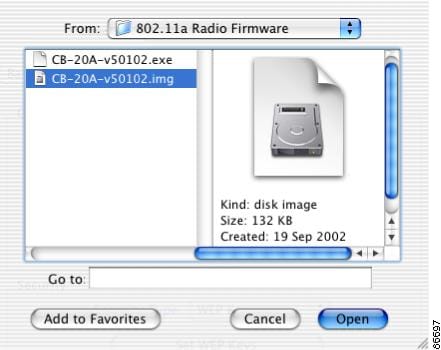
Step 4 ![]() Click the up and down arrows on the right of the From field and select the location (volume and folder) of the new radio firmware file on your hard disk.
Click the up and down arrows on the right of the From field and select the location (volume and folder) of the new radio firmware file on your hard disk.
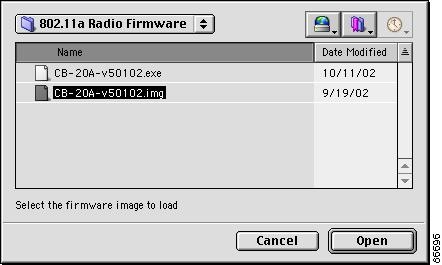
Step 5 ![]() Click the new radio firmware image file (.img); see Figure 8-7.
Click the new radio firmware image file (.img); see Figure 8-7.
Figure 8-7 Firmware File Location Screen
Step 6 ![]() Click the Open button. A dialog box appears indicating the progress of the download. The selected image is loaded into the client adapter's Flash memory.
Click the Open button. A dialog box appears indicating the progress of the download. The selected image is loaded into the client adapter's Flash memory.
Step 7 ![]() Click OK when a message appears indicating the firmware download was successful.
Click OK when a message appears indicating the firmware download was successful.
Loading New Radio Firmware (Mac OS 9)
Your client adapter's firmware is contained in the adapter's Flash memory, which allows it to be easily updated in the future.
Step 1 ![]() If you have not already done so, download the new firmware from the Cisco website.
If you have not already done so, download the new firmware from the Cisco website.
Step 2 ![]() Make sure the client adapter is installed in your computer and is operational.
Make sure the client adapter is installed in your computer and is operational.
Step 3 ![]() Select Load Firmware from the Edit drop-down menu (see Figure 8-8). The Firmware window appears (see Figure 8-9).
Select Load Firmware from the Edit drop-down menu (see Figure 8-8). The Firmware window appears (see Figure 8-9).
Figure 8-8 Edit Drop-Down Menu
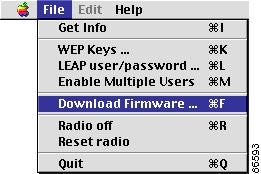
Figure 8-9 Firmware Window
Step 4 ![]() Under Name, select the location of the new firmware (for example, Macintosh HD).
Under Name, select the location of the new firmware (for example, Macintosh HD).
Step 5 ![]() Click the new firmware image file (.img).
Click the new firmware image file (.img).
Step 6 ![]() Click the Open button. A dialog box appears indicating the progress of the download. The selected image is loaded into the client adapter's Flash memory.
Click the Open button. A dialog box appears indicating the progress of the download. The selected image is loaded into the client adapter's Flash memory.
Step 7 ![]() When the Firmware download successful message appears, click OK.
When the Firmware download successful message appears, click OK.
Removing the Client Adapter
Follow the instructions below whenever you need to remove the client adapter from your computer.
Removing a PC Card
To remove a PC card from a Mac OS 9 computer after it is successfully installed and configured (such as when your laptop is to be transported), completely shut down your computer and pull the card directly out of the PC card slot. You can remove the PC card while the system is running, provided the card is not being used (that is, the client utility is not running and the card is not selected in the AppleTalk and TCP/IP control panels). When the PC card is reinserted and the computer is rebooted, your connection to the network should be re-established.
For Mac OS X systems, you can remove the card anytime.
Removing a PCI Client Adapter

PCI client adapters are installed inside desktop computers. To remove the PCI client adapter, follow the instructions below:
Step 1 ![]() Completely shut down and power off your computer and all accessories.
Completely shut down and power off your computer and all accessories.
Step 2 ![]() Disconnect the client adapter's antenna.
Disconnect the client adapter's antenna.
Step 3 ![]() Open or remove your computer cover.
Open or remove your computer cover.
Note ![]() Refer to your Macintosh computer manual for instructions on opening or removing your computer cover and on locating the PCI expansion slots.
Refer to your Macintosh computer manual for instructions on opening or removing your computer cover and on locating the PCI expansion slots.
Step 4 ![]() Locate the PCI expansion slot that holds your client adapter.
Locate the PCI expansion slot that holds your client adapter.
Step 5 ![]() Pull up firmly on the client adapter to release it from the slot and carefully tilt the adapter to allow it to clear the opening in the back panel.
Pull up firmly on the client adapter to release it from the slot and carefully tilt the adapter to allow it to clear the opening in the back panel.
Step 6 ![]() Reinstall the expansion slot cover and replace or close the computer cover.
Reinstall the expansion slot cover and replace or close the computer cover.
 Feedback