|
Step 1
|
Navigate to https://partners.dnaspaces.io/home to login to the Cisco Spaces - Partner Dashboard.
|
|
Step 2
|
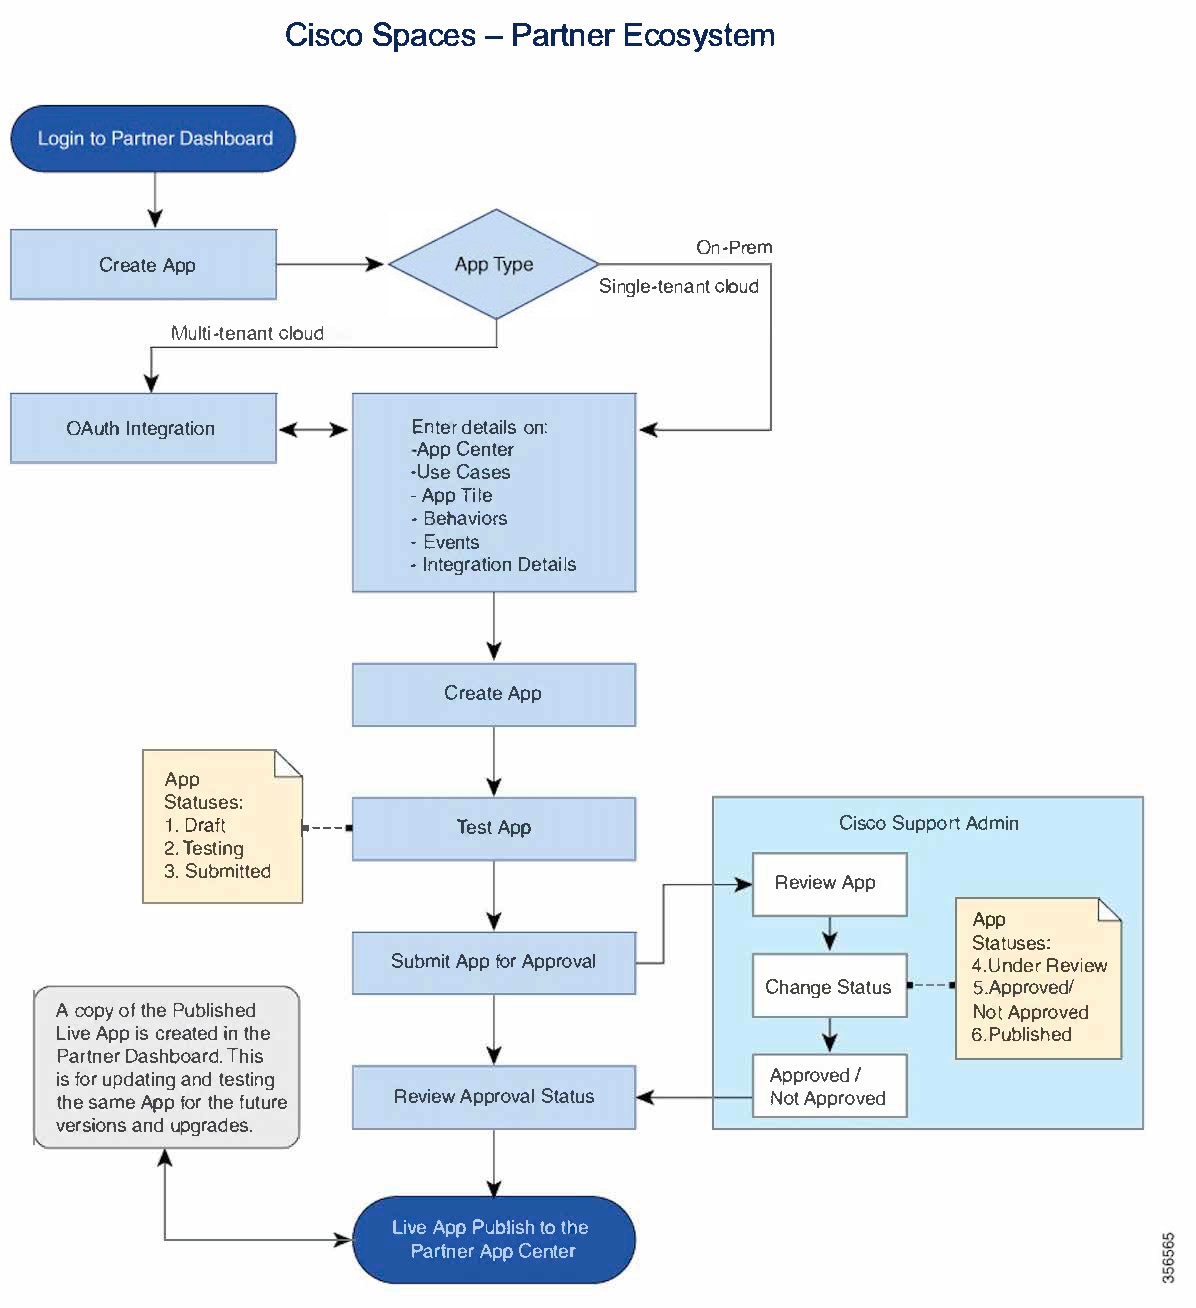
Click the Create New App tile.
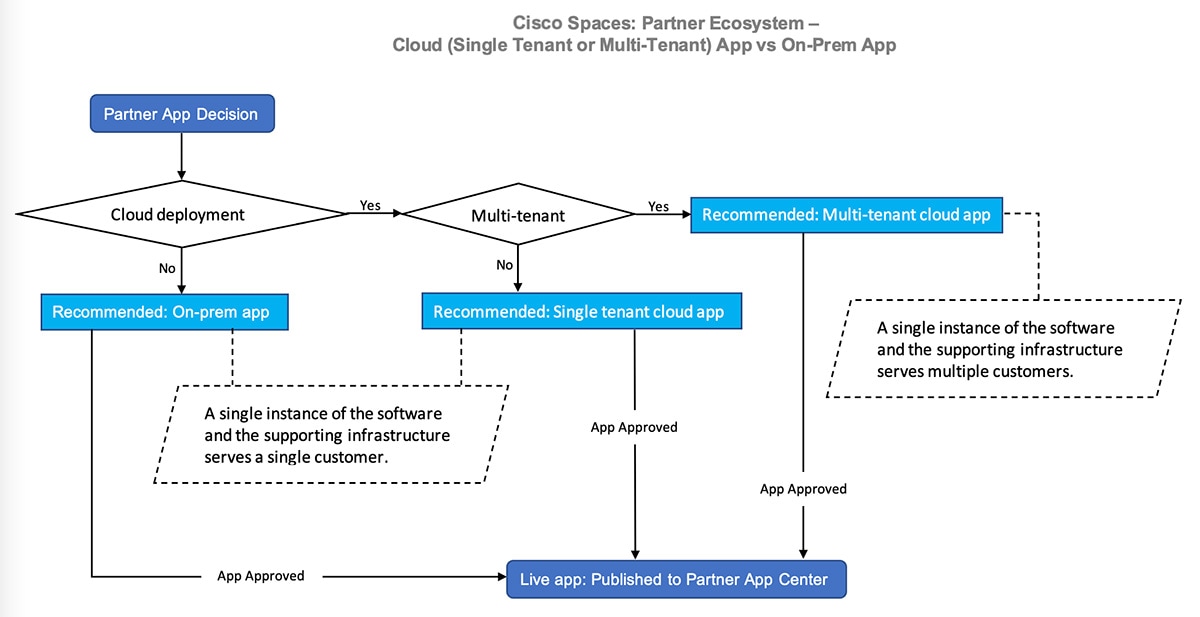
The Choose App Type dialog box displays the Multi Tenant Cloud, Single Tenant Cloud, and On-Prem options.
|
|
Step 3
|
Click the Create New App tile under the Partner Apps.
|
|
Step 4
|
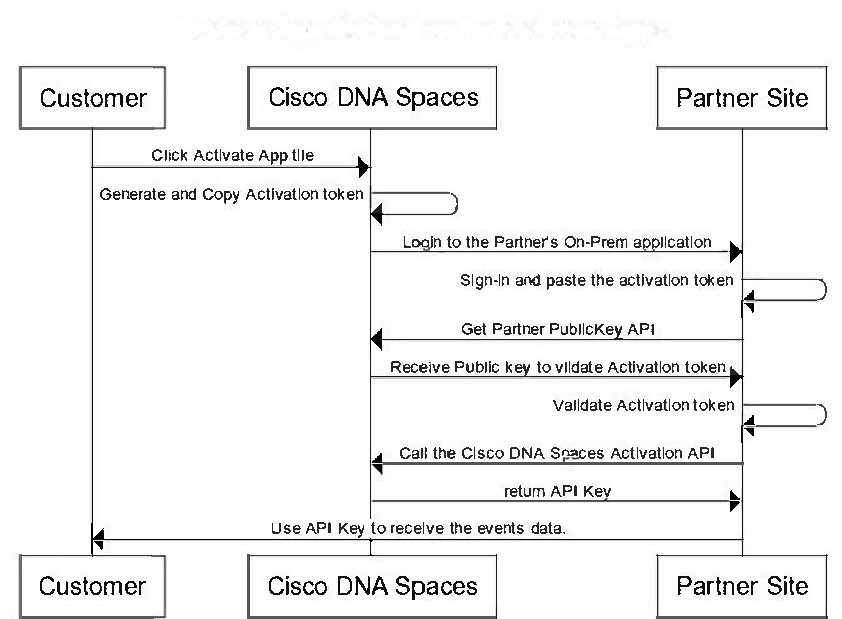
Select the On-Prem option.
|
|
Step 5
|
Click Create.
The App Center, Uses Cases, App Tile, Behaviors, Events, and the Integration Details tabs display. On each of these tabs, you can configure the App details.
|
|
Step 6
|
The App Center tab displays by default.
-
Choose the desired region. To create, activate, publish and manage app for the Europe region, choose the Europe Region option. Otherwise, choose Rest of the World (Except Europe region) option.
-
Enter a relevant APP Name.
-
Enter a relevant App Tagline for your App.
-
Click the Choose File button to select and upload the APP Icon image.
-
Enter a relevant App Description.
-
Choose the Primary Industry for the App.
-
Check the relevant check boxes under the More Industries section, if your app is applicable to specific business segments. Retail, Hospitality, Health Care, Manufacturing, Education, Financial Services, Venues, Workspaces, Real estate, and Others.
-
You can include (optional) following details: in the Developer Info, Support Contact, Sales Contact, and App Media sections such as the Company Logo, Company Name, Company Website, Support Contact, Support Email, Sales Phone, Sales Email, Screenshots, and Youtube Video URL.
-
Under the Developer Info section, click Choose File to upload a Company Logo of the App developer.
-
Enter the Company Name of the App developer, if needed.
-
Enter the Company Website of the App developer, if needed.
-
Under the Developer Info section, click Choose File to upload a Company Logo of the App developer.
-
Enter the Company Name of the App developer, if needed.
-
Enter the Company Website of the App developer, if needed.
-
Under the Support Contact section, enter the Support Phone number, if needed.
-
Under the Support Contact section, enter the Support Email address, if needed.
-
Under the Sales Contact section, enter the Sales Phone number, if needed.
-
Under the Sales Contact section, enter the Sales Email address, if needed.
-
Under the APP Media section, Drag & drop screenshots of your application from your local drive, or click the Click here to upload link to choose and upload your App screenshots, if needed.
-
Enter the Youtube Video URL and click Save, if you wish to save a video URL of your application.
|
|
Step 7
|
Click on the Use Cases tab.
|
|
Step 8
|
Click the Add a Use Case button if you wish to add one or more use cases.
-
Enter a relevant Use Case Headline.
-
Click the Choose File button to select and upload the Use Case Icon.
-
Enter relevant Use Case Short Description.
-
Enter the optional Use Case Long Description, if any.
-
Enter the optional Compatibility Notes, if any.
-
Choose the relevant Use Case Category. The available options are Analytics, Captive Portal, Marketing & Engagement, Asset Management, Wayfinding, Mapping, and Others. Choose Others if the use case does not belong to any of the available categories.
-
Provide other optional use case options, for the Who is this use case applicable to, What value does this drive for the customer? questions.
-
Optionally, select the appropriate Infrastructure Compatibility options.
-
Optionally, select the upload relevant Screenshots, and Youtube Video URL, if any
-
Click Save to save changes.
-
Click Add Another Use Case button to add additional use cases.
|
|
Step 9
|
Click on the App Tile tab. The App Tile Configuration section displays.
-
Enter a relevant APP Tile Label.
-
Enter the desired App Tile Tagline description.
-
Enter the relevant instructions in the App Activation Instructions window, if needed
-
Under the APP Launch Configuration section, you can choose to check the App Launch Link option and provide the App Launch URL or choose the Launch Instructions Notes option and enter the relevant information in the App Launch Instructions Notes window
|
|
Step 10
|
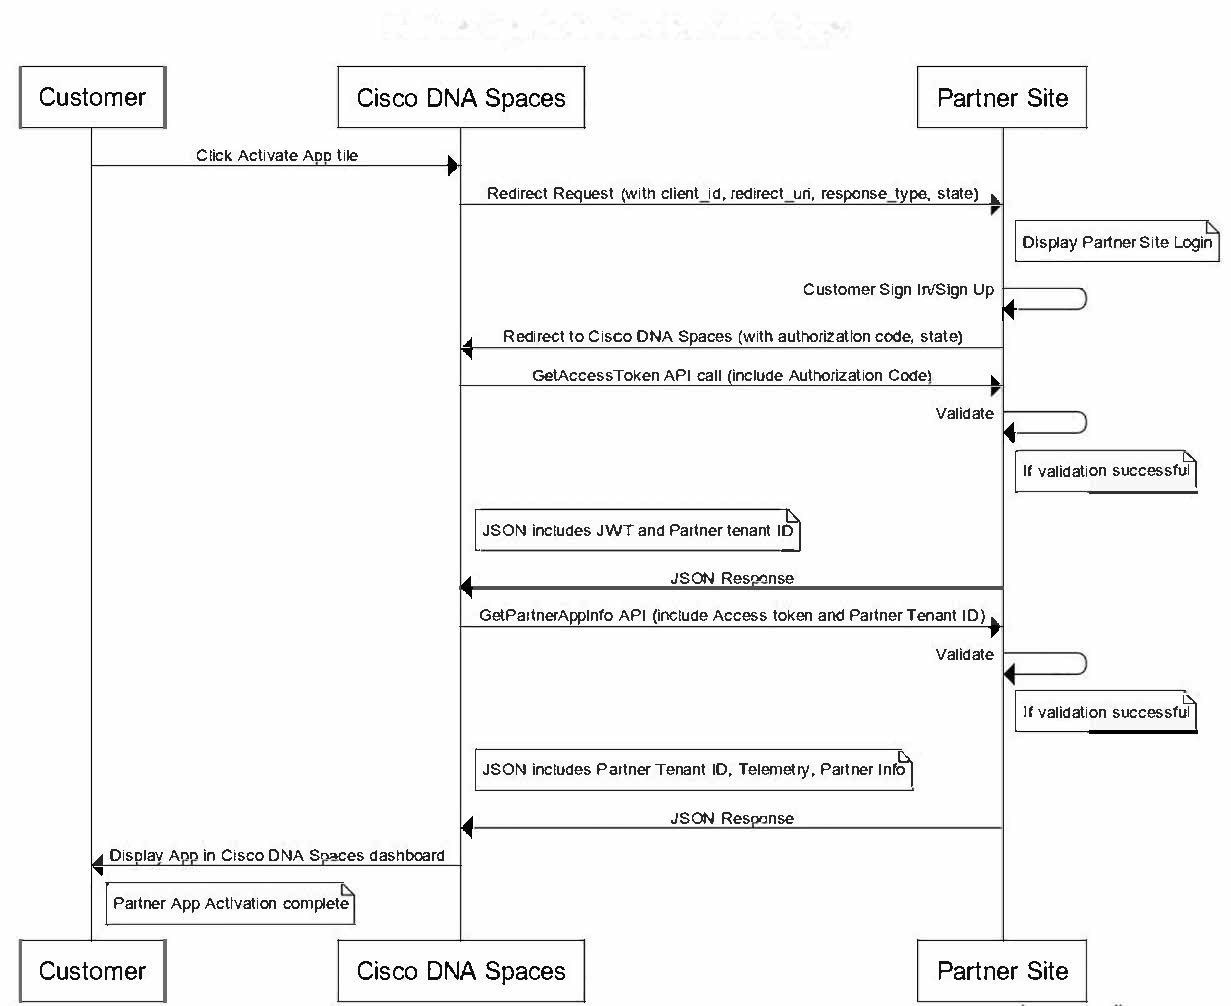
Click on the Behaviors tab. Enter details in the App Behaviors section, if you wish to support automated sign-up for new customers.
-
The NEW CUSTOMER ONBOARDING section allows you to enter the redirect URL for new customers' sign-up. Enter the redirect URL in the Sign Up URL field.
-
Enter correct address in the Contact Company Info field.
-
To enable customers to view details when they remove/delete the app, enter details in the Delete App Confirmation field. Ensure the URL uses the https:// protocol.
-
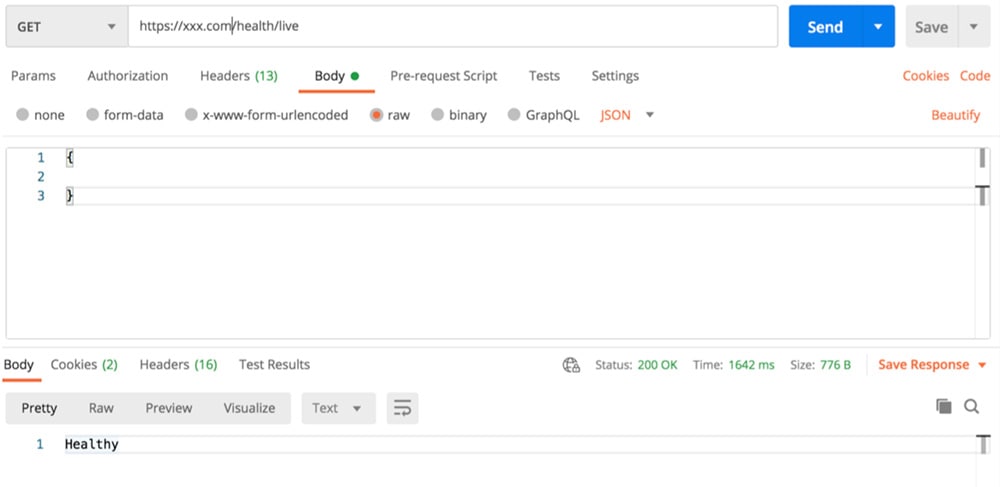
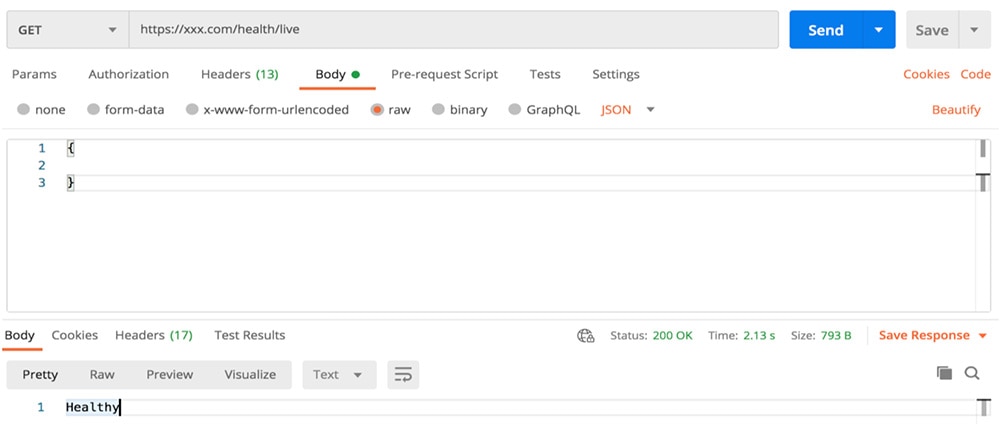
The app monitoring configurations help Cisco Spaces to monitor and report the app health and the uptime status. Under the APP MONITORING section, enter the correct link addresses in the App Health Check URL, API Health Status URL, and the App Status Page URL fields. Make sure to use the https:// protocol when entering the App Monitoring URLs.For more information, see Monitor Partner App Health.
|
|
Step 11
|
Click on the Events tab. The available app Events Types and Event Settings are listed.
The events listed on the Event Types screen are triggered in sequence, from the time of App activation occurs, till the time a device exists and various other
event types data are collected. Each event type is triggered on the occurrence a particular activity.
-
For example: The first time a Customer activates the partner app, the App Activation event is triggered in the background with information update such as the Customer has activated your App.
-
Next, the Location Information Change event triggers, which provides location changes information of all activations at the various locations as configured in
the location hierarchy.
-
If your Wi-Fi location infrastructure is setup, then you will receive a Device Location Update when a visitor connects to the SSID.
-
However, for the very first time when the device connects to the SSID, you will also receive the Device Presence event information at the time of entry. If the visitor device is associated with a User ID, you will receive a User Presence event type. Based on a user's device state, you will receive other event data information. For example: If a user device
is passive or when there is no device update for a specified interval of 10 minutes, then both User Presence and Device Presence events information will indicate as Inactive. For example: If a visitor is entering a location with multiple devices, such as a mobile device and a laptop at the same
time, and there are no location updates received for both devices for 10 minutes, then the User Presence and Device Presence events indicate as Inactive.
-
As soon as one of the devices is active at the location, the User Presence and Device Presence event status automatically changes to Active. If one of the devices or both devices are inactive for a longer period or a specified time-interval, then the Device Presence event is triggered.
-
If a business location has TelePresence devices configured, then such TelePresence devices will post information on the People Occupancy and People Count data in the room by using the built-in sensors. Though the People Count data is approximate, the People Occupancy data is accurate. The system automatically posts the updated data, whenever it identifies a change.
|
Note
|
It is highly recommended that you select only those Event Types that are applicable and required for your business use cases,
thereby limiting the number of events and avoiding unnecessary system overheads. Specifically, the event must be subscribed
only if you have your TelePresence device configured to interact with Cisco Spaces in order to limit the number of events that you receive and to avoid unnecessary overheads on the system.
|
-
The available Events Types displayed are:
-
Device Entry: This event is sent when a device enters a location.
|
Attention
|
The Device Entry event is deprecated and is now replaced by the Device Presence event.
|
-
Device Exit: This event is sent when a device has exited a location.
|
Attention
|
The Device Exit event is deprecated and is now replaced by the Device Presence event.
|
-
Profile Update: This event is sent when a device profile is updated. For example, this event is sent when an end-user provides information
in a captive portal.
-
Location Information Change: This event is sent when a location is updated or changed. For example, a location is moved under a group, location is renamed
or there is a change to the location metadata.
-
TelePresence: This event is sent when the TelePresence system encounters a people count update.
|
Attention
|
The TelePresence event is deprecated and is now replaced by the WebEx Telemetry event which is the enhanced version of the Telepresence update.
|
-
Device Location Update: This event is sent when a device location is updated. If you check the Receive Geo Coordinates option, you will receive the device latitude and longitude coordinates, along with the X and Y coordinates data for the device.
-
App Activation : This event is sent when a customer activates the application.
-
Account Admin Change: This event is sent when a account admin gets added/removed/updated for the partner account.
-
Device Presence: Used to track life cycle of a device at a location. Events are generated at device entry, when a device is inactive for
10 minutes, when a device is active after being inactive or when we determine that the device has exited. These events also
provide current count of devices at location (active and inactive).
-
User Presence: Based on available authentication in use and information available from the network, Cisco Spaces can map group multiple devices owned by a user. Events are generated at user entry, when a user is inactive for 10 minutes,
when a user is active after being inactive or when we determine that the user has exited. These events also provide current
count of user at location (active and inactive).
-
IoT Telemetry: This event is sent when there are telemetry updates from BLE, RFID, and Zigbee IoT devices.
-
IoT User Action: This event is sent when user actions are performed on IoT devices.
-
Device Count: This event is sent when there is a change in the (count) number of devices at the location.
-
WebEx Telemetry: This event is sent when there is telemetry from WebEx devices at the location.
|
Note
|
You need a Cisco Spaces ACT license to utilize this event.
|
-
Device Association: This event is sent when a device gets connected at a specified location. Device details include device ID, location details,
SSID, and other information associated with the user.
|
Note
|
-
For more information, go to https://developer.cisco.com/docs/cisco-spaces-firehose/api/.
-
During app activation, you can now see the groups defined under IoT services. However, these groups are displayed only if
you have selected one of the following events:
-
IOT_TELEMETRY
-
IOT_USER_ACTION
To manage the groups selected during app activation, in the Activation window, click the Groups tab. Here, you can add or edit the groups.
|
Note
|
-
For this feature to work, you must enable IoT services for the specified Cisco Spaces account. You must enable IoT services through both the Cisco Spaces Dashboard and the Cisco Spaces - Partner Dashboard for EXTEND accounts in order to use this feature.
-
You can see the groups mentioned above during app activations for activations done through both the Cisco Spaces Dashboard and the Cisco Spaces - Partner Dashboard.
|
|
-
Under the Event Settings section, check the desired location option.
-
Under Choose Locations, you can choose to receive the above Event types data for the various location levels specified in the Cisco Spaces - Location hierarchy. The Location hierarchy in Cisco Spaces can be setup to correspond to your business needs and your organizational hierarchy, instead of corresponding only to the
physical or geographical business hierarchy.
In Cisco Spaces, you can set up your business organizational hierarchy by defining the main or the Root Level, which can include one or more Group and Network level. Each Network level may include one or more floors, while each Floor level can include one or more Zones. Access points can be associated with the different zones.
-
Check All Location Types if you wish to make the app available and receive the event data from all the business locations.
-
Check the Location Types option if you wish to make the app available and receive the event data only from specific location types that you choose.
Root Level, Groups, Network, Floor, and Zone are the available location types.
|
Note
|
If you are operating only at specific levels in the location hierarchy, such as only at the Network, Floor or Zone levels, it is highly recommended that you choose to receive Event data only for those specific levels, in order to avoid
unnecessary system overheads. Only if you need to process information from all levels in the Cisco Spaces - Location hierarchy, then choose the All Location Types option.
|
-
Select the desired location types.
-
Some of the event types listed above include the device MAC address in the Event payloads. For the MAC Address Sharing event setting, if you check the Yes option, you will receive the Client MAC addresses along with the associated events details. If you wish to receive MAC Address
Sharing details, then you will be responsible for handling the GDPR compliance requirements. However, if you do not adhere
to GDPR compliance standards requirements and your business requirement only needs the device ID, then you can use the device
ID event type data provided by Cisco Spaces provides with all the device-related events.
-
Some of the event types listed above include the Social Identifier Sharing data in the Event payloads. For the Social Identifier Sharing event setting, if you check the Yes option, you will receive the Social identifier Sharing data along with the associated events details. If you wish to receive
Social identifier Sharing details, then you will be responsible for handling the GDPR compliance requirements. However, if
you do not adhere to GDPR compliance standards requirements and wish to avoid data privacy issues while handling or storing
the Social Identifier Sharing data, then you can choose the No option, which is checked by default.
-
Likely, some Partners may not have their wireless network infrastructure fully set up and configured to receive the above
Event types information to analyze the data that is received. To glance and get a quick preview of the typical sample data
that is received from the above events, choose the Yes option associated with the Receive Simulation Events option. You will receive sample dummy data from Cisco.
|
Note
|
-
Data that is provided as part of the Simulation Events is only dummy data. This sample data does not guarantee any interoperability or integrity across any other events or APIs.
-
Simulation data is available only for the US domain.
|
Check No if you do not wish to receive dummy simulation events data from Cisco.
The Permissions and the Location Permissions sections on the right-side displays information on the permission types that will be requested from customers during App
activation. the Permissions are based on the event types that you selected. For example: If you wish to collect the MAC address
of a device, then the app will request the MAC specific permissions from the Customer. These permissions will be based on
the selected events, location, and the privacy configurations.
|
|
Step 12
|
Under the Integration Details tab, select the desired Integration Types:
-
In the Pull Channels section, choose among the following options:
-
HTTP: Sends pull channel event details over a streaming HTTP connection.
-
gRPC: Sends pull channel event details over a streaming gRPC call.
-
Websocket: Sends pull channel event details over a streaming Websocket connection.
|
|
Step 13
|
Click Create to create the App.
|

 Feedback