Getting Started

Activate IoT Service (Wired)

The following procedure shows you how to activate IoT service (wired) on your devices from the Cisco Spaces dashboard.

Before you begin

To activate IoT service (wired), here are some prerequisites.

  • Cisco Spaces: Connector

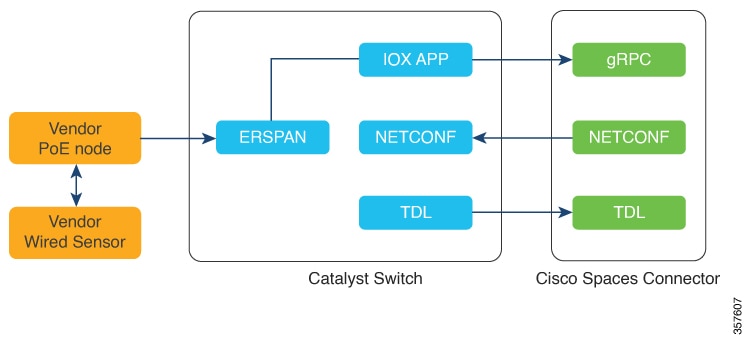
  • Cisco Catalyst 9300 or 9400 Series Switches with Cisco IOS XE Amsterdam 17.3.x and later


Note


The workflow initiated by this procedure automatically checks for these prerequisites.


Procedure


Step 1

Log in to Cisco Spaces.

Step 2

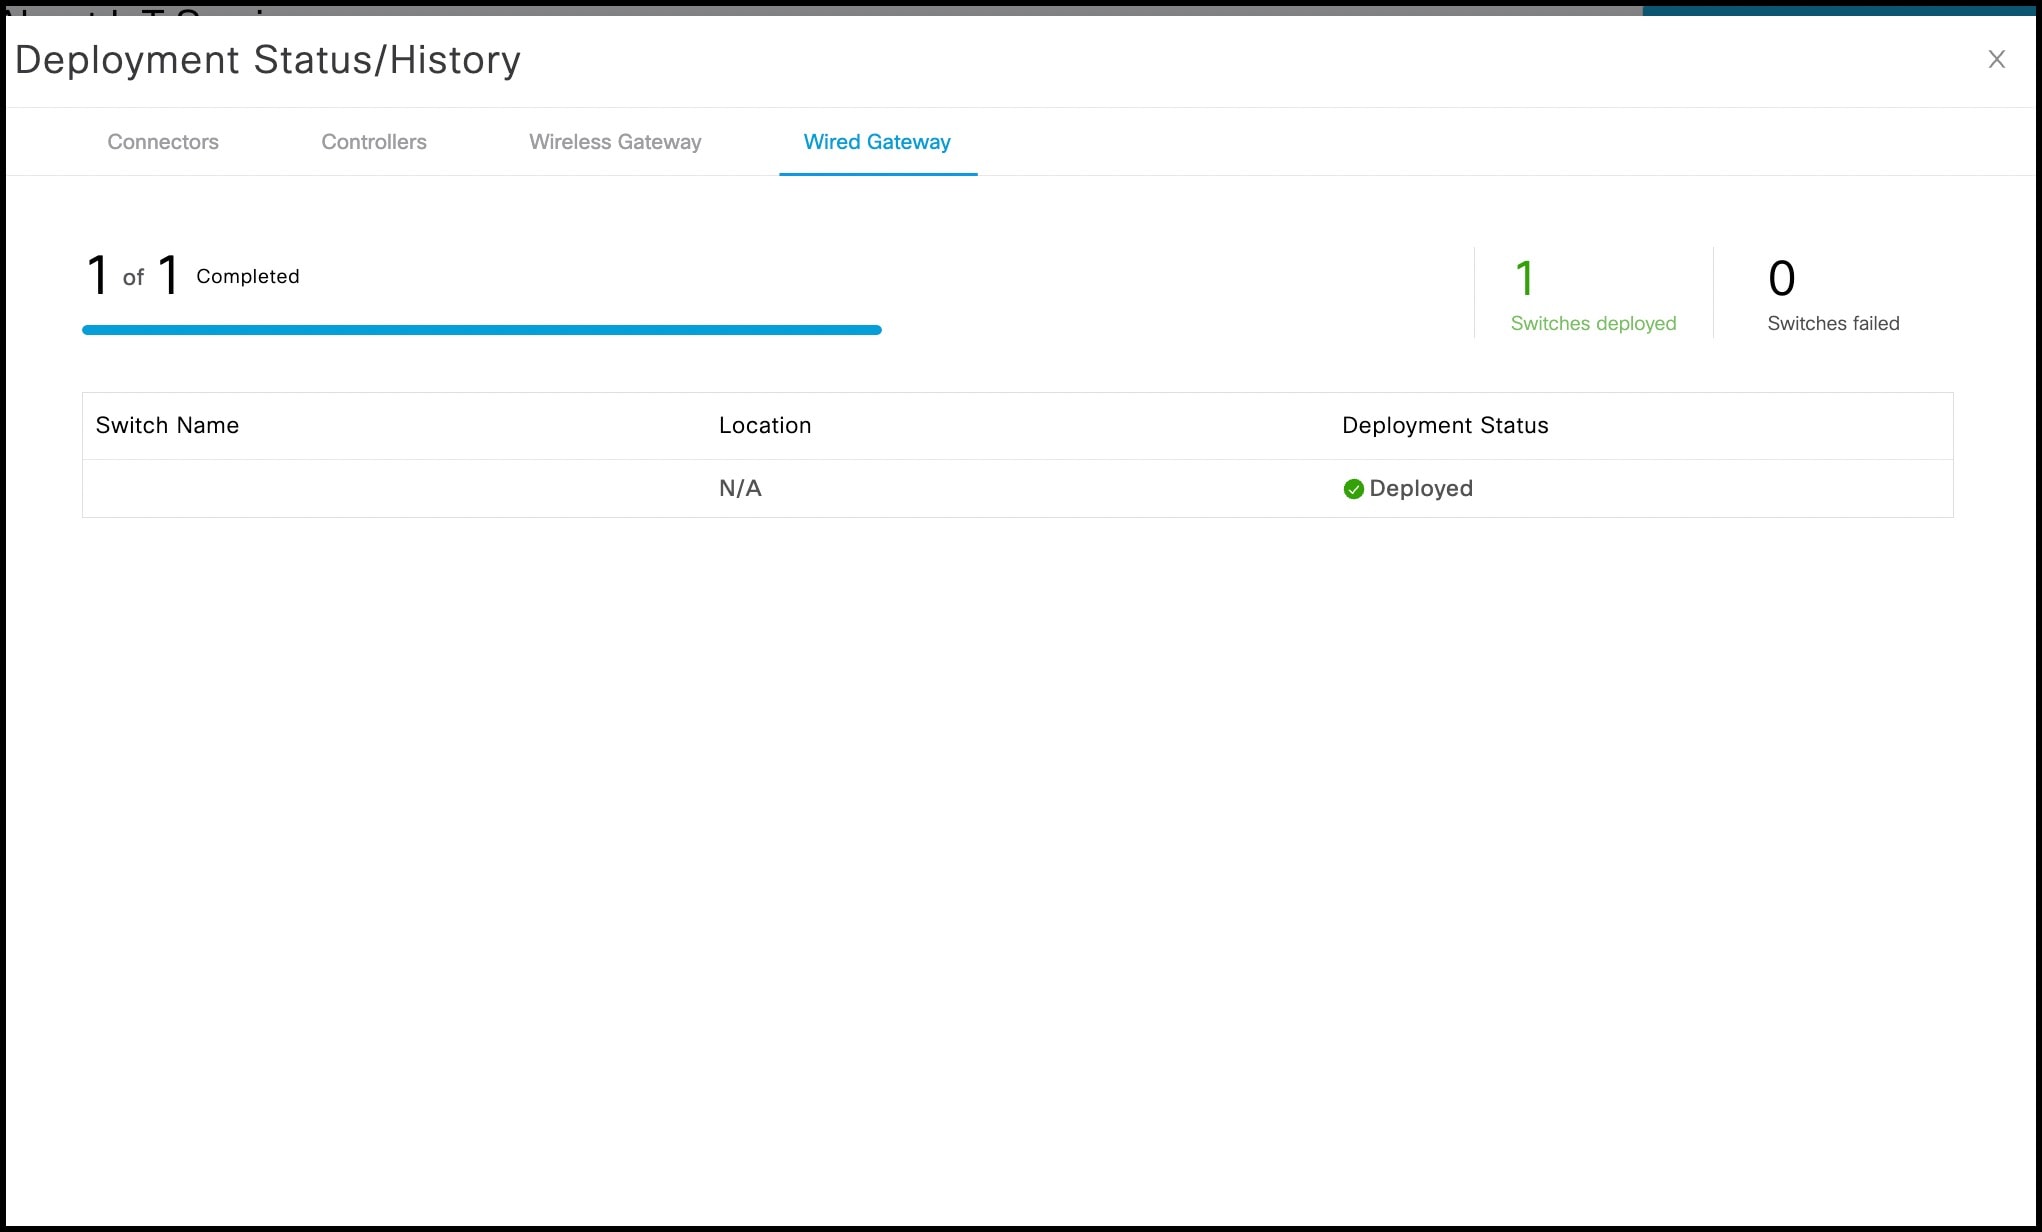
From the left navigation pane, click IoT Services > About IoT Services.

You can see the number of connectors activated with the IoT service (wired) service. You can also see the number of switches deployed as an IoT service (wired) gateway.

Click View Detailed Status to see the breakdown of the activation status by individual devices.
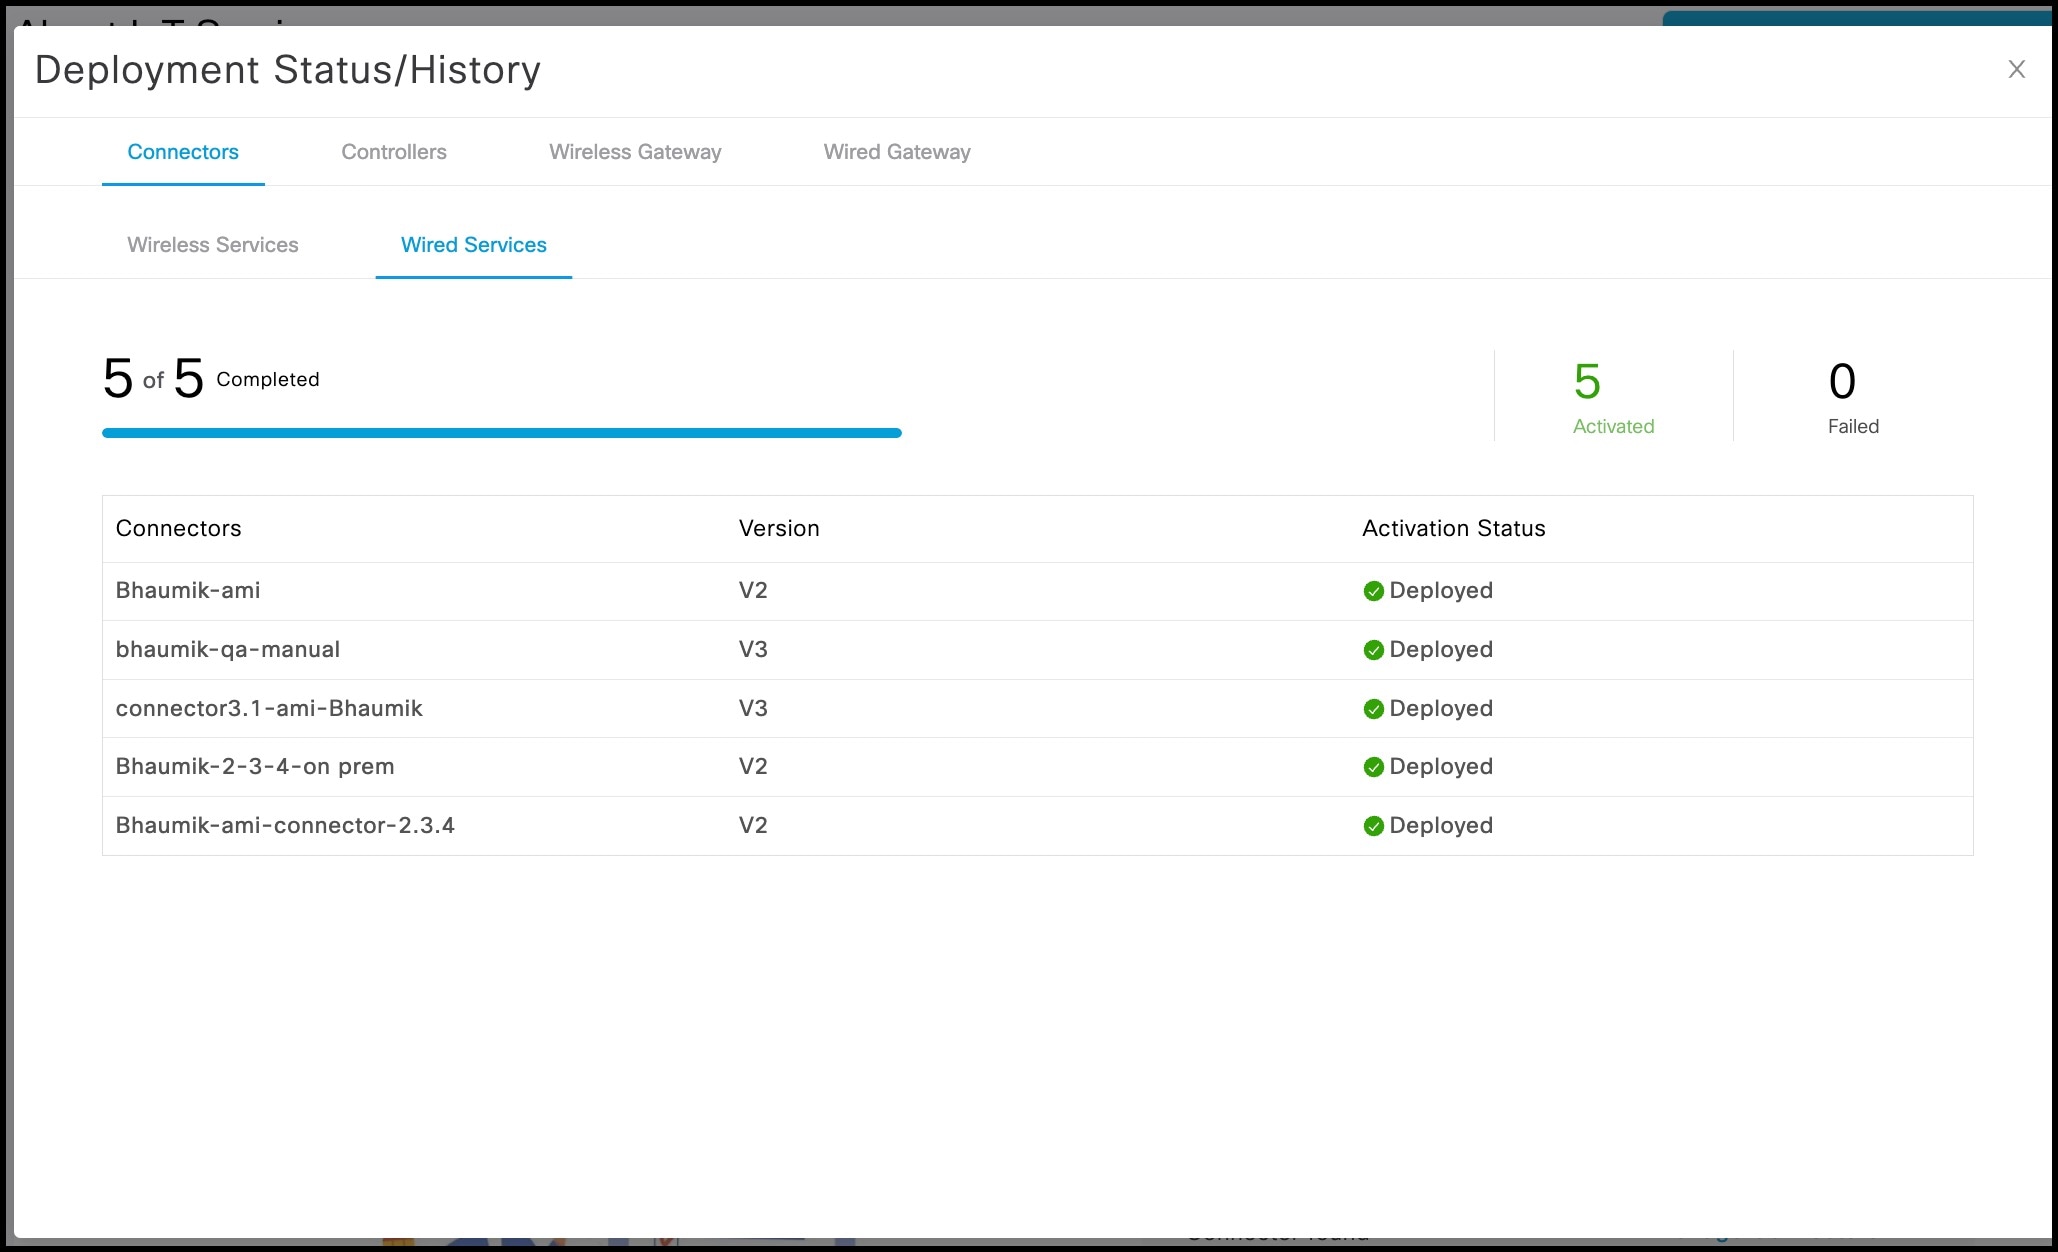
Figure 1. Detailed Status of Connectors Activated With IoT Service (Wired)
Figure 2. Detailed Status of Switches Activated as IoT Service (Wired) Gateways

Step 3

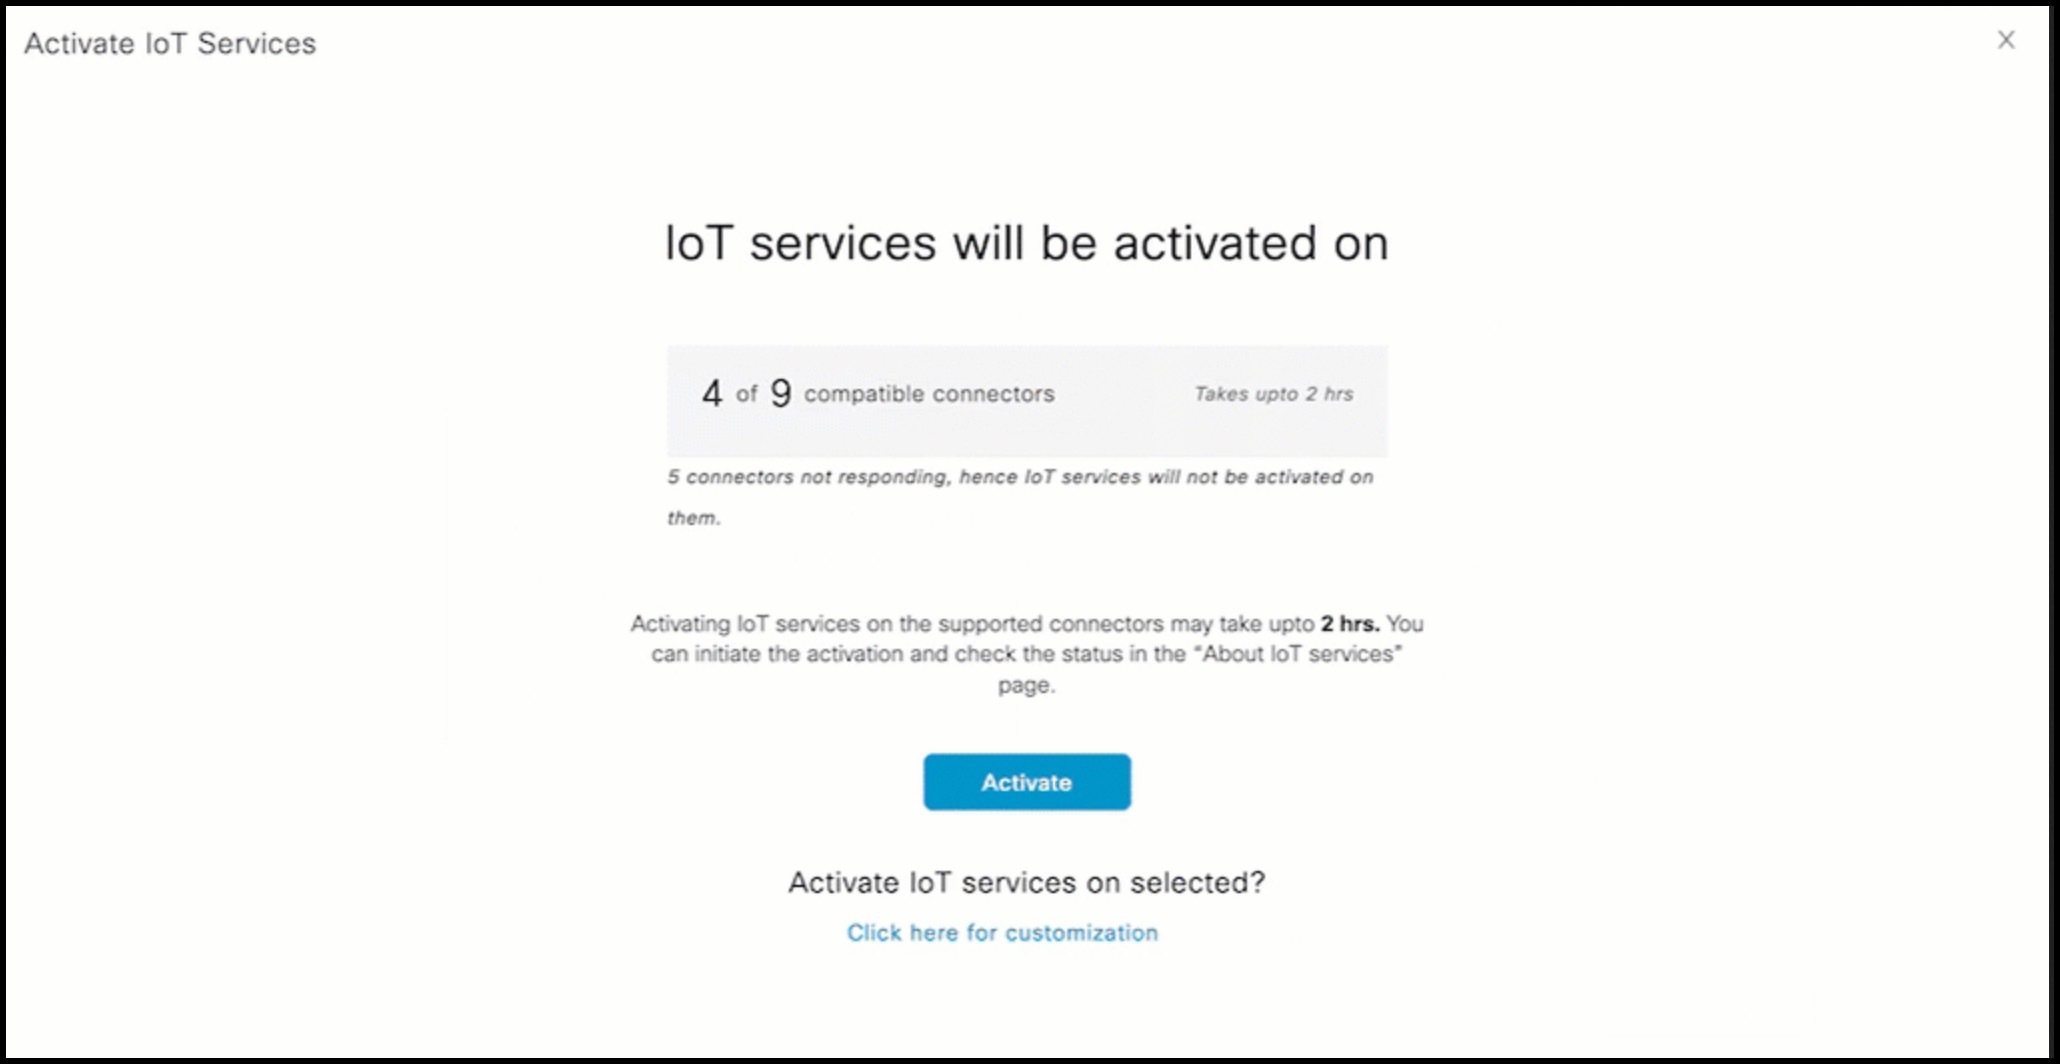
In the About IoT Services window top-right corner, click Activate IoT Services.
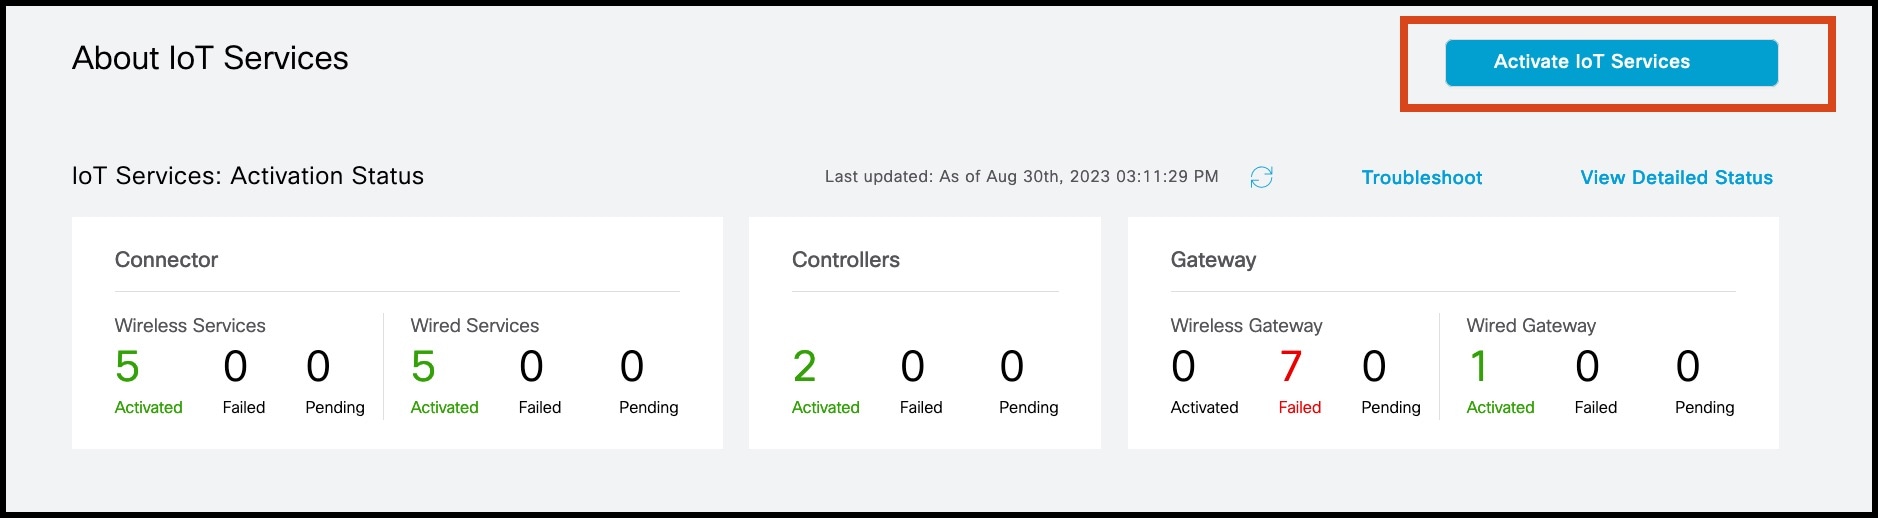
Figure 3. Activate IoT Services

Step 4

In the Activate IoT Services window that is displayed, choose Wired.
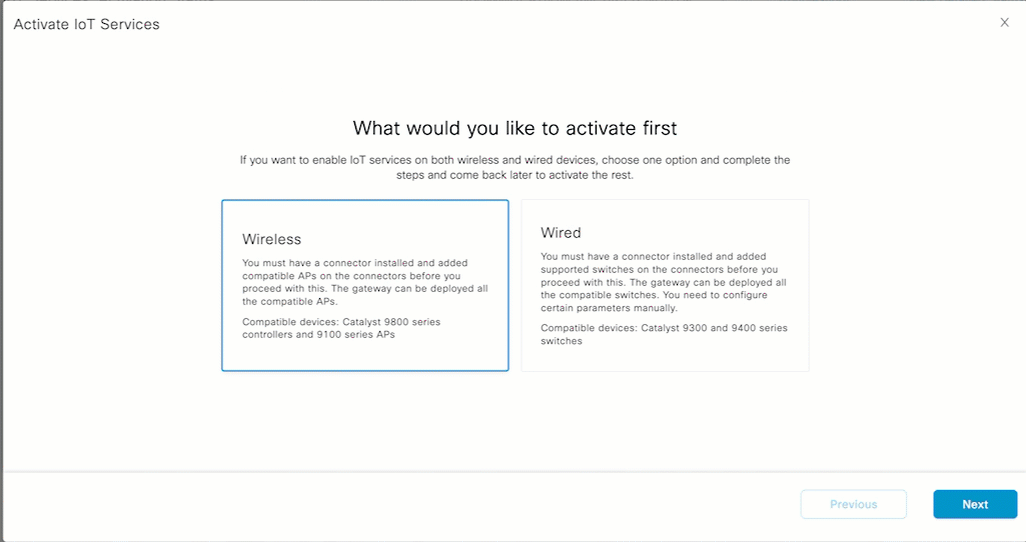
Figure 4. Activate IoT Service (Wired)
You can see the list of all devices that can be activated with IoT service (wired), along with the time taken for activation.
Figure 5. List of Devices that Support IoT Service (Wired)

Step 5

To activate IoT service (wired) on all devices on your network, do the following:

  1. In the IoT services will be activated on window, click Activate.

    Note

     
    For Smart power distribution unit (PDU) and Hella cameras, IoT service (wired) is now activated. Click Finish to exit this procedure. Continue the procedure only for sensors and other devices.
  2. To use wired sensors, you can activate wired gateway on your switches. Click Activate Wired.

    Figure 6. Activate IoT service (wired)
  3. Continue to Step 7 to deploy the IoT service (wired) gateway.

Step 6

To activate IoT service (wired) only on specific devices of your network, do the following:

  1. In the IoT services will be activated on window, click Click here for customization.

  2. Check if your preferred connector is activated. If it is not activated, choose one or more connectors you want to activate with IoT service (wired), and click Activate.

    Note


    For Smart PDU and Hella cameras, IoT service (wired) is now activated. There is no further need to proceed with the following steps in this task. Click Finish to exit this procedure. Continue the steps only for sensors and other devices, and click Activate Wired.

  3. If your connector is already activated, you can click Skip to Gateway Deployment.

Step 7

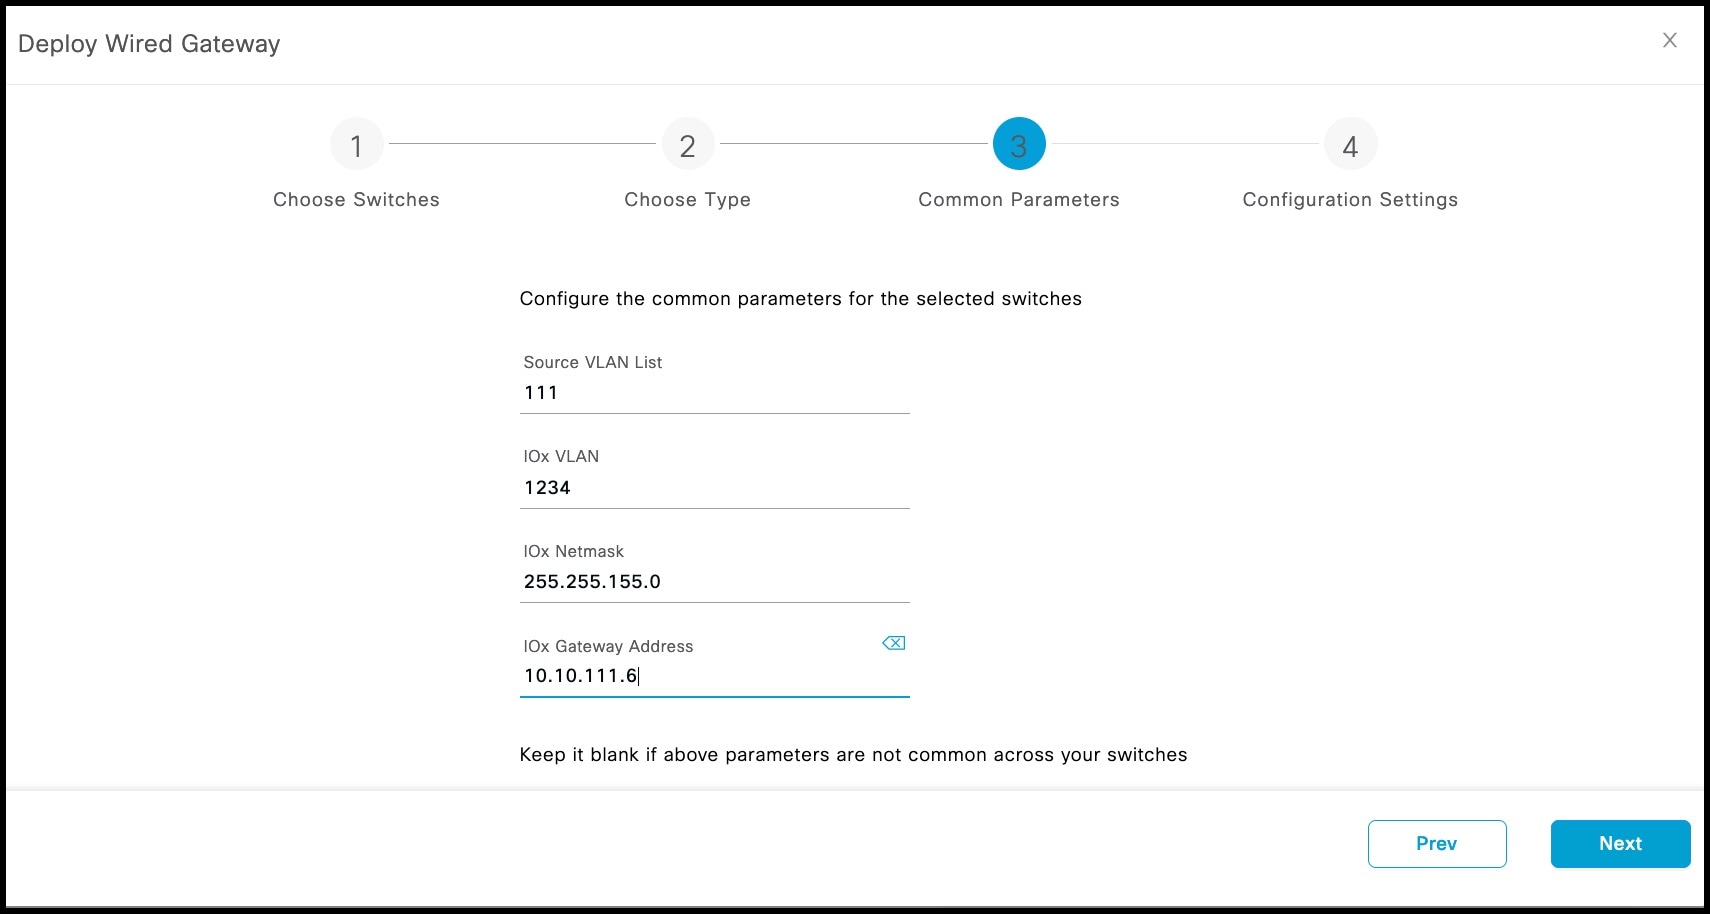
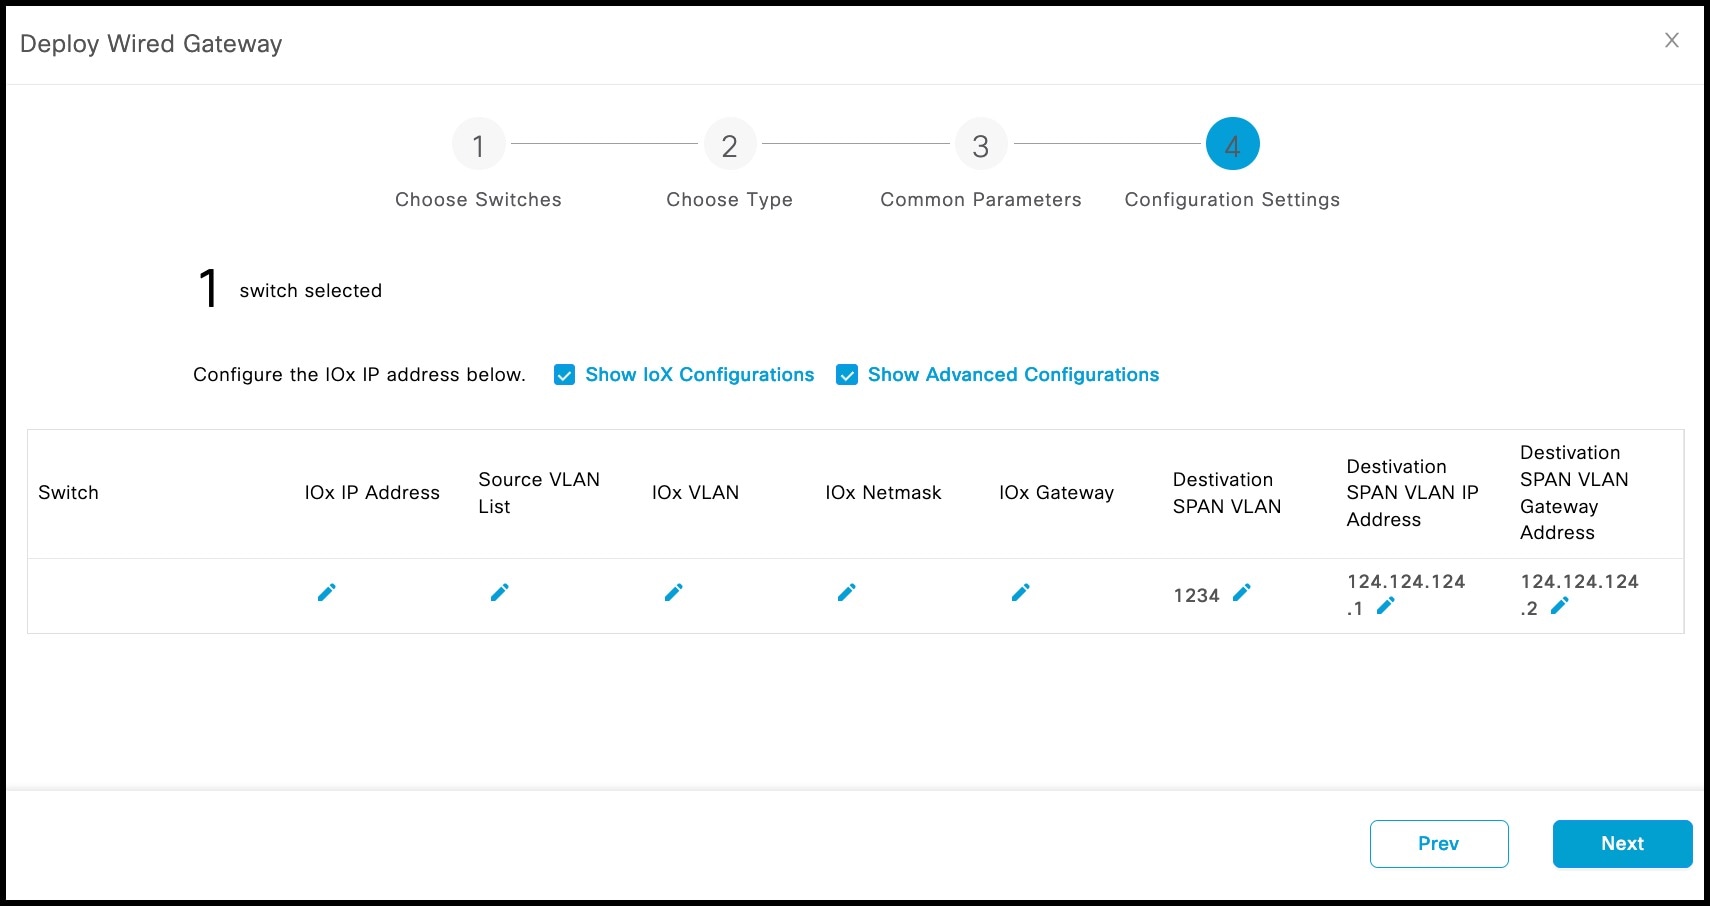
To deploy a switch as a IoT service (wired) gateway, do the following:

  1. In the Deploy Wired Gateway: 1. Choose Switches window that is displayed, check the respective switches check box on which you want to deploy IoT service (wired) gateway.

    Figure 7. Common Parameters: Wired Gateway
  2. In the Deploy Wired Gateway: 2. Choose Type window that is displayed, choose Static to configure static IP addresses and other details for the gateway.

  3. In the Deploy Wired Gateway: 3. Common Parameters window that is displayed, you can configure the following common parameters of the gateway:

    • Source VLAN list: List of VLANs to which the wired devices are connected. The traffic on these VLANs is monitored. If the wired devices are connected to multiple VLANs, enter the VLANs separated by a comma.

    • IOx VLAN: This is the VLAN on which the connector is reachable (for management or data). You must configure the Cisco IOx App's second interface to use this VLAN to send traffic to the connector. This VLAN can be the same as the wired PoE node VLAN. The connector must have the required permissions to accept communications from the Cisco IOx App.

    • IOx Netmask: This is the IP subnet mask that you must manually configure for the Cisco IOx App's second interface, and is used to communicate with the connector. This is not required if you select DHCP.

    • IoX Gateway Address: This is the IP address that you must manually configure for the Cisco IOx App's second interface, and is used to communicate with the connector. This is not required if you select DHCP.

    Figure 8. Common Parameters: Wired Gateway
    Figure 9. ERSPAN Session Interfaces
    Figure 10. Sample Configuration
  4. In the Deploy Wired Gateway: 4. Configuration Settings window that is displayed, you can add the IOx IP Address by clicking the pen icon. This is the IP address that you must manually configure for the Cisco IOx App's second interface, and is used to communicate with the Connector. This is not required if you select DHCP.

    You can also see and edit the wired gateway configurations you made previously by checking Show IoX Configurations check box. You can edit the IoX configurations:
    • Source VLAN list:

    • IOx VLAN

    • IOx Netmask

    • IoX Gateway Address

    • IOx IP Address

    You can also edit the default advanced configurations:

    • Destination SPAN VLAN: The VLAN used to send ERSPAN traffic from Power over Ethernet (PoE) nodes to Cisco IOx App. You can use an existing VLAN or create a new one. This VLAN can also be local to the switch.

    • Destination SPAN VLAN IP address: This is the Switched Virtual Interface (SVI) or the IP address of the destination VLAN that can be used to route traffic. If you are using an existing VLAN, you can provide the same IP address. We recommend that you create a new VLAN so that you can keep the ERSPAN traffic local without impacting the existing configuration. This VLAN is used only within the switch for the SPAN traffic.

    • Destination SPAN VLAN Gateway Address:

    Figure 11. Deploy Wired Gateway: 4. Configuration Settings
  5. Click Finish to deploy the IoT service (wired) gateway on the selected switch.