Installation Overview

Preinstallation Checks and Installation Guidelines

Before you mount and deploy your access point, we recommend that you perform a site survey (or use the Site Planning tool) to determine the best location to install your access point.

You should have the following information about your wireless network available:

  • Access point locations

  • Access point mounting options: To a vertical or horizontal wall or a DIN rail

  • Access point power options: Use either of the following options to power the AP:

    • DC power input

    • Cisco-approved power injector

    • 802.3at (PoE+), 802.3bt, and Cisco Universal PoE (Cisco UPOE)

  • Operating temperature: -40° to +158°F (-40° to +70°C) with still air.

  • Console access using the console port

    We recommend that you use a console cable that is one meter or less in length.


    Note


    The AP may face issues while booting if you use an unterminated console cable (not plugged into any device or terminal) or a console cable that is more than one meter in length.

We recommend that you make a site map showing access point locations so that you can record the device MAC addresses from each location and return them to the person who is planning or managing your wireless network.
Mounting the Access Point

This section provides instructions to mount the AP.


Note


Personnel mounting the AP must have knowledge of the wireless AP, bridging techniques, and grounding methods.


The IW9165E AP can be mounted in a vertical or horizontal orientation. It can be mounted to a wall or other flat surface, and can also be mounted to a DIN rail.

You can attach the AP directly into your own mounting bracket by using the mounting holes on the bottom of the AP.

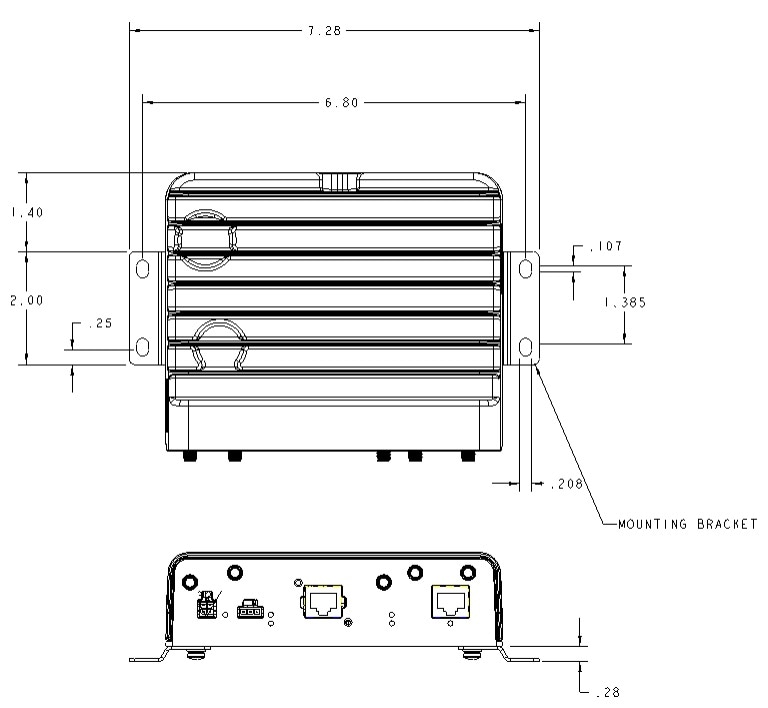
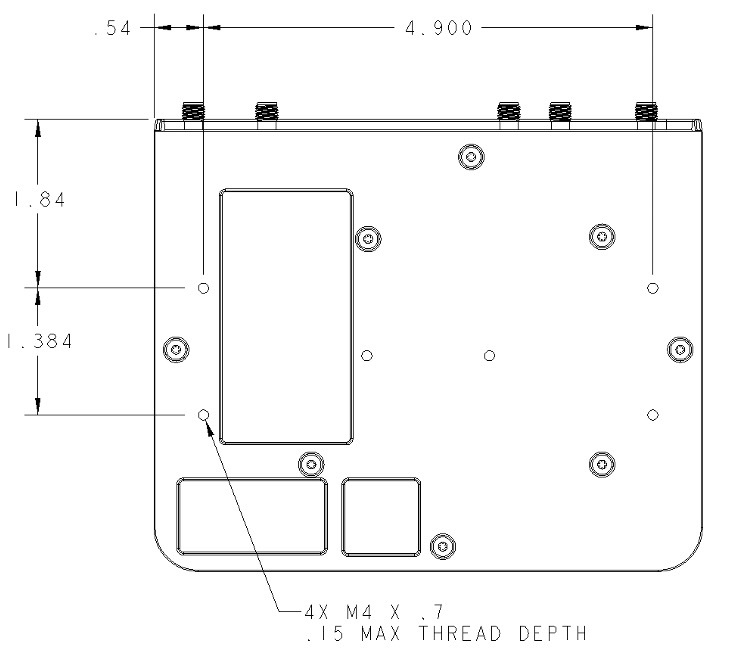
The following figure provides the mounting hole layout and dimensions (inch).

Figure 1. Dimensions of Mounting Holes on the Bottom of AP

Mounting on a Wall

The wall mounting kit contains the following:

  • Mounting brackets (x2)

  • Mounting screws (x4) M4 x 6mm


Tip


When choosing a location for wall-mounting an access point, consider cable limitations and wall structure, and consider suitable antenna location ahead of time.

Warning


Statement 1094—Read Wall-Mounting Instructions Before Installation

Read the wall-mounting instructions carefully before beginning installation. Failure to use the correct hardware or to follow the correct procedures could result in a hazardous situation to people and damage to the system.


Warning


A minimum of 1 inch clearance is required on all sides of the device except for the side mounted against the wall or DIN rail, to allow for proper air flow.


To mount the access point on a wall or other flat surface, follow these steps:

Procedure


Step 1

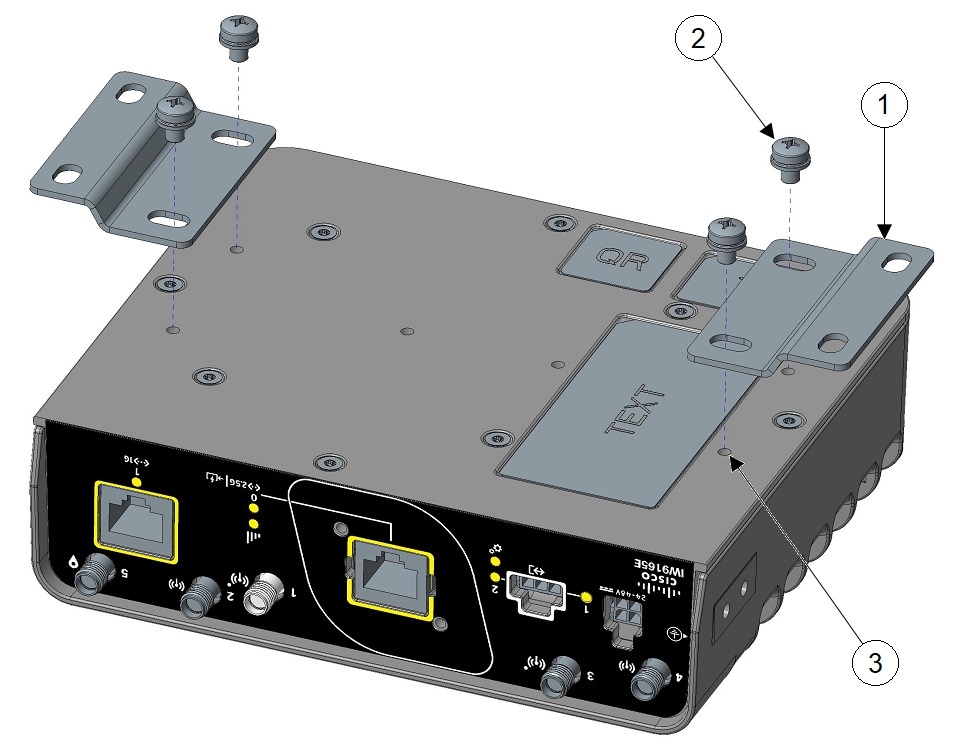
Attach the mounting brackets to the bottom of the access point.

Figure 2. IW9165E Mounting Brackets

1

Mounting brackets

2

M4 screws from kit

3

Mounting holes

Step 2

Align the mounting brackets (1 ) over the mounting holes (3 ) so that the larger holes on the brackets extend out over the access point.

Step 3

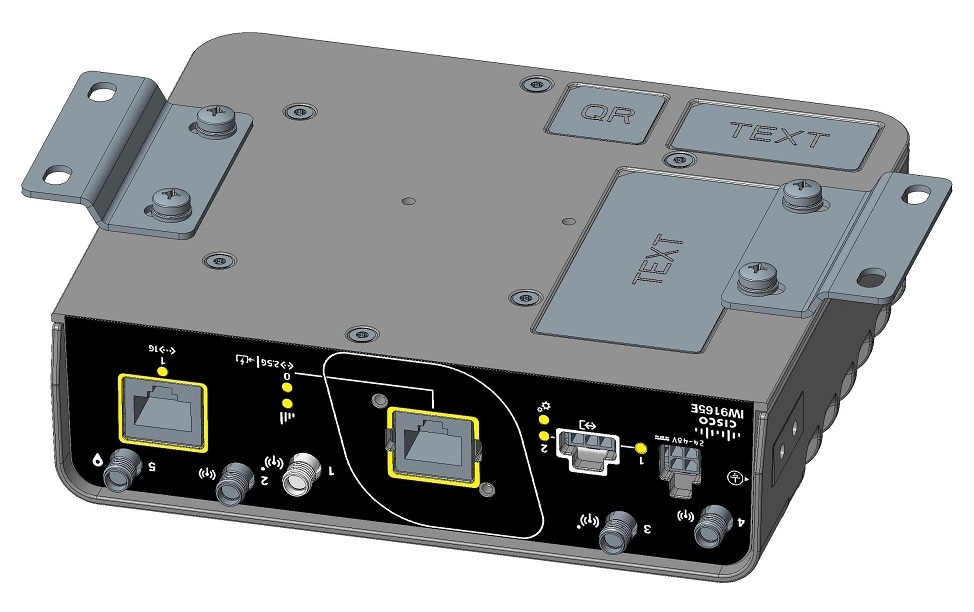
Attach the brackets to the access point with the four M4 screws (2 ) provided using a Phillips head driver. Torque to 12-15 in-lbs.

Figure 3. IW9165E With Mounting Brackets Attached

Step 4

Mount the access point with the attached brackets in a proper wall structure to carry the weight of the device. See the following for the dimensions of the mounting holes with the brackets attached to the access point.

Figure 4. Wall Mounting Hole Dimensions and Overall Dimensions With Mounting Brackets Attached

Step 5

Route the cables so that they do not put a strain on the connectors or mounting hardware.


Installing a DIN Rail

The DIN Rail kit is ordered separately.


Note


The DIN Rail can be installed on the IW9165E in two different orientations, horizontally and vertically.

Warning


A minimum of 1 inch clearance is required on all sides of the device except for the side mounted against the wall or DIN rail, to allow for proper air flow.

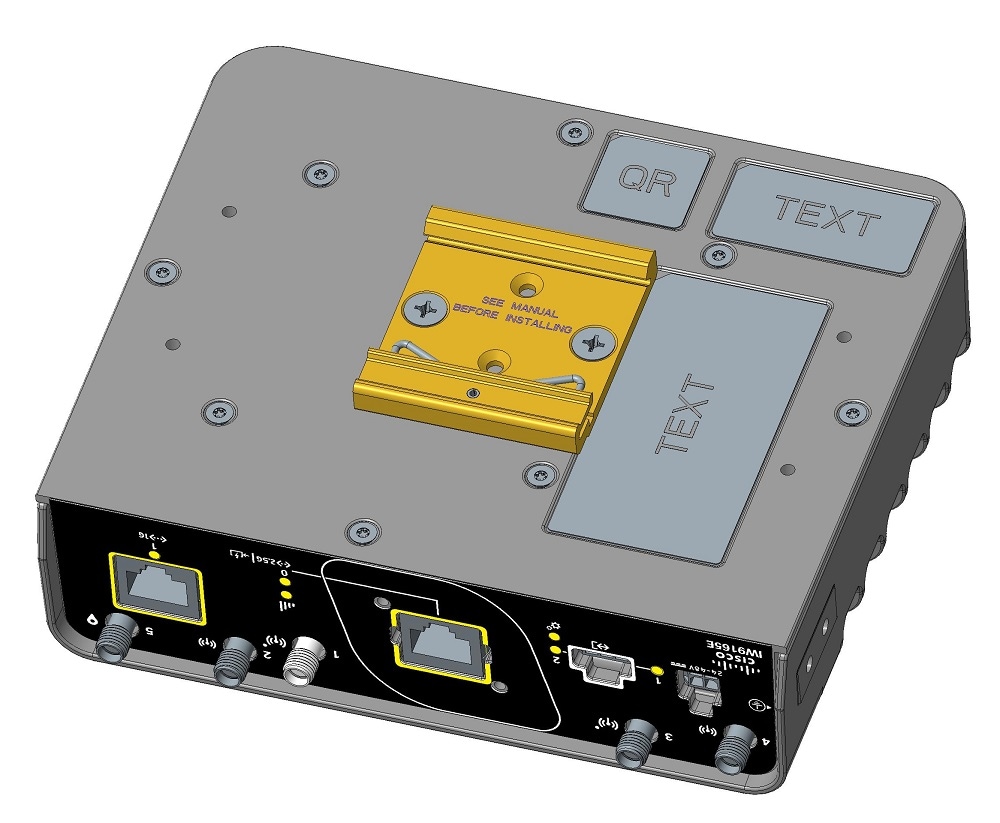
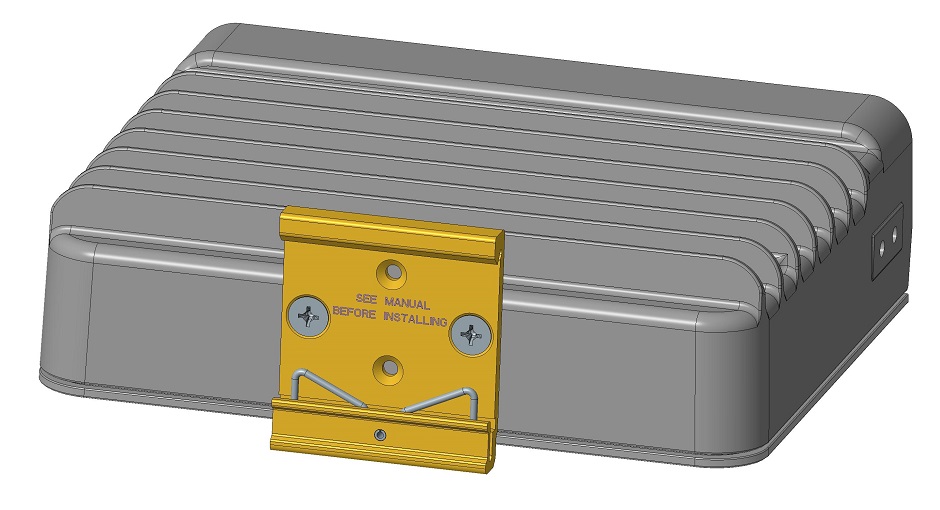
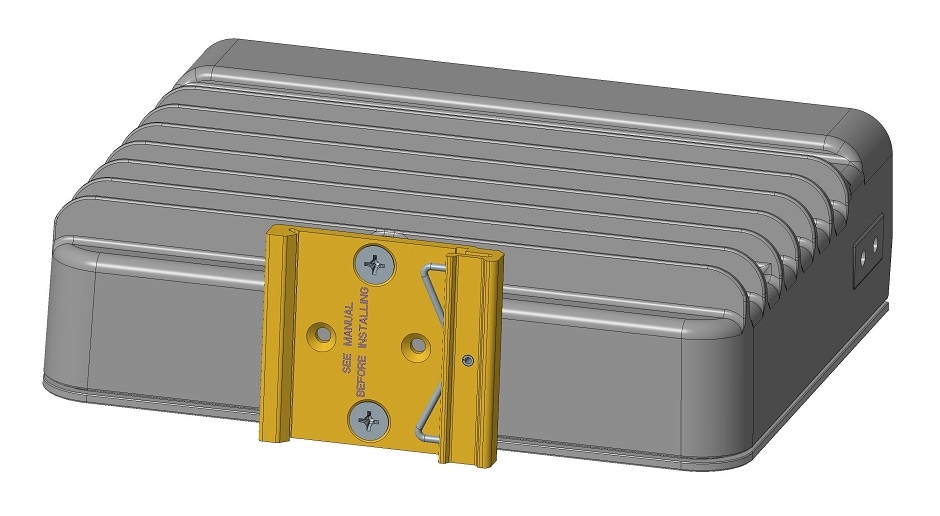
To attach the DIN rail bracket to the IW9165E, follow these steps.

Mounting the DIN Rail Bracket on the Access Point

Procedure

Step 1

First, attach the DIN rail bracket to the back of the access point. The DIN rail bracket can be attached to the bottom or the back of the access point. For back mounting, there are two ways to attach the bracket.

Step 2

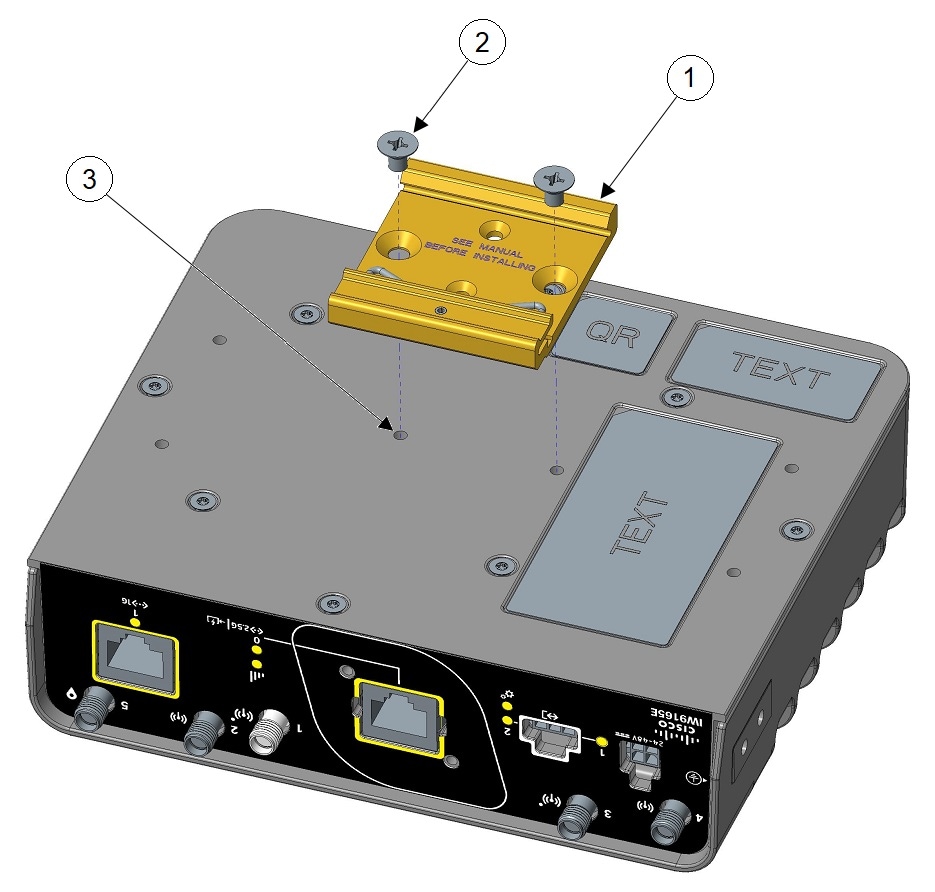
Attach the DIN mounting bracket to the access point using the two screws provided in the kit. Position the bracket over the two mounting holes that correspond to your orientation. Use 12-15 in-lbs. of torque to screw the bracket onto the access point.

Figure 5. Attaching the DIN Rail Bracket

1

DIN mounting bracket

2

M4 screws from kit

3

Mounting holes

Step 3

Once the bracket is attached to the access point, it can be mounted onto the DIN Rail.

Figure 6. DIN Rail Bracket Mounted on the Bottom
Figure 7. DIN Rail Bracket Mounted on the Back

Attaching the Bracket onto the DIN Rail

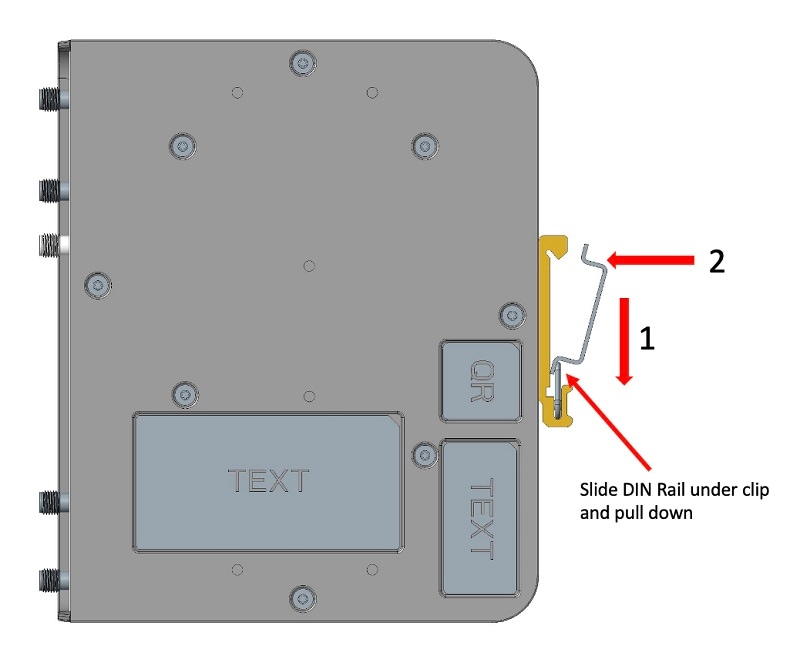
To attach the IW9165E with the bracket to a DIN rail, follow these steps.

Procedure

Step 1

Position the access point so that the lower edge and spring of the DIN clip, located within the bottom of the DIN rail bracket, engages with the bottom section of the DIN rail.

Step 2

Push up on the AP so that the spring of the DIN clip compresses against the lower section of DIN rail, and then rotate the AP so that the top hook of the DIN clip clamps to the top section of DIN rail.

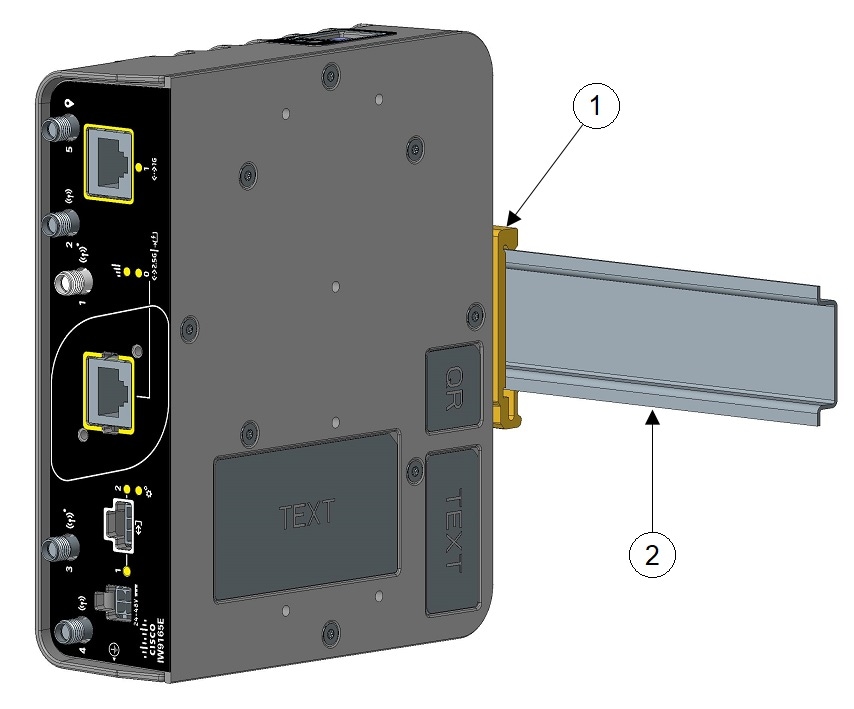
Figure 8. Bracket Attached to the DIN Rail

1

DIN rail bracket

2

DIN rail

Note


The procedure to attach the unit to the rail is the same with both orientations.

Note


To remove the router from the DIN Rail, simply reverse the procedure.


Grounding the Access Point

In all installations, after mounting the access point, you must properly ground the unit before connecting power cables.


Warning


Statement 1024—Ground Conductor

This equipment must be grounded. To reduce the risk of electric shock, never defeat the ground conductor or operate the equipment in the absence of a suitably installed ground conductor. Contact the appropriate electrical inspection authority or an electrician if you are uncertain that suitable grounding is available.


Warning


Statement 1074—Comply with Local and National Electrical Codes

To reduce risk of electric shock or fire, installation of the equipment must comply with local and national electrical codes.


The access point is shipped with a grounding kit.

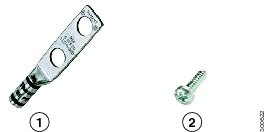
Figure 9. Access Point Grounding Kit Contents

1

Grounding lug

2

6-32 screws x 2


Note


The grounding kit also includes the oxide inhibitor, which is contained in a tube.

To ground the access point:

Procedure


Step 1

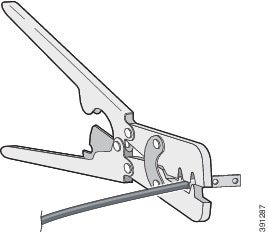
Use a crimping tool to crimp a 6-AWG ground wire (not included in the grounding kit) to the ground lug.

Step 2

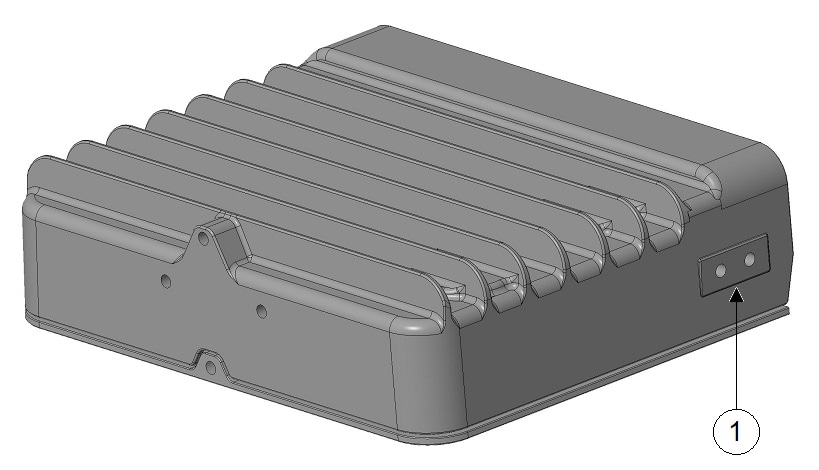
Connect the supplied ground lug to the access point ground connection point using the supplied screws. Apply supplied oxide inhibitor between the ground lug and the access point ground connection.

1

6-32 screws

2

Grounding lug

3

AP ground connection point

Step 3

Tighten the screws to 12-15 inch-lbs of torque.

Step 4

If necessary, strip the other end of the ground wire and connect it to a reliable earth ground such as a grounding rod or appropriate ground point on a grounded pole. Length of the ground cable should not exceed 1 meter, and 0.5 meter is preferred. Use supplied oxide inhibitor on the grounded interface.


Powering the Access Point

The AP supports these power sources:

  • DC power – 24–48 VDC

  • Power-over-Ethernet (PoE)

The AP can be powered via the PoE input from an inline power injector or a suitably powered switch port. Depending on the configuration and regulatory domain, the required power for full operation is 802.3bt or UPOE.

For more information, see Power Sources.

Power Feature Matrix

The following table provides the AP power feature matrix.

Table 1. Cisco Catalyst IW9165E Feature Matrix

Power Input

5G Radio

5G/6G Radio

GNSS

mGig Eth

RJ45 1G

24-48V

2x2

2x2

Yes

max 2.5G

Yes

802.3at

2x2

2x2

Yes

max 2.5G

Yes

802.3af

1x1

1x1

Yes

max 1G

No

Connecting a Power Injector

The AP supports the following power injector:

Table 2. Supporting Power Injectors

Power Source

Description

IW-PWRINJ-60RGDMG=

60W rated outdoor power injector, 5GE

The power injector provides DC voltage to the AP over the Ethernet cable and supports a total end-to-end Ethernet cable length of 100 m (328 ft) from the switch to the AP.

When an optional power injector powers your AP, follow these steps to complete the installation:

Procedure


Step 1

Before applying PoE to the AP, ensure that the AP is grounded (see Grounding the Access Point).

Step 2

Connect a CAT5e or better Ethernet cable from your wired LAN network to the power injector.

Note


The installer is responsible for ensuring that powering the AP from this type of power injector is allowed by local and/or national safety and telecommunications equipment standards.

Step 3

Ensure that the antennas are connected, and that ground is attached to the AP before you apply power to the AP.

Step 4

Connect a shielded outdoor-rated Ethernet (CAT5e or better) cable between the power injector and the AP's PoE-in connector.

Step 5

Connect the Ethernet cable to the AP PoE-In port.


Connecting a DC Power Cable to the Access Point

Follow these steps to connect a DC power cable to the access point:

Procedure


Step 1

Before connecting DC power to the access point, ensure that the ground is connected to the access point (see Grounding the Access Point).

Step 2

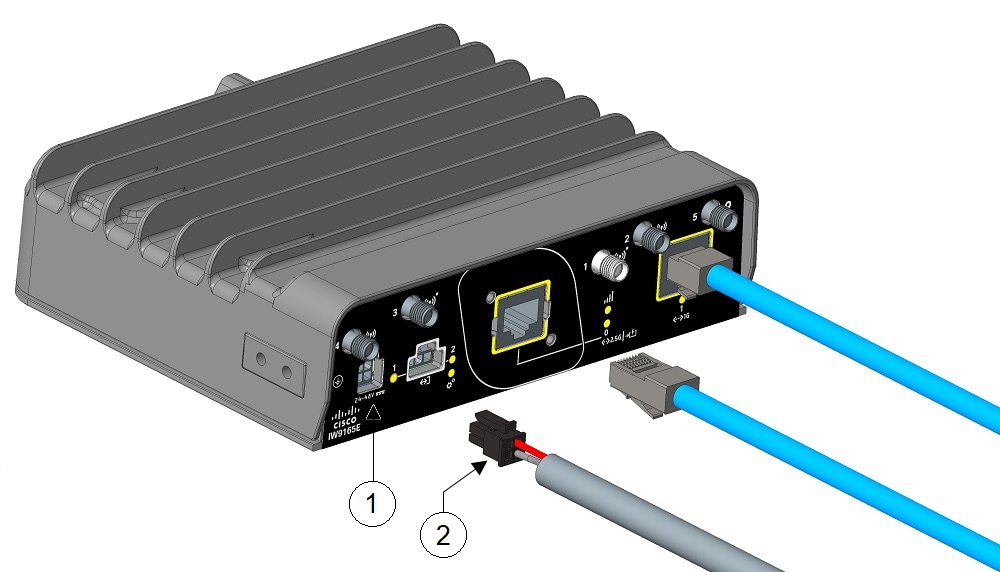
Plug the 4-Pin Micro-Fit connector cable into the DC connector in the chassis as shown in the following figure.

1

DC Connector

2

4-pin Micro-Fit DC connector

Note


For the 4-Pin Micro-Fit connector pinouts, see 4-Pin Micro-Fit Connector for DC Power.

Step 3

Ensure that the antennas are connected to the access point before you apply power to the access point.


Connect an Ethernet Cable to the Access Point

Connect an Ethernet cable to the access point by using a cable gland or an M12-RJ45 adapter.

Connecting an Ethernet Cable to the Access Point

Follow these steps to connect an Ethernet cable to the RJ-45 port:

Procedure


Step 1

Disconnect power to the power injector, and ensure all power sources to the access point are turned off.

Step 2

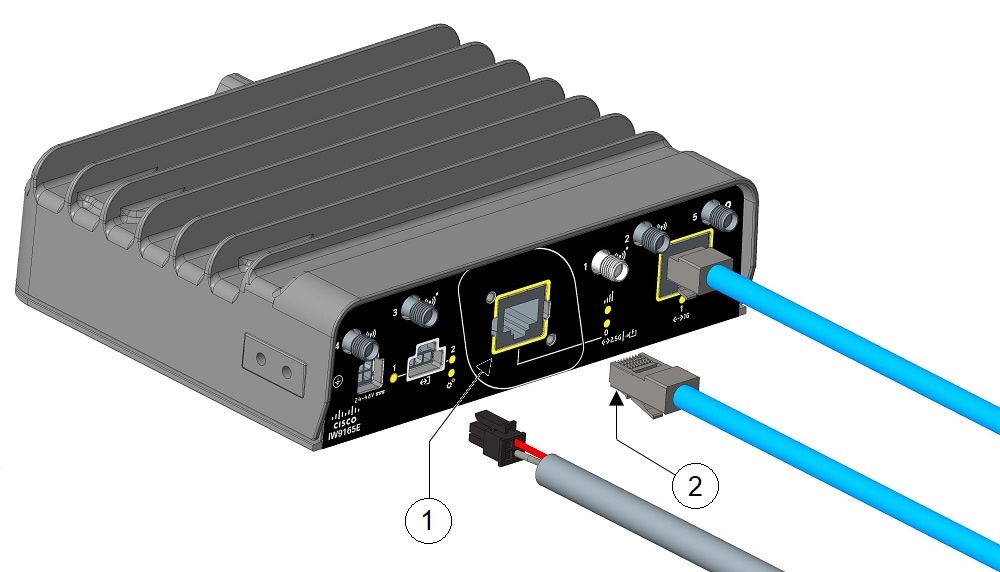
Insert the RJ-45 cable connector into the Ethernet port opening on the access point as shown in the following figure:

1

RJ-45 port

2

RJ-45 cable

Step 3

Ensure that the antennas are connected to the access point before you apply power to the access point.


Connecting to the RJ-45 Port Using M12 Adapter

Follow these steps to connect to the RJ-45 port using M12 adapter:

Procedure


Step 1

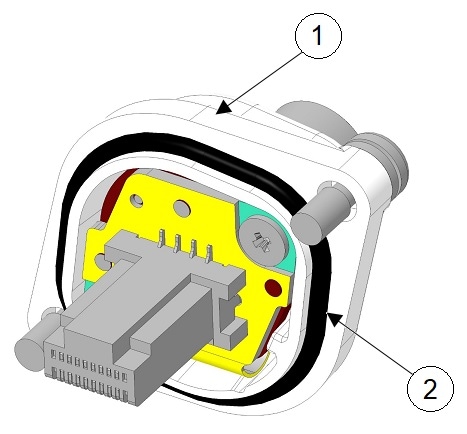
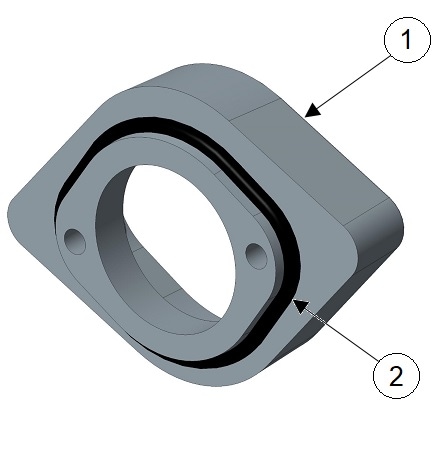
Ensure the O-rings are on the M12 adapter and spacer.

1

M12 adapter

2

O-ring

1

Spacer

2

O-ring

Step 2

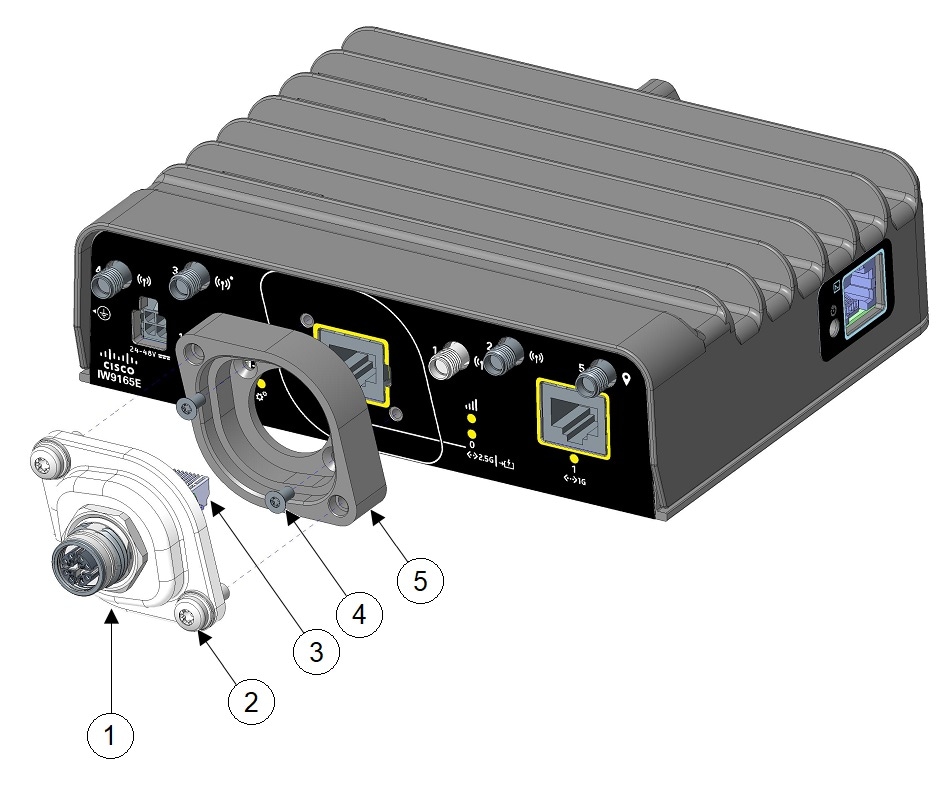
Attach the spacer to the chassis with the screws provided (4 in the following figure). Use 5-7 in-lbs. of torque to screw the spacer onto the access point.

1

M12-RJ45 adapter

2

Captive screws

3

RJ45 plug

4

M3 screws

5

Spacer

Step 3

Align the RJ45 plug with the RJ-45 connector in the chassis, and plug the M12 adapter into the chassis.

Step 4

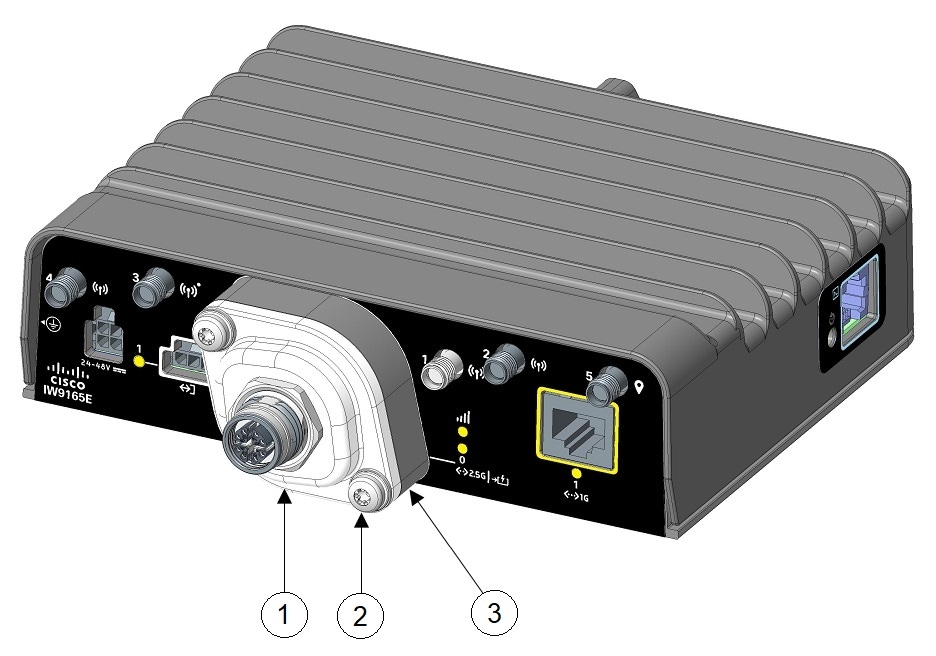
Tighten the M12 adapter captive screws into the chassis (2 in the following figure). Use 15-20 in-lbs. of torque to screw the M12 adapter onto the spacer and the chassis.

1

M12-RJ45 adapter

2

Captive screws

3

Spacer