Cisco CMX REST API Getting Started Guide

Overview of Cisco CMX Mobility Services

Using CMX Mobility Services, developer may leverage device location via Wi-Fi and device MAC address. Customer experiences may be improved by providing coupons, promotions, and other push notifications to devices. Additionally, various client location based service solutions may be developed providing many useful applications for use by the end device user as well as the venue operator.

This solution is an exciting suite of mobile software solutions that detect, connect, and engage with mobile devices operating in a Wi-Fi field. The individual mobile software offerings work together to create a total solution that you can configure to the benefit of your clients and their end users in a very wide variety of real world situations.

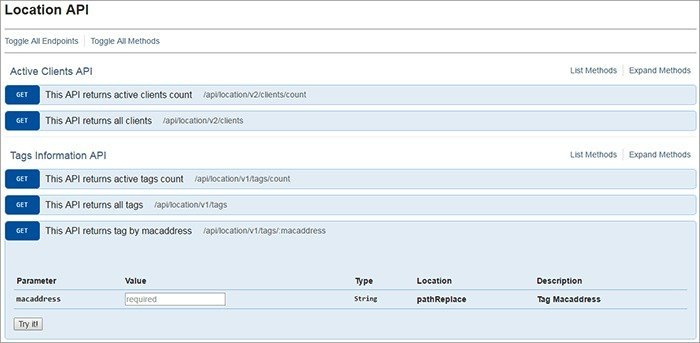
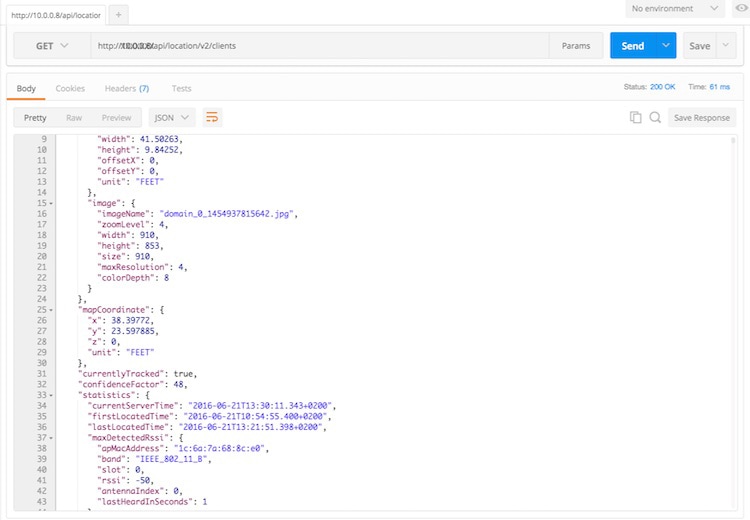
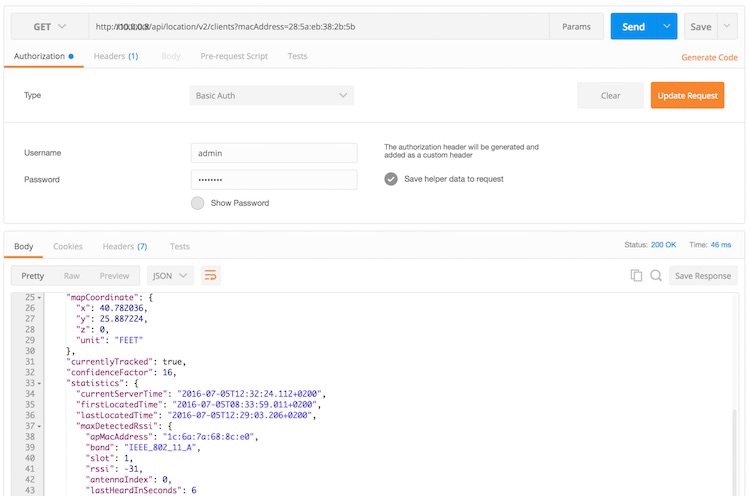
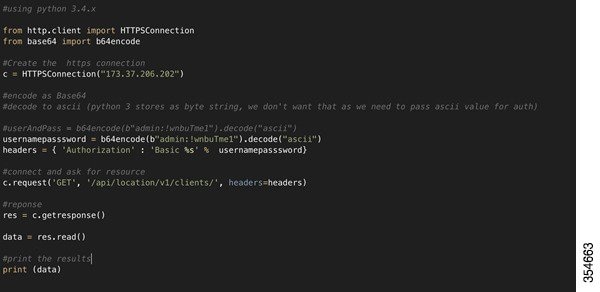
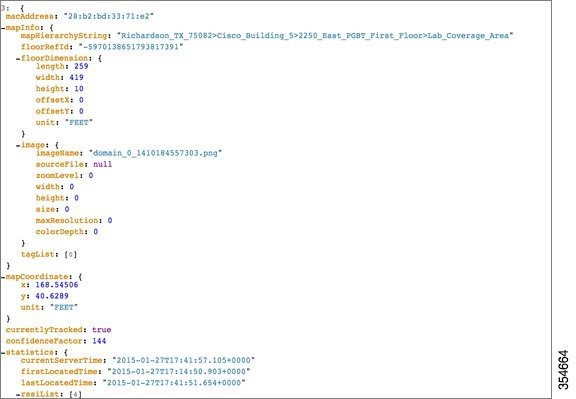
The CMX Mobility Services Restful API allows you to use them across languages, platforms, and frameworks. Using the APIs, you can develop application solutions that will use real-time intelligence gathered from your Wi-Fi network to enable people and their devices to interact more effectively through real-time contextual information such as location, temperature, availability of a user, or mobile device asset.

This guide provides information about the CMX Mobility Services Restful API. For more information about the Cisco CMX Mobility Application, see http://www.cisco.com/c/en/us/td/docs/wireless/mse/8-0/CMX-Connect-and-Engage-Mobile-SDK/guide/Cisco-CMX-ConnectEngage-Mobile-SDK-Config-Guide.html.


Note

To view information related to all CMX Mobility Services features and guides, visit the Cisco DevNet Site.


Support for REST APIs

The Cisco Connect Mobile Experiences (Cisco CMX) provides simplified Representational State Transfer (REST) APIs for use in various ways. The advantages of RESTful APIs are:

  • Based on the stateless REST architecture.

  • The information is delivered over the well-understood HTTP/HTTPS protocol.

  • Simplified design and easy to understand Resource URIs. These are usually self-explanatory.

  • Standardized libraries allow content negotiation capabilities by automatically sending the response in the user requested format.

  • Gives us a chance to simplify our data model, deprecate the older non scalable APIs, remove hierarchy dependency and do other enhancements.

The REST API uses the following HTTP methods:

  • GET—The HTTP method that retrieves a representation of a resource.

  • PUT—The HTTP method that stores an entity at a URI. This method helps to create a new entity or update existing entities.

  • POST—The HTTP method that requests the resource at the URI to perform some action with the provided entity.

  • DELETE—The HTTP method that requests to remove a resource.

The Cisco CMX provides updated documents specific to the REST API. The documentation provide the name, methods, and structure of the REST API query. For more information about REST API documentation, see http://mse-ip-address/apidocs/.

The REST API documentation is divided into five logical categories based on the specific functionality. The APIs are categorized as:

  • Configuration API—APIs to configure the Cisco CMX programmatically.

  • Location API—APIs to retrieve client location data programmatically from the Cisco CMX.

  • Analytics API—APIs to retrieve Analytics data programmatically from the Cisco CMX.

  • Connect API—APIs to find user session information.

  • Presence API—APIs to find visitor presence data.

Interacting with the REST API

To send queries to the Cisco MSE, you require a username and password. These credentials are required to create a base64 encoded string. After successful authentication, request are sent using the HTTP method (GET, PUT, POST, DELETE).

The following is the workflow for REST API:

  1. Authentication is sent from the client side, before initiating the request using the Authorization header.

  2. Combine the username and password credentials to form a sting " username:password".

  3. Use Base64 to encode the resulting string literal.

  4. Add an authorization method, a space and the staring "Basic" before the encoded string.

For example, if the user agent uses 'MyUsername' as username and 'MyPassword as password then the header is formed as follows:

  • Authorization: Basic QxhZGluOnNlc2FtIG9wZW4=

  • Authentication is sent to the root URI to reach (For example: https://<mseip>/api/contextaware)

A Python 2.7.x sample to create Base64 encoded authentication string (see the below image):

import urllib2

|
mse_user = 'username'                ##MSE Username
mse_pass = ;password'                ##MSE Password

password_manager = urllib2.HTTPPasswordMgrWithDefaultrealm()
password_manager.add_password(
    None, 'https://ip-address-of-mse' , mse_user, mse_pass  ##IP Address or resolvable hostname
)
auth_handler = urllib2.HTTPBasicAuthHandler(password_manager)
opener = urllib2.build_opener(auth_handler)
urllib2.install_opener(opener)

There are three ways to interact with the REST API:

  • Try it method

  • REST Client Plugin (Supported in browsers Google Chrome or Mozilla Firefox)

  • Using Programming Language

Using Try It Method

Cisco CMX is packaged with a REST API documentation, which can be accessed through a browser. Cisco CMX REST API documentation page is hosted on the server. For most of the REST APIs, there is a Try It .

Procedure


Step 1

Enter the IP address of the Cisco CMX server or the DNS name followed by /apidocs. For example, http://yourcmxIP/apidocs .

The Cisco CMX Home page for apidocs is displayed.
Step 2

Click View Details corresponding to any of the available service names displayed.

The individual methods are grouped under broad API categories.

Step 3

Enter the Username and Password to access the APIs.

Figure 1. Cisco CMX Credentials

An administrator can configure the username and password for accessing the REST APIs.

Step 4

Select an API method to view the list of methods under this category.

Figure 2. API Methods


Step 5

Click the individual methods to expand them, or click the Expand Methods button on the right to expand and view all the methods under the selected method.

Note 
Each API method is provided with a URL. You can use this URL to access the corresponding API within your code. Alternatively, you can use it on third-party REST clients such as POSTMAN or Advanced REST Client.
Step 6

Click Try It corresponding to the selected API.

Figure 3. Try It Feature


The API details are displayed. You can view the call details, response codes, response headers, and response body.
Step 7

Verify the output.

Figure 4. Try It Output


The following parameters are displayed in the output:
  • Call—Displays the structure of the query. To test the syntax, copy and paste the query into any web browser.

  • Response Code—Provides information related to query. This indicates whether the query was successful or not.

  • Response Headers—Displays the requested information.

  • Response Body—Displays the requested information. This parameter helps to understand the PUT form.

Tip 
  • The Response Body is used to understand the PUT form.

  • The Call details


Using Third Party REST Clients

To test the structure of API calls and queries and to Cisco CMX, use the REST Client plugins for the latest versions of the Web browsers, Google Chrome and Mozilla Firefox. For example, Advanced REST Client, Postman, and REST Client. The REST Client used is a personal preference.

For the following examples advanced REST Client plugin for Chrome is used.


Note

For more information about using the using the REST Clients, see plugin and application instructions for the REST client of your preference.


Example: Notification Definition (PUT)

Figure 5. Notification Definition (PUT)


Example: Notification Definition (GET)

Figure 6. Notification Definition (GET)


Example: All Clients (GET)

Figure 7. All Clients (GET)

Example: Client History by MAC Address (GET)

Figure 8. Client History by MAC Address (GET)


Using Programming Language

To test the structure of API calls, use Python programming language. Python is simple and extensively used for configuration and interaction of resource in the data center environment. Both Python 2.7. and Python 3.4.x are used. The comments in the code specifies the Python version.


Note

These examples are simple and formatting and other features are not implemented.


Tip

To get the best support for creating applications that access the CMX REST API, join the Cisco Devnet. For more information, see https://developer.cisco.com/site/devnet/home/index.gsp.


Example: Client Location List (GET)

Figure 9. Client Location List (GET)


Example: Single Client Location Information (GET)

Figure 10. Single Client Location Information (GET)


Tip

We recommend to join Cisco Devnet to get the best support for creating application that access the Cisco CMX REST APIs. For more information, see https://developer.cisco.com/site/devnet/home/index.gsp.


Example: Location Setup (POST)

Returns 204. No Content.

Example: Notification Subscription (GET)

Cisco MSE can send a real-time stream of all the activity for all clients to a destination. These notifications are a superset of the location update events. Use the PUT and GET APIs to enable the notification feature.

Figure 11. Notification Subscription (GET)


Example: Notification Subscription (PUT)

Returns 204. No Content.