Command Line Interface Overview


Note

The ASR 5000 hardware platform has reached end of life and is not supported in this release. Any references to the ASR 5000 (specific or implied) or its components in this document are coincidental. Full details on the ASR 5000 hardware platform end of life are available at: https://www.cisco.com/c/en/us/products/collateral/wireless/asr-5000-series/eos-eol-notice-c51-735573.html.


This chapter describes the numerous features in the command line interface (CLI). It includes information about the architecture of the CLI, its command modes and user privileges, how to obtain help within the CLI, and other key items.

The operating system (StarOS™) controls the overall system logic, control processes, and the CLI. The CLI is a multi-threaded user interface that allows you to manipulate, configure, control and query the hardware and software components that make up the system and its hosted services. In addition, the CLI can host multiple instances of management and service configuration sessions. This allows multiple users to simultaneously access and manage multiple hosted services.

This section provides the following information about the CLI:

CLI Structure

CLI commands are strings of commands or keywords and user-specified arguments that set or modify specific parameters of the system. Commands are grouped by function and the various command modes with which they are associated.

The structure of the CLI is hierarchical. All users begin at a specific entry point into the system, called the Exec (Execute) Mode, and then navigate through the CLI according to their defined user privileges (access level) by using other command modes.

CLI Command Modes

There are two primary CLI command modes:

  • Exec (Execute) Mode: The Exec Mode is the lowest level in the CLI. The Exec Mode is where you execute basic commands such as show and ping. When you log into the CLI, you are placed in this mode by default.

  • Config (Configuration) Mode: The Config mode is accessible only by users with administrator and security administrator privileges. If you are an administrative user, in this mode you can add and configure contexts and access the configuration sub-modes to configure protocols, interfaces, ports, services, subscribers and other service-related items.

The entry point into the CLI is called Exec Mode. In the initial CLI login, all users are placed into the default local context, which is the CLI's default management context. From this context, administrative users can access the Config Mode and define multiple service contexts.

Refer to the mode entry-path diagrams at the beginning of each mode chapter in the Command Line Interface Reference.


Important

The commands or keywords/variables that are available to the user vary based on platform type, StarOS version and installed license(s).


CLI Administrative Users

This section contains information on the administrative user types and privileges supported by the system.

Administrative User Types

There are two types of administrative users supported by the system:

  • Context-level administrative users: This user type is configured at the context-level and relies on the AAA subsystems for validating user names and passwords during login. This is true for both administrative user accounts configured locally through a configuration file or on an external RADIUS or TACACS+ server. Passwords for these user types are assigned once and are accessible in the configuration file.

  • Local-users: This user type supports ANSI T1.276-2003 password security protection. Local-user account information, such as passwords, password history, and lockout states, is maintained in /flash. This information is maintained in a separate local user database subject to AAA based authentication and is not used by the rest of the system. As such, configured local-user accounts are not visible with the rest of the system configuration.


Important

In release 20.0 and higher Trusted StarOS builds, the local user database is disabled. The Global Configuration mode local-user commands, and Exec mode show local-user and update local-user commands are unavailable. For additional information on Trusted builds, see the System Administration Guide.


Local-user and context-level administrative accounts can be used in parallel. However, a mechanism is provided to de-activate context-level administrative user accounts, thereby providing access only to local-user accounts.

Authenticating Administrative Users with RADIUS

To authorize users via RADIUS, you must include two RADIUS attributes in the RADIUS Access-Accept message:

  • RFC 2865 standard Service-Type

  • Starent Vendor-Specific Attribute (VSA) SN-Admin-Permission or SN1-Admin-Permission.

RADIUS SN-Admin-Permission / SN1-Admin-Permission AVP

The possible values for SN-Admin-Permission / SN1-Admin-Permission AVP are as follows:
  • None = 0

  • CLI = 1

  • FTP = 2

  • CLI-FTP = 3

  • Intercept = 4

  • CLI-Intercept = 5

  • CLI-Intercept-FTP = 7

  • ECS = 8

  • CLI-ECS = 9

  • CLI-FTP-ECS = 11

  • CLI-Intercept-ECS = 13

  • CLI-Intercept-FTP-ECS = 15

The default value is 1 (CLI).

RADIUS Mapping System

RADIUS server configuration depends on the type of server used and the instructions distributed by the server manufacturer. The following table shows the supported attribute/value mapping system that is constant, regardless of server manufacturer or model:
Table 1. RADIUS Attribute/Value Mapping System
Attribute Value
Framed 2
Administrative (Administrator) 6
NAS_Prompt 7
Authenticate_Only 8
Authorize_Only 17
Inspector 19650516
Security_Admin 19660618

RADIUS Privileges

There are four RADIUS privilege roles. The following table shows the relationship between the privilege roles in the CLI configuration and RADIUS Service-Type.
Table 2. CLI Privilege Roles and RADIUS Service Types
CLI Configuration Parameter RADIUS Service Type show admin Type
administrator Security_Admin (19660618) admin
config_administrator Administrative (6) cfgadm
operator NAS_Prompt (7) oper
inspector Inspector (19650516) inspect

Authenticating Administrative Users with TACACS+

The ASR 5500 or StarOS virtual machine is identified as a Network Access Server (NAS) and remotely accesses the Terminal Access Controller Access Control System+ (TACACS+) server for information about users who can perform administrative operations on the system.

The NAS is defined as a client-side requesting component associated with a specific IP address. StarOS only supports one NAS with one IP address. This NAS processes TACACS+ protocol packets within the local context. Several management services may be associated with a login.

StarOS only supports multiple-connection mode with a TACACS+ server. In a multiple-connection mode, each TACACS+ session opens and maintains a separate and private TCP connection to the server. When the session ends, this connection is always closed.

TACACS+ users and their passwords are defined and stored on the TACACS+ server. They are stored in a persistent space and are always known to the server while the server is running. The users are not directly known to the NAS.

Administrative User Privileges

Regardless of the administrative user type, the system supports four user privilege levels:

  • Inspector: Inspectors are limited to a small number of read-only Exec Mode commands. The bulk of these are show commands for viewing a variety of statistics and conditions. The Inspector cannot execute show configuration commands and does not have the privilege to enter the Config Mode.

  • Operator: Operators have read-only privileges to a larger subset of the Exec Mode commands. They can execute all commands that are part of the inspector mode, plus some system monitoring, statistic, and fault management functions. Operators do not have the ability to enter the Config Mode.

  • Administrator: Administrators have read-write privileges and can execute any command in the CLI except for a few security-related commands that can only be configured by Security Administrators. Administrators can configure or modify system settings and can execute all system commands, including those available to the Operators and Inspectors.

  • Security Administrator: Security Administrators have read-write privileges and can execute all CLI commands, including those available to Administrators, Operators, and Inspectors.

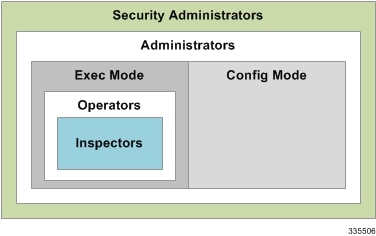
The following figure represents how user privileges are defined in the CLI configuration modes.

Figure 1. User Privileges


Though the privilege levels are the same regardless of user type, the corresponding user type names differ slightly. The following table displays the privilege level to administrative user type mappings:
Table 3. User Privilege to User Type Mapping
User Type as Defined by T1.276-2003 Local-User Level User Context-Level User
System Security Administrator Security Administrator Administrator
Application Security Administrator Security Administrator Administrator
System Administrator Administrator Config-Administrator
Application Administrator Administrator Config-Administrator
Application User/Operator Operator Operator
not applicable Inspector Inspector

Configure context-level administrative users in the Context Configuration Mode with the administrator, config-administrator, operator, and inspector commands.

Configure local-user administrative users at the Global Configuration Mode with the local-user username command.


Important

In release 20.0 and higher Trusted StarOS builds, the Global Configuration mode local-user commands are unavaible.


You can further refine administrative levels to include access to certain features with the following feature-use administrative user options:

  • Lawful Intercept (LI) Administrative User: To configure and manage LI-related issues, configure at least one administrative user account with LI functionality privileges.


Important

This privilege is available only for context-level administrative users. In addition, to ensure security in accordance with the standards, LI administrative users must access the system through the Secure Shell Protocol (SSH).


  • Enhanced Charging Service (ECS) Administrative User: To log in and execute ECS-related commands, configure at least one administrative user account with ECS functionality privileges.

All system users can be configured within any context. However, it is recommended that you configure users in the system's management context called local. Refer to sections later in this chapter for additional information about contexts.

Allowed Commands per User Type

With the exception of security administrators, all other management users are limited to a subset of the entire command list. This section defines the commands allowed for each management user type.

Inspector Mode Commands

In the Exec Mode, system inspectors can access the following commands:

  • abort

  • autoconfirm

  • context

  • default terminal

  • exit

  • help

  • logs checkpoint

  • no logging active

  • no logging trace

  • no reveal disabled commands

  • no timestamps

  • no autoconfirm

  • ping

  • reveal disabled commands

  • show (except show snmp communities and show snmp transports)

  • sleep

  • start crypto security-association

  • terminal length

  • terminal width

  • timestamps

  • traceroute

Operator Mode Commands

In the Exec Mode, system operators can access all inspector mode commands plus the following commands:

  • aaa test

  • alarm cutoff

  • bulkstats force

  • card

  • clear (a subset of all clear command variations)

  • debug

  • dhcp test

  • gtpc test

  • gtpp interim

  • gtpp test

  • gtpu test

  • gtpv0 test

  • host

  • logging active

  • logging filter

  • logging trace

  • monitor protocol

  • monitor subscriber

  • newcall

  • no card

  • no debug

  • no newcall policy

  • port

  • ppp echo-test

  • radius interim accounting

  • radius test

  • rlogin

  • show access-group

  • show access-list

  • show access-flow

  • show access statistics

  • show configuration

  • show snmp transports

  • ssh

  • telnet

  • test alarm

Administrator Mode Commands

Administrators can access all system commands except:

  • Context Configuration Mode:

    • config-administrator

    • operator

    • inspector

    • administrator

  • Global Configuration Mode:

    • snmp community

    • snmp user

    • local-user

    • suspend local-user

  • Exec Mode:

    • show snmp communities

    • clear (all clear command variations)

    • show local-user

    • password change local-user

Security Administrator Mode Commands

Security administrators can access all system commands.


Important

A security administrator cannot access the shell or monitor debug port output in Debug Mode through non-local context login.


CLI Contexts

A context is a group of configuration parameters that apply to the ports, interfaces, and protocols supported by the system. You can configure multiple contexts on the system, each of which resides as a separate, logically independent instance on the same physical device. The CLI can host multiple contexts within a single physical device.

This allows wireless service providers to use the same system to support:
  • Different levels of service

  • Multiple wholesale or enterprise customers or customer groups

  • Different classes of customers based on defined Class of Service (CoS) parameters

  • IP address pools across multiple contexts, thus saving IP address allocation

  • Enhanced security

Each defined context operates independently from any other context(s) in the system. Each context contains its own CLI instance, IP routing tables, access filters, compression methods, and other configured data.

By default, a single system-wide context called "local", is used exclusively for the management of the system. Think of the local context as the root directory of the system, since you can define and access all other contexts from this point. You cannot delete the local context.

From this location in the CLI, you can:
  • Create and configure other service contexts that contain different service configurations

  • Configure system-wide services such as CORBA and SNMP management interfaces, physical management ports, system messages, and others


Important

The system requires that you define at least one context in addition to the local context. This isolates system management functions from application or service functions.


Administrative users add contexts through the Global Configuration Mode. A substantial advantage of configuring numerous service contexts is that it allows operators to broadly distribute different subscribers across the system. This greatly enhances the performance of the system and minimizes the loss of sessions should a failure occur.

Understanding the CLI Command Prompt

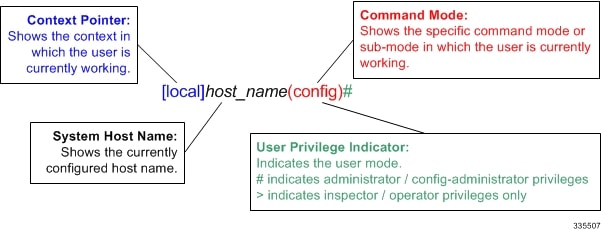
The CLI provides an intuitive command prompt that informs you of:

  • Exactly where you are located within the CLI

  • The command mode you are using

  • Your user privilege level.

The following figure shows the various components of the command prompt.

Figure 2. CLI Command Prompt


CLI Command Syntax

This section describes the components of the CLI command syntax that you should be familiar with prior to using the CLI. These include:

  • Commands: Specific words that precede, or initiate, a specific function.

  • Keywords: Specific words that follow a command to more clearly dictate the command's function.

  • Variables: Alphanumeric values that are user-supplied as part of the command syntax. Sometimes referred to as arguments, these terms further specify the command function.

  • Repetitive keywords (+): Specific keyword, that when followed by a plus (+) sign, indicates that more than one of the keywords can be entered within a single command.

In the following example, port_number and slot_number are the command variables for the info keyword:
show port info  slot_number/ port_number 

port_number/slot_number is a variable representing a particular Ethernet slot/port on an ASR 5500 or vitualized platfrom. See the System Administration Guide specific to the platform type for actual slot/port ranges.

A keyword that was supported in a previous release may be concealed in subsequent releases. StarOS continues to parse concealed keywords in existing scripts and configuration files created in a previous release. But the concealed keyword no longer appears in the command syntax for use in new scripts or configuration files. Entering a question mark (?) will not display a concealed keyword as part of the Help text.

Entering and Viewing CLI Commands

This section describes various methods for entering commands into the CLI.

Typing each command keyword, argument, and variable can be time-consuming and increase your chance of making mistakes. The CLI therefore, supports the following features to assist you in entering commands quickly and more accurately. Other features allow you to view the display and review previously entered commands.

Entering Partial CLI Commands

In all of the modes, the CLI recognizes partially-typed commands and keywords, as long as you enter enough characters for the command to be unambiguously recognized by the system. If you do not enter enough characters for the system to recognize a unique command or keyword, it returns a message listing all possible matches for the partial entry.

If you enter the partial command conf and press Enter, you enter the Global Configuration Mode. If you were to enter only c, the system would respond with the message:
Ambiguous Command 

CLI Command Auto-completion

Use the command auto-completion feature to automatically complete unique CLI commands. Press the Tab key after entering enough characters to enable this feature.
[local]host_name# sho <Tab > 
[local]host_name# show  
If you do not enter enough characters to allow the CLI to determine the appropriate command to use, the CLI displays all commands that match the characters you entered with auto-completion:

Important

If you enter a partial keyword for a keyword that is concealed in this release, pressing Tab will not complete the concealed keyword. You must type in the complete keyword to display/execute a concealed keyword.


[local]host_name# sh <Tab > 
show     shutdown 
[local]host_name# 
Enter a question mark (?) after a partial command to display all of the possible matching commands, and their related help text.
[local]host_name# sh?  
shutdown - Terminates execution of all tasks within the entire chassis 
show - Displays information based on a specified argument 
[local]host_name# 

Important

Entering"?" will not display keywords that have been concealed in this release.


Using CLI Auto-Pagination

When you enter commands whose expected results exceed the terminal window's vertical display, the auto-pagination function pauses the display each time the terminal window reaches its display limit. Press any key to display the next screen of results.

By default, auto-pagination functionality is disabled. To enable auto-pagination, type the pipe command: | more.
[local]host_name# show configuration | more  

Important

When auto-pagination is enabled, if a command's output exceeds the terminal window's vertical display parameters, you can exit by entering "q". This returns you to the CLI prompt.


Using CLI Autoconfirmation

By default, the system is configured to prompt all administrative users with a confirmation prior to executing certain commands. This functionality serves two purposes:

  • Helps ensure that you do not execute an unwanted configuration change.

For example, to save a configuration:
[local]host_name# save configuration  
Are you sure ? [Yes | No]: 
  • Indicates potential misspellings of names during configuration. The first time you configure an element name (context, subscribers, services, etc.), the prompt is displayed. The prompt is not displayed for subsequent entries of the name. Therefore, if you see the confirmation prompt after entering the name of a previously configured element, it is likely that you misspelled the name.

           You create a context named newcontext:
[local]host_name(config)# context newcontext  
Are you sure ? [Yes | No]: yes  
[newcontext]host_name(config-ctx)# 
           You revisit the context named newcontext:
[local]host_name(config)# context newcontext  
[newcontext]host_name(config-ctx)# 
           On another occasion, you misspell the context named newcontext:
[local]host_name(config)# context mewcontext  
Are you sure ? [Yes | No]:n  
Action aborted 
[local]host_name(config)# 
           After aborting the above action, you can again revisit newcontext:
[local]host_name(config)# context newcontext  
[newcontext]host_name(config-ctx)# 

You can control CLI autoconfirmation at the following levels:

  • Specific administrative user sessions: To enable or disable autoconfirmation, use the [no] autoconfirm commands while in the Exec Mode.

  • All Future Sessions: To disable or re-enable autoconfirmation for all future sessions, use the [no] autoconfirm commands while in the Global Configuration Mode.

  • For specific commands: Disable autoconfirmation for various commands that support the -noconfirm keyword, such as the save configuration or card reboot commands.

Regulating the Command Output

For many CLI commands, you can use | grep and/or | more keywords to regulate or control the command's output.

grep for Regular Expressions

Use the | grep keyword to filter through a command's output for certain expressions or patterns. Only those portions of the output that contain or exclude the pattern are displayed. The | grep has the following syntax:

| grep [  -E |  -i | -n |-v  | --extended-regexp  | --ignore-case | --invert-match | --line-number ]  expression 
Table 4. grep Options
Alternative Keyword Description
-E Match using extended regular expressions (EREs). Treat each pattern specified as an ERE ("IEEE Std 1003.1-2001, Section 9.4, Extended Regular Expressions"). If any entire ERE pattern matches some part of an input line excluding the terminating <newline>, the line shall be matched. A null ERE shall match every line.
-i Perform pattern matching in searches without regard to case. Lower case matches the same as upper case.
-n Precede each output line by its relative line number in the file, each file starting at line 1. The line number counter is reset for each file processed.
-v Select lines not matching any of the specified patterns. If the -v option is not specified, selected lines shall be those that match any of the specified patterns.
--extended-regexp The long form of the -E option.
--ignore-case The long form of the -i option.
--invert-match The long form of the -v option.
expression Specifies the character pattern to find in the command's output as an alphanumeric string of 1 to 256 characters.

A regular expression is a pattern that describes a set of strings. Regular expressions are constructed analogously to arithmetic expressions, by using various operators to combine smaller expressions. For additional information, refer to ISO/IEC/IEEE 9945:2009 Information technology – Portable Operating System Interface (POSIX®) Base Specifications, Issue 7.

more Command

Use the | more keyword to pause the terminal each time the terminal window reaches its display limit. Press any key to display the next screen. The function of this keyword is identical to the autoless command, except that you must manually enter it on a command-by-command basis.

Viewing Command History

To view a history of all commands line by line, simply scroll up or down with the <up arrow> and <down arrow> cursor keys on the keyboard.

The operating system supports EMACS-style text editing commands. This standard UNIX text editor format allows you to use keyboard-based shortcut keys for maneuvering around the CLI. The following table lists these available shortcut keys.

Table 5. EMACS Shortcut Keystrokes
Shortcut Keys Description
<Ctrl + p> and <up arrow> Recalls previous command in the command history
<Ctrl + n> and <down arrow> Recalls next command in the command history
<Ctrl + f> and <right arrow> Moves cursor forward by one character in command line
<Ctrl + b> and <left arrow> Moves cursor backward by one character in command line
<Esc> + <f> Moves cursor forward by one word in command line
<Esc> + <b> Moves cursor backward by one word in command line
<Ctrl> + <a> Moves cursor to the beginning of the command line
<Ctrl> + <e> Moves cursor to the end of the command line
<Ctrl> + <k> Deletes the current command line from the insertion point to the end of the line
<Ctrl> + <u> Deletes the current command line from the insertion point to the beginning of the line
<Ctrl> + <d> Deletes a single character in the current command line
<Esc> + <d> Deletes a word in the current command line
<Ctrl> + <c> Quits editing the current line
<Ctrl> + <l> Refreshes the display
<Ctrl> + <t> Transposes (or switches) the two characters surrounding the insertion point

Obtaining CLI Help

The CLI provides context-sensitive help for every command token and keyword available to you. To obtain, use one of these methods:

  • Command Help: Command help provides assistance for a specific command. Type a question mark (?) at the end of the specific command to accesses help.
    [local]host_name# test?  
      test - Performs test on followed mechanism 
  • Keyword Help: Keyword help provides assistance in determining the next keyword, argument, or option to use in the command syntax. Enter the command keyword, enter a space, and then type a question mark (?).
    [local]host_name# test alarm ?  
      audible - Tests internal audible alarm buzzer on SPC 
      central-office - Tests specified central office alarm relays 
      <cr> - newline 
  • Variable Help: Variable help provides the correct format, value, or information type for each variable that is part of the command syntax. For commands with variables, enter the command keyword, enter a space, and then type a question mark (?).
    [local]host_name# show card info ?  
    <Enter card number as an integer ranging 1 to n>  
      | - Pipeline  
      <cr> - Carriage Return or <Enter> key 

Exiting the CLI and CLI Command Modes

A CLI session is defined as the successful login into the CLI. When you establish a CLI session, you are placed into the system's Exec Mode. Depending upon your user privilege level, you can:

  • Use the local context to perform system management functions.

  • Move to an assigned context and work in Exec Mode.

  • Move to an assigned context as an administrative user and work in Global Configuration Mode or other configuration sub-mode.

This section addresses how to properly exit the various modes and the CLI.

Exiting Configuration Sub-modes

To exit a configuration sub-mode and return to the next highest configuration sub-mode or Global Configuration Mode, type the exit command at the system prompt.
[context_name]host_name(config-ctx)# exit  
[local]host_name(config)# 

Important

The CLI supports implicit mode-exits when using configuration files. Therefore, configuration files do not have to contain all of the required exit commands for you to leave various sub-config modes.


To exit a sub-mode and return to the Exec Mode, enter the end command.
[local]host_name(config-ctx)# end  
[local]host_name# 

Exiting Global Configuration Mode

To exit Global Configuration Mode, and return to the Exec Mode prompt, type the exit command at the prompt.

Ending a CLI Session

To end a CLI session and exit the CLI, type the exit command at the Exec Mode prompt.

Accessing the CLI

Access the CLI through the following methods:

  • Local login through an ASR 5500 Console port via a serial connection with a management card

  • Local login through a vConsole port via the hypervisor that initiated the StarOS virtual machine

  • Remote login using Telnet and Secure Shell (SSH) access to the CLI through any IP interface on the system. You can use remote login methods only after the system has been configured to support the various access methods.


Important

Even though you can access the CLI remotely through any available IP interface, management traffic should be isolated from network traffic by using one of the dedicated management interfaces supported on the ASR 5500 platform or StarOS virtual machine.


Multiple CLI sessions are supported, but the number of sessions varies based on the amount of available memory. The Resource Manager reserves enough resources so that as a minimum up to 15 CLI sessions are assured. One of the CLI sessions is always reserved for use exclusively by a CLI session on a Console or vConsole interface. Additional CLI sessions beyond the pre-reserved set are permitted if sufficient CPU or vCPU resources are available. If the Resource Manager is unable to reserve additional resources, you are prompted whether to allow the system to create the new CLI session, even without the reserved resources.

Accessing the CLI Locally Using an ASR 5500 Console Port

This section provides instructions for accessing the CLI locally through a Console port on the ASR 5500 platform.

Establish a connection between the serial Console port on an ASR 5500 and a workstation that has a communications application that accesses the workstation's serial port, such as Minicom for Linux or HyperTerminal® for MicroSoft Windows®. Refer to the ASR 5500 Installation Guide for detailed information on connecting to a serial Console port.

  1. Configure the communications application to support the following:

    Parameter Setting
    Baud Rate 115,200 bps
    Data Bits 8
    Parity None
    Stop Bits 1
    Flow Control None

    Important

    To change the configuration defined in the table above, modify the terminal command located in the Global Configuration Mode.


  2. At the terminal window, press Enter.
  3. If no configuration file is present (that is, this is the first time the system is powered), the CLI prompts you as to whether or not you want to use the Quick Setup Wizard. If the system was configured previously, you are prompted to enter a username and password.

Accessing the CLI Locally Using a vConsole Port

You connect to a vConsole port via a hypervisor that initiates a virtual machine running StarOS. Refer to the hypervisor user documentation and the VPC Administration Guide for additional information.

Remotely Accessing the CLI

To remotely access the CLI through a defined management interface, you must first configure the remote access method (such as Telnet or SSH).

You can find examples of how to configure this in the Getting Started chapter in the System Administration Guide.

Platform Related CLI Issues

StarOS runs on ASR 5500 and virtualized platforms. However, all CLI features and functions are not supported by all platforms.

This guide includes descriptions for all commands that have been qualified to run under StarOS. There may be specific instances where a command cannot be run and an error message is generated.

As features become fully qualified on specific or all platforms, this guide will be revised to reflect supported commands. For additional information, refer to the Release Notes provided with each StarOS version

Trusted Builds

A Trusted build is a starfile image from which non-secure or low security features have been deleted or disabled. However, the binaries in the Trusted starfile image are are identical to those found in other starfiles for a particular StarOS release-build number. In general, a Trusted build is more restrictive than a Normal build image.

You can identify whether your platform is running a Trusted build via the Exec mode show version command. The output of the command displays the word "Trusted" as part of the image description text.

The following non-secure programs and features are disabled/removed from a Trusted build:
  • Telnet
  • FTP (File Transfer Protocol)
  • Local user database access
  • tcpdump utility
  • rlogin (Remote Login) utility and rlogind (Remote Login daemon)
  • rsh (Remote Shell) and rcp (Remote Copy) utilities

IP Address Notation

When configuring a port interface via the CLI you may be required to enter an IP address. The CLI always accepts an IPv4 address, and in some cases accepts an IPv6 address as an alternative.

For some configuration commands, the CLI also accepts CIDR notation when entering an IP address. Always view the online Help for the CLI command to verify acceptable forms of IP address notation.

IPv4 Dotted-Decimal Notation

An Internet Protocol Version 4 (IPv4) address consists of 32 bits divided into four octets. These four octets are written in decimal numbers, ranging from 0 to 255, and are concatenated as a character string with full stop delimiters (dots) between each number.

For example, the address of the loopback interface, usually assigned the host name localhost, is 127.0.0.1. It consists of the four binary octets 01111111, 00000000, 00000000, and 00000001, forming the full 32-bit address.

IPv4 allows 32 bits for an Internet Protocol address and can, therefore, support 2^32 (4,294,967,296) addresses

IPv6 Colon-Separated-Hexadecimal Notation

An Internet Protocol Version 6 (IPv6) address has two logical parts: a 64-bit network prefix, and a 64-bit host address part. An IPv6 address is represented by eight groups of 16-bit hexadecimal values separated by colons (:).

A typical example of a full IPv6 address is 2001:0db8:85a3:0000:0000:8a2e:0370:7334

The hexadecimal digits are case-insensitive.

The 128-bit IPv6 address can be abbreviated with the following rules:
  • Leading zeroes within a 16-bit value may be omitted. For example, the address fe80:0000:0000:0000:0202:b3ff:fe1e:8329 may be written as fe80:0:0:0:202:b3ff:fe1e:8329
  • One group of consecutive zeroes within an address may be replaced by a double colon. For example, fe80:0:0:0:202:b3ff:fe1e:8329 becomes fe80::202:b3ff:fe1e:8329

IPv6 allows 128 bits for an Internet Protocol address and can support 2^128 (340,282,366,920,938,000,000,000,000,000,000,000,000) internet addresses.

CIDR Notation

Classless Inter-Domain Routing (CIDR) notation is a compact specification of an Internet Protocol address and its associated routing prefix. It is used for both IPv4 and IPv6 addressing in networking architectures.

CIDR is a bitwise, prefix-based standard for the interpretation of IP addresses. It facilitates routing by allowing blocks of addresses to be grouped into single routing table entries. These groups (CIDR blocks) share an initial sequence of bits in the binary representation of their IP addresses.

CIDR notation is constructed from the IP address and the prefix size, the latter being the number of leading 1 bits of the routing prefix. The IP address is expressed according to the standards of IPv4 or IPv6. It is followed by a separator character, the slash (/) character, and the prefix size expressed as a decimal number.


Important

On the ASR 5000, routes with IPv6 prefix lengths less than /12 and between the range of /64 and /128 are not supported.


The address may denote a single, distinct, interface address or the beginning address of an entire network. In the latter case the CIDR notation specifies the address block allocation of the network. The maximum size of the network is given by the number of addresses that are possible with the remaining, least-significant bits below the prefix. This is often called the host identifier.

For example:
  • the address specification 192.168.100.1/24 represents the given IPv4 address and its associated routing prefix 192.168.100.0, or equivalently, its subnet mask 255.255.255.0.
  • the IPv4 block 192.168.0.0/22 represents the 1024 IPv4 addresses from 192.168.0.0 to 192.168.3.255.
  • the IPv6 block 2001:DB8::/48 represents the IPv6 addresses from 2001:DB8:0:0:0:0:0:0 to 2001:DB8:0:FFFF:FFFF:FFFF:FFFF:FFFF.
  • ::1/128 represents the IPv6 loopback address. Its prefix size is 128, the size of the address itself, indicating that this facility consists of only this one address.

The number of addresses of a subnet defined by the mask or prefix can be calculated as 2address size - mask, in which the address size for IPv4 is 32 and for IPv6 is 128. For example, in IPv4, a mask of /29 gives 8 addresses.

Alphanumeric Strings

Some CLI commands require the entry of a string of characters that can contain a contiguous collection of alphabetic, numeric, or alphanumeric characters with a defined minimum and maximum length (number of characters)

Character Set

The alphanumeric character set is a combination of alphabetic characters (Latin letters) and numeric characters (Arabic numerals). The set consists of the letters A to Z (uppercase) and a to z (lowercase) and the numbers 0 to 9. The underscore character ( _ ) and dash/hyphen character ( - ) can also be used.

Blank spaces (whitespaces or SPACE characters) should mostly be avoided in alphabetic, numeric, and alphanumeric strings, except in certain ruledef formats, such as time/date stamps.

The following special characters can be used in ruledefs, APNs, license keys and other configuration/display parameters:
  • < > (arrow brackets) [less than or greater than]
  • * (asterisk) [wildcard]
  • : (colon)
  • $ (dollar sign) [wildcard]
  • . (dot)
  • = (equals sign)
  • ! (exclamation point)
  • % (percent)
  • / (slash - forward)
  • | (vertical bar)
The following special characters can be used to delimit the domain from the user name for global AAA functions:
  • @ (at sign)
  • - (dash or hyphen)
  • # (hash or pound sign)
  • % (percent)
  • \ (slash - backward) [must be entered as double slash \\]
  • / (slash - forward)

Quoted Strings

If descriptive text requires the use of spaces between words, the string must be entered within double quotation marks (" ").
interface "Rack 3 Chassis 1 port 5/2"