Deployment Options
Learn about options for deploying Cisco Jabber for iPhone and iPad.
- On-Premises Deployments
- Cloud-Based Deployments
- How the Client Connects to Services
- On-Premises Service Connections
- Cloud-Based Service Connections
- Single Sign-On (SSO) Deployments
- Cisco AnyConnect Deployments
On-Premises Deployments
An on-premises deployment is one in which you set up, manage, and maintain all services on your corporate network.
Product Modes
The default product mode is one in which the user's primary authentication is to a presence server.
At a minimum, Cisco Jabber for iPhone and iPad users have instant messaging and presence capabilities. Users can also have audio and video, voicemail, and conferencing.
You can deploy the client in the following modes.
- Full UC
-
To deploy full UC mode, you enable instant messaging and presence capabilities. You then provision users with devices for audio and video in addition to voicemail and conferencing capabilities.
- IM-Only
-
To deploy IM-only mode, you enable instant messaging and presence capabilities. You do not provision users with devices.
Full UC Diagrams
Review architecture diagrams for on-premises deployments with full UC capabilities.
Both full UC and IM-only deployments require a presence server as the user's primary authentication source. However, IM-only deployments require only instant messaging and presence capabilities. You do not need to provision users with devices in an IM-only deployment.
Diagram with Cisco Unified Presence
This topic refers to Cisco Unified Presence Release 8.6.
The following diagram illustrates the architecture of an on-premises deployment that includes Cisco Unified Presence:
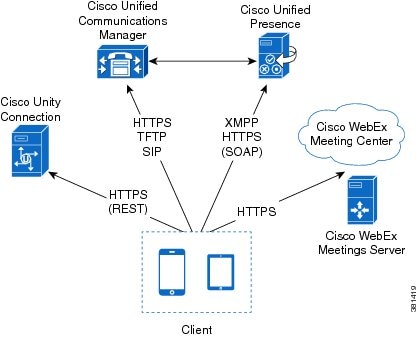
The following are the services available in an on-premises deployment:
- Presence
-
Users can publish their availability and subscribe to other users' availability through Cisco Unified Presence.
- Instant Messaging
-
Users send and receive instant messages through Cisco Unified Presence.
- Audio Calls
-
Users place audio calls through mobile devices through Cisco Unified Communications Manager.
- Video
-
Users place video calls through Cisco Unified Communications Manager.
- Voicemail
-
Users send and receive voice messages through Cisco Unity Connection.
- Conferencing
-
Integrate with one of the following:
- Cisco WebEx Meeting Center
-
Provides hosted meeting capabilities.
- Cisco WebEx Meetings Server
-
Provides on-premises meeting capabilities.
For information about contact sources in on-premises deployments, see the Contact Sources topic.
Diagram with Cisco Unified Communications IM and Presence
This topic refers to Cisco Unified Communications Manager IM and Presence Release 9.0 and later.
The following diagram illustrates the architecture of an on-premises deployment that includes Cisco Unified Communications Manager IM and Presence:
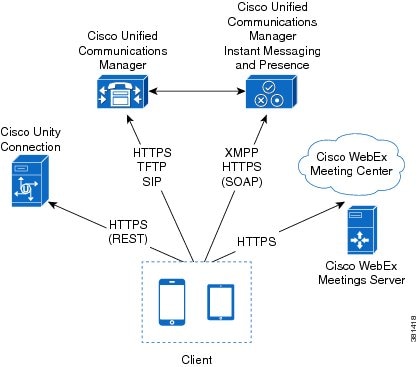
The following are the services available in an on-premises deployment:
- Presence
-
Users can publish their availability and subscribe to other users' availability through Cisco Unified Communications Manager IM and Presence.
- Instant Messaging
-
Users send and receive instant messages through Cisco Unified Communications Manager IM and Presence.
- Audio Calls
-
Users place audio calls through mobile devices through Cisco Unified Communications Manager.
- Video
-
Users place video calls through Cisco Unified Communications Manager.
- Voicemail
-
Users send and receive voice messages through Cisco Unity Connection.
- Conferencing
-
Integrate with one of the following:
- Cisco WebEx Meeting Center
-
Provides hosted meeting capabilities
- Cisco WebEx Meetings Server
-
Provides on-premises meeting capabilities
For information about contact sources in on-premises deployments, see the Contact Sources topic.
Cloud-Based Deployments
A cloud-based deployment is one in which Cisco WebEx hosts services. You manage and monitor your cloud-based deployment with the Cisco WebEx Administration Tool.
Cloud-Based Diagram
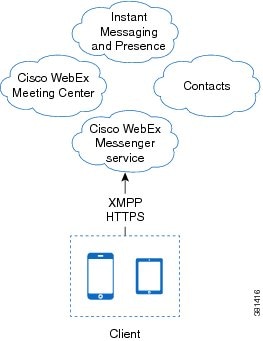
The following are the services available in a cloud-based deployment:
- Contact Source
-
The Cisco WebEx Messenger service provides contact resolution.
- Presence
-
The Cisco WebEx Messenger service lets users publish their availability and subscribe to other users' availability.
- Instant Messaging
-
The Cisco WebEx Messenger service lets users send and receive instant messages.
- Conferencing
-
Cisco WebEx Meeting Center provides hosted meeting capabilities.
Hybrid Cloud-Based Diagram
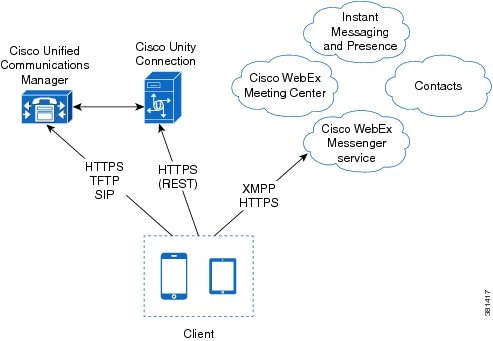
The following are the services available in a hybrid cloud-based deployment:
- Contact Source
-
The Cisco WebEx Messenger service provides contact resolution.
- Presence
-
The Cisco WebEx Messenger service lets users publish their availability and subscribe to other users' availability.
- Instant Messaging
-
The Cisco WebEx Messenger service lets users send and receive instant messages.
- Conferencing
-
Cisco WebEx Meeting Center provides hosted meeting capabilities.
- Audio Calls
-
Users place audio calls through mobile devices through Cisco Unified Communications Manager.
- Video
-
Users place video calls through Cisco Unified Communications Manager.
- Voicemail
-
Users send and receive voice messages through Cisco Unity Connection.
How the Client Connects to Services
- Service Discovery
- The client automatically locates and connects to services.
- Manual Connection Settings
- Users manually enter connection settings in the client user interface.
- Recommended Connection Methods
- Sources of Authentication
- Service Discovery
- Manual Connection Settings
Recommended Connection Methods
The method you should use to provide the client with the information it needs to connect to services depends on your deployment type, server versions, and product modes.
On-Premises Deployments
| Product Mode | Server Versions | Discovery Method |
|---|---|---|
| Full UC (Default Mode) |
|
A DNS SRV request against _cisco-uds .<domain> |
| Full UC (Default Mode) |
|
A DNS SRV request against _cuplogin.<domain> |
| IM Only (Default Mode) |
|
A DNS SRV request against _cisco-uds .<domain> |
| IM Only (Default Mode) |
|
A DNS SRV request against _cuplogin .<domain> |
 Note |
Cisco Unified Communications Manager version 9 and higher can still discover full Unified Communications and Instant Messaging only services using the _cuplogin DNS SRV request but a _cisco-uds request will take precedence if it is present. |
Hybrid Cloud-Based Deployments
| Server Versions | Connection Method |
|---|---|
|
HTTPS request against http://loginp.webexconnect.com/cas/FederatedSSO?org=<domain> |
Cloud-Based Deployments
| Deployment Type | Connection Method |
|---|---|
| Enabled for single sign-on (SSO) | Cisco WebEx Administration Tool |
| Not enabled for SSO | Cisco WebEx Administration Tool |
Sources of Authentication
A source of authentication, or an authenticator, enables users to sign in to the client.
- Cisco Unified Presence
- On-premises deployments in either full UC or IM only.
- Cisco WebEx Messenger Service
- Cloud-based or hybrid cloud-based deployments.
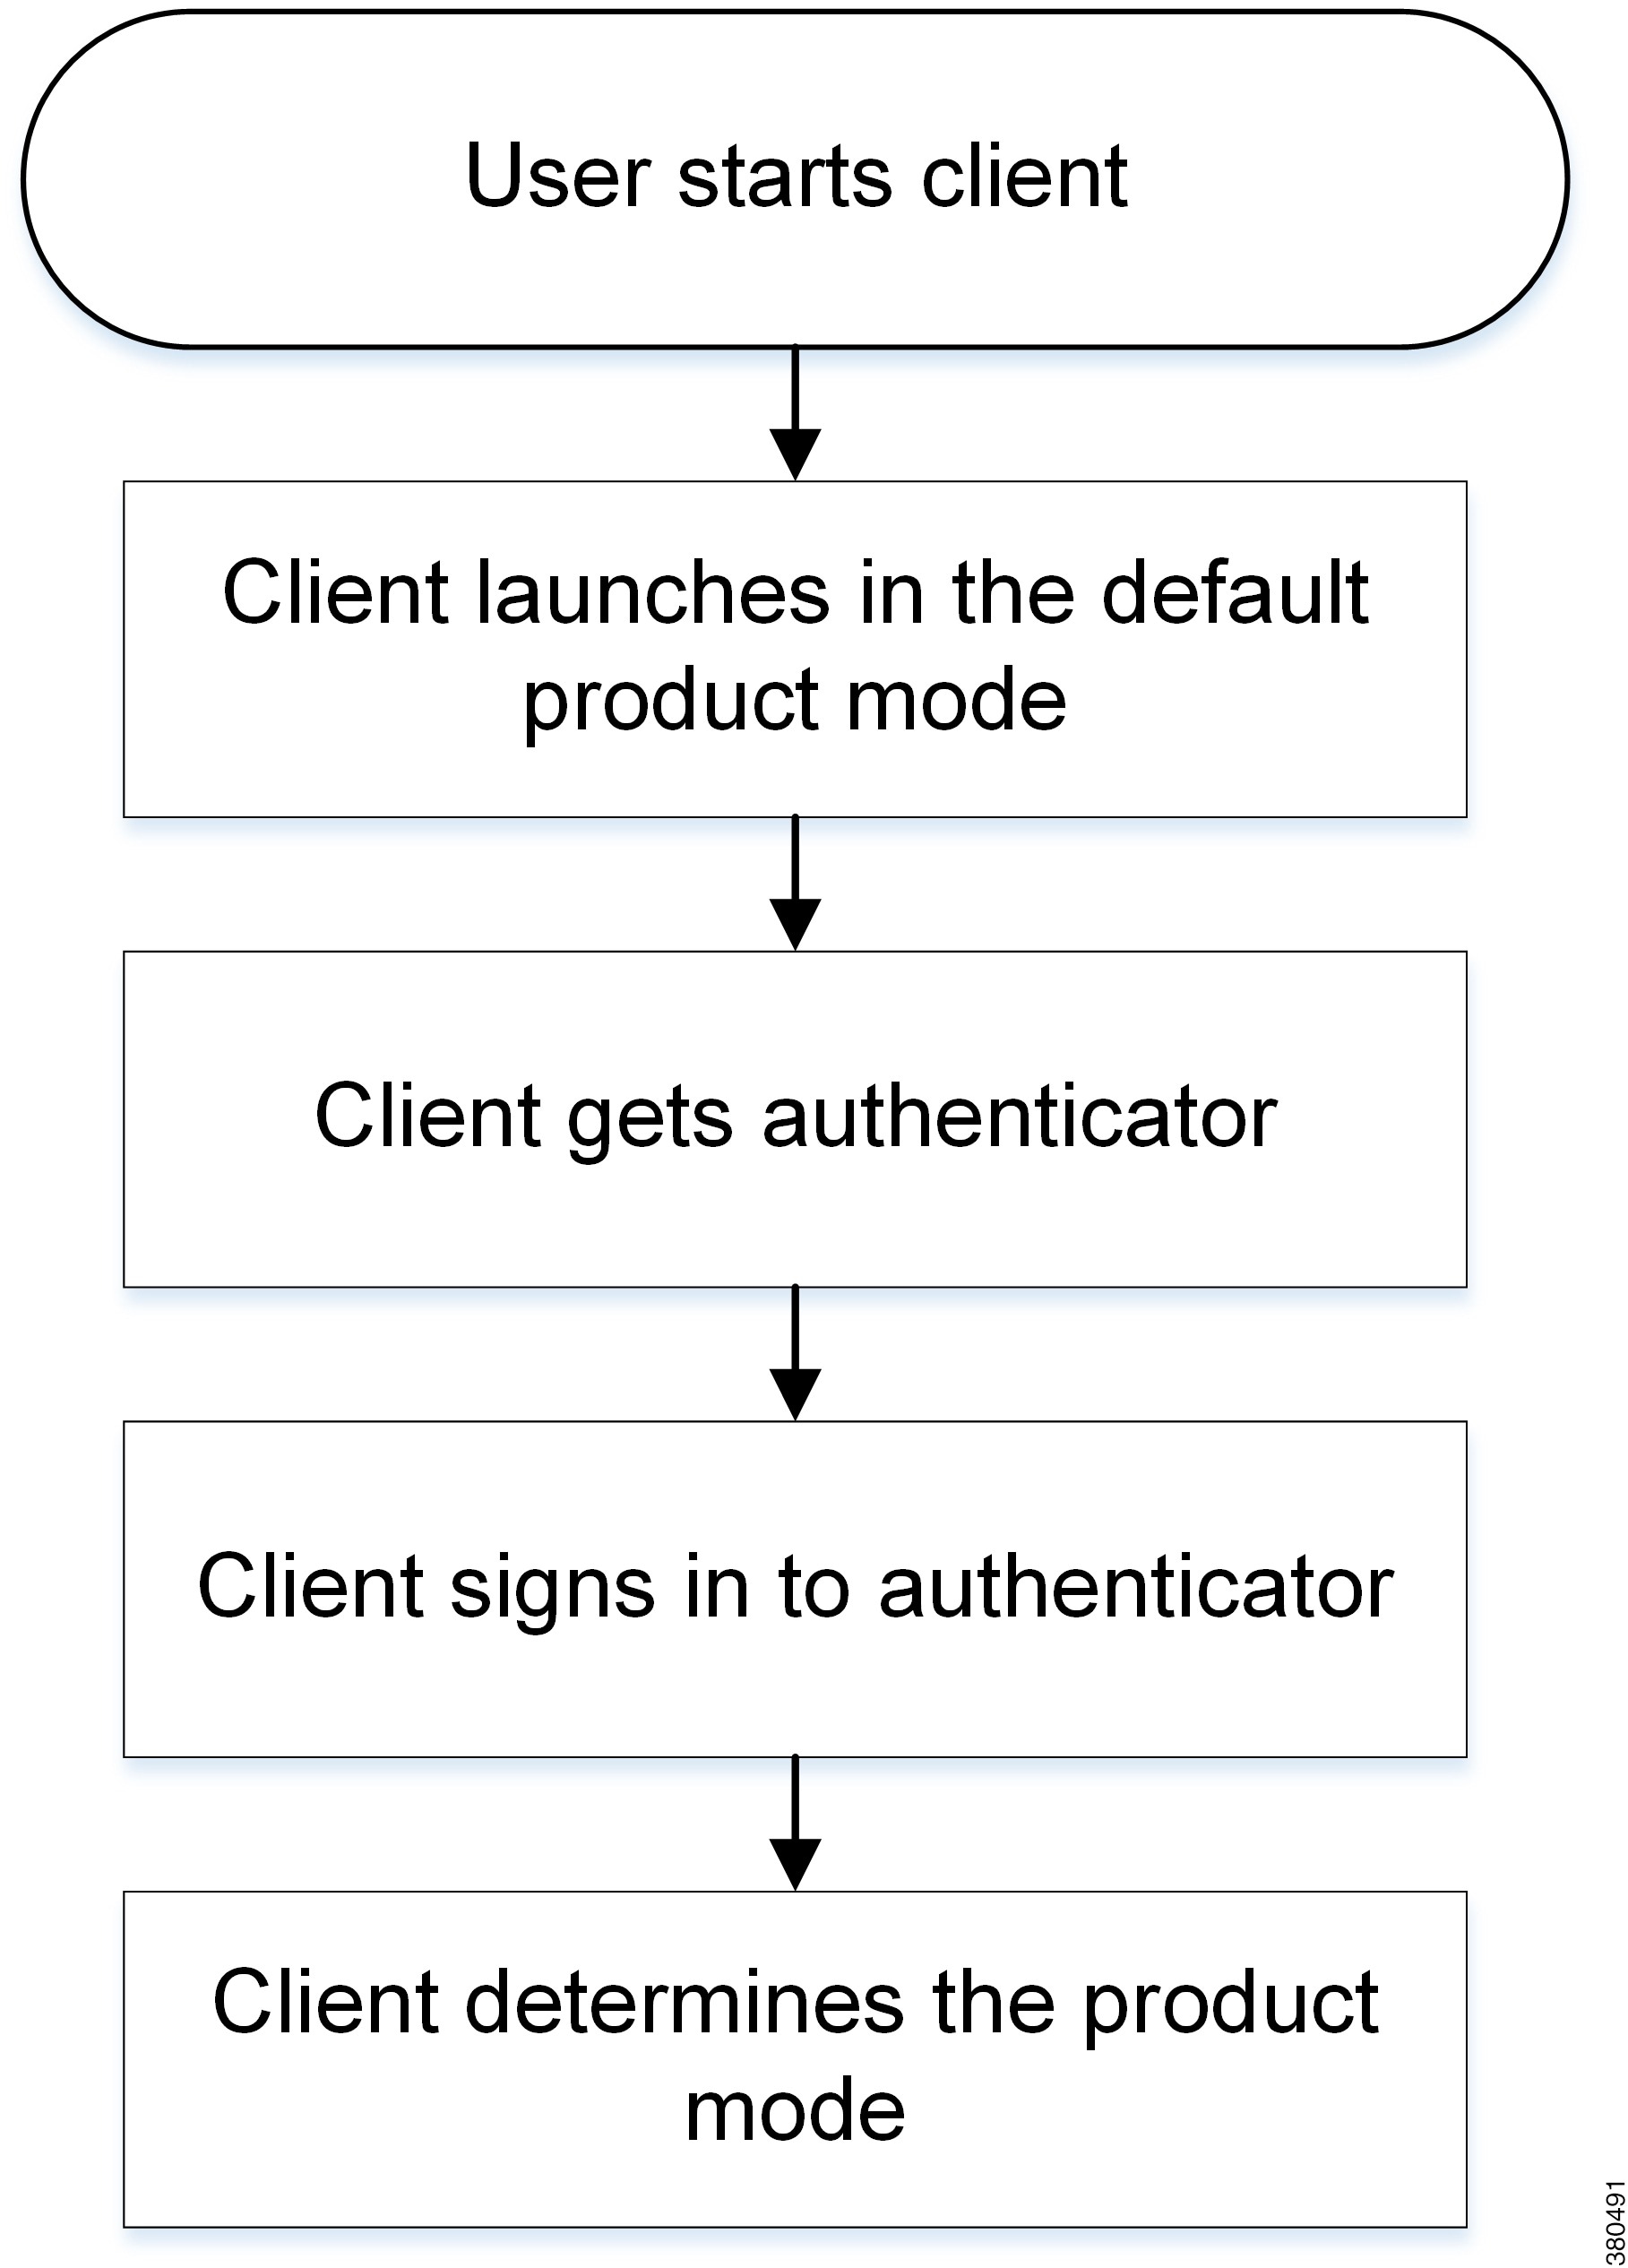
Initial Launch Sequence
On the initial launch after installation, Cisco Jabber starts in the default product mode. The client then gets an authenticator and signs the user in. After sign in, the client determines the product mode.
The following diagram illustrates the initial launch sequence:
How the Client Gets an Authenticator
- Client checks cache for manual settings. Users can manually enter authenticator through the client user interface.
- Client checks cache to discover if the user's domain is a WebEx organization. The client chooses WebEx as the authenticator.
- Client makes a WebEx cloud service HTTP request to discover if the user's organization domain is a WebEx organization. The client chooses WebEx as the authenticator.
- Client checks cache for service discovery. The client loads settings from previous queries for service (SRV) records.
- Client queries for SRV records. The client queries the DNS name server for SRV records to locate services. If the client finds the _cisco-uds SRV record, it can get the authenticator from the service profile.
if the client cannot get an authenticator, it prompts the user to manually select the source of authentication in the client user interface.
Service Discovery
Service discovery enables clients to automatically detect and locate services on your enterprise network. Clients query domain name servers to retrieve service (SRV) records that provide the location of servers.
Migrating from Cisco Unified Presence 8.x to Cisco Unified Communications IM and Presence 9.0 or later.
You must specify the Cisco Unified Presence server FQDN in the migrated UC service on Cisco Unified Communications Manager. Open Cisco Unified Communications Manager Administration interface. Select .
For UC services with type IM and Presence, when you migrate from Cisco Unified Presence 8.x to Cisco Unified Communications IM and Presence the Host Name/IP Address field is populated with a domain name and you must change this to the Cisco Unified Presence server FQDN.
However, Cisco Jabber can retrieve different SRV records that indicate to the client different servers are present and different services are available. In this way, the client derives specific information about your environment when it retrieves each SRV record.
The following table lists the SRV records you can deploy and explains the purpose and benefits of each record:
How the Client Locates Services
- Client's host computer or device gets a network connection. When the client's host computer gets a network connection, it also gets the address of a DNS name server from the DHCP settings.
- User starts Cisco Jabber.
-
User inputs email-like address or through URL provisioning to discover the service on the welcome screen for the first sign-in.
Note
URL provisioning allows users to click a link to cross launch Jabber without manually inputting email-like address for service discovery. The link will be sent by the administrator through email and contains the domain information that Jabber needs for service discovery. The link will be like: ciscojabber://provision?servicesdomain=<domain_for_service_discovery>, e.g., cisco.com. - The client gets the address of the DNS name server from the DHCP settings.
-
The client queries the name server for the following SRV records in order of priority:
The client caches the results of the DNS query to load on subsequent launches.
For information about deploying SRV records on your enterprise DNS structure, see the Cisco Jabber DNS Configuration Guide. The Cisco Jabber DNS Configuration Guide provides detailed information about how the client retrieves and uses SRV records and explains how to deploy SRV records on internal and external DNS name servers.
Client Issues HTTP Query
In addition to querying the name server for SRV records to locate available services, Cisco Jabbersends an HTTP query to the CAS URL for the Cisco WebEx Messenger service. This request enables the client to determine cloud-based deployments and authenticate users to the Cisco WebEx Messenger service.
http://loginp.webexconnect.com/cas/FederatedSSO?org=
http://loginp.webexconnect.com/cas/FederatedSSO?org=example.com
That query returns an XML response that the client uses to determine if the domain is a valid Cisco WebEx domain.
If the client determines the domain is a valid Cisco WebEx domain, it prompts users to enter their Cisco WebEx credentials. The client then authenticates to the Cisco WebEx Messenger service.
If the client determines the domain is not a valid Cisco WebEx domain, it uses the results of the query to the name server to locate available services.
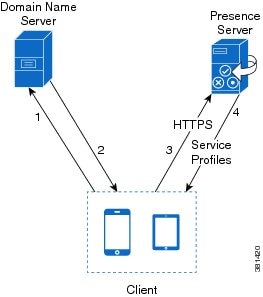
Cisco UDS SRV Record
In deployments with Cisco Unified Communications Manager version 9 and higher, Cisco Jabber can automatically discover services and configuration with the following SRV record: _cisco-uds.
The following image illustrates how the client uses the _cisco-uds SRV record:
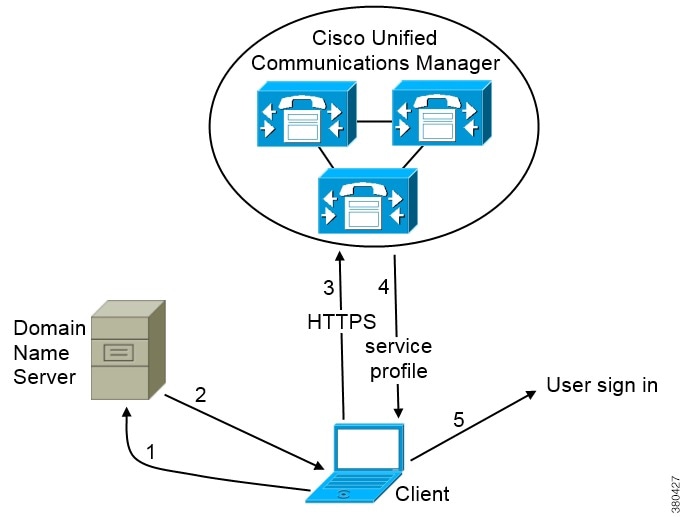
- The client queries the domain name server for SRV records.
- The name server returns the _cisco-uds SRV record.
-
The client locates the user's home cluster. As a result of automatically locating the user's home cluster, the client can retrieve the device configuration for the user and automatically register telephony services.
Note
In an environment with multiple Cisco Unified Communications Manager clusters, you must configure the Intercluster Lookup Service (ILS). ILS enables the client to find the user's home cluster.
See the appropriate version of the Cisco Unified Communications Manager Features and Services Guide to learn how to configure ILS.
- The client retrieves the user's service profile. The user's service profile contains the addresses and settings for UC services and client configuration. The client also determines the authenticator from the service profile.
- The client signs the user in to the authenticator.
CUP Login SRV Record
Cisco Jabber can automatically discover and connect to Cisco Unified Presence or Cisco Unified Communications Manager IM and Presence with the following SRV record: _cuplogin.
The following image illustrates how the client uses the _cuplogin SRV record:
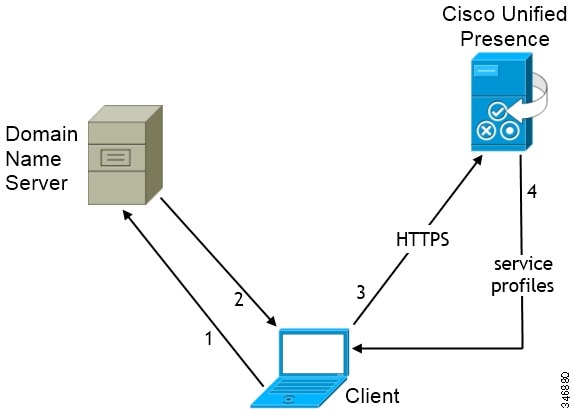
- The client queries the domain name server for SRV records.
- The name server returns the _cuplogin SRV record. As a result, Cisco Jabber can locate the presence server and determine that Cisco Unified Presence is the authenticator.
- The client prompts the user for credentials and authenticates to the presence server.
- The client retrieves service profiles from the presence server.
Note |
The _cuplogin SRV record also sets the default server address on the Manual setup and sign in screen. |
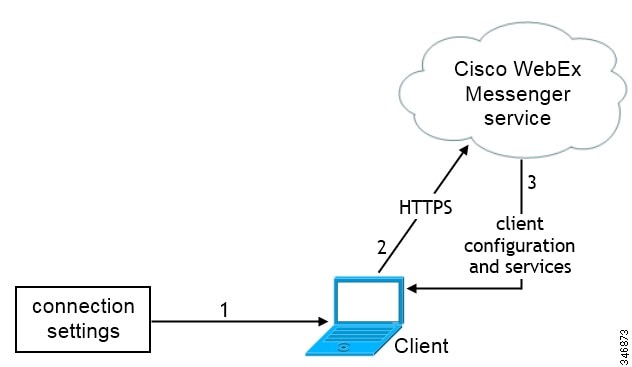
Manual Connection Settings
When you launch Cisco Jabber, you can specify the authenticator and server addresses in the Manual setup and sign in screen. The client then caches the server addresses to the local application configuration that it loads on subsequent launches.
- On-Premises with Cisco Unified Communications Manager Version 9.x and Higher
- If the client cannot get the authenticator and server addresses from the service profile.
- Cloud-Based or On-Premises with Cisco Unified Communications Manager Version 8.x
- The client prompts users to enter server addresses in the Manual setup and sign in screen if you do not set server addresses with SRV records.
Settings that you enter in the Manual setup and sign in screen take priority over any other sources including SRV records.
- Manual Connection Settings for On-Premises Deployments
- Manual Connection Settings for Cloud-Based Deployments
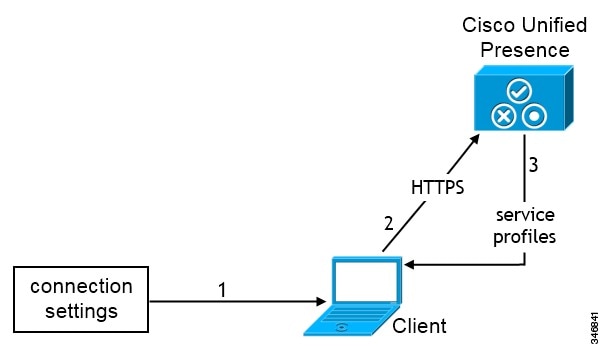
Manual Connection Settings for On-Premises Deployments
Users can set Cisco Unified Presence or Cisco Unified Communications Manager IM and Presence as the authenticator and specify the server address in the Manual setup and sign in screen.
You can automatically set the default server address with the _cuplogin SRV record.
The following diagram illustrates how the client uses manual connection settings in on-premises deployments:
Manual Connection Settings for Cloud-Based Deployments
Users can set the Cisco WebEx Messenger service as the authenticator and specify the CAS URL for login in the Manual setup and sign in screen.
The following diagram illustrates how the client uses manual connection settings in cloud-based deployments:
On-Premises Service Connections
Learn how the client can discover and connect to services in on-premises deployments.
Full UC and IM-Only Deployments
By default, the client connects to the presence server to authenticate users and retrieve service profiles. The client can automatically discover the presence server.
Presence Server Discovery
The client supports automatic server discovery using DNS SRV. The client can automatically discover either Cisco Unified Presence or Cisco Unified Communications Manager IM and Presence if the user does not specify the presence server address during sign in.
To discover the presence server, the client must first determine the domain. The client gathers this information from users, who must enter their username and domain when they sign in to the client.
After the client finds the domain, it gets the presence server address from the Domain Name Server (DNS).
When the client gets the presence server address, it connects to the presence server and then caches the address of the presence server.
If a redirect occurs to another server in the cluster, the client caches the address of the presence server to which it connects, not the address of the server before the redirect.
DNS SRV Records
The client retrieves the _cuplogin._tcp SRV record from the Domain Name Server (DNS) to lookup either Cisco Unified Presence or Cisco Unified Communications Manager IM and Presence.
Notes:
- You must add this SRV record to the DNS server on the presence server domain.
- The client uses port 8443 to connect to Cisco Unified Presence or Cisco Unified Communications Manager IM and Presence.
- The client supports weight and priority in SRV records.
The following is an example SRV record:
_cuplogin._tcp.domain SRV 0 1 8443 cup_server.domain
Connect to Available Services
If you use Cisco Unified Communications Manager IM and Presence Version 9 or later or Cisco Unified Communications Manager Version 9 or later, you can set up service profiles.
After the client retrieves the service profiles, it connects to available services.
Cloud-Based Service Connections
Learn how the client can discover and connect to services in cloud-based deployments.
Connect to Available Services
After the client connects to the Cisco WebEx Messenger service, users get instant messaging and presence capabilities and contact resolution. Users can also get conferencing capabilities if you enable hosted conferencing with Cisco WebEx Meeting Center.
In hybrid cloud-based deployments, the client gets the connection details for on-premises services. You specify the connection details with the Cisco WebEx Administration Tool.
Single Sign-On (SSO) Deployments
You can enable single sign-on (SSO) in certain deployment scenarios.
Learn what SSO capabilities are available and review login flows to understand how client authentication works in an SSO deployment.
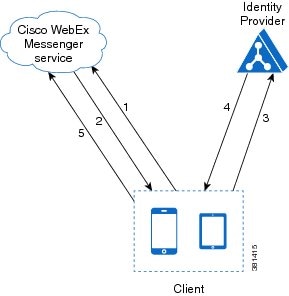
Cloud-Based SSO
In cloud-based deployments, the client supports SSO with the Cisco WebEx Messenger service.
The following steps describe the login flow for cloud-based SSO after users start the client:
- The client sends a login request to the Cisco WebEx Messenger service.
- The Cisco WebEx Messenger service redirects the client to the domain where your identity provider resides.
- The client follows the redirect and requests a login token from the identity provider.
- The identity provider gives a login token to the client.
- The client passes that login token to the Cisco WebEx Messenger service.
As a result, the client authenticates with the Cisco WebEx Messenger service.
The following diagram illustrates the login flow for cloud-based SSO:
Cisco AnyConnect Deployments
Cisco AnyConnect refers to a server-client infrastructure that enables the client to connect securely to your corporate network from remote locations such as Wi-Fi networks or mobile data networks.
The Cisco AnyConnect environment includes the following components:
- Cisco Adaptive Security Appliance
-
Provides a service to secure remote access.
- Cisco AnyConnect Secure Mobility Client
-
Establishes a secure connection to Cisco Adaptive Security Appliance from the user's device.
For information about requirements for Cisco Adaptive Security Appliance and Cisco AnyConnect Secure Mobility Client, see the Software Requirements topic.
Cisco AnyConnect Deployment Considerations
Cisco Adaptive Security Appliance provides a flexible architecture that can meet the needs of many different deployments. It is beyond the scope of this document to provide end-to-end deployment procedures. Rather, the purpose of this section is to provide information that you should consider when deploying Cisco Adaptive Security Appliance and Cisco AnyConnect Secure Mobility Client for Cisco Jabber for iPhone and iPad .
You should refer to the configuration guides for Cisco Adaptive Security Appliance to obtain task-based information on installing and configuring Cisco Adaptive Security Appliance.
- Application Profiles
- Automate VPN Connection
- Set Up Certificate-Based Authentication
- Session Parameters
- Group Policies and Profiles
Application Profiles
After users download the Cisco AnyConnect Secure Mobility Client to their device, the ASA must provision a configuration profile to the application.
The configuration profile for the Cisco AnyConnect Secure Mobility Client includes VPN policy information such as the company ASA VPN gateways, the connection protocol (IPSec or SSL), and on-demand policies.
- ASDM
-
Cisco recommends that you use the profile editor on the ASA Device Manager (ASDM) to define the VPN profile for the Cisco AnyConnect Secure Mobility Client.
When you use this method, the VPN profile is automatically downloaded to the Cisco AnyConnect Secure Mobility Client after the client establishes the VPN connection for the first time. You can use this method for all devices and OS types, and you can manage the VPN profile centrally on the ASA.
For more information, see the Creating and Editing an AnyConnect Profile topic of the Cisco AnyConnect Secure Mobility Client Administrator Guide for your release.
- iPCU
-
You can provision iOS devices using an Apple configuration profile that you create with the iPhone Configuration Utility (iPCU). Apple configuration profiles are XML files that contain information such as device security policies, VPN configuration information, and Wi-Fi, mail, and calendar settings.
The high-level procedure is as follows:
- Use iPCU to create an Apple configuration profile. For more information, see the iPCU documentation.
- Export the XML profile as a .mobileconfig file.
- Email the .mobileconfig file to users. After a user opens the file, it installs the AnyConnect VPN profile and the other profile settings to the client application.
- MDM
-
You can provision iOS devices using an Apple configuration profile that you create with third-party Mobile Device Management (MDM) software. Apple configuration profiles are XML files that contain information such as device security policies, VPN configuration information, and Wi-Fi, mail, and calendar settings.
The high-level procedure is as follows:
Automate VPN Connection
When users open Cisco Jabber from outside the corporate Wi-Fi network, Cisco Jabber needs a VPN connection to access the Cisco UC application servers. You can set up the system to allow Cisco AnyConnect Secure Mobility Client to automatically establish a VPN connection in the background, which helps ensure a seamless user experience.
Set Up Connect On-Demand VPN
The Apple iOS Connect On Demand feature enhances the user experience by automating the VPN connection based on the user's domain.
When the user is inside the corporate Wi-Fi network, Cisco Jabber can reach the Cisco UC infrastructure directly. When the user leaves the corporate Wi-Fi network, Cisco AnyConnect automatically detects if it is connected to a domain that you specify in the AnyConnect client profile. If so, the application initiates the VPN to ensure connectivity to the UC infrastructure. All applications on the device including Cisco Jabber can take advantage of this feature.
Note |
Connect On Demand supports only certificate-authenticated connections. |
The following options are available with this feature:
- Connect If Needed: Apple iOS attempts to initiate a VPN connection to the domains in the list only if it cannot resolve the address using DNS.
- Never Connect: Apple iOS never attempts to initiate a VPN connection to domains in this list.
Apple plans to remove the Always Connect option in the near future. After the Always Connect option is removed, users can select the Connect If Needed option. In some cases, Cisco Jabber users may have issues when using the Connect If Needed option. For example, if the hostname for the Cisco Unified Communications Manager is resolvable outside the corporate network, iOS will not trigger a VPN connection. The user can work around this issue by manually launching Cisco AnyConnect Secure Mobility Client before making a call.
Set Up Automatic VPN Access on Cisco Unified Communications Manager
- The mobile device must be set up for on-demand access to VPN with certificate-based authentication. For assistance with setting up VPN access, contact the providers of your VPN client and head end.
- For requirements for Cisco AnyConnect Secure Mobility Client and Cisco Adaptive Security Appliance, see the Software Requirements topic.
- For information about setting up Cisco AnyConnect, see the Cisco AnyConnect VPN Client Maintain and Operate Guides.
What to Do Next
-
Test this feature.
- Enter this URL into the Internet browser on the iOS device and verify that VPN launches automatically. You should see a VPN icon in the status bar.
- Verify that the iOS device can connect to the corporate network using VPN. For example, access a web page on your corporate intranet. If the iOS device cannot connect, contact the provider of your VPN technology.
- Verify with your IT department that your VPN does not restrict access to certain types of traffic (for example, if the administrator set the system to allow only email and calendaring traffic).
- Verify that you set up the client to connect directly to the corporate network.
Set Up Certificate-Based Authentication
Cisco recommends that you use certificate-based authentication for negotiating a secure connection to Cisco Adaptive Security Appliance from Cisco AnyConnect Secure Mobility Client.
ASA supports certificates issued by standard Certificate Authority (CA) servers such as Cisco IOS CA, Microsoft Windows 2003, Windows 2008R2, Entrust, VeriSign, and RSA Keon. This topic gives you a, high-level procedure for setting up ASA for certificate-based authentication. See the Configuring Digital Certificates topic in the appropriate ASA configuration guide for step-by-step instructions.
What to Do Next
Distribute Certificates with SCEP
You can use Simple Certificate Enrollment Protocol (SCEP) on Microsoft Windows Server to securely issue and renew certificates for client authentication.
To distribute certificates with SCEP, you must install the SCEP module on Microsoft Windows Server. See the following topics for more information:
Distribute Client Certificate with Mobileconfig File
Use this procedure to create a mobile configuration file that includes a certificate. You can use this file to distribute the certificate to users.
Session Parameters
You can configure ASA session parameters to improve performance for secure connections. For the best user experience, you should configure the following ASA session parameters:
- Datagram Transport Layer Security (DTLS)
-
DTLS is an SSL protocol that provides a data path that prevents latency and data loss.
- Auto Reconnect
-
Auto reconnect, or session persistence, lets Cisco AnyConnect Secure Mobility Client recover from session disruptions and re-establish sessions.
- Session Persistence
-
This parameter allows the VPN session to recover from service disruptions and re-establish the connection.
- Idle Timeout
-
Idle timeout defines a period of time after which ASA terminates secure connections, if no communication activity occurs.
- Dead-Peer Detection (DTD)
-
DTD ensures that ASA and Cisco AnyConnect Secure Mobility Client can quickly detect failed connections.
Set ASA Session Parameters
Cisco recommends that you set up the ASA session parameters as follows to optimize the end user experience for Cisco AnyConnect Secure Mobility Client.
Group Policies and Profiles
You should use the ASA Device Manager (ASDM) to create group policies, client profiles, and connection profiles. Create your group policies first and then apply those policies to the profiles. Using the ASDM to create profiles ensures that Cisco AnyConnect Secure Mobility Client downloads the profiles after it establishes a connection to ASA for the first time. The ASDM also lets you manage and maintain your policies and profiles in a central location.
See the Cisco AnyConnect Secure Mobility Client Administrator Guide for instructions on creating policies and profiles with the ASDM.
Trusted Network Detection
Trusted Network Detection is a feature that automates secure connections based on user location. When users leave the corporate network, Cisco AnyConnect Secure Mobility Client automatically detects that it is outside the trusted network and then initiates secure access.
You configure Trusted Network Detection on ASA as part of the client profile. For more information, see the Trusted Network Detection topic in the Cisco AnyConnect Secure Mobility Client Administrator Guide for your release.
Tunnel Policies
Tunnel policies configure how Cisco AnyConnect Secure Mobility Client directs traffic over a secure connection and include the following:
- Full Tunnel Policy
-
Lets you send all traffic over the secure connection to the ASA gateway.
- Split Include Policy with Network ACL
-
Enables you to restrict secure connections based on destination IP addresses. For example, in an on-premises deployment, you can specify the IP addresses for Cisco Unified Communications Manager, Cisco Unified Presence, your TFTP server, and other servers to restrict the secure connection only to your client's traffic.
- Split Exclude Policy
-
Allows you to exclude certain traffic from the secure connection. You can allow client traffic over the secure connection and then exclude traffic from specific destination subnets.
 Feedback