Set Up Security

Set up Security

Configure Cisco Unified Communications Manager for Line-Side

Security Concepts Overview

Before configuring security, consider the following security concepts:

  • Authentication - The process that verifies the identity of a communicating entity
  • Authorization - The process that specifies whether an authenticated user, device, service, or application has the necessary permission to access the requested information
  • Certificate - A message that includes the certificate issuer name, public key, and the digital signature
  • CAPF - The process by which devices can request a Locally Significant Certificate (LSC).
  • LSC - The X509v3 certificate issued by CAPF
  • CTL - The list of certificates that the phone will trust. It is created by CTL Client and signed by the Site Administrator Security Token (SAST).
  • SAST - The Portable Security Module (for example, USB) that contains a private key and X509v3 certificate. It provides authentication and signs the CTL file.
  • Digest Authentication - The value generated by hashing and then encrypting the message with the private key of the signer. The recipient decrypts the messages and the hash with the public key, and produces another hash. It then compares the result to ensure that the messages match and the contents are intact.
  • Encryption - The process of translating data into ciphertext. This ensures the confidentiality of the information.
  • Integrity - The process that ensures that data tempering did not occur in the transit

CTL Overview

Phone security with CTL is achieved using a CTL client. This offers the following security benefits:

  • Authentication of TFTP configuration files.
  • Encryption of TFTP configuration files.
  • Encrypted Signaling using TLS
  • Encrypted Media using SRTP

CTL Client performs the following two major tasks:

  1. Creates a CTL, file that contains certificate entries. A CTL file indicates the server, or servers, that support TLS for the phone configuration.
  2. Sets the Unified CM in mixed mode

Configuration

The following high-level steps are required to configure security in Unified CM:

  1. Configure a CTL Client.
  2. Install LSCs on the Phones.
  3. Configure a Phone Security Profile.
  4. Import Phone Security Profiles into a domain manager.
  5. Apply Phone Security Profile to a Phone.
  6. Configure and Apply a SIP Dial-Rule.

Configure a CTL Client


Warning

CTL providers and CAPF services must be activated prior to installing CTL certificates.

The following steps are required to configure security in Unified CM.

  1. Obtain two security tokens
  2. Acquire a Windows machine that has access to the Unified CM and Install CTL Client from Unified CM Administration Plugins.
  3. Open a CTL Client
  4. Enter the configuration settings (for example, Host/IP Address of Unified CM, CTL Provider Port number, OS Admin username and Password).
  5. Select Set Cisco Unified Communications Manager Cluster to Mixed Mode > Next.
  6. When CTL Client prompts, insert a USB key . Click OK.
  7. Security token information displays. Click Next. At this point CTL Client performs connections to all the Unified CM servers on the specified port and retrieves the existing CallManager and CAPF certificates.
  8. Detected certificate entries display in the pane.
  9. Click Add Tokens, and insert a second USB key to add other security tokens. Click OK.
  10. Click Add.
  11. After adding the tokens, click Finish.
  12. The CTL Client asks for the private key password for the USB eToken. This allows the eToken to sign the CTL file. Enter the password and click OK.
  13. After entering the correct password, the CTL Client signs the CTL file and writes to all the Unified CM servers in the cluster.
  14. Restart all the required Unified CM servers using CLI Utils system restart.
  15. Verify that the Cluster Security Mode is set to 1 in the Enterprise Parameters of Unified CM.

Install LSCs on the phones

Follow these steps to install LSC on the phone.

  1. Navigate to the Phone Configuration page.
  2. Under the Certificate Authority Proxy Function (CAPF) Information, set the Certificate Operation to Install/Upgrade.
  3. Set the authenticate mode to By Null String.
  4. Set Key size to 1024.
  5. Click Save.
  6. Reset the phones.

Configure a phone security profile

Follow these steps to configure a Phone Security Profile in Unified CM.

  1. Navigate to System > Security Profile > Phone Security Profile.
  2. Click Add New.
  3. Select the Phone Security Profile Type by choosing the phone model. Ensure that you choose the correct phone model.
  4. Enter the Name and description of the Security Profile.
  5. Enter the Device Security Mode as Encrypted.
  6. Leave the Transport type as TLS.
  7. Do not check the Enable Digest Authentication and TFTP Encrypted Config (leave them unchecked).
  8. Leave the rest of the settings as default.
  9. Click Save.

Note

The SIP Phone Port Parameter is only used for UDP transport. This setting is ignored by Unified CM as a result of using TLS. Also, be sure to use a Key Size of 1024.

Import phone security profiles into Unified CDM

Use the following steps to import the Phone Security Profiles into Unified CDM:

  1. Navigate to Network > PBX Devices > Import/Refresh Items.
  2. Select Phone Security Profiles.
  3. Click Import/Refresh Items.

Apply a phone security profile to a phone

Use the following steps to apply a phone security

  1. Navigate to Location Administration > Phone Management.
  2. Select the phone.
  3. Under Phone Details, update the Phone Security Profile settings.
  4. Click Modify.

Note

This setting can be applied at the time of phone registration.

Configure and Apply a SIP Dial-Rule

KPML dialing results in a reorder from the Phone-Proxy. Therefore, you must configure a SIP Dial-Rule using the steps below:

  1. Navigate to Call Routing > Dial Rules > SIP Dial Rules.
  2. Click Add New.
  3. Select 7940-7960-OTHER as the Dial pattern.
  4. Enter the name and description of SIP Dial Rule.
  5. Enter the description of a pattern.
  6. Create a local dialing pattern and select a Timeout 0.
  7. Create a PSTN Dialing pattern and select a Timeout of 0.
  8. Click Save.
  9. Navigate to the applicable Phone. Select Device > Phone > SIP Dial Rule under Protocol Specific Information.
  10. Select the applicable Dial Rule
  11. Click Save and Reset.

Set Up Adaptive Security Appliances

This section provides a high-level overview of the provisioning steps that are required for new customer onboarding when the Cisco Firepower Next Generation Firewall is used in ASA mode for multi-tenant traffic separation within the service provider data center network.

The configuration depends on the specific design and customer requirements. The examples provided are based on a setup where the firewall is connected to the Cisco Nexus 7000 aggregation node, and all customer traffic is sent to the firewall before it is forwarded to the computer resources.

Procedure


Step 1

Configure the customer-specific subinterfaces.

See Configure subinterfaces.

Step 2

Create the customer context.

See Create customer context.

Step 3

Define the network object groups.

See Define network object groups.

Step 4

Configure the traffic policies.

See Configure traffic access lists.

Step 5

Configure routing.

See Configure routes.

Step 6

(Optional) Configure NAT.

See (Optional) Configure NAT.


Configure subinterfaces

Procedure

Step 1

Access the ASA global system context.

Step 2

Define the customer-specific subinterfaces.

Example:

interface Port-channel21.1003
  vlan 1003 

interface Port-channel21.3003
  vlan 3003

Create customer context

Procedure

Step 1

Create a new customer context at the system level.

Example:
HCS-ASA(config)# context Customer03
Creating context 'Customer03'... Done. (5)
Step 2

Define the configuration URL for the new context.

Example:
HCS-ASA(config-ctx)# config-url disk0:/Customer03.cfg

WARNING: Could not fetch the URL disk0:/Customer03.cfg
INFO: Creating context with default config
Step 3

Allocate the customer interfaces to the new context.

Example:

HCS-ASA(config-ctx)# allocate-interface Port-channel21.1003
HCS-ASA(config-ctx)# allocate-interface Port-channel21.3003
Step 4

Change to the new context configuration mode.

Example:
HCS-ASA(config-ctx)#changeto context Customer03
HCS-ASA/Customer03(config)#

Define network object groups

Procedure

On the new customer context configuration level, define all network object groups.

Example:
object-group network mgmt_devices
 network-object 1xx.0.0.0 203.0.113.0/24
 network-object 1x.0.0.0 203.0.113.0/24
 network-object 192.0.2.0/24 203.0.113.0/24

object-group network uc_cluster
 network-object 2xx.0.0.0 203.0.113.0/24

object-group network phone
 network-object 1xx.00.0.0 203.0.113.0/24
 network-object 1xx.00.0.0 203.0.113.0/24

Configure traffic access lists

For complete configuration details, refer to the documentation for your ASA device.

Procedure

Step 1

Create the access lists.

Step 2

Apply the access lists to the interfaces.


Configure routes

Procedure

Create routes for the different interfaces.


(Optional) Configure NAT

Procedure

If Network Address Translation (NAT) is performed by ASA (for example, management applications and customer UC applications), create the NAT statements on the relevant contexts.

Example:
object-group network CUCM-pub
 network-object 200.1.1.2 255.255.255.255

object-group network CUCM-pub-NAT
 network-object 192.6.1.34 255.255.255.255

nat (any,mgmt) source static CUCM-pub CUCM-pub-NAT
Note 

The NAT statements, the contexts used, ASA routing, and other security options depend on the specific Cisco HCS design.


Multitenant Expressway Security

Security in multitenant Expressway follows the same approach as single-tenant Expressway, with some additional options and requirements. The existing security requirements for Webex Hybrid, mobile remote access (MRA), and SIP registration for Expressway in single-tenant mode form the basis for multitenant deployments. More security requirements for MRA in a multitenant environment are discussed in the following sections, including certificate management, service discovery, and SSO.

Certificate Management and Service Discovery

Expressway uses X.509 certificates to secure the TLS communication channels underlying almost all data paths into and out of both Expressway-E and Expressway-C. This includes the following connections:

  • HTTPS web access for admin

  • HTTPS service discovery for Jabber using mobile remote access (MRA)

  • HTTPS REST communication between Expressway-C and UC applications such as Unified CM, Unity Connection, and IM&P

  • SIP signaling between endpoints and Expressway-E, between Expressway-E and C across the traversal zone, and between Expressway-C and Unified CM

  • XMPP connections between Jabber and Expressway-E, between Expressway-E and C across the traversal zone, and between Expressway-C and IM&P

The basis for securing these communication channels is the public key infrastructure (PKI) system for establishing trust and exchanging cryptographic keys between communicating entities. This infrastructure and the use of X.509 certificates is described in detail in the Cisco Expressway Certificate Creation and Use Deployment Guide and the Mobile and Remote Access via Cisco Expressway Deployment Guide. Review these guides before before proceeding with this document. Certificate management in a multitenant Expressway environment builds on the certificate management of a single-tenant Expressway as described in these two documents.

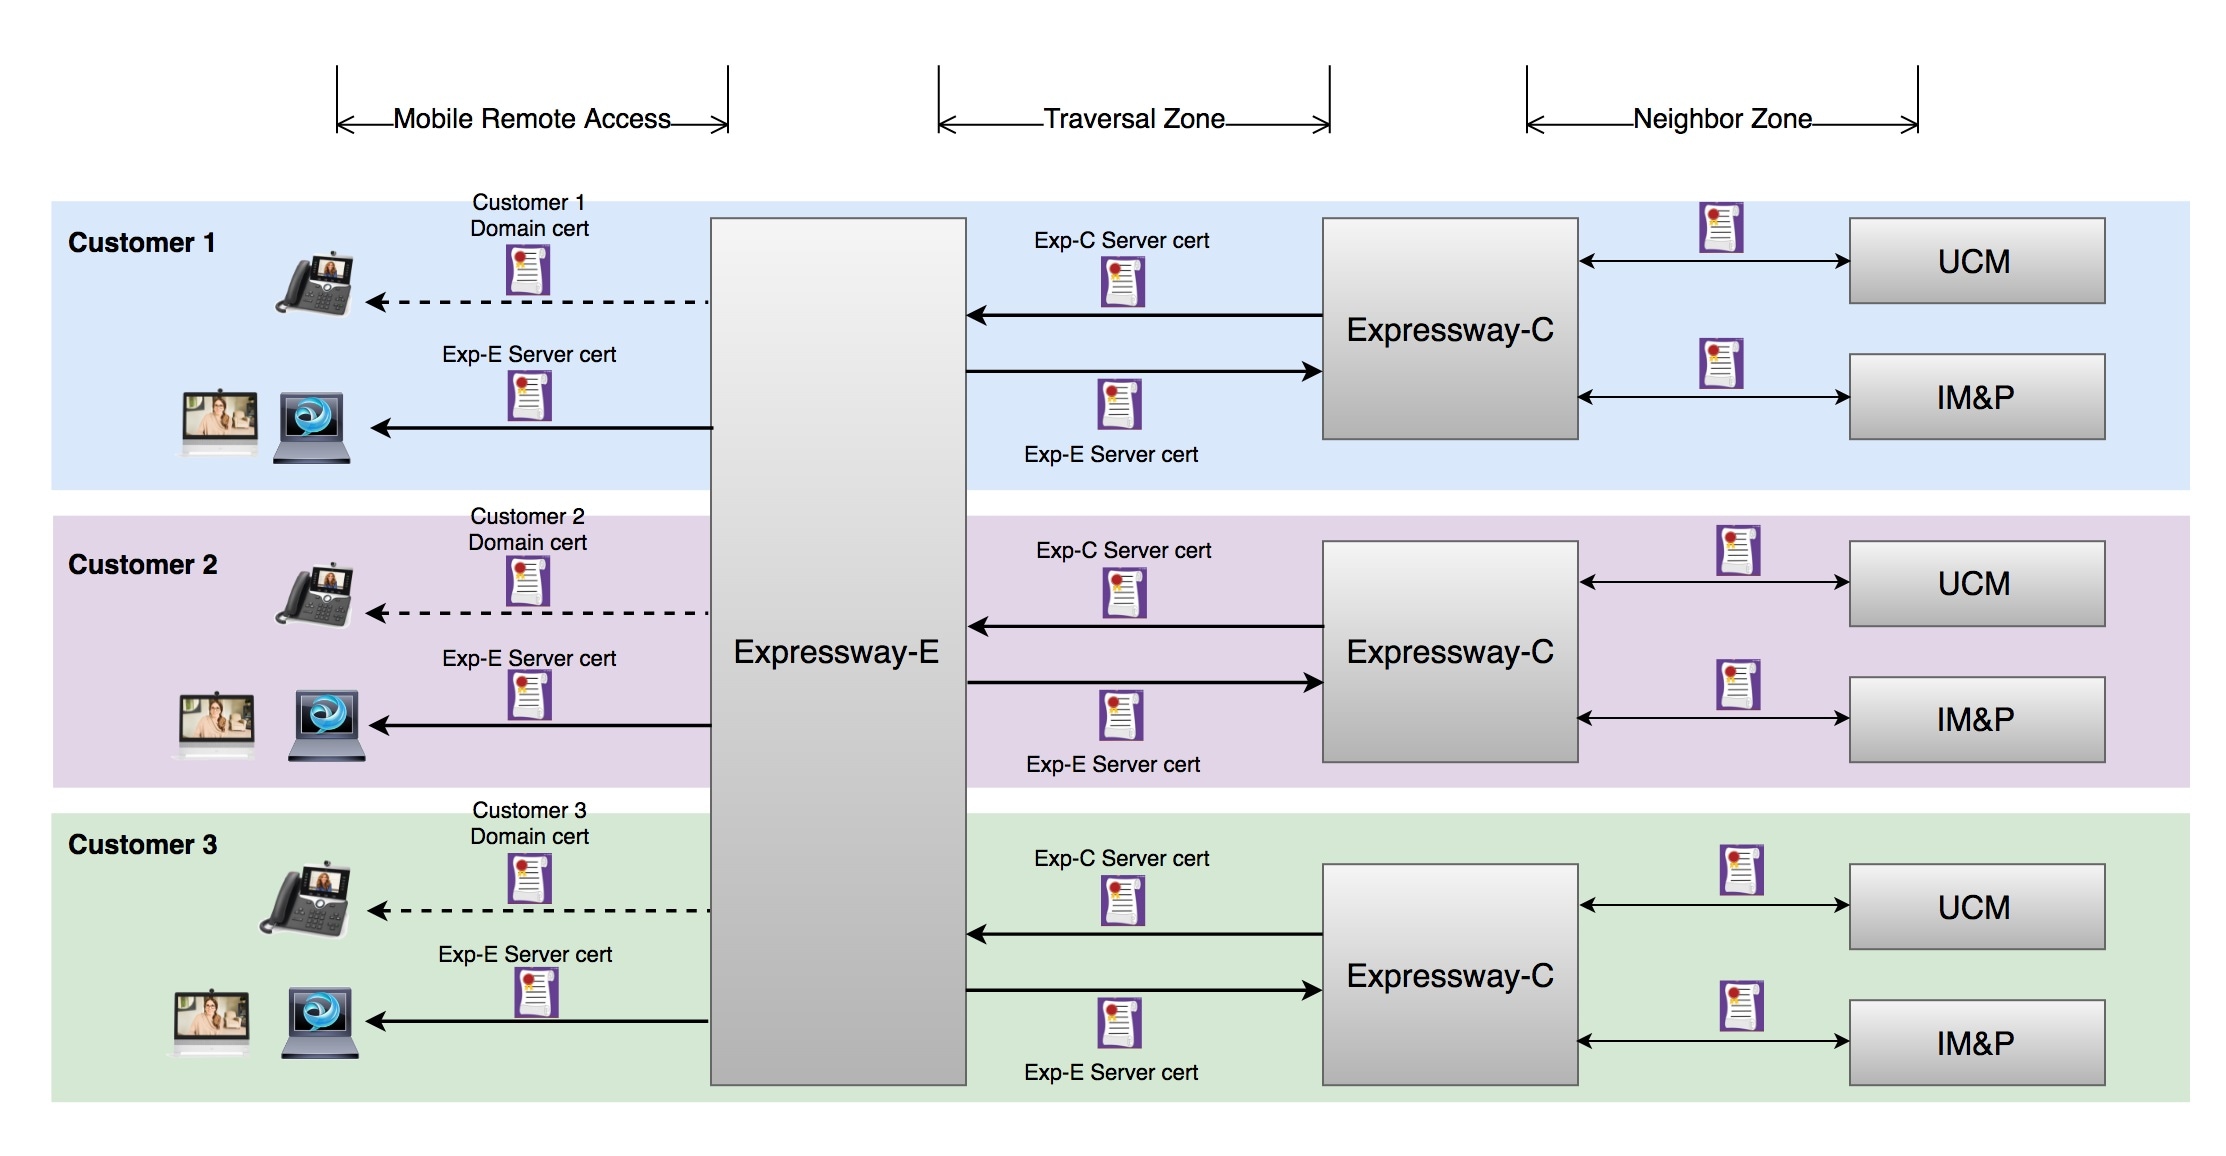
There are two types of certificates in the Expressway product line:

  • Server certificate

  • Domain certificate

Figure 1. Domain and Server Certificate Locations for Use

As always, security is a trade-off between convenience and privacy. Striking the right balance for each partner and customer depends on the details of the deployment, customer requirements, cost, and administrative overhead. The following sections discuss the various options available in a multitenant environment, and the pros and cons of each.

Server Certificate

The server certificate is found in the menu at Maintenance > Security certificates > Server certificate and continues to be used for the following applications even if there are domain certificates installed:

  • HTTPS access to the web interface and REST API communications

  • SIP signaling between Expressway-E and Expressway-C across the traversal zone, as well as Expressway-C and UC applications

  • XMPP connections between Expressway-E and Expressway-C across the traversal zone

  • Other services such as Syslog and LDAP

The procedure for generating, installing and managing the server certificate is the same as documented in the Cisco Expressway Certificate Creation and Use Deployment Guide. The server certificate is used for non-SNI-capable endpoints.

Domain Certificate

The domain certificate is a new option feature in X8.10. It allows the admin to generate and install domain-specific certificates to be used for clients that support server name indication (SNI).

SNI is an extension to the transport layer security (TLS) protocol. It enables clients to indicate which hostname they are attempting to connect to at the start of the TLS handshaking process. This allows the server to present a domain-specific certificate to the client, enabling multidomain (multitenant) solutions that share a single server across multiple domains.

During a TLS handshake, the client includes an SNI field in the ClientHello request. The Expressway looks up its certificate store and tries to find a match for the SNI hostname. If a match is found, the domain-specific certificate is returned to the client.

In the case of multitenant Expressway, we are sharing an Expressway-E cluster across multiple customer domains. So SNI allows endpoints to sign in with MRA using the user's native domain rather than the service provider domain. This is beneficial because the native user domain is different from the service provider domain in an HCS deployment. The user may not know the service provider domain.

Expressway-E Domain Certificate

Prior to X8.10, Expressway-E does not support SNI. It always returns the server certificate, which is the only certificate installed on Expressway-E. X8.10 adds domain certificates feature so Expressway-E now supports SNI. Admin may upload one (and only one) certificate per customer domain. Expressway locates and returns a certificate whose subject name matches the client's SNI request. During the TLS handshake, if a client TLS ClientHello request has SNI option set, Expressway-E searches its certificate store to locate a certificate whose subject name matches the SNI server hostname. The store contains both server certificate and all domain certificates. If a match is found, the certificate is returned to the client and the TLS handshake continues. Otherwise, Expressway-E either returns the server certificate for a HTTPS connection, or rejects the connection with a TLS Error #112 "Unrecognized Name" for SIP and XMPP connections. For endpoints that do not support SNI, they do not set the SNI option in a ClientHello request. In this case, the Expressway-E responds with the server certificate.

With domain certificate feature support in X8.10, Expressway-E now enforce the certificate hostname check during the TLS handshake for SNI-capable endpoints. Thus, admin must upload proper certificates for customer domains. Prior to 8.10, Expressway-E always returned the server certificate during the TLS handshake. From version X8.10 forward, if a certificate match is not found for the specific SNI hostname, Expressway-E rejects the connection with error #112 for SIP and XMPP connections.

The admin has two options to install a valid certificate for a customer domain. The first is to use the server certificate. This is typical for a single-tenant or domain deployment. The second is to install the domain certificate. The admin can install one certificate per customer domain. In either case, the subject name in the certificate's SubjectAlternateName (SAN) (or the CommonName (CN) if the SAN is absent) must match the client's SNI hostname for Expressway-E to locate the certificate.


Note

The domain certificate is an Expressway-E-only feature. Expressway-C does not support domain certificates.


Bootstrapping Expressway Certificates

From X12.5.6, the Cisco Expressway Series supports the ACME protocol (Automated Certificate Management Environment) which enables automatic certificate signing and deployment to the Cisco Expressway-E from a certificate authority such as Let's Encrypt. The main benefit of this feature is to generate low-cost server certificates to identify the Expressway-E, thereby reducing the cost of Expressway-based deployments like MRA (Mobile and Remote Access).

Due to the underlying validation mechanism this feature is most likely to be useful for MRA deployments. For Business to Business (B2B) applications, it's not always practical to include your primary domain in ACME certificates.

The configuration process is simple. You enter some information on the Cisco Expressway-E to create a certificate signing request (CSR), then the Expressway's ACME client interacts with the certificate authority to request the certificate. The Expressway downloads the certificate and you click a button to deploy it. After this manual step, you can schedule renewal so that the certificate does not expire—because ACME certificates are deliberately short-lived.

One compromise of the ACME protocol is that it requires an inbound HTTP connection to port 80 on the Cisco Expressway-E. For highly secure environments, you can disable ACME and use the traditional CSR procedure with your preferred certificate authority or open port 80 to connect to Firewall in HCS environment and communicate only with Expressway.

For more information about the configuration to open port 80 and connect to Firewall in HCS environment, see Configure ACME Services on Expressway.

Configure ACME Services on Expressway

Procedure

Step 1

Open Port 80 to connect to Expressway E.

Use the following command in CLI:
permit tcp host ACME_v2_API_IPeq host Expressway_IP
Note 

ACME V1 is deprecated. For information on ACME protocol updates and configuration through API, see https://letsencrypt.org/docs/acme-protocol-updates/.

Step 2

Configure ACME services on Expressway E.

For more information, see Cisco Expressway Certificate Creation and Use Deployment Guide available at https://www.cisco.com/c/en/us/support/unified-communications/expressway-series/products-installation-and-configuration-guides-list.html.


Domain Certificates and Clustered Systems

When a CSR is generated, a single request and private key combination is generated for that peer only.

If you have a cluster of Expressways, you must generate a separate signing request on each peer. Send those requests to the certificate authority and upload the returned domain certificates to each relevant peer.

Ensure that you upload the correct domain certificate to the appropriate peer. Otherwise, the stored private key on each peer will not correspond to the uploaded certificate.

Viewing a Currently Uploaded Domain Certificate

When you click a domain, the domain certificate data section shows information about the specific domain certificate currently loaded on the Expressway.

To view the currently uploaded domain certificate file, click Show (decoded) to view it in a human-readable form.

Click Show (PEM file) to view the file in its raw format.

To delete the currently uploaded domain, click Delete.


Note

Do not allow your domain certificate to expire. This may cause other external systems to reject your certificate and prevent the Expressway from connecting to those systems.


Add a New Domain

Procedure

Step 1

Go to Maintenance > Server certificates > Domain certificates.

Step 2

Click New.

Step 3

Under New local domain, enter the name of the domain you want to add. An example valid domain name is 100.example-name.com.

Step 4

Click Create domain.

Step 5

The new domain is added to the Domain certificates page. You can then proceed to upload a certificate for the domain.


Generate a Certificate Signing Request

The Expressway can generate domain CSRs. This removes the need to use an external mechanism to generate and obtain certificate requests.

To generate a CSR:

Procedure

Step 1

Go to Maintenance > Security certificates > Domain certificates.

Step 2

Click the domain for which you want to generate a CSR.

Step 3

Click Generate CSR to go to the Generate CSR page.

Step 4

Enter the required properties for the certificate. See Domain Certificates and Clustered Systems if your Expressway is part of a cluster.

Step 5

Click Generate CSR. The system produces a signing request and an associated private key. The private key is stored securely on the Expressway and cannot be viewed or downloaded. Never disclose your private key, not even to the certificate authority.

Step 6

You return to the Domain certificate page. From here you can:

  • Download the request to your local file system so that it can be sent to a certificate authority. You are prompted to save the file (the exact wording depends on your browser).

  • View the current request. Click Show (decoded) to view it in a human-readable form, or click Show (PEM file) to view the file in its raw format.


Note

  • Only one signing request can be in progress at any one time. This is because the Expressway tracks the private key file associated with the current request. To discard the current request and start a new request, click Discard CSR.

  • The user interface provides an option to set the digest algorithm. The default is set to SHA-256, with options to change it to SHA-384 or SHA-512.

  • The user interface provides an option to set the key length. Expressway supports a key length of 1024, 2048 and 4096.


Upload a New Domain Certificate

When the signed domain certificate is received back from the certificate authority, it must be uploaded to the Expressway. Use the Upload new certificate section to replace the current domain certificate with a new certificate.

To upload a domain certificate:

Procedure

Step 1

Go to Maintenance > Security certificates > Domain certificates.

Step 2

Click Browse in the Upload new certificate section to select and upload the domain certificate PEM file.

Step 3

If you used an external system to generate the CSR, you must also upload the server private key PEM file that was used to encrypt the domain certificate. (The private key file will have been automatically generated and stored earlier if the Expressway was used to produce the CSR for this domain certificate.)

  • The server private key PEM file must not be password protected.

  • You cannot upload a server private key if a certificate signing request is in progress.

Step 4

Click Upload domain certificate data.


Endpoint Service Discovery with Domain Certificates

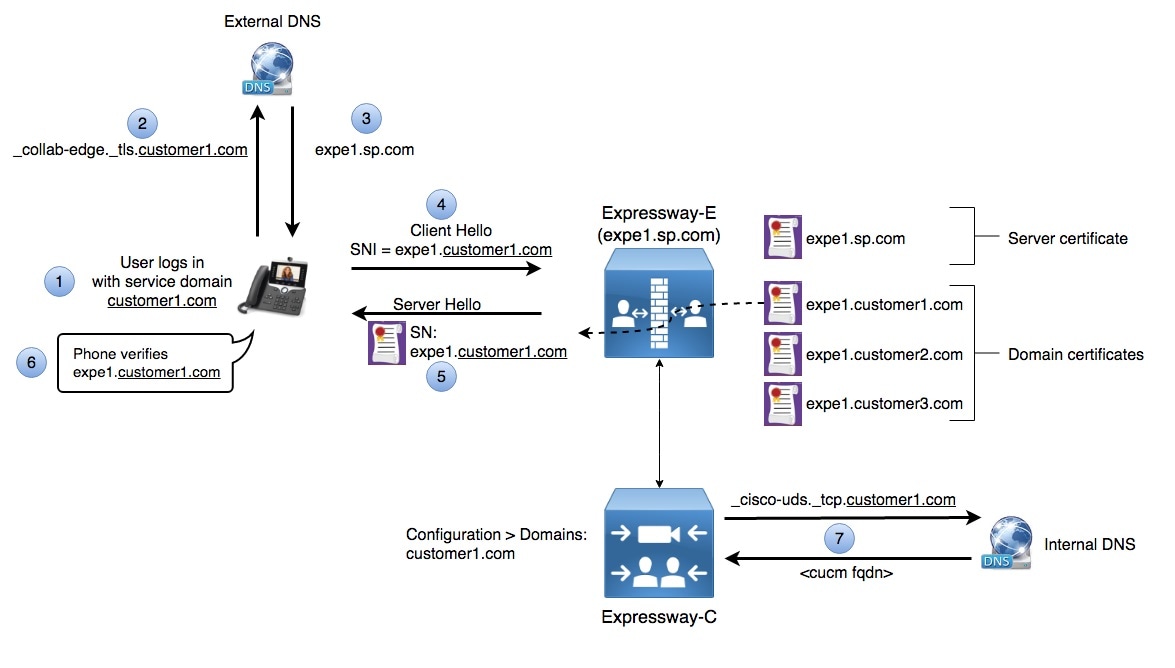
The way an SNI-capable endpoint operates when using SNI to discover MRA services is as follows. The endpoint attempts to locate the Expressway-E by initiating a DNS SRV lookup to _collab-edge._tls.<service_domain>, using the service domain the user entered. For Jabber, this is the domain portion of their userid. On a 88XX IP phone, the user enters it manually through the phone welcome screen where it prompts to "Enter activation code or service domain." For example, if a Jabber user enters user1@customer1.com, the service domain is customer1.com and SRV query is for _collab-edge._tls.customer1.com. Likewise, if an 88XX user enters "customer1.com" in the service domain prompt, the service domain is customer1.com and the SRV query is _collab-edge._tls.cutomer1.com. The DNS server returns one or more A-records to the request. The endpoint then compares the root domain of the A-record with the root domain of the service domain. If they match, the DNS A-record FQDN is used to set the SNI option. For example, if mra-e1.customer1.com is returned in DNS SRV lookup, then this FQDN is used for the SNI server hostname in the TLS ClientHello request. If the domains do not match, the endpoint constructs an FQDN for the SNI option, by combining the host portion of the A-record with the service domain. For example, if the A-record is expe1.sp.com (sp.com is the service provider's domain, which is different from service domain "customer1.com"), the endpoint sends set expe1.customer1.com in the SNI field of the TLS ClientHello while addressing the message to expe1.sp.com. The Expressway-E returns the matching certificate specifically for the SNI hostname and the endpoint verifies that the subject name in the certificate matches the FQDN sent in the SNI field, in this case "expe1.customer1.com." Once the TLS connection is open, the endpoint continues the service discovery process as before.

The following call flow illustrates how an SNI-capable IP Phone endpoint sets the SNI option during the TLS handshake:

  1. On the MRA client being registered, the user enters bob@example.com where example.com is the user’s service domain (customer domain).

  2. The client does a DNS resolution.

    1. It sends a DNS SRV request for _collab-edge._tls.example.com.

    2. The DNS replies to the request:

      • In a single-tenant setup: the DNS reply usually includes the hostname within the service domain (for example, mra-host.example.com).

      • In a multitenant setup: DNS may instead return the service provider’s MRA hostname in the service provider’s domain, which is different from the user’s service domain (for example, mra-host.sp.com).

  3. The client sets up SSL connection.

    1. The client sends SSL ClientHello request with an SNI extension:

      • If the DNS-returned hostname has the same domain as the user’s service domain, the DNS hostname is used in SNI server_name (unchanged).

      • Otherwise, in the case of a domain mismatch, the client sets the SNI server_name to the DNS hostname plus the service domain (for example instead of the DNS-returned mra-host.sp.com it changes to mra-host.example.com).

    2. The Cisco Expressway-E searches its certificate store to find a certificate matching the SNI hostname.

      • If a match is found, the Cisco Expressway-E will send back the certificate (SAN/dnsName=SNI hostname)

      • Otherwise, MRA will return its platform certificate.

    3. The client validates the server certificate.

      • If the certificate is verified, SSL setup continues and SSL setup finishes successfully.

      • Otherwise, a certificate error occurs.

  4. Application data starts. For SIP and HTTPS, the application starts SSL negotiation immediately. For XMPP, the SSL connection starts once the client receives XMPP StartTLS.

Figure 2. Service Discovery Using SNI

The following table summarizes the configuration requirements:

Step

Component

Item

Key

Value

Notes

1

Endpoint

Service domain

User's native domain (for example, customer1.com, customer2.com, ...)

The endpoint gets the service domain (for example, customer1.com) during user sign-in. The endpoint uses the service domain to query the DNS _collab-edge.tls.customer1.com SRV record.

2

External DNS

SRV record

_collab-edge._tls.customer1.com

expe1.customer1.com, expe2.customer1.com

or

expe1.sp.com, expe2.sp.com...

The domain of the customer is used in the SRV record key (for example, _collab-edge._tls.customer1.com). The record contains the hostname of each Expressway-E node in the cluster for loadsharing. One SRV record entry is required per customer domain sharing the Expressway-E.

The client sets the SNI depending on the domain portion of DNS replied A-record:

  • if the domain matches the service domain, the FQDN of A-record is used for SNI

  • if the domain does not match the service domain, then FQDN for SNI is constructed using host portion of DNS A-record and service domain.

3

External DNS

A record

expe1.sp.com

expe2.sp.com

...

<ip addr of expressway-e>

The Expressway-E hostname. One A record is required per Expressway-E node (up to 6 per cluster).

4, 5

Expressway-E

Domain cert

Subject Alternate Name (SAN) or Common Name (CN) if SAN is absent

expe1.customer1.com

A valid certificate must be installed for each customer sharing the Expressway-E. The subject name of the certificate must match the value sent in the SNI field (for example expe1.customer1.com).

7

Internal DNS

SRV record

_cisco-uds._tcp.customer1.com

<fqdn of cucm>

The customer's internal DNS (or the DNS that the service provider uses for the customer in the data center) must have an SRV record for the Unified CM that uses the same service domain that the user entered in the phone. So if the user entered customer1.com as the service domain, an SRV record of _cisco-uds._tcp.customer1.com is added to the internal DNS and resolves to the Unified CM FQDN.

Expressway-C Domains Customer domain (for example, customer1.com) Each Expressway-C cluster must have the customer domain associated with that customer configured in the Configuration > Domains page. This domain must match the domain used in step 1.

Note

SNI is only required for MRA, not Hybrid or Business to Business capabilities.


Software versions for endpoints that support MRA may not be updated with SNI support concurrently, so there is a need to support noncompliant versions temporarily. Also, using SNI requires domain-specific certificates for each customer, and each Expressway-E node requires unique certificates for each domain. Managing and signing those certificates can be expensive. There are alternatives for each type of MRA-capable endpoint, each of which has some drawback. The following sections discuss strategies for using these endpoints without domain certificates in a multitenant Expressway environment.

88xx Service Discovery without Domain Certificates

To deploy 88xx phones in a multitenant Expressway environment without using domain-specific certificates, the user enters a service provider-specified subdomain value on the phone's welcome screen prompt. This technique works for 88xx phones with and without the SNI enhancement described in the previous section. The advantage to this approach is that the service provider does not need to manage per-domain certificates. The disadvantage is that the user must be instructed to enter a domain value other than their normal enterprise domain.

This approach requires the users of each customer to use a customer-specific subdomain of the service provider domain. For example, if the service provider domain is sp.com, then end users of customer 1 use c1.sp.com. End users of customer 2 would use c2.sp.com, and so forth. This subdomain approach is required so that the shared Expressway-E can route the service discovery messages to the correct Expressway-C cluster. The root domain of these subdomains (for example, sp.com) must match the root domain of the A-record returned in the SRV lookup. For example, if the SRV record is _collab-edge._tls.c1.sp.com, the A-record contains sp.com as the root domain (for example, expe1.sp.com).

The sign-in sequence and configuration requirements for this option are the same as for Jabber Option 1 below. Refer to the Jabber Option 1 section for details on the configuration requirements. The terminology is slightly different: for 88xx, the service domain is used for SRV record lookup and service discovery in Expressway; for Jabber, the voice service domain is used for SRV record lookup and service discovery. Other than that, the flow and configuration are the same.


Note

To simplify the sign-in procedure for end users using endpoints with a camera (e.g. 8865), a QR code can be emailed to the user to be scanned in the welcome screen. Refer to the "Generate a QR Code for MRA Sign-In" section of the Cisco IP Phone 8800 Series Administration Guide for Cisco Unified Communications Manager.


Jabber Service Discovery without Domain Certificates

To deploy Jabber endpoints in a multitenant Expressway environment without using domain-specific certificates, there are two options:

  • With voice services domain

  • Without voice services domain

The "voice services domain" is a client configuration that can be applied during installation and is not visible to the user.

Refer to tech note Configure Mobile and Remote Access through Expressway/VCS in a Multi-Domain Deployment for an explanation of how domains are used by Jabber at various points in the deployment.

Option 1: With Voice Services Domain

In the first option, Jabber can be configured with a special domain called a voice services domain that is used for the initial Expressway-E connection. The voice services domain is an existing capability that Cisco Jabber uses to retrieve the DNS SRV records. It can be different from the sign-in domain that is used for user authentication and presence. The advantage of the voice service domain is in the DNS configuration. By using a voice service domain owned by the service provider, only the service provider's external DNS must be updated with the _collab-edge SRV record. Without the voice services domain, the customer domain is used for the SRV lookup. Thus each customer external DNS must be updated to include the _collab-edge SRV record.

The voice services domain requires some initial configuration on each Jabber client as documented in the Jabber guides. Refer to the Service Discovery chapter of the Jabber Planning Guide for a comprehensive discussion of the voice services domain. For this application, the voice services domain must be configured with a subdomain of the service provider domain. For example, if the service provider domain is sp.com, the voice services domain is a subdomain of sp.com (for example, c1.sp.com). A subdomain of the service provider domain is required because the Expressway-E routes service discovery messages to Expressway-C clusters based on this domain. Thus, the domain must be unique for each Expressway-C cluster to allow the Expressway-E to find the correct Expressway-C cluster for each customer. The following table shows example domain assignments and SRV records for a service provider domain, sp.com, and 5 customers sharing a 2 node Expressway-E cluster.

Customer Domain

Voice Services Domain

External DNS SRV Record

External SRV Record Response

Internal DNS SRV Record

Internal DNS SRV Record Response

customer1.com

c1.sp.com

_collab-edge._tls.c1.sp.com

expe1.sp.com

expe2.sp.com

_cisco-uds._tcp.c1.sp.com

cust1-cucm.sp.com

customer2.com

c2.sp.com

_collab-edge._tls.c2.sp.com

expe1.sp.com

expe2.sp.com

_cisco-uds._tcp.c2.sp.com

cust2-cucm.sp.com

customer3.com

c3.sp.com

_collab-edge._tls.c3.sp.com

expe1.sp.com

expe2.sp.com

_cisco-uds._tcp.c3.sp.com

cust3-cucm.sp.com

customer4.com

c4.sp.com

_collab-edge._tls.c4.sp.com

expe1.sp.com

expe2.sp.com

_cisco-uds._tcp.c4.sp.com

cust4-cucm.sp.com

customer5.com

c5.sp.com

_collab-edge._tls.c5.sp.com

expe1.sp.com

expe2.sp.com

_cisco-uds._tcp.c5.sp.com

cust5-cucm.sp.com

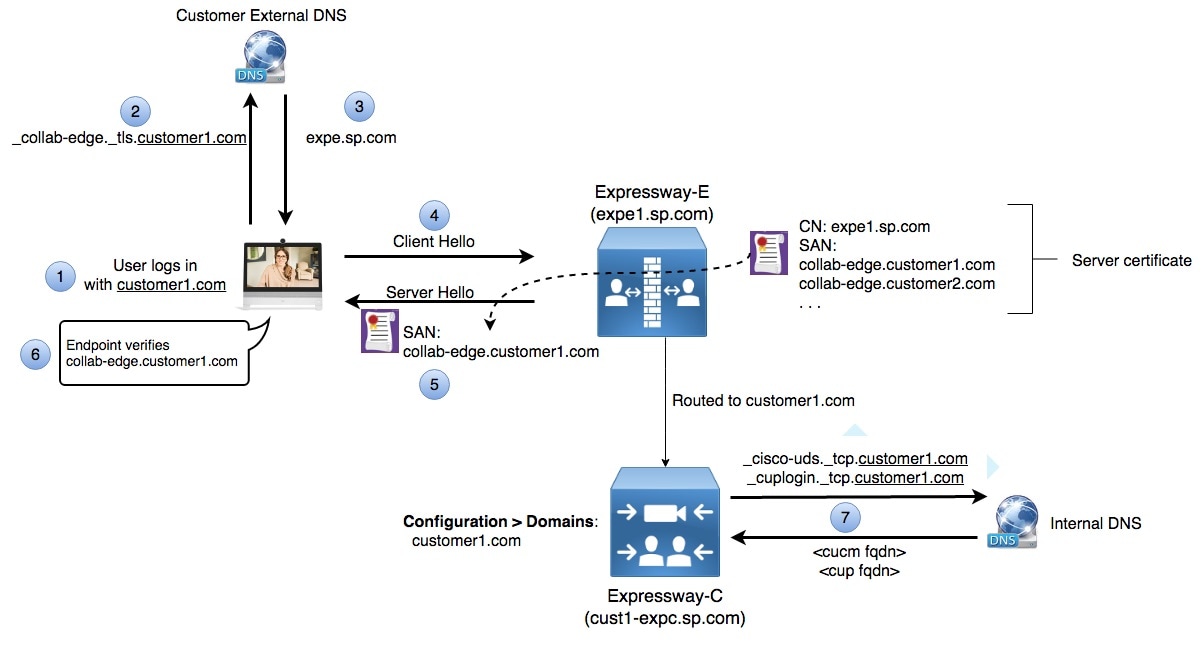
Both the customer domain and the voice services domain must be configured on the Expressway-C (Configuration > Domains). Based on the example domains above, the following diagram shows the sign-in sequence for a Customer 1 user:

Figure 3. Service Discovery Using Subdomains

The following table summarizes the configuration requirements for Jabber endpoints:

Step

Component

Item

Key

Value

Notes

1

Jabber

jabber-config.xml

VoiceServicesDomain

The domain of the Expressway-E (for example, c1.sp.com)

This can be configured in the jabber-config-user.xml file on the client (for example Windows PC), or in the jabber-config.xml on Unified CM. If configured on Unified CM, the user must initially sign in to Jabber in the network so the configuration file can be downloaded to the client. Refer to Service Discovery chapter of the Jabber Planning Guide for details on the Jabber configuration options.

2

Jabber

Login

The user's Jabber ID (for example, user1@customer1.com)

The user logs in with their Jabber ID which is their <username>@<service domain>. This ID is used to register with the IM&P presence engine or to connect to Webex.

3

External DNS

SRV record

_collab-edge._tls.c1.sp.com

expe1.sp.com, expe2.sp.com

The customer's Voice Services Domain (configured in step 1) must have an SRV record in the service provider's external DNS. These SRV records all point to the same set of shared Expressway-E nodes. All Expressway-E nodes in the cluster are listed in each SRV record for load balancing.

Although only one example record is shown here, all voice services domains assigned to customers must have an SRV record (for example, _collab-edge._tls.c2.sp.com, _collab-edge._tls.c3.sp.com, etc.). The content of each record is the same list of Expressway-E nodes.

6

Expressway-E

Server certificate

Subject name

expe1.sp.com

This is the normal Server certificate containing the hostname of the node as the Subject Name. Each node in the Expressway-E cluster requires a server certificate to be generated and signed with the subject name matching the hostname of the server.

8

Internal DNS

SRV record

_cisco-uds._tcp.c1.sp.com

<fqdn of cucm>

The internal DNS for the customer must be set up to resolve the SRV records for Unified CM using the same voice services domain configured in step 1.

8

Internal DNS

SRV record

_cuplogin._tcp.c1.sp.com

<fqdn of cup>

The internal DNS for the customer must be set up to resolve the SRV record for IM&P (CUP) using the same voice services domain configured in step 1.

Expressway-C

Domains

c1.sp.com

customer1.com

The Expressway-C cluster must be configured with both the voice services domain configured in step 1 (for example, c1.sp.com), and the customer domain used in step 2 (for example, customer1.com). These domains are configured in the Configuration > Domains page. This ensures that the Expressway-E can route the service discovery messages to the correct Expressway-C cluster.

Option 2: Without Voice Services Domain

The second option for configuring Jabber in a multitenant Expressway environment is without the voice services domain client configuration. For service discovery in this option, Jabber uses the customer domain the user entered during sign-in. This option is the same as for DX70/80 described as follows.

Comparison of Jabber Options

There are pros and cons of each option and the optimal choice depends on the details of the overall HCS deployment. These points may help evaluate each option.

Option 1: With Voice Services Domain

Option 2: Without Voice Services Domain

Usability

Each Jabber client must be configured with the voice services domain. There are several ways to do this as documented in the Service Discovery chapter of the Jabber Planning Guide.

No special setup of Jabber.

Certificate requirements

The Expressway-E server certificate is used. Jabber verifies the hostname returned in the SRV record response matches the hostname in the certificate.

The Expressway-E server certificate is used. Jabber verifies the hostname returned in the SRV record response matches the hostname in the certificate.

External DNS dependencies

A DNS SRV record is required for each customer in the service provider external DNS.

A DNS SRV record is required in each customer external DNS.

Internal DNS dependencies

The voice service domain is used in the per-customer internal DNS server for the Unified CM and CUP SRV records.

The customer domain is used in the per-customer internal DNS server for the Unified CM and CUP SRV records.

SSO

SSO is not supported

SSO is supported

DX70/80 Service Discovery without Domain Certificates

For DX70/80 software versions that do not support SNI (and for Jabber option #2), the approach is to configure a _collab-edge SRV record for each customer domain. The following table shows example domain assignments and SRV records for a service provider domain, sp.com, and 5 customers sharing a 2 node Expressway-E cluster.

Customer Domain

External DNS SRV Record

External SRV Record Response

Internal DNS SRV Record

Internal DNS SRV Record Response

customer1.com

_collab-edge._tls.customer1.com

expe1.sp.com

expe2.sp.com

_cisco-uds._tcp.customer1.com

cust1-cucm.sp.com

customer2.com

_collab-edge._tls.customer2.com

expe1.sp.com

expe2.sp.com

_cisco-uds._tcp.customer2.com

cust2-cucm.sp.com

customer3.com

_collab-edge._tls.customer3.com

expe1.sp.com

expe2.sp.com

_cisco-uds._tcp.customer3.com

cust3-cucm.sp.com

customer4.com

_collab-edge._tls.customer4.com

expe1.sp.com

expe2.sp.com

_cisco-uds._tcp.customer4.com

cust4-cucm.sp.com

customer5.com

_collab-edge._tls.customer5.com

expe1.sp.com

expe2.sp.com

_cisco-uds._tcp.customer5.com

cust5-cucm.sp.com

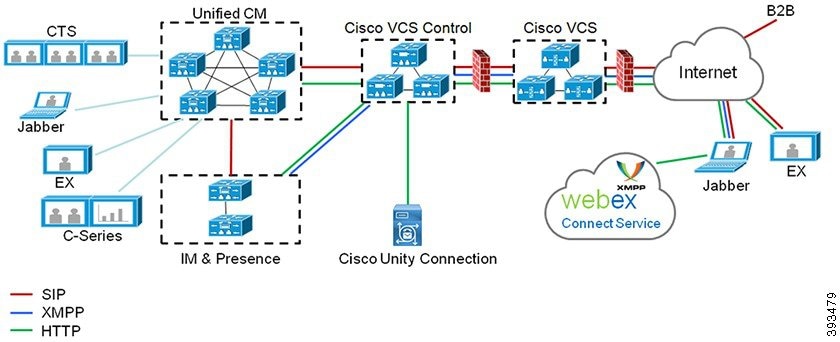
This is required because the DX70/80 cannot be configured to specify a domain different from the domain the user entered when signing in. Thus, the endpoint uses the user's native domain in the SRV lookup. The following diagram shows the sign-in sequence:

Figure 4. DX70/80 Endpoint Sign-in Sequence

The following table summarizes the configuration requirements for Jabber endpoints:

Step

Component

Item

Key

Value

Notes

1

DX70/80

User sign-in

The user logs in with the customer domain, userid, and password

The user logs in with their user ID (for example, user@customer1.com)

2

External DNS

SRV record

_collab-edge._tls.customer1.com

expe1.sp.com, expe2.sp.com, . . .

The customer domain is used in the SRV record, and one SRV record is required per customer domain sharing the Expressway-E. All Expressway-E nodes in the cluster are listed in the SRV record for load balancing.

5

Expressway-E

Server certificate

Subject Alternate Name (SAN)

collab-edge.customer1.com

This is the normal Server certificate containing the hostname of the node as the Subject Name. However, it also requires the domain name from each of the customers as Subject Alternate Names. Each node in the Expressway-E cluster requires a server certificate to be generated. It must be signed with the subject name matching the hostname of the server and the customer domains in the SAN.

6

DX70/80

Server certificate

Subject Alternate Name (SAN)

collab-edge.customer1.com

The DX70/80 verifies that the SAN of the certificate contains the domain the user entered. This can be either customer1.com or collab-edge.customer1.com. When generating the Expressway certificate signing request (CSR), selecting CollabEdgeDNS format for the SAN automatically prepends collab-edge to the customer domain.

7

Internal DNS

SRV record

_cisco-uds._tcp.customer1.com

<FQDN of Unified CM>

The customer's internal DNS (or the DNS that the service provider uses for the customer in the data center) must have an SRV record for the Unified CM that uses the same domain that the user entered in the endpoint. So if the user entered customer1.com, add an SRV record of _cisco-uds._tcp.customer1.com to the internal DNS and resolve to the Unified CM FQDN.

Expressway-C

Domains

Customer domain (for example, customer1.com)

Each Expressway-C cluster must have the customer domain associated with that customer configured in the Configuration > Domains page. This domain must match the domain used in step 1.

XMPP Federation Certificate Requirements

XMPP Federation in a multitenant Expressway environment is discussed in the XMPP Federation section of this document. On the Expressway-E Configuration > Unified Communications page, the Security mode can be configured with or without TLS. If configured without TLS, there are no certificate requirements. However, if federation is configured with TLS enabled, the Expressway-E server certificate must include each federated domain in the Subject Alternate Name field. By default when generating a certificate signing request (CSR), the Expressway-E includes all domains learned from all Expressway-C clusters that have XMPP Federation enabled. These prepopulated domains must be included in the CSR if TLS is enabled on the Unified Communications configuration page. Chat node aliases are also required in the Server certificate. Refer to the Mobile and Remote Access via Cisco Expressway Deployment Guide (X8.9.1) and Cisco Expressway Certificate Creation and Use Deployment Guide (X8.9) for more information.

Safeguarding Certificates

It is important to back up your certificates regularly to avoid the time and expense to generate new certificates. When using the CSR mechanism built into Expressway, the private key is stored within Expressway and never exported except during a backup operation. You can lose these private keys and their associated signed certificates if you perform the "factory-reset" or "systemreset.sh" operations, or if the Expressway is otherwise compromised. Without a backup, you must regenerate and re-sign all certificates on the Expressway.

Certificates are included in the normal system backup, so performing a regular system backup safeguards your certificates. The backup operation can be found in the menu at Maintenance > Backup and Restore.

SSO

Expressway currently supports SSO in single-tenant deployment. The configuration on a multitenancy setup is similar. Each customer can enable SSO for its users the same way as in single tenant deployment. Please follow the "Single Sign-On (SSO) Over the Collaboration Edge" chapter in the Mobile and Remote Access via Cisco Expressway Deployment Guide for SSO configuration on each customer or tenant.

The main concern in multitenant deployment is that the configuration on Expressway-E affects all customers it serves. For example, if an admin disables SSO on Expressway-E, then SSO is disabled for all tenants regardless of whether customers have SSO enabled on their Expressway-C. Therefore, it's important for admins to plan and configure SSO carefully. We recommend using the following SSO settings on Expressway-E (Configuration > Unified Communications > Configuration):

  • Locate Single Sign-on support:

    • select OFF if no SSO support is needed on any customers

    • select ON if SSO support is needed on one or more customers

  • if Single Sign-on support is set to ON, locate Check for Internal SSO Availability and select Yes (default setting). With this option, Expressway-E passes the client's SSO configuration request to the Expressway-C. Expressway-C then checks with its configuration and internal Unified CM nodes to determine if SSO is enabled for that client. This is best if there are mixed SSO configurations among customers.


Note

SSO is not supported for Jabber clients using the VoiceServicesDomain config option.


Activation Codes Overview

Activation codes make onboarding newly provisioned phones easy. An activation code is a single-use, 16-digit value that a user must enter on a phone while registering the phone. Activation codes provide a simple method for provisioning and onboarding phones without requiring an administrator to collect and input the MAC Address for each phone manually. This method is a simple alternative to autoregistration that you can use this method to provision a large number of phones, a single phone, or even to re-register existing phones.

You can also use Mobile and Remote Access-compliant devices to easily and securely register over Mobile and Remote Access using an activation code.

Activation Code Device Onboarding works in the following modes:

  • On premise

  • Mobile Remote Access

Activation codes provide the following benefits:

  • Onboarding using activation codes ensures that all newly provisioned phones or untrusted phones have their Manufacturing Installed Certificate (MIC) assessed and verified by Unified Communications Manager.


    Note

    Cisco Manufacturing Root certificates must be present in the CallManager-trust store to perform onboarding activity.


  • No need to manually enter actual MAC addresses. Administrators can use dummy MAC addresses and the phone updates the configuration automatically with the real MAC address during registration.

  • No need to deploy an IVR, such as TAPS, to convert phone names from BAT to SEP.

Phone users can obtain their activation codes via the Self-Care Portal, provided the Show Phones Ready to Activate enterprise parameter is set to True. Otherwise, administrators must provide the codes to phone users.


Note

When you provision with BAT MAC addresses, activation codes are tied to the phone model. BAT MAC is a reference to the device name that starts with 'BAT' and is followed by a random 12 hexidecimal digits that look like a MAC address. When saving a device configuration page with a blank MAC Address field, a random name with this format is created for you.You must enter an activation code that matches the phone model in order to activate the phone.

For added security, you can provision the phone with the actual MAC address of the phone. This option involves more configuration because the administrator must gather and input each phone's MAC address during provisioning, but provides greater security because users must enter the activation code that matches the actual MAC address on their phone.


Onboarding Process Flow in On-Premise Mode

Following is the process flow for onboarding new phones via activation codes :

  1. Administrator sets the configuration to require the user to enter an activation code for onboarding.

  2. Administrator provisions and configures the phone. If BAT MAC addresses are being used, the administrator does not enter the actual MAC address.

  3. Phone gets an IP address for TFTP via a DHCP opt 150, or from an alternate TFTP as configured in Phone settings. The phone downloads the XMLDefault file, and detects that an activation code is in use.

  4. The user enters the activation code on the phone.

  5. The Phone authenticates to Cisco Unified Communications Manager via the activation code and manufacturer-installed certificate.

  6. Cisco Unified Communications Manager updates the device configuration with the actual MAC address. The TFTP server sense the device configuration to the phone, allowing the phone to register. Note that device registration can be up to five minutes.


    Note

    It's recommended to add an additional subscriber to the default communication manager group for on-premise activation code onboarding. Else, when the node in the default communication manager group goes down, you may face onboarding issues.


Onboarding Process Flow in Mobile and Remote Access Mode

Following is the process flow for onboarding new phones via activation codes when you use the Mobile and Remote Access mode:

  1. Administrator configures Cloud/Hybrid communication to Enable Activation Code Onboarding with Cisco Cloud and specifies the Mobile and Remote Access Activation Domain.

  2. Administrator configures additional Mobile and Remote Access Service Domains, if required.

  3. Administrator creates a full-device configuration without specifying MAC address (BAT, AXL, GUI). The device name will be a random BAT MAC address.

  4. Administrator requests activation code for this device. Device Activation Service requests the code from the cloud-based device activation service.

  5. The user can get the code from the self-care portal or the administrator can send it to the user.

  6. The user powers up the phone and enters the activation code.

  7. Phone learns from the cloud the location of Expressway and authenticates to Mobile and Remote Access/Cisco Unified Communications Manager.

  8. Device activation service updates device configuration in the database with the phone's MAC address.

    The phone can now register and get its phone-specific configuration file from TFTP like normal Mobile and Remote Access, and register with Cisco Unified Communications Manager.

Activation Code Prerequisites

As of Release 12.5(1), the following Cisco IP Phone models support onboarding via activation codes: 7811, 7821, 7832, 7841, 7861, 8811, 8841, 8845, 8851, 8851NR, 8861, 8865, and 8865NR.

Release 12.5SR3 supports onboarding on the Cisco IP Phone models for both on-premise and MRA.

Additionally, Release 12.5(1)SU1 supports the following Cisco IP Phone models: 8832 and 8832NR

For cloud onboarding process, the following domain names should be resolved by the Cisco Unified Communications Manager:

  • fos-a.wbx2.com

  • idbroker.webex.com

  • push.webexconnect.com

  • btpush.webexconnect.com

Self Care Portal

If you plan to have your users use the Self Care Portal to onboard their phones, you need to set the portal up beforehand so that your users will have access. For details, go to "Self Care Portal" chapter of the Feature Configuration Guide for Cisco Unified Communications Manager.

Device Onboarding with Activation Codes Task Flow in On-Premise Mode

Complete these tasks to onboard new phones using activation codes.

Procedure

  Command or Action Purpose
Step 1

Activate the Device Activation Service

The Cisco Device Activation Service must be running in Cisco Unified Serviceability.

Step 2

Set Registration Method to use Activation Codes

Under Device Defaults, set the default registration method to use Activation Codes for supported phone models.

Step 3

Provision phones with activation code requirement. Following are two provisioning example options:

Cisco Unified Communications Manager has a variety of provisioning methods, including the options on the left. Whichever method you choose, make sure the Requires Activation Code for Onboarding check box is checked within that phone's Phone Configuration.

Step 4

Activate Phones

Distribute activation codes to users. Users must enter the code on the phone in order to use the phone.

Activate the Device Activation Service

To use activation codes, the Cisco Device Activation Service must be running in Cisco Unified Serviceability. Use this procedure to confirm the service is running.

Procedure


Step 1

From Cisco Unified Serviceability, choose Tools > Service Activation.

Step 2

From the Server drop-down, choose the Unified Communications Manager publisher node and click Go.

Step 3

Under CM Services, confirm that the Status of the Cisco Device Activation Service says Activated.

Step 4

If the service is not running, check the adjacent check box and click Save.


What to do next

Set Registration Method to use Activation Codes

Set Registration Method to use Activation Codes

Use this procedure to configure the system defaults so that phones of a specific model type will use activation codes to register with .


Note

This procedure applies for the onboarding of on-premise endpoints only. The Onboarding Method setting under Device Defaults does not apply for onboarding of Mobile and Remote Access endpoints using activation codes.

Procedure


Step 1

From Cisco Unified CM Administration, choose Device > Device Settings > Device Defaults.

Step 2

In the Device Defaults Configuration window, select the device type that will use activation codes for registration in the Dual Bank Information section, and change On-Premise Onboarding Method from Auto Registration to Activation Code.

Step 3

Click Save.

Note 

When device default is set to Activation Code, and if Auto Registration is earlier used for phone types, subsequent addition of new phones should follow Activation Code Onboarding or Manual Configuration of Phone (Using MAC address) and Registration.

For more information, see Add Phone with Activation Code Requirement and Add Phones with Activation Codes via Bulk Administration section to provision new phones.


Add Phone with Activation Code Requirement

Use this procedure if you want to provision a new phone with an activation code requirement.

Before you begin

Configure Universal Device and Line Templates with the settings that you want to apply as it makes the provisioning process faster.

Note

If you choose not to use templates, you can add a new phone and configure settings manually, or add settings via a BAT Template. In each case, the Requires Activation Code for Onboarding check box must be checked in the Phone Configuration window.

Procedure


Step 1

From Cisco Unified CM Administration, choose Device > Phone.

Step 2

Click Add New From Template to add settings from a universal line or device template.

Step 3

From the Phone Type drop-down menu, select the phone model.

Step 4

In the MAC Address field, enter a MAC address. With activation codes, you can use a dummy MAC address or the phone's actual MAC address.

You can modify the MAC address of a phone in the following scenarios:

  • BAT{mac}->SEP{mac}: You should know the exact device name for prefix to change from ?BAT? to ?SEP? upon Save.

  • SEP{mac}->BAT{mac}: You can blank out the MAC address for prefix to change from ?SEP? to ?BAT? and a new device name with a prefix of ?BAT?.

If Activation Code is enabled, the MAC Address field can be left blank. It is auto-populated with a dummy MAC address.

Step 5

From the Device Template drop-down, select a template such as an existing Universal Device Template with the settings ou want to apply.

Step 6

From the Directory Number field, select an existing directory number, or click New and do the following:

  1. In the Add New Extension popup, enter a new directory number and a Line Template that contains the settings you want to apply.

  2. Click Save and then click Close.

    The new extension appears in the Directory Number field.
Step 7

Optional. From the User field, select the User ID that you want to apply to this phone.

Step 8

Click Add.

Step 9

Check the Requires Activation Code for Onboarding check box. In case of Mobile and Remote Access mode, check the Allow Activation Code via Mobile and Remote Access check box.

Step 10

Configure any other settings that you want to apply. Refer to the online help for help with the fields and their settings.

Step 11

Click Save, and then click OK.

The Phone Configuration generates the new activation code. Click View Activation Code if you want to view the code.

What to do next

Activate Phones

Add Phones with Activation Codes via Bulk Administration

This optional task flow contains a provisioning example using Bulk Administration Tool's Insert Phones feature to provision a large number of phones in a single operation. These phones will use activation codes for registration.

Procedure

  Command or Action Purpose
Step 1

Configure BAT Provisioning Template

Configure a BAT Template that contains the settings that you want to apply to provisioned phones.

Step 2

Create CSV File with New Phones

Create a CSV file that contains the new phones that you want to add.

Step 3

Insert Phones

Use Bulk Administrations's Insert Phones function to add the new phones to the database.

Configure BAT Provisioning Template

Use this procedure to create a phone template with common settings that you can apply via Bulk Administration to newly provisioned phones of a specific phone model.
Before you begin
This procedure assumes that your users are already deployed on the system and that you have already set up device pools, SIP profiles, and phone security profiles that meet your needs.
Procedure

Step 1

From Cisco Unified CM Administration, choose Bulk Administration > Phones > Phone Template.

Step 2

Click Add New.

Step 3

From the Phone Type drop-down, select the phone model for which you want to create a template.

Step 4

Enter a Template Name.

Step 5

Check the Require Activation Code for Onboarding check box. In case of Mobile and Remote Access mode, check the Allow Activation Code via Mobile and Remote Access check box.

Step 6

Configure values for the following mandatory fields:

  • Device Pool
  • Phone Button Template
  • Owner User ID
  • Device Security Profile
  • SIP Profile
Step 7

Complete any remaining fields in the Phone Template Configuration window. For help with the fields and their settings, refer to the online help.

Step 8

Click Save.


What to do next
Create CSV File with New Phones

Create CSV File with New Phones

Use this procedure to create a new csv file with your new phones.

Note

You can also create your csv file manually.
Procedure

Step 1

From Cisco Unified CM Administration, choose Bulk Administration > Upload/Download Files.

Step 2

Click Find.

Step 3

Select and download the bat.xlt spreadsheet.

Step 4

Open the spreadsheet and go to the Phones tab.

Step 5

Add your new phone details to the spreadsheet. If you are using dummy MAC addresses, leave the MAC Address field empty. Check the Require Activation Code for Onboarding check box. In case of Mobile and Remote Access mode, check the Allow Activation Code via Mobile and Remote Access check box.

Step 6

When you are done, click Export to BAT Format.

Step 7

From Cisco Unified CM Administration, choose Bulk Administration > Upload/Download Files.

Step 8

Upload the csv file.

  1. Click Add New.

  2. Click Choose File and select the csv file for uploading.

  3. Select Phones as the target.

  4. Select Insert Phones - Specific Details for the transaction type.

  5. Click Save.


What to do next
Insert Phones

Insert Phones

Use this procedure to insert new phones from a csv file.
Procedure

Step 1

Select Bulk Administration > Phones > Insert Phones.

Step 2

From the File Name drop-down, select your csv file.

Step 3

From the Phone Template Name drop-down, select the provisioning template that you created.

Step 4

Check the Create Dummy MAC Address check box.

Note 
For added security, you can add actual MAC addresses to the csv file such that the activation code works only for the phone with the matching MAC address. In this instance, leave this check box unchecked.
Step 5

Check the Run Immediately check box to run the job right away. If you choose to run the job later, you must schedule the job in the Bulk Administration Tool’s Job Scheduler.

Step 6

Click Submit.


What to do next
Activate Phones

Activate Phones

After provisioning, distribute activation codes to your phone users so that they can activate their phones. Following are two options for gathering and distributing activation codes:

  • Self-Care Portal—Phone users can log in to the Self-Care Portal in order obtain the activation code that applies to their phone. They can either input the code on the phone manually, or use their phone's video camera to scan the barcode that displays in Self-Care. Either method will work. To use Self-Care to activate the phone, the Show Phones Ready to Activate enterprise parameter must be set to True in Cisco Unified Communications Manager (this is the default setting).


    Note

    For additional requirements on how to configure user access for the Self-Care portal, see the "Self-Care Portal" chapter of the Feature Configuration Guide for Cisco Unified Communications Manager.
  • CSV File—You can also export the list of outstanding users and activation codes to a csv file, which you can then distribute to your users. For a procedure, see Export Activation Codes.

Registration Process

Phone users must enter the activation code on their phone in order to use their phones. After a phone user enters the correct activation code on the phone, the following occurs:

  • Their phone authenticates with Cisco Unified Communications Manager.

  • The phone configuration in Cisco Unified Communications Manager updates with the actual MAC address of the phone.

  • The phone downloads the configuration file and any other relevant files from the TFTP server and registers with Cisco Unified Communications Manager.

What to do Next

The phone is now ready to use.

Export Activation Codes

Use this procedure to export a csv file of activation codes along with their corresponding phones and users. You can use this file to distribute activation codes to your users.
Procedure

Step 1

From Cisco Unified CM Administration, choose Device > Phone.

Step 2

From Related Links, select Export Activation Codes and click Go.


Device Onboarding Task Flow (Mobile and Remote Access Mode)

Complete these tasks to onboard new phones using activation codes, in Mobile and Remote Access mode.

Before you begin

The Cisco Device Activation Service must be running in Cisco Unified Serviceability (the service is running by default). To verify that the service is running, go to Activate the Device Activation Service.

Procedure

  Command or Action Purpose
Step 1

Enable Cisco Cloud Onboarding via Mobile and Remote Access

Under Cloud Onboarding, generate voucher, enable Activation Code Onboarding and specify the Mobile and Remote Access activation domain.

Step 2

Mobile and Remote Access Service Domain Configuration (Optional)

Onboard the cluster to the cloud to allow remote Mobile and Remote Access device onboarding to a specific Mobile and Remote Access Activation Domain.

Step 3

Upload Custom Certificate (Optional)

Optional. If you want to use your own custom certificates, remote Mobile and Remote Access endpoints will be able to download them from the cloud and use them to connect to Expressway.

Step 4

Provision phones with activation code requirement. Following are two provisioning sample options:

You must provision the phone in the Unified CM database. Unified CM has a variety of provisioning methods that you can use, including these sample options.

Step 5

Activate Phones

Distribute activation codes to users. Users must enter the code on the phone in order to use the phone.

Enable Cisco Cloud Onboarding via Mobile and Remote Access

Procedure


Step 1

To authorize the cluster (CCMAct service) to connect to the cloud-based device activation service, generate the voucher by clicking the Generate Voucher button.

Step 2

Specify an Mobile and Remote Access Activation Domain. (This is copied to the Mobile and Remote Access Service Domain list automatically.)

Step 3

Enable activation code onboarding by checking the 'Enable the Activation Code Onboarding' and 'Allow Mobile and Remote Access Onboarding' checkboxes. If you configured device defaults onboarding using 'Auto Registration', then the 'Allow Mobile and Remote Access Onboarding' checkbox is disabled and automatically checked as it can only work for phones in Mobile and Remote Access mode. If you configured device defaults onboarding using 'Activate Code', then both the check boxes are available.

Step 4

Click Save.


Mobile and Remote Access Service Domain Configuration (Optional)

To configure Mobile and Remote Access Service Domain for your phone, use the following procedure:

Procedure


Step 1

Choose Advanced Features > Mobile and Remote Access Service Domain to access the Mobile and Remote Access Service Domain window.

Step 2

Enter the Mobile and Remote Access Service Domain name.

Step 3

Enter the SRV record for the Expressway-E that is used for activation.

Step 4

Choose the default Mobile and Remote Access Service Domain by checking the Default check box next to the selected domain. This is the domain that is used when you choose '< None >' at the device pool level.

Step 5

Access the Dependency Records using the link on the row of that record that also lists the number of dependencies.


Upload Custom Certificate (Optional)

To upload custom certificates, use the following procedure:

Procedure


Step 1

Upload the certificates to the Expressway. Do not remove any other certificates.

Step 2

Upload the new certificates to Unified Communications Manager using the path CUCM OS Administration> Certificate Management . Use the “Phone-Edge-trust” type. (Cisco Unified Communication manager sends these to the cloud and then to the phone to access the Expressway.)

Step 3

Remove any other “Phone-Edge-trust” type certificates, as desired, so that the custom certificates are the only ones in use.


Additional Tasks for Activation Code

The following table lists additional tasks that you may need for activation codes.

Task

Procedure

Generate activation codes for registered phones

If you want to generate an activation code for an already-registered phone:

  1. From Cisco Unified CM Administration, choose Device > Phone.

  2. Search for and open the Phone Configuation for the phone for which you want to generate an activation code.

  3. Check the Requires Activation Code for Onboarding check box and click Save.

Regenerate activation codes for unregistered phones

To generate a new activation code for an unregistered phone, such as may be required if the activation process for a new phone fails, do the following:

  1. From Cisco Unified CM Administration, choose Device > Phone.

  2. Search for and open the Phone Configuation for the phone for which you want to generate an activation code.

  3. Click Release Activation Code

  4. Click Generate New Activation Code and click Save.

Set Optional Activation Code Parameters

If you want to configure optional service parameters for activation codes.

  1. From Cisco Unified CM Administration, choose System > Service Parameters.

  2. From the Server drop-down, select the publisher node.

  3. From the Service drop-down, select Cisco Device Activation Service.

  4. Configure a value for the following optional service parameters. For help with the settings, refer to the context-sensitive help

    • Activation Time to Live (Hours)—The number of hours that an activation code remains active. The default is 168

    • Enable Mobile and Remote Access Activation—Set this to True (the default setting) to enable Mobile and Remote Access activation.

    • Mobile and Remote Access Activation Domain—The domain where Mobile and Remote Access device activation takes place.

  5. Click Save.

Activation Code Use Cases

The following table highlights sample use cases with device onboarding via activation codes.

Use Case

Description

Replace an existing phone

Activation codes make it easy to replace existing phones. For example, let’s say that a remote worker needs a new phone as their phone is damaged.

  • The administrator opens the Phone Configuration settings for the damaged phone in Unified Communications Manager.

  • The administrator blanks out the MAC Address, checks the Requires Activation Code for Onboarding check box, and clicks Save.

  • The user acquires a new phone of the same phone model, and plugs their phone into the network.

  • The user logs in to Self-Care to get their activation code, and inputs the code on the phone. The phone onboards successfully.

Note 
In this scenario, the user can onboard any new phone so long as it is the same phone model as the damaged phone. In a more secure environment, the administrator may need to provision a replacement phone to replace the old phone (see below).

Secure shipping of new phone with activation codes

In a more secure environment where you can ensure that phone shipping process is secure by ting the activation code to a specific MAC address as follows:

  • The administrator provisions a new phone in Unified Communications Manager.

  • In the Phone Configuration settings for the new phone, the administrator enters the phone’s actual MAC Address and checks the Requires Activation Code for Onboarding check box.

  • The administrator packages the phone and ships the phone to the user.

  • The user plugs the new phone into the network.

  • The user logs in to Self-Care to get the activation code, enters the code on the phone. The phone onboards successfully.

Note 
In this scenario, the user can onboard only that specific phone.

Secure shipping of new phone (autoregistration)

As an alternative to activation codes, you can also use autoregistration and TAPS to securely ship phones to a remote worker:

  • In the Device Defaults Configuration, the administrator makes sure that the Onboarding Method for the phone model is Autoregistration.

  • The administrator provisions a new phone in Unified Communications Manager. In the Phone Configuration for the new phone, the administrator blanks out the phone’s actual MAC Address.

  • The administrator packages the phone and ships the phone to the user.

  • The user plugs the new phone into the network, and lets it autoregister.

  • The user uses TAPS to map the autoregistered record back to the old record.

Note 

This scenario requires you to configure both autoregistration and TAPS.

Re-onboarding phones via autoregistration

You can switch onboarding methods for specific phone models between Activation Codes and Autoregistration via the On-Premise Onboarding Method field in the Device Defaults Configuration window.

Note 
If you want to re-onboard an existing phone via autoregistration, you must delete the existing record from the database for autoregistration to work.

Onboarding On-Premise phones for Use in Mobile and Remote Access mode

You can onboard the phones on-premise, and then mark the phone for onboarding again in Mobile and Remote Access mode to leverage the security provided by OAuth connection to Expressway and trusted connection from Expressway to Cisco Unified Communications Manager.

In this scenario, with 'Allow Activation Code via Mobile and Remote Access' enabled, the phone onboards on-premise, validates the OAuth access token that it received, and switches to Mobile and Remote Access mode and initiates communication with the Expressway. If your internal network does not allow communication with the Expressway from on-premise, the phone does not register, but is ready to contact the Expressway when it is powered up off-premise.

Note 

The off-premise phones that are unregistered cannot update their firmware load.This scenario is useful with out-of-the-box phones that need to be on premise to download the latest firmware and use the Activation Code feature.

The phone switches to MRA mode when Allow Activation Code via MRA checkbox is checked and has MRA Service Domain and OAuth token.

Onboarding On-Premise Phones Through Zero Touch Onboarding

When the on-premise phones are registered and the security profile is configured as OAuth, the phone fetches the access token implicitly on reset or restart.

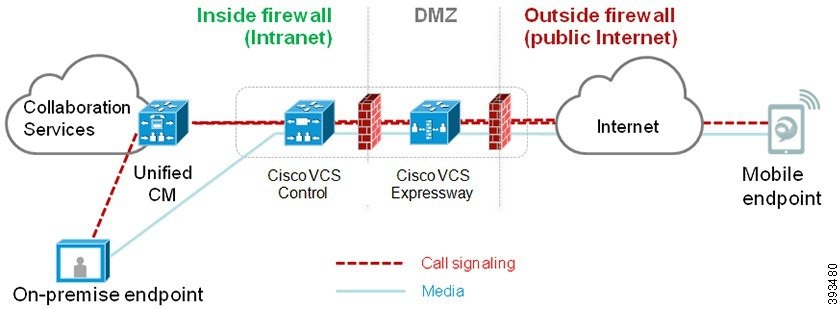
Mobile and Remote Access Overview

Mobile and Remote Access is a core part of the Cisco Collaboration Edge Architecture. It allows endpoints such as Cisco Jabber to have their registration, call control, provisioning, messaging, and presence services that are provided by when the endpoint is not within the enterprise network. Cisco Expressway connects the mobile endpoint to the on-premises network, providing secure firewall traversal and line-side support for Unified CM registrations.

The overall solution provides:

  • Off-premises access: a consistent experience outside the network for Jabber and EX/MX/SX Series clients

  • Security: secure business-to-business communications

  • Cloud services: enterprise grade flexibility and scalable solutions providing rich Webex integration and Service Provider offerings

  • Gateway and interoperability services: media and signaling normalization, and support for non-standard endpoints

Figure 5. Unified Communications: Mobile and Remote Access

Third-party SIP or H.323 devices can register to the Expressway-C and, if necessary, interoperate with Unified CM-registered devices over a SIP trunk.

Figure 6. Typical Call Flow: Signaling and Media Paths
  • Unified CM provides call control for both mobile and on-premises endpoints.

  • Signaling traverses the Expressway solution between the mobile endpoint and Unified CM.

  • Media traverses the Expressway solution and is relayed between endpoints directly; all media is encrypted between the Expressway-C and the mobile endpoint.

Configuring Mobile and Remote Access

To enable Cisco Jabber users with Mobile and Remote Access functionality, set up an Mobile and Remote Access User Policy within the User Profile Configuration window of Unified Communications Manager. The Mobile and Remote Access User Policy is not required for non-Jabber endpoints.

In addition, you must configure Cisco Expressway with Mobile and Remote Access. For details, see Mobile and Remote Access via Cisco Expressway Deployment Guide .

Configure ICE

Use this procedure if you want to deploy ICE to handle call setup for Mobile and Remote Access calls. ICE is an optional deployment that uses STUN and TURN services to analyze the available media paths for an Mobile and Remote Access call and to select the best path. ICE adds potentially to the call setup time, but increases the reliability of Mobile and Remote Access calls.

Before you begin

Decide how you are going to deploy ICE. You can configure ICE for groups of phones via the Common Phone Profile Configuration, to individual Cisco Jabber desktop devices, or through system-wide defaults that apply to all phones.

As a fallback mechanism, ICE can use a TURN server to relay media. Make sure that you have deployed a TURN server.

Procedure


Step 1

From Cisco Unified CM Administration:

  • Choose System > Enterprise Phone to configure system defaults for ICE.
  • Choose Device > Device Settings > Common Phone Profile to configure ICE for groups of endpoints and select the profile you want to edit.
  • Choose Device > Phone to configure ICE for an individual Cisco Jabber desktop endpoint and select the endpoint that you want to edit.
Step 2

Scroll down to the Interactive Connectivity Establishment (ICE) section.

Step 3

Set the ICE drop-down list to Enabled.

Step 4

Set the Default Candidate Type:

  • Host—A candidate obtained by selecting the IP address on the host device. This is the default.
  • Server Reflexive—An IP address and port candidate obtained by sending a STUN request. In many cases, this may represent the public IP address of the NAT.
  • Relayed—An IP address and port candidate obtained from a TURN server. The IP address and port are resident on the TURN server such that media is relayed through the TURN server.
Step 5

From the Server Reflexive Address drop-down list, select whether you want to enable STUN-like services by setting this field to Enabled or Disabled. You must set this field to enabled if you configured Server Relexive as the Default Candidate.

Step 6

Enter the IP address or hostname for the Primary and Secondary TURN Servers.

Step 7

Set the TURN Server Transport Type to Auto (default setting), UDP, TCP, or TLS.

Step 8

Enter the Username and Password of the TURN Server.

Step 9

Click Save.

Note 
If you configured ICE for a Common Phone Profile, you must associate phones to that Common Phone Profile for phones to be able to use the profile. You can apply the profile to a phone through the Phone Configuration window.

Mobile and Remote Access Prerequisites

Cisco Unified Communications Manager Requirements

The following requirements apply:

  • If you are deploying multiple clusters, set up an ILS network.

  • Mobile and Remote Access requires that you set up NTP servers for your deployment. Make sure that you have NTP servers deployed for your network and Phone NTP References for SIPendpoints.

  • If you are deploying ICE for media path optimization, you will need to deploy a server that can provide TURN and STUN services.

DNS Requirements

For the internal connection to Cisco Expressway, configure the following locally resolvable DNS SRV that points to :

_cisco-uds._tcp<domain>

You must create internal DNS records, for both forward and reverse lookups, for all Unified Communications nodes used with Mobile and Remote Access. This allows Expressway-C to find the nodes when IP addresses or hostnames are used instead of FQDNs. Make sure that the SRV record is not resolvable outside of the local network.

Cisco Expressway Requirements

This feature requires you to integrate with Cisco Expressway. For Cisco Expressway configuration details for Mobile and Remote Access, refer to the Mobile and Remote Access Through Cisco Expressway Deployment Guide.

The minimum Expressway release for Mobile and Remote Access Access Policy support with Cisco Jabber is X8.10.

Certificate Prerequisites

You must exchange certificates between , the IM and Presence Service, and Cisco Expressway-C. Cisco recommends that you use CA-signed certificates with the same CA for each system. In this case:

  • Install the CA root certificate chain on each system (for and the Service install the certificate chain to the tomcat-trust store).

  • For , issue a CSR to request CA-signed tomcat (for AXL and UDS traffic) and Cisco CallManager (for SIP) certificates.

  • For the Service, issue a CSR to request CA-signed tomcat certificates.


Note

If you use different CAs, you must install each CA's root certificate chain on , Service, and Expressway-C.


Note

You can also use self-signed certificates for both and the Service. In this case, you must upload onto Expressway-C the tomcat and Cisco CallManager certificates for and a tomcat certificate for the Service.


Expressway (Expressway-C) Settings for Activation Code

To enable the Activation Code in Expressway-C, go to Configuration > Unified Communications > Configuration > MRA Access Control. Set the value Allow activation code onboarding to Yes.

The setting enables on-boarding by activation code in the Expressway. The default value is No.

For details on how to configure Cisco Expressway for Mobile and Remote Access, refer to the Mobile and Remote Access Through Cisco Expressway Deployment Guide at https://www.cisco.com/c/en/us/support/%20unified-communications/expressway-series/products-installation-and-configuration-guides-list.html