Configure CSSM for Smart Licensing

Initial One Time Setup in CSSM for Smart Licensing

Use this procedure to set up the CSSM for Smart Licensing.

Procedure


Step 1

Log in to Cisco Smart Software Manager (CSSM) portal (https://software.cisco.com).

Step 2

Create a Smart Account (if you do not have a smart account) in CSSM, or get access to an existing smart account.

Step 3

Send an email to smart-operations@cisco.com, requesting API access for your Cisco ID.

The support team provides access to your ID and responds with a confirmation email.

Step 4

Create a CSSM client application with the CCO ID which stores the client ID and client secret.

Note 
  • The CCO ID used must have a Smart Account User role for the specific Smart Account for HCM-F to manage it.

  • To create the application, select the OAuth Grant type as Client Credentials Grant. HCM-F uses the Client Credentials Grant type to communicate with CSSM.

To create a new application with client credentials, click on Request API Access from the Cisco API Developer Portal and select the Client Credentials Grant option.

Step 5

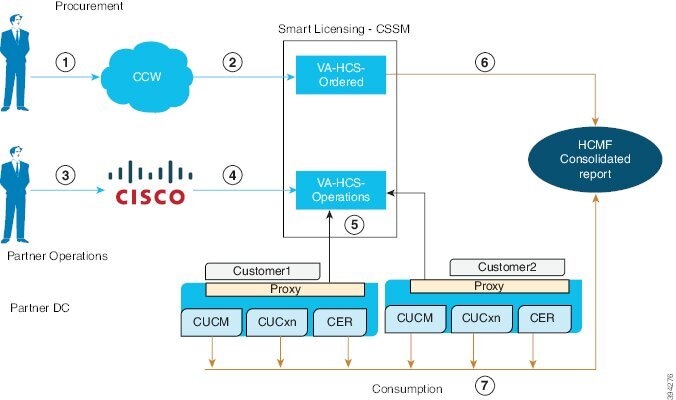
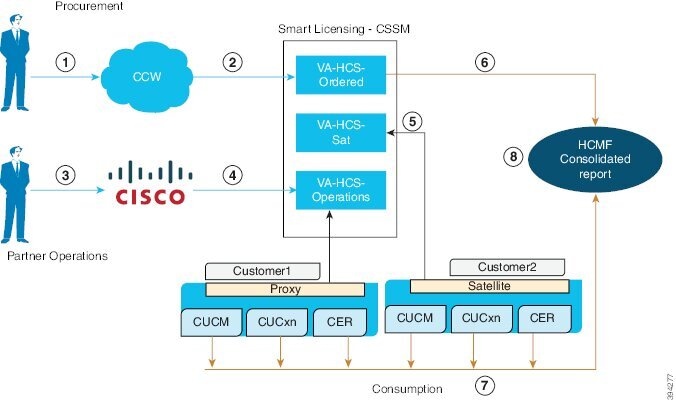
Login to the Smart Account in CSSM, and create Virtual Accounts, as per your requirement.

Note 

The admin does not need to create any product registration token to register the product. HCM- F performs all the token management for product registration.

While assigning the clusters to VA, the export control cannot be set if HCM-F creates the product registration token. To set the export control value, you have to manually create the product registration token in CSSM and select the export control check-box. For more information about how to register the UC applications that are in mixed mode to the VA in CSSM, see Registering the UC Applications in Mixed Mode to VA in CSSM.

We recommend you to get access to the operational licenses. If you have opted for operational licenses, then add the two virtual accounts: ordered virtual account (va-hcs-ordered), and operational virtual account (va-hcs-operational). For more information about operational licenses, see Configuring Operational Licenses.

Step 6

Register your product with CSSM, using HCM-F.

For more information on how to register UC applications in HCM-F, see Add Cluster Application in Cisco Hosted Collaboration Mediation Fulfillment Install and Configure Guide.

Note 
Until you register, your product is still in Evaluation Mode.
Step 7

Log in to CCW, select a smart account and virtual account, and order HCS licenses.

Note 
HCS licenses get deposited to the smart account and virtual accounts.
Step 8

Configure Smart Software Licensing alerts in CSSM.

For more information to configure the alerts, see https://software.cisco.com

For more information about adding the On-prem local account to CSSM, see Smart Software Manager On-Prem User Guide.


Registering the UC Applications in Mixed Mode to VA in CSSM

You can create the tokens with export control functionality for the UC applications that are in mixed mode.

Before you begin

Remove all the tokens from the specific VA in CSSM.

Procedure


Step 1

Create a token in the VA and select export control functionality.

Step 2

Run a CSSM sync from HCMF.

Step 3

Ensure that only the manually created token is present in the VA.

Step 4

Perform cluster assignment.


Initial One Time Setup in CSSM on-prem for Smart Licensing

Use this procedure to set up the Cisco Smart Software Manager (CSSM) on-prem server for Smart Licensing.

You can register the clusters to CSSM by using either the proxy or the on-prem server.

Pre-requisite for Registering Expressways clusters to the Cisco Smart Software Manager (CSSM) on-prem server for Smart Licensing

  1. Configure the Expressway clusters with DNS and domain name of the on-prem Server to adhere to the FQDN requirements of the Satellite Server to on-prem CSSM

  2. Expressway-E clusters are registered to CSSM via Proxy Mode, if Proxy is set at the Cluster level.

  3. Expressway-E clusters are registered to CSSM via Direct Mode, if Proxy is set at Customer Level.

  4. Expressway-C clusters are registered to CSSM via Proxy Mode, if Proxy is set at either Cluster level or Customer level.

Create a new or existing SSM on-prem local Account and register the account before using the Smart Licensing functions in the licensing workspace. Until you complete the registration process, all other Smart Licensing options are not available. Both network and manual registrations are supported.

For more information about CSSM on-prem configuration, see Smart Software Manager On-Prem User Guide.

Procedure


Step 1

Log in to Smart Software Manager on-prem portal.

Step 2

Create a Local Account or get access to an existing local account.

For more information about CSSM on-prem configuration, and creating local account, see Smart Software Manager On-Prem User Guide.

Step 3

Approve the account using the user name and password.

Step 4

Click Network, and ensure the hostname which is used in the registration URL is specified in the SSM On-Prem Name. Save the configuration.

Step 5

Click Security, and ensure the hostname which is used in the registration URL is specified in the Host common name. Save the configuration.

Update the registration URL in HCMF whenever you upgrade the Satellite Servers.

For example, if the registration url is: https://hostname/Transportgateway/services/DeviceRequestHandler, then the SSM On-Prem Name is hostname and Host common name is same as the Satellite hostname. Example of a token url is: https://hostname:8443/backend/oauth/token.

Step 6

Click Synchronisation , and do a full synchronization.

Step 7

Enable the API tool kit and create the client ID and secret for the local account.

To create a product registration token in SSM on-prem, see Creating Product Instance Registration Tokens section in the Smart Software Manager On-Prem User Guide .


Provisioning Workflow for Smart Licensing

Before you begin

Complete the following:

Procedure


Step 1

View Smart Account Summary

Step 2

Configure Smart Account

Step 3

Virtual Account Summary

Step 4

Assign and Unassign a cluster to Virtual Account


You can sync smart accounts and virtual accounts from HCM-F to CSSM and Satellite, either manually or automatically. For more information on manual sync, see Perform Manual Sync in Cisco Hosted Collaboration Mediation Fulfillment Install and Configure Guide.

Note

HCM-F periodically syncs with CSSM and Satellite.


What to do next

Verify the Status column for the job status in the HCM-F interface. Navigate to (Infrastructure Manager > Administration > Jobs) and see the Smart Account in the Job Entity column. If a job fails, hover over the information icon and the Job Details window pops up. Check the status information and recommended action.

Subscription Mapper

HCM-F pulls all the Subscription IDs from CSSM. You can select the customer for each Subscription ID from the Subscription Mapper page. When the Flex Usage report is generated, HCM-F uses this mapping to corelate the order and usage information and calculates the Compliance and True Forwarding.

Subscription Mapper page enables you to map the Subscription IDs to a particular customer and select the license model. You can do the following:
  • HCM-F identifies the license ordered details per customer and performs the true forwarding calculation and compliance check. For more information about true forwarding calculation, and compliance check, see Request or Download Flex Usage Report.

  • You can sort by the End date to identify which all subscriptions are about to expire.

  • To update your order, you can click the subscription number and connect to CCW with the Subscription ID.

Before you begin

  • Smart Account, virtual account, and satellite account should be configured in HCM-F.

  • HCM-F retrieves Subscription IDs from all the virtual account in CSSM and satellite.

Procedure


Step 1

From the side menu, select Infrastructure Manager > Smart Licensing > Subscription Mapper.

Step 2

The Subscription Mapper page shows the following information:

Select Subscription ID
Select the Subscription ID from the drop-down list.
Select Customer ID
Select the customer name from the drop-down list to which you want to map the Subscription ID.
You must map a customer to the Subscription ID to retrieve order details for the specific customer.
Select Licensing Model
Select the License model from the drop-down list.

Fields

Description

Subscription ID

Displays the subscription IDs that are retrieved while HCM-F performs a sync with CSSM and satellite.

License Details

Displays the number of licenses that are consumed by each subscription ID.

Hover over the i icon to see the license details that has the list of license types.

Start Date

Displays the start date of the license type. This is valid only for Flex licenses.

End Date

Displays the end date of the license type. This is valid only for Flex licenses.

Note 

For Perpetual licenses Start Date and End date is not valid.

Customer

Displays the name of the customer to which the Subscription ID is mapped.

License Model

Displays the model of the license. The supported options are: Perpetual, Named User, Named User + Perpetual, or Enterprise Agreement.


  • If the license model is already mapped, then the same is displayed in the Subscription Mapper page.

  • If subscription ID is already added, then it is auto-populated.

  • Existing configurations are retained.

  • Multiple subscription IDs can be mapped to a single customer.

  • One subscription ID must be mapped to a single customer.

  • All perpetual licenses are automatically mapped to the provider.


Note

Perpetual licenses might not have Subscription ID.


What to do next

For the detailed report about the license consumption for the Subscription ID of the customer, see the Flex Usage Report in Hosted Collaboration Solution Mediation Fulfillment Install and Configure Guide.

View Smart Account Summary

The Smart Account Summary page displays the CSSM Smart Accounts, and Satellite Smart Accounts.

Procedure


Step 1

From the side menu, select Infrastructure Manager > Smart Licensing > Smart Account Summary.

Step 2

The Smart Account Summary page shows the following information on smart accounts:

Fields

Description

Name

Name of smart account

Domain

Domain name of smart account

Type

Type of smart account

Status

Status of smart account: active or inactive

VA#

Number of virtual account associated with the smart account

Last SyncUp

Last sync up time of smart account

Alerts

Shows the alerts

Note 

To see the virtual accounts associated with the smart account, click the smart account name from the list. The Virtual Accounts page shows the list of virtual accounts.

Note 

To see the virtual accounts associated with the smart account, click the virtual account name from the list. The Virtual Accounts page shows the list of virtual accounts.

Step 3

Click Add New to configure a new smart account.

Click the Smart Account Name to edit the existing Smart Account.


Configure Smart Account Access

The Configure Smart Accounts page does not create a Smart Account in CSSM, but only saves the data locally in HCM-F to take care of other operations and reporting for Smart Accounts. You must create the Smart Account and client application directly in the CSSM portal.
Procedure

Step 1

From the side menu, select Infrastructure Manager > Smart Licensing > Configure Smart Account.

Step 2

Click Add New.

Step 3

Complete the fields in the Configure Smart Account Access page.

Fields

Description

Smart Account Domain Name

Domain name of smart account.

Client ID

ID of the smart account

Client Secret

Secret (password) of the smart account

Smart Account Name

Name of the smart account.

This is an optional field.

Step 4

Complete the fields in the Configure Smart Account Access page.

  1. In the Transport Settings enter the following fields:

    Table 1. Transport Mode Settings

    Fields

    Description

    Transport Mode

    Select the transport mode to access CSSM. The options are:

    • Proxy: Cisco products send usage information through a proxy server.

    • Satellite: Cisco products are installed on premise and the connectivity to Cisco is online or offline.

    • Direct: Cisco products send usage information directly.

  2. Configure the transport mode settings as follows:

    Table 2. Direct Transport Mode Settings

    Fields

    Description

    Authentication Gateway

    Displays the authentication gateway.

    CSSM Server

    Displays the CSSM server.

    Smart Account Domain Name

    Domain name of smart account.

    Client ID

    ID of the smart account

    Client Secret

    Secret (password) of the smart account

    Table 3. Proxy Transport Mode Settings

    Fields

    Description

    Proxy Hostname/IP

    Enter the proxy hostname or IP address.

    Note 

    When you set the transport mode as proxy, the setting connects the HCM-F to the CSSM through proxy but does not register the customer and cluster with the CSSM.

    To register the cluster and customer to the CSSM, add the proxy values at the customer and cluster level to connect to the CSSM through proxy, otherwise it will connect through direct mode, by default.

    For more information about setting the proxy at customer and cluster level, see Add Customer, and Add Cluster at Hosted Collaboration Mediation Fulfillment Install and Configure Guide.

    Proxy Port

    Enter the proxy port.

    Authentication Gateway

    Displays the authentication gateway.

    CSSM Server

    Displays the CSSM server.

    Smart Account Domain Name

    Domain name of smart account.

    Client ID

    ID of the smart account

    Client Secret

    Secret (password) of the smart account

    Table 4. Satellite Transport Mode Settings

    Fields

    Description

    Satellite Hostname

    Enter the satellite hostname.

    Satellite Port

    Enter the satellite port.

    Registration URL

    Enter the registration URL.

    Refer to the links below for the registration URLs for their respective satellite versions:

    • Satellite version 6.3.0 - https://<SATELLITE_IP_ADDRESS>/Transportgateway/services/DeviceRequestHandler

    • Satellite version 7.2.0 -

      • HCM-F V12.5SU2 and above - https://<SATELLITE_FQDN>/SmartTransport

      • below HCM-F V12.5SU2 - https://<SATELLITE_FQDN>/Transportgateway/services/DeviceRequestHandler

    • Satellite version 8.X - https://<SATELLITE_FQDN>/SmartTransport

    Token URL

    Enter the Token URL.

    Refer to the links below for the Token URLs for their respective satellite versions:

    • Satellite version 6.3.0 - https://<SATELLITE_IP_ADDRESS>:8443/backend/oauth/token

    • Satellite version 7.2.0 - https://<SATELLITE_FQDN>:8443/backend/oauth/token

    • Satellite version 8.X - https://<SATELLITE_FQDN>:8443/backend/oauth/token

    Local Account

    Domain Name

    Domain name of the satellite smart account.

    This field is displayed only when you select Satellite as the transport mode.

    Client ID

    ID of the smart account

    Client Secret

    Secret (password) of the smart account

    If the cluster is already assigned to a virtual account, and you want to change the transport mode settings, the cluster has to be unassigned from the virtual account, change the transport mode settings, and then reassign the clusters to the virtual account.

Step 5

Enable the Operational Licenses to autoregister the clusters to the specified virtual account.

For more information about Operational Licenses and Auto Registration of clusters, see Auto-registration of Clusters Using Direct or Proxy Mode

Step 6

Click Save.

Note 
For 12.5 release, HCM-F supports only one smart account. When the smart account is added in HCM-F, HCM-F performs a sync with CSSM to pull the Smart account and virtual account data. If the number of virtual accounts are high it might take more time to sync (approximately 1-2 hours).
Note 
From 12.5SU1 release, HCM-F supports multiple smart accounts with different client credentials, and multiple satellite accounts. When the smart account is added in HCM-F, HCM-F performs a sync with CSSM and satellite to retrieve the Smart account, virtual account, and local account data.

Configuring Operational Licenses

You can use operational license to generate reports in HCM-F for the amount-of-licenses that are ordered by the partner and the amount-of-licenses that are consumed. If you opt for operational license, then you have to create an operational virtual account in CSSM where Cisco stores all the licenses that the partner consumes. An ordered virtual account is also created where the licenses ordered by the partners from CCW are stored and are not used by the UC applications. Operational license can be opted by both Flex and perpetual license user. If you have opted for operational license, the licenses are stored in the operational virtual account in CSSM.

You can autoregister the clusters if you opt for operational licenses.


Note

If the clusters are registered in satellite, then HCM-F syncs with CSSM using proxy and gets the details of the satellite operational licenses.


Before you begin
  • You must have a Smart Account, Local Account, and Virtual Account in CSSM and Satellite.

  • The operational licenses are stored in operational virtual account (va-hcs-operational).

  • Set up operational licenses for the clusters.

    If the clusters are migrated to version 12.5 and later, the Flex Usage Report displays additional values for true forwarding, licenses consumed, and compliance check.

Procedure

Step 1

Fill this smart sheet http://cs.co/HCSPartnerRequestForm to get access to the Operational Licenses.

Step 2

Once you receive a confirmation, create the following virtual accounts in CSSM.

Ordered Virtual Account
Displays the name of the virtual account that stores the licenses that the partners order from CCW. We recommend the Ordered Virtual Account name as va-hcs-ordered.
Operational Virtual Account
Displays the name of the virtual account that stores the Cisco licenses to be consumed. We recommend the Operational Virtual Account name as va-hcs-operational. The clusters are registered to this virtual account in CSSM.

Task Flow of Operational License Without Satellite Account
This is the task flow of the operational license without the Satellite virtual account.
Figure 1. Task Flow of the Operational License Without Satellite Account
Procedure

Step 1

User orders licenses from CCW.

Step 2

For all users ordered licenses, a virtual account is created in CSSM: va-hcs-ordered.

Step 3

Fill this smart sheet http://cs.co/HCSPartnerRequestForm to get access to the Operational Licenses.

For more information on the prerequisites, see Configuring Operational Licenses.

Step 4

Create an operational virtual account in CSSM, where Cisco deposits all the operational licenses that are to be consumed: va-hcs-operations.

Once you have opted for operational license, autoregistration of clusters is possible while you configure a smart account.

Step 5

HCM-F queries ordered virtual account for licenses that are deposited per Subscription ID.

HCM-F is preconfigured to map Customer to Subscription ID.

Step 6

HCM-F queries Cisco Unified Communications applications for the license consumption report.

A consolidated report is generated with the ordered license details, consumption details, and compliance status. For more information about the report, see Request or Download Flex Usage Report

Task Flow of Operational License With Satellite Account
This is the task flow of the operational license with the Satellite virtual account.
Figure 2. Task Flow of the Operational License with Satellite Account
Procedure

Step 1

User orders licenses from CCW.

Step 2

For all users ordered licenses, a virtual account is created in CSSM: va-hcs-ordered.

Step 3

Fill this smart sheet http://cs.co/HCSPartnerRequestForm to get access to the Operational Licenses.

For more information on the prerequisites, see Configuring Operational Licenses.

Step 4

Create an operational virtual account in CSSM, where Cisco deposits all the operational licenses that are to be consumed: va-hcs-operations. User has to move the licenses from operations VA in CSSM to satellite VAs.

Autoregistration feature supports only one Satellite account. For using more than one Satellite, user can use the Satellite on board functionality that is provided by HCM-F.

Step 5

HCM-F queries ordered virtual account for licenses that are deposited per Subscription ID.

HCM-F is preconfigured to map Customer to Subscription ID.

Step 6

HCM-F queries Cisco Unified Communications applications for license consumption report.

A consolidated report is generated with the ordered license details, consumption details, and compliance status. For more information about the report, see Request or Download Flex Usage Report

Auto-registration of Clusters Using Direct or Proxy Mode


Note

If you enable autoregistration, HCM-F changes the license modes of the UC Applications to HCS mode. Hence, the publisher node of the clusters which are in enterprise mode reboots and the license mode is changed to HCS mode.


You can assign the clusters to the virtual account manually, however, from HCS 12.5 SU1 release you can auto-assign the clusters to the operational virtual account. This procedure enables you to autoregister the clusters to the operational virtual account using the proxy or direct mode.


Note

Autoregistration of clusters is possible for only one Smart Account. If Operational Licenses are enabled for a smart account, and you try to configure a new smart account or satellite account, the Operational Licenses check-box is disabled.

If you have not opted for Operational Licenses, you cannot autoregister the clusters to the operational virtual account.


Note

Configure the proxy settings at customer or cluster level before enabling auto-registration for Proxy mode. For more information, see Add Cluster in Cisco Hosted Collaboration Mediation Fulfillment Install and Configure Guide.


Procedure

Step 1

Navigate to Infrastructure Manager > Smart Licensing > Smart Account Summary. Click Add New to configure the smart accounts.

Step 2

Select Opted Operational Licenses to register the clusters to the following virtual accounts:

Ordered Virtual Account
Displays the name of the virtual account that stores the licenses that the partners order from CCW. We recommend the Ordered Virtual Account name as va-hcs-ordered.
Operational Virtual Account
Displays the name of the virtual account that stores the Cisco licenses to be consumed. We recommend the Operational Virtual Account name as va-hcs-operational. The clusters are registered to this virtual account in CSSM.
Note 
  • If the Ordered and Operational VAs are unchanged, a job for auto-registration is not triggered. Only way to trigger the job is to disable and enable the auto-registration again as part of smart account configuration update.

  • If the ordererd and operational VAs are different and valid, it first triggers de-registration job for unassigning the clusters from the old operational VA and then trigger auto-registration job for assigning to the new operational VA.

  • Any auto-registered cluster can be manually unassigned and re-assigned to different VA. In such case, that cluster is no longer considered as part of the autoregistration process. If at all the cluster has to be part of the auto-registration, then the smart account should be either updated with first disabling and then enabling auto-registration.

Autoregistration of the clusters is possible if any of the following conditions are met:

  • When the clusters with version 12.5 is installed, the clusters are automatically autoregistered to the operational virtual account.

  • When the clusters are upgraded to 12.5, and you have opted for operational licenses, you can choose to autoregister the clusters to the operational virtual account, otherwise they are manually assigned to the virtual accounts.

  • While configuring the smart account, if you opt for operational licenses and enable autoregistration, any existing 12.5 cluster version is autoregistered.

Following are the cluster assignment to virtual account scenarious:

Table 5. Cluster Assignment Scenarios

If...

Then...

You want one of the cluster to be removed from the autoregistered virtual account

You have to unassign the cluster manually from the autoregistered virtual account, and reassign the cluster manually to the specific virtual account.

You want one of the cluster to be reassigned to the autoregistered virtual account

You have to unassign the cluster manually from the specific virtual acount, and reassign the cluster manually to the autoregistered virtual account.

Any cluster fails to autoregister to the operational virtual account

You can do the following:

  • An on-demand or auto sync that happens in every 24 hours registers the cluster to the operational virtual account.

  • You can also disable the autoregistration option and enable it again as part of Smart Account update.

Step 3

Select Enable Auto Registration of applications (disable if you are using Satellite) option to autoregister the clusters to the operational virtual account in CSSM, while using the Direct and Proxy as the Transport Mode. De-select the autoregistration option, if you want to autoregister the clusters using the Satellite as the Transport Mode.

Autoregistration is automatically triggered when:

  • If any configuration details are wrong during the Smart Account configuration (For example, Proxy hostname, IP address, and so on), update the fileds with the right value, then the autoregistration is automatically triggered.

  • In case of proxy mode, if right proxy details are provided at cluster or customer level as part of the update, autoregistration is automatically triggered.

  • Any of the operations, such as credential change, network address change to a valid value for a cluster as part of the update also triggers autoregistration.


Autoregistration of Clusters Using Satellite Mode

Autoregistration automatically registers the clusters to the operational virtual account. You can autoregister the clusters by using Satellite mode.
Before you begin

Enabling autoregistration through satellite mode is allowed only if the Operational License is enabled while configuring the smart account as part of either the Proxy or Direct mode.

Procedure

Step 1

Navigate to Infrastructure Manager > Smart Licensing > Smart Account Summary. Click Add New to configure the smart accounts.

Step 2

Select Satellite as the Transport Mode.

Note 

Operational License options must be enabled while configuring smart accounts by using the Proxy or Direct mode.

Step 3

Select Enable Auto Registration to register the clusters to the operational virtual account.

When you configure a smart account using Satellite as the Transport Mode, the Enable Auto Registration option is enabled. You can provide an operational virtual account name, and the clusters are auto-assigned to the virtual account in the satellite server.


Virtual Account Summary

Virtual Account Summary window displays the list of Virtual accounts. Once a virtual account is selected, you can do the following:

  • Admin can change the license mode for any virtual account.

  • If no mode was present earlier, then the license mode could be set.

  • If no cluster is assigned to the VA, then you can change the mode of the VA.

  • If a cluster is assigned to the VA, then you cannot change the mode of the VA (It requires the clusters to be unassigned from the VA before changing the VA license mode). In this scenario, the license mode is noneditable. Hover over the tooltip for the VA to get the information. If the cluster is assigned to the VA, the tooltip states that the mode cannot be changed as clusters are associated with the VA. Once the clusters are unassigned, you can edit the license mode of VA.

    The license mode is not applicable for the virtual account in CSSM. License mode is applicable only on HCM-F. It enables to identify the mode it should set the UC application.

Procedure


Step 1

From the side menu, select Infrastructure Manager > Smart Licensing > Virtual Account Summary.

Step 2

The Virtual Accounts page shows the list of virtual accounts, and the following information on virtual accounts:

Fields

Description

Name

Name of virtual account

SA Name

Name of smart account

Access Level

Specifies the access level assigned to the virtual account

Clusters #

Number of clusters assigned to the virtual account

Customer#

Name of customers assigned to the virtual account


Assign and Unassign a Cluster to Virtual Account

If auto registration is enabled then the partner does not need to manually register or unregister unless they need to register clusters to different license repositories, such as, one smart account and one satellite server or two or more satellite servers.

Procedure

Step 1

From the side menu, select Infrastructure Manager > Smart Licensing > Virtual Account Summary.

Step 2

From the Virtual Accounts page, click a virtual account name.

Step 3

From the Edit Virtual Account page, select the license mode from the License Mode dropdown.

Step 4

Click Assign in the Clusters Assigned to Virtual Account section.

Note 
  • You cannot assign the cluster to the virtual account if the license mode for the virtual account is not set. A warning message is displayed asking to add the license mode for the VA.

  • You cannot change the license mode of a virtual account if a cluster is assigned to the virtual account. In this scenario, unassign the cluster from the virtual account.

Step 5

From the Assign Cluster to Virtual Account page, select the cluster by checking the check box.

Note 

Only clusters higher than 11.x is displayed here.

Step 6

Click Assign.

Note 
  • To unassign a cluster from the virtual account, select the cluster by checking the check box from the Clusters Assigned to Virtual Account section, and then click Unassign.

  • To assign or unassign a cluster from the virtual account, use the filter by customer name to filter the clusters.


View the Cluster Summary page to ensure that all the clusters are registered, and if it fails to register then refer to the recommended action.

View Cluster Summary

Procedure


Step 1

From the side menu, select Infrastructure Manager > Smart Licensing > Cluster Summary.

The Cluster Summary page displays the following:
  • List of Unified Communication clusters with the version 12.5 and later.

  • List of Expressway E and C clusters with version X12.6 and later that are configured with Smart licensing mode.

    Note 

    Registration of Expressway clusters in HCM-F is at the cluster level whereas for the other applications registration in HCM-F is done by node.

Fields

Description

Name

Name of the cluster

Type

Retrieves the type of cluster such as Unified CM, Unity Connection, CER, Expressway-E, Expressway-C from the HCM-F inventory.

Version

Specifies the Cluster version.

Smart Account

Name of the Smart Account that is associated with the virtual account.

Virtual Account

Virtual Account name that the cluster is associated with.

Status

Displays the status of the clusters, if they are registered, unregistered, partially registered or autoregistered to the virtual account. For example, if the cluster is autoregistered, then the status is displayed as Autoregistered.

The information icon provides details about the cluster status, description, and the recommended action.

The cluster status is prioritized as follows:

  • Multiple Virtual Account Registered -Specifies the clusters that are assigned offline using the Expressway user interface, where all the nodes are not registered to the same VA. Partial and mutiple VA applies only to Expressway-E and C clusters.

    NOTE: For clusters registered as multiple VA registered, you cannot assign/unassign clusters using the HCM-F application. Use the Expressway application to assign the multiple VA registered clusters.

  • Auto Registration Failed - Auto registration of the cluster fails.

  • Manual Registration Failed - Manual assignment of cluster fails.

  • Deregistration Failed - Manual unassignment of the cluster fails.

  • Deregistered - cluster is unassigned manually.

  • Partially Registered - cluster is partially assigned when:

    • All nodes of a cluster are not registered.

    • If one of the node of the cluster is either registered/unregistered

    NOTE: Partially Registered status applies only to Expressway E and C clusters.

  • Auto Registration Inprogress - auto registration of the cluster is in progress.

  • Auto Deregistration InProgress - Auto deregistration of cluster is in progress.

  • Auto Registered - cluster is autoregistered to the virtual account.

  • Manually Registered - cluster is manually assigned to a virtual account.

  • Deregistered - clusters are not assigned to any virtual account.

NOTE:

Add all the nodes of the Expressway cluster in HCM-F, to register the cluster. If there is a mismatch in the number of Expressway cluster nodes that is configured in HCM-F, then the registration fails.

Job Status

The information icon provides the provisioning status of the cluster.

Step 2

Hover over the information icon for a cluster in the Job Status column to see the job details of the cluster.

Fields

Description

Job Type

Specifies the provisioning status of the cluster.

Entity Type

Specifies the type of the cluster.

Date/Time Initiated

Specifies the data and time when the job was initiated.

Date/Time Completed

Specifies the data and time when the job completed.

Status

Specifies the overall status of the job.

Entity Name

Specifies the entity name of the cluster.

Description

Details of the job.

Status Information

Status of the job

Recommended Action

Describe the action to resolve the issue.

Step 3

To modify a cluster, select a cluster from the list, and modify the details in the Cluster Summary page.

For more information about the field details in the Cluster Summary page, see Add Cluster section in Cisco Hosted Collaboration Mediation Fulfillment Install and Configure Guide.

Note 

If you apply a filter of Type on the Cluster, then the set of keyword values that are allowed for Expressway clusters in Smart licensing mode are: core, edge, expressway,expresswayedge, expressway edge,expresswaycore, and expressway core.


Edit Virtual Account

Use this procedure to change the settings associated with the Virtual Account:
Procedure

Step 1

From the side menu, select Infrastructure Manager > Smart Licensing > Virtual Account Summary

Step 2

Select the virtual account to make changes, the Edit Virtual account window displays.

Field

Description

Name

Name of virtual account

Description

Displays a short description of the account

Smart Account Name

Displays the Smart account name.

Domain Name

Displays the associated domain name of the cluster.

License Mode

Specifies the license mode that is associated with the cluster.

Commercial Access Level

Specifies the access level that is assigned to the virtual account

Step 3

Clusters Assigned- Displays the details of all clusters that are associated with the virtual account. Select unassign, to unassign a cluster for the account. Click Assign, to add a new cluster to the account.