The Search tab enables users to search for specific contacts on SocialMiner.
You can perform a default search or a field-specific search.
A default search is a freeform search. To perform a default search, enter the text that you want to search for in the Search
field and then click Search. A default search searches the following fields:
-
sc.author
-
sc.title
-
sc.tags
-
sc.description
-
sc.socialContactStatus
-
sc.sourceType
-
sc.isSoftLocked
-
chat.agentName
-
chat.agentNickname
-
chat.transcript
The sc.title, sc.description, and chat.transcript field searches are not case-sensitive. To search in all other fields, the
search term you enter must be an exact (case-sensitive) match.

Note |
For SocialMiner standalone chat or Unified CCX single-session chat, the chat.agentName is always saved in the database in
lower case text, no matter how an agent signs in. For example, if an agent signs in as JSmith, you must search for jsmith
to find the contact.
|
A field-specific search allows you to choose the field in which you want to search. Place your cursor in the Search field
and press the spacebar to view a drop-down list of searchable fields. Select the specific field you want to search and enter
a term (or more than one term enclosed in quotes) beside the field name. Wildcard-based searches using "?" (for a single character)
and "*" (for multiple characters) are allowed.
When you start to type, the drop-down list of searchable fields is filtered based on what you type. For example, if you type
chat, only the fields that contain chat appear.
Certain characters are special and cannot be included in the default search unless they are escaped—meaning either enclosing
them in quotes or proceeding them with a backslash. For example, if you want to include the character + in your search, you
need to enter \+ or "+". The same is true for the colon (:). To include it in your search, you must enter \: or ":" to have
it recognized. (For a full list of all special characters, see the Solr wiki.)
You can perform a field-specific search on the following fields:
-
sc.author: The person who created the social contact.
-
sc.link: The link to the social contact.
-
sc.publishedDate: The date the social contact was published.
-
sc.createdDate: The date the social contact was created.
-
sc.socialContactStatus: The status of the social contact (unread, reserved, handled, discarded, draft, or queued).
-
sc.socialContactStatusDate: The date that the status of the social contact last changed.
-
sc.tags: The tags applied to the social contact. Tags can be applied automatically by the system when the contact enters a
feed or manually by a user.
-
sc.sourceType: The feed type to which the social contact belongs.
-
chat.agentNickname: Nickname for the agent in the chat room.
-
chat.agentName: Login username for the agent in the chat room.
-
de.id: The social contact ID. This ID is upper-case. The field is case-sensitive.
SocialMiner also allows for a combination of default and field-specific searches using AND and OR operators.
For example, to search for a contact that contains the phrase "This is a test contact" and is authored by John Smith, you
can search using any of the following criteria:
- sc.author:John* (wildcard in field-based search)
OR
- sc.author:"John Smith" AND test contact (a mix of field-based search and default search)
OR
- test contact (just the default search)
Search results are displayed similarly to campaign results.
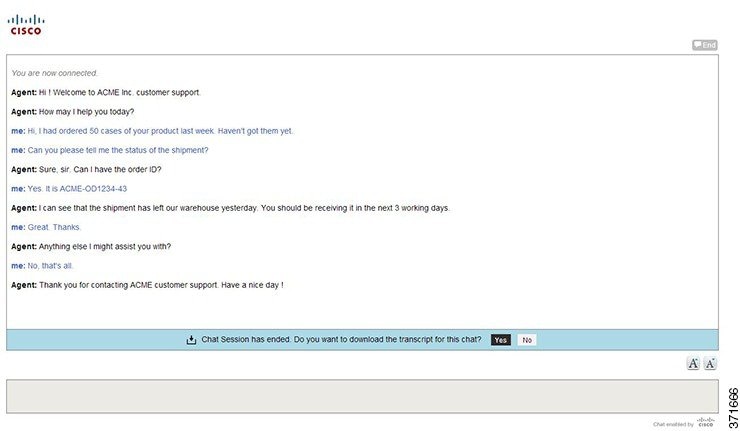
The title of any chat social contact is an active link if a transcript has been saved. Select the link to open a window displaying
the chat transcript. The chat transcript only becomes available once a chat session is closed. If one party in the chat does
not close their window, then the system cannot generate the transcript until the inactivity timeout expires.
Email contacts appear in search results but the email messages cannot be viewed in SocialMiner. If you want to view an email
message, you must locate the message in the appropriate folder on the Exchange server and view it from there.
 Feedback