ECE and WebexConnect Digital Channels in a Single Deployment

Overview

CCE customers have been using ECE for digital channels (Chat and Email) for an extended period. With the recent introduction of Digital Channels Integration using Webex Connect in 12.6(2), a wide variety of communication channels such as SMS, Email, Facebook Messenger, and Whatsapp were made available.

CCE now empowers customers to deploy both Webex Connect and ECE on a single CCE instance, allowing Contact Center agents to independently leverage digital channels from both platforms.

This feature will significantly improve the agent's experience, ensuring a seamless, cohesive, and uninterrupted workflow. Consequently, customer support across digital channels will be greatly enhanced.

Prerequsities

In addition to the prerequisites for configuring ECE and Webex Connect individually, ensure the following prerequisites are met when configuring both these components together in the same deployment:

  • It is highly recommended that you apply Finesse ES05 or later on Finesse 12.6(2) and ECE ES10 or later on ECE 12.6(1) for the gadgets to function effectively.

  • Ensure that ECE is set up within the limits specified in the Configuration Limits and Feature Availability for Reference Designs chapter of the Solution Design Guide for Cisco Unified Contact Center Enterprise at https://www.cisco.com/c/en/us/support/customer-collaboration/unified-contact-center-enterprise/products-implementation-design-guides-list.html. This means that the limits that apply to ECE also apply to the combination of ECE and Webex Connect.

  • Ensure Single Sign-On (SSO) is enabled for both ECE and Webex Connect.

    For details on how to enable SSO in ECE, see the Agent Single Sign-On chapters in the Enterprise Chat and Email Administrator’s Guide to Administration Console.

    For details on how to enable SSO in Unified CCE, see the Migrate Agents and Supervisors to Single Sign-On Accounts topic in the Single Sign-On chapter of the Cisco Unified Contact Center Enterprise Features Guide at https://www.cisco.com/c/en/us/support/customer-collaboration/unified-contact-center-enterprise/products-feature-guides-list.html.

  • The Media Routing Domains (MRDs) for Webex Connect and ECE Digital Channels must be unique and cannot be shared. Each MRD should be incorporated into the Application Path that corresponds to the specific ECE application instance, as well as the pre-configured instance designated for Webex Connect, formatted as XXXX.UQ.Desktop.

Workflow For Enabling ECE and WxConnect in Same Deployment

Table 1. Workflow for enabling ECE and WxConnect in the Same Deployment

Step

Task

ECE Digital Channels

Webex Connect Digital Channels

1

Create a unique MRD for ECE and WxConnect.

Configure MRD settings, such as Max Calls in Queue, Max Time in Queue, and task interruptibility.

Note


For Emails and asynchronous social chat channels like SMS, consider a longer Start Timeout and Max Duration for the Media Routing Domain.

Create a unqiue media routing domain (MRD) for each ECE channel: one for chat and one for email, and map it to the ECE instance.

Use the Media Routing Domain List tool to create the MRDs.

For details on how to create a new MRD, see the following topic in the integrated Online Help:

List Tools > Media Routing Domain List > Media Routing Domain List Box > Attributes Tab (Media Routing Domain)
You can either create unique MRDs for each of the Webex Connect Digital Channels allowing for granular reporting, or set varied task queue limits and behaviors, including whether the channel can be interrupted (Interruptible or not). Alternatively, you can map the various Webex Connect powered channels under a single MRD.

Note

 
If you create the MRDs through the Unified CCE Administration portal, the MRDs get automatically associated to the system-defined application paths. If you have created the MRDs using the Media Routing Domain List tool under Configuration Manager, you must explicitly associate the MRD with the application path.

For instructions on how to create a new MRD using Media Routing Domain List tool, see the following topic in the integrated Online Help:

List Tools > Media Routing Domain List > Media Routing Domain List Box > Attributes Tab (Media Routing Domain)

For instructions on how to create a new MRD using the Unified CCE Administration console, see the following topic in the integrated Online Help:

Manage Calls > Route Settings > Media Routing Domains and then use Set up media channels to associate with Digital Channels

Create Skill Groups and Precision Queues for the MRD.

You can create Skill Groups and Precision Queues for the MRD using standard configuration options and assign agents to these queues through a routing script.

For details on how to create Skill Groups, see the following topic in the integrated Online Help:

Explorer Tools Features > Skill Group Explorer

2

Associate the created MRDs with system-defined application paths.

For every agent peripheral gateway, there is a system-defined application path that gets created with a suffix "UQ.Desktop". There is also an associated system-defined application called UQ.Desktop that automatically gets created in the sytem and identifies the Cisco Finesse server as a client to the Agent PG, to control Agent states in MRDs created for digital channels. The first number in the application path identifies the Logical Controller ID of the PG. An example of the system-defined application path is 5000.UQ.Desktop.

Use the Configuration Manager to associate the MRDs with the system-defined application paths.

For instructions on how to associate the MRDs with the system-defined application paths, see the following topic in the integrated Online Help:

List Tools > Application Path List Box > Attributes tab

If you created the MRDs using the Media Routing Domain List tool, use the Configuration Manager to associate the MRDs with the system-defined application paths.

For instructions on how to associate the MRDs with the system-defined application paths, see the following topic in the integrated Online Help:

List Tools > Application Path List Box > Attributes Tab

3

Add the ECE and Webex Connect Digital Channels gadget to the Cisco Finesse desktop layout.

Once added, you can start using gadgets from both platforms seamlessly in a single Finesse Desktop instance.

For details on how to add the ECE gadget, see the Configuring Finesse topic in the Post-Installation Tasks chapter of the Enterprise Chat and Email Installation and Configuration Guide at https://www.cisco.com/c/en/us/support/contact-center/enterprise-chat-email-12-6-1/model.html#InstallandUpgrade.

For more information on how to use the ECE gadgets, see the Enterprise Chat and Email User Guide for Agents and Supervisors at https://www.cisco.com/c/en/us/support/customer-collaboration/cisco-enterprise-chat-email/products-user-guide-list.html.

For details on how to add the Webex Connect Digital Channels gadget, see the Add Manage Digital Channels gadget topic in the Manage Desktop Layout chapter of the Cisco Finesse Administration Guide at https://www.cisco.com/c/en/us/support/customer-collaboration/finesse/products-maintenance-guides-list.html.

For more information on how to use the Digital Channels gadget, see the Manage Digital Channels Gadget User Guide at https://www.cisco.com/c/en/us/support/customer-collaboration/finesse/products-user-guide-list.html.

4

Optionally, you can create workflows to automate common repetitive agent tasks.

Configure the workflows in Cisco Finesse.

For more information, see the Manage Workflows chapter in the Cisco Finesse Administration Guide at https://www.cisco.com/c/en/us/support/customer-collaboration/finesse/products-maintenance-guides-list.html.

Configure the workflows in Cisco Finesse.

For more information, see the Manage Workflows chapter in the Cisco Finesse Administration Guide at https://www.cisco.com/c/en/us/support/customer-collaboration/finesse/products-maintenance-guides-list.html.

(or)

Configure the rules and events in Webex Engage. Rules and events in Webex Engage provide similar functionality as workflows in Cisco Finesse. For more information, see Events and Rules topic in the Administration and Setup Guide for Webex Engage with Cisco Contact Center Enterprise at https://www.cisco.com/c/dam/en/us/td/docs/voice_ip_comm/cust_contact/contact_center/icm_enterprise/wxengage_for_digital_channels/admin/guide/Administration_and_Setup_Guide_for_Webex_Engage_with_CCE.pdf

You can also refer to Example of Webex Connect Flow. This section explains how to set up a Flow for a Call Survey that can be embedded in a chat channel. The Flow is designed within Webex Connect and uses an Event created in Webex Engage.

5

Configure reports from ECE & Webex Connect MRD.

Historical reports are available in ECE's Reports Console. Real-time reports and historical reports are available through Cisco Unified Intelligence Center (CUIC) when integrated with Unified CCE. Integrated customers should use CUIC for real-time reports, and the Reports Console in ECE for historical reports.

For details on reporting on the Reports Console, see the Enterprise Chat and Email Administrator’s Guide to Reports Console.

For details on reporting on CUIC, see the Cisco Unified Intelligence Center User Guide.

Webex Connect provides insights into the number of messages sent and received across various channels, as well as a comprehensive summary of all exchanges through the Reports tab in the Webex Connect tenant. For interactions on Digital Channels that have been escalated to an agent, reporting is available through CUIC stock reports. Reporting

Enable Notifications for ECE Gadget

To enable pop-over notifications for ECE gadgets:

  1. Navigate to the following ECE JavaScript

    <Install Dir>\eService\templates\finesse\gadget\agent\ece.js
  2. Add the following code to the ECE JavaScript

finessse.containerServices.ContainerServices.init();
const showMyGadgetNotification = window.finesse.containerservices.ContainerServices.showMyGadgetNotification;
if (showMyGadgetNotification) {
    showMyGadgetNotification({
        messageFrom: task.title,    // Either the title or the message from where it is coming from
        message: detail.message,    // Detail of the message. Can be few initial lines of the message.
        isDismissable: true,        // The notification should be dismissable
        timeout: 8000,              // The notification will be shown for eight seconds on the top right corner.
        icon: {name: 'circle', size: 14, color: 'red'}      // The red circle icon will be seen in the notification popup.
    });
}
// The name and color can be changed as per the email and chat.
// It is upto you what color you would like to show on the finesse notification popup and in the notification center.
// you can use it as shown in the below comments
// icon: {name: 'email', size: 14, color: 'blue'}
// icon: {name: 'chat', size:14, color: 'green'}

Once activated, a red dot will appear on the "Manage Email and Chat" link in the left navigation pane in Finesse when a new chat or a new email is received.


Note


This feature would enable Notifications for new activities like chat or email, not for subsequent updates on an existing conversation.


ECE and Webex Connect Digital Channels Comparison

Here’s a comparison of ECE and Webex Connect Digital Channels to help you understand the agent's experience when using both groups of the Digital Channels in the same deployment.

Scenario/Action

ECE Digital Channels

Webex Connect Digital Channels

Agent Login/Logout

Agent Login

Prior to ES03 on ECE 12.6(1) or later, agents log into ECE automatically when they log into the Finesse Desktop. After applying the ES, agents log into Finesse Desktop and then log into ECE by clicking "Manage Chat and Email Gadget."

Agents log into the Finesse Desktop and then click on "Manage Digital Channels". They are then prompted to sign in, and once they do, they log in to the Digital Channels gadget.

Agent logs into the gadgets on multiple browsers.

Finesse Desktop can show a random SSO "Login Error" message if the agent logs into the ECE gadget on multiple browsers.

Digital Channel Gadgets work as expected.

Browser is closed or the system is shut down

The agents are logged out of all gadgets.

The agent remains active.

Default user sign-out option is set to Sign out from Voice Channel.

ECE will log out of Chat MRD in 120 seconds, while the agent's ready state may be preserved for a little longer in an Email MRD before logging out.

Agent state remains ready in Digital Channels.

Agent closes the browser and logs in again within 60 seconds.

The agent state is not retained and they must log in again.

Agent state is retained.

Agent closes the browser and logs in again within 120 seconds.

The agent will be logged out.

The agent will be logged out.

Agent Logout

Log out of the ECE gadget.

Logout of Finesse Desktop to logout of the Digital Channels gadget.

Display/UX in Finesse Desktop

Display of the Finesse Digital Channel State Control (FNC) icons

ECE and Digital Channels are very similar, making it difficult to tell them apart.

Availability of the FNC icons

Prior to ES10 on ECE 12.6(1), icons appear when agents log into the Finesse Desktop. Post the ES application, icons appear after agents click on the "Manage ECE Gadget".

The icons appear after the agent clicks on Manage Digital Channels and then signs in again when prompted.

Handling Tasks

Task Transfer

Agent can transfer tasks to a queue or to an other agent.

Agent can transfer tasks to a queue only.

Task Offer

All tasks are automatically accepted.

Tasks are displayed as a pop-up dialog box in Finesse Desktop and must be accepted to begin.

Auto-pushback task

Auto-push back is supported when agent does not start the task within the configured time.

Auto-push back is not supported.

Task Interrupt/Timeout

Initiate the necessary Finesse workflow when a task is interrupted.

The Finesse workflow is not initiated as the Interrupt is not accepted.

Digital Channel gadget works as expected.

AgentState-13 (Interrupted) needs to be displayed on Agent_Real_Time when an agent is interrupted.

ECE works as expected.

AgentState-13 (Interrupted) is not being displayed on Agent_Real_Time when an agent working on Digital Channel Chat is interrupted.

RONA (Redirection on No Answer (RONA)

The task is redirected back to the queue after the agent fails to start the task within a specified time.

The task is redirected back to the queue after the agent fails to answer.

Workflows/Rules and Events

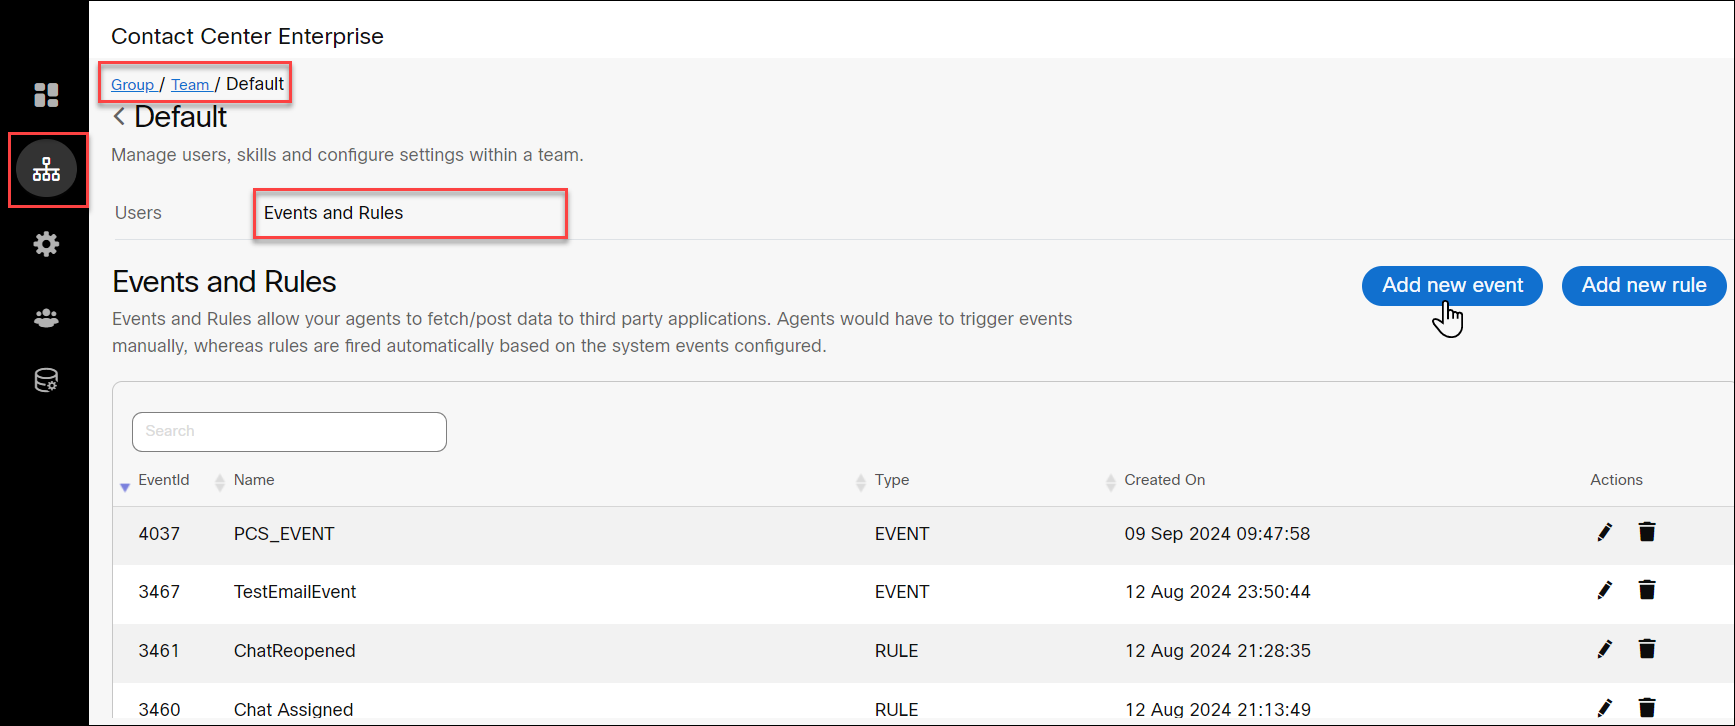
Applying a workflow to specific teams.

The workflow can be applied to a specific team or multiple teams.

All Rules and Events will apply to the one available team: the default team.

Applicable trigger points for the workflows or rules and events

You can create workflows for any of the trigger options listed in the When to Perform Actions drop-down in the Add Workflow gadget in Cisco Finesse.

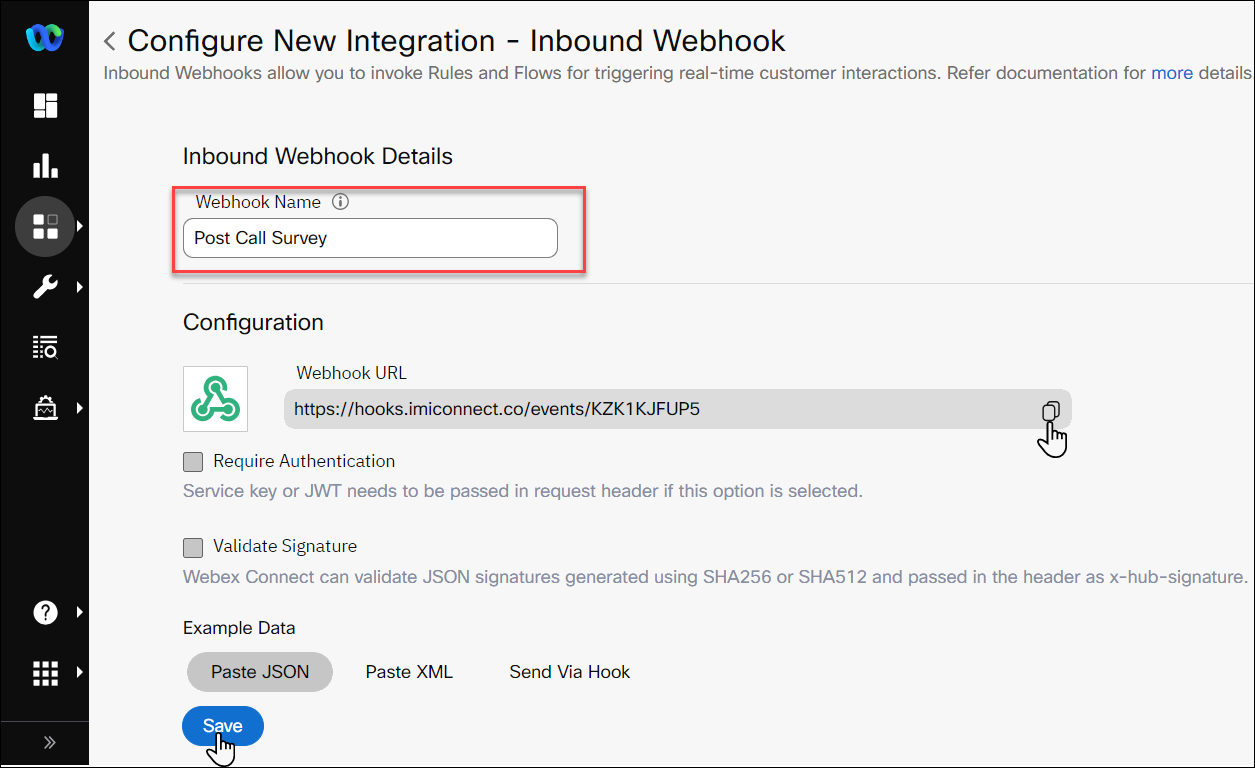
Workflows can only be created for some of the trigger options available in the Fire When drop-down in the Events and Rules page in Webex Engage. For more information on supported options, see the Add a New Rule section in the Administration and Setup Guide for Webex Engage with Cisco Contact Center Enterprise.

Others

Conflicting keyboard shortcuts

If shortcuts of ECE and Digital Channels gadget conflict and you install Finesse 12.6(2) ES 05, the shortcut will work on the gadget that is currently active (open in the active tab). For example, the default shortcut key Ctrl + Shift + 4 activates the Ready for Email state on whichever gadget (ECE or Digital Channel) is currently active. If the ECE gadget is active, the ECE's Email channel transitions to the Ready state. Similarly, if the Digital Channel gadget is open, the Digital Channel's Email channel transitions to the Ready state.

If there are conflicts between the ECE shortcuts and Digital Channels gadget before installing the patch, you might encounter keyboard conflict errors and the shortcut keys will not work as expected.

Inactive gadget pause during Gadget Switch

The ECE gadget does not automatically pause and stays active.

Digital Channel gadget pauses as expected.

Failover and failback of gadgets

At times, failover and failback of the ECE server may not work seamlessly.

Digital Channel gadgets failover and failback as expected.

Example of Webex Connect Flow

This section explains how to set up a Flow for a Call Survey that can be embedded in a chat channel. The Flow is designed within Webex Connect and uses an Event created in Webex Engage.


Note


The following example illustrates how Webex Engage and Webex Connect can be used to establish a call survey, and it should be regarded as a reference rather than a comprehensive guide. When creating a flow in your deployment, you will need to make adjustments based on your specific business requirements and system environment.


Procedure


Step 1

In Webex Connect, create a new Webhook URL to start a Webex Connect Flow that triggers a survey right after a call ends.

  1. Log into Webex Connect.

  2. On the left pane, select Services.

  3. On the Services page, choose the required service.

  4. From the left sidebar, click on Assets, and then select Integrations from the displayed menu.

  5. On the Integrations page, click Add Integration, and then select Inbound Webhook from the displayed menu.

  6. On the Configure New Integration - Inbound Webhook dialog, the Webhook URL is displayed by default. This URL triggers the Call Survey Event that you will create in the upcoming steps. Enter a unique name in the Webhook name field.

  7. Click the copy icon to copy the Webhook URL to your clipboard.

  8. Click Save.

    The new Inbound Webhook is created and displayed on the Integrations page.

Step 2

In Webex Engage, create a new event.

  1. Log into Webex Engage.

  2. From the left sidebar, select Groups.

  3. From the list of groups, select your group.

  4. Webex Engage displays its only team: the default team. Click on Default to access it.

  5. Go to the Events and Rules tab and click Add new event.

  6. In the Configure Events section, enter the following:

    1. Name —Enter a unique name for the new event.

    2. Method—Choose POST.

    3. URL—Paste the Webhook URL you copied in the previous step (1 g).

    4. Expected Response Format —Choose JSON.

    5. Add Param —Include the variables you want in your flow. Useful options are shown in the following screenshot.

    6. Click Save changes.

    For more information on adding parameters, see the Add a New Event section in the Administration and Setup Guide for Webex Engage with Cisco Contact Center Enterprise at https://www.cisco.com/c/dam/en/us/td/docs/voice_ip_comm/cust_contact/contact_center/icm_enterprise/wxengage_for_digital_channels/admin/guide/Administration_and_Setup_Guide_for_Webex_Engage_with_CCE.pdf.

Step 3

In Webex Connect, create the Flow for the Call Survey.

  1. From the left sidebar, select Services.

  2. On the Services page, choose the required service.

  3. Select the Flows tab and then click Create Flow in the upper-right corner.

  4. On theCreate Flow dialog, enter the following:

    1. Flow Name— Enter a name for the new Flow.

    2. Type— Select Work Flow.

    3. Method— Choose New Flow.

    4. Click Start from Scratch.

    5. Click Create.

  5. On the Select Trigger Category dialog, select Webhook.

    Webex Connect displays the Flow Builder canvas with the Webhook node. The Configure Webhook page opens, enabling you to configure the Webhook node. Alternatively, you can access this page by double-clicking the node in the Flow Builder.

  6. To configure the Webhook node:

    1. On the Configuration tab, keep the default selection of the Select existing webhook radio button. From the Webhook Name field, select the Webhook you created earlier.

    2. On the Transition Actions (optional) tab, add the necessary variables for your flow as shown in the below screenshot, then click Save. You can also include the custom variables created in Webex Engage during step 2 by selecting Add Params. Additionally, you have the option to add default variables like 'n2.chatid' that are readily available in Webex Engage. Ensure that the variables you enter in Webex Connect match exactly with those in Webex Engage. For more information, see Transition Actions.

  7. Add the Evaluate node if your business logic needs it.

  8. Drag the Live Chat or In-App Messaging node onto the Flow builder canvas. Double-click the node, enter the following,:

    1. Destination Type— Set to UserId

    2. Destination — Set to $(CustomerID).

    3. Thread ID— Enter $(ChatThreadVariable). This entry makes sure the Call Survey form is sent to the correct chat thread.

    4. Set Message Type to Form, the Content Type to STATIC, and set Form Template to an existing Call Survey form.

    5. Click Save.

  9. Drag the Receive node onto the Flow builder canvas. Double-click the node and enter the following:

    1. Form(threadId)—Enter $(ChatThreadVariable). This entry makes sure the Call Survey form is sent to the correct chat thread.

    2. Form(userId)—Set to $(CustomerId).

    3. Set Event Name to Form Response, the Content Type to STATIC, and Form Template to an existing Call Survey form.

    4. Click Save.

    5. In the Transition Actions (Optional) tab, you can opt to generate logs when the flow exits this node by adding a logID, as shown below.

  10. Drag the Append Conversation node onto the Flow builder canvas. Double-click the node and enter the following:

    1. Method Name— Choose Append Chat.

    2. Node Authentication—Choose WxmTestEngage.

    3. Channel— Choose Livechat.

    4. Conversation ID—Enter $(ConversationId).

Step 4

Complete your Flow by creating connections between the various nodes within the canvas, as illustrated below.