Common Tasks

Script Editor Online Help

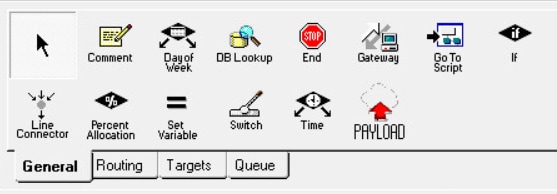
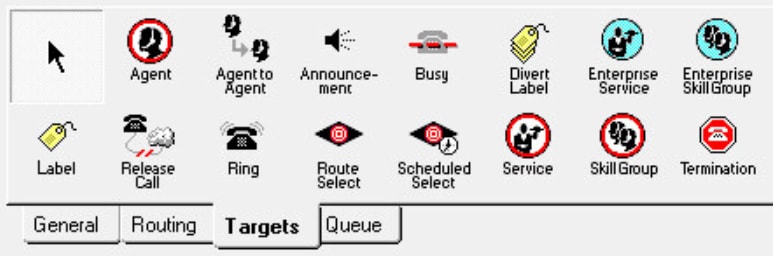
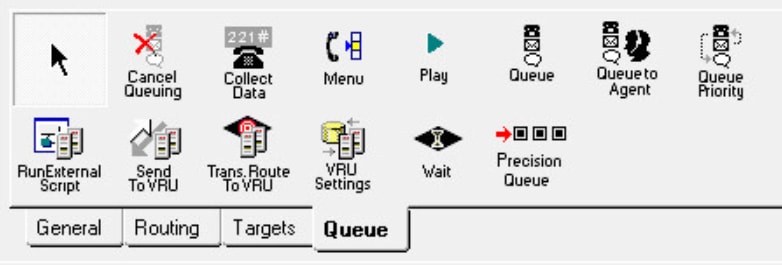
This chapter contains information about some of the most common tasks you perform in Script Editor. This topic does not contain information about all the tasks you can perform. For more information on other Script Editor tasks, see the Script Editor online help.


Note


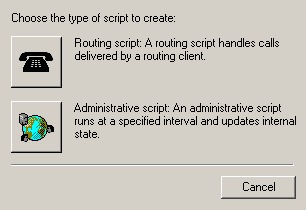
If you are a department administrator for Packaged CCE deployments (Packaged CCE: CCE-PAC-M1 and Packaged CCE: CCE-PAC-M1 Lab Only), you do not have access to the Script Editor. Instead, use the Internet Script Editor client, unless restricted by the feature control of the client or by your role.


Toolbars

View Toolbars

You can control which toolbars appear in the application window by using the View menu.

Procedure


Step 1

Choose Toolbar from the View menu.

The submenu lists the four toolbars. Toolbars that are currently open, are checked.

Step 2

To open a toolbar from the submenu, select the unchecked toolbar.

Step 3

To close a toolbar from the submenu, clear the checked toolbar.

You can also control the size of the toolbar icons from the Toolbar submenu:

  • To display large toolbar icons with text, check Large Icons.

  • To display small toolbar icons without text, uncheck Large Icons.

Note

 
Toolbar icons in this document are always shown as large icons with text.

The Palette

Figure 1. Palette Icon

You can display the Palette by clicking the Palette icon in the Main toolbar or by selecting Palette from the View menu. The Palette contains the icons that represent the nodes used in scripts.

Use Palette to Build a Script

You use the Palette to build a script by moving icons representing different nodes into the script workspace. You can build a script in the following ways:

Procedure

  • Place the cursor over an object and hold the left mouse button, then drag the object into the workspace and release the mouse button.

  • Place the cursor over an object and click the left mouse button, then move the cursor into the workspace and click the mouse button again. To insert more of the same node, reposition cursor and click again.

Targets Tab

The following figure displays the Targets tab of the Palette:

Figure 4. Targets Tab of the Palette

The Targets tab contains icons for the following scripting activities:

Queue Tab

The following figure displays the Queue tab of the Palette:

Figure 5. Queue Tab of the Palette

The Queue tab contains icons for the following scripting activities:

Create Routing Script

Procedure


Step 1

In Script Editor, choose File > New or click New. You are prompted to select a Routing Script or an Administrative Script:

Figure 6. New Dialog Box

Step 2

Click the following icon.

Figure 7. Routing Script

The new script opens in the Edit window, with a Start node. (See Start Node.

Step 3

Build the script.

Step 4

To save the script, choose File > Save or click Save. You are prompted for a script name.


Add Comments to a Node

Figure 8. Comment icon

Most nodes have a Comment tab :

Figure 9. Comment Tab

Procedure


Step 1

To add a comment, type in the Enter text field.

Step 2

To select the location where you want your comment to appear in the node, select a radio button in the Text justification area.


Specify a Connection Label Location for a Node

Most nodes have a Connection Labels tab.

Figure 10. Connection Tab

Procedure


Step 1

When viewing a script in monitor mode, you can specify the location of connection labels by moving the slider in the Label position area to one of the following locations:

  1. Origin, displays the connection label close to the node you are editing.

  2. Destination, displays the connection label close to the targeted node.

  3. Center, displays the connection label between the nodes.

Step 2

You can remove the connection label by clearing the Display monitor labels check box.


Validate Scripts

Procedure


Step 1

To validate a single script, with the script open in the active window, choose Script > Validate or click the Validate Icon on the toolbar.

Step 2

To validate multiple scripts, choose Script > Validate All or on the toolbar, click the Validate All Icon.

You are prompted to choose between validating active versions of all scripts or all the opened scripts.

Figure 11. Validate All Query Dialog

Step 3

Make the appropriate selection and click OK.

  1. If a script is valid, a dialog box opens stating that script is valid.

  2. If the script is not valid, the Validate Script dialog box opens with a list of the errors and warnings. When you select an error, the node where the error occurs is highlighted in the Edit window.


Open Script Explorer

Procedure


In Script Editor, choose File > Script Explorer or on the toolbar, click the Explorer Icon.

The Script Explorer dialog box opens, listing scripts by customer and business entity:

You can then set the active version of the script, view its properties, rename it, or delete it. For more information, see the Script Editor Online Help.


Schedule Routing Script

You schedule a script by associating it with a call type as follows:

Procedure


Step 1

Choose Script > Call Type Manager. The Call Type Manager dialog box opens.

Figure 12. Call Type Manager Dialog Box—Call Directory Tab

Step 2

Select the Schedules tab.

Figure 13. Call Type Manager Dialog Box - Schedules Tab

Step 3

Select the call type to associate with the script.

Step 4

Click Add. The Add Call Type Schedule dialog box opens.

Step 5

In the Script tab, select the script to schedule:

Figure 14. Add Call Type Dialog Box - Script Tab

Step 6

In the Period tab, choose the information to define the period for which the schedule will be effective.

Figure 15. Add Call Type Schedule Dialog Box - Period Tab

Step 7

Optionally, in the Description tab, enter a description of the schedule.

Step 8

Click OK in the Add Call Type Schedule dialog box.

Step 9

Click OK in the Call Type Manager dialog box.

Note

 
The schedule is not saved until you click OK in the Call Type Manager dialog box.

Viewing Modes

You can view a script in four different modes:

  • Browse - Allows you to view the script.

  • Edit - Allows you to edit the script.

  • Monitor - Allows you to monitor the script

  • Quick Edit - Allows you to make certain modifications to a script, with the following guidelines:

    • In Quick Edit mode, you cannot add or delete a node.

    • In Quick Edit mode, you can adjust most of the properties of the script nodes you select in the Node Control table of your assigned feature control set. However, in Quick Edit mode you cannot edit any properties of the selected nodes that change the structure of a script or that reset previous reporting data.

  • As a Quick Edit Only User:

    • You can only edit scripts through Quick Edit mode.

    • You cannot create or delete a script.

    • You can access the Properties of any script node in any mode by either right-clicking the node and selecting Properties, or by double-clicking the node.

    • You cannot edit the Call Type Manager dialog box (Script > Call Type Manager).

    • You cannot edit the Administrative Manager dialog box (Script > Administrative Manager).

    • You cannot edit the Custom Functions dialog box (Script > Custom Functions).

    • You can choose the viewing mode from the Scripting toolbar, or from the Script menu.

Find Nodes Option

Unified ICM Script Editor is a tool used to create, modify, and schedule routing scripts. A script consists of a series of nodes. When managing large, complex scripts, the Find Nodes option makes it easier to identify/access the node you want to view.

Use the Find Nodes option to find specific script nodes by:

  • Node ID

  • Object

  • Node Type

  • String

Use the Find Nodes option to find script nodes in:

  • Current script

  • All active script versions

  • All open scripts


Note


For more information about using Unified ICM Script Editor's features, see the Unified ICM Script Editor online help.

Find Nodes and Nodes Found Dialog Boxes

Most properties of the "Find Nodes" dialog box are common and appear regardless of the "Find Nodes By" selection. However, as you select each of the options in the "Find Nodes By" section, the appearance of the "Find Nodes" dialog box changes.

The "Nodes Found" dialog box displays the results of your "Find" operation. The following tables list the "Find Node" dialog box and "Nodes Found" dialog box property descriptions.

Keyboard equivalents are indicated in parentheses after each field or button.

Use Tab/Shift+Tab in the "Find Nodes" dialog box to change focus and navigate to the sections, buttons, and input fields. You can reach each field or button within a section/group (Find Nodes By/In) by using the Up/Down keys.

Use Tab/Shift+Tab in the "Nodes Found" dialog box to change focus. You can reach each node by using the Up/Down keys.

Note


Once the "Nodes Found" dialog box appears, click "Reload Configuration" or close "Nodes Found" dialog box to get the latest configuration. The change in configuration will appear in Script Editor.


Common find nodes dialog box properties

Type Description
Find   Click to find nodes based on the search criteria set in the "Find Nodes" dialog box. The "Nodes Found" dialog appears displaying a list of the nodes found that matched the search criteria you select.
Close (Alt+F4)   Click to close the "Find Nodes" dialog box.
Help   Click to access the "Find Nodes" online help.

Find Nodes by Section

Type Description
Node ID (Alt+N)   The default selection. Selects a node based on its node ID. Disabled if no script is open or the Current script option is not selected. When selected a "Please enter node ID:" field appears. Displays the node in the Current script based on the node ID.
Object (Alt+O)   Selects node(s) based on references to an object. When selected, the "Please select object type:" and "Please select object:" drop-down lists appear. Select the object type first, then the object. Displays a list of nodes in the Current script, All active script versions, or All opened scripts having a reference to the selected object.
Node Type (Alt+T)   Selects node(s) based on the node type. When selected, the "Please select node type" drop-down list appears. Displays a list of nodes of the selected type in the Current script, All active script versions, or All opened scripts.
String (Alt+S)   Selects node(s) based on a string that is entered. This string is case insensitive. When selected, the "Please enter string" field appears. Displays a list of nodes containing the substring of the input string in the Current script, All active script versions, or All opened scripts. Note: By default, this search criteria does not search the "Comment" field in each node. Check the "Search comment field option" (Alt+F) to search the "Comment" field as well.

Find Nodes in Section

Type Description
Current script (Alt+C)   Select to find nodes in the current script based on any of the "Find Nodes By" properties. Disabled if no script is open.
All active script versions (Alt+A)   Select to find nodes in all active script versions based on the Object, Node Type, or String "Find Nodes By" properties. If no script is open, this is the only "Find Nodes In" option enabled.
All opened scripts (Alt+P)   Select to find nodes in all open scripts based on the Object, Node Type, or String "Find Nodes By" properties. Disabled if no script is open.

Common Nodes Found Dialog Box Properties

Type Description
List field   A listing of the nodes found due to the Find.
Close (Alt+F4)   Click to close the "Nodes Found" dialog box.
Help   Click to access the "Nodes Found" online help.
Next Node (Alt+N)   Click to select the next node in the list.
Status bar   Displays "Finding nodes in script." as the search proceeds, then displays the number of nodes found matching the search criteria.

Find Nodes by Node ID

Procedure


Step 1

Open the Script Editor tool.

Step 2

Choose Edit > Find Node (Ctrl+F). The Find Nodes dialog box appears.

Step 3

In the "Find Nodes By" section, choose Node ID.

Step 4

Enter the ID of the node you wish to view in the "Please enter node ID:" field.

Step 5

Click Find. The node with the ID matching your input is highlighted.

Note

 
If there is no node with a matching ID, a message appears stating: "Cannot find node with ID <xxx>." (where <xxx> is the node ID).

Step 6

Choose a node in the list and that node is highlighted in the script.


Find Nodes by Object

Procedure


Step 1

Open the Script Editor tool.

Step 2

Choose Edit > Find Node (Ctrl+F). The "Find Nodes" dialog box appears.

Step 3

In the "Find Nodes By" section, choose Object. Two drop-down lists appear, one providing a list of object types ("Please select object type:"), the other providing a list of objects ("Please select object:").

Step 4

Select the desired object type.

Step 5

Select the desired object.

Step 6

Click Find. A "Nodes Found" dialog box appears displaying a list of nodes referencing the selected object.

Note

 
If no node has a reference to the selected object, a message appears stating: "Cannot find any node with reference to <xxx> object: <Yay>." (where <xxx> is the object type selected and <Yay> is the object selected).

Step 7

Select a node in the list and that node is highlighted in the script.


Find Nodes by Node Type

Procedure


Step 1

Open the Script Editor tool.

Step 2

Choose Edit > Find Node (Ctrl+F). The "Find Nodes" dialog box appears.

Step 3

In the "Find Nodes By" section, choose Node Type. A drop-down list appears providing a list of node types ("Please select node type:").

Step 4

Select the desired node type.

Step 5

Click Find. A "Nodes Found" dialog box appears displaying a list of nodes of the selected type.

Note

 
If no node of the selected type is found, a message appears stating: "Cannot find any node of <xxx> type." (where <xxx> is the node type).

Step 6

Choose a node in the list and that node is highlighted in the script.


Find Nodes by String

Procedure


Step 1

Open the Script Editor tool.

Step 2

Choose Edit > Find Node (Ctrl+F). The "Find Nodes" dialog box appears.

Step 3

In the "Find Nodes By" section, choose String. The "Please enter string:" field appears.

Note

 
The Find By String "Please enter string:" field entry is case insensitive.

Step 4

Enter the appropriate string into this field.

Step 5

Click Find. A "Nodes Found" dialog box appears displaying a list of nodes containing a substring of the input string.

Note

 
By default, Find does not search the "Comment" field in each node. Check the Search comment field option (Alt+F) to search on the "Comment" field as well.

Note

 
If no node has reference to the input string, a message appears stating: "Cannot find any node with reference to string <xxx>." (where <xxx> is the string selected).

Step 6

Choose a node in the list and that node is highlighted in the script.