Precision Queue

Capabilities

Precision Queues

Precision routing offers a multidimensional alternative to skill group routing: using Unified CCE scripting, you can dynamically map the precision queues to direct a call to the agent who best matches the caller's precise needs. Precision queues are the key components of precision routing.

To configure Precision Routing, you must do the following:

  1. Create attributes. Attributes are characteristics that can be assigned a True | False value or a Proficiency rating from 1 to 10.

  2. Assign attributes to agents.

  3. Create precision queues.

  4. Create routing scripts.

There is no need to add an agent to a precision queue; agents become members of precision queues automatically based on their attributes. If a precision queue requires an agent who lives in Boston, who speaks fluent Spanish, and who is proficient in troubleshooting a specific piece of equipment, an agent with the attributes Boston = True, Spanish = True, and Repair = 10 is automatically part of the precision queue. A Spanish caller in Boston who needs help with equipment is routed to that agent.

A precision queue includes:

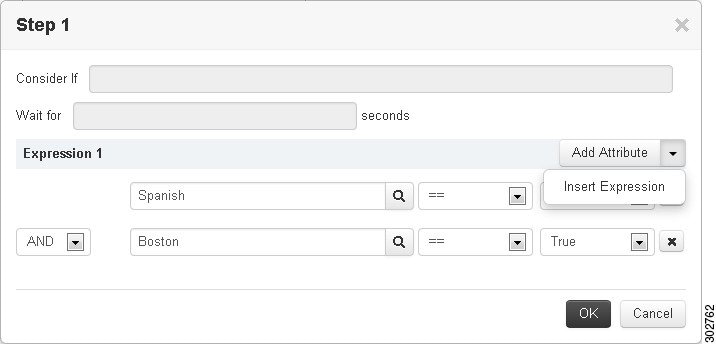
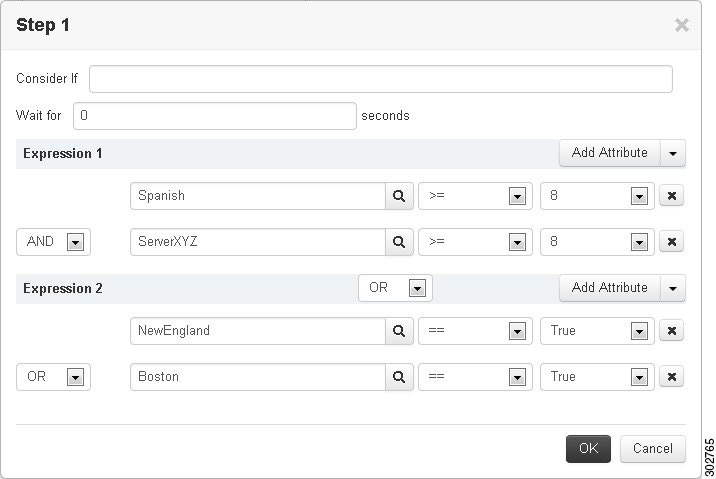
  • Terms: A term compares an attribute against a value. For example, you can create the following term: Spanish == 10. The term of the attribute is the highest proficiency in Spanish.

    Each precision queue can have multiple attributes, and these attributes can be used in multiple terms. For example, to select an agent with a Spanish proficiency value between 5 and 10, you would create one term for Spanish > 5 and another for Spanish < 10.

  • Expressions: An expression is a collection of one or more terms. The terms in an expression must share the same operator—they must all be AND or must all be OR relationships.


  • Steps: A precision queue step is a time-based routing point within the precision queue. A step is a collection of one or more expressions.

    A step may also include wait time and a Consider If formula. Use wait time to assign a maximum amount of time to wait for an available agent. Use a Consider If formula to evaluate the step against predefined criteria, for example, another queue.

Administrators can see and manage attributes. Supervisors can configure attributes for their supervised agents on the Attributes tab of the Agents tool.

Skill Groups or Precision Queues?

Should you use skill groups or precision queues for the routing needs of your organization? This section distinguishes the two methods.

Use a Skill Group

A skill group represents a competency or responsibility. For example, it could be a predefined collection of traits, such as salespeople who are in charge of selling to England. The skill group could be called "English sales". If you wanted to divide the agents in this group into two types of proficiencies (perhaps based on experience), you would need to set up two separate skill groups; for example, English Sales 1 and English Sales 2. You would then associate an agent with one of them, based on the agent's proficiency. Do this by accessing the skill group and locating the agent that you want to add to it (or add that skill group to the agent). To summarize, creating a skill group involves first building a concept of what combinations of traits you want for each agent, like English Sales 2.

Use a Precision Queue

In contrast to skill groups, a precision queue breaks down attribute definitions to form a collection of agents at an attribute level. The agents that match the attribute level of the precision queue become associated with that precision queue.

With precision queues, the preceding English sales example involves defining the attributes English and Sales, and associating agents that have those traits to them. The precision queue English Sales would dynamically map all those agents that had those traits to the precision queue. In addition, you can define more complex proficiency attributes to associate with those agents. This would allow you to build, in a single precision queue, multiple proficiency searches like English language proficiency 10 and sales proficiency 5.

To break down the precision queue example into skill groups, you would need to set up two separate skill groups: English language proficiency 10 and sales proficiency 5. With precision queues, you can refine agents by attributes. With skill groups, you define a skill group and then assign agents to it.

Decide on Skill Groups or a Precision Queue

Precision routing enhances and can replace traditional routing. Traditional routing looks at all of the skill groups to which an agent belongs and defines the hierarchy of skills to map business needs. However, traditional routing is restricted by its single-dimensional nature.

Precision routing provides multidimensional routing with simple configuration, scripting, and reporting. Agents are represented through multiple attributes with proficiencies so that the capabilities of each agent are accurately exposed, bringing more value to the business.

If your routing needs are not too complex, consider using one or two skill groups. However, if you want to conduct a search involving as many as ten different proficiency levels in one easily managed queue, use precision queues.

Attributes

Attributes identify a call routing requirement, such as language, location, or agent expertise. You can create two types of attributes: Boolean or Proficiency.

When you create a precision queue, you identify which attributes are part of that queue and then implement the queue in a script. When you assign a new attribute to an agent and the attribute value matches the precision queue criteria, the agent is automatically associated with the precision queue.

You must take system limits into account when you assign attributes to agents, and satisfy both of the following conditions:

  • A) an agent can have a maximum of 50 attributes

and

  • B) an agent can belong to a maximum total of 50 combined precision queues and skill groups

Failure to meet both of these conditions will result in an unsuccessful configuration operation.

For example, if a particular attribute is used in many precision queues, and that attribute is assigned to an agent, that agent belongs to all of those precision queues. It is therefore possible to exceed condition B by assigning just a few attributes to an agent, if those attributes are used in many precision queues.

It is therefore prudent to plan carefully and to keep system limits in mind when creating attributes and adding them to precision queues.

Navigate to Unified CCE Administration > Organization > Skills > Attributes to configure attributes.

Administrators can see and manage attributes. Supervisors can configure attributes for their supervised agents on the Attributes tab of the Agents tool.

Precision Queue Call Flow Example

At a high level, consider a 5-step precision queue with a Consider If formula for Caller is Premium Member attached to the Step 1:

  • Step 1 - Attribute: Skill > 8 - Consider If: Caller is Premium Member

  • Step 2 - Attribute: Skill > 6

  • Step 3 - Attribute: Skill > 4

  • Step 4 - Attribute: Skill > 3

  • Step 5 - Attribute: Skill >= 1

Caller John, who is not a premium customer, calls 1-800-repairs. John's call is routed to this precision queue.

  • Since John is not a premium customer, John is immediately routed out of Step 1 (because of the Consider If on Step 1) and into Step 2 where John waits for the call to be answered.

  • After the Step 2 wait time has expired, John's call moves to Step 3 to wait for an agent.

  • After the Step 3 wait time has expired, John's call moves to Step 4 to wait for an agent.

  • When it arrives at Step 5, John's call will wait indefinitely for an available agent. This step cannot be avoided by any call because there is no routing logic past this.

The overarching idea is that customer will use each successive step to expand the pool of available agents. Eventually, when you reach the "last" step (the step with the highest number), the call is waiting in a potentially very large pool of agents. With each extra step, the chances of the call being handled increase. This also puts the most valuable and skilled agents in the earlier precision queue steps. Calls come to them first before moving on the less appropriate agents in later steps.


Note


When two or more agents have the same proficiently level for the attributes the PQ step leverages the Longest Available Agent (LLA).


Scripts for Precision Queues

To implement Precision Routing in your contact center, you must create scripts.

You can create and use configured (static) and dynamic precision queue nodes in your scripts.

  • Static precision queue nodes target a single, configured precision queue. When the script utilizes a single precision queue, use static precision queues.

  • Dynamic precision queue nodes are used to target one or more previously configured precision queues. Use dynamic precision queues when you want a single routing script for multiple precision queues (for example, when the overall call treatment does not vary from one precision queue to another). Dynamic precision queues can simplify and reduce the overall number of routing scripts in the system.

Precision Queue Script Node

Use the Precision Queue script node to queue a call based on caller requirements until an agent with desired proficiency become available. This node contains multiple agent selection criteria which are separated into steps.

A single call can be queued on multiple precision queues. If an agent becomes available in one of the precision queues, the call is routed to that resource. You cannot reference multiple precision queues with a single Precision Queue node. However, you can run multiple Precision Queue nodes sequentially to achieve this.

The Precision Queue node includes a Priority field, which sets the initial queuing priority for the calls processed through this node versus other calls queued to the other targets using different nodes. The priority is expressed as an integer from 1 (top priority) to 10 (least priority). The default value is 5.

If more than one call is queued to a precision queue when an agent becomes available, the queued call with the lowest priority number is routed to the target first. For example, assume an agent in a precision queue becomes available and two calls are queued to that precision queue. If one call has priority 3 and the other has priority 5, the call with priority 3, the lower value, is routed to the precision queue while the other call continues to wait. If the priorities of the two calls are same, then the call queued first is routed first.

VRU (voice response unit) script instructions are not sent to the VRU. If a call enters the precision queue node and no resource is available, the call is queued to the precision queue and the node transfers the call to the default VRU, if the call is not already on a VRU. The script flow then exits immediately through the success branch. The script should then continue with a run external script node to instruct the VRU what to do while holding the call until an agent becomes available. Typically, this invokes a network VRU script that plays music-on-hold, possibly interrupted on a regular basis with an announcement. The script flow can also use other queuing nodes to queue the same call to other targets, for example, Queue to Skill Group and Queue to Agent.


Note


Non-voice tasks can also be picked or pulled out of turn from queues, not necessarily based on the priority of the call. Such non-voice tasks that are picked or pulled by a specific agent, require a Pick/Pull node to be used in the ICM script. However, the agents belonging to other skill groups or precision queues can also pick tasks that may be queued in Skill Groups or Precision Queues other than their own. These are denoted by Picked by another Skillgroup/PQ or Pulled by another Skillgroup/PQ monitor labels, when viewing the scripts in monitor mode.


Queuing Behavior of the Precision Queue Node

Precision queues internally are configured with one or more time-based steps, each with a configured wait time. After a call is queued, the first step begins and the timer starts. This occurs although the path of the script exited the success node and a new node may be targeted (for example, Run Ext. Script).

If the timer for the first step expires, control moves to the second step (assuming one exists), and so on. As long as the call remains in queue and there are steps left to perform, the call internally continues to move between steps regardless of the path the call takes after it leaves the precision queue node. If a call is queued to two or more precision queues, the call internally walks through the steps for each precision queue in parallel. After the call reaches the last step on a precision queue, it remains queued on that step until the call is routed, abandoned, or ended.

If there is an update to the precision queue definition, then all queued calls in the precision queue are re-evaluated and are re-run from the first step.

For example, consider the wait time for an ongoing call at step 1 to be 1080 seconds, of which 1000 seconds has already elapsed. Now, suppose the wait time is changed to 900 seconds, then the wait time for this call is also reset to 900 seconds, even though only 80 more seconds are left to move to the next step.

Dynamic Limits for Skill Groups and Precision Queues Per Agent

The number of skill groups and precision queues per agent significantly affects the following subcomponents of Unified CCE:

  • Cisco Finesse servers

  • Agent PGs

  • Router

  • Logger


Note


We use queue as a common term for skill groups and precision queues.


To maintain the performance of your solution, periodically remove unused queues.

The Reference Designs set a standard limit for the average queues per agent on each PG. On a particular PG, some agents can have more queues than other agents. As long as the average across all the agents on the PG is within the limit, you can still have the maximum active agents on that PG.

For example, assume that you have three groups of agents on a PG in a 4000 Agent Reference Design:

  • Group A has 500 agents with five queues each.

  • Group B has 1000 agents with 15 queues each.

  • Group C has 500 agents with 25 queues each.

These three groups average to 15 queues per agent, so you can have them all on a single PG under the standard limits.

You can also exceed that standard limit if you reduce the number of agents on each PG and on the whole system.


Note


See the configuration tables in the configuration limits chapter for the standard limits.


The Cisco Finesse server doesn’t display statistics for unused queues. So, the active queues affect the performance of the Cisco Finesse server more than the total configured queues.

The Cisco Finesse desktop updates queue (skill group) statistics at 10-second intervals. The Cisco Finesse Desktop also supports a fixed number of queue statistics fields. You can’t change these fields.

This table shows the approximate reduction in the number of agents your solution can support with more queues per agent:

Table 1. Dynamic Agents and Queues Limits

Queues per Agent

Maximum Agents per PG

Maximum Agents for 2000 Agent Reference Design

Maximum Agents for 4000 Agent Reference Design1

Maximum Agents for 12000 Agent Reference Design

Maximum Agents for 24000 Agent Reference Design

10

2000

2000

4000

12000

24000

15

2000

2000

4000

12000

16000

20

1500

1500

3000

9000

12000

30

1000

1000

2000

6000

8000

40

750

750

1500

4500

6000

50

600

600

1200

3600

4800

1 You can’t have more than 4000 Agents on a Rogger deployment.

Unified CCE supports a maximum of 50 unique skill groups across all agents on a supervisor’s team, including the supervisor’s own skill groups. If this number is exceeded, all skill groups that are monitored by the supervisor still appear on the supervisor desktop. However, exceeding this number can cause performance issues and isn’t supported.


Note


Each precision queue that you configure creates a skill group for each Agent PG and counts toward the supported number of skill groups per PG. The skill groups are created in the same Media Routing Domain as the precision queue.


Initial Setup

When you configure precision queues associated with a large number of agents, the system avoids potential overload conditions by updating the agent associations as system resources allow. Updates may take a few minutes. If you submit multiple configuration updates, the system has a threshold of five concurrent configuration updates, and will reject any updates that exceed the threshold.

Add Attributes

Procedure


Step 1

Navigate to Unified CCE Administration > Organization > Skills > Attributes.

Step 2

In the List of Attributes window, click New. The New Attributes window has two tabs: General and Member.

Step 3

Complete the following fields on the General tab:

Field Required Description

Name

yes

Type a unique attribute name. For example, to create an attribute for mortgage insurance, type mortgage.

Description

no

Enter a maximum of 255 characters to describe the attribute.

Type

no

Select the type: Boolean or Proficiency.

Default

no

Select the default (True or False for Boolean, or a number from 1 to 10 for Proficiency).

Step 4

Click Save.


Search for Agents

The Search field in the Agents tool offers an advanced and flexible search.

Click the + icon at the far right of the Search field to open a popup window, where you can:

  • Select to search for agents only, supervisors only, or both.

  • Select to search for all agents or only ECE enabled agents.

  • Enter a username, agent ID, first or last name, or description to search for that string.

  • Enter one or more site names separated by spaces. (Site is an OR search.)

  • Enter one or more peripheral set names separated by spaces (Peripheral Set is an OR search). The search is case-insensitive and does not support partial matches.


Note


Search by department is available only when departments are configured.


Assign Attributes to Agents

Procedure


Step 1

With the selected agent displayed, click the Attributes tab.

Step 2

Complete the Attributes tab:

This tab shows the attributes associated with this agent and their current values.

Click Add to open a popup list of all attributes, showing the name and current default value for each.

  1. Click the attributes you want to add for this agent.

  2. Set the attribute value as appropriate for this agent.


Add Precision Queue

Procedure


Step 1

Navigate to Unified CCE Administration > Organization > Skills > Precision Queues.

This opens a List of Precision Queues window showing all precision queues that are currently configured.

Step 2

Click New to open the New Precision Queue window. Complete the fields.

Name Required Description

Description

no

Enter up to 255 characters to describe the precision queue.

Media Routing Domain

no

MRDs organize how requests for media are routed. The system routes calls to skill groups or precision queues that are associated with a particular communication medium; for example, voice or email. This field defaults to Cisco_Voice.

Service Level Type

yes

Select the service level type used for reporting on your service level agreement.

Service level type indicates how calls that are abandoned before the service level threshold affect the service level calculation.

  • Ignore Abandoned Calls (the default): Select this option if you want to exclude abandoned calls from the service level calculation.

  • Abandoned Calls have Negative Impact: Select this option if you want only those calls that are answered within the service level threshold time to be counted as treated calls. The service level is negatively affected by calls that abandon within the service level threshold time.

  • Abandoned Calls have Positive Impact: Select this option if you consider a call that is abandoned within the service level threshold time as a treated call. With this configuration, abandoned calls have a positive impact on the service level.

Service Level Threshold

yes

Enter the time in seconds that calls are to be answered based on your service level agreement, from 0 to   2,147,483,647.

The time that you enter in this field is used to report on service level agreements and does not affect how long a call remains in a precision queue. The length of time a call remains in a step is determined by the wait time for each individual step.

Agent Order

yes

Select an option to determine which agents receive calls from this queue.

The ordering of agents does not dictate the agents who are selected into a Precision Queue step. Agents are included or excluded based on the conditions specified for the step.

  • Longest Available Agent (the default): The default method of agent ordering for a precision queue. The call is delivered to the agent who has been in the available (or ready) state the longest.

  • Most Skilled Agent: The call is delivered to the agent who has the highest competency sum from all the attributes pertinent to the Precision Queue step. In an agent-rich environment, this can mean that more competent agents would be utilized more than less competent agents.

  • Least Skilled Agent: The call is delivered to the agent who has the lowest competency sum from all the attributes pertinent to the Precision Queue step.

Bucket Intervals

no

Select the bucket interval whose bounds are to be used to measure the time slot in which calls are answered.

The field defaults to the system default.

To select a different bucket interval:

Step 3

Click the numbered Step Builder link (Step 1, Step 2, and so on) to build a precision queue step in the Step Builder popup window.

Step 4

When you have finished adding, click Save.


Consider If Formula for Precision Queue

If you are not on the last step of the precision queue, then you can enter a Consider If formula for that step. A Consider If formula evaluates a call (within a step) against additional criteria. Each time a call reaches a step with a Consider If expression, the expression is evaluated. If the value for the expression returns as true, the call is considered for the step. If the value returns as false, the call moves to the next step. If no expression is provided for a step, the step is always considered for calls.

To add a Consider If formula, type the formula into the Consider If box. Alternatively, you can use the Script Editor to build the formula and then copy and paste it into the Consider If box. Objects used in Consider If formulas are case-sensitive. All Consider If formulas that you add to a precision queue must be valid. If you add an invalid formula, you cannot save the precision queue. To ensure that the formula is valid, use Script Editor to build and validate the formula.

Only the following scripting objects are valid in a Consider If formula:

  • Call

  • PQ

  • Skillgroup

  • ECC

  • PQ Step

  • Call Type

  • Custom Functions (You can create custom functions in Script Editor.)

It is possible that a valid Consider If formula can become invalid. For example, if you delete an object used in the formula after you create or update the precision queue, the formula is no longer valid.

Consider If Formula Examples

  • PQ.PQ1.LoggedOn > 1--Evaluates whether there is more than one agent logged in to this queue.

  • CallType.CallType1.CallsRoutedToday > 100--Evaluates whether more than 100 calls of this call type were routed today.

  • PQStep.PQ1.1.RouterAgentsLoggedIn > 1--Evaluates whether there is more than one router agent logged in to this queue for Step 1.

  • CustomFunction(Call.PeripheralVariable1) > 10--Evaluates whether this formula using a custom function returns a value greater than 10.

Build Precision Queue Steps

Every precision queue must have a step, and every step must have an Expression. An Expression is a collection of attribute terms.

Procedure


Step 1

Click the numbered step link in the Steps panel (Step 1, Step 2, and so on).

The step number popup window opens.

Step 2

Build the first step as follows.

  1. Click the magnifying glass icon to the right of the Select Attribute field in the Expression 1 panel.

  2. Select an attribute from the list.

  3. Use the two Select fields to establish the terms of the attribute. Click the first Select field to choose an operator.

    • For Boolean attributes, choices are the operators for Equal and Not Equal.

    • For Proficiency attributes, choices are the operators for True, False, Less Than, Less Than or Equal To, Greater Than, and Greater Than or Equal To.

  4. Click the second Select field to choose a value.

    • For Boolean attributes, values are True and False.

    • For Proficiency attributes, values are numbers from 1 to 10.

    Your selection creates an attribute term for the Expression.

Step 3

To add a second attribute to the first Expression, click Add Attribute in the Expression 1 row.

  1. Select AND or OR to establish the relationship between the first and second attributes.

  2. Repeat steps 2b, 2c, and 2d.

Step 4

Continue to add attributes to Expression 1.

All attributes within an expression must be joined by the same logical operator. They must all be ANDs, or they must all be ORs.

Step 5

To add a second Expression, click the Add Attribute drop-down in the Expression 1 row and select Add Expression.

Step 6

Select AND or OR to establish the relationship between the first and second Expressions.

Step 7

Add attributes to Expression 2.

Step 8

Continue to add Expressions as needed.


In this example, a Spanish caller located in the Boston area needs an onsite visit from a technician to repair his ServerXYZ. An ideal agent should be fluent in Spanish and have the highest proficiency in ServerXYZ. This can be seen in Expression 1. Expression 2 allows us to specify that the selected agent must also be from either Boston or the New England area.

Step 9

When you have completed the step, click OK to add it to the precision queue.

Step 10

To build the next step, click Add Step.

Each successive step is prepopulated with the Expressions and attributes of its predecessor. Decrease the attribute qualifications and competencies in successive steps to lower the bar such that the pool of acceptable agents increases.

Step 11

When you have created all steps, you can open any step except the last and enter values in the Consider if and Wait for fields.

  • Consider if is a formula that evaluates a call within a step against additional criteria. (See Consider If Formula for Precision Queue for more information about Consider If.)

  • Wait for is a value in seconds to wait for an available agent. A call will queue at a particular step and wait for an available agent matching that step criteria until the number of seconds specified. A blank wait time indicates that the call will proceed immediately to the next step if no available agents match the step criteria. Wait time defaults to 0 and can take a value up to 2147483647.


Configure a Static Precision Queue

Procedure


Step 1

In the Precision Queue Properties dialog box, select the Statically option.

Step 2

From the list, select a precision queue to which to route all calls that enter this node.

Step 3

In the Priority selection box, select the initial queuing priority for calls processed through this node. You can select from 1 - 10. The default is 5.

Step 4

Check the Enable target requery check box to enable the requery feature for calls processed through this node.

Step 5

Check the Wait if Agents Not Logged In check box.

If this check box is selected and the agents associated with this step are not logged in, then the router waits for the time that is configured for that step. Whereas, if this check box is not selected, the router does not wait on any step.

Note

 
The router waits indefinitely on the last step, irrespective of the selection of this check box.

Step 6

To edit a precision queue, select a precision queue from the list, and then click Edit Precision Queue.


Configure a Dynamic Precision Queue

Procedure


Step 1

In the Precision Queue Properties dialog box, select the Dynamically option.

Step 2

In the Priority selection section, select the initial queuing priority for calls processed through this node. You can select from 1 - 10. The default is 5.

Step 3

Check the Enable target requery check box to enable the requery feature for calls processed through this node.

Step 4

Check the Wait if Agents Not Logged In check box.

If this check box is selected and the agents associated with this step are not logged in, then the router waits for the time that is configured for that step. Whereas, if this check box is not selected, the router does not wait on any step.

Note

 
The router waits indefinitely on the last step, irrespective of the selection of this check box.

Step 5

Select a queue option:

  • To dynamically route calls that enter this node to a precision queue name, select the Precision Queue Name option.
  • To dynamically route calls that enter this node to a precision queue ID, select the Precision Queue ID option.

Step 6

Click Formula Editor to create a formula that determines the precision queue name or ID to which to route calls.