Unified CCX or IPIVR-Specific VM Installation Information

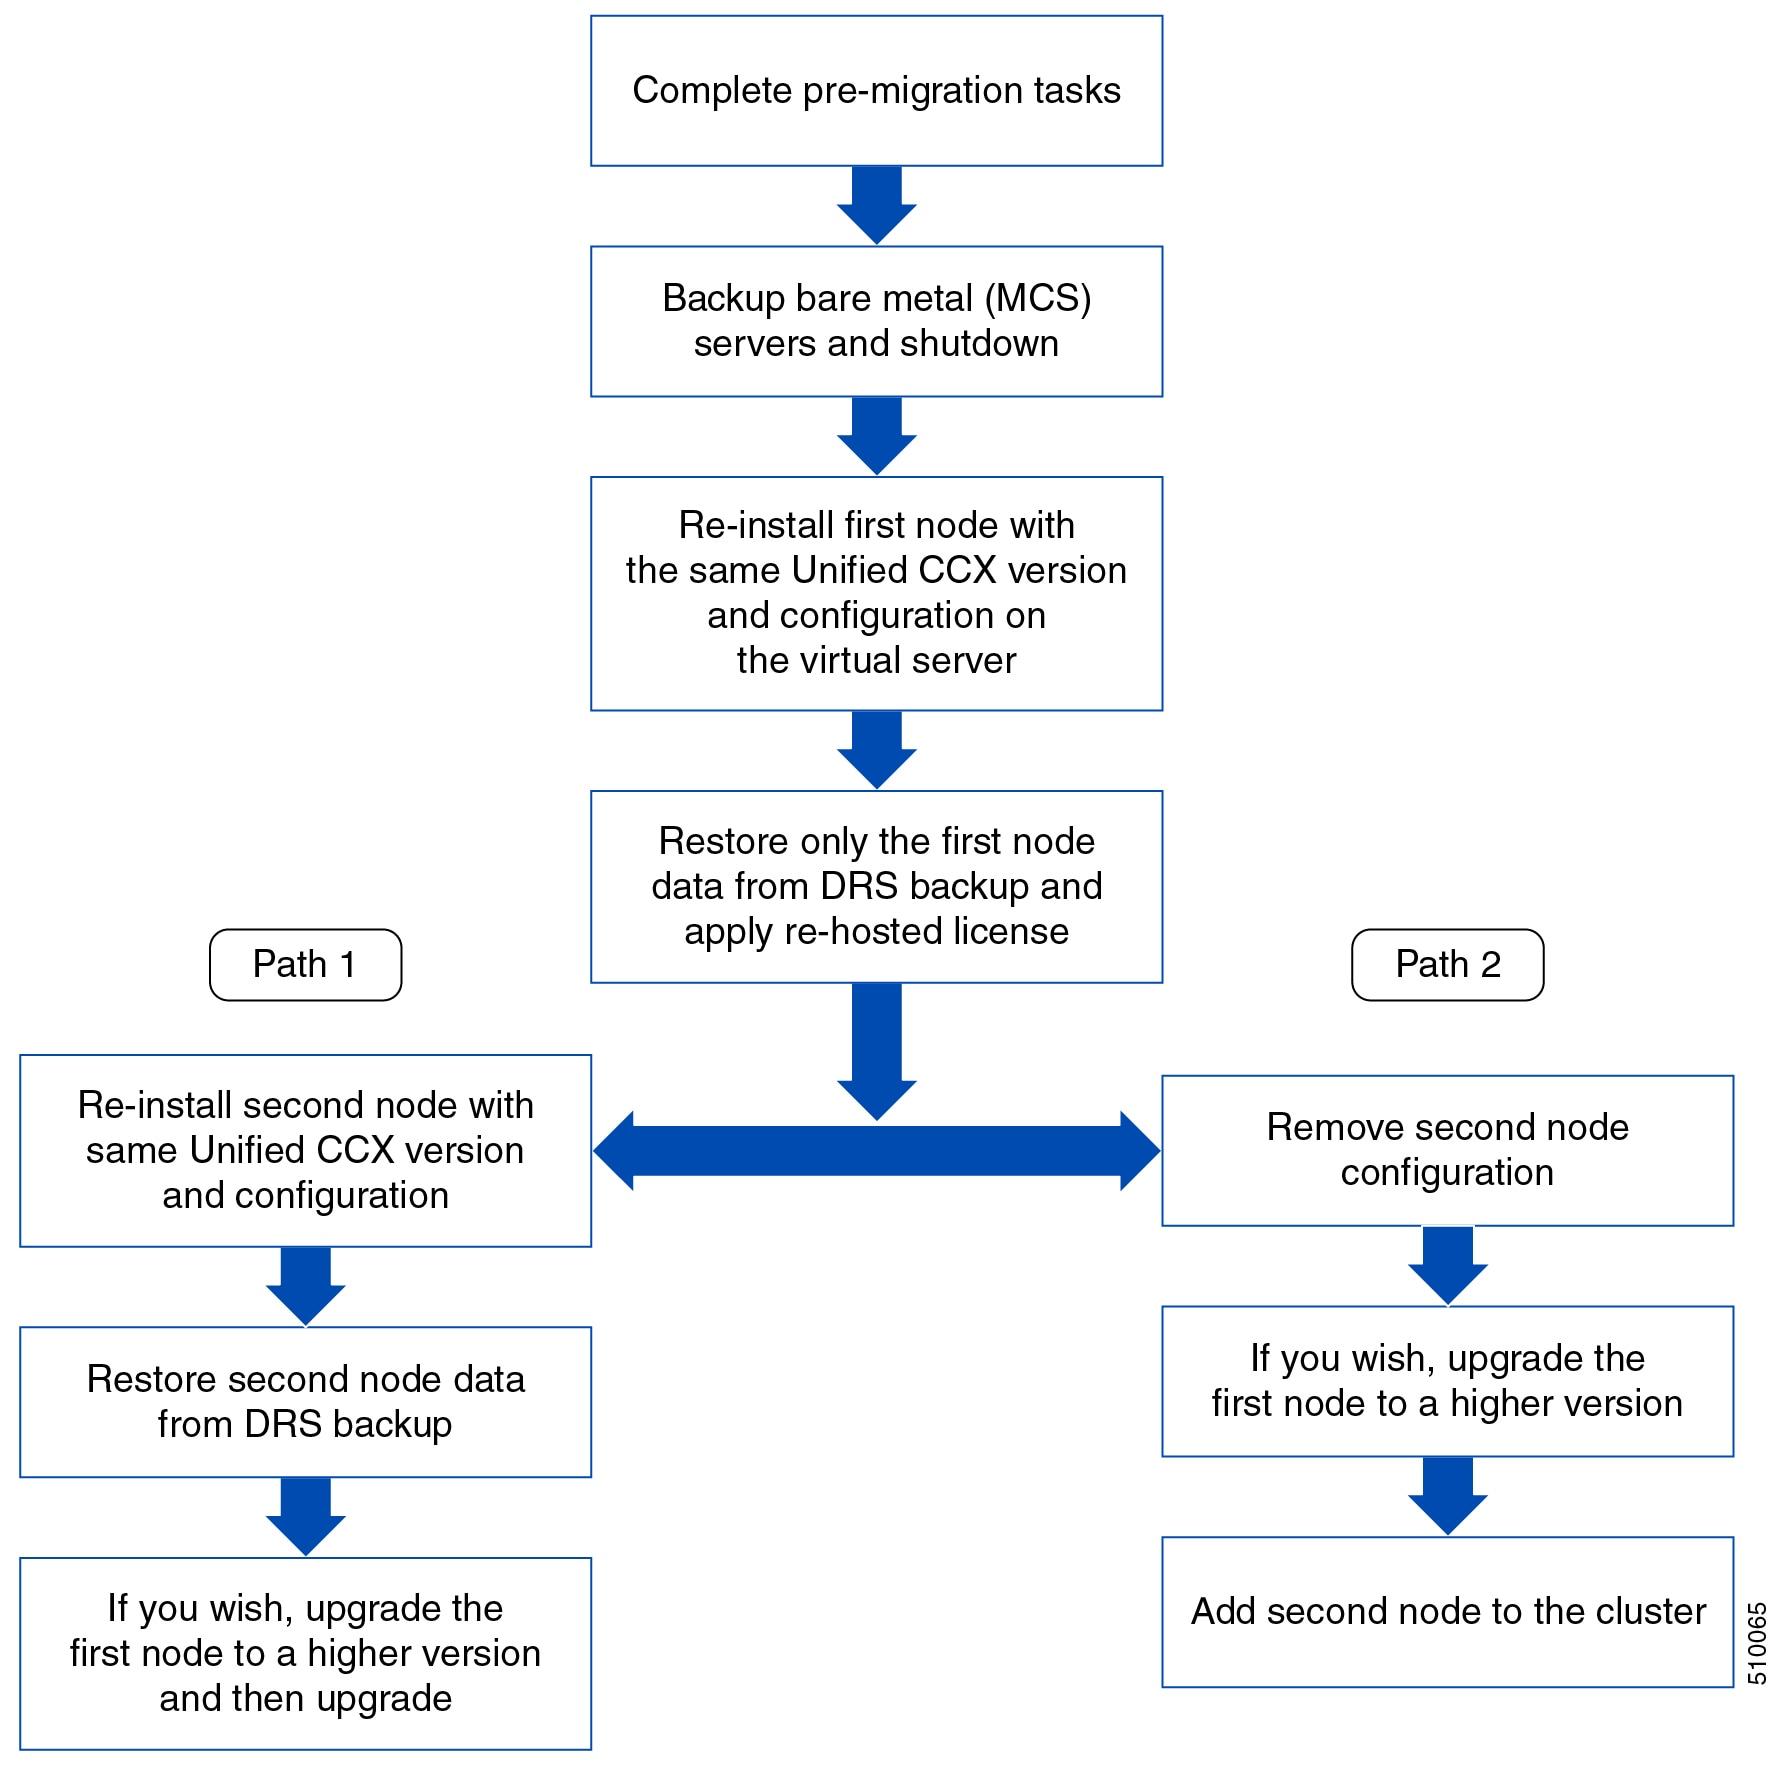
Migrating and Upgrading Unified CCX from Physical to Virtual Server

To migrate and upgrade Unified CCX from a physical server to a virtual server, you can follow either of the following paths.


Note

Only virtual servers are supported from Unified CCX release 10.0(1).


For more information on supported upgrade paths, see the Software and Hardware Compatibility Guide for Cisco Unified CCX and Cisco Unified IP IVR, available here:

http://www.cisco.com/c/en/us/support/customer-collaboration/unified-contact-center-express/products-device-support-tables-list.html

Pre-migration checklist

Complete the following steps before you start migration:

Procedure


Step 1

Run utils create report platform command and obtain the platformConfig.xml for the existing nodes.

Step 2

Go to http://www.cisco.com/web/cuc_afg/index.html to access the Answer File Generator.

Step 3

Enter the information for appropriate fields referring the platformConfig.xml. Password is encrypted, enter the decrypted password.

Step 4

Click Generate Answer Files to get platformConfig.xml and license MAC.

Step 5

Make a note of the license MAC that is displayed.

Step 6

Get the rehosted license.

  1. Go to https://tools.cisco.com/SWIFT/LicensingUI/Home.

  2. Click Transfer > License for Rehost-initiate.

  3. Select the licenses to transfer and click Next.

    Note 

    If the licenses are not displayed in the table. Specify the device details. For more information, see the video "How to Rehost and RMA Licenses", available at: https://tools.cisco.com/SWIFT/LicensingUI/Home.

  4. Enter the new MAC address and click Next.

  5. Enter the email details to receive the re-hosted license and click Submit.

Step 7

(Path 2) Before you remove the second node, archive the recordings. See "Exporting Recordings From CAD" section of Cisco CAD Installation Guide available at: http://www.cisco.com/en/US/products/sw/custcosw/ps1846/prod_installation_guides_list.html.

Note 

Unifed CCX stores 2.6 GB of recordings on the first node and 2.6 GB on the second node. If you choose Path 2 then the recordings on the second node are lost.


Migrating Unified CCX

Complete the following steps to migrate Unified CCX from a physical server to virtual server:

Task

Reference

Backup Unified CCX on bare metal server and store the backup TAR file at a safe SFTP network location. Shutdown the server.

See Backup and Restore section of Cisco Unified Contact Center Express Administration and Operations Guide, available here: http://www.cisco.com/en/US/products/sw/custcosw/ps1846/prod_maintenance_guides_list.html.

Install ESXi on any one of the Unified CCX Supported Hardware for Virtualization.

See ESXi_Support_for_Contact_Center_Applications for ESXi version support information.

Deploy virtual machines from the templates.

See Readme with the Unified CCX virtual machine template.

Install the same version of Unified CCX on the virtual machine with the same network and platform settings of the bare metal server.

See Unified CCX Installation section of Cisco Unified Contact Center Express Installation and Upgrade Guide, available here: http://www.cisco.com/en/US/products/sw/custcosw/ps1846/prod_installation_guides_list.html.

For unattended installation, see the Perform Unattended Installation Using Answer File Generator section of the Cisco Unified Contact Center Express Installation and Upgrade Guide.

Restore the first node from DRS backup.

See Backup and Restore section of Cisco Unified Contact Center Express Administration and Operations Guide, available here: http://www.cisco.com/en/US/products/sw/custcosw/ps1846/prod_maintenance_guides_list.html.

(Path 1) Re-install second node

and

(Path 1) Restore second node.

To re-install, second node, see Unified CCX Installation section of Cisco Unified Contact Center Express Installation and Upgrade Guide, available here: http://www.cisco.com/en/US/products/sw/custcosw/ps1846/prod_installation_guides_list.html

To restore second node, See Backup and Restore section of Cisco Unified Contact Center Express Administration and Operations Guide, available here: http://www.cisco.com/en/US/products/sw/custcosw/ps1846/prod_maintenance_guides_list.html.

(Path 2) Remove second node.

To remove second node,
  1. Login to Unified CCX Administration page.

  2. Click System > Server.

Upgrading Unified CCX

To upgrade Unified CCX, see Unified CCX Upgrade section in this guide.

Modifying Virtual Machine Settings after Upgrade (L2 and RU) to Version 10.0(1) and later

You can make all of the following modifications after you shutdown the Unified CCX server.

Migrating to Different Agent VM Profile

When there is any change in the agent Virtual Machine (VM) profile, ensure that a complete backup is taken of the existing Unified CCX system. Delete the existing VM on which the Unified CCX is installed before the new VM is created with the new required agent profile. After the Unified CCX is installed on this VM, then restore the backup from the Unified CCX that was initially taken.

Modifying RAM

If you perform an L2 (Linux to Linux) or RU (Refresh Upgrade) upgrade to 10.0(1) and later version from a previous version, and after performing the switch-version, the following error message might appear when you log in to the Unified CCX Administration: Error: VM configuration does not match the OVA profile. To resolve the error, follow these steps:

Procedure


Step 1

Shut down the Unified CCX server.

Step 2

Increase the vRAM size as per the above table for 10.0(x) and later versions.

Note 

Do not perform any changes to the existing vDisk.

Step 3

Power on the Unified CCX server.


Modifying vNIC

If you are upgrading to Unified CCX 10.5(1) and later from a previous version, change the vNIC to VMXNET3 using the following switch-version steps:

Procedure


Step 1

Shut down the Unified CCX server.

Step 2

To modify the vNIC settings, use one of the following methods:

  • Modify vNIC when MAC Address Is Automatic
  • Modify vNIC when MAC Address Is Manual
  • Use PowerCLI to Modify vNIC
Note 

First, confirm whether the existing network adapter is configured with a manual (static) or automatic (dynamic) MAC address.


Modifying vNIC when MAC Address Is Automatic

Procedure


Step 1

Navigate to the Summary tab for the VM, choose Edit Settings.

Step 2

Choose Network adapter 1 and check whether the radio button in the MAC Address section is selected for Automatic or Manual (do not make any changes).

Step 3

Choose substep a or b below and accordingly follow the steps. If you have the proper VMware license you can also use the PowerCLI method substep c instead of substep a or b. The PowerCLI method is applicable for both Automatic and Manual MAC address configurations.

  1. If the existing network adapter is configured with an **Automatic** (dynamic) MAC address, the administrator needs to modify the virtual machine configuration file.

    For tips on how to edit the vmx file, see Tips for editing a .vmx file (http://kb.vmware.com/kb/1714).

    Before you edit the .vmx file be sure to do the following:

    • The file has a file extension of ".vmx" and can be found in: /vmfs/volumes/datastore/virtual_machine_directory/virtual_machine_name.vmx.

    • Always power off the virtual machine.

    • Determine location of virtual machine datastore and host (or cluster).

    • Make sure you are logged on as a user with the correct permission level to edit the file.

    Below is an example list of steps to accomplish this process. Depending on the specific version of ESXi in your environment and other variables some of these steps may vary slightly.

    1. Navigate to the Summary tab for the VM in question, right-click the Storage volume on which the VM is located, and choose Browse this datastore.

    2. In the Datastore Browser window, locate and select the relevant folder for the VM in question.

    3. Right-click on the <virtual_machine_name>.vmx file and choose Download..., selecting a folder on your local machine for the file.

    4. Make a backup copy of the .vmx file on your local machine by running the following commands from a Windows Command Prompt in the same folder as the downloaded .vmx file. If your edits break the virtual machine, you can roll back to the original version of the file. copy "<virtual_machine_name>.vmx" "<virtual_machine_name>.vmxBACKUP".

    5. Add the necessary configuration to the end of the .vmx file by running the following commands from a Windows Command Prompt in the same folder as the downloaded .vmx file copy "<virtual_machine_name>.vmx" temp_file.vmx findstr /V /R "^ethernet0.virtualDev.*" temp_file.vmx > "<virtual_machine_name>.vmx" echo ethernet0.virtualDev = "vmxnet3" >> "<virtual_machine_name>.vmx".

    6. Upload the edited <virtual_machine_name>.vmx file to the Datastore by selecting the relevant folder for the VM in question in the Datastore Browser window, clicking the button for "Upload files to this datastore", and choosing "Upload File...".

    7. Locate the edited <virtual_machine_name>.vmx file from your local machine and select it, acknowledging that existing files of the same name will be overwritten Note: Keep the "Datastore Browser" window open, as you will need it again in Step x.

    8. Now that .vmx file is updated, note on which ESXi host the VM in question is located.

    9. From the main vSphere client window, right-click the VM in question in the list of VMs and choose "Remove from Inventory."

    10. Navigate back to the "Datastore Browser" (from the window left open earlier. Otherwise, open the Datastore Browser from another VM's Summary page "Storage" list or the ESXi host's Summary page "Storage" list).

    11. Locate and select the relevant folder for the VM in question.

    12. Right-click on the <virtual_machine_name>.vmx file and choose "Add to Inventory."

    13. Step through the "Add to Inventory" wizard, selecting the same host on which you previously noted the VM was located. These steps will ensure that the VM will utilize the updated .vmx file using the network adapter type as "vmxnet3."

    14. On the newly-readded VM you can verify the change by selecting "Edit Settings..", choosing "Network adapter 1" and verifying that the "Adapter Type" section shows "Current adapter: VMXNET 3."

  2. If the existing network adapter is configured with a **Manual** (static) MAC address, the administrator can simply remove the existing network adapter and add a new network adapter using the same MAC address:

    1. Verify VM is powered off.

    2. Save MAC address of the existing Network adapter.

    3. Delete existing Network adapter.

    4. Add new Network Adapter using the "VMXNET 3" Adapter type. Use the previously saved MAC address in the manual configuration box.

  3. Alternatively, the VMware vSphere PowerCLI can be used to edit the .vmx file with the proper network adapter configuration. The VMware vSphere PowerCLI (set cmdlet) is supported in the following environment:

    • Cisco UC Virtualization Foundation (appears as "Foundation Edition" in vSphere Client).

    • VMware vSphere Standard Edition, Enterprise Edition, or Enterprise Plus Edition.

    • Evaluation mode license.

      The VMware vSphere PowerCLI (set cmdlet) is NOT supported in the following environment:

    • Cisco UC Virtualization Hypervisor (appears as "Hypervisor Edition" in vSphere Client).

    • VMware vSphere Hypervisor Edition.

    1. Install VMware vSphere PowerCLI (http://www.vmware.com/support/developer/PowerCLI/).

    2. Always power off the virtual machine.

    3. From the Windows "Start" menu select Start -> All Programs -> VMware -> VMware vSphere PowerCLI -> VMware vSphere PowerCLI.

    4. Running the following commands, replacing <virtual_machine_host> with the ESXi host machine hostname and <virtual_machine_name> with the actual virtual machine name. Enter credentials when prompted. Connect-VIServer <virtual_machine_host> get-vm "<virtual_machine_name>" | get-networkadapter | set-networkadapter -type "vmxnet3"

    Once the virtual machine is modified, reload it Get-View -ViewType VirtualMachine -Filter @{"Name" = "<virtual_machine_name>"} | %{$_.reload()}

Step 4

Power on the Unified CCX server.


Modifying Guest OS and Update VMWare Tools

Use the following steps to change the Guest OS version and upgrade VMware tools to upgrade to Unified CCX 9.x, 10.x, and later from a previous version:

Procedure


Step 1

Shut down the Unified CCX server.

Step 2

Modify the Guest OS settings on the Virtual Machine to the Red Hat Enterprise Linux version based on the virtualization tables at Virtualization for Cisco Unified Contact Center Express. For example, Unified CCX 10.5.1 supports RHEL 6 (64-bit).

Step 3

Power on the Unified CCX server.

Note 

When Cisco provided OVA is deployed using the thin client of vCenter 6.5, ensure that Check and upgrade Tools during power cycling setting is enabled. This setting enables the VMware tools to get automatically upgraded when powered on.

Step 4

Upgrade VMware Tools.


Modifying Virtual Machine Settings after Upgrade (L2 and RU) to Version 11.0(1) and later

You can make all of the following modifications after you shutdown the Unified CCX server.

Modifying Video Card Settings

Use the following steps to change the Video card settings:

Procedure


Step 1

Shut down the Unified CCX server.

Step 2

Increase the Total video memory size to 8 MB.

Step 3

Power on the Unified CCX server.


New Identity Support for Unified CCX or IPIVR 9.0(2)

Use this feature to quickly deploy new instances of Unified CCX.

In the current version, using this procedure you can deploy Publisher Node/First Node of a Unified CCX cluster only. Install the Subscriber Node/Second Node using the standard installation procedure.

Perform the following procedure to create the new identity:

Procedure


Step 1

Use the correct OVA to create a new VM for the Unified CCX virtual machine.

Step 2

Use the standard installation process to install the Unified CCX product.

Step 3

After the installation, do not perform any configuration. Convert the VM into a template.

Step 4

Use that template to create a new virtual machine instance.

Step 5

Power on the VM.

Step 6

Use the Answer File Generator tool (http://www.cisco.com/web/cuc_afg/index.html) to create a platformConfig.xml file.

Step 7

Insert the XML file into a virtual floppy instance (for directions, see http://kb.vmware.com/selfservice/microsites/search.do?language=en_US&cmd=displayKC&externalId=1739).

Step 8

Mount the .flp file in the floppy drive of the new VM.

Step 9

Log in to the CLI of the VM (using the console or SSH) and run the command β€œutils import config”. The system reboots and restarts with the new identity.