Phone Installation

Verify the Network Setup

As they deploy a new IP telephony system, system administrators and network administrators must complete several initial configuration tasks to prepare the network for IP telephony service. For information and a checklist for setting up and configuring a Cisco IP telephony network, see the documentation for your particular Cisco Unified Communications Manager release.

For the phone to operate successfully as an endpoint in your network, your network must meet specific requirements. One requirement is the appropriate bandwidth. The phones require more bandwidth than the recommended 32 kbps when they register to Cisco Unified Communications Manager. Consider this higher bandwidth requirement when you configure your QoS bandwidth. For more information, refer to Cisco Collaboration System 12.x Solution Reference Network Designs (SRND) or later ( https://www.cisco.com/c/en/us/td/docs/voice_ip_comm/cucm/srnd/collab12/collab12.html ).


Note


The phone displays the date and time from Cisco Unified Communications Manager. The time displayed on the phone can differ from the Cisco Unified Communications Manager time by up to 10 seconds.


Procedure


Step 1

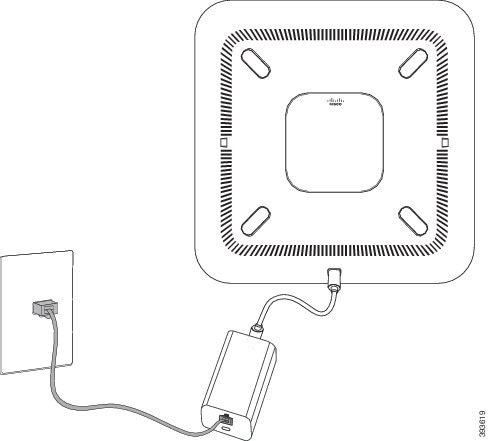
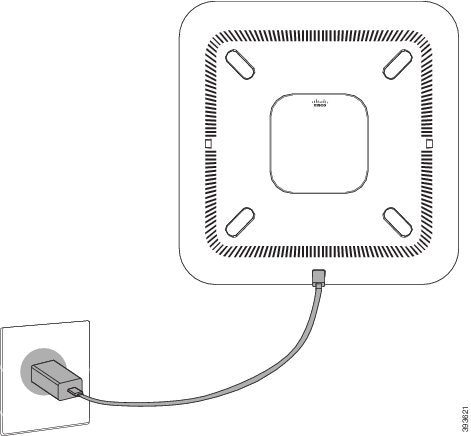
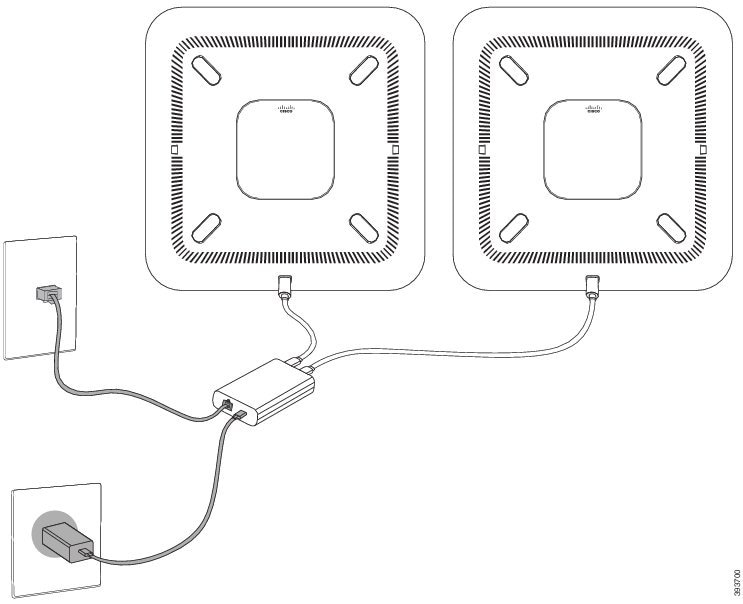
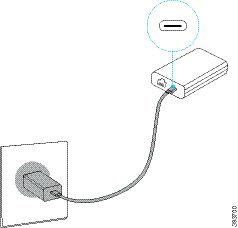
Configure a VoIP Network to meet the following requirements:

  • VoIP is configured on your routers and gateways.

  • Cisco Unified Communications Manager is installed in your network and is configured to handle call processing.

Step 2

Set up the network to support one of the following:

  • DHCP support

  • Manual assignment of IP address, gateway, and subnet mask


Activation Code Onboarding for On-premises Phones

You can use Activation Code Onboarding to quickly set up new phones without autoregistration. With this approach, you control the phone onboarding process using the one of the following:

  • Cisco Unified Communications Bulk Administration Tool (BAT)

  • Cisco Unified Communications Manager Administration interface

  • Administrative XML Web Service (AXL)

Enable this feature from the Device Information section of the Phone Configuration page. Select Require Activation Code for Onboarding if you want this feature to apply to a single on-premises phone.

Users must enter an activation code before their phones can register. Activation Code Onboarding can be applied to individual phones, a group of phones, or across an entire network.

This is an easy way for users to onboard their phones because they only enter a 16-digit activation code. Codes are entered either manually or with a QR code if a phone has a video camera. We recommend that you use a secure method to give users this information. But if a user is assigned to a phone, then this information is available on the Self Care Portal. The audit log records when a user accesses the code from the portal.

Activation codes can only be used once, and they expire after 1 week by default. If a code expires, you will have to provide the user with a new one.

You will find this approach an easy way to keep your network secure because a phone cannot register until the Manufacturing Installed Certificate (MIC) and activation code are verified. This method is also a convenient way to bulk onboard phones because it doesn't use the Tool for Auto-registered Phone Support (TAPS) or autoregistration. The rate of onboarding is one phone per second or about 3600 phones per hour. Phones can be added with the Cisco Unified Communications Manager Administrative, with Administrative XML Web Service (AXL), or with BAT.

Existing phones reset after they are configured for Activation Code Onboarding. They don't register until the activation code is entered and the phone MIC is verified. Inform current users that you are moving towards Activation Code Onboarding before you implement it.

For more information, see Administration Guide for Cisco Unified Communications Manager and IM and Presence Service, Release 12.0(1) or later.

Activation Code Onboarding and Mobile and Remote Access

You can use Activation Code Onboarding with Mobile and Remote Access when deploying Cisco IP phones for remote users. This feature is a secure way to deploy off-premises phones when autoregistration is not required. But you can configure a phone for autoregistration when on-premises, and activation codes when off-premises. This feature is similar to Activation Code Onboarding for on-premises phones, but it makes activation code available for off-premises phones also.

Activation Code Onboarding for Mobile and Remote Access requires Cisco Unified Communications Manager 12.5(1)SU1 or later, and Cisco Expressway X12.5 or later. Smart Licensing should be enabled also.

You enable this feature from the Cisco Unified Communications Manager Administration, but note the following:

  • Enable this feature from the Device Information section of the Phone Configuration page.

  • Select Require Activation Code for Onboarding if you want this feature to apply just to a single on-premises phone.

  • Select Allow Activation Code via MRA and Require Activation Code for Onboarding if you want to use Activation Onboarding for a single off-premises phone. If the phone is on-premises, it changes to Mobile and Remote Access mode and uses the Expressway. If the phone cannot reach the Expressway, it does not register until it is off premises.

For more information, see the following documents:

  • Administration Guide for Cisco Unified Communications Manager and IM and Presence Service, Release 12.0(1)

  • Mobile and Remote Access Through Cisco Expressway for Cisco Expressway X12.5 or later

Enable Autoregistration for Phones

The Cisco IP Phone requires Cisco Unified Communications Manager to handle call processing. See the documentation for your particular Cisco Unified Communications Manager release or the context-sensitive help in the Cisco Unified Communications Manager Administration to ensure that Cisco Unified Communications Manager is set up properly to manage the phone and to properly route and process calls.

Before you install the Cisco IP Phone, you must choose a method for adding phones to the Cisco Unified Communications Manager database.

By enabling autoregistration before you install the phones, you can:

  • Add phones without first gathering MAC addresses from the phones.

  • Automatically add a Cisco IP Phone to the Cisco Unified Communications Manager database when you physically connect the phone to your IP telephony network. During autoregistration, Cisco Unified Communications Manager assigns the next available sequential directory number to the phone.

  • Quickly enter phones into the Cisco Unified Communications Manager database and modify any settings, such as the directory numbers, from Cisco Unified Communications Manager.

  • Move autoregistered phones to new locations and assign them to different device pools without affecting their directory numbers.

Autoregistration is disabled by default. In some cases, you might not want to use autoregistration; for example, if you want to assign a specific directory number to the phone, or if you want to use a secure connection with Cisco Unified Communications Manager. For information about enabling autoregistration, see the documentation for your particular Cisco Unified Communications Manager release. When you configure the cluster for mixed mode through the Cisco CTL client, autoregistration is automatically disabled, however you can enable it. When you configure the cluster for nonsecure mode through the Cisco CTL client, autoregistration is not enabled automatically.

You can add phones with autoregistration and TAPS, the Tool for AutoRegistered Phones Support, without first gathering MAC addresses from phones.

TAPS works with the Bulk Administration Tool (BAT) to update a batch of phones that were already added to the Cisco Unified Communications Manager database with dummy MAC addresses. Use TAPS to update MAC addresses and to download predefined configurations for phones.

Cisco recommends that you use autoregistration and TAPS to add fewer than 100 phones to your network. To add more than 100 phones to your network, use the Bulk Administration Tool (BAT).

To implement TAPS, you or the end user dials a TAPS directory number and follows voice prompts. After the process is complete, the phone contains the directory number and other settings, and the phone is updated in Cisco Unified Communications Manager Administration with the correct MAC address.

Verify that autoregistration is enabled and is properly configured in Cisco Unified Communications Manager Administration before you connect any Cisco IP Phone to the network. For information about enabling and configuring autoregistration, see the documentation for your particular Cisco Unified Communications Manager release.

Autoregistration must be enabled in Cisco Unified Communications Manager Administration for TAPS to function.

Procedure


Step 1

In Cisco Unified Communications Manager Administration, click System > Cisco Unified CM.

Step 2

Click Find and select the required server.

Step 3

In Auto-registration Information, configure these fields.

  • Universal Device Template

  • Universal Line Template

  • Starting Directory Number

  • Ending Directory Number

Step 4

Uncheck the Auto-registration Disabled on this Cisco Unified Communications Manager check box.

Step 5

Click Save.

Step 6

Click Apply Config.


Daisy Chain Mode

You can connect two conference phones using a Smart Adapter and the USB-C cables that are provided in the daisy chain kit to expand the audio coverage area in a room.

In daisy chain mode, both units receive power though the Smart Adapter which is connected to a power adapter. You can use only one external microphone per unit. You can use either a pair of wired microphones with the units or a pair of wireless microphones with the units, but not a mixed combination of the microphones. When a wired microphone is connected to one of the units, it unpairs any wireless microphones that are connected to the same unit. Whenever there is an active call, the LEDs and the menu options on the phone screen of both units are synchronized.

Install the Conference Phone

After the phone connects to the network, the phone startup process begins, and the phone registers with Cisco Unified Communications Manager. If you disable the DHCP service, you must configure the network settings on the phone.

If you used autoregistration, you must update the specific configuration information for the phone such as associating the phone with a user, changing the button table, or directory number.

After the phone connects, it determines if a new firmware load has to be installed on the phone.

If you are using the conference phone in daisy chain mode, see Install the Conference Phone in Daisy Chain Mode.

Before you begin

Ensure that you have the latest firmware version that is installed on your Cisco Unified Communications Manager. Check for updated device packages here:

https://www.cisco.com/c/en/us/td/docs/voice_ip_comm/cucm/compat/matrix/CMDP_BK_CCBDA741_00_cucm-device-package-compatibility-matrix.html

Procedure


Step 1

Choose the power source for the phone:

  • Power over Ethernet (PoE) deployment with a Cisco IP Conference Phone 8832 PoE Injector

  • Non-PoE Ethernet deployment with a Cisco IP Conference Phone 8832 Non-PoE Ethernet Injector

  • Wi-Fi deployment with a Cisco IP Conference Phone 8832 Power Adapter

For more information, see Ways to Provide Power to Your Conference Phone.

Step 2

Connect the phone to the switch.

  • If you use PoE:
    1. Plug the Ethernet cable into the LAN port.

    2. Plug the other end of the Ethernet cable into either the Cisco IP Conference Phone 8832 PoE Injector or the Cisco IP Conference Phone 8832 Ethernet Injector.

    3. Connect the injector to the conference phone with the USB-C cable.

  • If you do not use PoE:
    1. If you are using the Cisco IP Conference Phone 8832 Ethernet Injector, plug the power adapter into an electrical outlet.

    2. Connect the power adapter to the Ethernet injector using a USB-C cable.

      OR

      If you are using the Cisco IP Conference Phone 8832 Non-PoE Ethernet Injector, plug it into an electrical outlet.

    3. Plug the Ethernet cable into the Non-PoE Ethernet injector or the Ethernet injector.

    4. Plug the Ethernet cable into the LAN port.

    5. Connect the Non-PoE Ethernet injector or the Ethernet injector to the conference phone using a USB-C cable.

  • If you use Wi-Fi:
    1. Plug the Cisco IP Conference Phone 8832 Power Adapter into the electrical outlet.

    2. Connect the power adapter to the conference phone using a USB-C cable.

      Note


      Instead of the power adapter, you can use the Non-PoE Ethernet injector to get power to the phone. However, you must unplug the LAN cable. The phone only connects to Wi-Fi when the Ethernet connection is not available.

Step 3

Monitor the phone startup process. This step verifies that the phone is configured properly.

Step 4

If you do not use autoregistration, manually configure the security settings on the phone.

Step 5

Allow the phone to upgrade to the current firmware image that is stored on your Cisco Unified Communications Manager.

Step 6

Make calls with the phone to verify that the phone and features work correctly.

Step 7

Provide information to the users about how to use their phones and how to configure their phone options. This step ensures that users have adequate information to successfully use their Cisco phones.


Ways to Provide Power to Your Conference Phone

Your conference phone needs power from one of these sources:

  • Power over Ethernet (PoE)

    • North America

      • Cisco IP Conference Phone 8832 PoE Injector

      • Cisco IP Conference Phone 8832 Ethernet Injector

    • Outside of North America—Cisco IP Conference Phone 8832 PoE Injector

  • Non-PoE Ethernet

    • North America

      • Cisco IP Conference Phone 8832 Non-PoE Ethernet Injector

      • Cisco IP Conference Phone 8832 Ethernet Injector with a Cisco IP Conference Phone 8832 Power Adapter connected to an electrical outlet.

    • Outside of North America—Cisco IP Conference Phone 8832 Non-PoE Ethernet Injector

  • WiFi—Use the Cisco IP Conference Phone 8832 Power Adapter connected to an electrical outlet.

Figure 1. Conference Phone PoE Power Options

The following figure shows the two PoE power options.

Cisco IP Conference Phone 8832 PoE Injector with the PoE power option

Cisco IP Conference Phone 8832 PoE Injector with the PoE power option

Cisco IP Conference Phone 8832 Ethernet Injector with the PoE power option

Cisco IP Conference Phone 8832 Ethernet Injector with the PoE power option

Figure 2. Conference Phone Ethernet Power Options

The following figure shows the two Ethernet power options.

Cisco IP Conference Phone 8832 Non-PoE Ethernet Injector with the Ethernet power option

Cisco IP Conference Phone 8832 Non-PoE Ethernet Injector with the Ethernet power option

Cisco IP Conference Phone 8832 Ethernet Injector with the Ethernet power option

Cisco IP Conference Phone 8832 Ethernet Injector with the Ethernet power option

Figure 3. Conference Phone Power Option When Connected to a Wi-Fi Network
Conference Phone Power Option When Connected to a Wi-Fi Network
Figure 4. Conference Phone Power Option in Daisy Chain Mode. The following figure shows the power option when the phone is connected in daisy chain mode.
Conference Phone Power Option in Daisy Chain Mode

Install the Wired Expansion Microphones

The phone supports an optional kit with two wired expansion microphones. You can extend the microphones up to 7 feet (2.13m) from the phone. For best results, place the microphones between 3 feet (0.91 m) and 7 feet (2.1 m) away from the phone.

Procedure


Step 1

Plug the end of the microphone cable into the port on the side of the phone.

Step 2

Extend the microphone cable to the desired position.

The following figure shows installation of a wired expansion microphone.
Figure 5. Wired Expansion Microphone Installation
Wired Expansion Microphone Installation

Install the Wireless Expansion Microphones

The conference phone provides the option of connecting two wireless expansion microphones.

Note


You must use either two wired microphones or two wireless microphones with the phone, but not a mixed combination.


When the phone is in a call, the LED on the expansion microphone is lit green. To mute the expansion microphone, press the Mute key. When the microphone is muted, the LED is lit red. When the battery in the microphone is low, the battery indication LED blinks rapidly.

Before you begin

Disconnect the wired expansion microphones before you install wireless expansion microphones. You cannot use both wired and wireless expansion microphones at the same time.

Procedure


Step 1

Position the table mount plate on the table surface location where you want to place the microphone.

Step 2

Remove the adhesive for the double-stick tape on the bottom of the table mount plate. Place the table mount plate to adhere to the table surface.

Step 3

Attach the microphone to the table mount plate. Magnets are embedded in the microphone to snap the unit into place.

You can move the microphone and attached table mount to a different location on the table surface as needed. Use care when moving to protect the unit.


Install the Wireless Microphone Charging Cradle

You use the charging cradle to charge the wireless microphone battery.

Procedure


Step 1

Plug the charging cradle power adapter into an electrical outlet.

Step 2

Plug one end of the USB-C cable to the charging cradle and the other end into the power adapter.

The following figure shows installation of a wireless microphone charging cradle.
Figure 6. Wireless Microphone Charging Cradle Installation
Wireless Microphone Charging Cradle Installation

Install the Conference Phone in Daisy Chain Mode

The daisy chain kit contains a Smart Adapter, a short LAN cable, two long, thicker USB-C cables, and a shorter, thinner USB-C cable. In daisy chain mode, the conference phones require external power from an electrical outlet. You must use the Smart Adapter to connect the phones together. The long USB-C cables go to the phone and the short one goes to the power adapter. Refer to the following figure when you connect the power adapter and the LAN port to the Smart Adapter.

Figure 7. Smart Adapter Power Port and LAN Port

You can use only one microphone per unit.


Note


You must use either two wired microphones or two wireless microphones with the phone, but not a mixed combination.


The USB-C cable for the power adapter is thinner than the USB-C cables that connect to the phone.

Procedure


Step 1

Plug the power adapter into the electrical outlet.

Step 2

Connect the short, thinner USB-C cable from the power adapter to the Smart Adapter.

Figure 8. Smart Adapter USB Port Connected to the Power Outlet

Step 3

Connect the Ethernet cable to the Smart Adapter and the LAN port.

Figure 9. Smart Adapter LAN Port Connected to the LAN Port on the Wall Outlet

Step 4

Connect the first phone to the Smart Adapter using the longer, thicker USB-C cable.

Step 5

Connect the second phone to the Smart Adapter using a USB-C cable.

The following figure shows installation of the conference phone in daisy chain mode.
Figure 10. Conference Phone Installation in Daisy Chain Mode

Reboot Your Conference Phone from the Backup Image

Your Cisco IP Conference Phone 8832 has a second, backup image that allows you to recover the phone when the default image has been compromised.

To reboot your phone from the backup image, perform the following procedure.

Procedure


Step 1

Hold the * key while connecting the power to the conference phone.

Step 2

After the LED bar light turns ON green and then OFF, you can release the * key.

Step 3

The conference phone reboots from the backup image.


Set Up the Phone from the Setup Menus

The phone includes many configurable network settings that you may need to modify before the phone is functional for your users. You can access these settings, and change some of them, through menus on the phone.

The phone includes the following setup menus:

  • Network Setup: Provides options for viewing and configuring a variety of network settings.

    • IPv4 Setup: This submenu provides additional network options.

    • IPv6 Setup: This submenu provides additional network options.

  • Security Setup: Provides options for viewing and configuring a variety of security settings.


Note


You can control whether a phone has access to the Settings menu or to options on this menu. Use the Settings Access field in the Cisco Unified Communications Manager Administration Phone Configuration window to control access. The Settings Access field accepts these values:

  • Enabled: Allows access to the Settings menu.

  • Disabled: Prevents access to most entries in the Settings menu. The user can still access Settings > Status.

  • Restricted: Allows access to the User Preferences and Status menu items and allows volume changes to be saved. Prevents access to other options on the Settings menu.

If you cannot access an option on the Admin Settings menu, check the Settings Access field.


You configure settings that are display-only on the phone in Cisco Unified Communications Manager Administration.

Procedure


Step 1

Press Settings.

Step 2

Select Admin Settings.

Step 3

Enter password if required, then click Sign-In.

Step 4

Select Network Setup or Security Setup.

Step 5

Perform one of these actions to display the desired menu:

  • Use the navigation arrows to select the desired menu and then press Select.
  • Use the keypad on the phone to enter the number that corresponds to the menu.

Step 6

To display a submenu, repeat step 5.

Step 7

To exit a menu, press Back.


Apply a Phone Password

Procedure


Step 1

In Cisco Unified Communications Manager Administration, navigate to the Common Phone Profile Configuration window (Device > Device Settings > Common Phone Profile).

Step 2

Enter a password in the Local Phone Unlock Password option.

Step 3

Apply the password to the common phone profile that the phone uses.


Text and Menu Entry From the Phone

When you edit the value of an option setting, follow these guidelines:

  • Use the arrows on the navigation pad to highlight the field that you wish to edit. Press Select in the navigation pad to activate the field. After the field is activated, you can enter values.

  • Use the keys on the keypad to enter numbers and letters.

  • To enter letters by using the keypad, use a corresponding number key. Press the key one or more times to display a particular letter. For example, press the 2 key once for "a," twice quickly for "b," and three times quickly for "c." After you pause, the cursor automatically advances to allow you to enter the next letter.

  • Press the softkey if you make a mistake. This softkey deletes the character to the left of the cursor.

  • Press Revert before pressing Apply to discard any changes that you made.

  • To enter a period (for example, in an IP address), press * on the keypad.

  • To enter a colon for an IPv6 address, press * on the keypad.


Note


The Cisco IP Phone provides several methods to reset or restore option settings, if necessary.


Configure the Network Settings

Procedure


Step 1

Press Settings.

Step 2

Select Admin Settings > Network Setup > Ethernet setup.

Step 3

Set the fields as described in Network Setup Fields.

After you set the fields, you may need to reboot the phone.

Network Setup Fields

The Network Setup menu contains fields and submenus for IPv4 and IPv6.

To change some of the fields, you need to turn DHCP off.

Table 1. Network Setup Menu

Entry

Type

Default

Description

IPv4 setup

Menu

See the "IPv4 Setup Submenu" table.

This option displays only when the mode or in dual-stack mode.

IPv6 setup

Menu

See the "IPv6 Setup Submenu" table.

Host name

String

Host name of the phone. If using DHCP, this name is automatically assigned.

Domain name

String

Name of the Domain Name System (DNS) domain in which the phone resides.

To change this field, turn off DHCP.

Operational VLAN ID

Operational Virtual Local Area Network (VLAN) that is configured on a Cisco Catalyst switch in which the phone is a member.

Admin VLAN ID

Auxiliary VLAN in which the phone is a member.

SW Port Setup

Auto Negotiate

10 Half

10 Full

100 Half

100 Full

Auto Negotiate

Speed and duplex of the switch port, where:

  • 10 Half = 10-BaseT/half duplex

  • 10 Full = 10-BaseT/full duplex

  • 100 Half = 100-BaseT/half duplex

  • 100 Full = 100-BaseT/full duplex

LLDP-MED: SW Port

Disabled

Enabled

Enabled

Indicates whether Link Layer Discovery Protocol Media Endpoint Discovery (LLDP-MED) is enabled on the switch port.

Table 2. IPv4 Setup Submenu

Entry

Type

Default

Description

DHCP

Disabled

Enabled

Enabled

Enables or disables the use of DHCP.

IP Address

Internet Protocol version 4 (IPv4) address of the phone.

To change this field, turn off DHCP.

Subnet Mask

Subnet mask that the phone uses.

To change this field, turn off DHCP.

Default Router 1

Default router used that the phone uses.

To change this field, turn off DHCP.

DNS Server 1

Primary Domain Name System (DNS) server (DNS Server 1) that the phone uses.

To change this field, turn off DHCP.

DNS Server 2

Primary Domain Name System (DNS) server (DNS Server 2) that the phone uses.

DNS Server 3

Primary Domain Name System (DNS) server (DNS Server 3) that the phone uses.

Alternate TFTP

No

Yes

No

Indicates whether the phone is using an alternative TFTP server.

TFTP Server 1

Primary Trivial File Transfer Protocol (TFTP) server that the phone uses.

If you set the Alternate TFTP option to On, you must enter a nonzero value for the TFTP Server 1 option. If neither the primary TFTP server nor the backup TFTP server is listed in the CTL or ITL file on the phone, you must unlock the file before you can save changes to the TFTP Server 1 option. In this case, the phone deletes the file when you save changes to the TFTP Server 1 option. A new CTL or ITL file downloads from the new TFTP Server 1 address.

See the TFTP notes after the final table.

TFTP Server 2

Secondary TFTP server that the phone uses.

If neither the primary TFTP server nor the backup TFTP server is listed in the CTL or ITL file on the phone, you must unlock the file before you can save changes to the TFTP Server 2 option. In this case, the phone deletes the file when you save changes to the TFTP Server 2 option. A new CTL or ITL file downloads from the new TFTP Server 2 address.

See the TFTP Notes section after the final table.

DHCP Address Released

No

Yes

No

Table 3. IPv6 Setup Submenu

Entry

Type

Default

Description

DHCPv6 Enabled

Disabled

Enabled

Enabled

Enables or disables the use of IPv6 DHCP.

IPv6 Address

The IPv6 address of the phone.

To change this field, turn off DHCP.

IPv6 Prefix Length

Length of the IPv6 address.

To change this field, turn off DHCP.

IPv6 Default Router 1

Default IPv6 router.

To change this field, turn off DHCP.

IPv6 DNS Server 1

Primary IPv6 DNS server

To change this field, turn off DHCP.

IPv6 Alternate TFTP

No

Yes

No

Indicates whether the phone is using an alternative IPv6 TFTP server.

IPv6 TFTP Server 1

Primary IPv6 TFTP server used that the phone uses.

See the TFTP Notes section after this table.

IPv6 TFTP Server 2

Secondary IPv6 TFTP server used that the phone uses.

See the TFTP Notes section after this table.

IPv6 Address Released

No

Yes

No

Before IPv6 setup options can be configured on your device, IPv6 must be enabled and configured in Cisco Unified Communication Administration. The following device configuration fields apply to IPv6 configuration:

  • IP Addressing Mode

  • IP Addressing Mode Preference for Signalling

If IPv6 is enabled in the Unified cluster, the default setting for IP addressing mode is IPv4 and IPv6. In this addressing mode, the phone will acquire and use one IPv4 address and one IPv6 address. It can use the IPv4 and the IPv6 address as required for media. The phone uses either the IPv4 or IPv6 address for call control signalling.

For more information about IPv6, see:

TFTP Notes

When the phone looks for the TFTP server, the phone gives precedence to manually assigned TFTP servers, regardless of the protocol. If your configuration includes both IPv6 and IPv4 TFTP servers, the phone prioritizes the order that it looks for the TFTP server by giving priority to manually assigned IPv6 TFTP servers and IPv4 TFTP servers. The phone looks for the TFTP server in this order:

  1. Any manually assigned IPv4 TFTP servers

  2. Any manually assigned IPv6 servers

  3. DHCP assigned TFTP servers

  4. DHCPv6 assigned TFTP servers

For information about the CTL and ITL files, see the Cisco Unified Communications Manager Security Guide.

Set Domain Name Field

Procedure

Step 1

Set the DHCP Enabled option to No.

Step 2

Scroll to the Domain Name option, press Select, and enter a new domain name.

Step 3

Press Apply.


Enable Wireless LAN from the Phone

Ensure that the Wi-Fi coverage in the location where the wireless LAN is deployed is suitable for transmitting voice packets.

A fast-secure roaming method is recommended for Wi-Fi users. We recommend that you use 802.11r (FT).

For complete configuration information, see the Cisco IP Phone 8832 Wireless LAN Deployment Guide at this location:

https://www.cisco.com/c/en/us/support/collaboration-endpoints/unified-ip-phone-8800-series/products-implementation-design-guides-list.html

The Cisco IP Phone 8832 Wireless LAN Deployment Guide includes the following configuration information:

  • Wireless network configuration

  • Wireless network configuration in Cisco Unified Communications Manager Administration

  • Wireless network configuration on the Cisco IP Phone

Before you begin

Make sure that Wi-Fi is enabled on the phone, and the Ethernet cable is disconnected.

Procedure


Step 1

To enable the application, press Settings.

Step 2

Navigate to Admin settings > Network setup > Wi-Fi client setup > Wireless.

Step 3

Press On.


Set Up the Wireless LAN from Cisco Unified Communications Manager

In Cisco Unified Communications Manager Administration, you must enable a parameter called "Wi-Fi" for the conference phone.


Note


In the Phone Configuration window in Cisco Unified Communications Manager Administration (Device > Phone), use the wired-line MAC address when you configure the MAC address. Cisco Unified Communications Manager registration does not use the wireless MAC address.


Perform the following procedure in Cisco Unified Communications Manager Administration.

Procedure


Step 1

To enable the wireless LAN on a specific phone, perform the following steps:

  1. Select Device > Phone.

  2. Locate the required phone.

  3. Select the Enabled setting for the Wi-Fi parameter in the Product Specific Configuration Layout section.

  4. Check the Override Common Settings check box.

Step 2

To enable wireless LAN for a group of phones,

  1. Select Device > Device Settings > Common Phone Profile.

  2. Select the Enabled setting for the Wi-Fi parameter.

    Note


    To ensure that the configuration in this step works, uncheck the Override Common Settings check box mentioned in Step 1d.

  3. Check the Override Common Settings check box.

  4. Associate the phones with that common phone profile using Device > Phone.

Step 3

To enable wireless LAN for all WLAN-capable phones in your network,

  1. Select System > Enterprise Phone Configuration.

  2. Select the Enabled setting for the Wi-Fi parameter.

    Note


    To ensure that the configuration in this step works, uncheck the Override Common Settings check box mentioned in Step 1d and Step 2c.

  3. Check the Override Common Settings check box.


Set Up Wireless LAN from the Phone

Before the Cisco IP Phone can connect to the WLAN, you must configure the network profile for the phone with the appropriate WLAN settings. You can use the Network setup menu on the phone to access the Wi-Fi client setup submenu and set up the WLAN configuration.


Note


The Wi-Fi client setup option does not appear in the Network setup menu when Wi-Fi is disabled on the Cisco Unified Communications Manager.


For additional information, see Cisco IP Conference Phone 8832 WLAN Deployment Guide, located here: http://www.cisco.com/c/en/us/support/collaboration-endpoints/unified-ip-phone-8800-series/products-implementation-design-guides-list.html

Before you begin

Configure the wireless LAN from Cisco Unified Communications Manager.

Procedure


Step 1

Press Settings.

Step 2

Select Admin settings > Network setup > Wi-Fi client setup.

Step 3

Set up the wireless configuration as described in the following table.

Table 4. Wi-Fi Client Setup Menu Options

Option

Description

To change

Wireless

Turns the wireless radio on the Cisco IP Phone on or off.

Scroll to the Wireless option, and use the toggle switch to change the setting between On and Off.

Network name

Enables you to connect to a wireless network using the Choose a Network window. This window has two softkeys - Back and Other.

In the Choose a Network window, select the network that you wish to connect to.

Wi-Fi sign in access

Enables the display of the Wi-Fi sign in window.

Scroll to Wi-Fi sign in access option, and use the toggle switch to change the setting between On and Off.

IPv4 setup

In the IPv4 Setup configuration submenu, you can do the following:

  • Enable or disable the phone to use the IP address that the DHCP server assigns.

  • Manually set the IP Address, Subnet Mask, Default Routers, DNS Server, and Alternate TFTP servers.

For more information about the IPv4 address fields, see the “IPv4 Setup Submenu” table.

Scroll to IPv4 setup and press Select.

IPv6 setup

In the IPv6 setup configuration submenu, you can do the following:

  • Enable or disable the phone to use the IPv6 address that is either assigned by DHCPv6 server or acquired by SLAAC through an IPv6-enabled router.

  • Manually set the IPv6 Address, Prefix Length, Default Routers, DNS Server, and Alternate TFTP servers.

For more information about the IPv6 address fields, see the “IPv6 Setup Submenu” table.

Scroll to IPv6 setup and press Select.

MAC address

Unique Media Access Control (MAC) address of the phone.

Display only. Cannot configure.

Domain name

Name of the Domain Name System (DNS) domain in which the phone resides.

See Set Domain Name Field.

Step 4

Press Save to make changes or press Revert to discard the connection.


Set the Number of WLAN Authentication Attempts

An authentication request is a confirmation of the user's sign-in credentials. It occurs whenever a phone that has already joined a Wi-Fi network tries to reconnect to the Wi-Fi server. Examples include when a Wi-Fi session times out or a Wi-Fi connection is lost and then reacquired.

You can configure the number of times a Wi-Fi phone sends an authentication request to the Wi-Fi server. The default number of attempts is 2, but you can set this parameter from 1 to 3. If a phone fails the authentication, then the user is prompted to sign in again.

You can apply WLAN Authentication Attempts to individual phones, to a pool of phones, or to all the Wi-Fi phones in your network.

Procedure


Step 1

In Cisco Unified Communications Manager Administration, select Device > Phone and locate the phone.

Step 2

Navigate to the Product Specific Configuration area and set the WLAN Authentication Attempts field.

Step 3

Select Save.

Step 4

Select Apply Config.

Step 5

Restart the phone.


Enable WLAN Prompt Mode

Enable WLAN Profile 1 Prompt Mode if you want a user to sign into the Wi-Fi network when their phone powers-up or resets.

Procedure


Step 1

In Cisco Unified Communications Manager Administration, select Device > Phone.

Step 2

Locate the phone that you need to set up.

Step 3

Navigate to the Product Specific Configuration area and set the WLAN Profile 1 Prompt Mode field to Enable.

Step 4

Select Save.

Step 5

Select Apply Config.

Step 6

Restart the phone.


Set Up a Wi-Fi Profile using Cisco Unified Communications Manager

You can configure a Wi-Fi profile and then assign the profile to the phones that support Wi-Fi. The profile contains the parameters required for phones to connect to the Cisco Unified Communications Manager with Wi-Fi. When you create and use a Wi-Fi profile, you or your users do not need to configure the wireless network for individual phones.

Wi-Fi profiles are supported on Cisco Unified Communications Manager Release 10.5(2) or later. EAP-FAST, PEAP-GTC, and PEAP-MSCHAPv2 are supported in Cisco Unified Communications Manager Release 10.0 and later. EAP-TLS is supported in Cisco Unified Communications Manager Release 11.0 and later.

A Wi-Fi profile enables you to prevent or limit changes to the Wi-Fi configuration on the phone by the user.

We recommend that you use a secure profile with TFTP encryption enabled to protect keys and passwords when you use a Wi-Fi profile.

When you set up the phones to use EAP-FAST, PEAP-MSCHAPv2, or PEAP-GTC authentication, your users need individual user ids and passwords to sign into the phone.

The phones only support one server certificate which can be installed either with SCEP or the manual install method but not both methods. The phones don't support the TFTP method of certificate installation.

Procedure


Step 1

In the Cisco Unified Communications Administration, select Device > Device Settings > Wireless LAN Profile.

Step 2

Click Add New.

Step 3

In the Wireless LAN Profile Information section, set the parameters:

  • Name—Enter a unique name for the Wi-Fi profile. This name displays on the phone.

  • Description—Enter a description for the Wi-Fi profile to help you differentiate this profile from other Wi-Fi profiles.

  • User Modifiable—Select an option:
    • Allowed—Indicates that the user can make changes to the Wi-Fi settings from their phone. This option is selected by default.

    • Disallowed—Indicates that the user cannot make any changes to the Wi-Fi settings on their phone.

    • Restricted—Indicates that the user can change the Wi-Fi username and password on their phone. But users are not allowed to make changes to other Wi-Fi settings on the phone.

Step 4

In the Wireless Settings section, set the parameters:

  • SSID (Network Name)—Enter the network name available in the user environment to which the phone can be connected. This name is displayed under the available network list on the phone and the phone can connect to this wireless network.

  • Frequency Band—Available options are Auto, 2.4 GHz, and 5 GHz. This field determines the frequency band that the wireless connection uses. If you select Auto, the phone attempts to use the 5 GHz band first and only uses the 2.4 GHz band when the 5 GHz is not available.

Step 5

In the Authentications Settings section, set the Authentication Method to one of these authentication methods: EAP-FAST, EAP-TLS, PEAP-MSCHAPv2, PEAP-GTC, PSK, WEP, and None.

After you set this field, you may see extra fields that you need to set.

  • User certificate—Required for EAP-TLS authentication. Select Manufacturing installed or User installed. The phone requires a certificate to be installed, either automatically from the SCEP or manually from the administration page on the phone.

  • PSK passphrase—Required for PSK authentication. Enter the 8- 63 character ASCII or 64 HEX character pass phrase.

  • WEP Key—Required for WEP authentication. Enter the 40/102 or 64/128 ASCII or HEX WEP key.

    • 40/104 ASCII is 5 characters.

    • 64/128 ASCII is 13 characters.

    • 40/104 HEX is 10 characters.

    • 64/128 HEX is 26 characters.

  • Provide Shared Credentials: Required for EAP-FAST, PEAP-MSCHAPv2, and PEAP-GTC authentication.

    • If the user manages the username and password, leave the Username and Password fields blank.

    • If all your users share the same username and password, you can input the information in the Username and Password fields.

    • Enter a description in the Password Description field.

    Note


    If you need to assign each user a unique username and password, you need to create a profile for each user.

Step 6

Click Save.


What to do next

Apply the WLAN Profile Group to a device pool (System > Device Pool) or directly to the phone (Device > Phone).

Set Up a Wi-Fi Group using Cisco Unified Communications Manager

You can create a wireless LAN profile group and add any wireless LAN profile to this group. The profile group can then be assigned to the phone when you set up the phone.

Procedure


Step 1

In Cisco Unified Communications Administration, select Device > Device Settings > Wireless LAN Profile Group.

You can also define a wireless LAN profile group from System > Device Pool.

Step 2

Click Add New.

Step 3

In the Wireless LAN Profile Group Information section, enter a group name and description.

Step 4

In the Profiles for this Wireless LAN Profile Group section, select an available profile from the Available Profiles list and move the selected profile to the Selected Profiles list.

When more that one wireless LAN profile is selected, the phone uses only the first wireless LAN profile.

Step 5

Click Save.


Verify the Phone Startup

After the phone has power connected to it, it automatically cycles through a startup diagnostic process.

Procedure


Power up the phone.

When the main screen displays, it has started up properly.


Change a User's Phone Model

You or your user can change a user's phone model. The change can be required for a number of reasons, for example:

  • You have updated your Cisco Unified Communications Manager (Unified CM) to a software version that doesn't support the phone model.

  • The user wants a different phone model from their current model.

  • The phone requires repair or replacement.

The Unified CM identifies the old phone and uses the old phone's MAC address to identify the old phone configuration. The Unified CM copies the old phone configuration into the entry for the new phone. The new phone then has the same configuration as the old phone.

Limitation: If the old phone has more lines or line buttons than the new phone, the new phone doesn't have the extra lines or line buttons configured.

The phone reboots when the configuration is complete.

Before you begin

Set up your Cisco Unified Communications Manager according to the instructions in the Feature Configuration Guide for Cisco Unified Communications Manager.

You need a new, unused phone that comes preinstalled with Firmware Release 12.8(1) or later.

Procedure


Step 1

Power off the old phone.

Step 2

Power on the new phone.

Step 3

On the new phone, select Replace an existing phone.

Step 4

Enter the primary extension of the old phone.

Step 5

If the old phone had a PIN assigned, enter the PIN.

Step 6

Press Submit.

Step 7

If there is more than one device for the user, select the device to replace and press Continue.