Your Phone

The Cisco IP Phone 8800 Series

The Cisco IP Phones 8811, 8841, 8845, 8851, 8851NR, 8861, 8865, and 8865NR deliver easy-to-use, highly secure voice communications.

Figure 1. The Cisco IP Phone 8800 Series
Cisco IP Phone 8800 Series

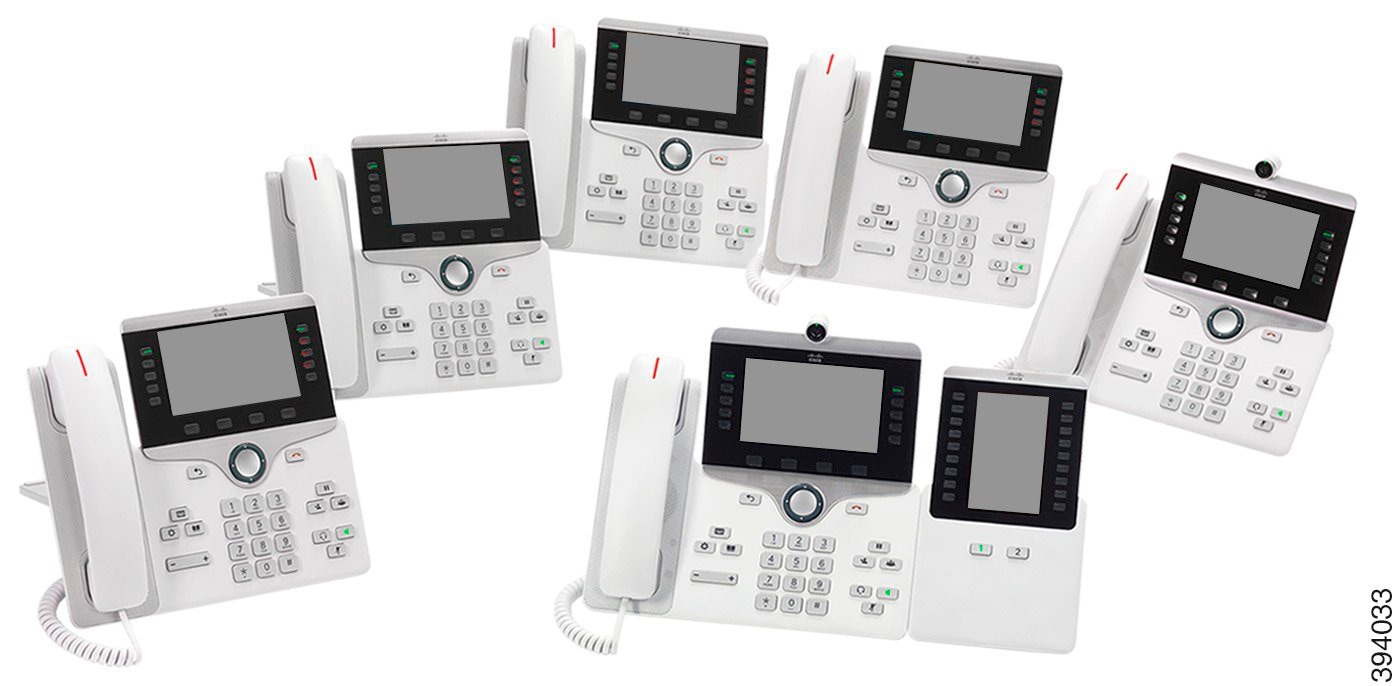
The following table shows the major hardware features of the Cisco IP Phone 8800 Series.

Table 1. Cisco IP Phone 8800 Series Major Features

Features

8811

8841

8845

8851

8851NR

8861

8865

8865NR

Screen

Grayscale

Color

Color

Color

Color

Color

Color

Color

USB Ports

0

0

0

1

1

2

2

2

Built-in Camera

No

No

Yes

No

No

No

Yes

Yes

Wi-Fi

No

No

No

No

No

Yes

Yes

No

Bluetooth

No

No

Yes

Yes

No

Yes

Yes

No

Cisco Intelligent Proximity

No

No

Yes

Yes

No

Yes

Yes

No

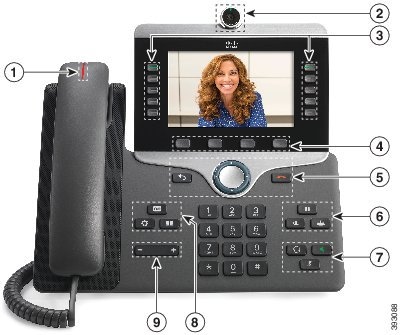
Your phone must be connected to a network and configured to connect to a call control system. The phones support many functions and features, depending on the call control system. Your phone may not have all functions available, based on the way your administrator has set up the phone.

To make or receive a video call, you must use the Cisco IP Phone 8845, 8865, or 8865NR. The other phones in the Cisco IP Phone 8800 Series only support audio calls.

When you add features to your phone, some features require a line button. But each line button on your phone can support only one function (a line, a speed dial, or a feature). If your phone's line buttons are already in use, your phone does not display any additional features.

To check which phone model you have, press Applications and select Phone information. The Model number field shows your phone model.


Note


You should save the box and packaging for the Cisco IP Phone 8845, 8865, and 8865NR. The cameras on these phones are fragile. If you move the phone, we recommend that you pack the phone into the original box to protect the camera. For more information, see Protect Your Video Phone Camera.


Feature Support

This document describes all the features that the device supports. However, not all features may be supported with your current configuration. For information on supported features, contact your administrator.

New and Changed Information

You can use the information in the following sections to understand what has changed in the document. Each section contains the major changes.

New and Changed Information for Firmware Release 14.2(1)

The following information is new or changed for Firmware Release 14.2(1).

Feature

New or Changed

Simplified Extension Mobility Login with Cisco Headset 730 USB Adapter

Sign into Extension Mobility with Your Cisco Headset

Associate Your Headset with Your User Information

Bluetooth Mute Sync for Cisco Headset 700 Series

Cisco Headset 730 Buttons and Hardware

New settings for Cisco Headset 500 Series

Standard Base for Cisco Headset 561 and 562

Multibase for Cisco Headset 560 Series

Change Call Behavior of On Dock or Off Dock

Enable Always On Mode

New Cisco Headset 720 and 980 Support

Supported Accessories

Cisco Headset 700 Series

Cisco Headset 720 Buttons and Hardware

Bang & Olufsen Cisco Headset 900 Series Buttons and Hardware

New and Changed Information for Firmware Release 14.1(1)SR2

The following information is new or changed for Firmware Release 14.1(1)SR2.

Feature

New or Changed

Updated the topics for the call history enhancement for hunt group

Recent Calls List

View All Calls on Your Phone

New and Changed Information for Firmware Release 14.1(1)

The following information is new or changed for Firmware Release 14.1(1).

Feature

New or Changed

Improved Call Alert for Hunt Group

Answer a Call Within Your Hunt Group

Configurable Calling Number Display for Enhanced Line Mode

Enhanced Line Mode

Expanded Speed Dial

Transfer a call to another personAnswer a Call from Another Group (Group Pickup)Add Another Person to a Call

Configurable Delayed PLAR

Make a Call With A Hotline Phone

MRA Support for Extension Mobility Login with Cisco Headsets

Sign into Extension Mobility with Your Cisco Headset

New settings for the Cisco Headset 730

Set the Cisco Headset 730 Equalizer

Set the Cisco Headset 730 Audio Notifications

New and Changed Information for Firmware Release 12.8(1)

Table 3. New and Changed Information for Firmware Release 12.8(1)

Feature

New or Changed Content

Feature control changes

Mark Your Calls as Spam

Turn Off the Lower Your Voice Alert

Phone Data Migration

Replace Your Existing Phone with a New Phone

Simplify Extension Mobility Login with a Cisco Headset 500 Series

Sign into Extension Mobility with Your Cisco Headset

Associate Your Headset with Your User Information

Cisco Circular Economy

Cisco Circular Economy

New and Changed Information for Firmware Release 12.7(1)

The following table shows the changes made for Firmware Release 12.7(1).

Table 4. Cisco IP Phone 8800 User Guide Revisions for Firmware Release 12.7(1)

Revision

Updated Section

Updated for mark a call as unwanted

Mark Your Calls as Spam

Updated for wallpaper support on key expansion modules.

Change the Wallpaper

Updated for Lower your voice.

Turn Off the Lower Your Voice Alert

Updated for Select Key LED and Energy Savings.

Energy Savings

Turn Off the Select Key LED for Energy Save Mode

Updated for E-hook.

Enable electronic hookswitch control on your phone

Updated for Cisco Headset 730 support

Headsets

Supported Accessories

Cisco Headset 700 Series

Cisco Headset 730 Buttons and Hardware

Cisco Headset Customization and subsections for Cisco Headset 700 Series Customization

Updated for hunt group calls on Call Alert

Answer a Call Within Your Hunt Group

Cisco Headset 500 Series Firmware Release 1.5 Change

Erase all Bluetooth pairings

General changes

In certain circumstances, users who dialed a number that was busy received the reorder tone. With this release, the user hears the busy tone.

Updated the LED states, based on the line mode: Softkey, Line, and Feature Buttons

New section Phone Icons

Updated Enhanced Line Mode for string change.

New and Changed Information for Firmware Release 12.6(1)

All references into Cisco Unified Communications Manager documentation have been updated to support all Cisco Unified Communications Manager releases.

The following table shows the changes made for Firmware Release 12.6(1).

Table 5. Cisco IP Phone 8800 User Guide Revisions for Firmware Release 12.6(1)

Revision

Updated Section

Updated for improved Session line mode

Normal Line Mode

Updated for improved Enhanced line mode

Enhanced Line Mode

New and Changed Information for Firmware Release 12.5(1)SR3

All references into Cisco Unified Communications Manager documentation have been updated to support all Cisco Unified Communications Manager releases.

The following table shows the changes made for Firmware Release 12.5(1)SR3.

Table 6. Cisco IP Phone 8800 User Guide Revisions for Firmware Release 12.5(1)SR3

Revision

Updated Section

Added support for Reset Headset Settings

Reset Cisco Headset settings from your phone

New topic

Phone Keypad Characters

New topic

Share a Network Connection with Your Phone and Computer

New topic

Protect Your Video Phone Camera

New and Changed Information for Firmware Release 12.5(1)SR2

No user guide updates were required for Firmware Release 12.5(1)SR2.

Firmware Release 12.5(1)SR2 replaces Firmware Release 12.5(1) and Firmware 12.5(1)SR1. Firmware Release 12.5(1) and Firmware Release 12.5(1)SR1 have been deferred in favor of Firmware Release 12.5(1)SR2.

New and Changed Information for Firmware Release 12.5(1)SR1

The following table describes changes to this book to support Firmware Release 12.5(1)SR1.

Table 7. Cisco IP Phone 8800 User Guide revisions for Firmware Release 12.5(1)SR1.

Revision

Updated Section

Cisco Headset 561 and 562

Cisco Headset 500 Series

Cisco Headset 561 and 562 Multibase

Multibase for Cisco Headset 560 Series

Whisper Paging on Cisco Unified Communications Manager Express

Intercom Calls

Chinese Language Support

Chinese Language Support

Connect with Activation Code Onboarding

Connect with Activation Code Onboarding

Disable handset so audio path can be kept on headset

Audio Path Selection

New and Changed Information for Firmware Release 12.1(1)SR1

The following table describes changes to this book to support Firmware Release 12.1(1)SR1.

Table 8. Cisco IP Phone 8800 User Guide revisions for Firmware Release 12.1(1)SR1.

Revision

Updated Section

Updated for Simplified Line Label and Incoming Calls in Enhanced Line Mode.

Enhanced Line Mode

Updated for Cisco Wallpaper on Key Expansion Modules.

Cisco IP Phone 8800 Key Expansion Module

New and Changed Information for Firmware Release 12.1(1)

The following table describes changes to this book to support Firmware Release 12.1(1).

Table 9. Cisco IP Phone 8800 User Guide revisions for Firmware Release 12.1(1).

Revision

Updated Section

Updated for Cisco Headset 521 and 522.

Cisco Headset 500 Series and Cisco Headset 521 and 522 Controller Buttons and Hardware

Updated for Call History.

View Your Recent Calls

Added for Accessibility enhancements

Accessibility Features for the Cisco IP Phone 8800 Series and the included sections such as Voice Feedback

Enable Voice Feedback from Accessibility

Adjust Voice Speed

Updated for Incoming Call Notifications and Call Alert.

Enhanced Line Mode

Updated for Cisco Headset 531 and Cisco Headset 532.

Cisco Headset 500 Series

Test Your Microphone

Adjust Your Speaker Sidetone

Adjust Your Bass and Treble

Adjust Your Microphone Volume

Updated for Speed Dial navigation.

Make a Call with a Speed-Dial Button

Updated for Speed Dial Button.

Add a Speed Dial Button from Your Phone

Modify a Speed Dial Button from Your Phone

Delete a Speed Dial Button from Your Phone

New and Changed Information for Firmware Release 12.0(1)

The following table describes changes to this book to support Firmware Release 12.0(1).

Table 10. Cisco IP Phone 8800 User Guide revisions for Firmware Release 12.0(1).

Revision

Updated Section

Updated for new key expansion module

Cisco IP Phone 8800 Key Expansion Module

New and Changed Information for Firmware Release 11.7(1)

The following table describes changes to this book to support Firmware Release 11.7(1).

Table 11. Cisco IP Phone 8800 User Guide revisions for Firmware Release 11.7(1).

Revision

Updated Section

Updated for video call enhancements

Video Calls

Updated for new user experience

Badged Icons

Phone Screen Features

Enhanced Line Mode

New and Changed Information for Firmware Release 11.5(1)SR1

The following table describes changes to this book to support Firmware Release 11.5(1)SR1.

Table 12. Cisco IP Phone 8800 User Guide revisions for Firmware Release 11.5(1)SR1.

Revision

Updated Section

Updated for Cisco IP Phone 8865NR support

The Cisco IP Phone 8800 Series

Set Up Wi-Fi Client

Buttons and Hardware

Supported Accessories

Updated for Video with Closed Shutter

Stop Your Video

Updated for MLPP and Do not disturb support

Turn On Do Not Disturb

Prioritized Calls

Answer a Priority Call

Updated for Wi-Fi sign support

Set Up Wi-Fi Client

Connect to a Preconfigured Wi-Fi Network

New and Changed Information for Firmware Release 11.5(1)

The following table describes changes to this book to support Firmware Release 11.5(1).

Table 13. Cisco IP Phone 8800 User Guide revisions for Firmware Release 11.5(1).

Revision

Updated Section

Updated the following sections for Enhance Line Mode.

Added the following section for Postpone a Phone Upgrade

Phone Firmware and Upgrades

Revised the following section for Do Not Disturb

Turn On Do Not Disturb

Added Connect to a Pre-Configured Wi-Fi Network

Connect to a Preconfigured Wi-Fi Network

New and Changed Information for Firmware Release 11.0

The following table describes changes to this book to support Firmware Release 11.0.

Table 14. Cisco IP Phone 8800 User Guide revisions for Firmware Release 11.0.

Revision

Updated Section

Removed references to specific font size.

Change the Font Size.

Updated the following section for improved Barge and Merge support.

Add Yourself to a Call on a Shared Line

Revised the following section for the improved Problem Report Tool support.

Report All Phone Issues

Added new icon to the following section for Do Not Disturb(DND).

Turn On Do Not Disturb

Updated the following section for Welcome screen.

Connect to Expressway

Phone Setup

Your administrator sets up your phone and connects it to the network. If your phone is not set up and connected, contact your administrator for instructions.

Adjust the Handset Rest

If your phone is wall-mounted or if the handset slips out of the cradle too easily, you may need to adjust the handset rest to ensure that the receiver does not slip out of the cradle.

Figure 2. Adjust the Handset Rest

Handset Rest Adjustment procedure

Procedure


Step 1

Remove the handset from the cradle and pull the plastic tab from the handset rest.

Step 2

Rotate the tab 180 degrees.

Step 3

Hold the tab between two fingers, with the corner notches facing you.

Step 4

Line up the tab with the slot in the cradle and press the tab evenly into the slot. An extension protrudes from the top of the rotated tab.

Step 5

Return the handset to the handset rest.


Change the Viewing Angle of Your Phone

You can change the angle of the phone to eliminate glare on the screen. If your phone has a video camera, you can change the angle to improve the camera view.

Procedure


Step 1

Hold the receiver in the cradle with one hand.

Step 2

Move the footstand with the other hand to change the angle.

Step 3

(Optional) Adjust the footstand on the key expansion module and ensure that the phone and key expansion module are stable.

Step 4

(Optional) Press Self-view to check the camera angle.


Connect to the Network

You need to connect the phone to the network.

  • Wired network connection—The phone is plugged into the network with an Ethernet cable.

  • Wireless connection—The Cisco IP Phone 8861 and 8865 can connect to a Wireless Access Point using Wi-Fi.

After connecting the phone to the network, your phone may be set up for:

  • Virtual Private Network (VPN)—Your phone connects to a protected network.

  • Mobile and Remote Access Through Expressway—If your administrator sets up Mobile and Remote Access Through Expressway and you connect your phone to the network, it connects to the Expressway server.

Share a Network Connection with Your Phone and Computer

Both your phone and your computer must connect to your network to function. If you only have one Ethernet port, then your devices can share the network connection.

Before you begin

Your administrator must enable the PC port in Cisco Unified Communications Manager before you can use it.

Procedure

Step 1

Connect the phone SW port to the LAN with an Ethernet cable.

Step 2

Connect your computer to the phone PC port with an Ethernet cable.


Set Up Wi-Fi Client

The Cisco IP Phone 8861 and 8865 can access a Wi-Fi network. You need a power adapter to power the phone. The Cisco IP Phone 8865NR cannot be used with a Wi-Fi network.

The Cisco IP Conference Phone 8832 can access a Wi-Fi network. You need a power adapter to power the phone. The Cisco IP Conference Phone 8832NR cannot be used with a Wi-Fi network.


Note


The phone PC port is disabled when Wi-Fi is enabled on your phone.


Before you begin

Your administrator needs to configure settings on the call control system to enable Wi-Fi access.

Procedure

Step 1

If the phone is plugged into the Ethernet, unplug the Ethernet cable.

Step 2

Press Applications .

Step 3

Press Settings.

Step 4

Navigate to Admin settings > Network setup > Wi-Fi client setup > Wi-Fi sign in access.

Step 5

Navigate to Admin settings > Network setup > Wi-Fi client setup.

Step 6

Navigate to Wireless and press On.

Step 7

Navigate to Wi-Fi sign in access and press On.

Step 8

Press Apply to save the changes, or press Revert to cancel the changes.

Step 9

Navigate to Network name.

Step 10

When the phone finishes scanning the SSID, choose a network to join.

Step 11

Enter your Wi-Fi credentials and press Connect.


Connect to a Preconfigured Wi-Fi Network

You can connect to a Wi-Fi network with your Cisco IP Phone 8861 and 8865. But the Cisco IP Phone 8865NR does not support Wi-Fi.

Depending upon how your phone is configured, you could be required to sign in when you join a Wi-Fi network or when your phone powers up.

You cannot dismiss the Wi-Fi sign-in window without entering the correct username and password.

Procedure

Step 1

Enter your Wi-Fi credentials when prompted.

Step 2

Select Sign-in.


Connect to a VPN

You connect to your VPN in one of two ways:
  • By entering credentials (username and password, or just a password)

  • With a certificate

If you have a certificate installed on your phone, you do not need to do anything. Your phone automatically connects to the VPN.

Procedure

Step 1

When prompted, enter your VPN credentials.

Step 2

Select Sign-in.


Set up a Phone for Use with VPN

Before you begin

To complete this procedure, you must have a valid TFTP server address. If you do not have this information, contact your administrator.

You cannot use the Wi-Fi client with the Cisco IP Phone 8865NR.

Procedure

Step 1

Press Applications .

Step 2

Select Admin settings.

Step 3

Select one of the following menu items:

  • All phones connected to the Ethernet: Ethernet setup
  • Cisco IP Phone 8861 and 8865 users that use Wi-Fi: Network setup > Wi-Fi client setup

Step 4

Select IPv4 Setup.

Step 5

Navigate to Alternate TFTP and choose On.

Step 6

Select TFTP server 1.

Step 7

Enter your TFTP server address in the TFTP server 1 field.

Step 8

Press Apply.

Step 9

Press Continue.

Step 10

Press Exit.


Connect with Activation Code Onboarding

If your network has been configured to support this feature, then you can use Activation Code Onboarding to connect to your company's phone network.

Enter an Activation Code

Activation codes are used to set up your new phone. They can only be used once, and expire after 1 week. Contact your administrator if you don't know your code or if you need a new one.

Procedure

Step 1

Enter your activation code on the activation screen.

Step 2

Press Submit.


Activate Your Phone with a QR Code

If your phone has a camera, you can scan a QR code to activate the phone. If you inadvertently press Enter manually, press Back to return to the QR code screen.

Before you begin

You need the QR code for your phone. If you are assigned to a phone, then the code is available on the Self Care Portal. But your administrator may have blocked you from viewing this information.

Codes are valid for up to 1 week by default, and have an expiry date near the bottom of the graphic. If the code has expired or if you need a code, then contact your administrator.

Procedure

Step 1

Make the QR code ready with one of these methods:

  • Print the email with the QR code and hold the paper in front of the phone camera.
  • Display the QR code on your mobile device and hold the device in front of the phone camera.

Step 2

Turn the ring around the camera clockwise to open the shutter.

Step 3

Scan the QR code.

When the scan succeeds, your phone registers with the server, and you're ready to make your first call.

Connect to Expressway

You can use Mobile and Remote Access Through Expressway to connect into your corporate network when you are working away from your office. Because your phone does not have a TFTP address configured, the phone displays a Welcome screen to begin the sign-in process.

You can use Mobile and Remote Access Through Expressway to connect to your corporate network when you are working away from your office.

Before you begin

If you have been using your phone at the office or with a VPN, reset your service mode before you connect to Expressway.

If you need to connect to Mobile and Remote Access Through Expressway on-premise, restart your phone and press Select when prompted.

Procedure

Step 1

Reset service mode through Settings > Admin Settings > Reset Settings > Service mode.

Step 2

Press Select when prompted to change the service mode.

Step 3

Enter your activation code or service domain on the Welcome screen and press Continue.

Step 4

Enter the service domain and press Continue.

Step 5

Enter your username and password.

Step 6

Press Submit.

Step 7

Select Sign in.


Activate your phone automatically with a QR Code

If your phone has a camera, you can scan a QR code to activate the phone. If you inadvertently press Enter manually, press Back to return to the QR code screen.

Before you begin

You need the QR code from your welcome message.

If the code from your welcome message has expired, generate an activation code for your device with the Self Care portal or request an activation code from your administrator.

Procedure

Step 1

Make the QR code ready with one of these methods:

  • Print the email with the QR code and hold the paper in front of the phone camera.
  • Display the QR code on your mobile device and hold the device in front of the phone camera.
  • Display the QR code on your computer and hold the phone in front of the computer screen.

Step 2

Turn the ring around the camera clockwise to open the shutter.

Step 3

Scan the QR code.

When the scan succeeds, your phone registers with the server, and you're ready to make your first call.

Change the Service Mode

When your phone connects to the existing server, you hear a beep tone that exists for 5 seconds. You also view an alert message window which indicates that you can change the service mode to Huron.

Procedure

Step 1

To change the service mode:

  • Press the Select key on the phone.
  • Select Settings > Admin Settings > Reset Settings > Service Mode.
Your phone deactivates your VPN, and then restarts.

Step 2

Press Reset to change the service to Huron.

Step 3

Press Cancel to retain the existing service.


Secure the Phone with a Cable Lock

You can secure your Cisco IP Phone 8800 Series with a laptop cable lock up to 20 mm wide.

Procedure


Step 1

Take the looped end of the cable lock and wrap it around the object to which you want to secure your phone.

Step 2

Pass the lock through the looped end of the cable.

Step 3

Unlock the cable lock.

Step 4

Press and hold the locking button to align the locking teeth.

Step 5

Insert the cable lock into the lock slot of your phone and release the locking button.

Step 6

Lock the cable lock.


Replace Your Existing Phone with a New Phone

You can change your phone model. The change can be required for a number of reasons, for example:

  • You have updated your Cisco Unified Communications Manager (Unified CM) to a software version that doesn't support the phone model.

  • You wants a different phone model from their current model.

  • Your phone requires repair or replacement.

Limitation: If the old phone has more lines or line buttons than the new phone, the new phone doesn't have the extra lines or line buttons configured.

The phone reboots when the configuration is complete.

Before you begin

Your administrator needs to set up Cisco Unified Communications Manager to enable the phone migration.

You need a new phone that hasn't been connected to the network or previously configured.

Procedure


Step 1

Power off the old phone.

Step 2

Power on the new phone.

Step 3

If prompted, enter your activation code.

Step 4

Select Replace an existing phone.

Step 5

Enter the primary extension of the old phone.

Step 6

If the old phone had a PIN assigned, enter the PIN.

Step 7

Press Submit.

Step 8

If you have several devices, select the device to replace from the list and press Continue.


Protect Your Video Phone Camera

The camera on your video phone is fragile and could break during transportation of the phone.

Before you begin

You need one of these:

  • Original phone box and the packing material

  • Packaging material, such as foam or bubble wrap

Procedure


Step 1

If you have the original box:

  1. Place the foam on the camera in such a way that the lens is well-protected.

  2. Place the phone in its original box.

Step 2

If you do not have the box, carefully wrap the phone with foam or bubble wrap to protect the camera. Ensure that the foam protects and surrounds the camera so that nothing can press against the camera from any direction or the camera may be damaged in transport.


Activate and Sign In to Your Phone

You may need to activate or sign in to your phone. Activation happens once for your phone, and connects the phone to the call control system. Your administrator gives you your sign-in and activation credentials.

Sign In to Your Phone

Before you begin

Get your user ID and PIN or password from your administrator.

Procedure


Step 1

Enter your user ID in the User ID field.

Step 2

Enter your PIN or password in the PIN or Password field, then press Submit.


Sign In to Your Extension from Another Phone

You can use Cisco Extension Mobility to sign in to a different phone in your network and have it act the same as your phone. After you sign in, the phone adopts your user profile, including your phone lines, features, established services, and web-based settings. Your administrator sets you up for the Cisco Extension Mobility service.

Before you begin

Get your user ID and PIN from your administrator.

Procedure


Step 1

Press Applications .

Step 2

Press Apps.

Step 3

Select Extension Mobility (name can vary).

Step 4

Enter your user ID and PIN.

Step 5

If prompted, select a device profile.


Sign Out of Your Extension from Another Phone

Procedure


Step 1

Press Applications .

Step 2

Press Apps.

Step 3

Select Extension Mobility.

Step 4

Press Yes to sign out.


Sign into Extension Mobility with Your Cisco Headset

You can use Cisco Extension Mobility to sign in to a different phone in your network and have it act the same as your phone. After you sign in, the phone adopts your user profile, including your phone lines, features, established services, and web-based settings. Your administrator sets you up for the Cisco Extension Mobility service.

Headset sign-in is supported for Mobile and Remote Access (MRA).

When your phone is connected with Mobile and Remote Access, you don't get the sign-in screen.

You plug your Cisco Headset 500 Series into someone else's phone. The headsets need to use the USB or Y-cable to access this feature, or be paired and connected to the phone through the Cisco Headset 560 Series Standard Base or Cisco Headset 560 Series Multibase.

The Cisco Headset 700 Series or Bang & Olufsen Cisco Headset 900 Series needs to connect to the phone with the USB cable, or be paired and connected to the phone through the USB adapter (Cisco Headset USB HD Adapter or Cisco Headset USB-C Adapter).

If your headset is not mapped to your user ID, the first time you perform this procedure, phone may prompt you to map the headset to your ID and the Cisco Unified Communications Manager maps the headset to your user record. The prompt depends on configuration settings for the phone. When your headset is mapped to you, the phone gets your user ID, based on the headset serial number, and displays your ID in the Extension Mobility sign-in screen.


Note


If the headset is upgrading or you're on a call, the association can't be made. Wait until the upgrade is finished or the call is finished before you perform this procedure.


When you unplug the headset or the USB adapter, you are signed out of Extension Mobility after a delay unless you confirm the sign-out.

If you move your wireless headset too far from the phone, the phone signs you out of Extension Mobility after a predetermined inactivity time.

You are also automatically signed out of Extension Mobility after a predetermined inactivity time.

Before you begin

A headset firmware upgrade can't be in progress.

The phone must be idle.

Procedure


Step 1

Plug your headset into the phone.

Step 2

If prompted, enter your user ID and PIN to map the headset to your user information.

If the headset has been already associated with another user, choose Yes to sign the user out.

Step 3

In the Extension Mobility screen, enter your user ID and PIN, and press Submit and then Sign in.

Step 4

If prompted, select a device profile.

Step 5

When finished, unplug your headset.

Step 6

Press Sign out.


Self Care Portal

You can customize some phone settings with the Self Care portal web site, which you access from your computer. The Self Care portal is part of your organization's Cisco Unified Communications Manager.

Your administrator gives you the URL to access the Self Care portal, and provides your user ID and password.

In the Self Care portal, you can control features, line settings, and phone services for your phone.

  • Phone features include speed dial, do not disturb, and your personal address book.

  • Line settings affect a specific phone line (directory number) on your phone. Line settings can include call forwarding, visual and audio message indicators, ring patterns, and other line-specific settings.

  • Phone services can include special phone features, network data, and web-based information (such as stock quotes and movie listings). Use the Self Care Portal to subscribe to a phone service before you access it on your phone.

If you use a Cisco IP Phone 8800 Key Expansion Module, then you can configure it for speed dial and other phone services.

The following table describes some specific features that you configure with the Self Care portal. For more information, see the Self Care portal documentation for your call control system.

Table 15. Features Available on the Self Care Portal

Features

Description

Call forward

Use the number that receives calls when call forward is enabled on the phone. Use the Self Care portal to set up more complicated call forward functions, for example, when your line is busy.

Additional phones

Specify the additional phones such as your mobile phone that you want to use to make and receive calls with the same directory numbers as your desk phone. You can also define blocked and preferred contacts to restrict or allow calls from certain numbers to be sent to your mobile phone. When you set up additional phones, you can also set up these features:

  • Single number reach—Specify whether the additional phone should ring when someone calls your desk phone.

  • Mobile calls—If the additional phone is a mobile phone, you can set it up to allow you to transfer mobile calls to your desk phone or desk phone calls to your mobile phone.

Speed dial

Assign phone numbers to speed-dial numbers so that you can quickly call that person.

Speed dial numbers

When you dial a number on your phone, you enter a series of digits. When you set up a speed dial number, the speed dial number must contain all the digits you need to make the call. For example, if you need to dial 9 to get an outside line, you enter the number 9 and then the number you want to dial.

You can also add other dialed digits to the number. Examples of additional digits include a meeting access code, an extension, a voicemail password, an authorization code, and a billing code.

The dial string can contain the following characters:

  • 0 to 9

  • Pound (#)

  • Asterisk (*)

  • Comma (,)—This is the pause character, and gives a 2 second delay in the dialing. You can have several commas in a row. For example, two commas (,,) represent a pause of 4 seconds.

The rules for dial strings are:

  • Use the comma to separate the parts of the dial string.

  • An authorization code must always precede a billing code in the speed dial string.

  • A single comma is required between the authorization code and the billing code in the string.

  • A speed dial label is required for speed dials with authorization codes and additional digits.

Before you configure the speed dial, try to dial the digits manually at least once to ensure that the digit sequence is correct.

Your phone does not save the authorization code, billing code, or extra digits from the speed dial in the call history. If you press Redial after you connect to a speed dial destination, the phone prompts you to enter any required authorization code, billing code, or additional digits manually.

Example

To set up a speed dial number to call a person at a specific extension, and if you need an authorization code and billing code, consider the following requirements:

  • You need to dial 9 for an outside line.

  • You want to call 5556543.

  • You need to input the authorization code 1234.

  • You need to input the billing code 9876.

  • You must wait for 4 seconds.

  • After the call connects, you must dial the extension 56789#.

In this scenario, the speed dial number is 95556543,1234,9876,,56789#.

Buttons and Hardware

The Cisco IP Phone 8800 Series has two distinct hardware types:

  • Cisco IP Phones 8811, 8841, 8851, 8851NR, and 8861—do not have a camera.

  • Cisco IP Phones 8845, 8865, and 8865NR—have a built-in camera.

The following figure shows the Cisco IP Phone 8845.

Figure 3. Cisco IP Phone 8845 Buttons and Hardware
Cisco IP Phone 8845 buttons and hardware

The following table describes the Cisco IP Phone 8800 Series Buttons.

Table 16. Cisco IP Phone 8800 Series Buttons

1

Handset and Handset light strip

Indicates whether you have an incoming call (flashing red) or a new voice message (steady red).

2

Camera

Cisco IP Phone 8845, 8865, and 8865NR only

Use the camera for video calls.

3

Programmable feature buttons and line buttons

Programmable feature buttons and line button Access your phone lines, features, and call sessions.

When adding features to the phone line keys, you are limited by the number of line keys available. You cannot add more features than the number of line keys on your phone.

For more information, see the Softkey, Line, and Feature Buttons section in the "Cisco IP Phone Hardware" chapter.

4

Softkey buttons

Softkey button Access to functions and services.

For more information, see the Softkey, Line, and Feature Buttons section in the "Cisco IP Phone Hardware" chapter.

5

Back, Navigation cluster, and Release

Back Return to the previous screen or menu.

Navigation cluster Navigation ring and Select button—Scroll through menus, highlight items and select the highlighted item.

Release End a connected call or session.

6

Hold/Resume, Conference, and Transfer

Hold/Resume Place an active call on hold and resume the held call.

Conference Create a conference call.

Transfer Transfer a call.

7

Speakerphone, Mute, and Headset

Speakerphone Toggle the speakerphone on or off. When the speakerphone is on, the button is lit.

Mute Toggle the microphone on or off. When the microphone is muted, the button is lit.

Headset Toggle the headset on. When the headset is on, the button islit. To leave headset mode, you pick up the handset or select Speakerphone .

8

Contacts, Applications, and Messages

Contacts Access personal and corporate directories.

Applications Access recent calls, user preferences, phone settings, and phone model information.

Messages Autodial your voice messaging system.

9

Volume button

Volume Adjust the handset, headset, and speakerphone volume (off hook) and the ringer volume (on hook).

Phone Keypad Characters

The phone keypad allows you to enter letters, numbers, and special characters. You press the Two (2) to Nine (9) keys to get the letters and numbers. You use the One (1), Zero (0)), Asterisk (*), and Pound (#) keys for special characters. The following table lists the special characters for each key for the English locale. Other locales will have their own characters.

Table 17. Special Characters on the Keypad

Keypad Key

Special Characters

One (1)

/ . @ : ; = ? -_ & %

Zero (0)

(space) , ! ^ ' " |

Asterisk (*)

+ * ~ ` < >

Pound (#)

# $ £ ◻ \ ( ) { } [ ]

Navigation

Use the outer ring of the Navigation cluster to scroll through menus and to move between fields. Use the inner Select button of the Navigation cluster to select menu items.

Figure 4. Navigation Cluster
Navigation Cluster

If a menu item has an index number, you can enter the index number with the keypad to select the item.

Softkey, Line, and Feature Buttons

You can interact with the features on your phone in several ways:

  • Softkeys, located below the screen, give you access to the function displayed on the screen above the softkey. The softkeys change depending on what you are doing at the time. The More ... softkey shows you that more functions are available.

  • Feature and line buttons, located on either side of the screen, give you access to phone features and phone lines.

    • Feature buttons—Used for features such as Speed dial or Call pickup, and to view your status on another line.

    • Line buttons—Used to answer a call or resume a held call. When not used for an active call, used to initiate phone functions, such as the missed calls display.

Feature and line buttons illuminate to indicate status.

LED Color and State

Normal Line Mode: Line Buttons

Normal Line Mode: Feature Buttons

Enhanced Line Mode

Line button Green, steady LED

Active call or two-way intercom call, held call, privacy in use

Active call or two-way intercom call, privacy in use

Line button Green, flashing LED

Not applicable

Held call

Line button Amber, steady LED

Incoming call, reverting call, one-way intercom call, logged into a Hunt Group

One-way intercom call, logged into a Hunt Group

Line button Amber, flashing LED

Not applicable

Incoming call, reverting call

Line button Red, steady LED

Remote line in use, Remote line on hold, Do Not Disturb active

Remote line in use, Do Not Disturb active

Line button Red, flashing LED

Not applicable

Remote line on hold

Your administrator can set up some functions as softkeys or as feature buttons. You can also access some functions with softkeys or the associated hard button.

Phone Screen Features

The phone screen shows information about your phone such as directory number, active call and line status, softkeys, speed dials, placed calls, and phone menu listings. The screen is made up of three sections: the header row, the middle section, and the footer row.

Figure 5. Cisco IP Phone 8800 Screen
Cisco IP Phone 8800 screen

The following table describes the Cisco IP Phone screen components.

Table 18. Cisco IP Phone Screen Information

1

At the top of the screen is the header row. The header row displays the phone number, current date and time, as well a number of icons. The icons display when features are active.

2

The middle of the phone screen displays the information associated with the line and feature buttons on the phone.

3

The bottom row of the screen contains the softkey labels. Each label indicates the action for the softkey button below the screen.

Phone Icons

Your phone screen displays many icons. This section gives images of the common icons

Icons are in color or grayscale, depending on the screen.

Lines

Icon

Description

handset

Line/Directory Number

handset with bars to the left

Speed dial

up and down arrows

Intercom

two vertical bars

Held call

handset with audio arcs

Active call

Shared Lines

Icon

Description

handset with upward lines

Incoming call on shared line.

red handset with audio arcs

Shared line active by another user.

Recents

Icon

Description

handset with left arrow

Incoming call

handset with right arrow

Outgoing call

handset with left arrow over the top

Missed call

Bluetooth Icons

If your phone model supports Bluetooth, you see these icons.

Table 19. Bluetooth Icons

Icon

Description

Bluetooth icon

Bluetooth is turned on.

dark oval with Bluetooth icon

A device is connected with Bluetooth.

outlined oval with Bluetooth icon

Bluetooth is turned on but no device is connected.

Wi-Fi Network Icons

If your phone is connected to the Wi-Fi network, you see these icons.

Table 20. Network Icons

Icon

Description

wi-fi icon with 4 active bars

wi-fi icon with 3 active bars

wi-fi icon with 2 active bars

wi-fi icon with 1 active bar

Wi-Fi connected and the number of bars indicates the signal strength.

wi-fi icon with no active bars

There is no Wi-Fi connection

Clean your phone screen

Procedure

If your phone screen gets dirty, wipe it with a soft, dry cloth.

Caution


Don't use any liquids or powders on the phone because they can contaminate the phone components and cause failures.


Badged Icons

If you have missed calls, the missed call icon, and a counter showing the number of missed calls, display on your phone desktop. If you receive a voicemail, the missed call icon changes to the voicemail icon and voicemail counter until you listen to your messages.

In addition, if you have more than one call on a line, either the held icon or the off hook icon change to show the number of calls.

Differences Between Phone Calls and Lines

We use the terms lines and calls in very specific ways to explain how to use your phone.

  • Lines—Each line corresponds to a directory number or intercom number that others can use to call you. You have as many lines as you have directory numbers and phone line icons. Depending upon how your phone is configured, you could have up to 16 lines.

  • Calls—Each line can support multiple calls. By default, your phone supports four connected calls per line, but your administrator can adjust this number according to your needs.

    Only one call can be active at any time; other calls are automatically placed on hold.

    Here is an example: If you have two lines and each line supports four calls, then you could have up to eight connected calls at one time. Only one of those calls is active and the other seven are held calls.

USB Ports

Your phone may have one or more USB ports. Each USB port supports a maximum of five USB devices. Each device connected to the port is included in the maximum device count, including any Key Expansion Modules.

For example, your phone can support five USB devices on the side port and five additional standard USB devices on the back port. Many third-party USB products contain more than one USB device, and thus count as more than one device.

If you use a USB hub and remove the USB cable from the phone during an active call, your phone might restart.

Mobile Device Charging

You can use the USB ports on your phone to charge your mobile device if the device has a USB connection. The following ports support USB charging:

  • Side port—Provides standard device charging.

  • Back port (Cisco IP Phone 8861, 8865, and 8865NR only)—Provides standard device charging as well as fast-charging.

Your phone continues to charge the mobile device while it is in power-saving mode but stops charging in Power Save Plus mode.

When you use your phone to charge your mobile device, the following conditions apply:

  • A short delay may occur before charging begins.

  • In some situations, your device will not display the charging icon. For example, the icon may not display when the device is fully charged.

  • When more than one Cisco IP Phone 8800 Key Expansion Module is attached to your phone, the back USB port cannot fast-charge the device.

If you unplug your tablet and immediately plug in a USB headset to the phone, a 3-second delay occurs before the phone recognizes the USB headset.

Chinese Language Support

You can input Chinese characters and have Chinese displays on your phone by selecting 拼音. This feature is supported on speed dial, call history, and personal and corporate directories.

This feature is supported on both the phone and the key expansion modules. But, it is only available in Asian countries and only Chinese (China) is supported. Chinese input is based on the Pinyin input method, which is common to PCs and mobile phones in many Asian countries.

This feature requires the Chinese locale installer, but it does not require any additional configuration.

Search Call History

Chinese input is based on the Pinyin input method, which is common to PCs and mobile phones in many Asian countries.

Procedure

Step 1

Press Applications .

Step 2

Select Recents.

When the phone is in the idle state, you can also view the Recent calls list by pressing the Navigation cluster up.

Step 3

Select ABC.

Step 4

Select 拼音.

Step 5

Use the navigation cluster and the keypad to select your input.


Add a Speed Dial Button from Your Phone

Chinese users can configure a speed dial button from your phone, if you cannot access the Self Care Portal. Chinese input is based on the Pinyin input method, which is common to PCs and mobile phones in many Asian countries.

Procedure

Step 1

Press and hold a line key for 2 seconds.

Step 2

Select 拼音.

Step 3

In the Name field, enter the name of the speed-dial number.

Step 4

In the Number field, enter the phone number. Include all the digits that are required to complete the call.

Step 5

Select Apply to save your speed-dial number.


Add a New Contact to Your Corporate or Personal Directory

Chinese users can store the contact information for friends, family, or coworkers. Chinese input is based on the Pinyin input method, which is common to PCs and mobile phones in many Asian countries.

Procedure

Step 1

Press Contacts .

Step 2

Select Personal directory or Corporate directory.

Step 3

Select 拼音.

Step 4

Enter first name, last name, and optionally a nickname.

Step 5

Press Phones, enter the phone number along with any required access codes, and then press Submit.


Bluetooth and Your Phone

If your phone supports Bluetooth, use a Bluetooth headset and connect your mobile phone or tablet to the phone.

Bluetooth connections work best when you're within 3 to 6 feet (1 to 2 meters) from your phone, but you might be able to be as far away as 66 feet (20 meters). The Bluetooth connection can degrade if you have a barrier (wall, door, window), large metal object, or other electronic devices between your phone and the connected device.

To connect a mobile device or headset to your phone with Bluetooth, start by pairing the device with your phone. You can pair up to 50 mobile devices and Bluetooth headsets with the phone.

After the headset or mobile device is paired, the phone connects to the headset or mobile device when the headset or mobile device is turned on.

When you use a Bluetooth headset and mobile devices with your phone, keep these things in mind:

  • The last Bluetooth headset or mobile device connected with the phone is the default device that the phone uses.

  • You can connect one mobile device (phone or tablet) and one Bluetooth headset at the same time.

  • The phone can connect to only one paired mobile device at a time. If your mobile phone is connected and you turn on your tablet, the tablet connects to the phone and the mobile phone disconnects.

  • When your Bluetooth headset and your mobile device are connected to the phone, you cannot use the Bluetooth headset to answer desk phone calls from the mobile device.

Accessibility Features for the Cisco IP Phone 8800 Series

The Cisco IP Phone 8800 Series provide accessibility features for the blind, and the visually-, hearing-, and mobility-impaired. Because many of these features are standard, they can be used by users with disabilities without requiring any special configuration.

In this document, the term phone support pages refers to the web pages that users can access to set up certain features. For Cisco Unified Communications Manager (Release 10.0 and later), these pages are the Self Care Portal. For Cisco Unified Communications Manager (Release 9.1 and earlier), these pages are the User Options web pages.

Cisco is committed to designing and delivering accessible products and technologies to meet the needs of your organization. You can find more information about Cisco and its commitment to accessibility at this URL: http://www.cisco.com/go/accessibility

Hearing-Impaired Accessibility Features

Your phone comes with standard accessibility features that require little or no setup.

Figure 6. Hearing-Impaired Accessibility Features—Cisco IP Phone 8861 Shown
Cisco IP Phone 8861 with callouts. Number 1 is the light strip on the top of the handset. Number 2 is the cluster of three keys on the lower right of the keypad. The top row of two keys is the headset button on the left and the speakerphone button on the right. Below them is the mute button. Number 3 is the volume button. Numbers 4, 5, and 6 point to the phone's handset.

The following table describes the hearing-impaired accessibility features on the Cisco IP Phone 8800 Series.

Table 21. Hearing-Impaired Accessibility Features

Item

Accessibility Feature

Description

1

Visual message-waiting indicator (handset)

This lighted strip is visible from all angles. Your phone also provides an audible message-waiting indicator.

To change the light or the audible voice-message indicator, sign in to the phone support pages and access the message-indicator settings. You can change each setting to on or off.

Your administrator can also change your settings.

2

Visual notification of phone state

  • Toggle the Mute and Speakerphone buttons on and off to indicate the phone state.

  • Use the Mute button to toggle the microphone on or off. When the microphone is muted, the button is lit.

  • Use the Speakerphone button to toggle the speakerphone on or off. When the speakerphone is on, the button is lit.

3

Adjustable ringtone, pitch, and volume

  • Select Applications > Preferences.

  • Adjust the volume level for the phone ring. While the handset is in the cradle and the headset and speakerphone buttons are off, press Volume to raise or lower the volume.

Your administrator can also change your settings.

4

Inline-amplifier support (handset)

Cisco IP Phone handsets support third-party inline amplifiers. You attach an amplifier to the handset and cord and it sits between the handset and the IP phone.

5

Hearing aid compatible (HAC) handset

Supports these accessibility features:

  • Hearing-aid compatible.

  • Magnetic coupling of the hearing aid.

  • Federal Communications Commission (FCC) loudness requirements for the Americans with Disabilities Act (ADA).

  • Section 508 loudness requirements, which are met by using industry-standard inline handset amplifiers.

6

Acoustic coupled TTY and TDD support (handset)

Cisco IP Phones support these TTY and TDD features:

  • Acoustic or direct connect TTYs from industry-leading manufacturers.

  • Real-time text transmission over phone lines.

  • Hearing and voice carry over phones (HCO/VCO).

  • VoIP network operating at G.711.

For information about setting up TTY, contact your administrator.

Vision-Impaired and Blind Accessibility Features

Your phone comes with standard accessibility features that require little or no setup.

Figure 7. Vision-Impaired and Blind Accessibility Features—Cisco IP Phone 8861 Shown
Cisco IP Phone 8861 with callouts. Number 1 is the light strip on the top of the handset. Number 2 points to the buttons on each side of the screen. Number 3 points to the screen. Number 4 points to the row of four buttons below the screen. Number 5 points to the round navigation cluster with a button to the left and a button on the right. Number 6 points to the cluster of three buttons on the top left of the keypad. Number 7 points to the cluster of three buttons on the top right of the keypad. Number 8 points to the volume bar on the bottom left of the keypad. Number 9 points to the keypad. Number 10 points to the cluster of three buttons to the bottom right of the keypad. More information follows in the table.

The following table describes the vision-impaired and blind accessibility features on the Cisco IP Phone 8800 Series.

Table 22. Vision-Impaired and Blind Accessibility Features

Item

Accessibility Feature

Description

1

High-contrast visual and audible alert of an incoming call

Alerts you to an incoming call. The handset light strip flashes during incoming calls and stays lit when a voicemail message is received.

2

Line, feature, and session buttons on the Cisco IP Phone

  • Line and feature buttons are to the left of the LCD. Session buttons are to the right of the LCD.

  • For locales that read right to left, such as Arabic, session buttons are on the left and the line and feature buttons are on the right.

Use line buttons to start, answer, or switch to a call on a particular line.

Features, such as speed dial, line status, privacy, do not disturb (DND), and service URLs, can be assigned to feature buttons.

Your administrator sets up programmable feature buttons on your phone.

Use session buttons to perform tasks, such as answering a call or resuming a held call.

Colors indicate your phone's status:

  • Green, steady—Active call or two-way intercom call.

  • Green, flashing—Held call.

  • Amber, steady—Privacy in use, one-way intercom call, DND active, or signed in to a hunt group.

  • Amber, flashing—Incoming call or reverting call.

  • Red, steady—Remote line in use (shared line or line status).

  • Red, flashing—Remote line on hold.

3

Back-lit color LCD screen on the Cisco IP Phone

  • The Cisco IP Phone 8811 has a grayscale LCD with adjustable contrast.

Allows you to adjust your phone screen's brightness.

4

Softkeys

  • These are large buttons just below the LCD.

Provide access to special functions. The functions are displayed on the LCD.

5

Navigation Cluster (includes the Navigation ring and the Select button)

  • The Navigation cluster is located just above the keypad.

  • Back button to the left of the Navigation cluster

  • Release button to the right of the Navigation cluster

Use the Navigation ring to move up, down, left, and right in the phone LCD. The Select button is in the center of the Navigation cluster.

Use the Back button to return to the previous screen or menu.

Use the Release (End Call) button to end a call or session.

6

Messages button, Applications button, and Contacts button

  • These three large buttons are located to the left of the keypad.

  • In this group of buttons, the Messages button is the single button in the top row. Below the Messages button, the Applications button is on the left, and the Contacts button is on the right.

Allow you to easily access your messages, applications, and contacts.

7

Hold button, Transfer button, and Conference button

  • These three large buttons are located to the right of the keypad.

  • In this group, the Hold button is the single button in the top row. Below the Hold button, the Transfer button is on the left, and the Conference button is on the right.

Allow you to use these functions on your phone.

8

Volume key

  • This key is located at the bottom left of the phone.

Allows you to increase or decrease the ring volume or the sound through the handset, headset, or speakerphone.

Press the right side of the rocker key to increase the volume; press the left side of the rocker key to decrease the volume.

9

Standard 12-key layout

Allows you to use existing or familiar key positions. Key 5 has a nib.

10

Headset, Speakerphone, and Mute buttons

  • These buttons are located on the bottom right of the phone.

  • In this group, the Mute button is the single button in the bottom row. Above the Mute button, the Headset button is on the left, and the Speakerphone button is on the right.

Provide audible notification of the phone state:

  • Toggle the Headset, Mute, and Speakerphone buttons on and off to indicate the phone state.

  • Use the Headset button to toggle the headset on. When the headset is on, the button is lit. Pick up the handset or select Speakerphone to leave headset mode.

  • Use the Mute button to toggle the microphone on or off. When the microphone is muted, the button is lit. When you turn on Mute, your phone beeps once; when you turn off Mute, your phone beeps twice.

  • Use the Speakerphone button to toggle the speakerphone on or off. When the speakerphone is on, the button is lit.

Adjustable Footstand

You can adjust the footstand to provide optimum phone display viewing and easy access to all buttons and keys.

Voice Feedback

Voice Feedback helps people vision problems to use their Cisco IP Phone. When enabled, a voice prompt helps you navigate your phone buttons, and to use and configure phone features. The voice also reads out incoming Caller IDs, displayed screens and settings, and button functions.

Here are a few important items to keep in mind as you use this feature.

  • Voice Feedback is enabled and disabled with the Select button that is located in the center of the Navigation cluster. When the phone is idle, quickly tap Select three times to turn this feature on or off. A voice prompt alerts you to the feature status.

  • Push a softkey once, and Voice Feedback reads out the feature that is associated with the key. Quickly push the softkey twice to execute the feature.

  • Hard keys, such as the Contacts, Applications, and Messages buttons, are treated differently. Push a hard key once, and a voice reads out the screen name followed by the application or setting that is displayed on the phone.

Volume is adjusted with the Volume button. To adjust your handset volume, lift the receiver from the cradle, and press Volume. If you use a headset, select the Headset button, and then Volume. If you use the speakerphone, select Speakerphone and Volume.

You may not hear Voice Feedback if you select the Headset button, but don't have a connected headset. Select Speakerphone and you hear Voice Feedback again.

When on a call, only you hear Voice Feedback so your privacy is assured. Voice Feedback is only available for English language users. If this feature is not available to you, then it is disabled on your phone.

Mobility-Impaired Accessibility Features

Your phone comes with standard accessibility features that require little or no setup.

To check which phone model you have, press Applications and select Phone information. The Model number field shows your phone model.

Figure 8. Mobility-Impaired Accessibility Features—Cisco IP Phone 8861 Shown
Cisco IP Phone 8861 with callouts. Number 1 points to the buttons on either side of the screen. Number 2 points to the 4 buttons under the screen, the two buttons on either side of the round navigation button, and the clusters of 3 buttons on the top left and top right of the keypad. Number 3 points to the top-right button in the lower right button cluster. Number 4 points to the keypad.

The following table describes the mobility-impaired accessibility features on the Cisco IP Phone 8800 Series.

Table 23. Mobility-Impaired Accessibility Features.

Item

Accessibility Feature

Description

1

Lighted buttons

Allow you to access the following features:

  • Phone lines and intercom lines (line buttons)

  • Speed-dial numbers (speed-dial buttons, including the speed-dial line status feature)

  • Web-based services, such as a personal address book

  • Phone features, such as privacy

Indicate your phone's status:

  • Green, steady—Active call or two-way intercom call

  • Green, flashing—Held call

  • Amber, steady—Privacy in use, one-way intercom call, DND active, or signed in to hunt group

  • Amber, flashing—Incoming call or reverting call

  • Red, steady—Remote line in use (shared line or Line Status)

2

Large buttons to access Applications, Messages, Contacts, Hold, Transfer, and Conference

Allow you to easily access your phone applications, voice messages, corporate and personal directories, and calling features.

3

Built-in speakerphone

Indicates whether the speakerphone is on or off. When the speakerphone is on, the button is lit.

4

Tactile-discernible buttons and functions, including a nib on Key 5

Allow you to easily locate your phone's keys. For example, Key 5 has a nib, which you can use to locate other key positions.

Cisco IP Phone 8800 Series Wall Mount Kit Accessibility

The Cisco IP Phone 8800 Series phones can be mounted on a wall using one of the following wall mount kits:

  • Wallmount Kit for Cisco IP Phone 8800 Series—used to mount a single phone on the wall.

  • Wallmount Kit for Cisco IP Phone 8800 Series with single KEM—used to mount a single phone with one attached key expansion module on a wall.

  • Wallmount Kit for Cisco IP Phone 8800 Video Series—used to mount a single video phone on the wall.

The Wallmount Kit for Cisco IP Phone 8800 Series and Wallmount Kit for Cisco IP Phone 8800 Series with single KEM meet the 307.2 Protrusion Limits section of the Americans with Disabilities Act (ADA) ADAAG requirement for mounting a phone on the wall.

The Wallmount Kit for Cisco IP Phone 8800 Video Series is slightly larger and does not meet the 307.2 Protrusion Limits section of the Americans with Disabilities Act (ADA) ADAAG requirement for mounting a phone on the wall.

The following figure shows a side view of the phone with the wall mount kit installed.

Figure 9. Side View of the Phone Installed with the Wall Mount Kit
Side view of an IP phone installed with a wall mount kit

Phone Firmware and Upgrades

Your phone comes pre-installed with firmware that is specific to the call control system.

Occasionally, your administrator upgrades the phone firmware for you. This upgrade happens in the background even if you are using your phone.

Postpone a Phone Upgrade

When new firmware is available, the Ready to upgrade window is displayed on your phone and a timer begins a 15-second countdown. If you do nothing, the upgrade proceeds.

You can postpone your firmware upgrade for 1 hour and up to 11 times. The upgrade is also postponed if you make or receive a phone call.

Procedure


Select Delay to postpone a phone upgrade.


View the Progress of a Phone Firmware Upgrade

During a phone firmware upgrade, you can view the upgrade progress.

Procedure


Step 1

Press Applications .

Step 2

Press Settings.

Step 3

Select Phone information > Show detail.

Step 4

Select System information , and press Show details.

Step 5

Press Exit.


Energy Savings

Your administrator can reduce the amount of power your phone screen uses with the following options:

  • Power Save—The backlight or screen turns off when the phone is inactive for a set interval.

  • Power Save Plus—Your phone screen turns on and off at times that are based on your work schedule. If your work hours or work days change, you can contact your administrator to reconfigure your phone.

For example, your administrator can set your phone to alert you 10 minutes before it turns off. You get a message that your phone is turning off soon and you get notifications at these intervals:

  • Four rings at 10 minutes before power off

  • Four rings at 7 minutes before power off

  • Four rings at 4 minutes before power off

  • 15 rings at 30 seconds before power off

If your phone is active, it waits until it has been inactive for a set interval before it notifies you of the pending power shutdown.

Turn On Your Phone

When your phone turns off to save energy, the phone screen is blank and the Select button lights up.

Procedure


Press Select to turn your phone back on.


Phone Line Modes

Your phone can be set up in one of these modes:
  • Normal line mode—In this mode, the buttons to the left and right of the screen have different functions. Usually, the left buttons are the line buttons and the right buttons are the feature buttons. The line and feature buttons are reversed for locales that read from right to left. This mode is also known as session line mode.

  • Enhanced line mode—In this mode, the buttons on the left and right of the screen can be set up as line buttons. This mode increases the number of phone lines that you can see and use. You see an alert for an incoming call.

Normal Line Mode

When your phone is set up for normal (Session) line mode, you interact with the phone in these ways:
  • Use the New call window to place a call.

  • Select Answer to answer a call, unless your phone is set up for an Incoming Call alert. If your phone is set up for an Incoming Call alert, select Answer, Decline, or Ignore.

  • Five line keys are available. If your phone is connected to your mobile device or tablet with Bluetooth, only four line keys are available.

Firmware release 12.6(1) introduced an improved Session line mode. Now all of your outgoing calls are handled with the primary line unless you select another line. If you have calls on multiple lines, the calls are handled in sequence. When the last call ends, your phone reverts to the primary line.

Enhanced Line Mode

When your phone is set up for Enhanced line mode, you interact with the phone in these ways:

  • Select a phone line and enter the phone number to make calls. The Recents list displays phone numbers similar to the number being dialed.

  • Select Answer, Decline, or Ignore to answer calls.

  • Ten line keys are available.

    You can see your missed calls by selecting a line key to view the missed calls for that line in the call window. The missed call counter clears when you return to the idle screen.

It depends how Enhanced line mode is configured, but you will see the call connected status and the line label with one of the following combinations:

  • The name of the person calling, and the line receiving the call.

  • The directory number of the person calling, and the line receiving the call.

  • The name of the person calling, and their directory number.

  • The directory number of the person calling.

Forwarded calls are also identified.

Additional Help and Information

If you have questions about the functions available on your phone, contact your administrator.

The Cisco website (https://www.cisco.com) contains more information about the phones and call control systems.

Accessibility Features

Cisco IP Phones provide accessibility features for the vision impaired, the blind, and the hearing and mobility impaired.

For detailed information about the accessibility features on these phones, see http://www.cisco.com/c/en/us/support/collaboration-endpoints/unified-ip-phone-8800-series/products-technical-reference-list.html.

You can also find more information about accessibility at this Cisco website:

http://www.cisco.com/web/about/responsibility/accessibility/index.html

Troubleshooting

You may experience issues related to the following scenarios:

  • Your phone cannot communicate with the call control system.

  • The call control system has communication or internal problems.

  • Your phone has internal problems.

If you experience problems, your administrator can help troubleshoot the root cause of the problem.

Find Information About Your Phone

Your administrator may ask for information about your phone. This information uniquely identifies the phone for troubleshooting purposes.

Procedure

Step 1

Press Applications .

Step 2

Select System information.

Step 3

Select Phone information.

Step 4

(Optional) Press Show detail to view the active load information.

Step 5

Press Exit.


Report Call Quality Issues

Your administrator may temporarily configure your phone with the Quality Reporting Tool (QRT) to troubleshoot performance problems. Depending on the configuration, use the QRT to:

  • Immediately report an audio problem on a current call.

  • Select a general problem from a list of categories and choose reason codes.

Procedure

Step 1

Press Report quality.

Step 2

Scroll and select the item that closely matches your problem.

Step 3

Press the Select softkey to send the information to your system administrator.


Report All Phone Issues

You can use the Cisco Collaboration Problem Report Tool (PRT) to collect and send phone logs, and to report problems to your administrator. If you see a message that the PRT upload has failed, the problem report is saved on the phone and you should alert your administrator.

Procedure

Step 1

Press Applications .

Step 2

Select Phone information > Report problem.

Step 3

Select Settings > System information > Report problem.

Step 4

Enter the date and time that you experienced the problem in the Date of problem and Time of problem fields.

Step 5

Select Problem description.

Step 6

Select a description from the displayed list, then press Submit.


Lost Phone Connectivity

Sometimes your phone loses its connection to the phone network. When this connection is lost, your phone displays a message.

If you are on an active call when the connection is lost, the call continues. But, you don't have access to all normal phone features because some functions require information from the call control system. For example, your softkeys might not work as you expect.

When the phone reconnects to the call control system, you'll be able to use your phone normally again.

For more information on phone registration, please visit Manual phone registration.

Cisco One-Year Limited Hardware Warranty Terms

Special terms apply to your hardware warranty and services that you can use during the warranty period.

Your formal Warranty Statement, including the warranties and license agreements applicable to Cisco software, is available at: Product Warranties.