Adjust footstand
Procedure
|
The Cisco Unified IP Phone 3905 has a foldable footstand. Unfold the footstand to give the phone an elevated viewing angle. |
The documentation set for this product strives to use bias-free language. For the purposes of this documentation set, bias-free is defined as language that does not imply discrimination based on age, disability, gender, racial identity, ethnic identity, sexual orientation, socioeconomic status, and intersectionality. Exceptions may be present in the documentation due to language that is hardcoded in the user interfaces of the product software, language used based on RFP documentation, or language that is used by a referenced third-party product. Learn more about how Cisco is using Inclusive Language.
|
The Cisco Unified IP Phone 3905 has a foldable footstand. Unfold the footstand to give the phone an elevated viewing angle. |
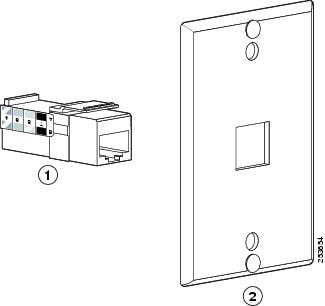
You can mount the Cisco Unified SIP Phone 3905 on the wall by using a standard telephone wall plate with an opening for an RJ-45 connector. Cisco recommends that you use Leviton Wall Mount plate (Leviton type number: 4108W-0SP) to wall mount the Cisco Unified SIP Phone 3905.
The following figure shows a list of items required to mount the Cisco Unified SIP Phone
|
1 |
RJ45 Connector |
2 |
Leviton Wall Mount Plate |
|
Step 1 |
Plug the telephone line cord (RJ45 connector) into the phone jack at the base of the phone as shown in the following image: 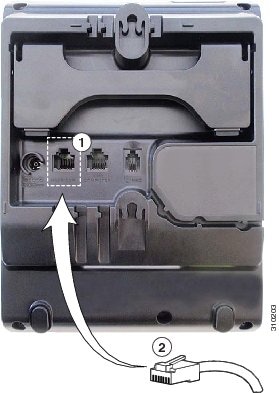
|
||||||||
|
Step 2 |
Plug the RJ45 connector into the wall mount phone jack as shown in the following image: 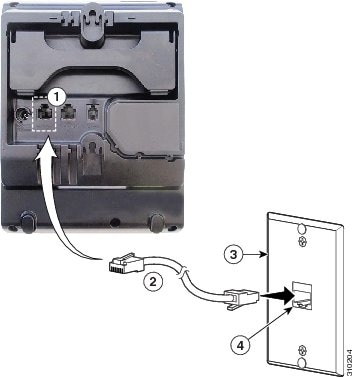
|
||||||||
|
Step 3 |
Slip the mounting holes on the base of the wall mount plate and over the wall mount pins as shown in the following image: 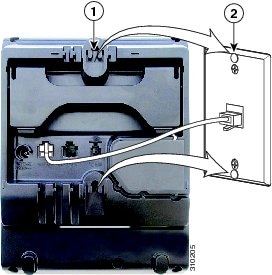
|
||||||||
|
Step 4 |
Firmly slide the IP phone down into place as shown in the following image: 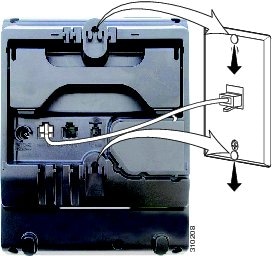 |
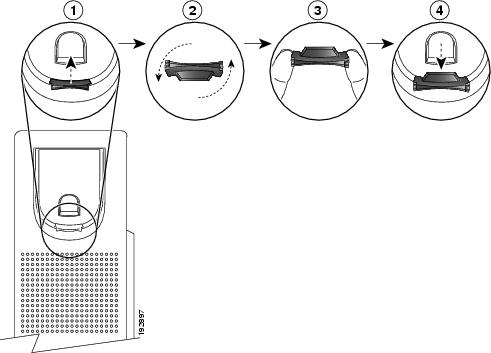
If your phone is wall-mounted or if the handset slips out of the cradle too easily, you may need to adjust the handset rest to ensure that the receiver does not slip out of the cradle.
|
Step 1 |
Remove the handset from the cradle and pull the plastic tab from the handset rest. |
|
Step 2 |
Rotate the tab 180 degrees. |
|
Step 3 |
Hold the tab between two fingers, with the corner notches facing you. |
|
Step 4 |
Line up the tab with the slot in the cradle and press the tab evenly into the slot. An extension protrudes from the top of the rotated tab. |
|
Step 5 |
Return the handset to the handset rest. |
 Feedback