- Introduction
- Create a License Plan
- Use Electronic Fulfillment to Add Licenses
- Upgrade Existing Licenses
- Other Fulfillment Options
- License Rehost
- Migrate Licenses to Cisco Prime License Manager
License Management
Introduction
-
Determine licensing requirements for your product. See License View Settings.
-
Migrate your existing licenses if your Cisco Prime License Manager manages upgraded product instances that implement a different licensing methodology. See Migrate Licenses to Cisco Prime License Manager.
-
Perform new license fulfillment. See Create a License Plan.
Create a License Plan
Use the following procedure to plan the addition of new licenses.
What to Do Next
-
Place your order: Purchase your licenses or use your service contract to get a PAK.
-
Fulfill your licenses: Enter your PAK into the License Fulfillment screen of Cisco Prime License Manager and, through the e-Fulfillment process, fulfill your licenses. Cisco Prime License Manager communicates with Cisco licensing servers and your new licenses will be installed and ready to use.
Use Electronic Fulfillment to Add Licenses
Complete the following procedure to electronically fulfill your licenses.
Create a licenses plan.
Upgrade Existing Licenses
There are three types of license upgrades:
 Note | Upgrade licenses can only be used to convert currently installed licenses. |
Use the following procedure to fulfill a major version upgrade using eFulfillment.
Other Fulfillment Options
Next to the Fulfill Licenses from the PAK option on the License Fulfillment page, there is another option entitled Other Fulfillment Options.
In Manual Fulfillment mode, selecting the drop-down arrow under this option reveals only one option: Generate License Request.
In eFulfillment mode, selecting the drop-down arrow under this option reveals three options:
Fulfill Licenses from File
To fulfill licenses from a file on your computer:
Generate License Request
To obtain a new license (using Manual fulfillment) generate a license request through the page, and then use the information generated to submit a request. You receive your license file through email. Use the following procedure to generate a license request.
- Log in to Cisco Prime License Manager.
- From the window, select Generate License Request from the drop-down list under Other Fulfillment Options.
- Copy the selected text to your clipboard or click Save it to a file on your PC.
Retrieve Fulfilled Licenses
The Retrieve Fulfilled Licenses option is exclusive to e-Fulfillment. This feature connects to the Cisco licensing servers to retrieve and install the licenses that have been fulfilled for this Cisco Prime License Manager. This feature is useful if you wish to synchronize your Cisco Prime License Manager with the Cisco back office regarding licenses that have been fulfilled.
Use the following procedure to retrieve fulfilled licenses:
-
Log in to Cisco Prime License Manager.
-
Select .
-
If not already selected, click the Enable button to enable e-Fulfillment.
-
Under Other Fulfillment Options, select Retrieve Fulfilled Licenses. The Retrieve Fulfilled Licenses window appears.
-
Enter your Cisco Username and Password. You can add a description (optional) in the Transaction Description field.
-
Click the Retrieve and Install Licenses button.
-
Your Cisco Prime License Manager is synchronized with the Cisco back office and all licenses currently fulfilled are installed.
License Rehost
Licenses are fulfilled to a specific Cisco Prime License Manger. If you require licenses to be moved to a new Cisco Prime License Manager, they will be need to be rehosted.
A rehost may be required if:
- A hardware failure occurred and new hardware is required for Cisco Prime License Manager
- Multiple Cisco Prime License Managers are desired and a subset of fulfillment licenses need to be moved to a new Cisco Prime License Manager
License rehosts or transfers can be requested at www.cisco.com/go/license and do not require Global Licensing Operations (GLO) support.
Note | In order to use the rehost portal, you must use the same Cisco.com user ID that initially ordered or fulfilled the licenses. |
To perform a rehost, the license registration ID from the source machine as well as license request or license registration ID from the target machine is required.
Use the following procedure to perform a license rehost.
| Step 1 | From Product License Registration (www.cisco.com/go/license), select Devices. | ||
| Step 2 | Under the License ID tab of a particular device, select the license(s) that you want to rehost. | ||
| Step 3 | In the pop-up that appears, select Rehost/Transfer. | ||
| Step 4 | In the Quantity to Assign field, enter the number of licenses you want to transfer. | ||
| Step 5 | In the License Request field, enter the License Request from the Cisco Prime License Manager of the target device. | ||
| Step 6 | Click Next. | ||
| Step 7 | In the Review screen, review your selections. | ||
| Step 8 | Enter your email address, select your name from the drop-down list next to End User, and indicate that you agree with the Terms of the License. | ||
| Step 9 | Click Submit. | ||
| Step 10 | The rehosted
license is emailed to you. It must then be manually installed on
the target Cisco Prime License Manager.
|
Migrate Licenses to Cisco Prime License Manager
When you upgrade a product instance from 8.x and earlier to 9.x and later, you must manually migrate your licenses. With the assistance of the Global Licensing Organization (GLO), you must convert licensing from the old paradigm to the new paradigm. For example, you can transfer licenses from Cisco Unified Communications Manager Release 8.x and older to Release 9.x and later.
This section describes the different migration paths you can follow using Cisco Prime License Manager. Cisco Emergency Responder, Cisco Unified Communications Manager, and Cisco Unity Connection each have their own migration paths.
Note | The migration path you follow depends upon a number of factors (for example: the product type, whether servers contain data from a previous version, and so on). The following flow charts provide a guide for the decisions that must be made to successfully complete your migration. For a broader view of the migration process, see the release notes for the product instance in question. |
Note | If Cisco Prime License Manager is in demo mode, do not create multiple migration requests. Complete the first migration, including installation of the license, prior to initiating a second migration. If a migration request results in multiple license files, install all of them, in order, before proceeding. |
Use the following procedure to plan for migration of product instances whose licenses have not yet been migrated to Cisco Prime License Manager.
Cisco Emergency Responder Migration Path
The following flow chart will aid you in migrating Cisco Emergency Responder licenses to Cisco Prime License Manager:
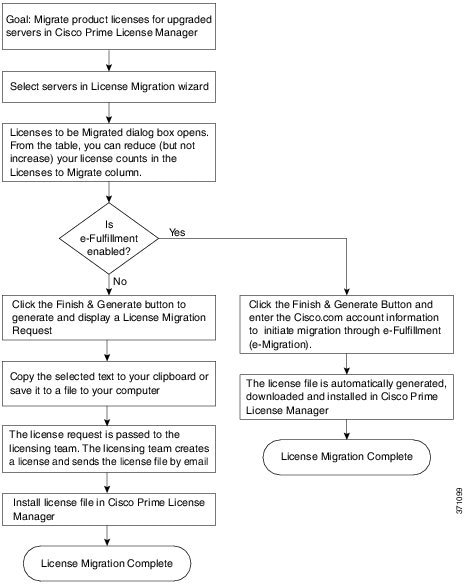
- Cisco Emergency Responder Migration Path with E-Fulfillment Enabled
- Cisco Emergency Responder Migration Path with E-Fulfillment Disabled
Cisco Emergency Responder Migration Path with E-Fulfillment Enabled
The term Standard Migration refers specifically to Cisco Emergency Responder. Cisco Unified Communications Manager and Cisco Unity Connection have their own unique migration paths and are documented separately.
Use the following procedure to plan for migration of product instances whose licenses have not yet been migrated to Cisco Prime License Manager if e-Fulfillment is enabled.
| Step 1 | From the Licenses > Fulfillment window in Cisco Prime License Manager, select . |
| Step 2 | From the Choose Product Type section, select the type of product to upgrade from the drop-down menu and click Next. |
| Step 3 | From the New License Version section, select the version of the product to which you are migrating licenses. |
| Step 4 | From the Available Product Instances window, select a product instance and click the arrow to move it to the
Product Instances to Migrate window.
Click Next. |
| Step 5 | From the table, you can reduce (but not increase) your license counts in the Licenses to Migrate column. You may also choose to run a compliance check by clicking Run Compliance Check, or reset the license values by clicking Reset Values. Click OK to close the dialog box and then click Next to move on to the Summary and Next Steps section. |
| Step 6 | Specify an optional description for the transaction. Read the End User License Agreement and click Finish & Generate Request. |
| Step 7 | Enter your Cisco user ID in the Cisco.com (CCO) User ID field. The request is electronically submitted, and processed immediately. Your licenses are installed automatically. |
Cisco Emergency Responder Migration Path with E-Fulfillment Disabled
The term Standard Migration refers specifically to Cisco Emergency Responder. Cisco Unified Communications Manager and Cisco Unity Connection have their own unique migration paths and are documented separately.
Use the following procedure to plan for migration of product instances whose licenses have not yet been migrated to Cisco Prime License Manager if e-Fulfillment is disabled.
| Step 1 | From the Licenses > Fulfillment window in Cisco Prime License Manager, select . |
| Step 2 | From the Choose Product Type section, select the type of product to upgrade from the drop-down menu and click Next. |
| Step 3 | From the New License Version section, select the version of the product to which you are migrating licenses. |
| Step 4 | In
the Available Product Instances window, select a product instance and click the arrow to move it to the
Product Instances to Migrate window.
Click Next |
| Step 5 | From the table, you can reduce (but not increase) your license counts in the Licenses to Migrate column. You may also choose to run a compliance check by clicking the Run Compliance Check button, or reset the license values by clicking the Reset Values button. Click OK to close the dialog box and then click Next to move on to the Summary and Next Steps section. |
| Step 6 | In the Summary and Next Steps section, you can view and save a summary of the changes you made. To view the summary, click View Summary. A default name for the summary also appears in the Name field using the format <productname>-migrate-<date-time-stamp> format. Instructions for placing your order and fulfilling your licenses also appear in this section. Click Finish & Generate Request. |
| Step 7 | Copy the selected text to your clipboard or click Save it to a file on your computer. |
| Step 8 | Select License Migration Portal under Step 2 and paste the copied text in the designated field or select the saved file from your computer. |
| Step 9 | Click Close to return to the License Fulfillment page. |
Cisco Unified Communications Manager Migration Path
The following flow chart will aid you in migrating Cisco Unified Communications Manager licenses to Cisco Prime License Manager:

Use the following procedure to plan for migration of all Unified Communication product instances whose licenses have not yet been migrated to Cisco Prime License Manager.
| Step 1 | From the window in Cisco Prime License Manager, select . | ||||||||||
| Step 2 | In the Migrate Licenses to Cisco Prime License Manager wizard, select Unified CM from the drop-down menu in the Choose Product Type section. | ||||||||||
| Step 3 | From the New License Version section, select the version of the product to which you are migrating licenses. The migration process is outlined in this section, and is dependent on the type of product you select. | ||||||||||
| Step 4 | Click Next. | ||||||||||
| Step 5 | To upgrade a product instance, select the product instance in
the Available Product Instances window and click the arrow to move it to the
Product Instances to Migrate window.
| ||||||||||
| Step 6 | Click Next. | ||||||||||
| Step 7 | The Summary of Pre-Upgrade Product Instance Data table
lists the product instances you selected in the previous step. This table
cannot be edited. Below the table are a number of fields that require input:
| ||||||||||
| Step 8 | In this Summary and Next Steps section, indicate how the upgrade was ordered: If you select "Upgraded using one or more service contracts", enter the UCSS/ESW Contract Numbers. If you select "Purchased the upgrade", enter the Sales Order Numbers. | ||||||||||
| Step 9 | Enter your
Cisco user ID in the
Cisco.com
(CCO) User ID field.
Company Name and the field used to capture additional information are optional. However, if you enter the company name, it is used in the subject line of the email and is included in the name of the zip file. A default name for the summary also appears in the Name field using the format <productname>-migrate-<date-time-stamp> format. Instructions for placing your order and fulfilling your licenses also appear in this section. Click Finish & Generate Request. | ||||||||||
| Step 10 | From the License
Migration Request and Next Steps window, download the License Migration
Request zip file to your computer.
Email the License Migration Request to Cisco licensing support using the link provided. Click Close to return to the License Fulfillment page. |
Cisco Unity Connection Migration Path
The following flow chart will aid you in migrating Cisco Unity Connection licenses to Cisco Prime License Manager:
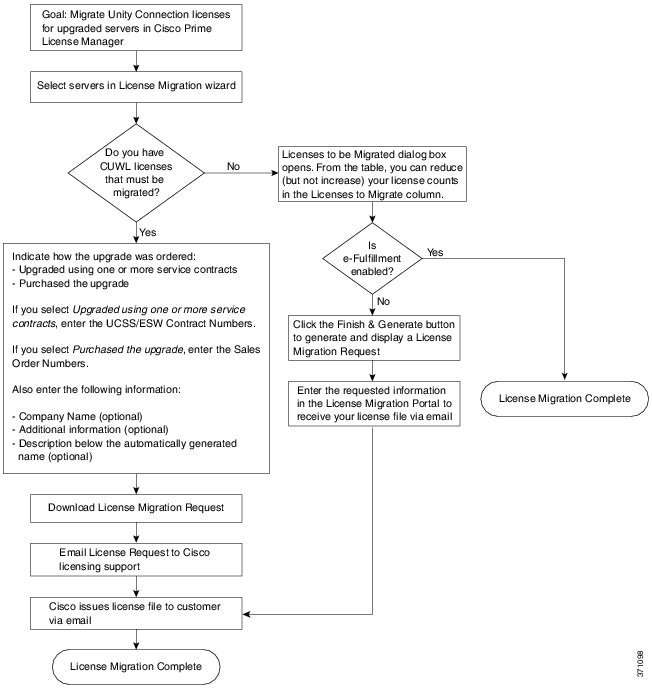
Use the following procedure to plan for migration of all Unity Connection product instances whose licenses have not yet been migrated to Cisco Prime License Manager.
| Step 1 | From the window in Cisco Prime License Manager, select . | ||||||||||
| Step 2 | In the Migrate Licenses to Cisco Prime License Manager wizard, select Unity Connection from the drop-down menu in the Choose Product Type section. | ||||||||||
| Step 3 | From the New License Version section, select the version of the product to which you are migrating licenses. The migration process is outlined in this section, and is dependent on the type of product you select. | ||||||||||
| Step 4 | Click Next. | ||||||||||
| Step 5 | To upgrade a product instance, select the product instance in the Available Product Instances window and click the arrow to move it to the Product Instances to Migrate window. | ||||||||||
| Step 6 | Click Next. | ||||||||||
| Step 7 | The License
Counts section prompts you to select one of two options
relating to Cisco Unified Workshop Licenses (CUWL):
| ||||||||||
| Step 8 | The option you selected in Step 4 determines
the information displayed in the Summary
and Next Steps section.
|
Alternate Cisco Unified Communications Manager Migrations Path
The following are alternate migration paths, available for use under specific circumstances:
- Upgrades completed without the License Count Utility (LCU) Report
- Fresh install with imported pre-9.x data
Upgrades completed without LCU Report
The Cisco Prime License Manager Migration Utility relies on DLU and license usage retained during the upgrade.
In situations where a product is upgraded to 9.x, 10.x, or 11.x without running License Count Utility on a pre-9.x version. Please contact the Cisco licensing office and have the license file reissued if changes are required.
Fresh install with imported pre-9.x data
A migration may be required following a fresh install in situations where pre-9.0 DLU or license information is not available in Release 9.x, 10.x, or 11.x VM. This may occur when:
- UC Release 8.6 needs to be upgraded as a new VM, with phone data exported
- A new Release 9.x, 10.x, or 11.x VM is created, with phone data imported
The following procedure enables you to perform a migration after a fresh install. This procedure requires that an LCU report be run against pre-upgrade product instance, if still accessible, or that MAC addresses of the pre-upgrade product instances be available.
| Step 1 | From the window in Cisco Prime License Manager, click . |
| Step 2 | In the Migrate Licenses to Cisco Prime License Manager wizard, select the type of product to upgrade and the version from the drop-down menus in the Choose Product Type section. The migration process is outlined in this section, and is dependent on the type of product you select. |
| Step 3 | Click Next. |
| Step 4 | From the Choose Product Instances section appears, check the checkbox next to Show additional Unified CM product instances. Selecting this option allows you to view products without prior version data. |
| Step 5 | To migrate a product instance, select it in the Available Product Instances window and click the arrow to move it to the Product Instances to Migrate window. Click Next. |
| Step 6 | After you have read the contents of the Additional Information Will Be Required window, click Continue to close the window. |
| Step 7 | Enter the following information in the License
Counts section:
|
| Step 8 | Download the License Migration Request zip file to your computer. |
| Step 9 | Email the License Migration Request to Cisco licensing support using the link provided. |
| Step 10 | Click Close to return to the License Planning window. |
Licensing Migration Support
Product licensing has a grace period from the time that users are configured on the system. For Cisco Unified Communications Manager and Unity Connection, the grace period is 60 days.
The Global Licensing Operations (GLO) Team is available 24 x 7 x 365 and has knowledgeable agents that can help process your request and route it to the team best able to assist you. Expect a response within 48-72 hours.
- Open your service request through the web: https://tools.cisco.com/ServiceRequestTool/scm/mgmt/case
- Open any service request through licensing@cisco.com (include Cisco.com user ID)
- Open a service request by telephone using country-specific numbers: http://www.cisco.com/c/en/us/support/web/tsd-cisco-worldwide-contacts.html
 Feedback