Configure the Domain

Configure the Domain Overview

The IM and Presence Domain window displays the following types of domains:

  • Administrator-managed IM address domains. These are internal domains that you have added manually but have not yet assigned to any users, or that were added automatically by the Sync Agent but the user's domain has since changed and so it is no longer in use.

  • System-managed IM address domains. These are internal domains that are in use by a user in the deployment and which can be added either manually or automatically.

If the domain appears in the IM and Presence Domain window, the domain is enabled. You do not need to enable a domain. You can manually add, update, and delete local IM address domains.

It is possible to have a domain configured on two clusters, but in use on only the peer cluster. This appears as a system-managed domain on the local cluster, but is identified as being in use on only the peer cluster.

The CiscoSync Agent service performs a nightly audit and checks the Directory URI of each user on the local cluster, and on the peer cluster if interclustering is configured, and automatically builds a list of unique domains. A domain changes from being administrator-managed to system-managed when a user in the cluster is assigned that domain. The domain changes back to administrator-managed when the domain is not in use by any user in the cluster.

Domain Configuration Examples

The Cisco Unified Communications Manager IM and Presence Service supports flexible node deployment across any number of DNS domains. To support this flexibility, all IM and Presence Service nodes within the deployment must have a node name set to that node's Fully Qualified Domain Name (FQDN). The following sample node deployment options for the IM and Presence Service are described below.

  • Multiple Cluster with Different DNS Domains and Subdomains

  • Single Cluster with Different DNS Domains or Subdomains

  • Single Cluster where the DNS Domain is Different than the Unified Communications Manager Domain


Note


If any IM and Presence Service node name is based on the hostname only, then all IM and Presence Service nodes must share the same DNS domain.

There is no requirement that the IM and Presence Service default domain or any other IM domain that is hosted by the system to align with the DNS domain. An IM and Presence Service deployment can have a common presence domain, while having nodes deployed across multiple DNS domains


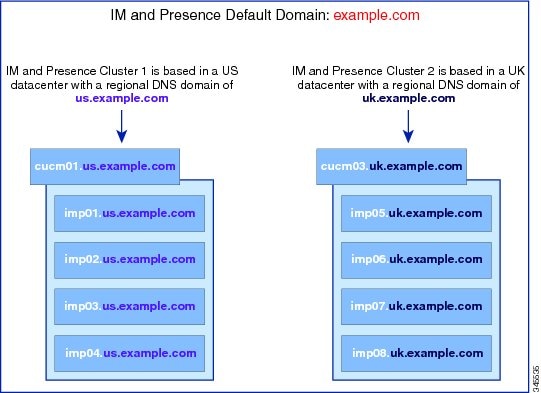
Multiple Cluster with Different DNS Domains and Subdomains

IM and Presence Service supports having the nodes associated with one IM and Presence Service cluster in a different DNS domain or subdomain to the nodes that form a peer IM and Presence Service cluster. The diagram below highlights a sample deployment scenario that is supported.


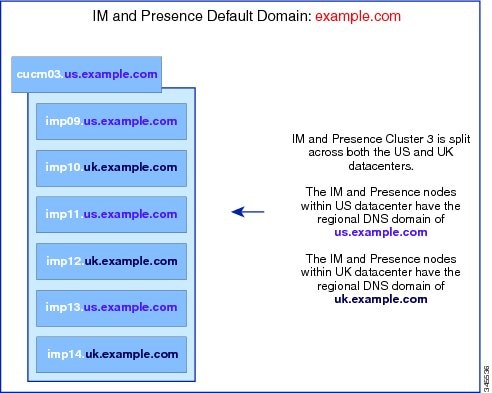
Single Cluster with Different DNS Domains or Subdomains

IM and Presence Service supports having the nodes within any IM and Presence Service cluster deployed across multiple DNS domains or subdomains. The diagram below highlights a sample deployment scenario that is supported.


Note


High availability is also fully supported in scenarios where the two nodes within a presence redundancy group are in different DNS domains or subdomains.


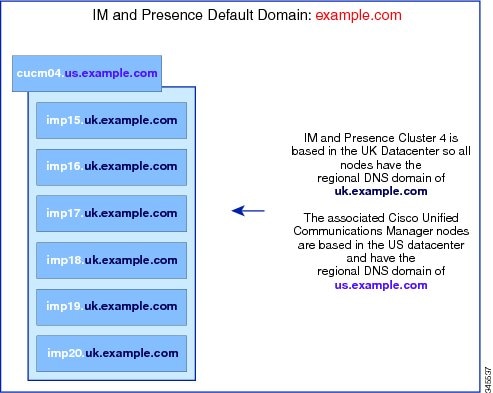
Single Cluster where the DNS Domain is Different than the Unified Communications Manager Domain

IM and Presence Service supports having the IM and Presence Service nodes in a different DNS domain to their associated Cisco Unified Communications Manager cluster. The diagram below highlights a sample deployment scenario that is supported.


Note


To support Availability Integration with Cisco Unified Communications Manager, the CUCM Domain SIP Proxy service parameter must match the DNS domain of the Cisco Unified Communications Manager cluster.

By default, this service parameter is set to the DNS domain of the IM and Presence database publisher node. If the DNS domain of the IM and Presence database publisher node differs from the DNS domain of the Cisco Unified Communications Manager cluster, you must edit this service parameter to use the domain of the Cisco Unified Communications Manager cluster.


Configure the Domain Prerequisites

Configure the Domain Task Flow

Complete these tasks to configure domains for the IM and Presence Service.

Procedure

  Command or Action Purpose

Step 1

Disable High Availability

If high availability is enabled, you must temporarily disable it. Changing the default domain requires you to stop services temporarily; if you stop the services while high availability is enabled, a system failover will occur.

Step 2

Deactivate IM and Presence Services

Stop essential services prior to changing the domain.

Step 3

Configure the Default Domain on IM and Presence Service

Configure the default domain value for the IM and Presence Service cluster. This procedure is applicable for both DNS and non-DNS deployments.

Step 4

Perform any of these tasks:

Optional. Complete these tasks only if you want to add, edit, or delete administrator-managed domains on your local cluster.

Step 5

Regenerate XMPP Client and TLS Certificates

If you are using TLS XMPP Federation, proceed to generate new XMPP client and TLS certificates.

Step 6

Start IM and Presence Services

After completing your domain configuration, restart services.

Step 7

Enable High Availability for Presence Redundancy Groups

If you had high availability configured, enable it once more.

Note

 
Make sure that the services that you started are running on all cluster nodes before you enable high availability.

Disable High Availability

If you have High Availability configured, you must disable it in each presence redundancy group before you configure the default domain. If High Availability is enabled when you stop services for the default domain change, failover occurs.

Before you begin

Take a record of the number of active users for each cluster node in each Presence Redundancy Group. You can find this information in the (System > Presence Topology) window of Cisco Unified CM IM and Presence Administration. You will need these numbers later when you re-enable High Availability.

Procedure


Step 1

From the Cisco Unified CM Administration user interface, choose System > Presence Redundancy Groups.

Step 2

Click Find and select the group.

Step 3

On the Presence Redundancy Group Configuration window, uncheck the Enable High Availability check box.

Step 4

Click Save.

Step 5

Repeat this procedure for each Presence Redundancy Group.

Step 6

When you are done, wait at least two minutes to sync the new HA settings across the cluster before you make any further changes


What to do next

Deactivate IM and Presence Services

Deactivate IM and Presence Services

Use this procedure to stop IM and Presence services before you make changes to the default domain. Perform this procedure on all nodes in the cluster.

Before you begin

Make sure that High Availability is disabled. For details, see Disable High Availability.

Procedure


Step 1

From Cisco Unified IM and Presence Serviceability, choose Tools > Control Center - Network Services.

Step 2

From the Server list, choose the node on which you want to deactivate services and click Go.

Step 3

In the IM and Presence Services area, deselect the following services:

  • Cisco Client Profile Agent

  • Cisco Sync Agent

  • Cisco XCP Router

Step 4

Click Stop.

Step 5

From the Related Links drop-down list, select Service Activation and click Go.

Step 6

In the IM and Presence Services area, deselect the following services:

  • Cisco SIP Proxy

  • Cisco Presence Engine

Step 7

Click Save.

Step 8

Make a list of all the nodes on which you have disabled these services. You will need to restart the services after you have completed the changes to the default domain.


What to do next

Configure the default domain for the IM and Presence Service:

Otherwise, if the default domain is already configured, complete one of these tasks to add, edit, or delete domains.

Configure the Default Domain on IM and Presence Service

Use this procedure to configure the default domain value for an IM and Presence Service cluster. This procedure is applicable if you have a DNS or non-DNS deployment.

This procedure changes only the default domain of the IM and Presence Service cluster. It does not change the DNS domain associated with any IM and Presence Service node within that cluster. For instructions on how to change the DNS domain of an IM and Presence Service node, see Changing IP Address and Hostname for Cisco Unified Communications Manager and IM and Presence Service at http://www.cisco.com/c/en/us/support/unified-communications/unified-communications-manager-callmanager/products-maintenance-guides-list.html.


Note


The default domain is configured when you add an IM and Presence Service publisher node to Cisco Unified Communications Manager. If the system fails to retrieve the default domain value from the Cisco Unified Communications Manager during node installation, the default domain value is reset to DOMAIN.NOT.SET. Use this procedure to change the IM and Presence Service default domain value to a valid domain value.


Before you begin

Make sure that High Availability is disabled, and essential IM and Presence Services are stopped. For details, Deactivate IM and Presence Services.

Procedure


Step 1

Log in to the IM and Presence Service database publisher node.

Step 2

From Cisco Unified CM IM and Presence Administration, choose Presence > Settings > Advanced Configuration.

Step 3

Choose Default Domain.

Step 4

In the Domain Name field, enter the new presence domain and click Save.

A system update can take up to 1 hour to complete. If the update fails, the Re-try button appears. Click Re-try to reapply the changes or click Cancel.


What to do next

If you are using TLS XMPP Federation, proceed to Regenerate XMPP Client and TLS Certificates.

Add or Update IM Address Domains

You can add or edit administrator-managed domains on your local cluster. You cannot edit system-managed domains, or administrator-managed domains that are associated with other clusters.

System-managed domains cannot be edited because they are in use. A system-managed domain automatically becomes an administrator-managed domain if there are no longer users on the system with that IM address domain (for example, if the users are deleted). You can edit or delete administrator-managed domains.

Before you begin

Make sure that High Availability is disabled, and essential IM and Presence Services are stopped. For details, Deactivate IM and Presence Services

Procedure


Step 1

In Cisco Unified CM IM and Presence Administration, choose Presence > > Domains.

The Find and List Domains window appears displaying all administrator-managed and system-managed IM address domains.

Step 2

Perform one of the following actions:

  • Click Add New to add a new domain. The Domains window appears.
  • Choose the domain to edit from the list of domains. The Domains window appears.

Step 3

Enter a unique domain name up to a maximum of 255 characters in the Domain Name field, and then click Save.

Each domain name must be unique across the cluster. Allowable values are any upper- or lowercase letter (a-zA-Z), any number (0-9), the hyphen (-), or the dot (.). The dot serves as a domain label separator. Domain labels must not start with a hyphen. The last label (for example, .com) must not start with a number. Abc.1om is an example of an invalid domain.


What to do next

If you are using TLS XMPP Federation, proceed to Regenerate XMPP Client and TLS Certificates.

Delete IM Address Domains

You can delete administrator-managed IM address domains that are in the local cluster using Cisco Unified CM IM and Presence Administration GUI.

You cannot delete system-managed domains because they are in use. A system-managed domain automatically becomes an administrator-managed domain if there are no longer users on the system with that IM address domain (for example, if the users are deleted). You can edit or delete administrator-managed domains.


Note


If you delete an administrator-managed domain that is configured on both local and peer clusters, the domain remains in the administrator-managed domains list; however, that domain is marked as configured on the peer cluster only. To completely remove the entry, you must delete the domain from all clusters on which it is configured.


Before you begin

Make sure that High Availability is disabled, and essential IM and Presence Services are stopped. For details, Deactivate IM and Presence Services.

Procedure


Step 1

In Cisco Unified CM IM and Presence Administration, choose Presence > Domains.

The Find and List Domains window appears displaying all administrator-managed and system-managed IM address domains.

Step 2

Choose the administrator-managed domains to delete using one of the following methods, and then click Delete Selected.

  • Check the check box beside the domains to delete.
  • Click Select All to select all domains in the list of administrator-managed domains.

Tip


Click Clear All to clear all selections.

Step 3

Click OK to confirm the deletion or click Cancel.


What to do next

If you are using TLS XMPP Federation, proceed to Regenerate XMPP Client and TLS Certificates.

Regenerate XMPP Client and TLS Certificates

After you make changes to the IM domain, you must regenerate the XMPP client or TLS certificates.

Procedure


Step 1

In Cisco Unified CM IM and Presence OS Administration, choose Security > Certificate Management.

Step 2

Click Find to generate a list of the certificates.

Step 3

Click on the cup-xmpp-s2s certificate.

Step 4

In the Certificate Details window, click Regenerate.


Start IM and Presence Services

After you have made your changes to the default domain, use this procedure to restart IM and Presence services on all cluster nodes.

Before you begin

Regenerate XMPP Client and TLS Certificates

Procedure


Step 1

From Cisco Unified IM and Presence Serviceability, choose Tools > Control Center - Network Services.

Step 2

From the Server list, choose the node on which you want to reactivate services and click Go.

Step 3

In the IM and Presence Services area, select the following services:

  • Cisco Client Profile Agent

  • Cisco Sync Agent

  • Cisco XCP Router

Step 4

Click Restart.

Step 5

From the Related Links drop-down list, select Service Activation and click Go.

Step 6

In the IM and Presence Services area, select the following services:

  • Cisco SIP Proxy

  • Cisco Presence Engine

Step 7

Click Save.


What to do next

Enable High Availability for Presence Redundancy Groups

Enable High Availability for Presence Redundancy Groups

You can enable high availability for the presence redundancy groups after you have changed the default domain and restarted IM and Presence services.

Procedure


Step 1

From the Cisco Unified CM Administration user interface, choose System > Presence Redundancy Groups.

Step 2

Click Find and select the group.

The Presence Redundancy Group Configuration window displays.

Step 3

Check the Enable High Availability check box.

Step 4

Click Save.

Step 5

Repeat this procedure on each Presence Redundancy Group.