Configuring an Email Account to Access Unity Connection Voice Messages
Overview
Cisco Unity Connection allows licensed users to use a third-party IMAP client to access voice messages from their desktop machines. You can also forward voice messages with text and reply to voice messages with text; the text portion of the message is accessible through the Unity Connection text-to-speech feature.
 Note |
When users change their Cisco Personal Communications Assistant (PCA) password (also known as the web-application password) in the Unity Connection Messaging Assistant, they also must update the password in their IMAP client application. Passwords are not synchronized between IMAP clients and the Cisco PCA. If users have trouble receiving voice messages in an IMAP client even after updating their Cisco PCA password in both applications, see the “Creating Registry Entries for Microsoft Outlook” section on page 3-19. |
Considerations to Configure IMAP Email Clients
Note the following considerations when configuring IMAP email clients to access Unity Connection voice messages:
-
In Cisco Unity Connection Administration, configure the following settings on the System Settings > SMTP Configuration > Server page to match the SSL settings in the IMAP email clients:
-
Allow Connections From Untrusted IP Addresses
-
Require Authentication From Untrusted IP Addresses
-
Transport Layer Security From Untrusted IP Addresses Is (Disabled, Required, Optional)
-
-
IMAP email clients all include two fields in which you can enter either the IP address or the fully qualified domain name of the Unity Connection server. When a Unity Connection cluster is configured, enter the fully qualified domain name of a DNS A record that includes the Unity Connection publisher and subscriber servers. If your DNS server allows you to specify the order in which DNS tries to contact Unity Connection servers, specify that the server that is available most often is the first server contacted. This usually is the publisher server.
Some IMAP email clients do not respect DNS A records. For those clients, if the first Unity Connection server is not available, the client does not try to access the other Unity Connection server.
-
When a user forwards or replies to a voice message from an IMAP email client, the message will be sent to recipients on the Unity Connection server unless the user specifically configures the message to be sent through another account.
Creating and Configuring an Account to Access Unity Connection in Apple Mail
To use Apple Mail to access Unity Connection voice messages, create and configure a new Apple Mail account for the user. You need the following information:
-
Unity Connection username (alias).
-
Cisco Personal Communications Assistant (PCA) password. (This is the web application password that is set on the User pages in Cisco Unity Connection Administration.)
-
The IP address, or if DNS is configured, the fully qualified domain name of the Unity Connection server.
Creating and Configure a New Account in Apple Mail
Procedure
|
Step 1 |
In Apple Mail, on the Mail menu, select Preferences. |
||
|
Step 2 |
At the top of the Preferences dialog box, select Accounts. |
||
|
Step 3 |
In the lower left corner, select +. |
||
|
Step 4 |
In the Account Type list, select IMAP. |
||
|
Step 5 |
In the Description field, enter a name for the account. This name appears only in Apple Mail. |
||
|
Step 6 |
In the E-Mail Address field, enter the Unity Connection SMTP Address of the user and the name of the Unity Connection server. You can find this information in the SMTP Address field on the User Basics page in Cisco Unity Connection Administration. The E-Mail Address typically follows this format: <alias>@<fully qualified domain name of the Unity Connection server> |
||
|
Step 7 |
In the Full Name field, enter the username. |
||
|
Step 8 |
In the Incoming Mail Server field, enter the IP address or the fully qualified domain name of the Unity Connection server.
|
||
|
Step 9 |
In the User Name field, enter the Unity Connection username. |
||
|
Step 10 |
In the Password field, enter the Cisco PCA password. |
||
|
Step 11 |
In the Outgoing Mail Server (SMTP) field, select the IP address or the fully qualified domain name of the Unity Connection server. |
||
|
Step 12 |
Select Server Settings. |
||
|
Step 13 |
Optionally, in the SMTP Server Options dialog box, check the Use Secure Sockets Layer (SSL) check box.
|
||
|
Step 14 |
In the Authentication list, select Password. |
||
|
Step 15 |
Select OK to close the SMTP Options dialog box. |
||
|
Step 16 |
Select the Advanced tab. |
||
|
Step 17 |
In the Keep Copies of Messages for Offline Viewing list, select the applicable option. |
||
|
Step 18 |
Close the Preferences dialog box. |
||
|
Step 19 |
In the Save Changes dialog box, select Save. |
Creating and Configuring an Account to Access Unity Connection in Eudora
To use Eudora to access Unity Connection voice messages, create and configure a new Eudora account for the user. You need the following information:
-
Unity Connection username (alias).
-
Cisco Personal Communications Assistant (PCA) password. (This is the web application password that is set on the User pages in Cisco Unity Connection Administration.)
-
The IP address, or if DNS is configured, the fully qualified domain name of the Unity Connection server.
Creating and Configure a New Account in Eudora
Procedure
|
Step 1 |
Start Eudora. |
||
|
Step 2 |
On the Eudora Tools menu, select Personalities. |
||
|
Step 3 |
Right-click anywhere in the Personalities tab, and select New. |
||
|
Step 4 |
In the New Account wizard, on the Account Settings page, select Next to accept the default value, Create a Brand New E-Mail Account. |
||
|
Step 5 |
On the Personality Name page, enter a display name for the account. The value that you enter here is visible only in Eudora. |
||
|
Step 6 |
Select Next. |
||
|
Step 7 |
On the Personal Information page, enter the username. |
||
|
Step 8 |
Select Next. |
||
|
Step 9 |
On the E-Mail Address page, enter the Unity Connection SMTP Address of the user and the name of the Unity Connection server. You can find this information in the SMTP Address field on the User Basics page in Cisco Unity Connection Administration. The E-Mail Address typically follows this format: <alias>@<fully qualified domain name of the Unity Connection server> |
||
|
Step 10 |
Select Next. |
||
|
Step 11 |
On the User Name page, enter the Unity Connection username. |
||
|
Step 12 |
Select Next. |
||
|
Step 13 |
On the Incoming E-Mail Server page, enter the IP address or the fully qualified domain name of the Unity Connection server.
|
||
|
Step 14 |
For the type of server, select IMAP. |
||
|
Step 15 |
Select Next. |
||
|
Step 16 |
On the IMAP Location Prefix page, do not enter a value. |
||
|
Step 17 |
Select Next. |
||
|
Step 18 |
On the Outgoing E-Mail Server page, enter the IP address or the fully qualified domain name of the Unity Connection server. |
||
|
Step 19 |
Select Next. |
||
|
Step 20 |
On the Success page, select Finish to create the account and close the wizard. |
||
|
Step 21 |
In the Enter Password dialog box, enter the Cisco PCA password of the user. |
||
|
Step 22 |
Select OK. |
||
|
Step 23 |
Optionally, configure the new account to use SSL. For more information, see Eudora Help.
|
Creating and Configuring an Account to Access Unity Connection in IBM Lotus Notes
 Caution |
If you plan to configure user accounts to use Cisco Unity Connection ViewMail for IBM Lotus Notes, do not follow the instructions in this section. Instead, follow the configuration instructions in the Release Notes for Cisco Unity Connection ViewMail for IBM Lotus Notes, available at http://www.cisco.com/en/US/products/ps6509/prod_release_notes_list.html. |
To use Notes to access Unity Connection voice messages, create and configure a new Notes account for the user. You need the following information:
-
Unity Connection username (alias).
-
Cisco Personal Communications Assistant (PCA) password. (This is the web application password that is set on the User pages in Cisco Unity Connection Administration.)
-
The IP address, or if DNS is configured, the fully qualified domain name of the Unity Connection server.
Caution
When using Lotus Notes version 7.x to access Unity Connection voice messages, you must first configure Notes to connect to a Domino account before configuring the Unity Connection account.
Creating and Configure a New Account in IBM Lotus Notes
Procedure
|
Step 1 |
Start IBM Lotus Notes. |
||
|
Step 2 |
On the Notes File menu, select . |
||
|
Step 3 |
In the Lotus Notes Client Configuration wizard, on the Additional Services page, check the Internet Mail Servers (POP or IMAP, SMTP) check box. |
||
|
Step 4 |
Select Next. |
||
|
Step 5 |
On the Set Up Internet Mail page, in the Select the Type of Server Used for Retrieving Incoming Mail list, select IMAP. |
||
|
Step 6 |
In the Enter a New Account Name list, select Incoming Internet Mail. |
||
|
Step 7 |
In the Incoming Mail Server field, enter the IP address or the fully qualified domain name of the Unity Connection server.
|
||
|
Step 8 |
Select Next. |
||
|
Step 9 |
On the Set Up Internet Mail page, in the Account Name field, enter the Unity Connection SMTP Address of the user and the name of the Unity Connection server. You can find this information in the SMTP Address field on the User Basics page in Cisco Unity Connection Administration. The Account Name typically follows this format: <alias>@<fully qualified domain name of the Unity Connection server> |
||
|
Step 10 |
In the Password fields, enter and confirm the Cisco PCA password of the user. |
||
|
Step 11 |
If you want to encrypt voice messages and other data that are sent between Notes and Unity Connection, check the Log On Using SSL check box. If not, skip to Step 12.
|
||
|
Step 12 |
Select Next. |
||
|
Step 13 |
On the second Set Up Internet Mail page, in the Enter a New Account Name list, select Outgoing Internet Mail. |
||
|
Step 14 |
In the Outgoing SMTP Mail Server list, enter the IP address or the fully qualified domain name of the Unity Connection server. |
||
|
Step 15 |
Select Next. |
||
|
Step 16 |
On the third Set Up Internet Mail page, in the E-Mail Address field, enter the Unity Connection alias of the user and the name of the Unity Connection server. Use the following format: <alias>@<fully qualified domain name of the Unity Connection server> |
||
|
Step 17 |
In the Internet Domain field, enter the Internet domain name of the Domino mail server. |
||
|
Step 18 |
Select Next. |
||
|
Step 19 |
Select OK. |
Creating and Configuring an Account to Access Unity Connection in Microsoft Outlook
Caution |
If you plan to configure user accounts to use Cisco ViewMail for Microsoft Outlook, do not follow the instructions in this section. Instead, follow the configuration instructions in the applicable Release Notes for Cisco ViewMail for Microsoft Outlook, available at http://www.cisco.com/en/US/products/ps6509/prod_release_notes_list.html. |
To use Microsoft Outlook to access Unity Connection voice messages, create and configure a new Microsoft Outlook account for the user. You need the following information:
-
Unity Connection username (alias).
-
Cisco Personal Communications Assistant (PCA) password. (This is the web application password that is set on the User pages in Cisco Unity Connection Administration.)
-
The IP address, or if DNS is configured, the fully qualified domain name of the Unity Connection server.
In addition to configuring Microsoft Outlook to access Unity Connection voice messages, you can also install the optional ViewMail for Outlook plug-in. See the “Creating and Configuring an Account to Access Unity Connection in Microsoft Outlook Express” section on page 3-7.
Creating and Configuring a New Account in Outlook
Procedure
|
Step 1 |
Start Microsoft Outlook. |
||
|
Step 2 |
On the Microsoft Outlook Tools menu, select E-Mail Accounts. |
||
|
Step 3 |
In the E-Mail Accounts wizard, select Add a New E-Mail Account. |
||
|
Step 4 |
Select Next. |
||
|
Step 5 |
On the Server Type page, select IMAP. |
||
|
Step 6 |
Select Next. |
||
|
Step 7 |
Enter values in the User Information section: |
||
|
Step 8 |
Enter values in the Server Information section: |
||
|
Step 9 |
Enter values in the Logon Information section:
|
||
|
Step 10 |
If you do not want to encrypt voice messages and other data that are sent over the network between Microsoft Outlook and Unity Connection, skip to Step 15. If you do not configure Microsoft Outlook to use SSL, the Unity Connection username and password that are sent to Unity Connection over the network and the voice messages sent back from Unity Connection are not encrypted.
|
||
|
Step 11 |
Select More Settings. |
||
|
Step 12 |
In the Internet E-Mail Settings dialog box, select the Advanced tab. |
||
|
Step 13 |
Under Incoming Server (IMAP), check the This Server Requires an Encrypted Unity Connection (SSL) check box. |
||
|
Step 14 |
Select OK to close the Internet E-Mail Settings dialog box. |
||
|
Step 15 |
If the Unity Connection SMTP server is configured to allow connections from untrusted IP addresses, skip to Step 21. If the Unity Connection SMTP server is configured to require authentication from untrusted IP addresses, continue with Step 16. |
||
|
Step 16 |
Select More Settings. |
||
|
Step 17 |
In the Internet E-Mail Settings dialog box, select the Outgoing Server tab. |
||
|
Step 18 |
Verify that the My Outgoing Server (STMP) Requires Authentication check box is checked. |
||
|
Step 19 |
Verify that Use Same Settings as My Incoming Mail is selected. |
||
|
Step 20 |
Select OK to close the Internet E-Mail Settings dialog box. |
||
|
Step 21 |
Select Next. |
||
|
Step 22 |
Select Finish. |
||
|
Step 23 |
In the left pane of Microsoft Outlook, select the Inbox folder for the new account. |
||
|
Step 24 |
On the Microsoft Outlook Tools menu, select . |
||
|
Step 25 |
If prompted, enter the Unity Connection username and Cisco PCA password. |
Creating and Configuring an Account to Access Unity Connection in Microsoft Outlook Express
To use Microsoft Outlook Express to access Unity Connection voice messages, create and configure a new Microsoft Outlook Express account for the user. You need the following information:
-
Unity Connection username (alias).
-
Cisco Personal Communications Assistant (PCA) password. (This is the web application password that is set on the User pages in Cisco Unity Connection Administration.)
-
The IP address, or if DNS is configured, the fully qualified domain name of the Unity Connection server.
Creating and Configuring a New Account in Microsoft Outlook Express
Procedure
|
Step 1 |
Start Microsoft Outlook Express. |
||
|
Step 2 |
On the Microsoft Outlook Express Tools menu, select Accounts. |
||
|
Step 3 |
In the Internet Accounts dialog box, select the Mail tab. |
||
|
Step 4 |
Select , and the Internet Unity Connection wizard appears. |
||
|
Step 5 |
On the Your Name page, in the Display Name field, enter the username. |
||
|
Step 6 |
Select Next. |
||
|
Step 7 |
On the Internet E-Mail Address page, select I Already Have an E-Mail Address That I'd Like to Use. |
||
|
Step 8 |
In the E-Mail Address field, enter the SMTP Address of the user and the name of the Unity Connection server. You can find this information in the SMTP Address field on the User Basics page in Cisco Unity Connection Administration. The E-Mail Address typically follows this format: <alias>@<fully qualified domain name of the Unity Connection server> |
||
|
Step 9 |
Select Next. |
||
|
Step 10 |
On the E-Mail Server Names page, in the My Incoming Mail Server Is a <protocol> Server list, select IMAP. |
||
|
Step 11 |
In the Incoming Mail (POP3, IMAP, or HTTP) Server field, enter the IP address or the fully qualified domain name of the Unity Connection server.
|
||
|
Step 12 |
In the Outgoing Mail (SMTP) Server field, enter the IP address or the fully qualified domain name of the Unity Connection server. |
||
|
Step 13 |
Select Next. |
||
|
Step 14 |
On the Internet Mail Logon page, in the Account Name and Password fields, enter the Unity Connection username and Cisco PCA password. |
||
|
Step 15 |
Verify that the Remember Password check box is not checked. If this option is checked, and the Unity Connection password of the user expires, changes, or is locked, Microsoft Outlook Express does not prompt the user to enter the Unity Connection password. The result is that users do not receive voice messages from Unity Connection. |
||
|
Step 16 |
Select Next. |
||
|
Step 17 |
On the Congratulations page, select Finish. |
||
|
Step 18 |
In the Internet Accounts dialog box, select the account that you created in Step 4, and select Properties. |
||
|
Step 19 |
In the <account name> Properties dialog box, select the IMAP tab. |
||
|
Step 20 |
Uncheck the Store Special Folders check box. |
||
|
Step 21 |
In the Root Folder Path field, enter INBOX (all upper-case letters). |
||
|
Step 22 |
If you do not want to encrypt voice messages and other data that are sent over the network between Microsoft Outlook Express and Unity Connection, skip to Step 25.
If you want to encrypt voice messages and other data that are sent between Microsoft Outlook Express and Unity Connection, continue with Step 23. |
||
|
Step 23 |
Select the Advanced tab. |
||
|
Step 24 |
Under Incoming Mail, check the This Server Requires a Secure Unity Connection (SSL) check box. |
||
|
Step 25 |
Select OK to close the <account name> Properties dialog box. |
||
|
Step 26 |
Select Close to close the Internet Accounts dialog box. |
Creating and Configuring an Account to Access Unity Connection in Novell GroupWise
To use GroupWise to access Unity Connection voice messages, create and configure a new GroupWise account for the user. You need the following information:
-
Unity Connection username (alias).
-
Cisco Personal Communications Assistant (PCA) password. (This is the web application password that is set on the User pages in Cisco Unity Connection Administration.)
-
The IP address, or if DNS is configured, the fully qualified domain name of the Unity Connection server.
Creating and Configuring a New Account in GroupWise
Procedure
|
Step 1 |
Start GroupWise. |
||
|
Step 2 |
On the GroupWise Tools menu, select . |
||
|
Step 3 |
In the Accounts dialog box, select Add. |
||
|
Step 4 |
In the Create Account dialog box, in the Account Name field, enter a name for the account. This name appears only in GroupWise. |
||
|
Step 5 |
In the Account Type list, select IMAP4. |
||
|
Step 6 |
Select Next. |
||
|
Step 7 |
In the Create Internet Account dialog box, in the Incoming Mail Server (IMAP4) field, enter the IP address or the fully qualified domain name of the Unity Connection server.
|
||
|
Step 8 |
In the Login Name field, enter the Unity Connection username. |
||
|
Step 9 |
In the Outgoing Server field, enter the IP address or the fully qualified domain name of the Unity Connection server. |
||
|
Step 10 |
In the E-Mail Address field, enter the SMTP Address of the user and the name of the Unity Connection server. You can find this information in the SMTP Address field on the User Basics page in Cisco Unity Connection Administration. The E-Mail Address typically follows this format: <alias>@<fully qualified domain name of the Unity Connection server> |
||
|
Step 11 |
In the From Name field, enter the username. |
||
|
Step 12 |
Select Next. |
||
|
Step 13 |
Follow the on-screen prompts to complete the configuration. |
||
|
Step 14 |
If you do not want to encrypt voice messages and other data that are sent over the network between GroupWise and Unity Connection, skip to Step 20.
If you want to encrypt voice messages and other data that are sent between GroupWise and Unity Connection, continue with Step 15. |
||
|
Step 15 |
In the Accounts dialog box, select the name of the account that you just created. |
||
|
Step 16 |
Select Properties. |
||
|
Step 17 |
Select the Advanced tab. |
||
|
Step 18 |
Under Incoming Mail Server (IMAP4), check the Use SSL check box. |
||
|
Step 19 |
Select OK to close the <Account Name> Properties dialog box. |
||
|
Step 20 |
Select Close to close the Accounts dialog box. |
||
|
Step 21 |
Create the inbox for the new account, and download Unity Connection voice messages: |
Creating and Configuring an Account to Access Unity Connection in Opera
To use Opera to access Unity Connection voice messages, create and configure a new Opera account for the user. You need the following information:
-
Unity Connection username (alias).
-
Cisco Personal Communications Assistant (PCA) password. (This is the web application password that is set on the User pages in Cisco Unity Connection Administration.)
-
The IP address, or if DNS is configured, the fully qualified domain name of the Unity Connection server.
Creating and Configuring a New Account in Opera
Procedure
|
Step 1 |
Start Opera. |
||
|
Step 2 |
On the Opera Tools menu, select Mail and Chat Accounts. |
||
|
Step 3 |
In the Manage Accounts dialog box, select New. |
||
|
Step 4 |
In the New Account wizard, select IMAP. |
||
|
Step 5 |
Select Next. |
||
|
Step 6 |
In the Real Name field, enter the account name. |
||
|
Step 7 |
In the E-Mail Address field, enter the Unity Connection SMTP Address of the user and the name of the Unity Connection server. You can find this information in the SMTP Address field on the User Basics page in Cisco Unity Connection Administration. The E-Mail Address typically follows this format: <alias>@<fully qualified domain name of the Unity Connection server> |
||
|
Step 8 |
In the Organization field, enter the applicable value. |
||
|
Step 9 |
Select Next. |
||
|
Step 10 |
In the Login Name field, enter the Unity Connection username. |
||
|
Step 11 |
In the Password field, enter the Cisco PCA password. |
||
|
Step 12 |
Select Next. |
||
|
Step 13 |
In the Incoming Server field, enter the IP address or the fully qualified domain name of the Unity Connection server.
|
||
|
Step 14 |
If you want to encrypt voice messages and other data that are sent between Opera and Unity Connection, check the Use Secure Unity Connection (TLS) check box. (TLS is an updated version of SSL.)
|
||
|
Step 15 |
In the Outgoing Server field, enter the IP address or the fully qualified domain name of the Unity Connection server. |
||
|
Step 16 |
Select Finish. |
||
|
Step 17 |
Select OK to close the Subscribe IMAP Folders dialog box. |
||
|
Step 18 |
Select OK to close the Manage Accounts dialog box. |
Creating and Configuring an Account to Access Unity Connection in Thunderbird
To use Thunderbird to access Unity Connection voice messages, create and configure a new Thunderbird account for the user. You need the following information:
-
Unity Connection username (alias).
-
Cisco Personal Communications Assistant (PCA) password. (This is the web application password that is set on the User pages in Cisco Unity Connection Administration.)
-
The IP address, or if DNS is configured, the fully qualified domain name of the Unity Connection server.
Creating and Configuring a New Account in Thunderbird
Procedure
|
Step 1 |
Start Thunderbird. |
||
|
Step 2 |
On the Thunderbird File menu, select . |
||
|
Step 3 |
In the Account wizard, on the New Account Setup page, select E-Mail Account. |
||
|
Step 4 |
Select Next. |
||
|
Step 5 |
On the Identity page, in the Your Name field, enter the username. |
||
|
Step 6 |
In the E-Mail Address field, enter the Unity Connection SMTP Address of the user and the name of the Unity Connection server. You can find this information in the SMTP Address field on the User Basics page in Cisco Unity Connection Administration. The E-Mail Address typically follows this format: <alias>@<fully qualified domain name of the Unity Connection server> |
||
|
Step 7 |
Select Next. |
||
|
Step 8 |
On the Server Information page, under Select the Type of Incoming Server You Are Using, select IMAP. |
||
|
Step 9 |
In the Incoming Server field, enter the IP address or the fully qualified domain name of the Unity Connection server.
|
||
|
Step 10 |
Select Next. |
||
|
Step 11 |
On the User Names page, enter the Unity Connection username. |
||
|
Step 12 |
Select Next. |
||
|
Step 13 |
On the Account Name page, enter a name for the account. This name appears only in Thunderbird. |
||
|
Step 14 |
Select Next. |
||
|
Step 15 |
On the Congratulations page, confirm that the settings are correct, then select Finish. |
||
|
Step 16 |
If you do not want to encrypt voice messages and other data that are sent over the network between Thunderbird and Unity Connection, you are finished creating and configuring a new account. If you want to encrypt voice messages and other data that are sent between Thunderbird and Unity Connection, continue with Step 17. |
||
|
Step 17 |
In the left pane of Thunderbird, select the name of the account that you just created. |
||
|
Step 18 |
In the right pane of Thunderbird, under Accounts, select View Settings for This Account. |
||
|
Step 19 |
In the Account Settings dialog box, under the account that you just created, select Server Settings. |
||
|
Step 20 |
Under Server Settings, select the Use Secure Unity Connection (SSL) check box.
|
||
|
Step 21 |
Select OK to close the Account Settings dialog box. |
Creating and Configuring an Account to Access Unity Connection in Windows Mail for Windows Vista
To use Windows Mail for Windows Vista to access Unity Connection voice messages, create and configure a new Windows Mail account for the user. You need the following information:
-
Unity Connection username (alias).
-
Cisco Personal Communications Assistant (PCA) password. (This is the web application password that is set on the User pages in Cisco Unity Connection Administration.)
-
The IP address, or if DNS is configured, the fully qualified domain name of the Unity Connection server.
Creating and Configuring a New Account in Windows Mail
Procedure
|
Step 1 |
Start Windows Mail. |
||
|
Step 2 |
On the Tools menu, select Accounts. |
||
|
Step 3 |
In the Internet Accounts dialog box, select Add. |
||
|
Step 4 |
On the Select Account Type page, select E-Mail Account. |
||
|
Step 5 |
Select Next. |
||
|
Step 6 |
On the Your Name page, in the Display Name field, enter the username. |
||
|
Step 7 |
Select Next. |
||
|
Step 8 |
On the Internet E-Mail Address page, in the E-Mail Address field, enter the Unity Connection SMTP Address of the user and the name of the Unity Connection server. You can find this information in the SMTP Address field on the User Basics page in Cisco Unity Connection Administration. The E-Mail Address typically follows this format: <alias>@<fully qualified domain name of the Unity Connection server> |
||
|
Step 9 |
Select Next. |
||
|
Step 10 |
On the Set Up E-Mail Servers page, under Incoming E-Mail Server Type, select IMAP. |
||
|
Step 11 |
In the Incoming Mail (POP3 or IMAP) Server field, enter the IP address or the fully qualified domain name of the Unity Connection server.
|
||
|
Step 12 |
In the Outgoing E-Mail Server (SMTP) Name field, enter the IP address or the fully qualified domain name of the Unity Connection server. |
||
|
Step 13 |
If the Unity Connection SMTP server is configured to allow connections from untrusted IP addresses, skip to Step 15. If the Unity Connection SMTP server is configured to require authentication from untrusted IP addresses, continue with Step 14. |
||
|
Step 14 |
Check the Outgoing Server Requires Authentication check box. |
||
|
Step 15 |
Select Next. |
||
|
Step 16 |
On the Internet Mail Logon page, enter the user Unity Connection alias and Cisco PCA password. |
||
|
Step 17 |
Select Next. |
||
|
Step 18 |
On the Congratulations page, select Finish. |
||
|
Step 19 |
Select Close to close the Internet Accounts dialog box. |
||
|
Step 20 |
If you do not want to encrypt voice messages and other data that are sent over the network between Windows Mail and Unity Connection, you are finished creating and configuring a new account. If you want to encrypt voice messages and other data that are sent between Windows Mail and Unity Connection, continue with Step 21. |
||
|
Step 21 |
On the Tools menu, select Accounts. |
||
|
Step 22 |
In the Internet Accounts dialog box, select the name of the mail account that you just created and select Properties. |
||
|
Step 23 |
In the Properties dialog box, select the Advanced tab. |
||
|
Step 24 |
Under both the Outgoing Mail field and the Incoming Mail field, check the This Server Requires a Secure Unity Connection (SSL) check box. |
||
|
Step 25 |
Select OK.
|
||
|
Step 26 |
Select Close to close the Internet Accounts dialog box. |
Setting Up ViewMail for Outlook
Cisco ViewMail for Microsoft Outlook 8.5 and Later
To install and set up Cisco ViewMail for Microsoft Outlook, see the applicable Release Notes for Cisco ViewMail for Microsoft Outlook at http://www.cisco.com/en/US/products/ps6509/prod_release_notes_list.html.
Cisco Unity Connection ViewMail for Microsoft Outlook 8.0
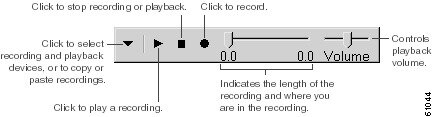
Using ViewMail for Outlook 8.0 to access Cisco Unity Connection voice messages, users can play and record voice messages using the Media Master. See Figure 3-1.
Task List for Setting Up ViewMail for Outlook 8.0
ViewMail must be installed on each user workstation. Complete the following tasks to set up ViewMail 8.0 for users:
Procedure
|
Step 1 |
Review the applicable Release Notes for Cisco Unity Connection ViewMail for Microsoft Outlook, available at http://www.cisco.com/en/US/products/ps6509/prod_release_notes_list.html. The document specifies the requirements and procedures for installing 8.0. |
|
Step 2 |
If you have not already done so, install ViewMail 8.0 according to the procedures in the Release Notes for Cisco Unity Connection ViewMail for Microsoft Outlook. |
|
Step 3 |
If you have not already done so, configure an IMAP account in Microsoft Outlook. See the “Creating and Configuring an Account to Access Unity Connection in Microsoft Outlook” . |
|
Step 4 |
If users have more then one IMAP account configured, you must configure ViewMail 8.0 to use the IMAP account that is used to access Unity Connection. See the “Configuring the IMAP Account for ViewMail for Outlook 8.0”. |
|
Step 5 |
If you use secure messaging or TRAP, you must configure several ViewMail 8.0 settings. See the “Configuring ViewMail for Outlook 8.0 Settings for Secure Messaging and TRAP”. |
Configuring the IMAP Account for ViewMail for Outlook 8.0
If users have more than one IMAP account configured, you must configure ViewMail 8.0 to use the IMAP account that is used to access Unity Connection. This ensures that messages composed using ViewMail are sent to the Unity Connection server. If users have only one IMAP account configured, ViewMail automatically uses it to send messages to Unity Connection.
SUMMARY STEPS
- From the Microsoft Outlook Tools menu, select ViewMail Options.
- Select the Accounts tab.
- In the Select the Account to Access Cisco Unity Connection With field, select the IMAP account that is used to access Unity Connection.
- Select Save.
DETAILED STEPS
|
Step 1 |
From the Microsoft Outlook Tools menu, select ViewMail Options. |
|
Step 2 |
Select the Accounts tab. |
|
Step 3 |
In the Select the Account to Access Cisco Unity Connection With field, select the IMAP account that is used to access Unity Connection. |
|
Step 4 |
Select Save. |
Configuring ViewMail for Outlook 8.0 Settings for Secure Messaging and TRAP
If you have configured Unity Connection for secure messaging or if you want users to be able to record or play messages by phone using Telephone Record and Playback (TRAP), you must configure several ViewMail 8.0 settings.
After ViewMail 8.0 has been installed, do the following procedure on each user workstation.
Procedure
|
Step 1 |
From the Microsoft Outlook Tools menu, select ViewMail Options. |
|
Step 2 |
Select the Server tab. |
|
Step 3 |
Enter the server settings in the Table 3-1 and select Save. |
Server Settings
|
Field |
Setting |
|---|---|
|
Cisco Unity Connection Server Name |
Enter the name of the Unity Connection server. (Required for secure messaging and TRAP.) |
|
Username |
Enter the Unity Connection username (alias). |
|
Password |
(Optional) Enter the Cisco PCA password (also known as the web-application password) of the user. If you do not enter the password, the user is prompted for it each time Microsoft Outlook is restarted. If you do not want the user to be prompted for the password each time Microsoft Outlook is restarted, you must also check the Remember Password check box. |
|
Remember Password |
(Optional) Check this check box if you want ViewMail to remember the user password so that the user does not have to re-enter it each time Microsoft Outlook is restarted. |
|
Proxy Server Address |
If you have a firewall that blocks HTTPS traffic between user workstations and the Unity Connection server, enter the IP address of the HTTPS proxy server. |
|
Proxy Server Port |
If you have a firewall that blocks HTTPS traffic between user workstations and the Unity Connection server, enter the server port to use when connecting to the HTTPS proxy server. |
|
Validate HTTPS Certificate |
If you replace the default self-signed certificate with a certificate from a certificate authority, check the Validate HTTPS Certificate check box. If you are using the default certificate installed with Unity Connection, this check box must not be checked. |
|
Extension |
Enter the extension of the user. This setting is required only if you want the user to be able to record or play messages by phone. |
Configuring Unity Connection for HTML-based Message Notification
Unity Connection can be configured to send message notifications in the form of an HTML template to an email address. All HTML notifications in Unity Connection require an HTML-based notification template. The HTML-based templates can be selected and applied by the administrator to allow HTML notification for a device. The template selected can either be a default or a custom template that the administrator has created.
To get the HTML notifications exactly as per the template defined by the administrator, the user’s email client must support the display of images and icons. For more information on whether your email client support the display of images and icons, refer to documentation of your email service provider.
HTML notifications are supported with the following email clients:
-
Microsoft Outlook 2007
-
Microsoft Outlook 2010
-
IBM Lotus Notes
-
Gmail (Web based access only)
The user must ensure to select the authentication or non-authentication mode as desired. In addition, make sure the signed SSL certificates are installed in order to access the notifications via email and the voice message via Mini Web Inbox.
Configuring the Authentication Mode
If the administrator has created a template that include images, icons, and/or status items, then the authentication mode ensures that the user authenticates with his or her Unity Connection credentials before the images are displayed as an HTML email on an email client.
By default, the system is configured for the authentication mode. The administrator can configure the authentication mode using the Cisco Unity Connection Administration.
Procedure
|
Step 1 |
In Cisco Unity Connection Administration, select System Settings > General Configuration. |
|
Step 2 |
On the Edit General Configuration page, select the Authenticate Graphics for HTML Notification option to turn on the authentication mode. |
|
Step 3 |
Click Save. |
Note |
The Unity Connection credentials are required only once for each session of Microsoft Outlook.
|
Configuring the Non-Authentication Mode
The non-authentication mode does not prompt user for credentials and the embedded images or icons are displayed without authentication in the email notification.
Procedure
|
Step 1 |
In Cisco Unity Connection Administration, select System Settings > General Configuration. |
|
Step 2 |
On the Edit General Configuration page, deselect the Authenticate Graphics for HTML Notification option to turn off the authentication mode. |
|
Step 3 |
Click Save. |
Configuring Microsoft Outlook to Display Images in an HTML Message Notification
In the authentication mode, to view all the custom graphics or administrative replaceable images as per the HTML-based template, you must make sure that your Microsoft Outlook client has all the required hotfixes and registry entries.
If the non-authentication mode is configured then your Microsoft Outlook client does not require any hotfixes or registry entries.
Caution |
The user workstation must have the SSL certificates installed irrespective of the mode selected (authentication or non-authentication). |
If you are using Microsoft Internet Explorer version 8, refer to the settings given in the Configuring Windows Vista and Windows 7 (32 bit and 64 bit) for Mini Web Inbox section.
Note |
If due to certain security implications you are not allowed to install the required hotfixes or update registry entries, then you can create the templates without images, MWI status, and message status. |
|
Microsoft Outlook Version |
Microsoft Outlook 2007 |
Microsoft Outlook 2010 (32 bit and 64 bit) |
|---|---|---|
|
Windows XP SP3, Windows 7 (32 and 64 bit), and Windows Vista (32 and 64 bit) |
|
|
Creating Registry Entries for Microsoft Outlook
Procedure
|
Step 1 |
Go to Start > Run. Type regedit and press Enter. |
|
Step 2 |
Browse to the following path for Microsoft Outlook 2007: HKEY_CURRENT_USER\Software\Microsoft\Office\12.0\Common |
|
Step 3 |
Browse to the following path for Microsoft Outlook 2010: HKEY_CURRENT_USER\Software\Microsoft\Office\14.0\Common |
|
Step 4 |
Add “AllowImageProxyAuth = 1” as new DWORD value. |
Configuring Microsoft Outlook for Automatic Image Download
Even after updating your Microsoft Outlook with required hotfixes and registry entries, you need to right click on the image, if any given in the template, and select Show images. You can also right click on the prompt appearing at the above of message window to show the images.
To automatically download images without performing these steps with every session, you must select the required options given under the Tools > Trust Center > Automatic Download section in your Microsoft Outlook email client.
Configuring Unity Connection to Send Voice Message as an Attachment
The administrator can configure Unity Connection to send the voice message as an attachment in the HTML notification to the user. Along with the link to access Mini Web Inbox through the HTML notification email, the user can now access the voice message attachment in the .wav format that can be played on PC or mobile using any player. Prior to Unity Connection 10.0(1) version, the end user received only a link in the HTML notifications to access Mini Web Inbox and listen to voice messages through Mini Web Inbox only.
Note |
In case of forwarded messages, the attachment is sent only for the latest voice message. |
If a user tries to access the voice message attachment using mobile, the following mobile clients are supported:
-
Supported versions of iPhone 4 and above
-
Supported versions of Android
Note
The secure and private voice messages cannot be sent as an attachment.
By default, the system is configured for not to send the voice message as an attachment. The administrator can configure to send voice message as an attachment using the Cisco Unity Connection Administration.
Procedure
|
Step 1 |
In Cisco Unity Connection Administration, select Advanced > Messaging. |
|
Step 2 |
On the Messaging Configuration page, select the Allow voice mail as attachments to HTML notifications option to send the voice message as an attachment. |
|
Step 3 |
Click Save. |
Configuring the Size of Voice Messages Sent as an Attachment with HTML Notification
The administrator can configure the size of voice messages sent as an attachment with HTML notifications. The user can access the voice message attachment in the .wav format that can be played on PC or mobile using any player.
By default, the system is configured to send the voice message as an attachment upto 2048KB and maximum size can be 12288 KB. The administrator can configure the size of the voice message using the Cisco Unity Connection Administration.
Procedure
|
Step 1 |
In Cisco Unity Connection Administration, select Advanced > Messaging. |
|
Step 2 |
On the Messaging Configuration page, enter the size of voice message in the Max size of voice mail as attachment to HTML notifications (KB) text box. |
|
Step 3 |
Click Save. Make sure to restart the Connection Notifier service in order to changes take effect. |
Configuring Unity Connection for Mini Web Inbox
Configuring IBM Lotus Notes for Mini Web Inbox
Mini Web Inbox does not support the default IBM Lotus Notes supported browser. When a user receives a message notification on his IBM Lotus Notes email client and clicks a link in the notification to open Mini Web Inbox, the Mini Web Inbox must open in the default operating system browser.
Procedure
|
Step 1 |
In your Lotus Notes client, select File > Preferences > Web Browser. |
|
Step 2 |
Select the Use the browser I have set as the default for this operating system option. |
|
Step 3 |
Click Apply and then Ok. |
Configuring Windows Vista and Windows 7 (32 bit and 64 bit) for Mini Web Inbox
Procedure
|
Step 1 |
Select Start > Control Panel > Flash Player. |
|
Step 2 |
Select the Camera and Mic tab in the Flash Player Settings Manager window. |
|
Step 3 |
Click Camera and Microphone Settings by Site. |
|
Step 4 |
Select the Ask me when a site wants to use the camera or microphone option in the Camera and Microphone Settings by Site window. |
|
Step 5 |
Click Add. |
|
Step 6 |
Add the website that you are using for Unity Connection, for example, ucbu-cisco-vmxyz.cisco.com. |
|
Step 7 |
Click Allow and then Close. |
Troubleshooting IMAP Client Sign-In Problems
When users change their Cisco PCA password (also known as the web-application password) in the Messaging Assistant, they also must update the password in their IMAP client application so that the client can continue to access Unity Connection and retrieve voice messages.
If users have trouble receiving voice messages in an IMAP client, consider the following possibilities:
-
If the IMAP client application prompts a user for the Cisco PCA password, but does not accept it, the Cisco PCA password may have expired or changed, or is locked. Users can change their password in the Messaging Assistant first and then update it from their IMAP client application.
-
If Microsoft Outlook users are not prompted for their Cisco PCA password, verify that the Remember Password check box on the Internet E-mail Settings (IMAP) page is not checked. If this option is checked, and the password of the user has expired, changed, or is locked, Microsoft Outlook does not prompt the user to enter the Cisco PCA password. The result is that the user does not receive voice messages from Unity Connection, and Microsoft Outlook prompts for the username and password.
 Feedback