Cisco Unity Connection Web Inbox
Published May 2015
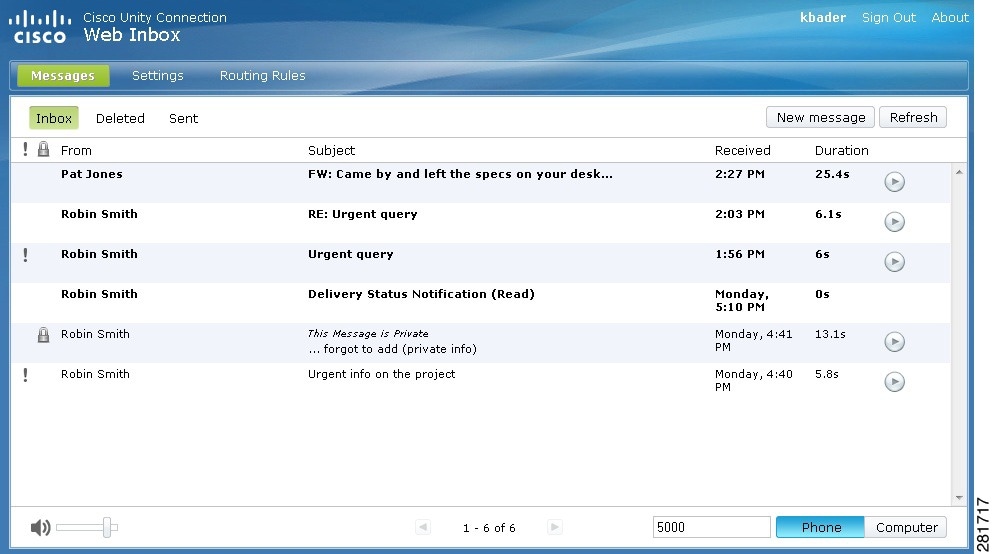
About the Cisco Unity Connection Web Inbox
The Cisco unity Connection Web Inbox lets you manage voice messages and any voice message receipts you receive. You can compose new voice messages, and play, reply to, forward, or delete the voice messages you receive.
Unity Connection 12.5(1) and later, provides you an additional functionality to play all the Video Messages through telephone record and playback (TRAP). Using this functionality you can play all the new video messages that are received on Unity Connection 12.5(1) and later. The video messages that are received before upgrading to Unity connection 12.5(1) will be played as audio only.
Access the Web Inbox by using an Internet browser to go to http://<Cisco Unity Connection server>/inbox . (The URL is case sensitive.)
 Timesaver |
Bookmark the Web Inbox URL, so you do not have to enter the web address each time you want to access the Web Inbox. |
Web Inbox Controls
|
1 |
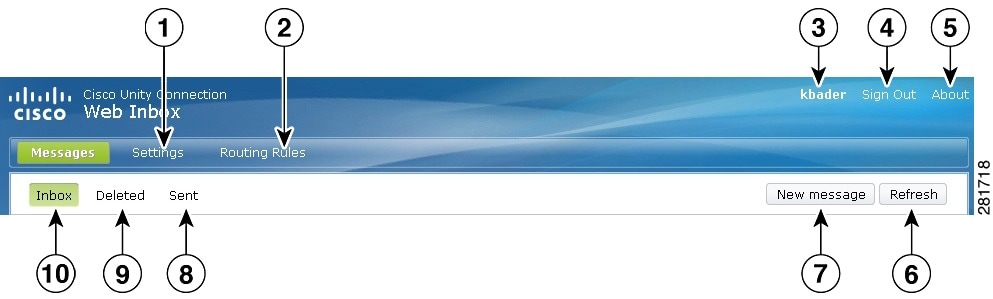
Open the Messaging Assistant in a new browser window or tab.
|
6 |
Refresh the information on the current page. |
||
|
2 |
Open the Cisco Unity Connection Personal Call Transfer Rules web tool in a new browser window or tab.
|
7 |
Compose a new voice message. |
||
|
3 |
(Display only) The account with which you are signed in. |
8 |
View or manage messages in your Sent folder. |
||
|
4 |
Sign out of Web Inbox and return to the sign-in page. |
9 |
View or manage messages in your Deleted Items folder. |
||
|
5 |
View Web Inbox information. |
10 |
View or manage messages in your Inbox folder. |
Inbox Folder Message Area
|
1 |
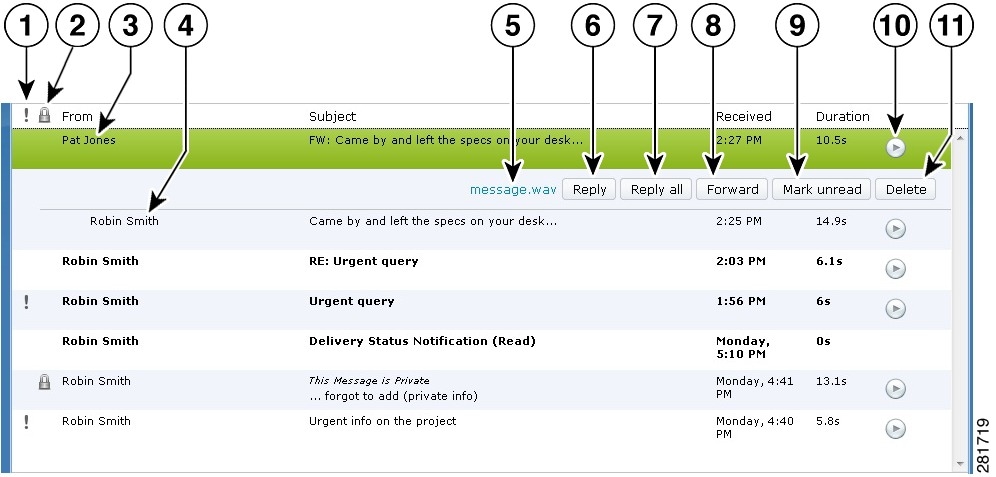
Indicates the message is marked Urgent. |
7 |
Reply to the sender and all recipients. |
|
2 |
Indicates the message is marked Secure. |
8 |
Forward the message. |
|
3 |
When you select a message in the message list, the message becomes highlighted, and additional controls are available for downloading the message audio, replying to the message, forwarding it, and so on. |
9 |
Mark the message unread. |
|
4 |
When you select a forwarded message, the introduction plays. The original message appears as a separate, indented entry below the introduction. |
10 |
Play the message audio, or pause playback. |
|
5 |
Right-click to download the message audio and save the file on your computer. (This option is not available for messages that are marked Secure.) |
11 |
Delete the message. (If your administrator has configured your mailbox to save deleted messages temporarily, this action moves the message to the Deleted folder.) |
|
6 |
Reply only to the sender. |
Audio Controls

|
1 |
Change the audio playback volume. (Available only when Computer is selected as the playback and recording device.) |
3 |
Cisco Unity Connection calls you at the extension or URI that you enter in the text box to make a recording or to play audio. You speak and listen through the phone handset or speakerphone. |
|
2 |
View the number of messages in the folder and scroll through pages of messages if there are more than 25 messages in the folder. |
4 |
Connection uses the computer microphone and speakers or other default audio device to make a recording or to play audio. |
Composing a New Message
|
1 |
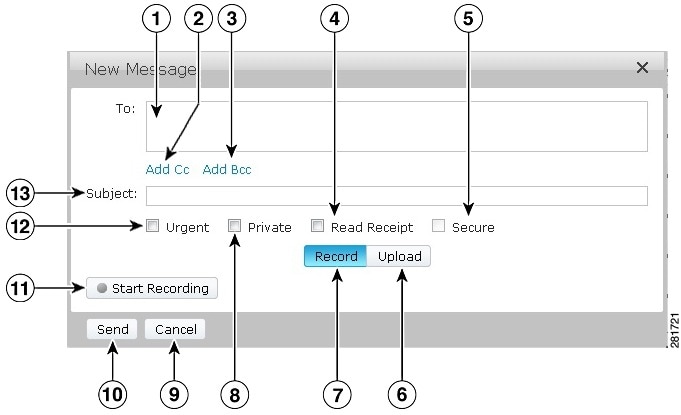
Enter the first one or more letters of a user’s name (first, last, or username). Cisco Unity Connection automatically suggests users whose names match your entry. |
8 |
Mark the message Private. |
|
2 |
Open the Cc recipients field to enter additional recipients who will receive a copy of the message. |
9 |
Discard the message without sending or saving it. |
|
3 |
Open the Bcc recipients field to enter additional recipients who will receive a blind copy of the message. |
10 |
Send the message. |
|
4 |
Request a read receipt for the message. |
11 |
In Record mode, select Start Recording to use the Phone or Computer audio device. In Upload mode, select Upload File (not pictured here) to use a prerecorded audio file. |
|
5 |
Mark the message Secure. (Depending on your mailbox configuration, this option may not be available, or may already be selected.) |
12 |
Mark the message Urgent. |
|
6 |
Select Upload mode. |
13 |
Enter the subject of the message. |
|
7 |
Select Record mode. |
 Note |
While composing a new message, if a security alert appears in Mozilla FireFox browser, click on View Certificate and install the certificate to avoid getting the alert in future. |
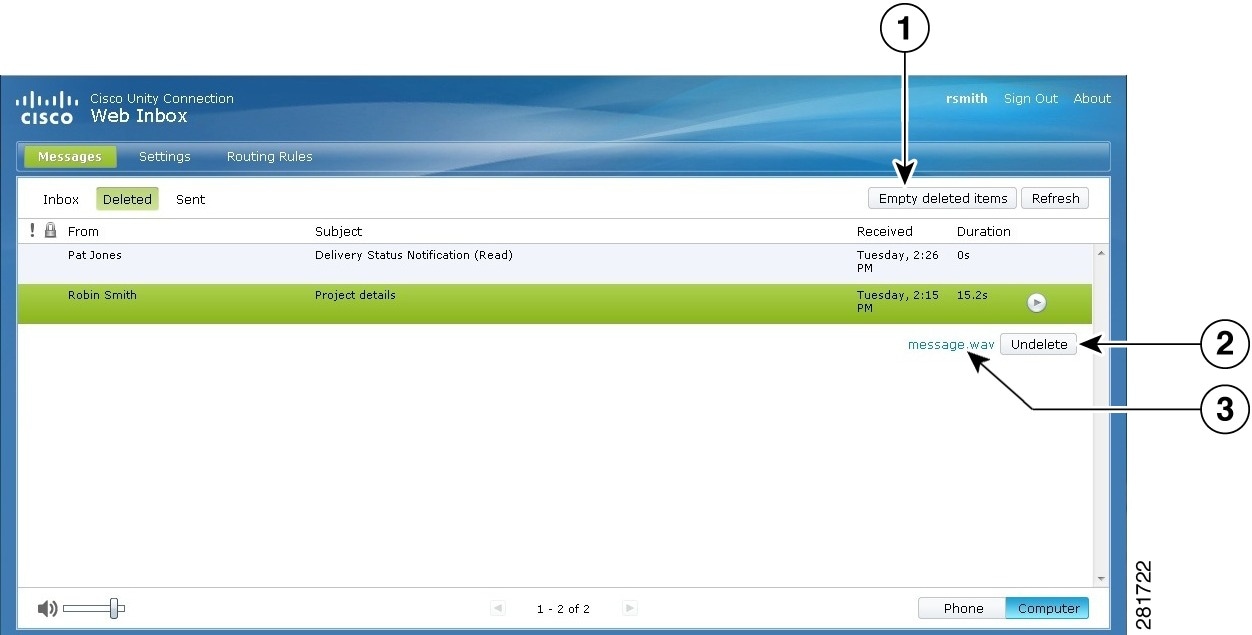
Deleted Folder
|
1 |
Permanently delete all items in the Deleted folder. |
3 |
Right-click to download the message audio and save the file on your computer. (This option is not available for secure messages.) |
|
2 |
Move the selected message back to the Inbox folder. |
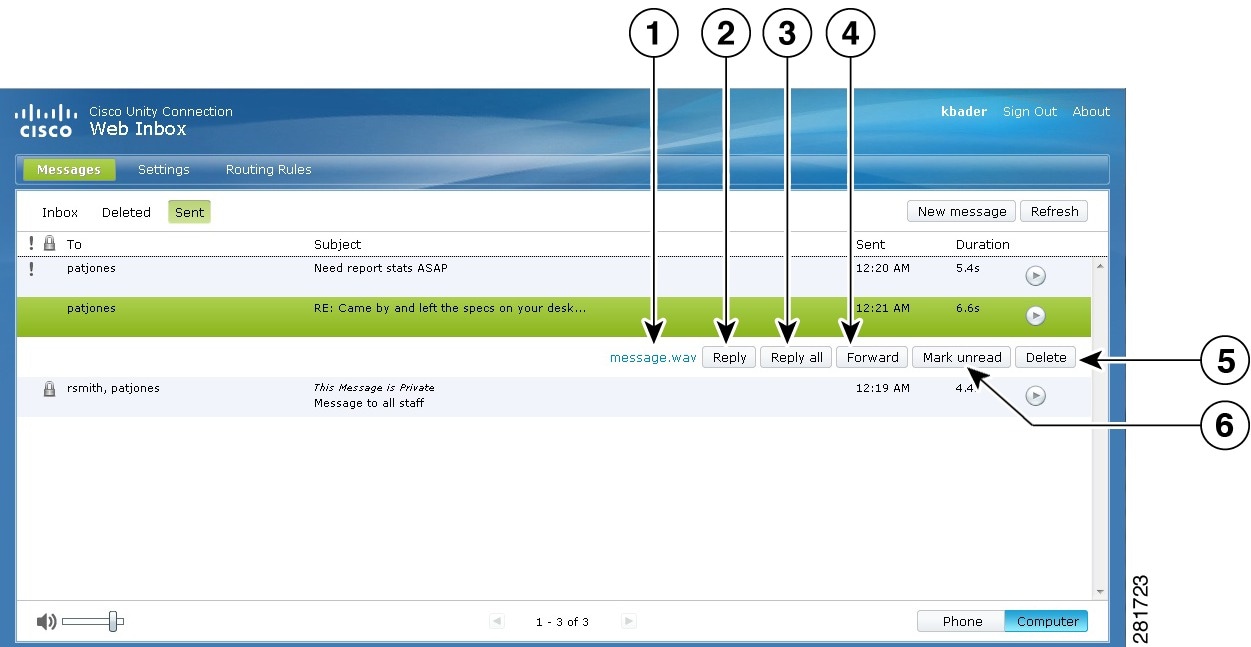
Sent Folder
|
1 |
Right-click to download the message audio and save the file on your computer. (This option is not available for secure messages.) |
4 |
Forward the message. |
|
2 |
Reply only to the sender. |
5 |
Delete the message permanently. (Sent messages are not moved to the Deleted folder.) |
|
3 |
Reply to the sender and all recipients. |
6 |
Mark the message unread. |
Configuration Settings for Using Web Inbox
In IPv6 scenarios, you need to perform the steps mentioned in the below sections on all the browsers to access Web Inbox on different operation systems. See the following sections:
Opening Web Inbox on MAC Operating System using Firefox 3.6
Playing a Message through Web Inbox on Mac Operating System Using Safari
Enabling Start Recording Button on Chrome
Enabling Start Recording Button on Firefox
Enabling Start Recording Button on Internet Explorer
Note |
The steps mentioned in the above sections need to be performed only for the first time for a particular Connection server. |
Opening Web Inbox on MAC Operating System using Firefox 3.6
Procedure
| Step 1 |
Open the Web Inbox using the IPv6 address in the address bar. The syntax of the Connection is shown below: Syntax A pop-up window appears. |
| Step 2 |
Click on the Show Certificate button. |
| Step 3 |
Check the Always trust "<Connection_hostname>" when connecting to "<Connection_ip>"checkbox. |
| Step 4 |
Expand Trust and select "Always Trust" from the When using this certificate drop-down list. |
| Step 5 |
Drag the Certificate Root certificate to desktop. |
| Step 6 |
Drag the Certificate Root to the Keychain Access. |
| Step 7 |
Double-click the Certificate Root. A popup window appears. |
| Step 8 |
Click on the Always Trust button to open the Web Inbox using Firefox 3.6. |
Note |
The above mentioned steps need to be performed only for the first time for a particular Connection server. |
Playing a Message through Web Inbox on Mac Operating System Using Safari
Procedure
| Step 1 |
Right-click the "message.wav" file of the desired voicemail and select Open in new tab. The Authentication dialog box appears. |
| Step 2 |
Enter the login credentials of the user in the Authentication dialog box. Check the Always Remember check box on the Authentication dialog box to avoid failure in playing messages through Web Inbox. |
| Step 3 |
Click on the play button in Web Inbox. A pop up window appears. |
| Step 4 |
Select Always Trust in the popup window. |
| Step 5 |
Click on play button in Web Inbox to play a message. |
Enabling Start Recording Button on Chrome
Procedure
| Step 1 |
Enter the URL to open Web Inbox in the address bar. |
| Step 2 |
Click on the lock icon at the left most corner of the address bar. A popup window appears. |
| Step 3 |
Click on the Certificate Information in the popup window. The Certificate dialog box appears. |
| Step 4 |
Click on the Details tab on the Certificate dialog box. |
| Step 5 |
Click on the Copy to File button. The Certificate Export Wizard appears. |
| Step 6 |
Click Next. |
| Step 7 |
Navigate to a location where you want to export the Certificate. |
| Step 8 |
Click OK. A dialog box confirming the successful export of Certificate appears. |
| Step 9 |
Click OK. |
| Step 10 |
Click on the Settings icon at the right-most corner of the Chrome browser. The Settings page appears. |
| Step 11 |
Click on the Under the Hood option in the left pane of the Settings page. |
| Step 12 |
Click Manage certificates. The Certificates dialog box appears. |
| Step 13 |
Click on the Intermediate Certification Authorities tab. |
| Step 14 |
Click Import. The Certificate Import Wizard appears. |
| Step 15 |
Navigate to the location where you had exported the certificate and select the Certificate. |
| Step 16 |
Click Open. A dialog box confirming the successful import of certificate appears. |
| Step 17 |
Click OK. |
| Step 18 |
Enter the URL to open Web Inbox in the address bar. |
| Step 19 |
Confirm that the Start Recording button is enabled while sending a voicemail. |
Enabling Start Recording Button on Firefox
Procedure
| Step 1 |
Open the Firefox browser. |
| Step 2 |
Click Tools > Options. |
| Step 3 |
Click on the Security tab. |
| Step 4 |
Click Exceptions in the first section on the Security tab. The Allowed Sites - Add-ons Installation dialog box appears. |
| Step 5 |
Enter the hostname of Connection in the Address of Web site field. |
Enabling Start Recording Button on Internet Explorer
Procedure
| Step 1 |
Open the Internet Explorer browser. |
| Step 2 |
Click Tools > Internet Options. |
| Step 3 |
Click on the Security tab. |
| Step 4 |
Click Trusted sites in the Select a Zone to view or change security settings section. |
| Step 5 |
Click Sites. |
| Step 6 |
Enter the Connection URL in the Add this website to the zone field. |
 Feedback