Manage CDN Servers

After you have provisioned the CDN, you may need to add servers to the CDN or modify existing servers. From the Servers tab of the Provisioning > Edit CDN window, you can edit all of the servers that you have in your environment, you can register existing Edge and Mid cache servers that were provisioned as part of the initial OMD installation and add them to your CDN, and you can add Origin Servers to your CDN. This chapter describes how to perform these configuration tasks.


Note

If you are running OMD Director in an HA configuration, you can only make configuration changes from the Primary OMD Director instance. To perform the steps in this chapter, make sure you are logging into the Primary OMD Director instance. If you are logged into the Backup OMD Director instance, you will see “This OMD Director is currently running in backup mode” in the header. If you are logged into a an OMD Director running in Detached mode because of an HA failure, you will see “This OMD Director is currently running in detached mode”.

Note

To delete a server (except for an Origin server) you must go to Provisioning > CDN Overview. You can delete an Origin Server from either Provisioning > CDN Overview or the Provisioning > Edit CDN.


This chapter includes the following topics:

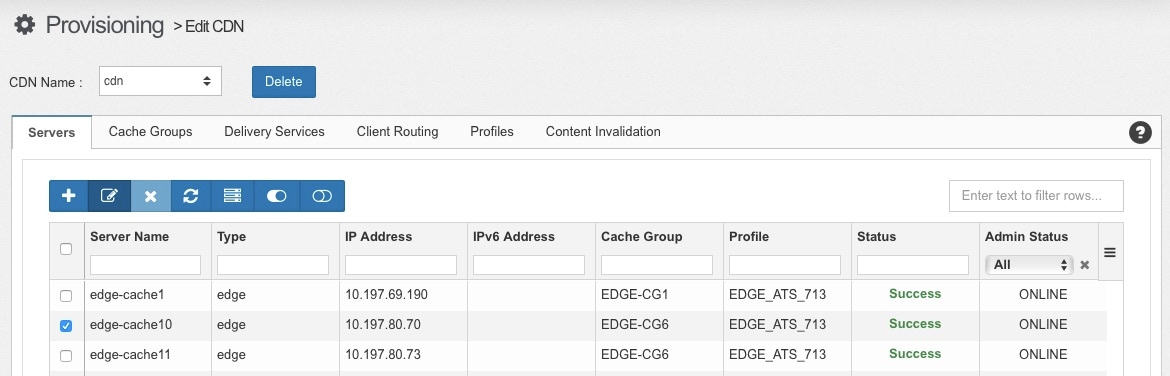
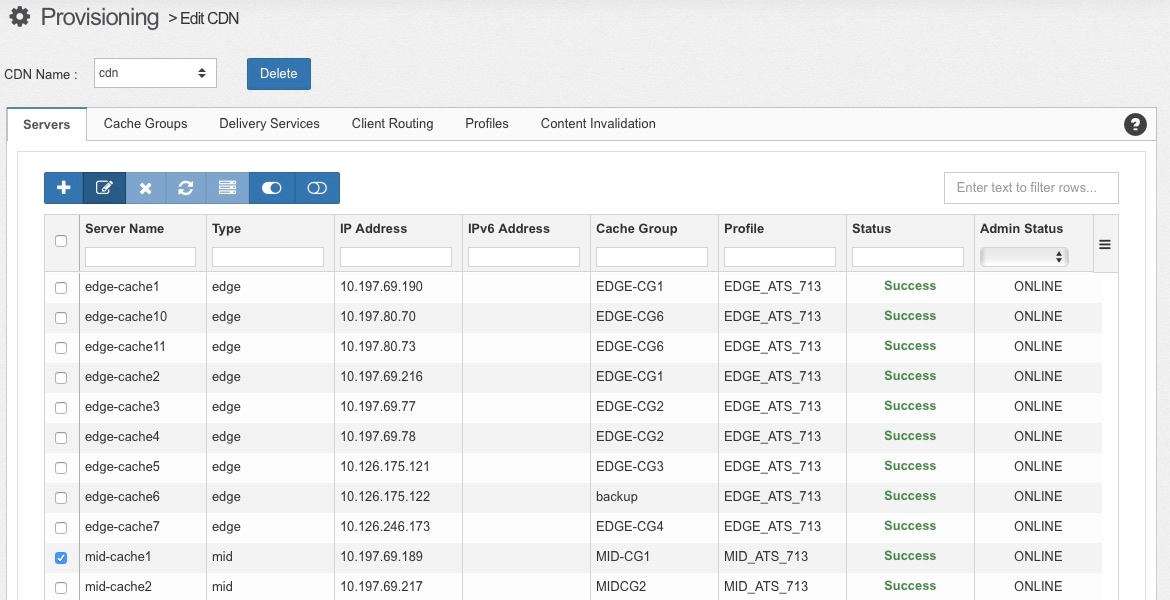
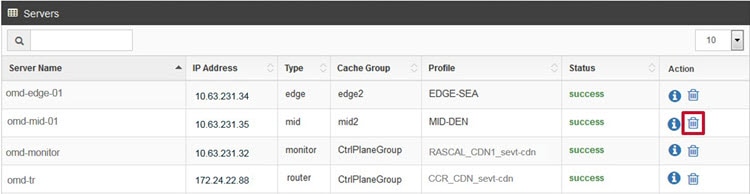
Add an Origin Server to the CDN

Origin Servers need to be added to the CDN if:

  • You have a Delivery Service that is using MSO

  • An Origin Server will be used by more than one Delivery Service

Typically the Origin Servers are not automatically registered with the CDN so you will need to manually add them. When you add an Origin Server to the CDN, you will also assign it an Origin Server Profile to use and you will assign it to an Origin Server cache group.

Perform the following steps to add an Origin Server to OMD Director:

Procedure


Step 1

Choose Provisioning > Edit CDN. From the CDN Name drop-down list above the tabs, make sure the correct CDN is selected.

Step 2

Next to the Server Name drop-down list, click the Add (plus) icon.

Step 3

In the Add New Server window that appears, configure the following information to add a new server:

  • Name: Enter the hostname of the Origin Server. Do not enter the domain. You will enter domain in the Domain Name field.
  • IP Address: Enter the IP address of the Origin Server.
  • Netmask: Enter the subnet mask of the Origin Server.
  • Gateway: Enter the IP address of the default gateway for the Origin Server.
  • IPv6 Address: Enter the IPv6 address of the Origin Server.
  • IPv6 Gateway: Enter the IPv6 address of the default gateway for the Origin Server.
  • Cache Group: Choose the Origin cache group to which the server should be assigned. You can assign the Origin cache groups to a Mid Cache’s Parent Cache Group and Secondary Parent Cache Group settings to determine the primary and backup Origin Servers for the Mid caches in that group. For information on creating an Origin cache group, see Create Origin Server Cache Groups.
  • Profile: Choose the Origin Server profile to assign to this server. Only Origin Server profiles will appear in this list. The profile that is assigned to the Origin Server is used for MSO and determines the rank of that server when a Mid cache group does not have a Parent Cache Group configured or if the Parent Cache Group has more than one Origin Server assigned. If this Origin Server is not serving any Delivery Services that use MSO, you can choose any profile.
  • Advanced Settings:
    • TCP Port: The default port is 80. If the Origin Server listens on a different port, change this value to the port.

    • MTU: If an MTU other than 1500 is needed, enter the new value.

    • Domain Name: Enter the domain name of the Origin Server. The values entered in the Name field and the Domain Name field will create the FQDN of the Origin Server.

  • Admin Status: If the Origin Server is ready to be online, choose Online. Otherwise choose Offline and come back to change this setting once the Origin Server is ready to be online.
Step 4

Click Add to save and add the new server.

Step 5

When the server has been successfully added, the “Processing” status in the title bar will disappear and you will see a green check mark for every action in the Status column. Click OK to close the status window.

Step 6

After you add the Origin Server, you can optionally assign it to a device group. If you want to assign the Origin Server to a device group, in the Assign Device Groups field, choose the device groups to which you would like to add the server. When you are finished, click Save.


Add a New Registered Server to the CDN

To add a registered server to the CDN, follow these steps:

Procedure


Step 1

Choose Provisioning > Edit CDN.

Step 2

Make sure the Servers tab is selected.

Step 3

The bottom section of the Servers tab will show servers that have not yet been registered to the CDN. The following is an example:

Step 4

Click the arrow icon for the server you want to add.

Step 5

From the Profiles drop-down list, choose a profile for each server. These profiles were created as part of the initial OMD installation. Only the profiles that are appropriate for the server, based on the server type, will appear in the drop-down list.

Step 6

If you are adding a cache server, from the Cache Group drop-down list, choose the cache group to add this server to. Only groups that are appropriate for the cache type will appear in the drop-down list.

Step 7

When the status of the server shows “Provision Success”, the Add icon at the end of the row is enabled. Click the Add icon to finishing adding the server to the CDN.

Step 8

To confirm that the server was added to the CDN, you can confirm that it appears in the Server Name list.

Step 9

After you add the server to the CDN, you can optionally assign it to a device group. If you want to assign the server to a device group, in the Assign Device Groups field, choose the device groups to which you would like to add the server. When you are finished, click Save.


Edit Traffic Monitor or Traffic Router Servers

To edit an existing Traffic Monitor or Traffic Router server, follow these steps:

Procedure


Step 1

Choose Provisioning > Edit CDN. From the CDN Name drop-down list above the tabs, make sure the correct CDN is selected.

Step 2

From the Servers tab, choose a Traffic Monitor or Traffic Router server from the Server Name list.

Step 3

Change the desired settings. From the Servers tab you can change the following settings of the Traffic Monitor/Router server:

  • IP Address: This is the IP address assigned to the Traffic Monitor or Traffic Router server.

  • Netmask: This is the netmask for the primary IP address assigned to the server.

  • Gateway: This is the gateway for the primary IP address assigned to the server.

  • IPv6 Address: This is the optional IPv6 address assigned to the server.

  • IPv6 Gateway: This is the optional IPv6 gateway address assigned to the server.

  • Ethernet Interface: This is the primary ethernet interface for the server.

  • MTU: This is the MTU of the server interface.

  • Cache Group: The cache group to which the server belongs. This is a read-only value.

  • Profile: The profile that is assigned to this server. This is a read-only value.

  • Admin Status

Step 4

When you have finished making your changes, click Save.

Step 5

When the server has been successfully updated, the “Processing” status in the title bar will disappear and you will see a green check mark for every action in the Status column. Click OK to close the status window.


Edit an Existing Edge Cache Server

To edit an exiting server, follow these steps:

Procedure


Step 1

Choose Provisioning > Edit CDN. From the CDN Name drop-down list above the tabs, make sure the correct CDN is selected.

Step 2

From the Servers tab, choose the Edge cache server from the Server Name list.

Step 3

Change the desired settings. From the Servers tab you can change the following settings of the Edge cache server:

  • IP Address: This is the primary IP address assigned to the primary streaming interface of the server, which is used by default to stream content. If needed, secondary IP addresses can be added to the Edge cache to use to stream content for certain Delivery Services. Secondary IP addresses can be assigned to either the same interface that the primary IP address is assigned to, or to a different interface that is available for streaming content. For information about adding a secondary IP address to use for streaming content, see Manage Secondary Streaming IPs.

    Note 

    Secondary IP addresses can only be added for Edge cache servers.

  • Netmask: This is the netmask for the primary IP address assigned to the server.

  • Gateway: This is the gateway for the primary IP address assigned to the server.

  • Ethernet Interface: This is the primary interface that the server uses to stream content. This is the interface to which the primary IP address is assigned.

  • MTU: This is the MTU of the primary streaming interface.

  • Cache Group: The cache group to which the server belongs. The server can only belong to one cache group.

  • Profile: The profile that is assigned to this server.

  • Admin Status

Step 4

When you have finished making your changes, click Save.

Step 5

When the server has been successfully updated, the “Processing” status in the title bar will disappear and you will see a green check mark for every action in the Status column. Click OK to close the status window.


Manage Secondary Streaming IPs

Edge cache servers can stream content using primary or secondary IP addresses and you can identify which IP address the Edge cache should use based on the Delivery Service to which it is assigned. The secondary IP addresses can be assigned to either the same interface as the primary IP address or a different interface.

To add a secondary IP address to the Edge cache server that can be used to stream content, perform the following steps:

Procedure


Step 1

Choose Provisioning > Edit CDN. From the CDN Name drop-down list above the tabs, make sure the correct CDN is selected.

Step 2

Click the Servers tab and from the Server Name drop-down list, choose the Edge cache for which you want to add a secondary IP address.

Step 3

Expand the Manage Secondary Streaming IP area. It shows the currently configured interfaces and any secondary IP addresses that are configured.

Step 4

You can assign a secondary IP address to use to stream content to the same interface that the Primary IP address is assigned to or to a different interface that is available for streaming. To assign the secondary streaming IP address to a different interface, click the + icon in the Server Interfaces section to add an interface in OMD Director for this Edge cache.

Note 

If you are assigning the secondary streaming IP address to the primary streaming interface, go to Step 4.

Step 5

In the Add Secondary Streaming Interface dialog box that appears, configure the following fields and then click Add to add the interface:

  • Interface: From the Interface drop-down list, choose the name of a second interface on the Edge cache server to use for streaming content. If you do not see the interface listed, choose Add New and enter the name of the second interface that is available on the Edge cache server to stream content. What you enter in this field must match the name of an interface in Linux on the Edge cache server.

    Warning 

    If you enter an interface name that does not exist on the server, the health check for the interface will fail and the Edge cache will be marked as unavailable. This will prevent the Traffic Router from redirecting requests to this Edge cache.

  • MTU: Choose either 1500 or 9000.

Step 6

To add a secondary streaming IP address and assign it to an interface, click the click the + icon in the Secondary Streaming IPs section.

Step 7

In the Add Secondary IP pop-up window that appears, enter the following information and then click Add to add the IP address:

  • Ethernet Interface: Choose the interface to which you want to assign the secondary IP address.

  • IP Stack: Choose whether you want to add only an IPv4 secondary IP address, only an IPv6 secondary IP address, or both an IPv4 and IPv6 secondary IP address.

  • IP Address: From the IP Address drop-down list, choose the secondary IP address to use for streaming content. If you do not see the IP address listed, choose Add New and enter the secondary IP address to use for streaming content. The IP address you enter must match an address already configured on the chosen interface in Linux. Entering an address in this field will not assign the address to the underlying interface.

    Warning 

    If you enter an IP address that does not match an address already configured on the chosen interface, the health check for the secondary IP address will fail and the Edge cache will be marked as unavailable. This will prevent the Traffic Router from redirecting requests to this Edge cache.

  • Netmask: Enter the subnet mask to use with the secondary IP address. The subnet mask you enter must match the subnet mask already configured on the chosen interface in Linux.

  • Gateway: This is a required field but is for informational purposes only. This field is not used by Media Streamer. You can leave this field set to the default value, which is the gateway for the primary IP address assigned to the server.


What to do next

To determine which IP address an Edge cache server will use to stream content, you choose the IP address of the Edge cache server either when you assign the server to a Delivery Service or when you assign the Edge cache to a Device Group. For more information on choosing the IP address when assigning the Edge cache to a Delivery Service, see Add a New DNS or HTTP Delivery Service or Edit an Existing DNS or HTTP Delivery Service. For more information on choosing the IP address when assigning the Edge cache to a Device Group, see Create a Device Group or Edit a Device Group.

Edit an Existing Mid Cache Server

To edit an exiting Mid cache server, follow these steps:

Procedure


Step 1

Choose Provisioning > Edit CDN. From the CDN Name drop-down list above the tabs, make sure the correct CDN is selected.

Step 2

From the Servers tab, choose the Mid cache server from the Server Name list.

Step 3

Change the desired settings. From the Servers tab you can change the following settings of the Mid cache server:

  • IP Address: IP address used to stream content. This IP address must already be configured on the server.

  • Netmask: Netmask for the IP address that is used to stream content. This must match the netmask already configured on the server.

  • Gateway: Gateway for the IP address that is used to stream content. This must match the gateway already configured on the server.

  • Ethernet Interface: Name of the interface that is used to stream content.

  • MTU: The MTU can be either 1500 or 9000.

  • Cache Group: The cache group to which the server belongs. The server can only belong to one cache group.

  • Profile: The profile that is assigned to this server.

  • Admin Status

Step 4

When you have finished making your changes, click Save.

Step 5

When the server has been successfully updated, the “Processing” status in the title bar will disappear and you will see a green check mark for every action in the Status column. Click OK to close the status window.


Edit an Existing Origin Server

To edit an exiting origin server, follow these steps:

Procedure


Step 1

Choose Provisioning > Edit CDN. From the CDN Name drop-down list above the tabs, make sure the correct CDN is selected.

Step 2

From the Servers tab, choose the origin server from the Server Name list.

Step 3

Change the desired settings. From the Servers tab you can change the following settings of the origin server:

  • IP Address: IP address used to stream content. This IP address must already be configured on the server.

  • Netmask: Netmask for the IP address that is used to stream content. This must match the netmask already configured on the server.

  • Gateway: Gateway for the IP address that is used to stream content. This must match the gateway already configured on the server.

  • IPv6 Address: IPv6 address used to stream content. This IPv6 address must already be configured on the server.

  • IPv6 Gateway: Gateway for the IPv6 address that is used to stream content. This must match the gateway already configured on the server.

  • Ethernet Interface: Name of the interface that is used to stream content.

  • MTU: The MTU can be either 1500 or 9000.

  • Cache Group: The cache group to which the server belongs. The server can only belong to one cache group.

  • Profile: The profile that is assigned to this server. The profile that is assigned to the Origin Server is used for MSO and determines the rank of that server when a Mid cache group does not have a Parent Cache Group configured or if the Parent Cache Group has more than one Origin Server assigned. If this Origin Server is not serving any Delivery Services that use MSO, you can choose any profile.

  • TCP Port: This is the port number that the Origin Server listens on.

  • Domain Name: This is the domain name of the Origin Server. The values entered in the Name field and the Domain Name field will create the FQDN of the Origin Server.

  • Admin Status

Step 4

When you have finished making your changes, click Save.

Step 5

When the server has been successfully updated, the “Processing” status in the title bar will disappear and you will see a green check mark for every action in the Status column. Click OK to close the status window.


Delete a Server from CDN Overview Window

To delete a server from the CDN Overview window, follow these steps:


Note

If you are running OMD Director in an HA configuration, you can only make configuration changes from the Primary OMD Director instance. To perform the steps in this section, make sure you are logging into the Primary OMD Director instance.

Procedure


Step 1

Choose Provisioning > CDN Overview.

Step 2

In the Servers section, click the Delete icon (trashcan) for the server that you want to delete.

Note 
The CDN system requires one Edge cache server, one Mid cache server, one Traffic Router, and one Traffic Monitor.
Note 
If the word “updating” appears instead of the Delete icon (trashcan), this indicates that the Server has been modified and is in the process of being updated. To delete the Server, you will need to wait until it has finished updating.
Step 3

In the Deleting Server confirmation window that appears, click Yes to confirm that you want to delete the server.

Step 4

When the Server has been successfully deleted, the “Processing” status in the title bar will disappear and you will see a green check mark for every action in the Status column. Click OK to close the status window.


Delete an Origin Server from Edit CDN Window

To delete an Origin server from the Edit CDN window, follow these steps:


Note

If you are running OMD Director in an HA configuration, you can only make configuration changes from the Primary OMD Director instance. To perform the steps in this section, make sure you are logging into the Primary OMD Director instance.

Procedure


Step 1

Choose Provisioning > Edit CDN. From the CDN Name drop-down list, choose the CDN you are editing.

Step 2

Make sure the Servers tab is selected.

Step 3

From the Server Name drop-down list, choose the Origin Server you want to delete.

Step 4

Click the OK button next to the Server Name field.

Step 5

In the Deleting Server confirmation window that appears, click Yes to confirm that you want to delete the server.

Step 6

When the Server has been successfully deleted, the “Processing” status in the title bar will disappear and you will see a green check mark for every action in the Status column. Click OK to close the status window.