UCS X-Series M8 Ordering Guide
Available Languages
Bias-Free Language
The documentation set for this product strives to use bias-free language. For the purposes of this documentation set, bias-free is defined as language that does not imply discrimination based on age, disability, gender, racial identity, ethnic identity, sexual orientation, socioeconomic status, and intersectionality. Exceptions may be present in the documentation due to language that is hardcoded in the user interfaces of the product software, language used based on RFP documentation, or language that is used by a referenced third-party product. Learn more about how Cisco is using Inclusive Language.
- US/Canada 800-553-2447
- Worldwide Support Phone Numbers
- All Tools
 Feedback
 Feedback
The Cisco UCS X-Series Modular System simplifies your data center, adapting to the unpredictable needs of modern applications while also providing for traditional scale-out and enterprise workloads. It reduces the number of server types to maintain, helping to improve operational efficiency and agility as it helps reduce complexity. Powered by the Cisco Intersight™ cloud operations platform, it shifts your thinking from administrative details to business outcomes with hybrid cloud infrastructure that is assembled from the cloud, shaped to your workloads, and continuously optimized.
This enterprise-class server offers market-leading performance, versatility, and density without compromise for workloads. Up to eight compute nodes can reside in the 7-Rack-Unit (7RU) Cisco UCS X9508 Chassis, offering one of the highest densities of compute, I/O, and storage per rack unit in the industry.
Purpose
This document describes how to order the UCS X-Series M8 Product
Scope
This ordering guide describes the information for:
● Ordering Structure of Cisco UCS X-Series M8 Product
● Catalog of Product IDs
● Ordering Server Hardware and Software options
● Links to additional resources
Audience
Buy Method Through Cisco (Eg: Direct Customer & Tier 1 Partners):
● Scenario 1: Customer Without Enterprise Agreement for Cisco Intersight Software License
● Scenario 2: Customer With Enterprise Agreement for Cisco Intersight Software License
Buy Method Through Distributor (Eg: Tier 1 & Tier 2 Partners):
● Scenario 1: Customer Without Enterprise Agreement for Cisco Intersight Software License
● Scenario 2: Customer With Enterprise Agreement for Cisco Intersight Software License
Ordering Structure of UCS X-Series M8 Ordering Structure
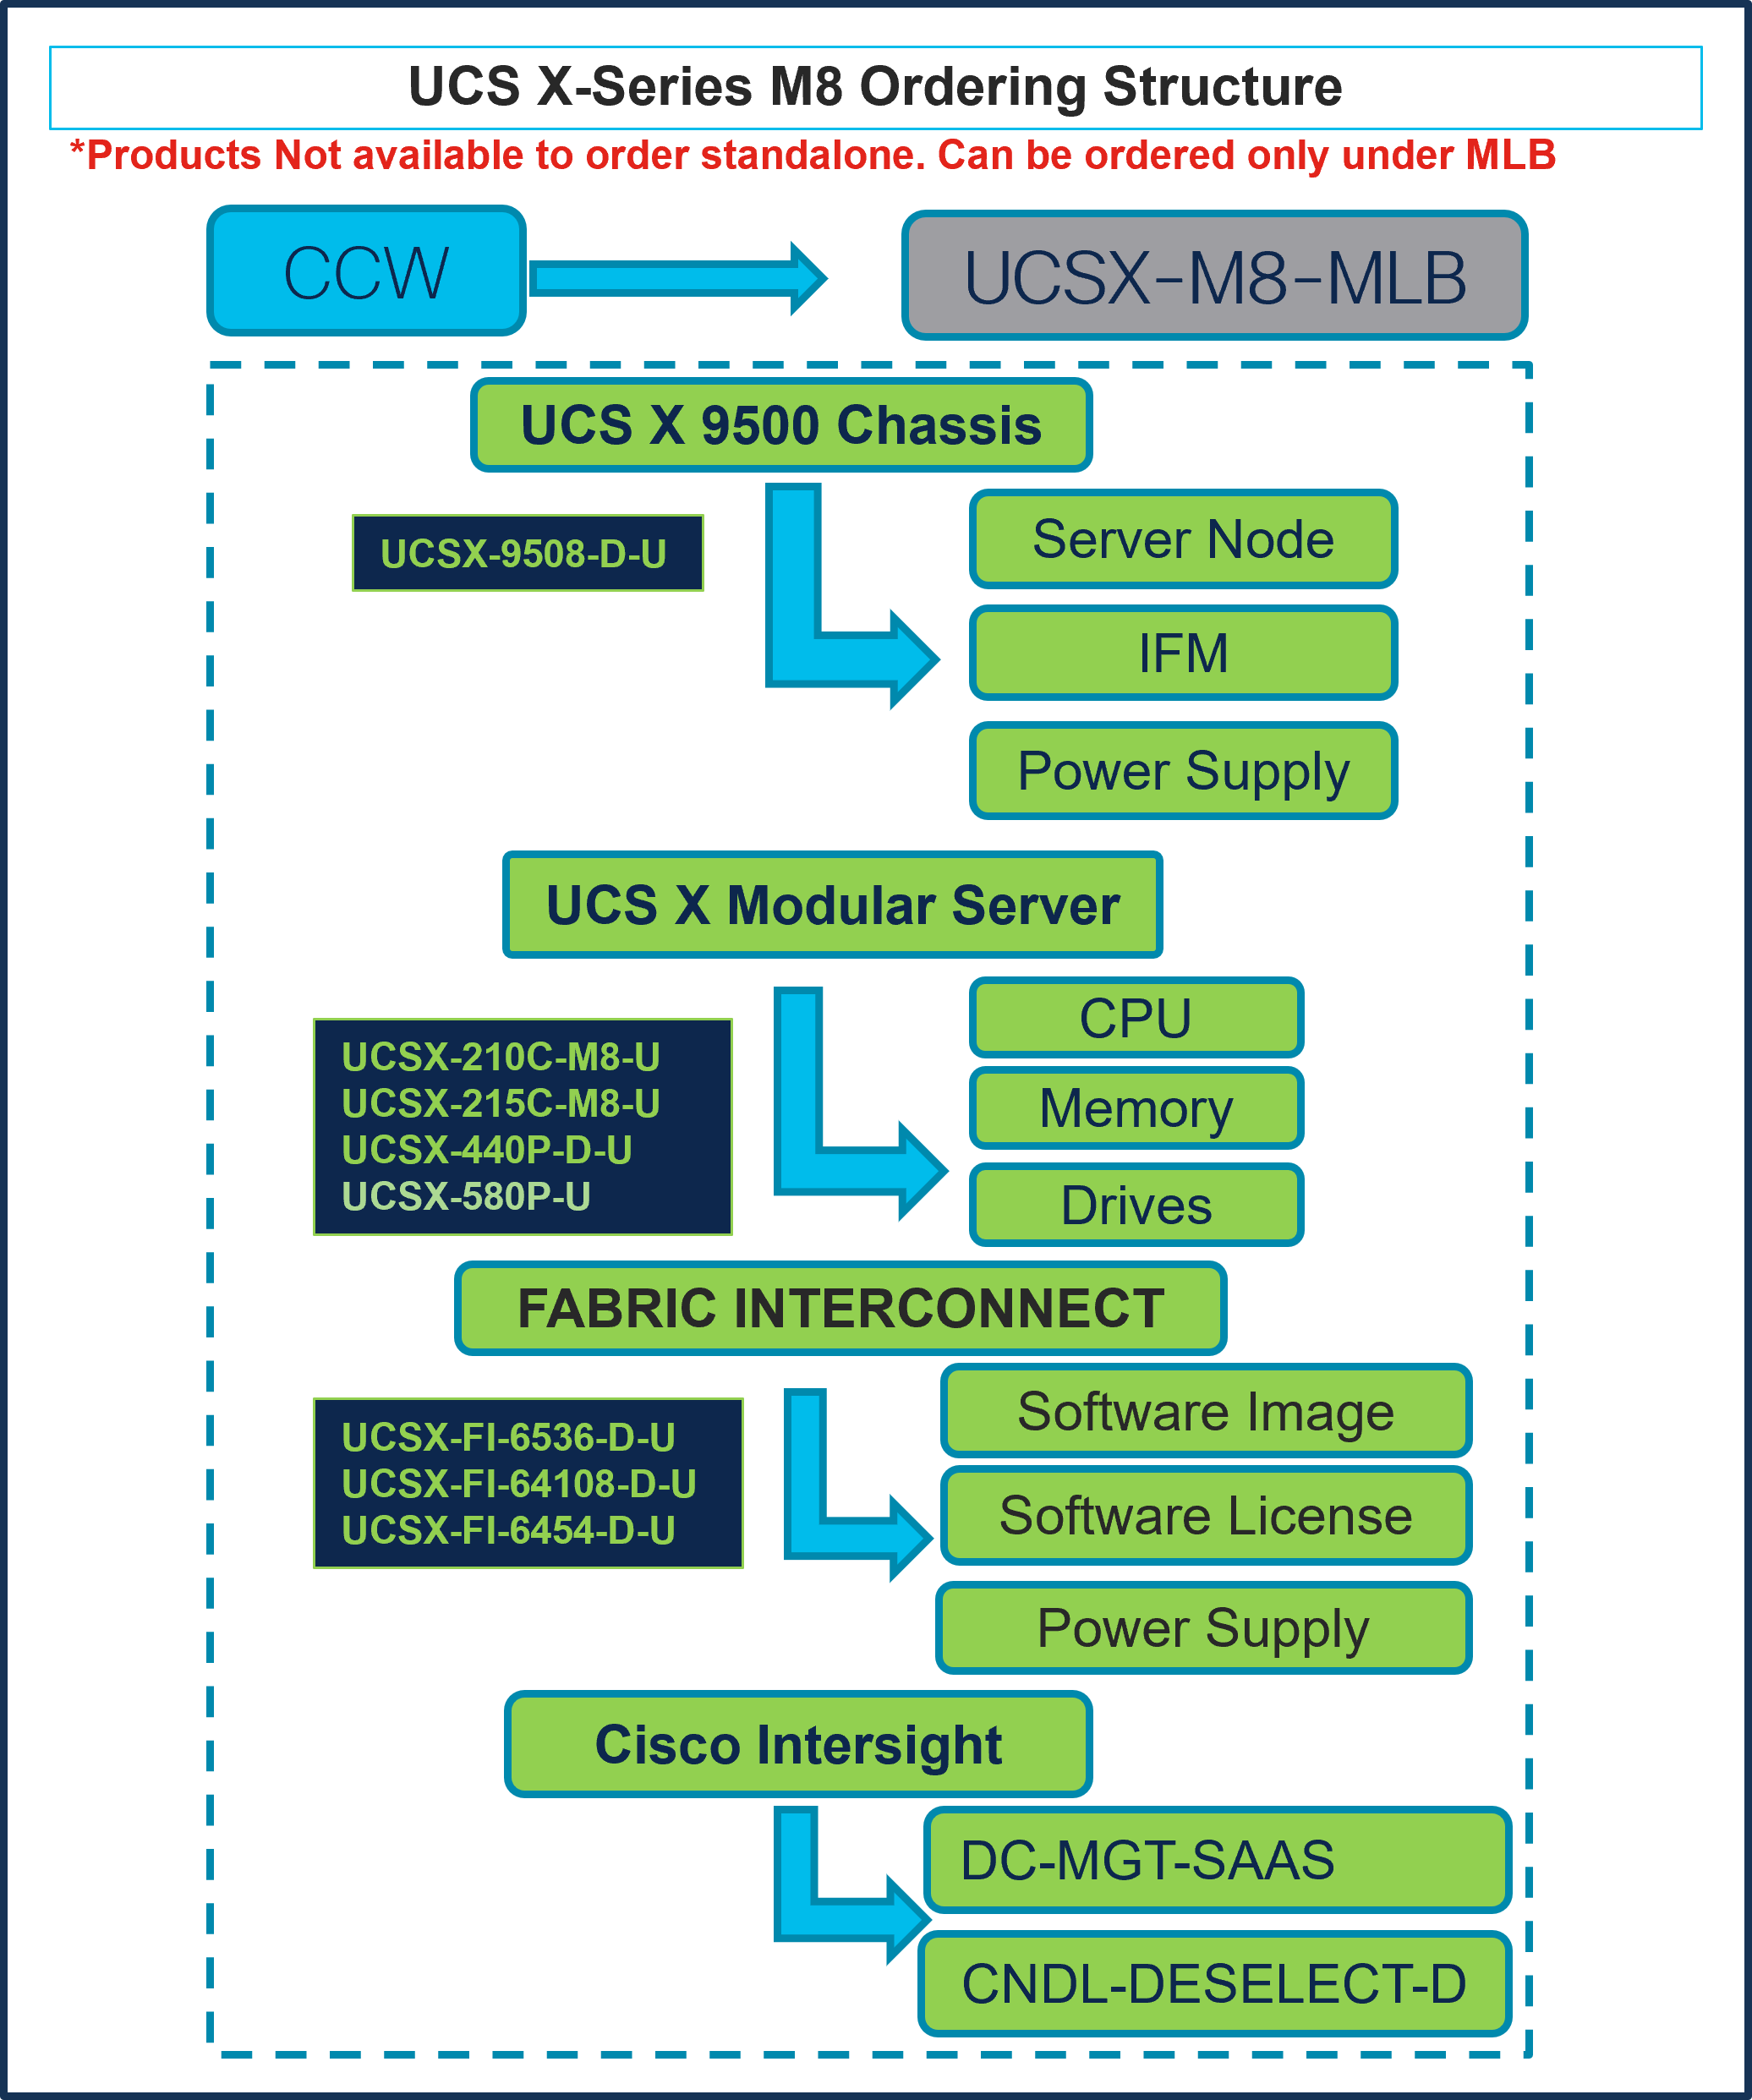
Note: For a complete list of part numbers for the see the Cisco UCS X210c M8 Compute Node Spec Sheet, Cisco UCS X215c M8 Compute Node Spec Sheet, Cisco UCS X9508 Chassis Spec Sheet
Table 1. PID of Major Line Bundle (MLB)
| Product ID (PID) |
Description |
| UCSX-M8-MLB |
UCSX M8 Modular Server and Chassis MLB |
Table 2. Cisco Chassis Major Line PIDs
| Product ID (PID) |
Description |
| UCSX-9508-D-U |
UCS X9508 Chassis Configured |
Table 3. Cisco X-Series Compute Node Major Line PIDs
| Product ID (PID) |
Description |
| UCSX-215C-M8 |
Cisco UCS X215c M8 Compute Node without CPU, memory, drive bays, drives, VIC adapter, or mezzanine adapters (ordered as a UCS X9508 chassis option) |
| UCSX-215C-M8-U |
Cisco UCS X215c M8 Compute Node without CPU, memory, drive bays, drives, VIC adapter, or mezzanine adapters (ordered standalone) |
| UCSX-210C-M8 |
Cisco UCS X210c M8 Compute Node without CPU, memory, drive bays, drives, VIC adapter, or mezzanine adapters (ordered as a UCS X9508 chassis option) |
| UCSX-210C-M8-U |
Cisco UCS X210c M8 Compute Node without CPU, memory, drive bays, drives, VIC adapter, or mezzanine adapters (ordered as a standalone) |
| UCSX-410C-M8 |
UCSX 410c M8 Compute Node w/o CPU, Memory, Storage, Mezz |
Table 4. PCIe Node Major Line PIDs
| Product ID (PID) |
Description |
| UCSX-440P-D-U |
UCS X-Series Gen4 PCIe node |
| UCSX-580P-U |
UCS X-Series Gen5 PCIe node |
Table 5. Cisco Fabric Interconnect Major Line PIDs
| Product ID (PID) |
Description |
| UCSX-FI-6536-D-U |
Fabric Interconnect 6536 |
| UCSX-FI-64108-D-U |
Fabric Interconnect 64108 |
| UCSX-FI-6454-D-U |
Fabric Interconnect 6454 |
Table 6. Cisco Intersight Major Line PIDs
| Product ID (PID) |
Description |
| DC-MGT-SAAS |
Cisco Intersight SaaS |
| CNDL-DESELECT-D |
Conditional Deselect |
Buy Method Through Cisco (Eg: Direct Customer & Tier 1 Partners)
Scenario 1: Customer Without Enterprise Agreement for Cisco Intersight Software License
Step 1.
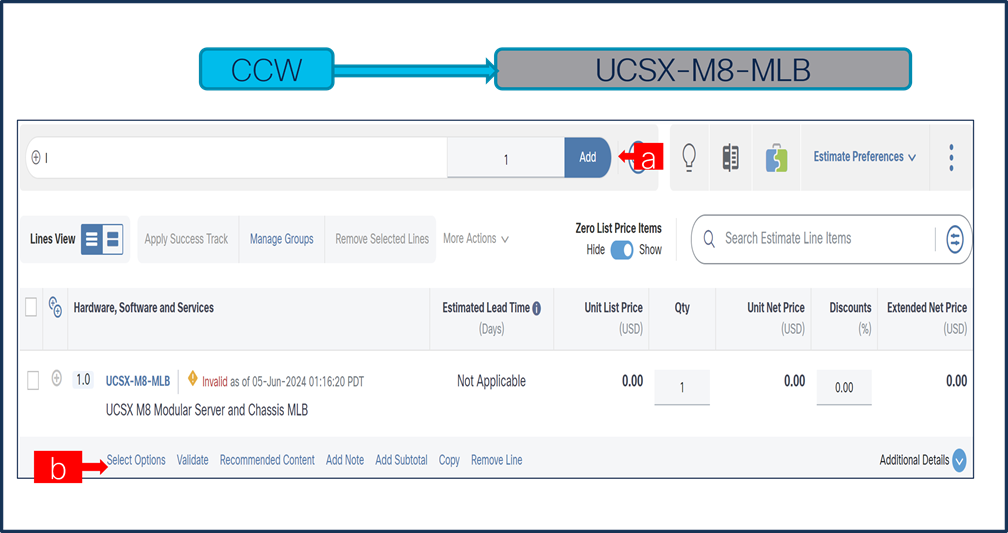
a. In CCW, search for MLB PID and click on “Add”
b. Click on “Select Options” to enter the configurator.
Step 2.
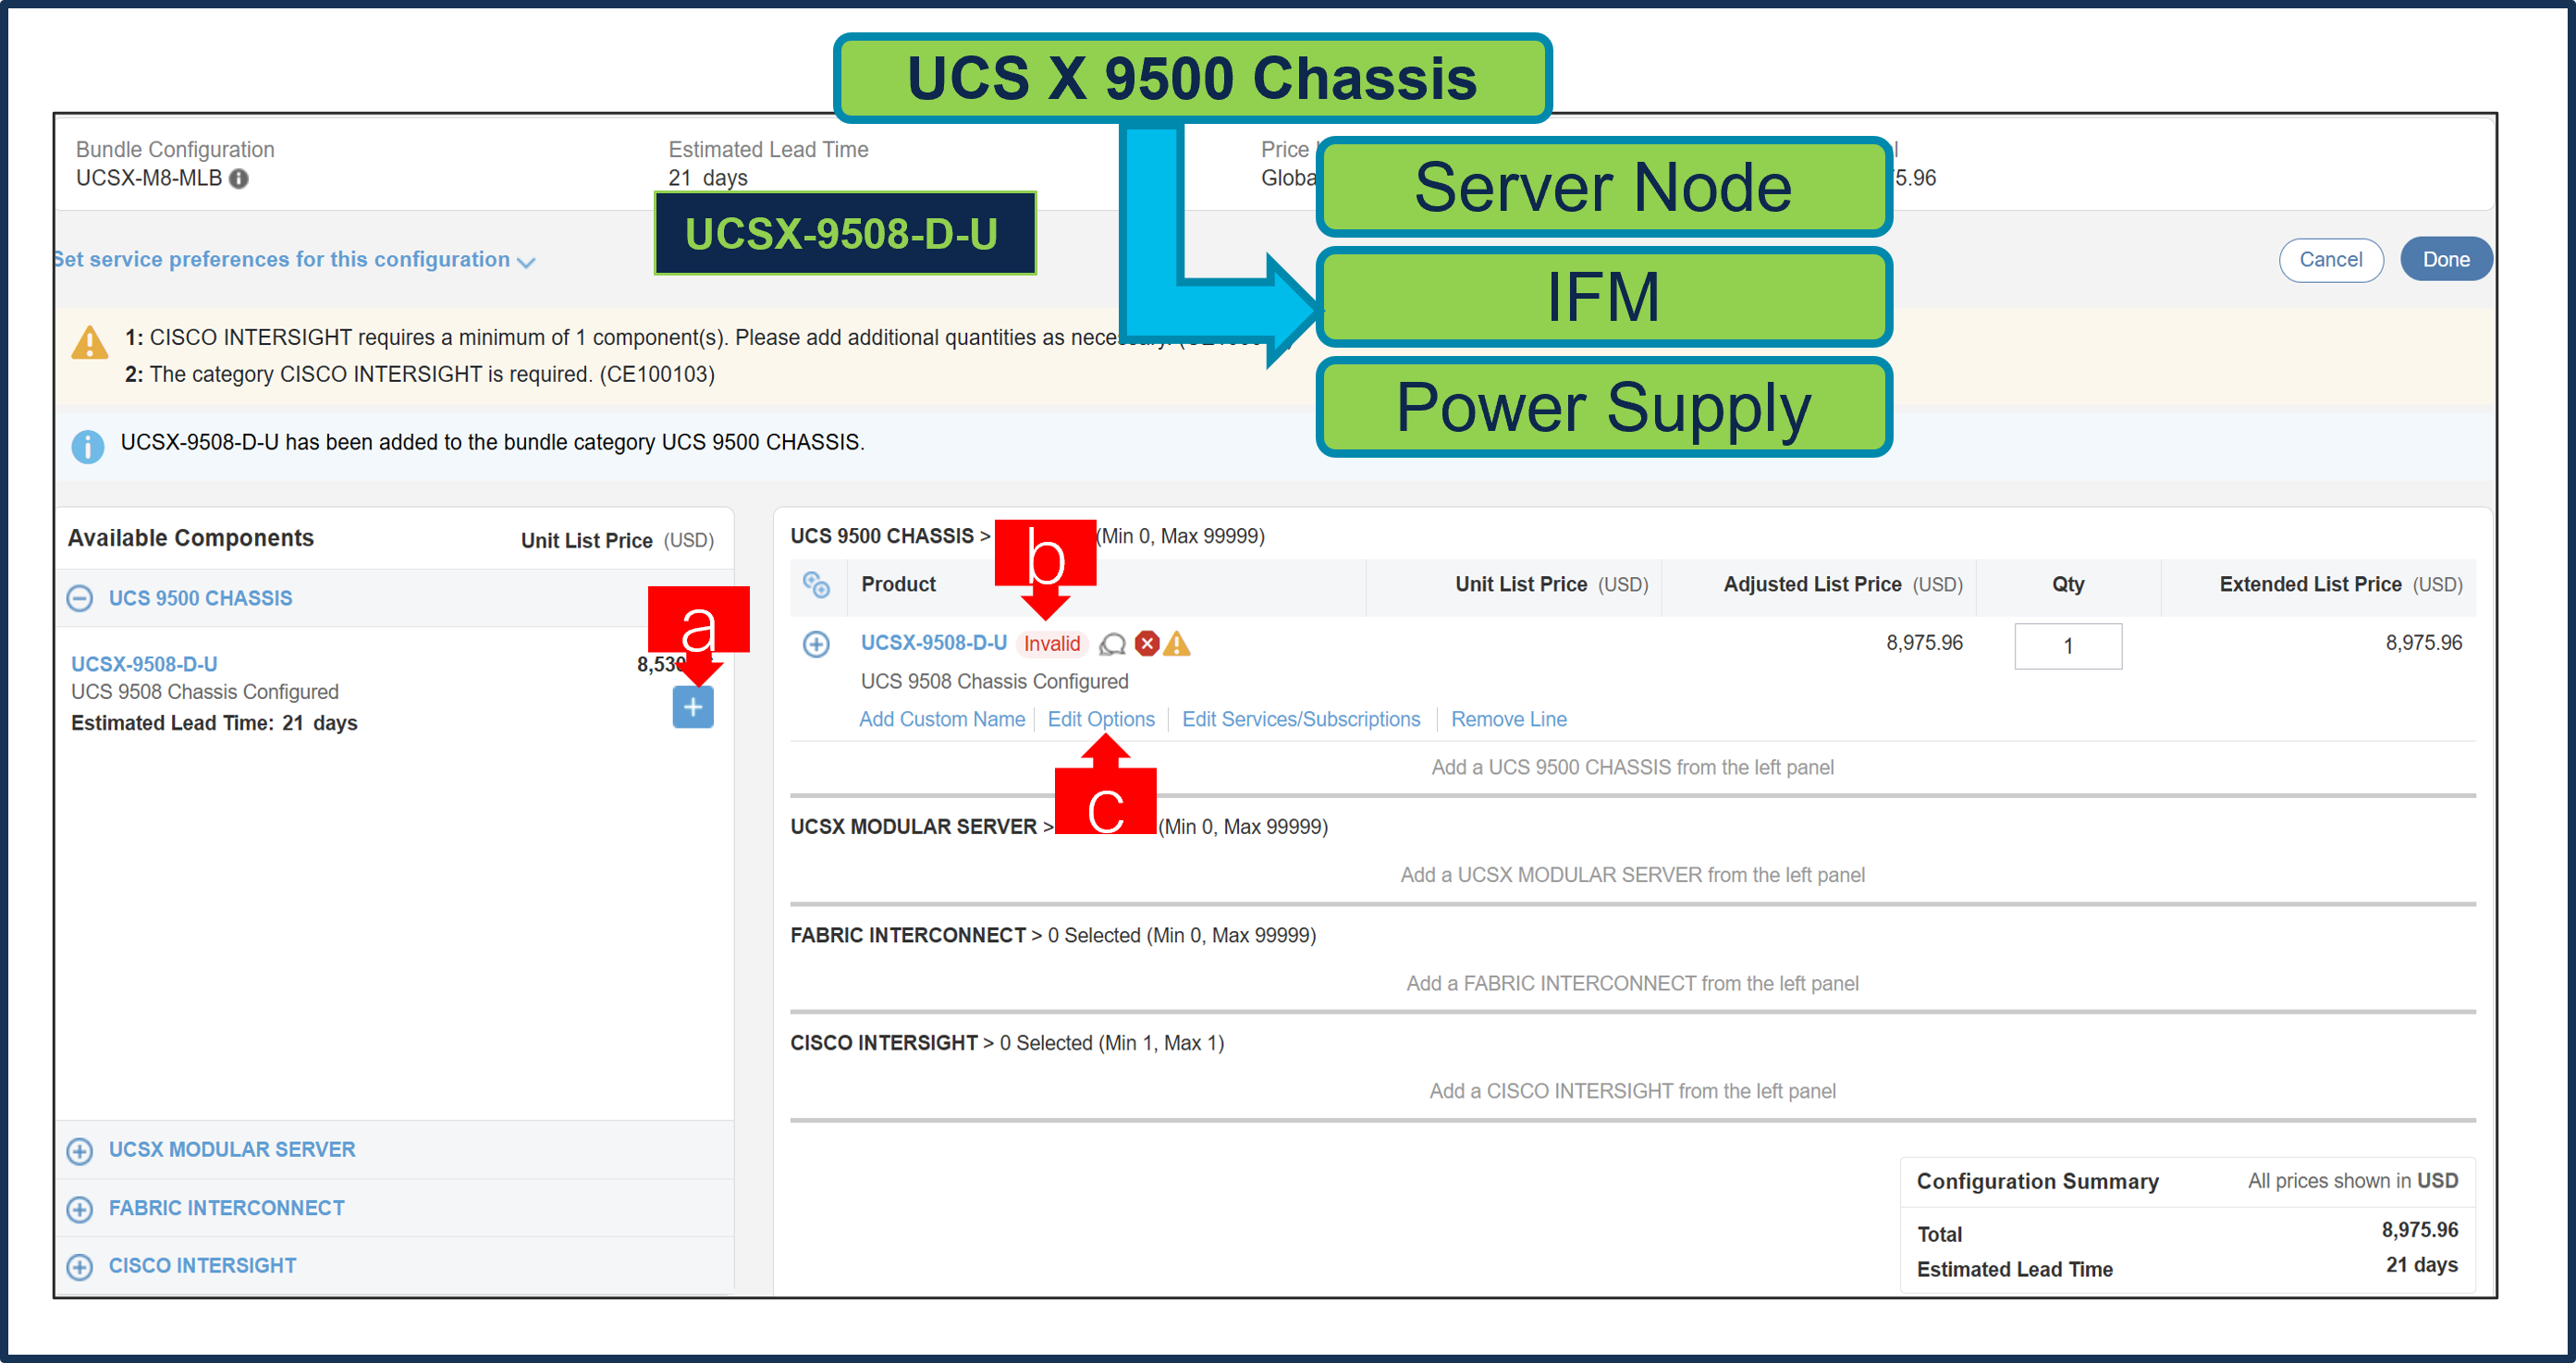
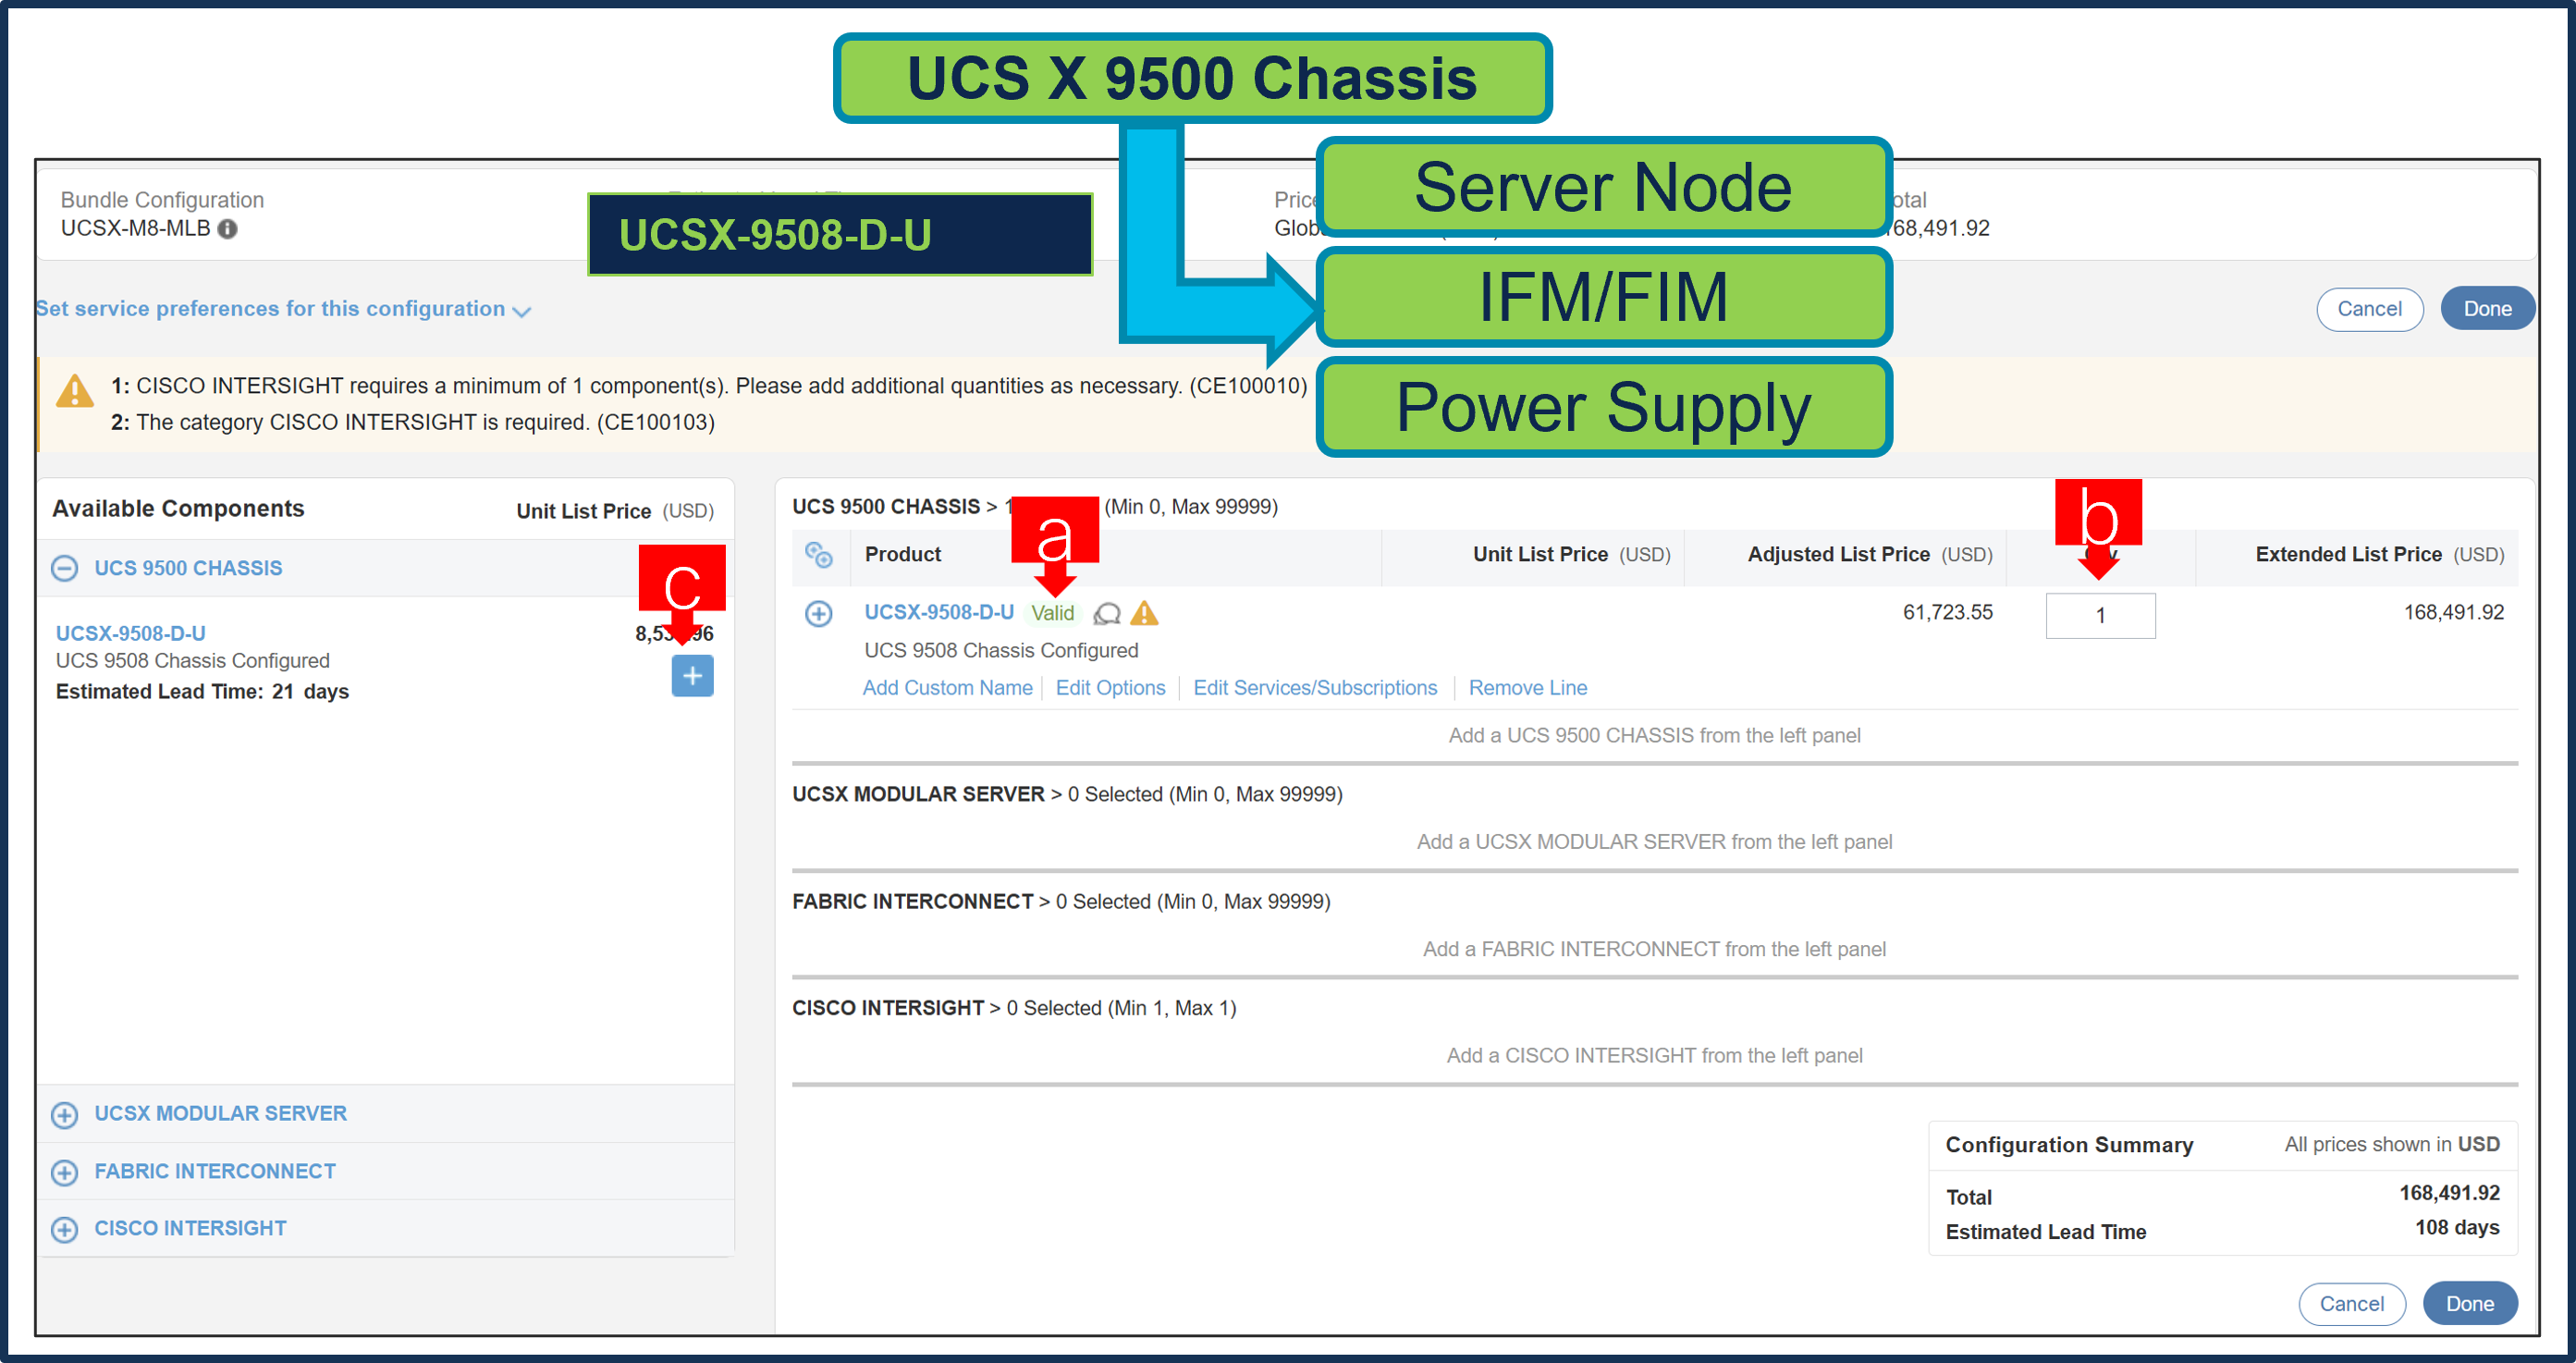
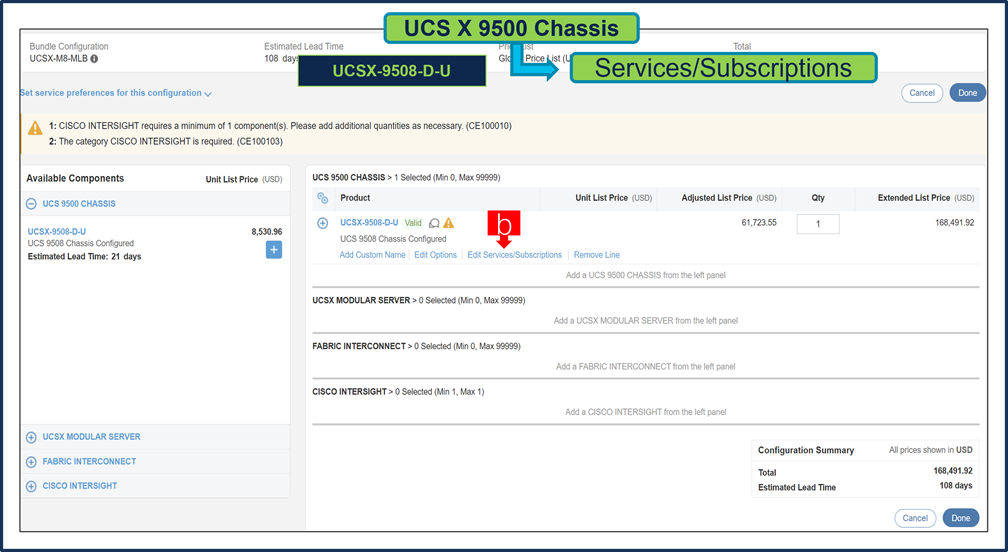
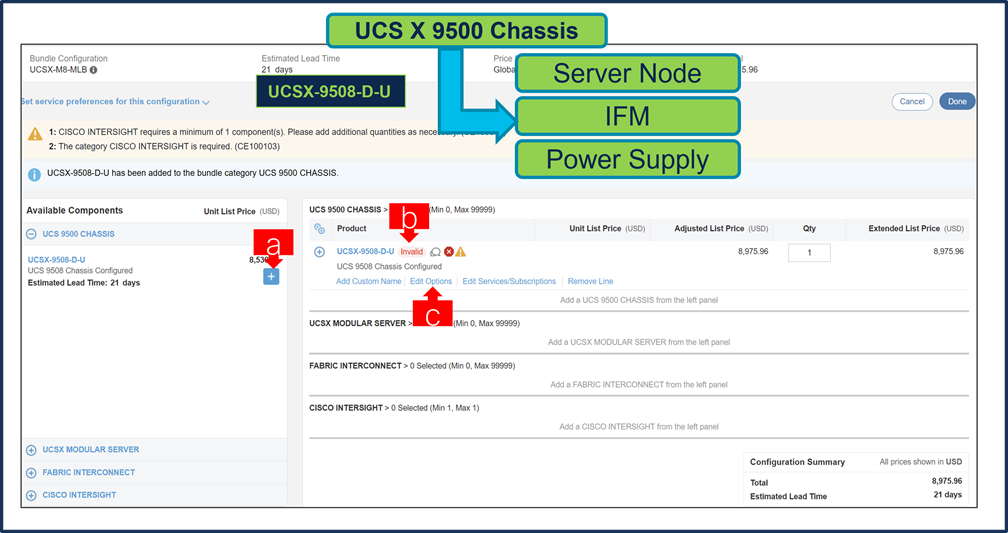
a. Select UCSX-9508-D-U ATO from under MLB by clicking the “PLUS”
b. Notice the UCSX-9508-D-U ATO Status is invalid as further configuration needed.
c. Click on “Edit Options” to enter the configurator.
Step 3.
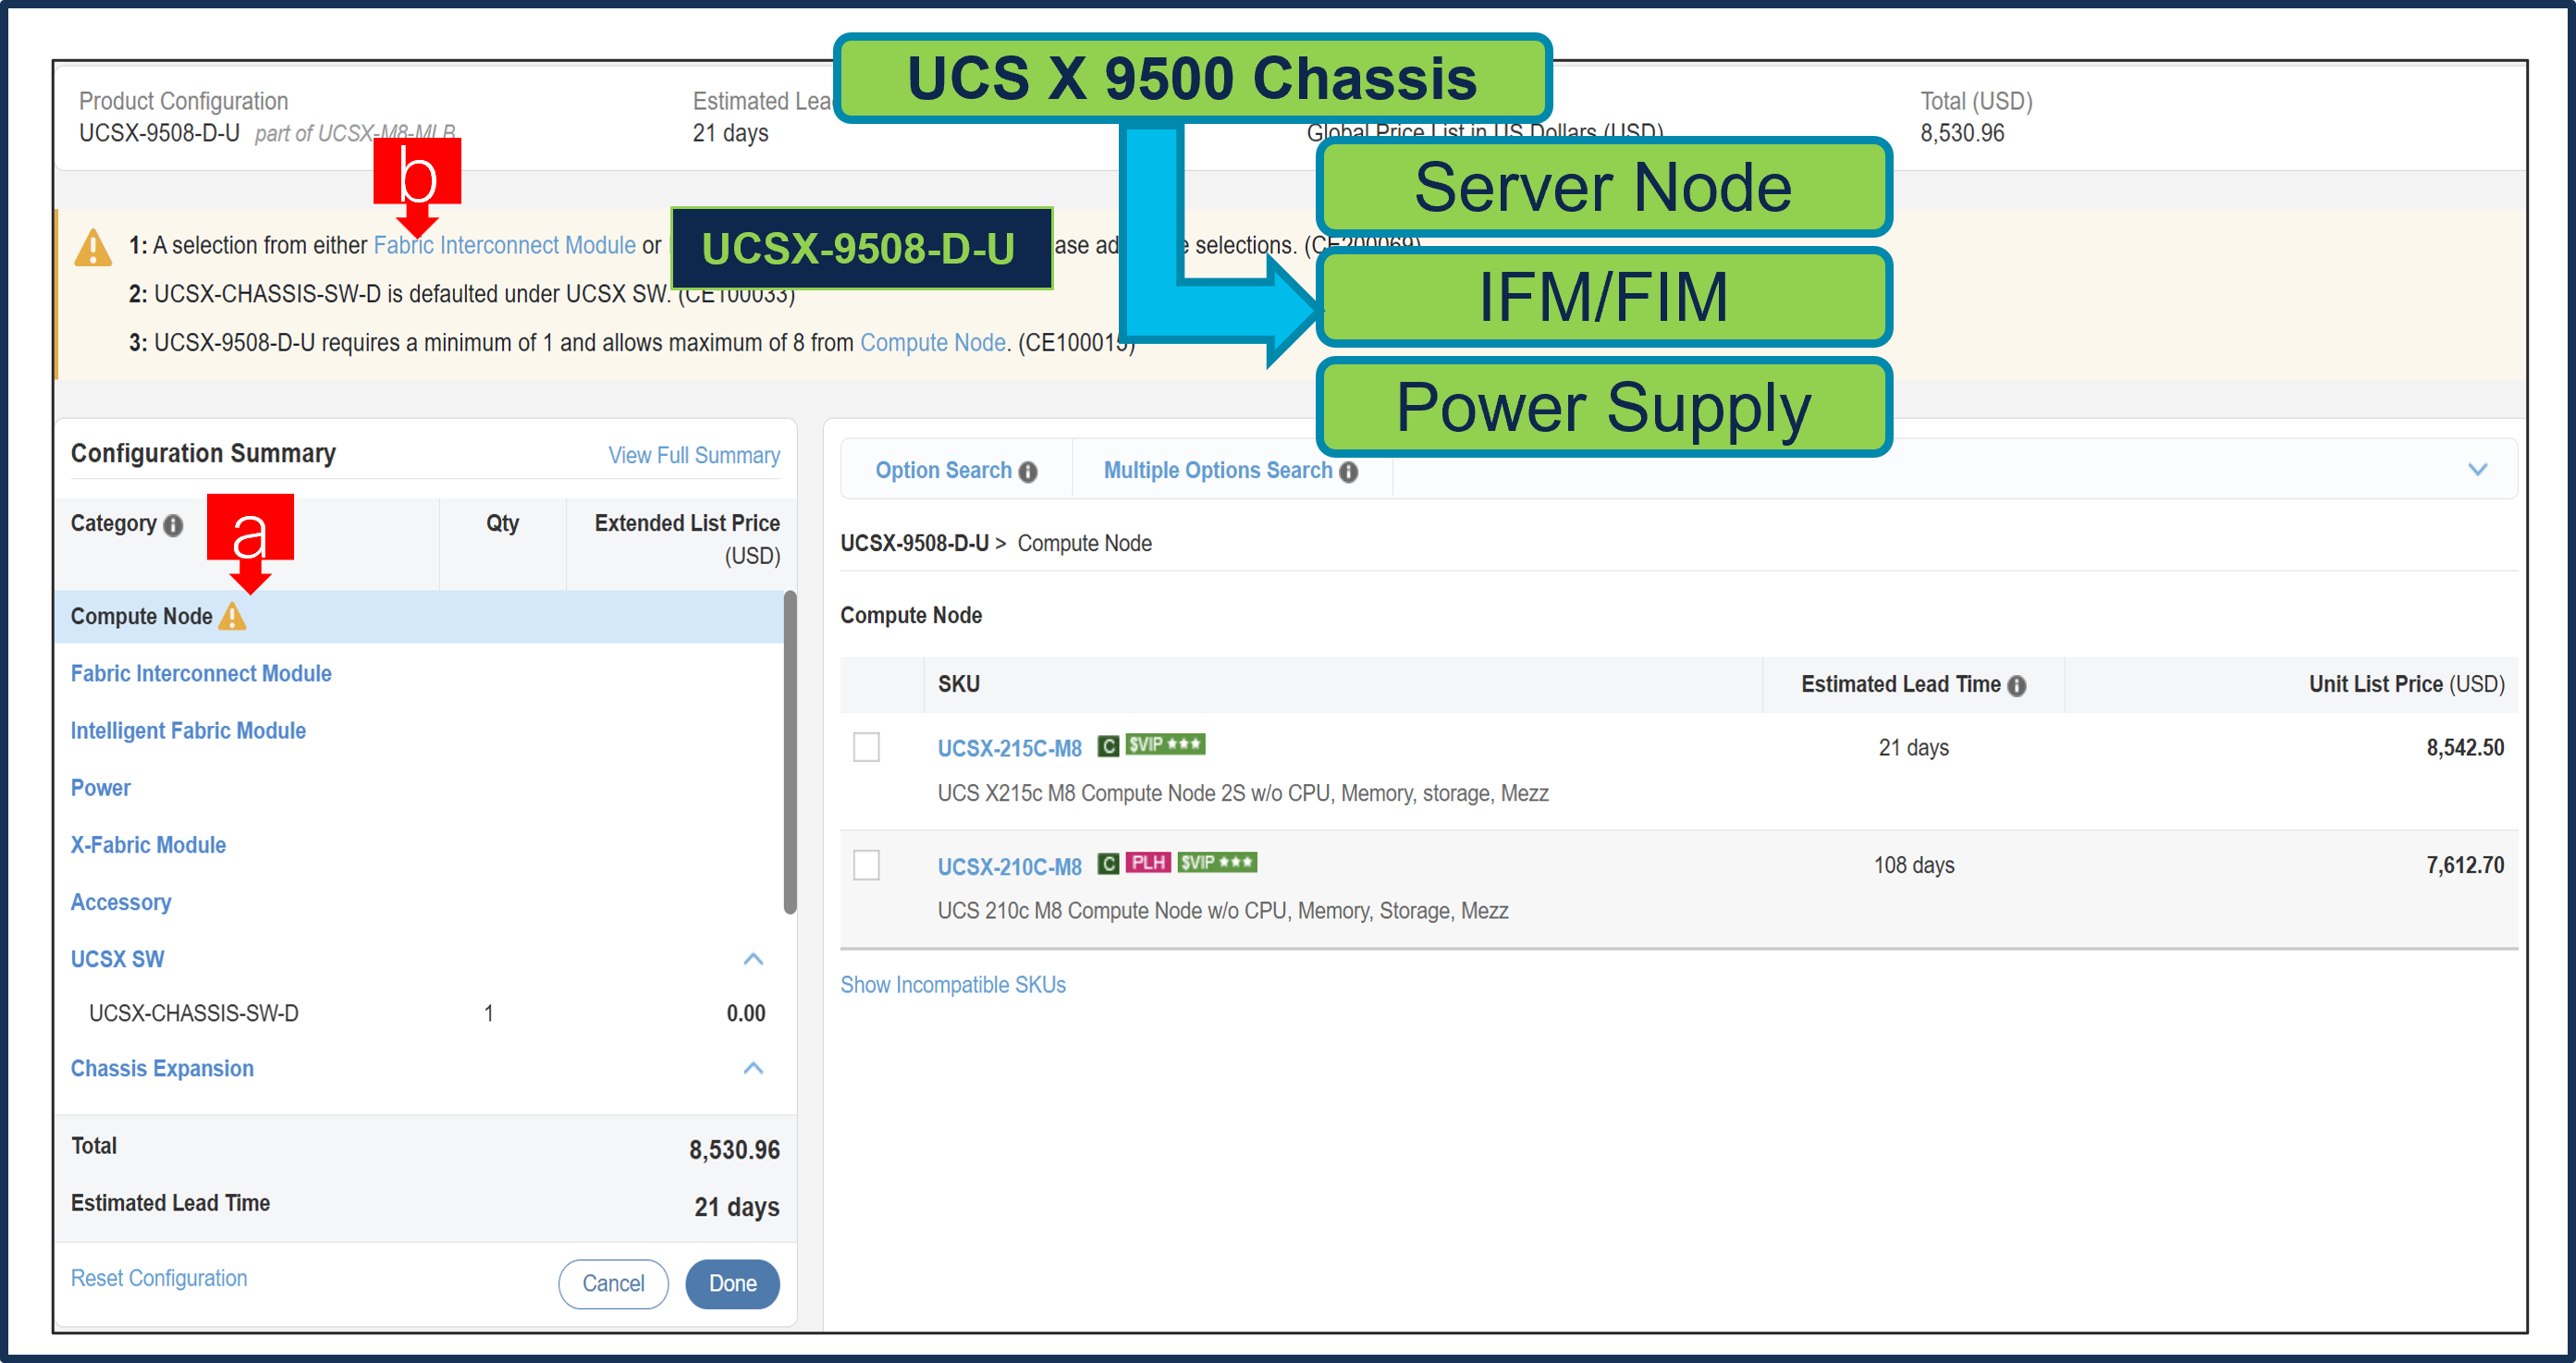
a. Configure UCSX-9508-D-U by selecting Compute Node, Fabric Interconnect Module or Intelligent Fabric Module, Power Supply and Power Cables from category window on the left.
b. Follow warning messages to configure the minimum required selections under Chassis.
Step 4.
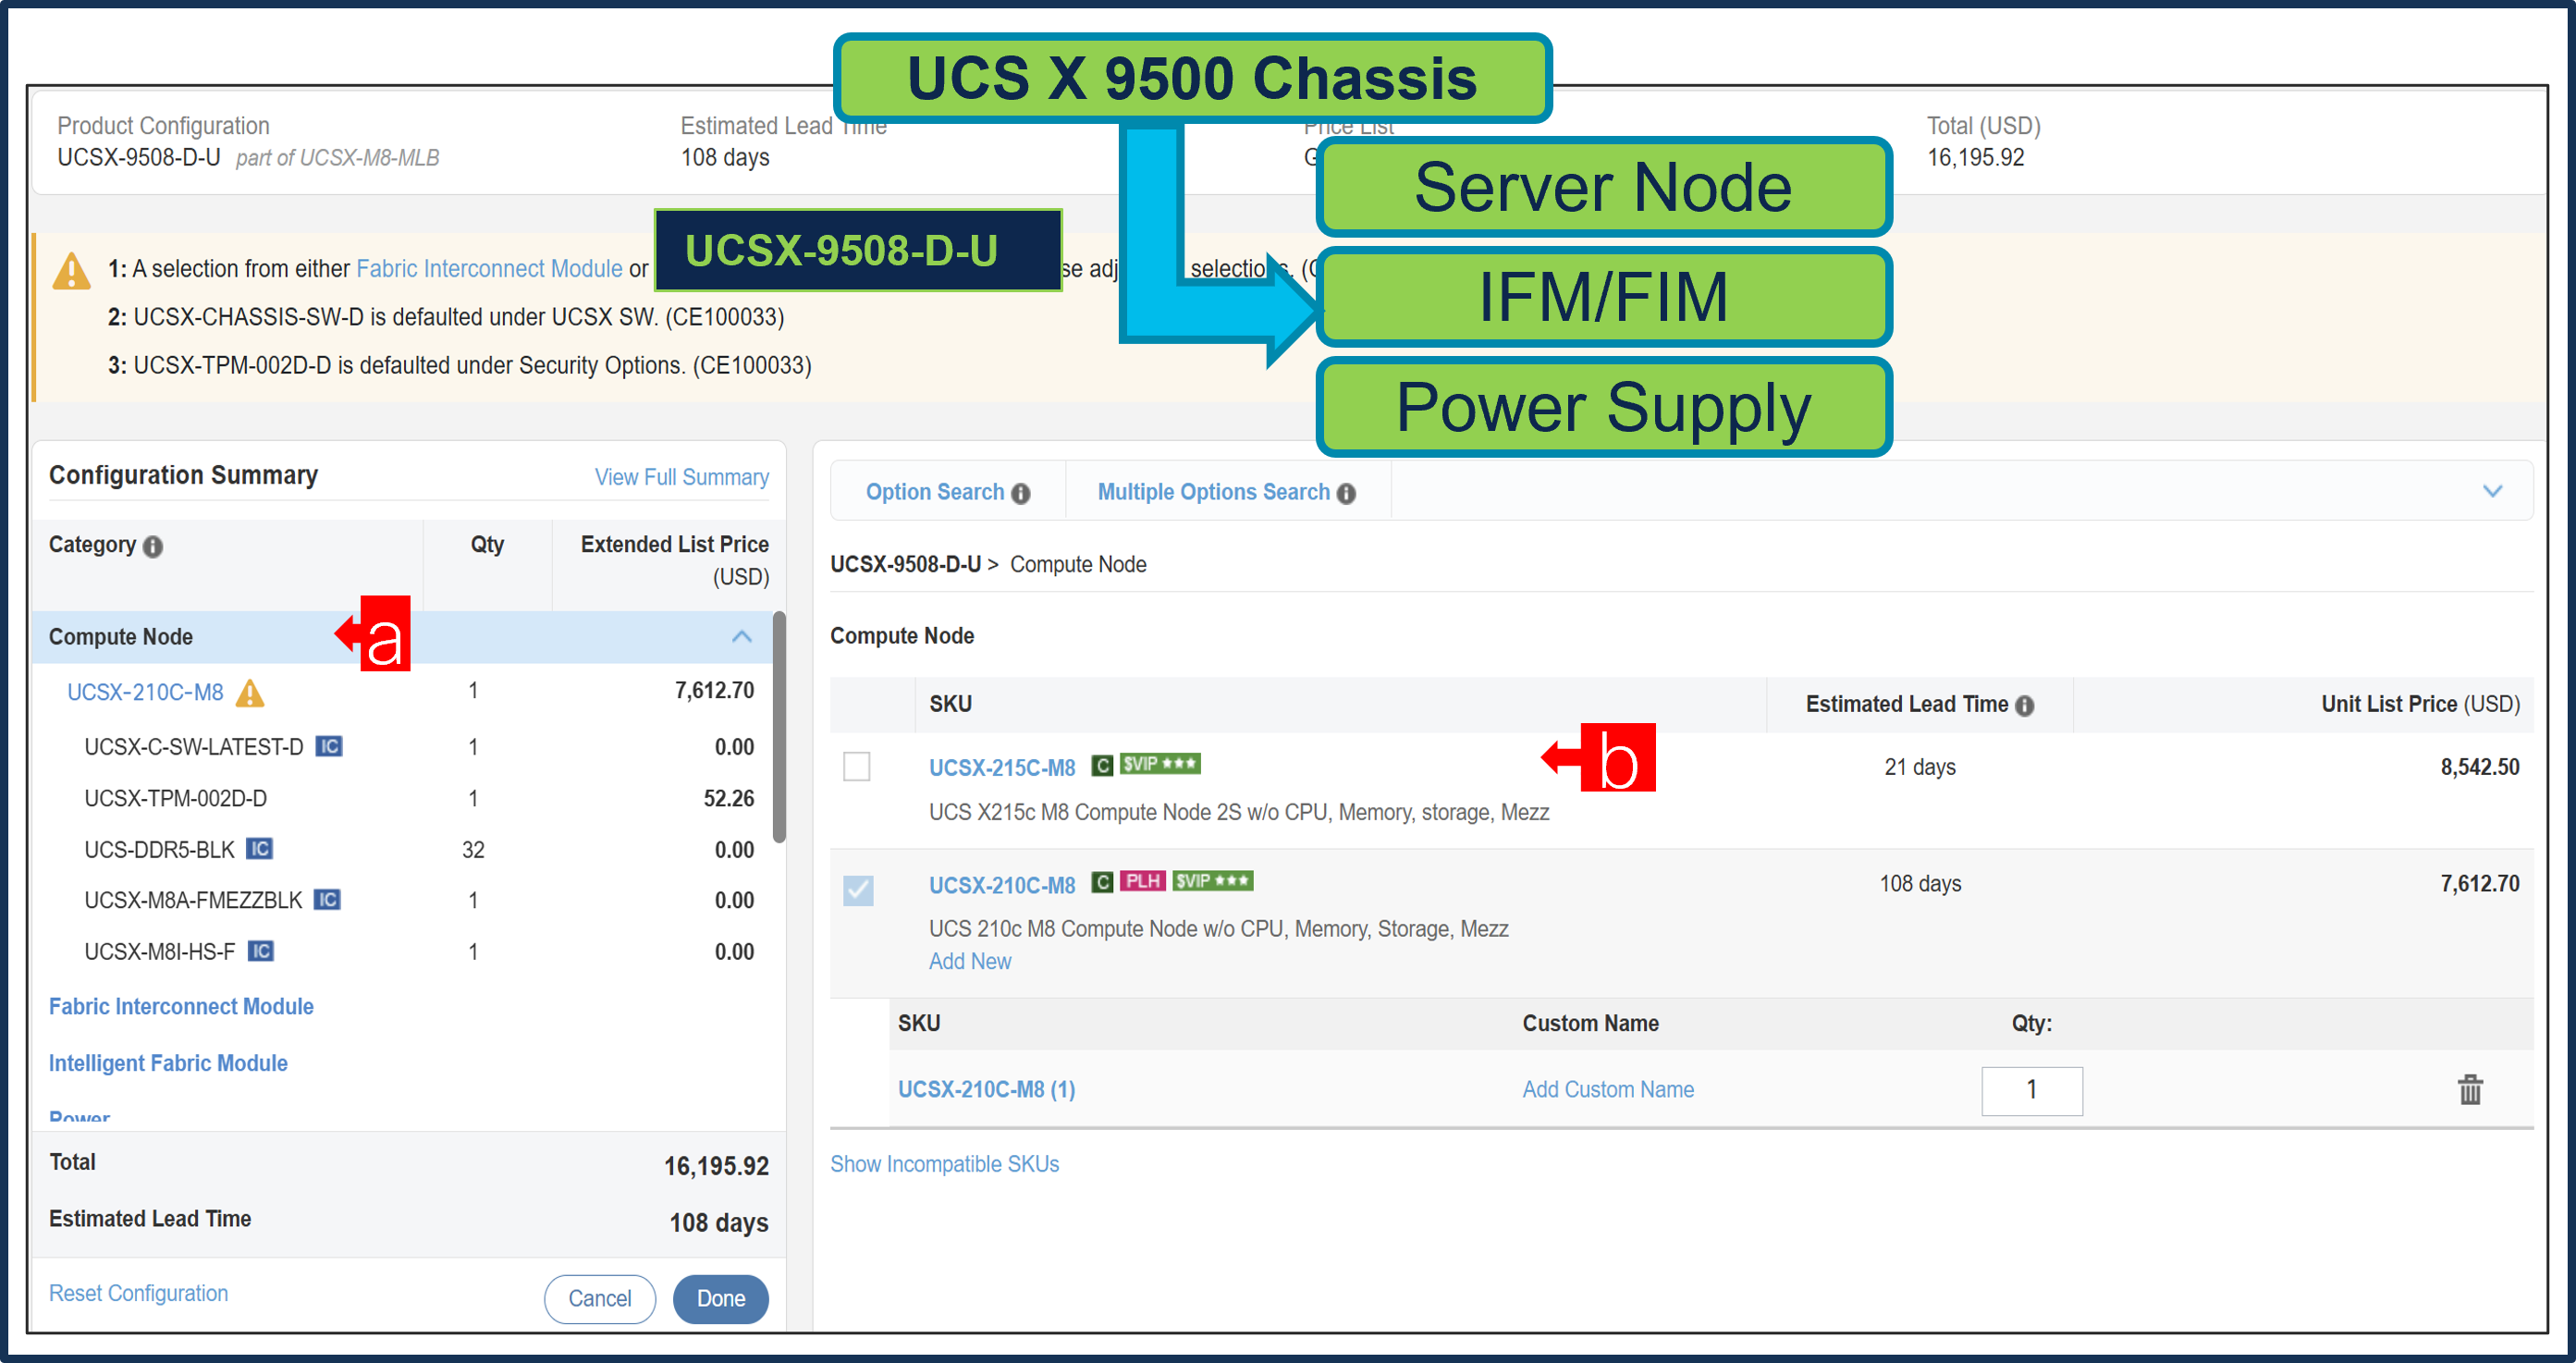
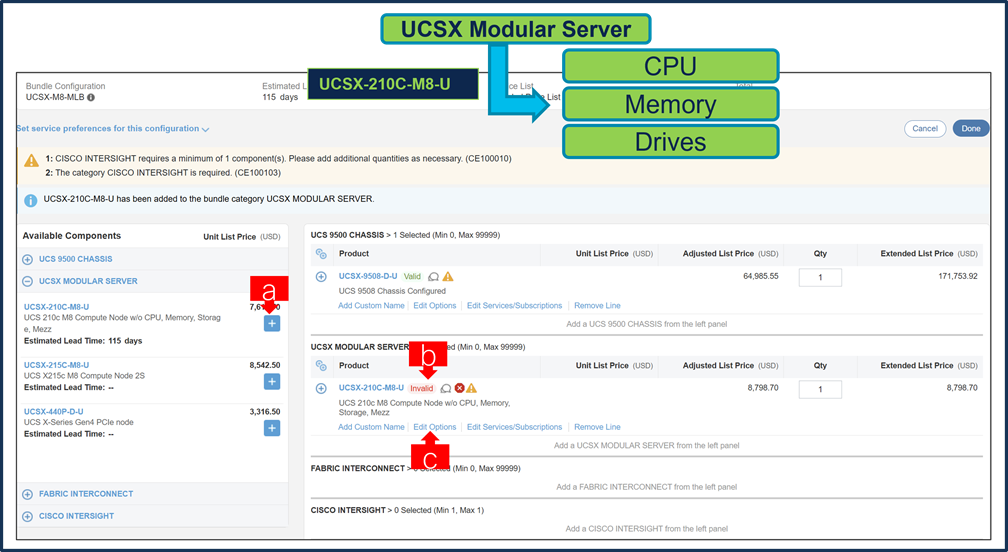
a. Compute Node is required selection and is further configurable.
b. User can select either Server: UCSX-215C-M8 or UCSX-210C-M8 or UCSX-410C-M8 or all three together in same configuration.
Step 5.
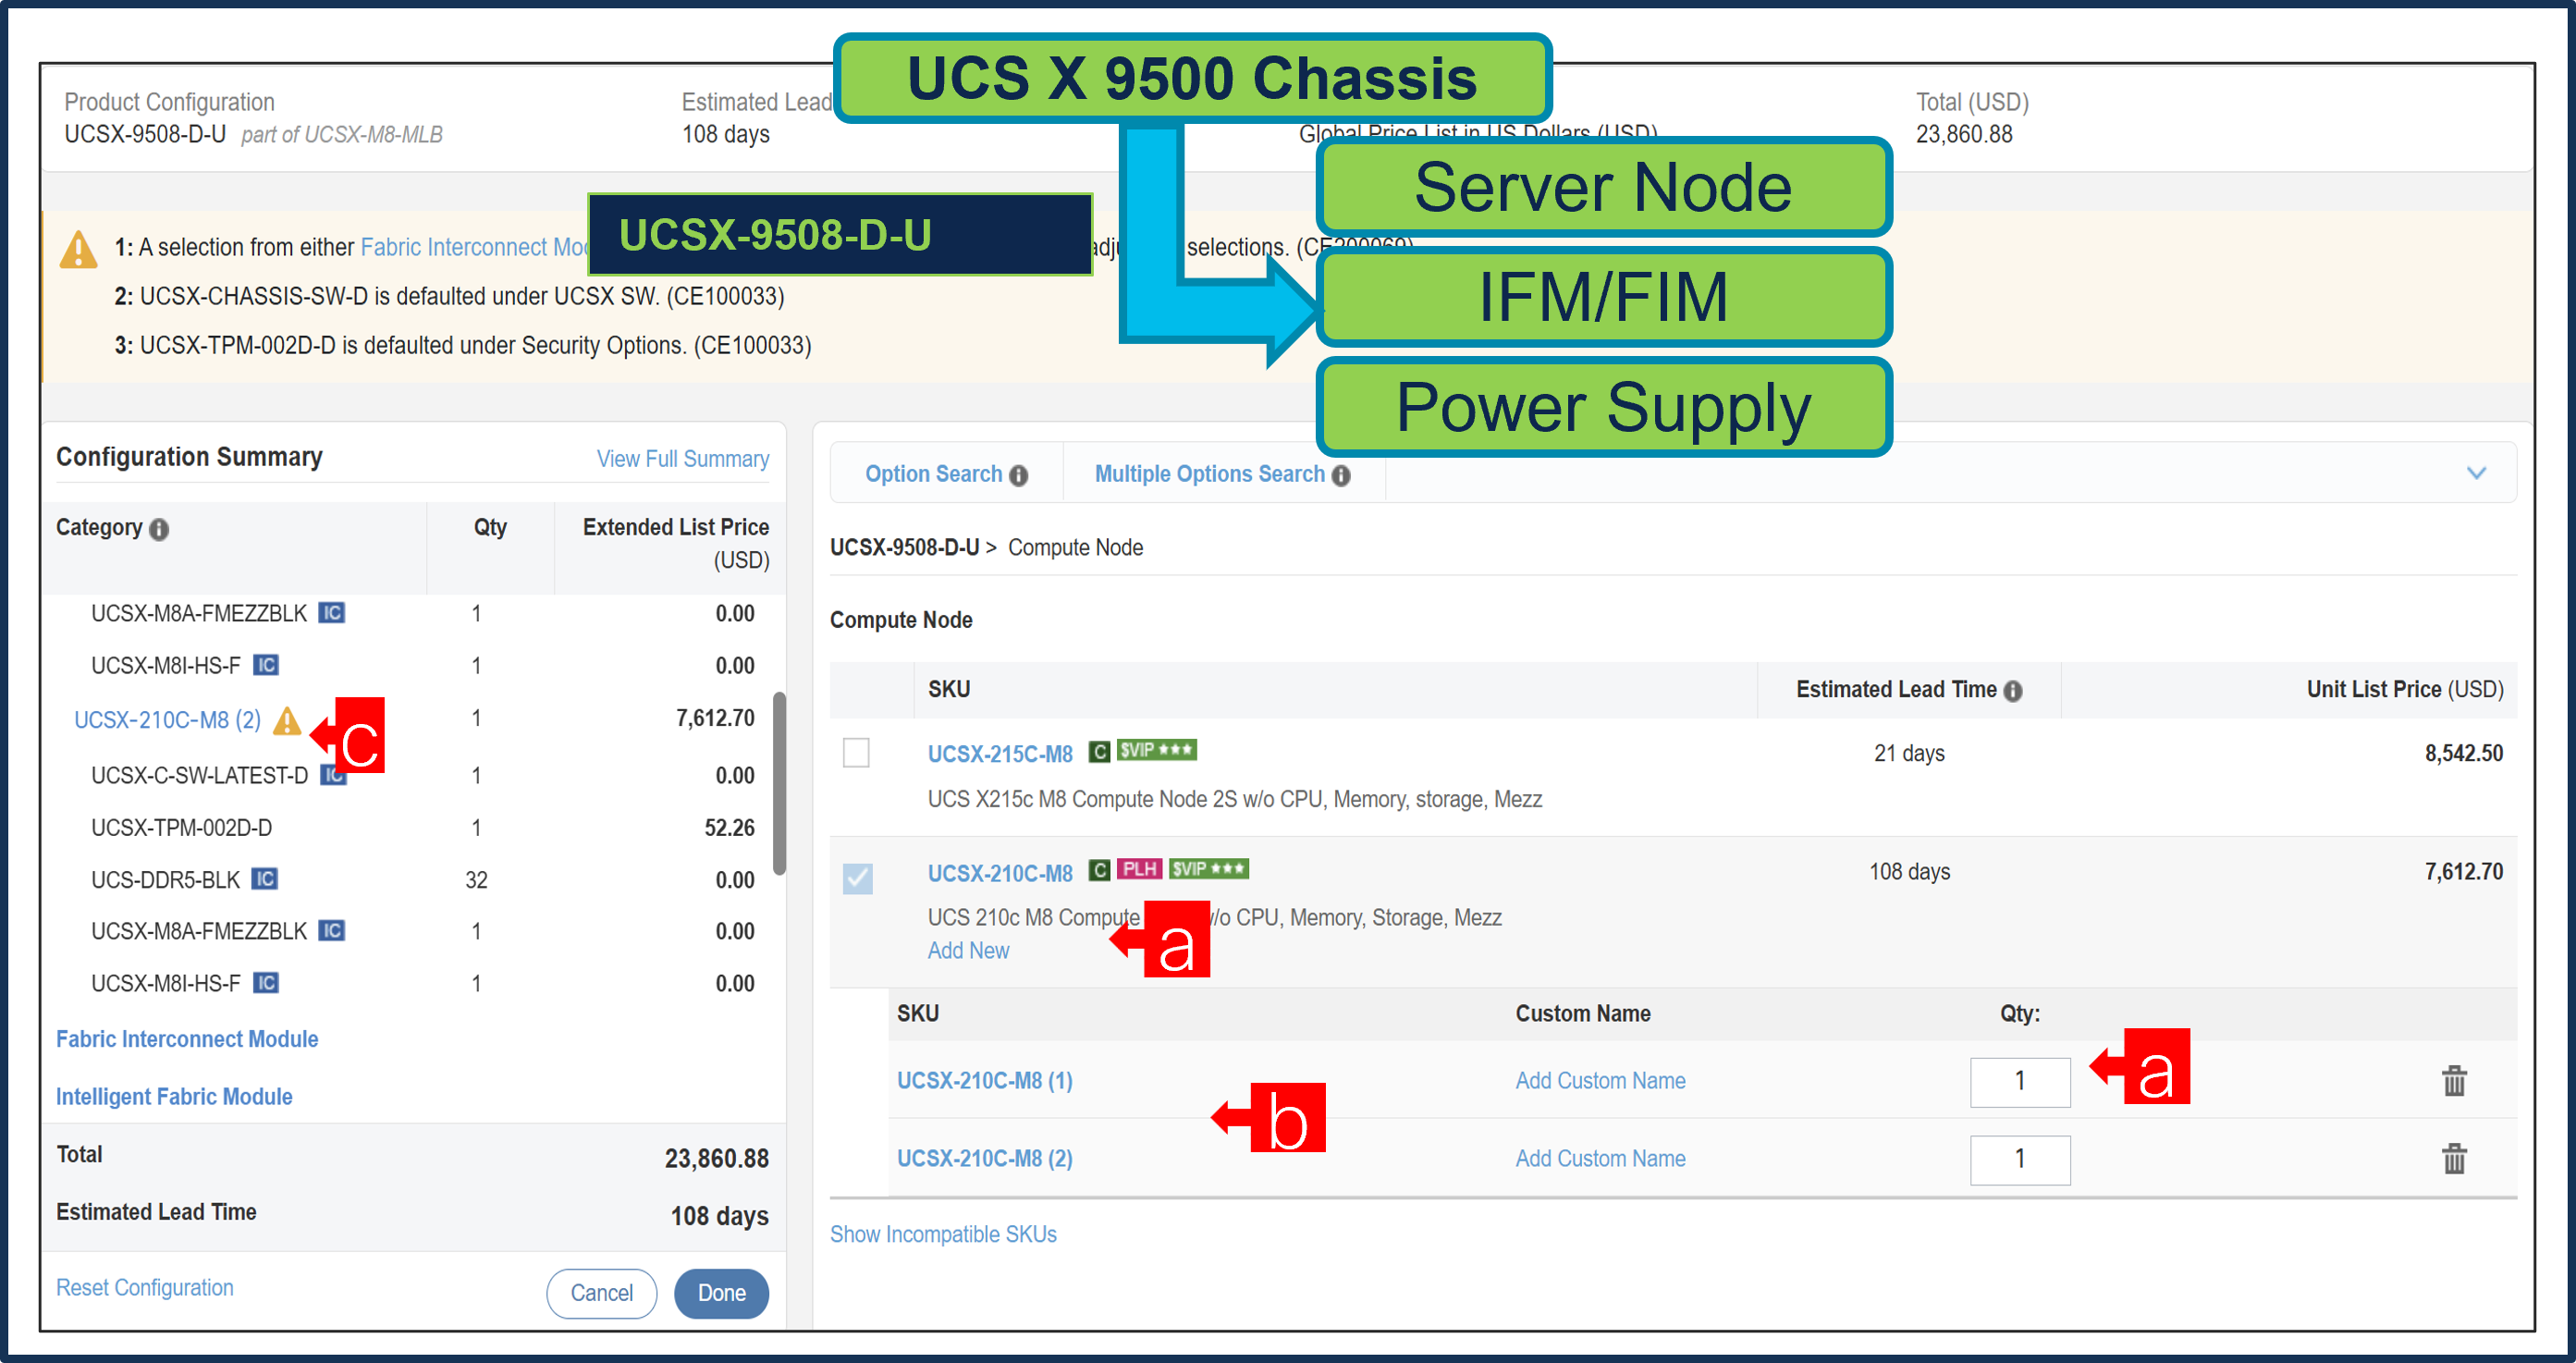
a. Server: UCSX-210C-M8 can be selected in multiple QTY by changing the QTY in the box or you can select same server and configure differently within same chassis by clicking in ADD NEW button.
b. Here in this example, we have 2 instances of server selected with 1 QTY each.
c. Click on Server PID in the left to configure the particular instance.
Step 6.
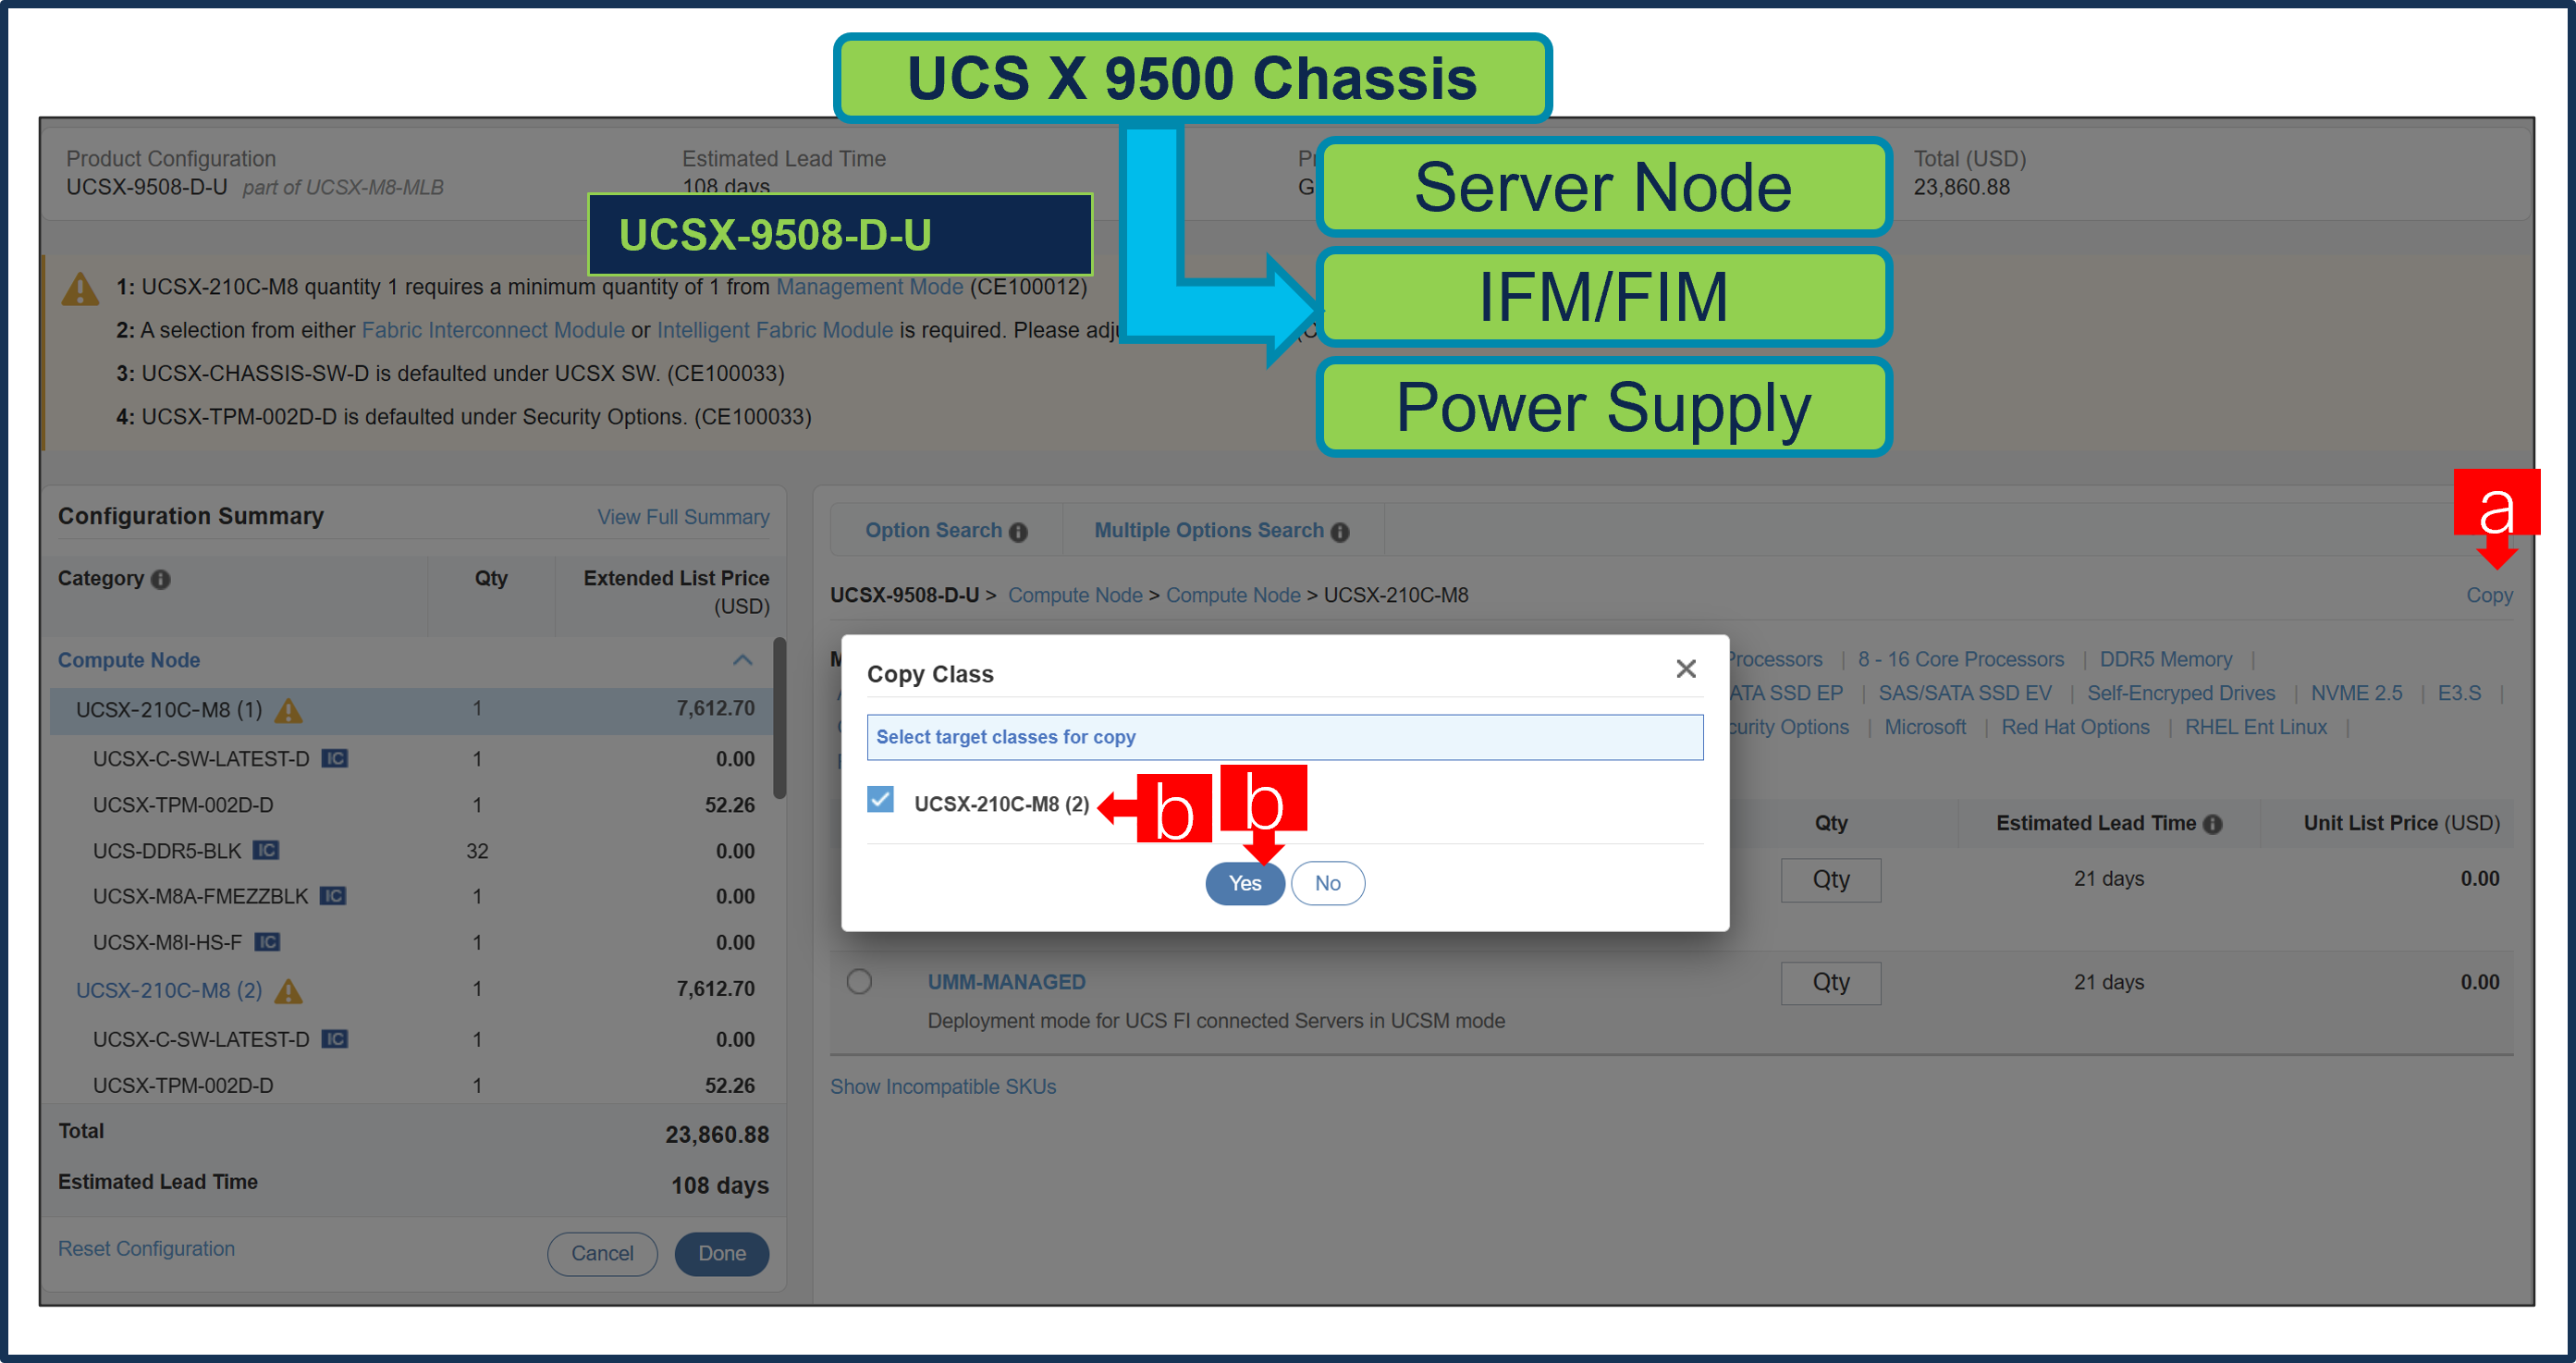
a. Configuration of one server Instance can be copied to another instance. Click on Copy Button on the extreme right as shown here.
b. Select the particular instance and click Yes.
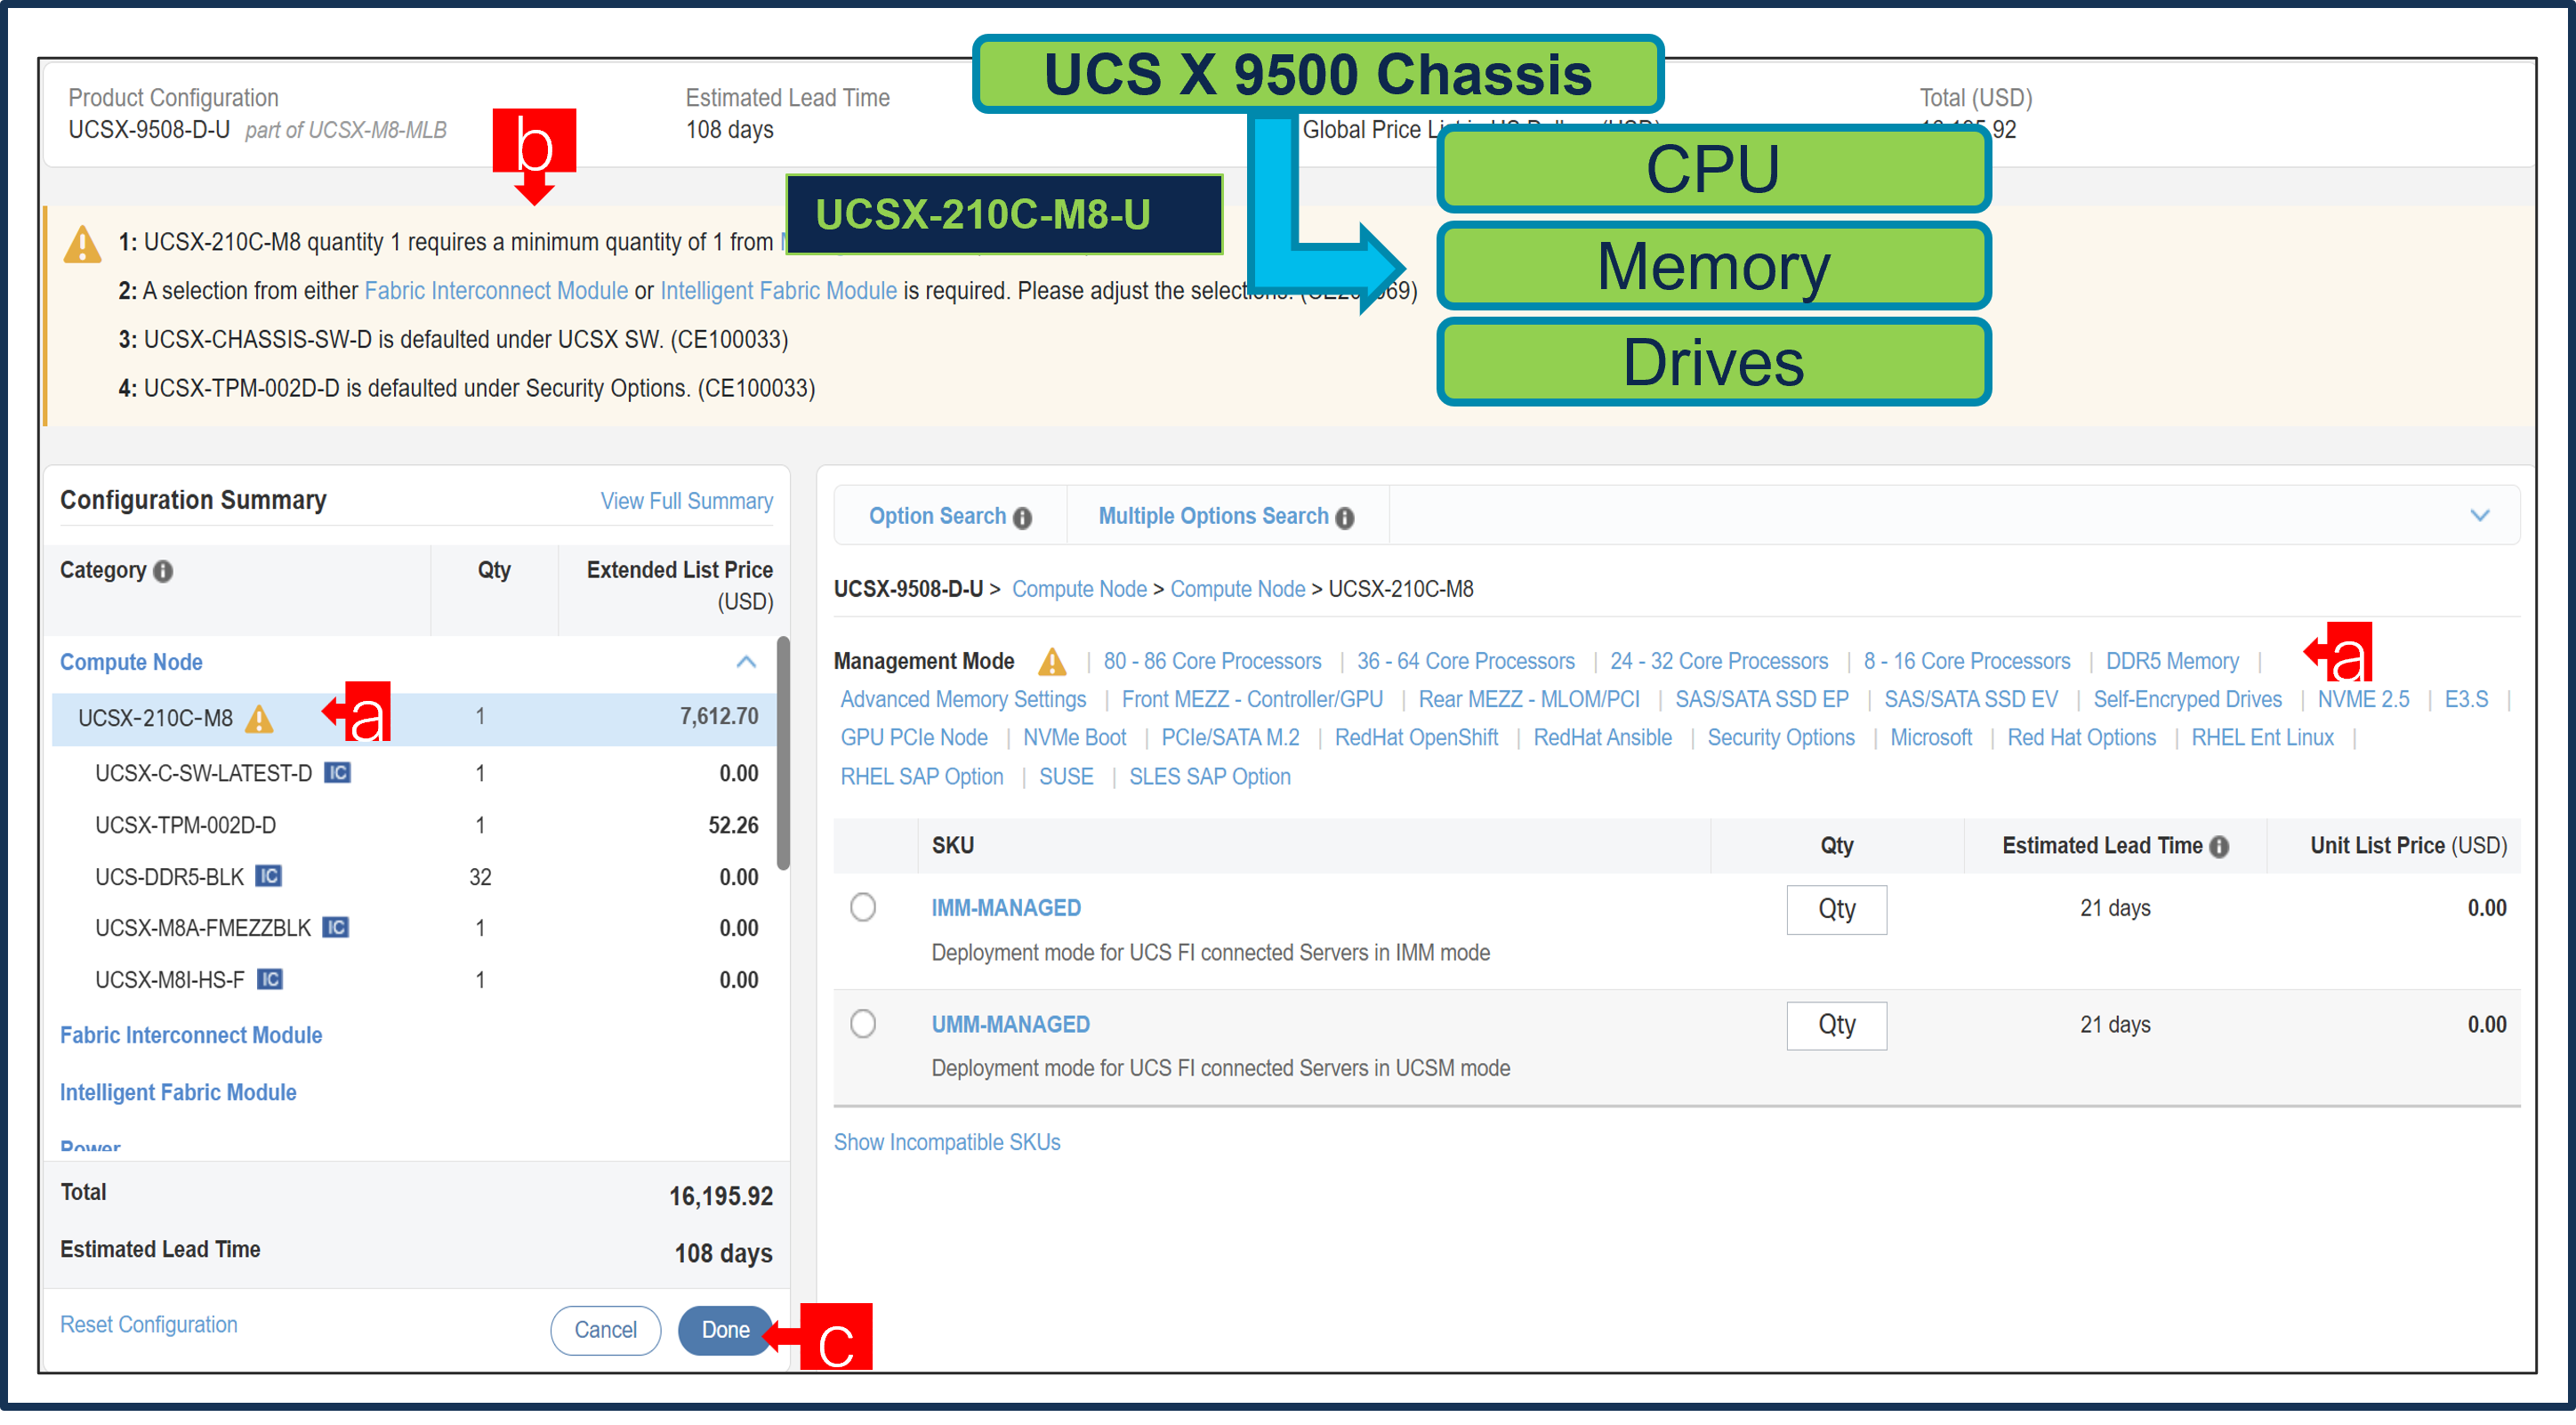
Step 7.
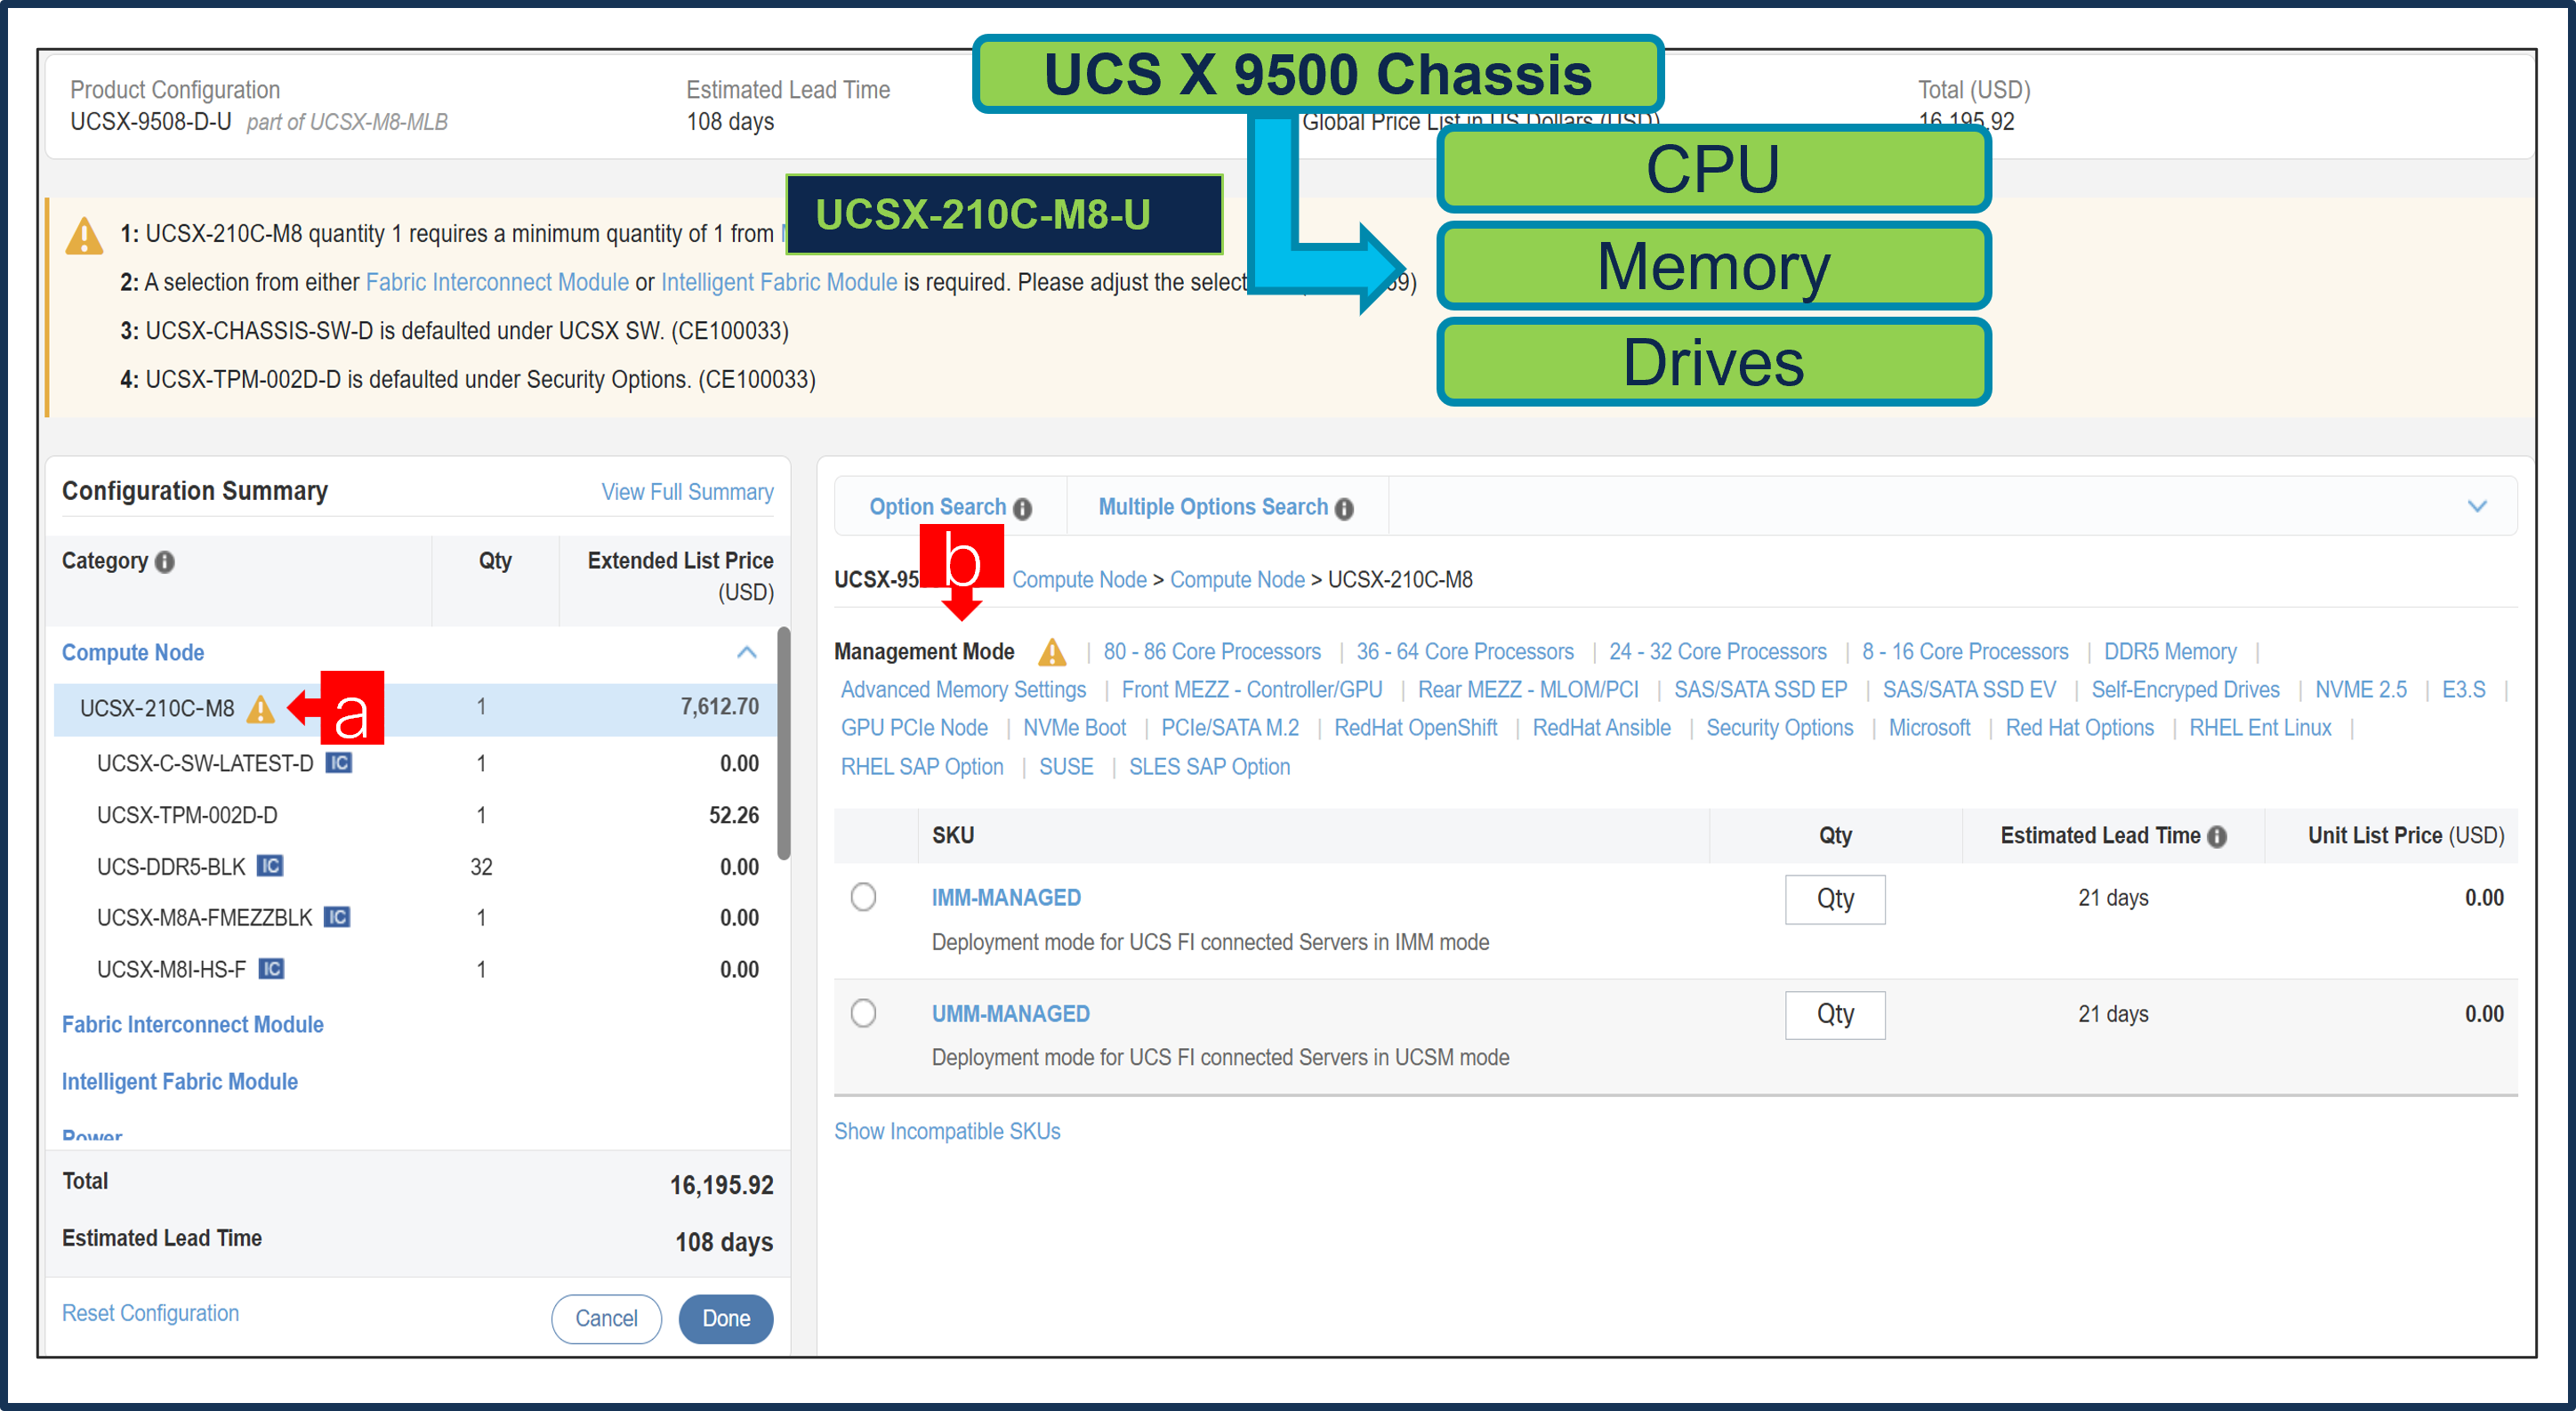
a. Click on Server PID in the left to configure it.
b. User need to select Management Mode option based on how they plan to deploy the Server.
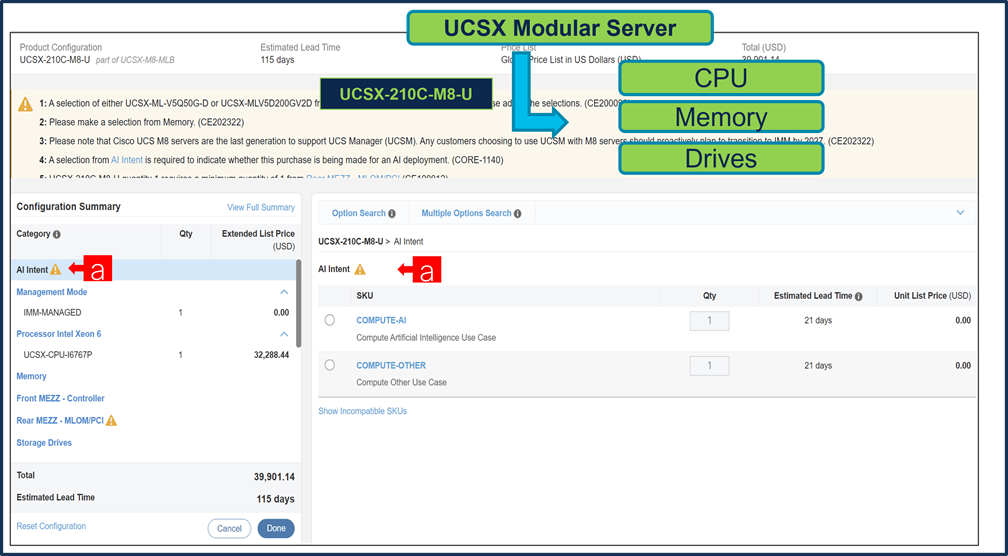
Step 8.
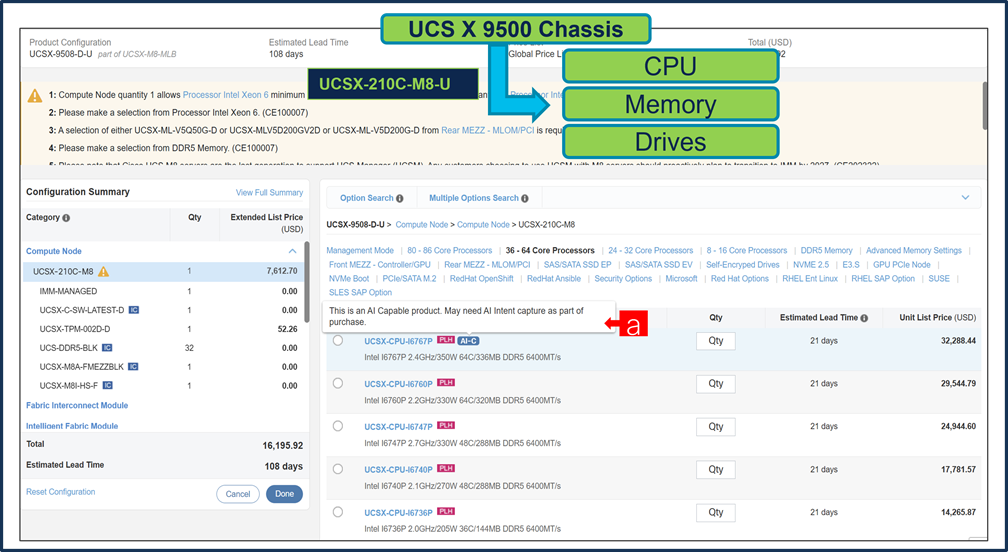
a. If any AI Capable PID is selected, then User need to make selection from AI Intent option class.
Step 9.
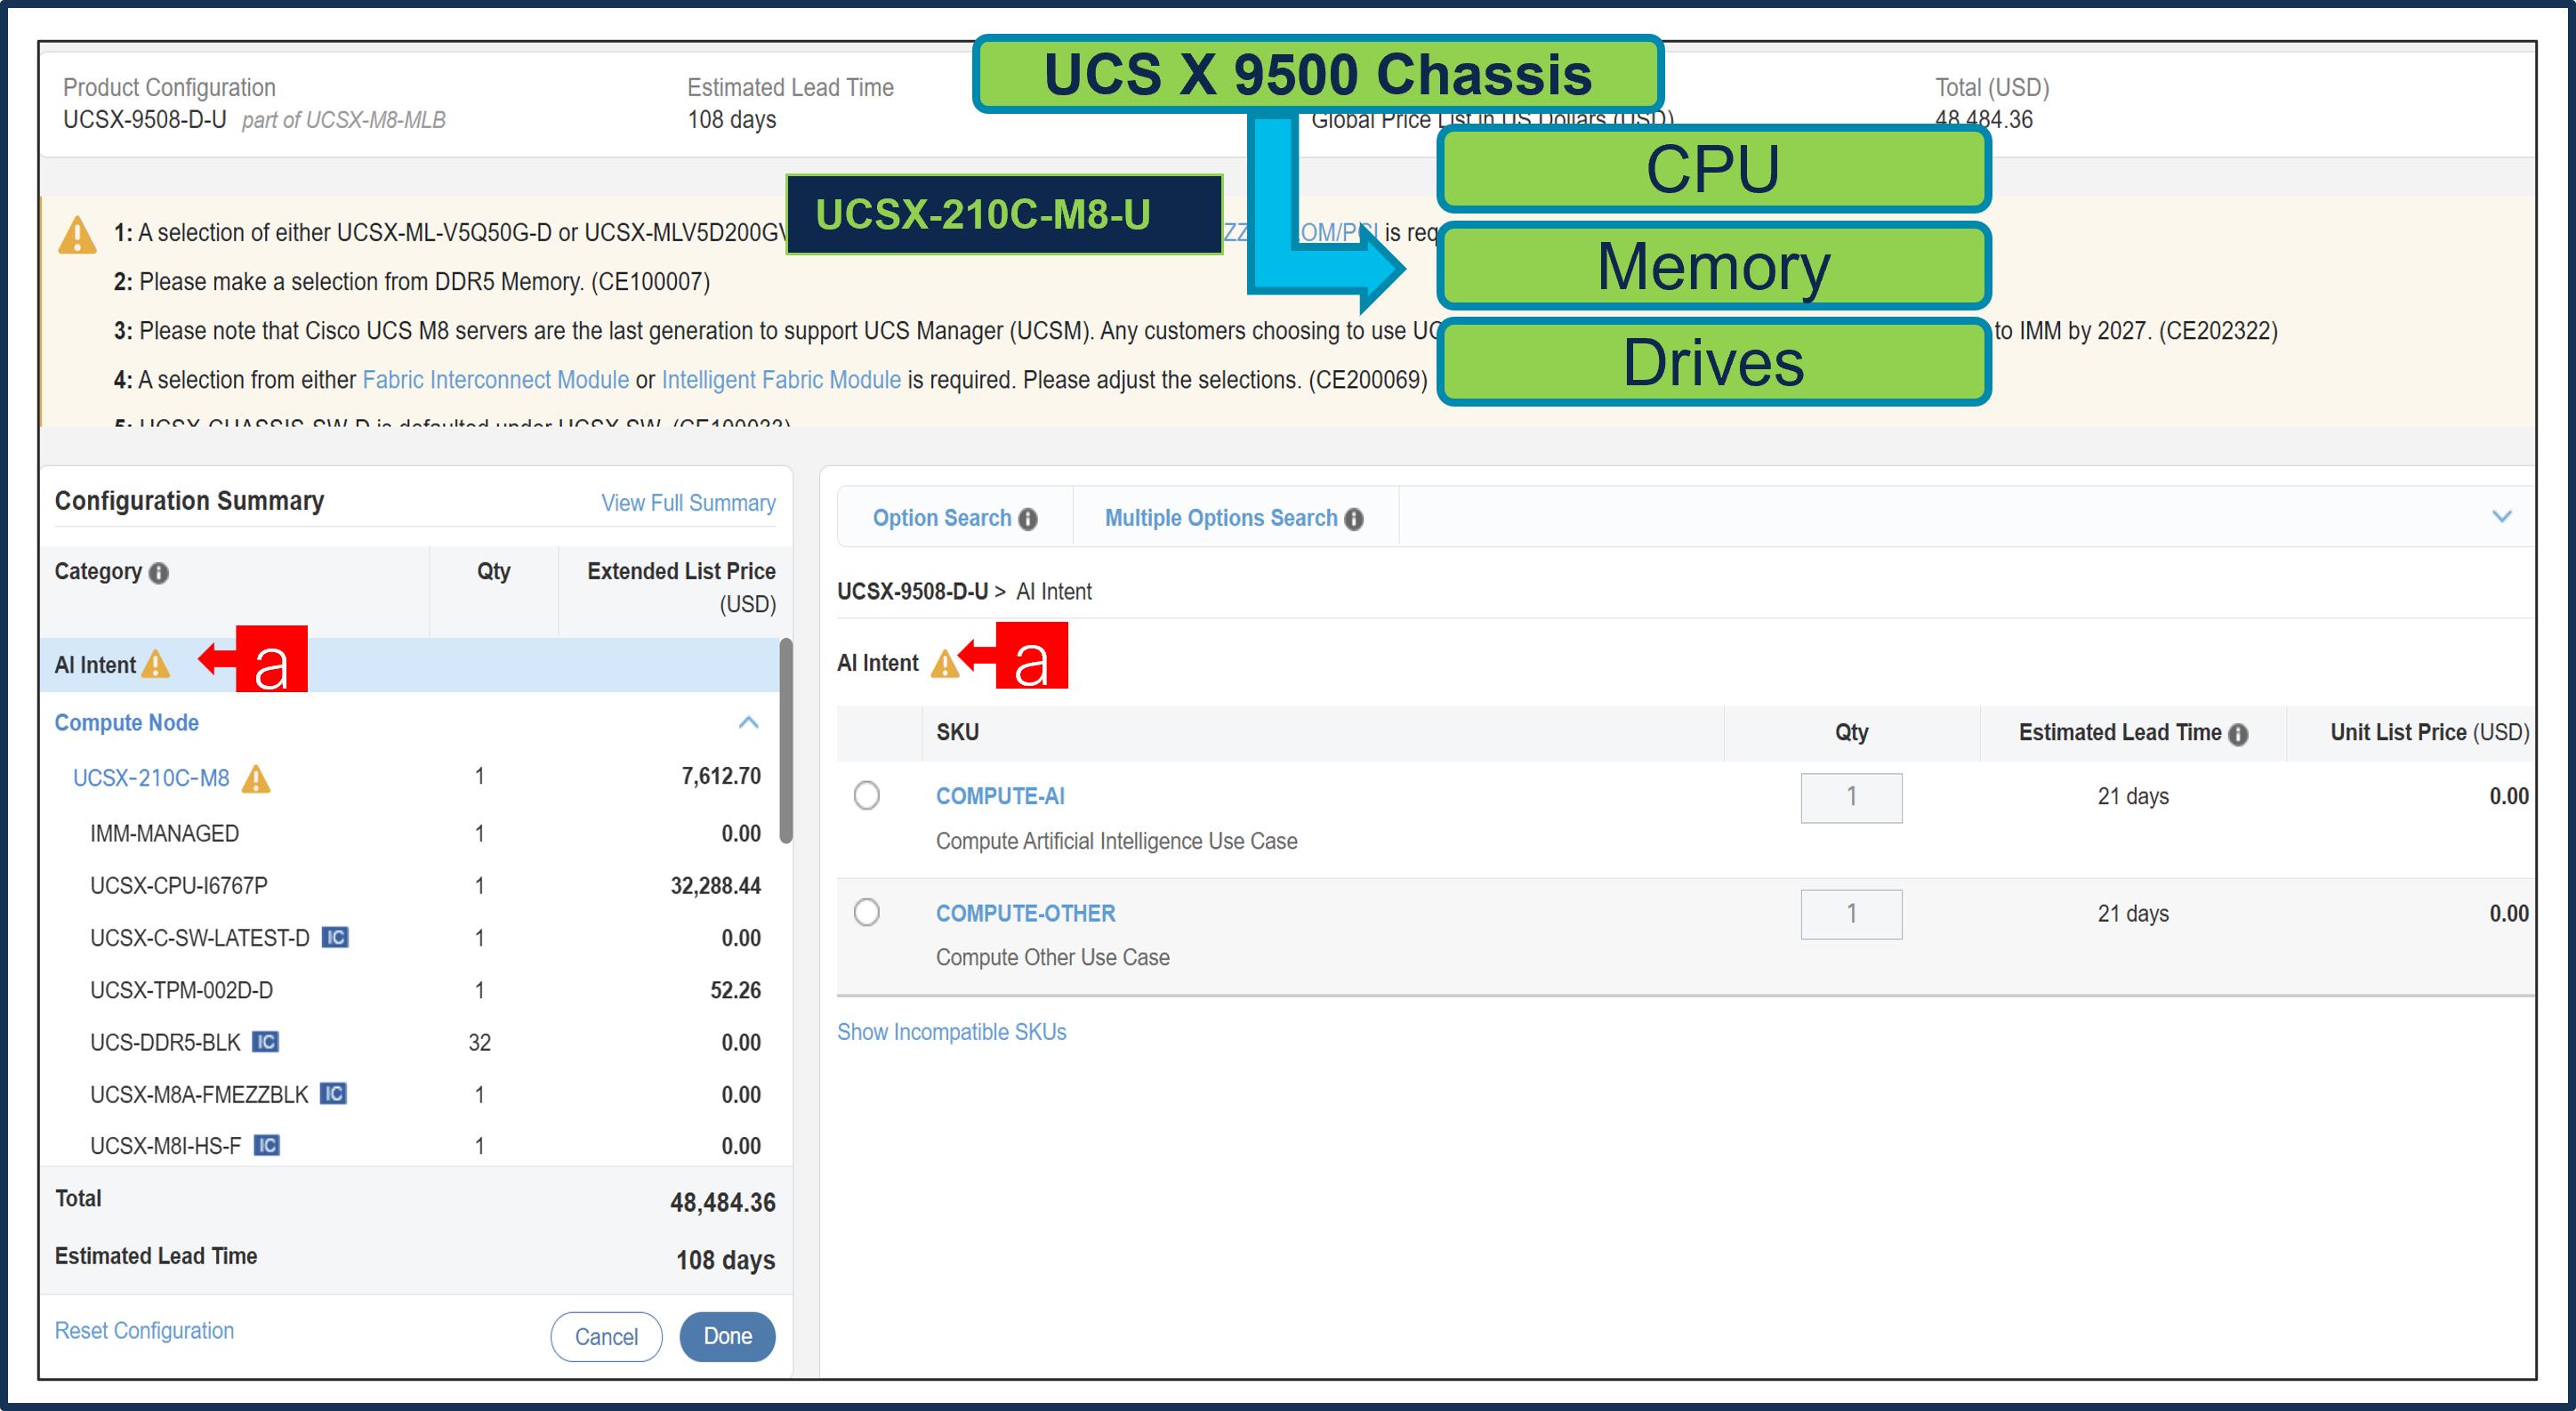
a. By making the right selection it provides information to Cisco that if Server is being intended to use AI features or not.
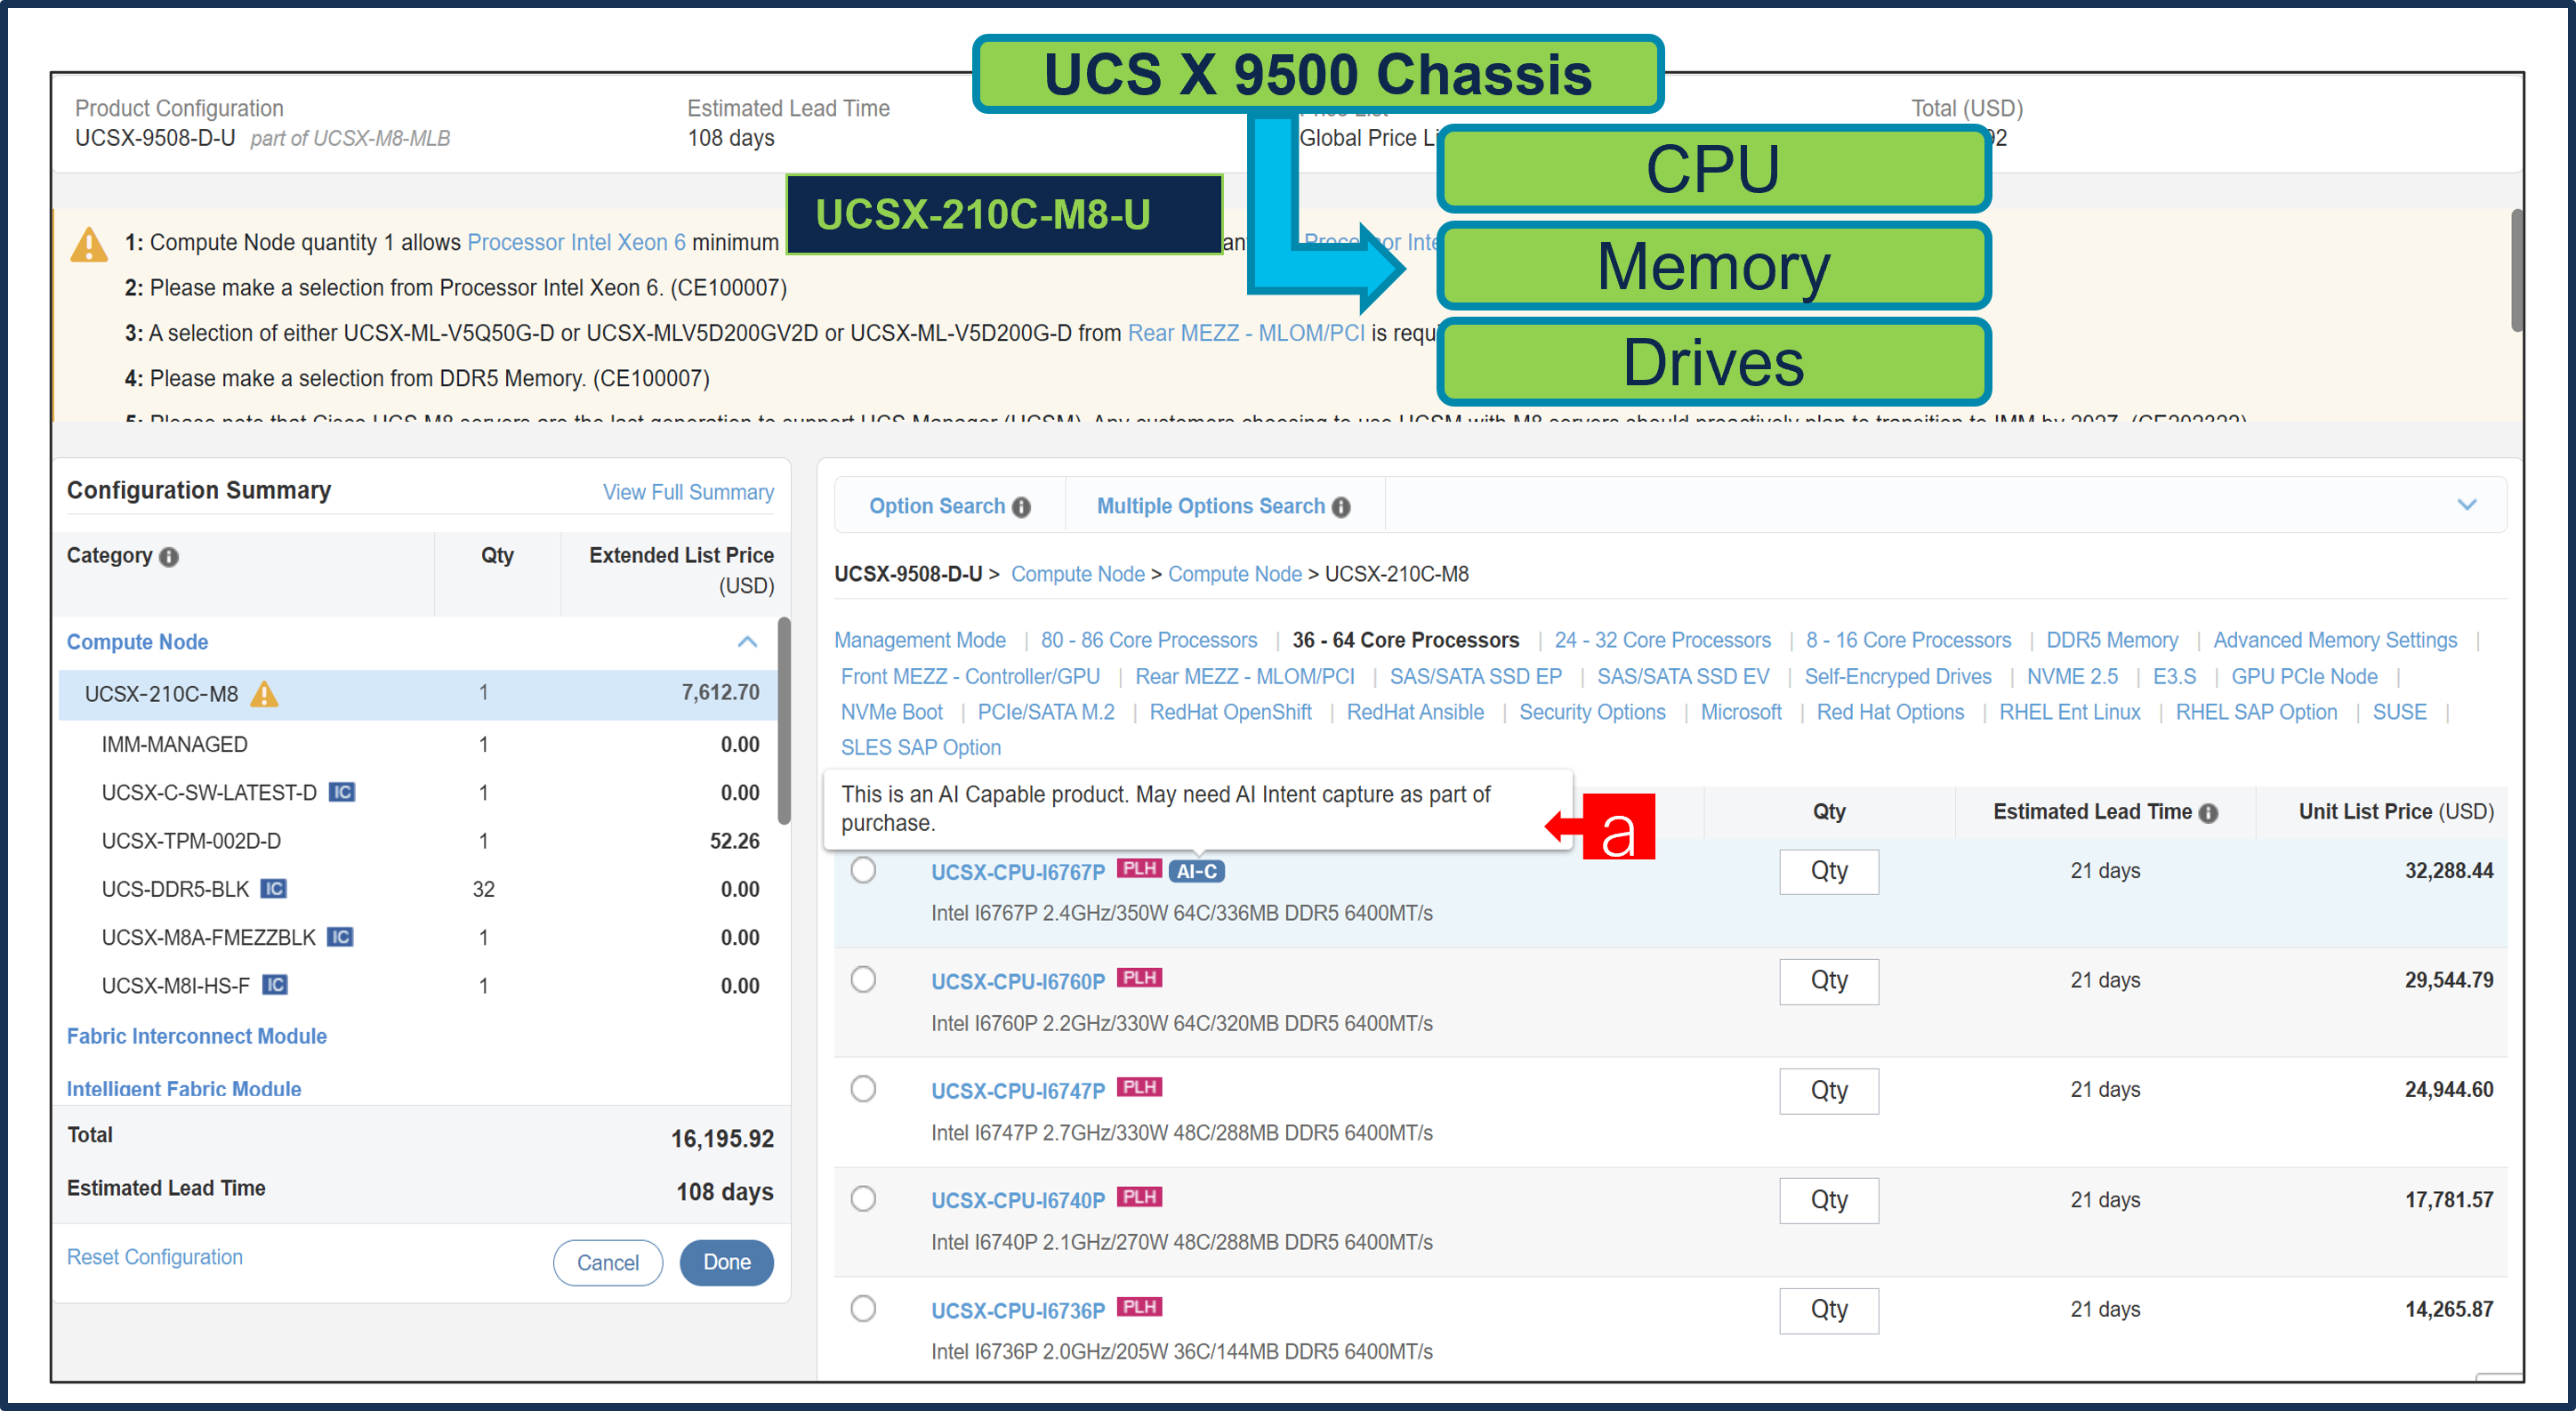
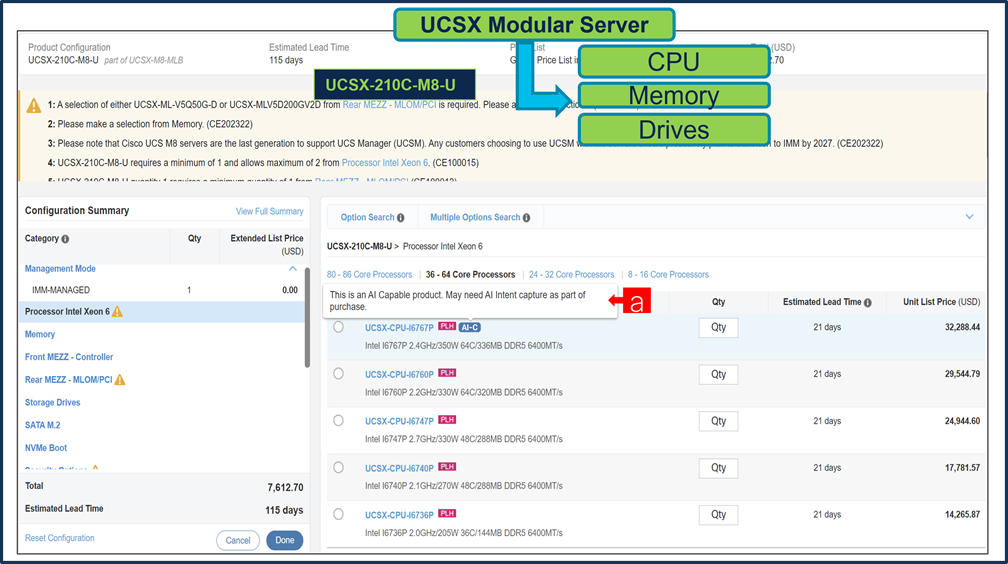
Step 10.
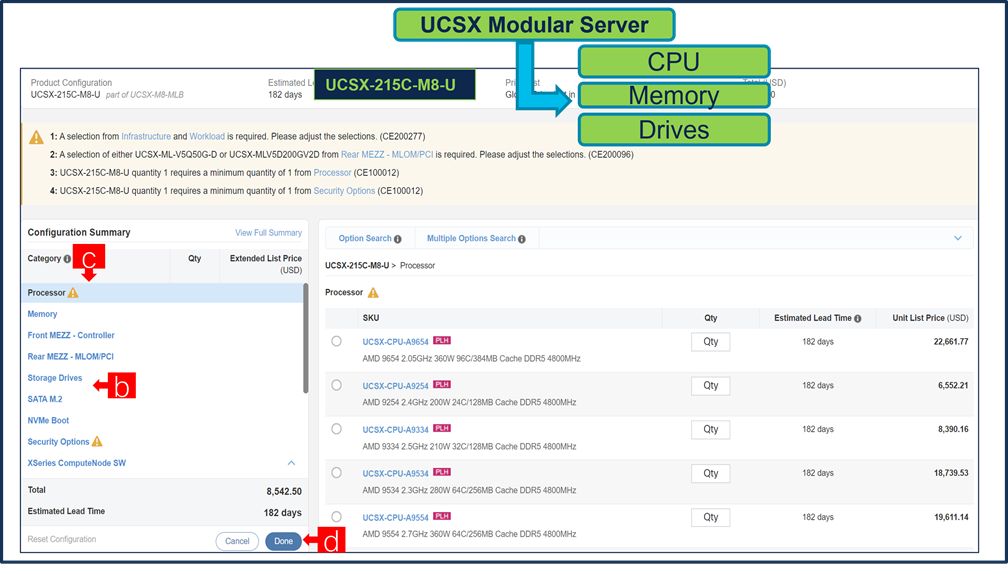
a. Configure UCSX-210C-M8 by selecting Processor, Memory, Drives and other peripheral devices and PIDs are listed in the window on the right.
b. Follow warning messages to configure the minimum required selections under Server.
c. Click on “Done” when completed.
Step 11.
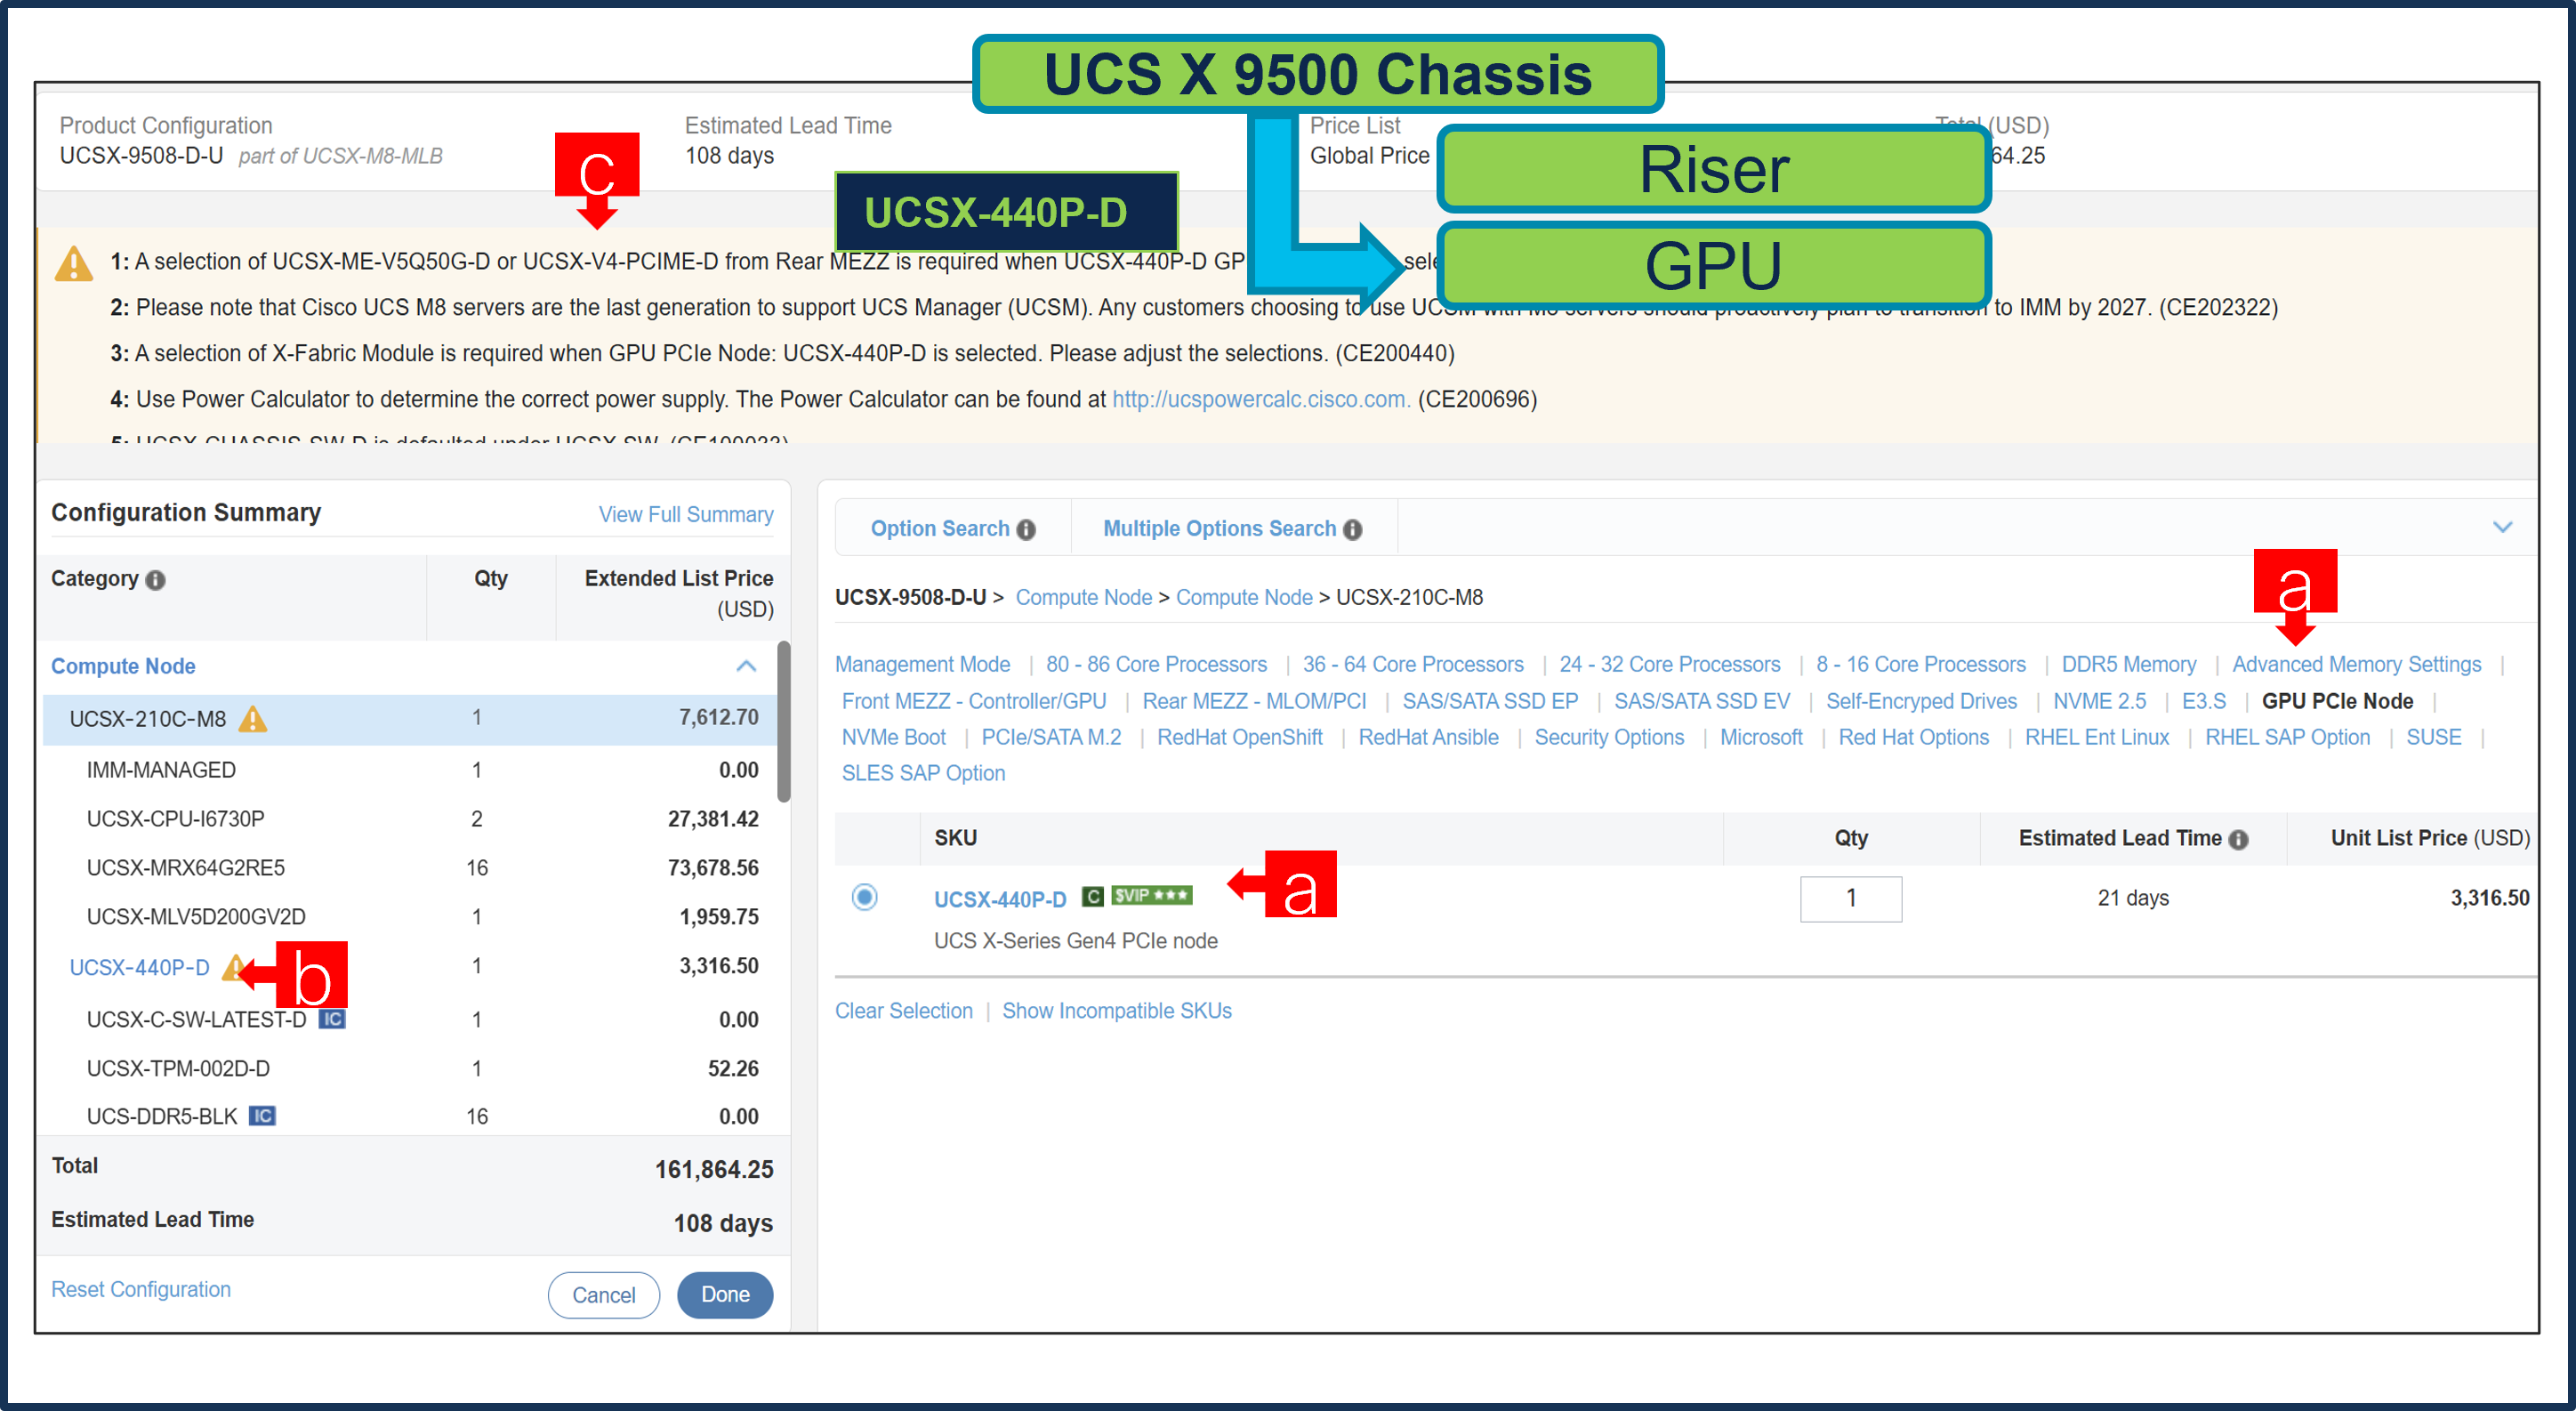
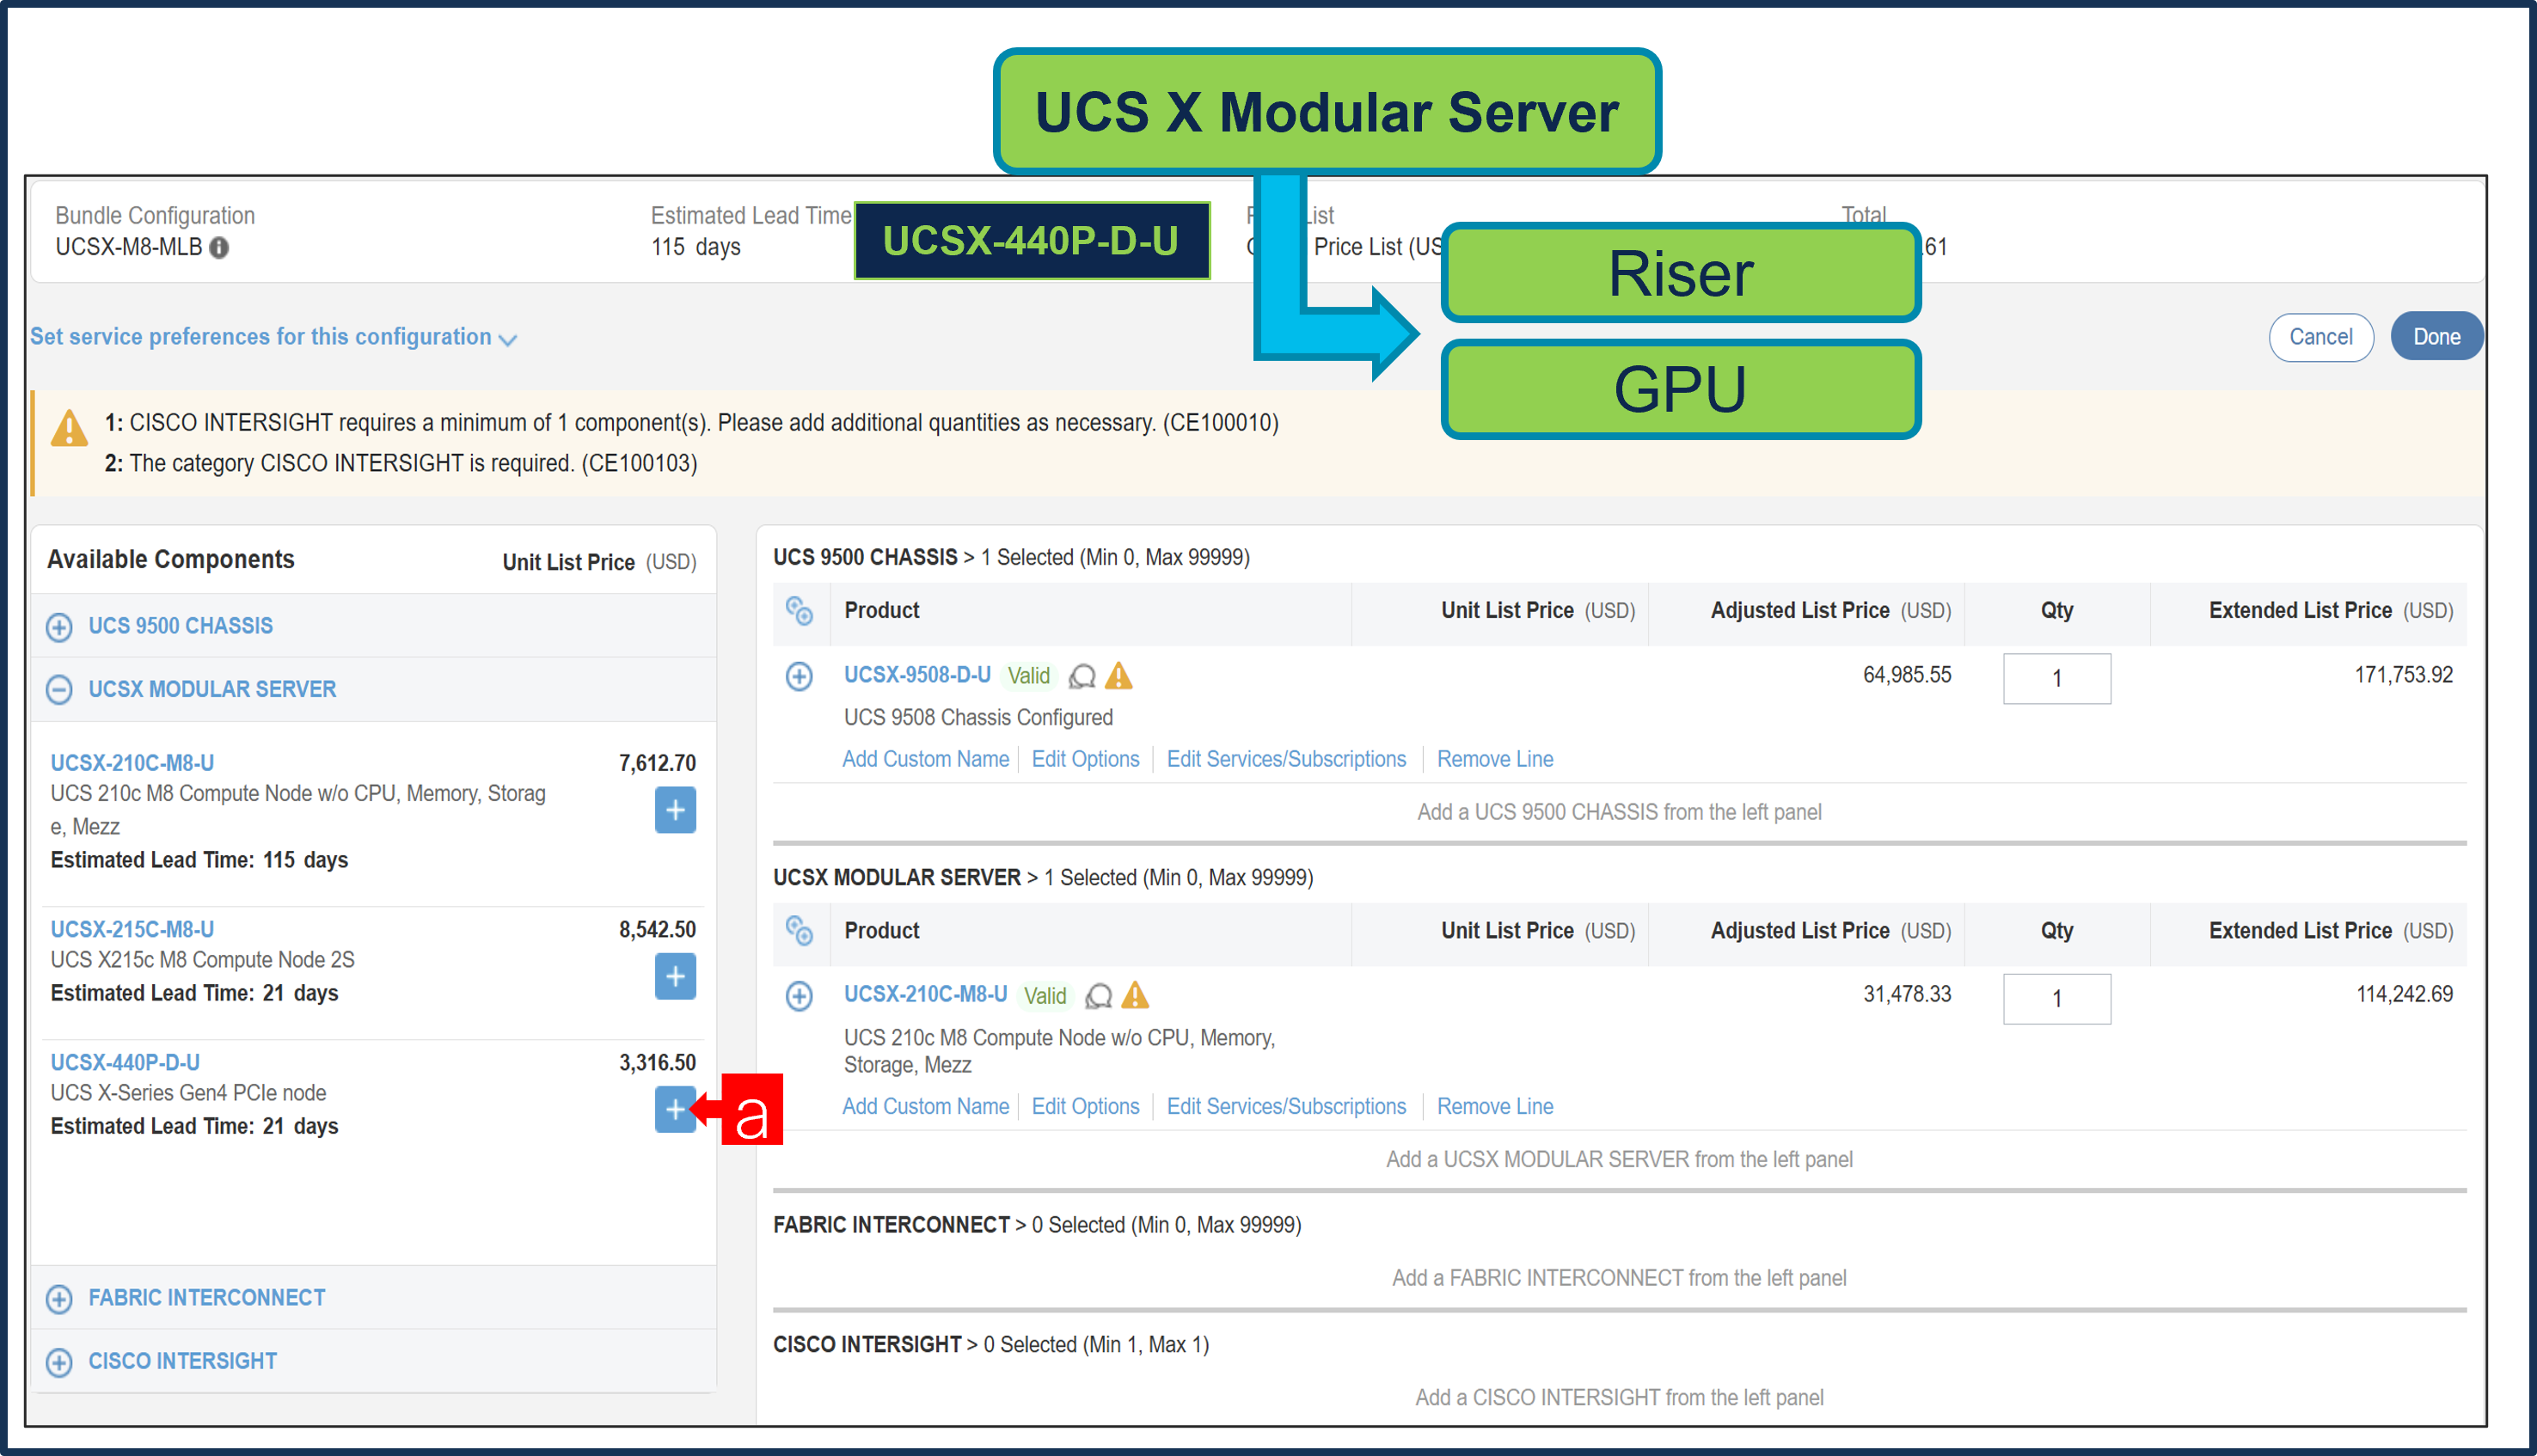
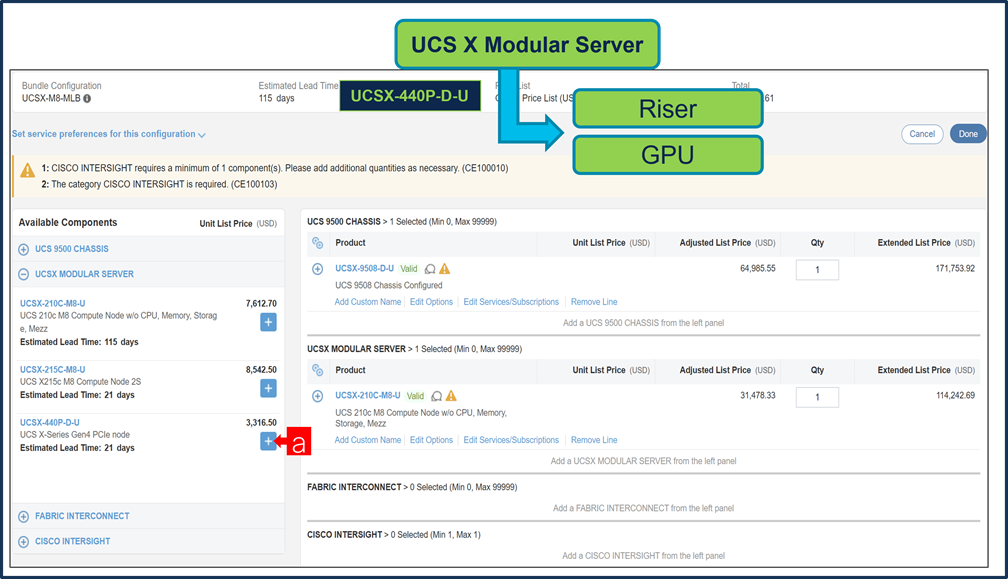
a. Configure GPU PCIe Node: UCSX-440P-D under Compute Node: UCSX-210C-M8.
b. Click on UCSX-440P-D to configure it further in Left Window.
c. Selection of X- Fabric Module: UCSX-F-9416-D under Chassis: UCSX-9508-D-U is required with UCSX-440P-D.
Step 12.
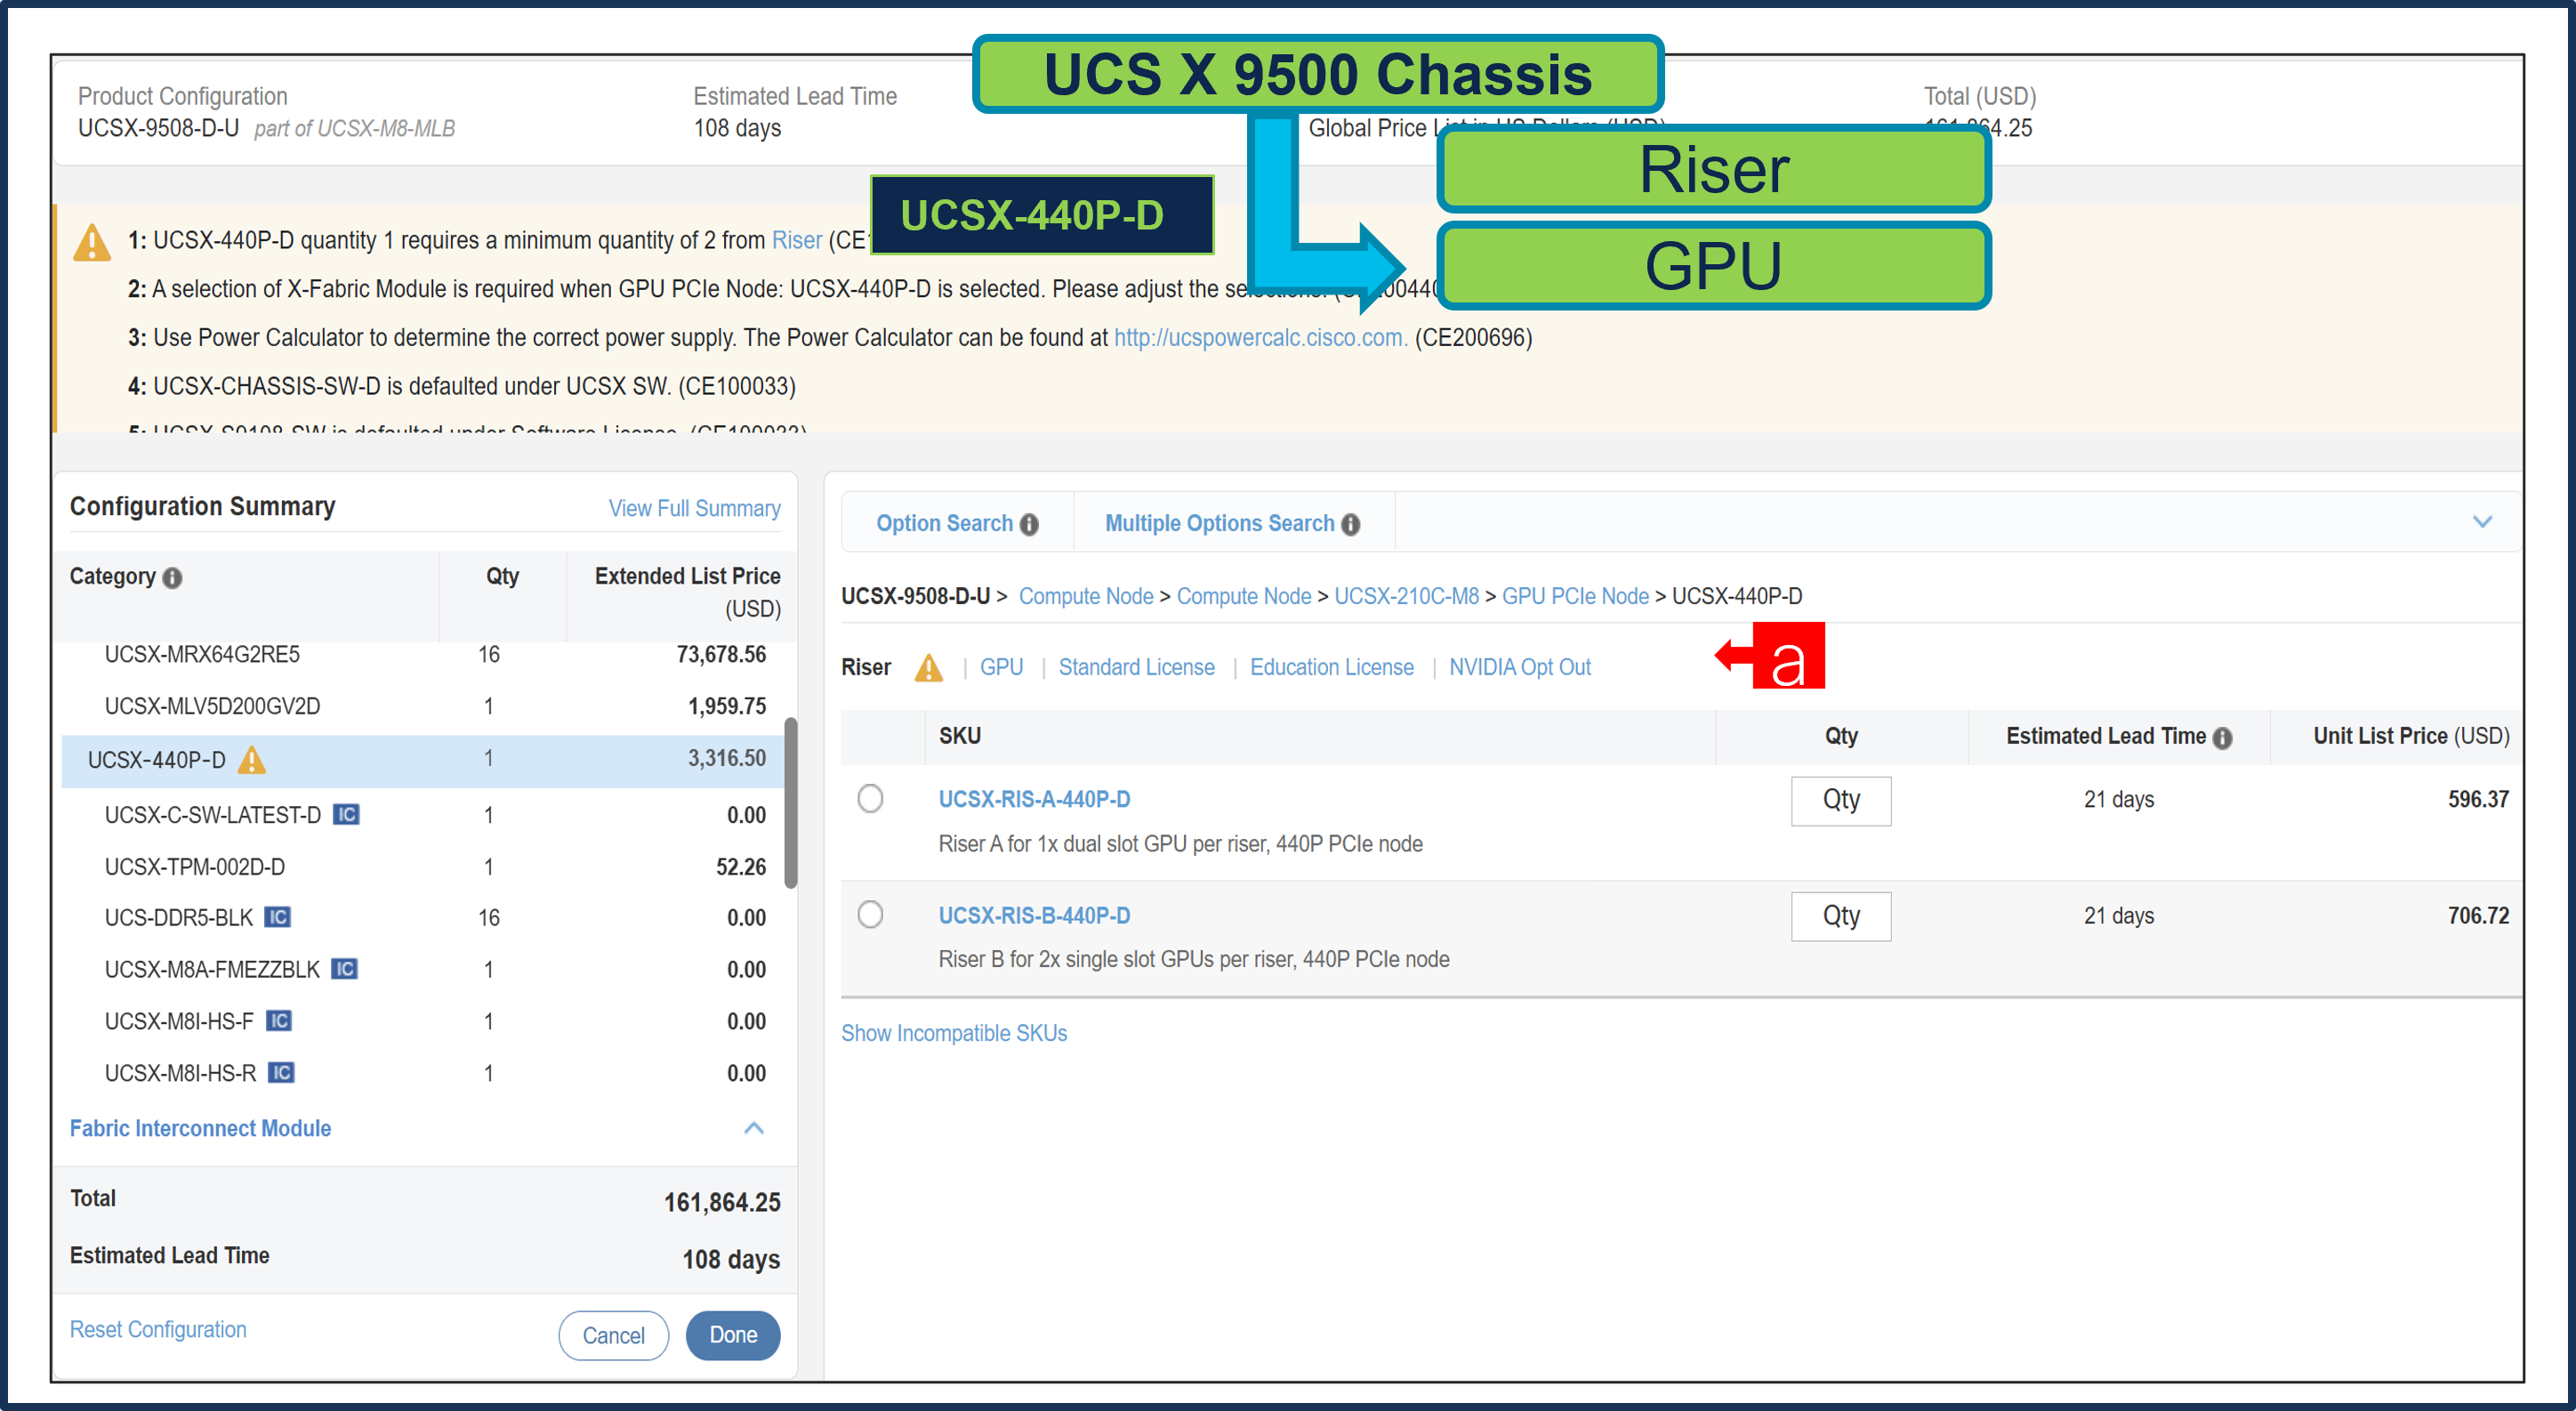
a. Configure GPU PCIe Node: UCSX-440P-D by selecting Riser, GPU and NVIDIA License on the Right Window.
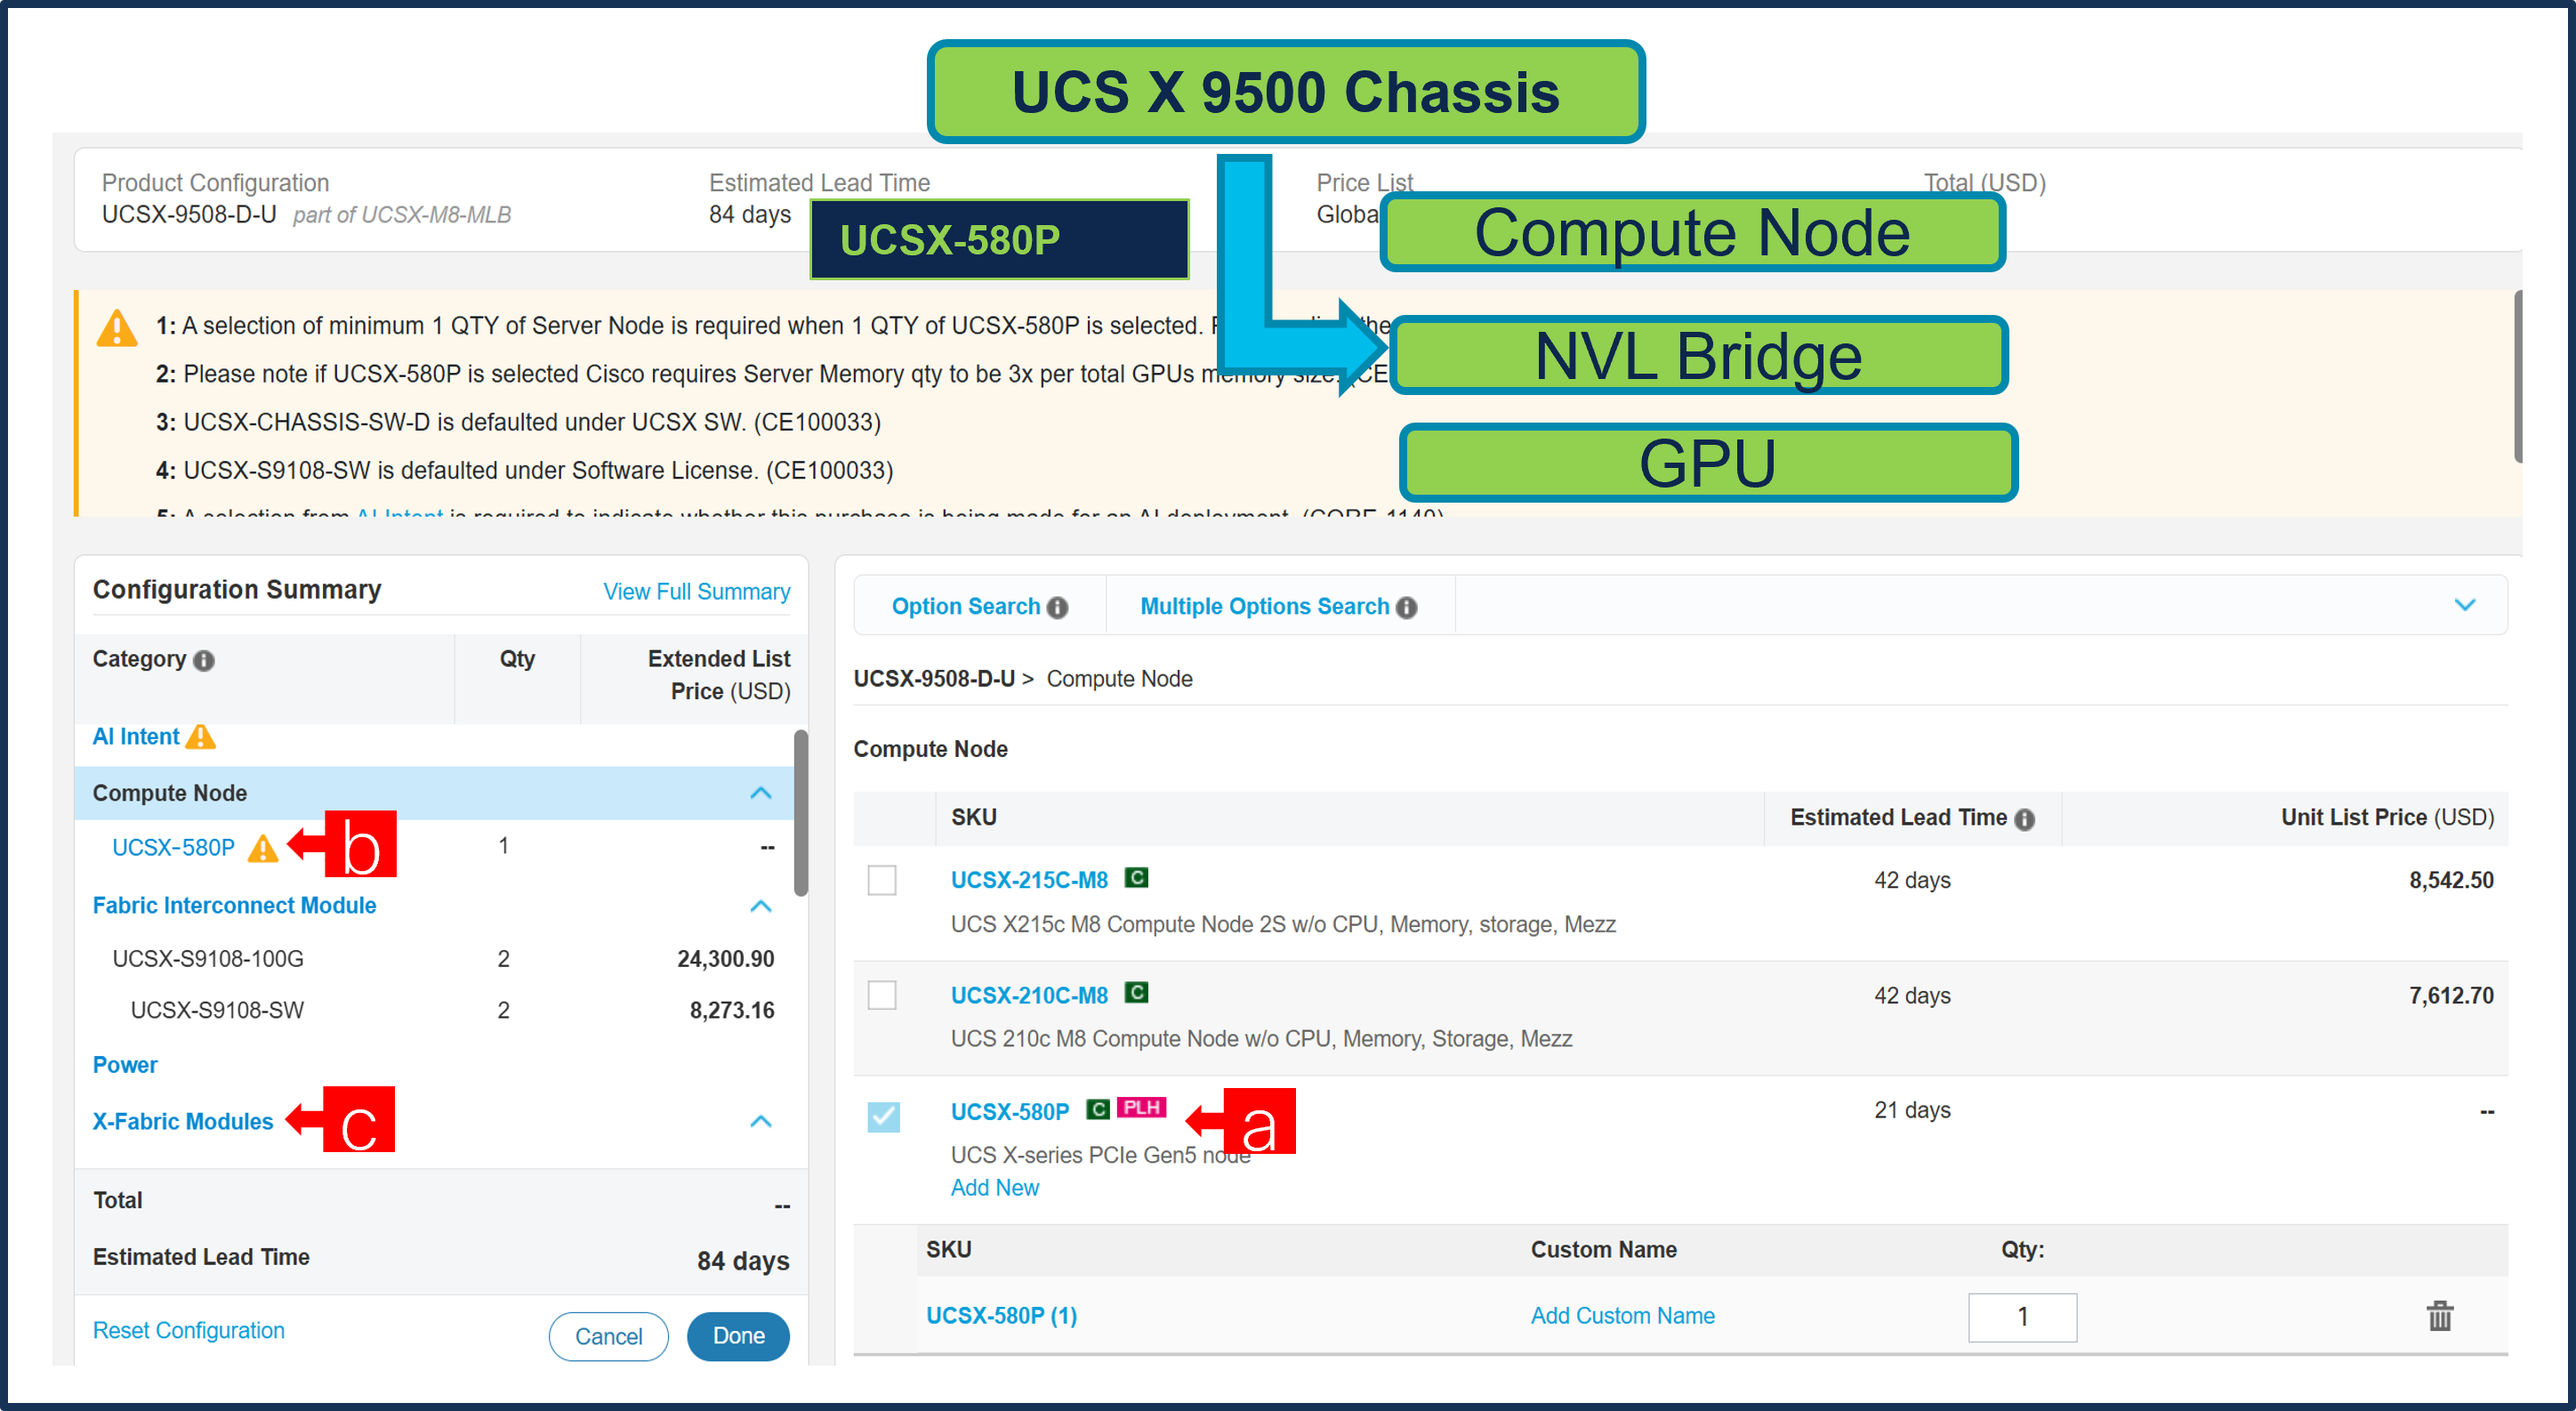
a. Configure GPU PCIe Node: UCSX-580P under Chassis UCSX-9508-D-U
b. Click on UCSX-580P to configure it further in Left Window.
c. Selection of X- Fabric Module: UCSX-F-9516 under Chassis: UCSX-9508-D-U is required with UCSX-580P.
Note: GPU PCIe Node: UCSX-580P max quantity 2 per chassis allowed and consumes (2) Blade slots. GPU PCIe Node: UCSX-580P defaulted in slots 3 & 4 and/or 7 & 8.
Step 14.
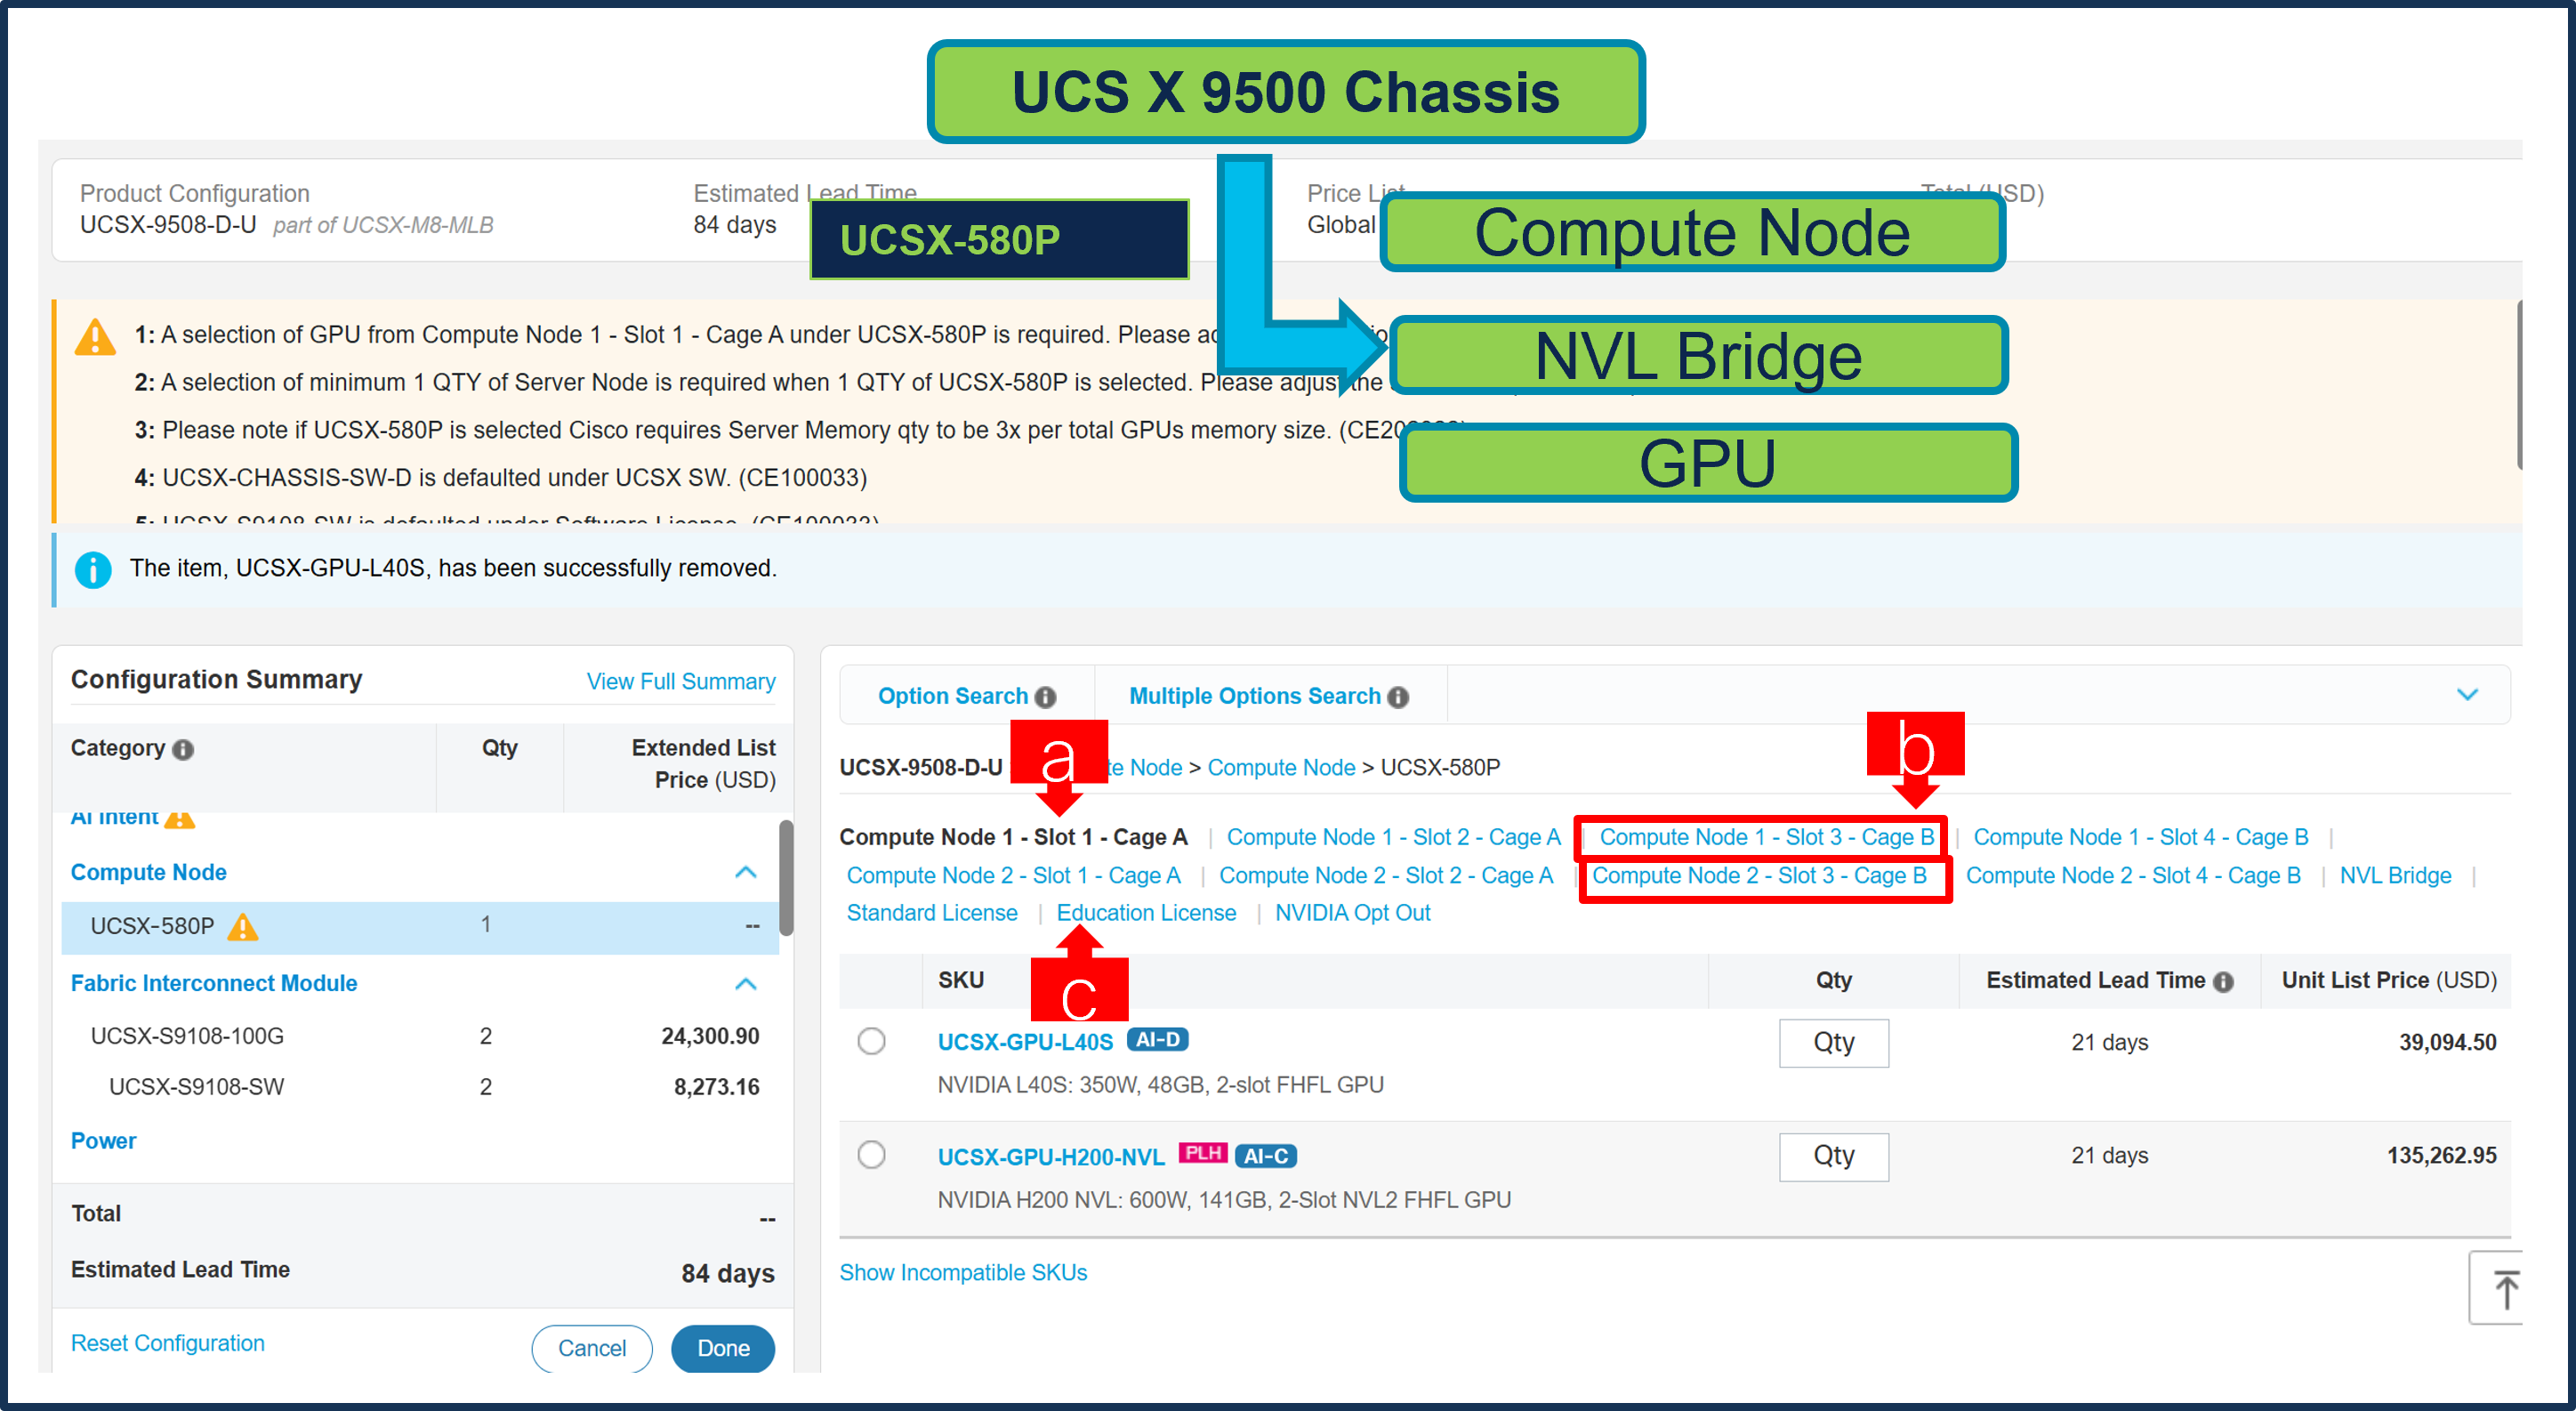
a. Configure GPU PCIe Node: UCSX-580P by selecting GPU from Compute Node 1 Slots and/or Compute Node 2 Slots.
b. If a Slot is selected from either Compute Node 1 or 2 the same slot number cannot be repeated/selected.
c. Select NVIDIA License for GPUs when required.
Note: Note: Mixing GPUs in a single Compute Node is not allowed. Mixing GPU across Compute Node 1 & 2 is allowed.
Step 15.
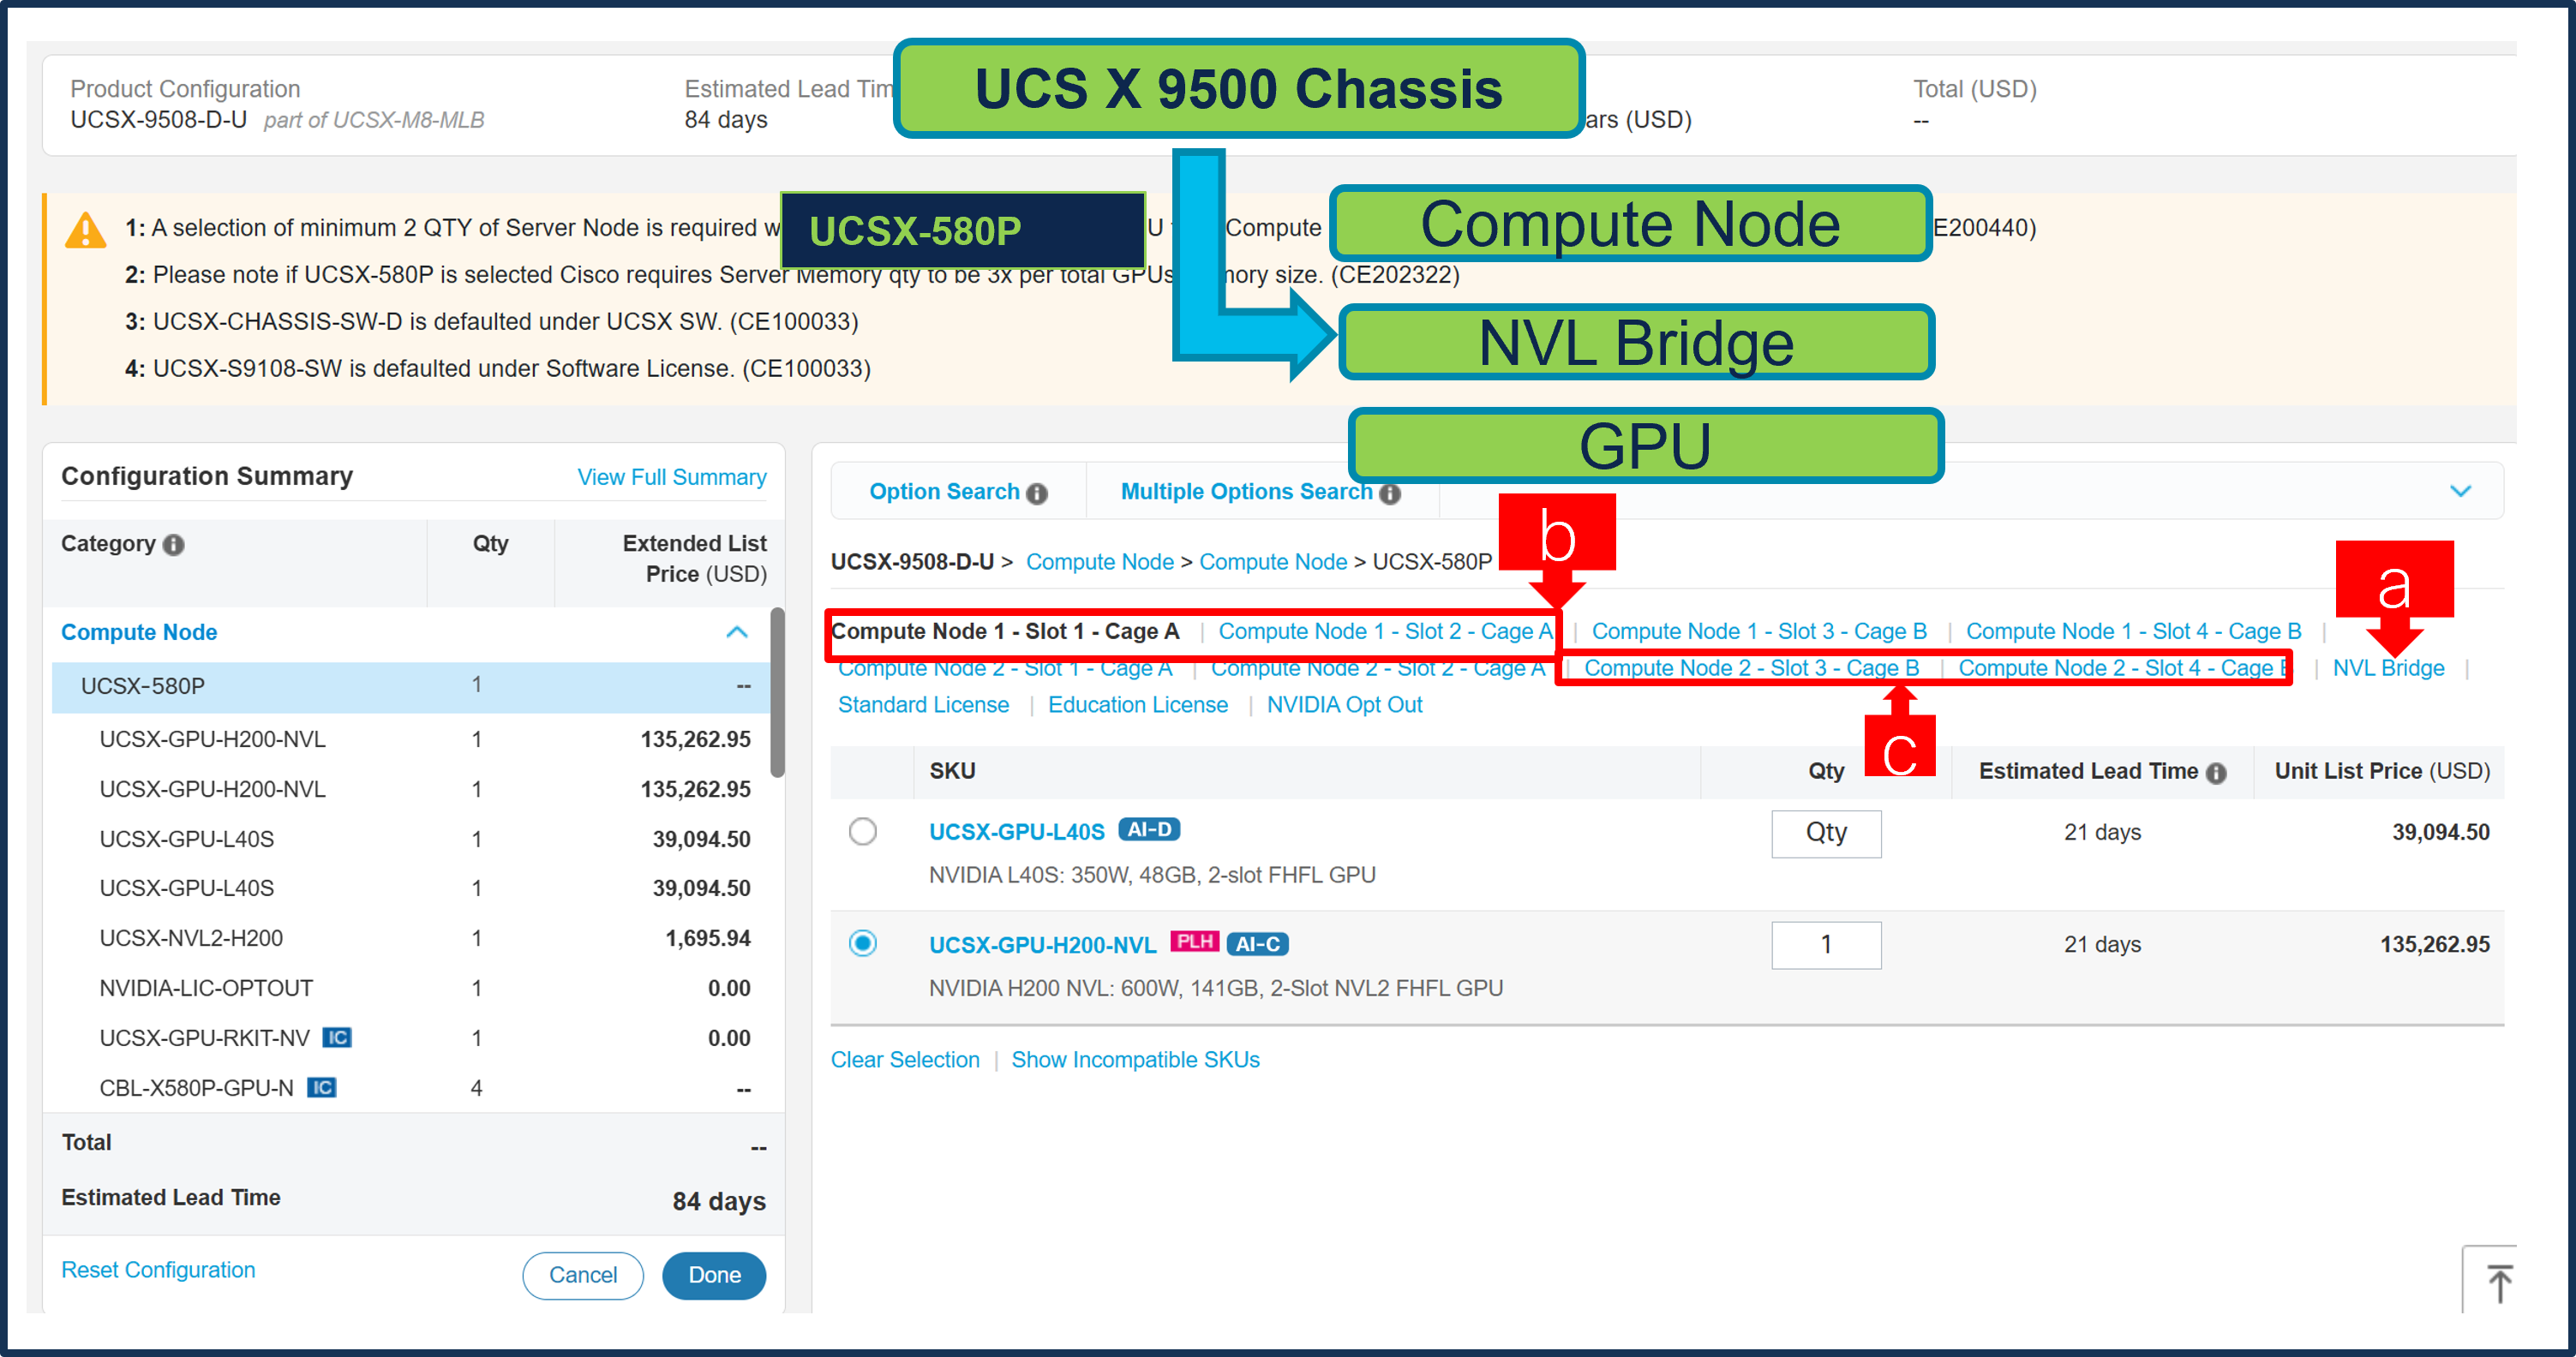
a. NVL Bridge is only supported with GPU H200 NVL and minimum 2 GPUs required.
b. GPUs must be selected in consecutive slots 1 & 2 and/or 3 & 4 of the same Compute Node.
c. If selecting Compute Node 1 a Minimum 1 Server Node is required, If selecting from both Compute Node 1 and 2 then a minimum 2 Server Nodes are required.
Step 16.
a. Note Status is now showing as Valid.
b. Increase the quantity for multiples of same configuration.
c. Click the “PLUS” to add and configure the same product with different option/quantities or select a different product.
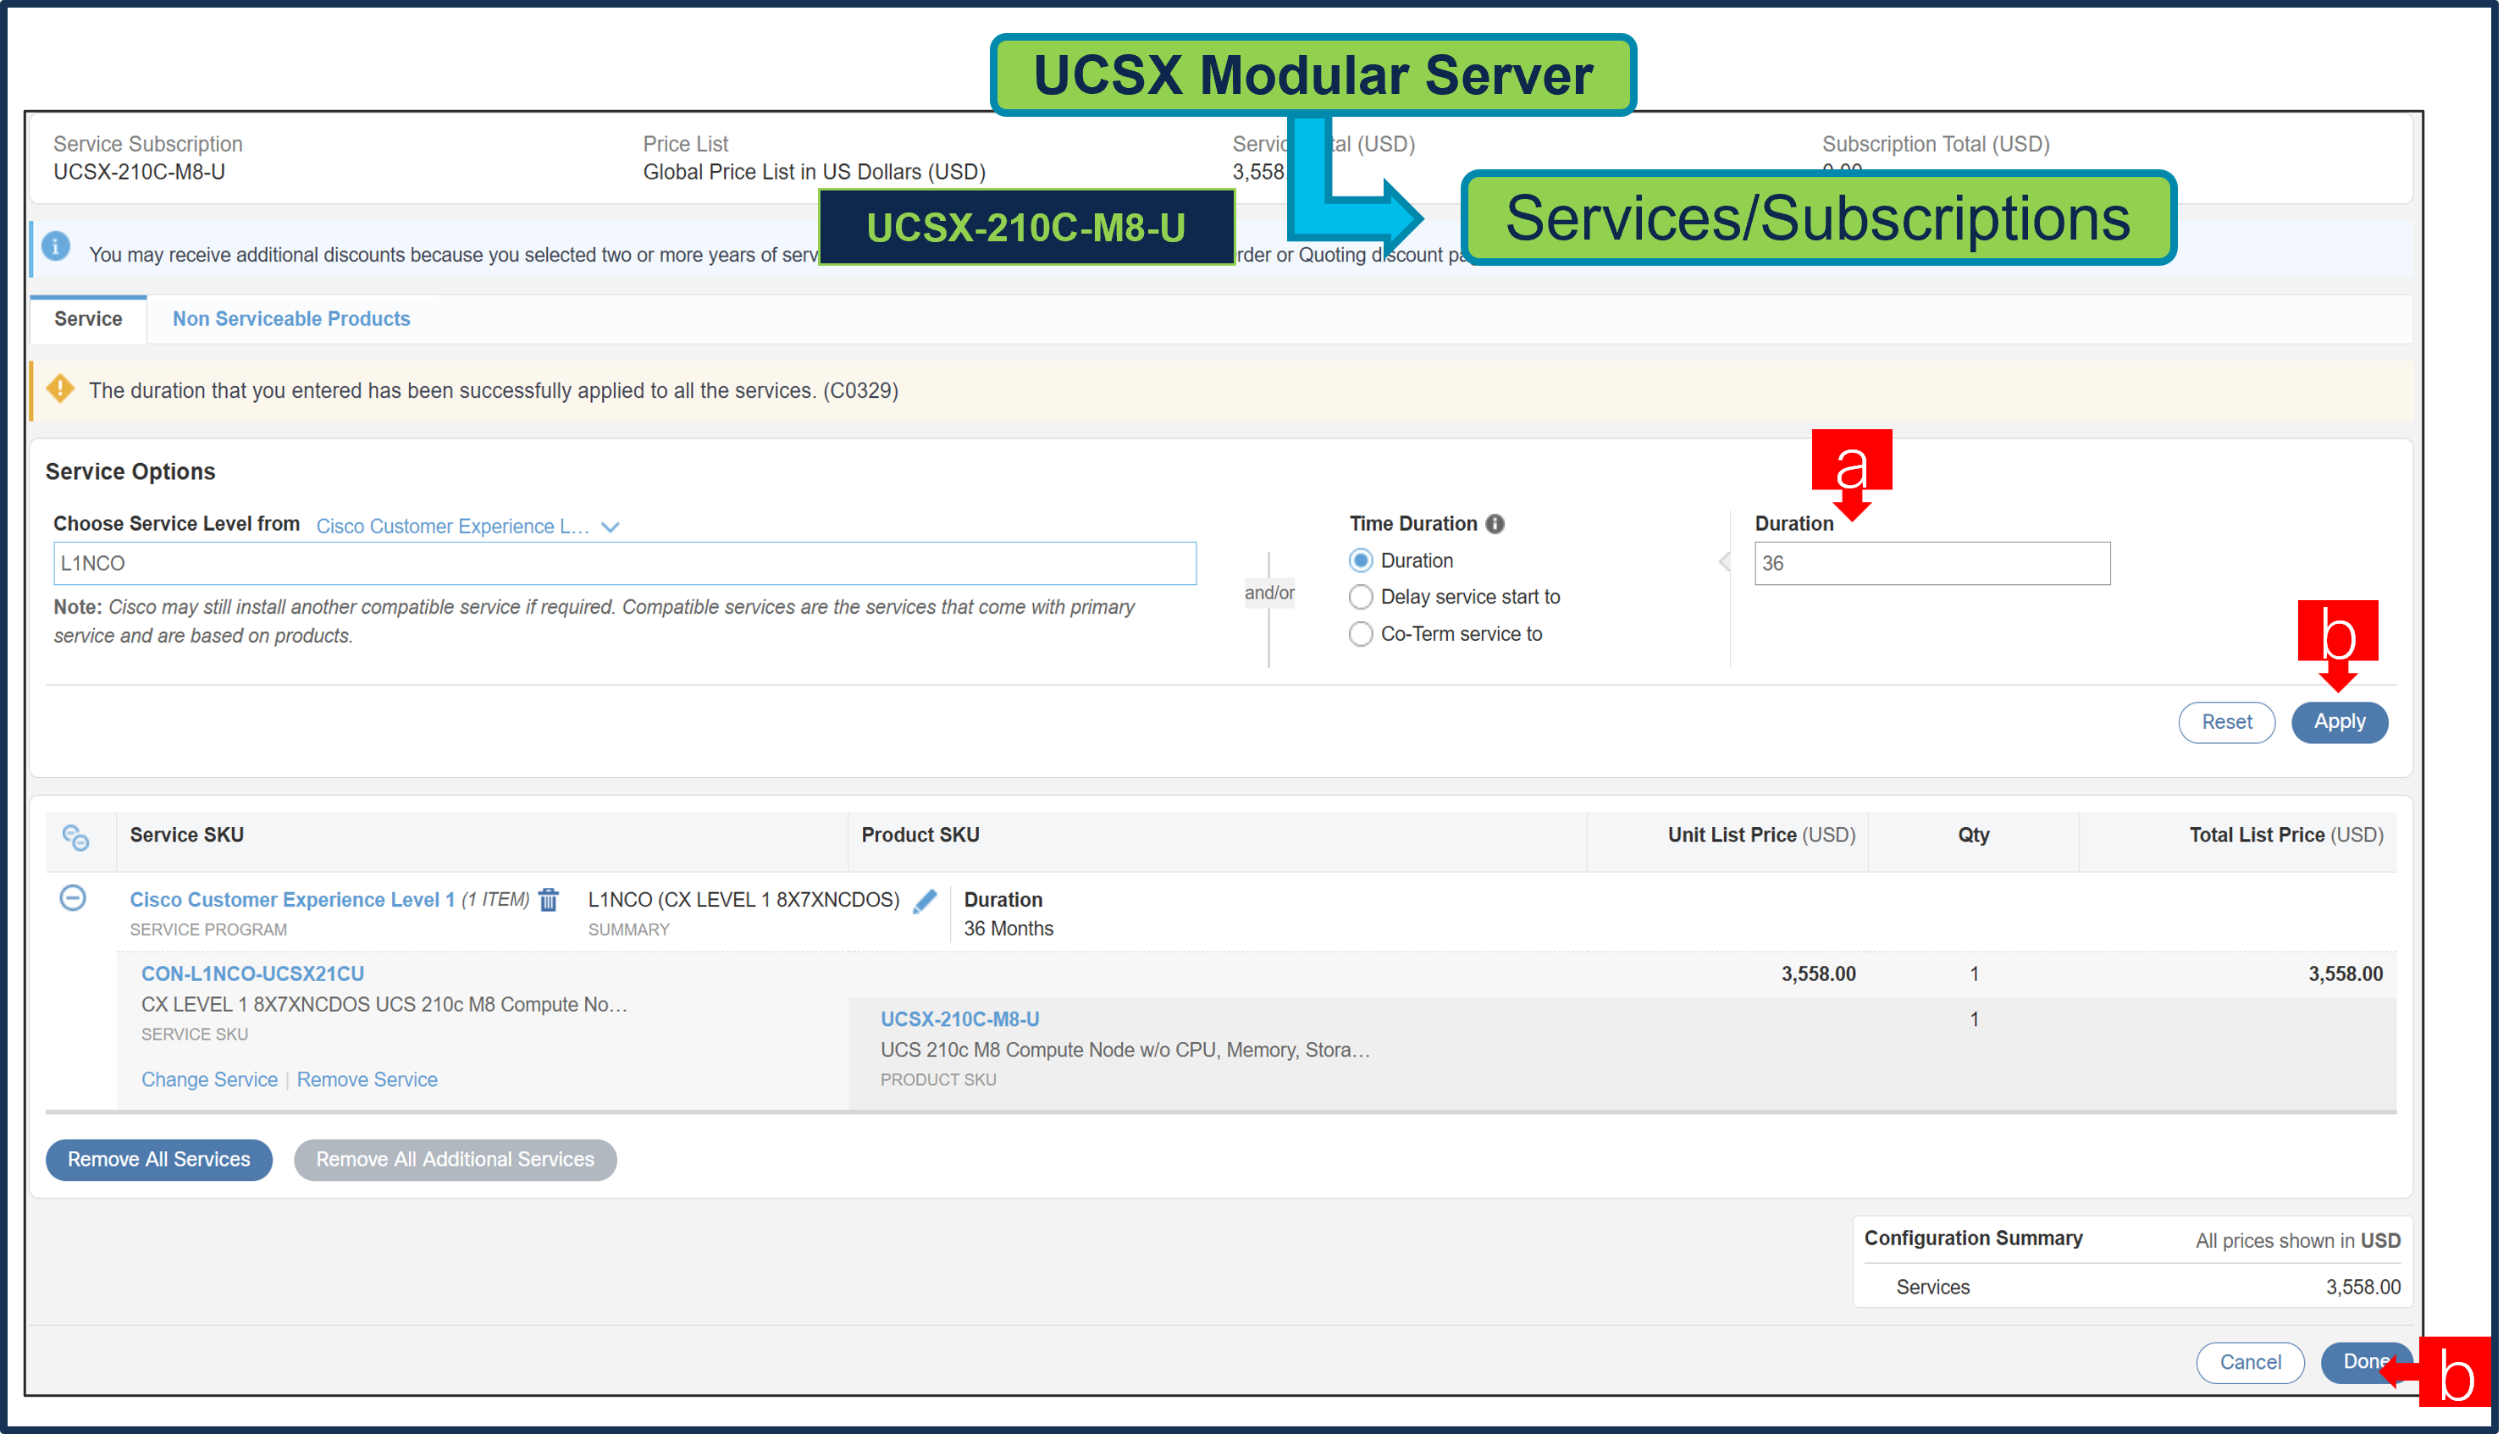
Step 17.

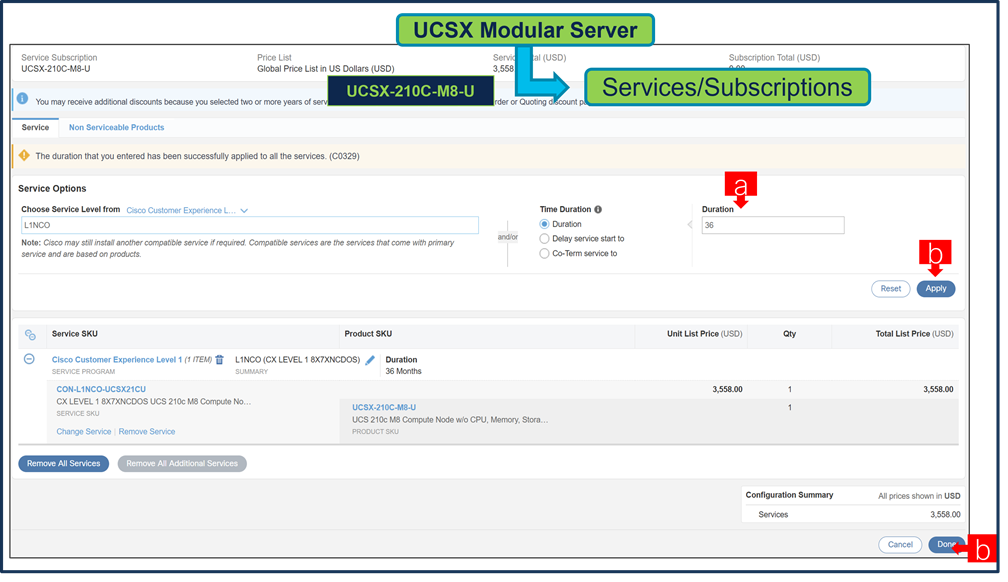
a. Click on “Edit Services/Subscriptions” to edit Term Duration for HW Support.
Note: It is recommended that Term Duration for HW Support must align with Software Subscription Duration.
Step 18.
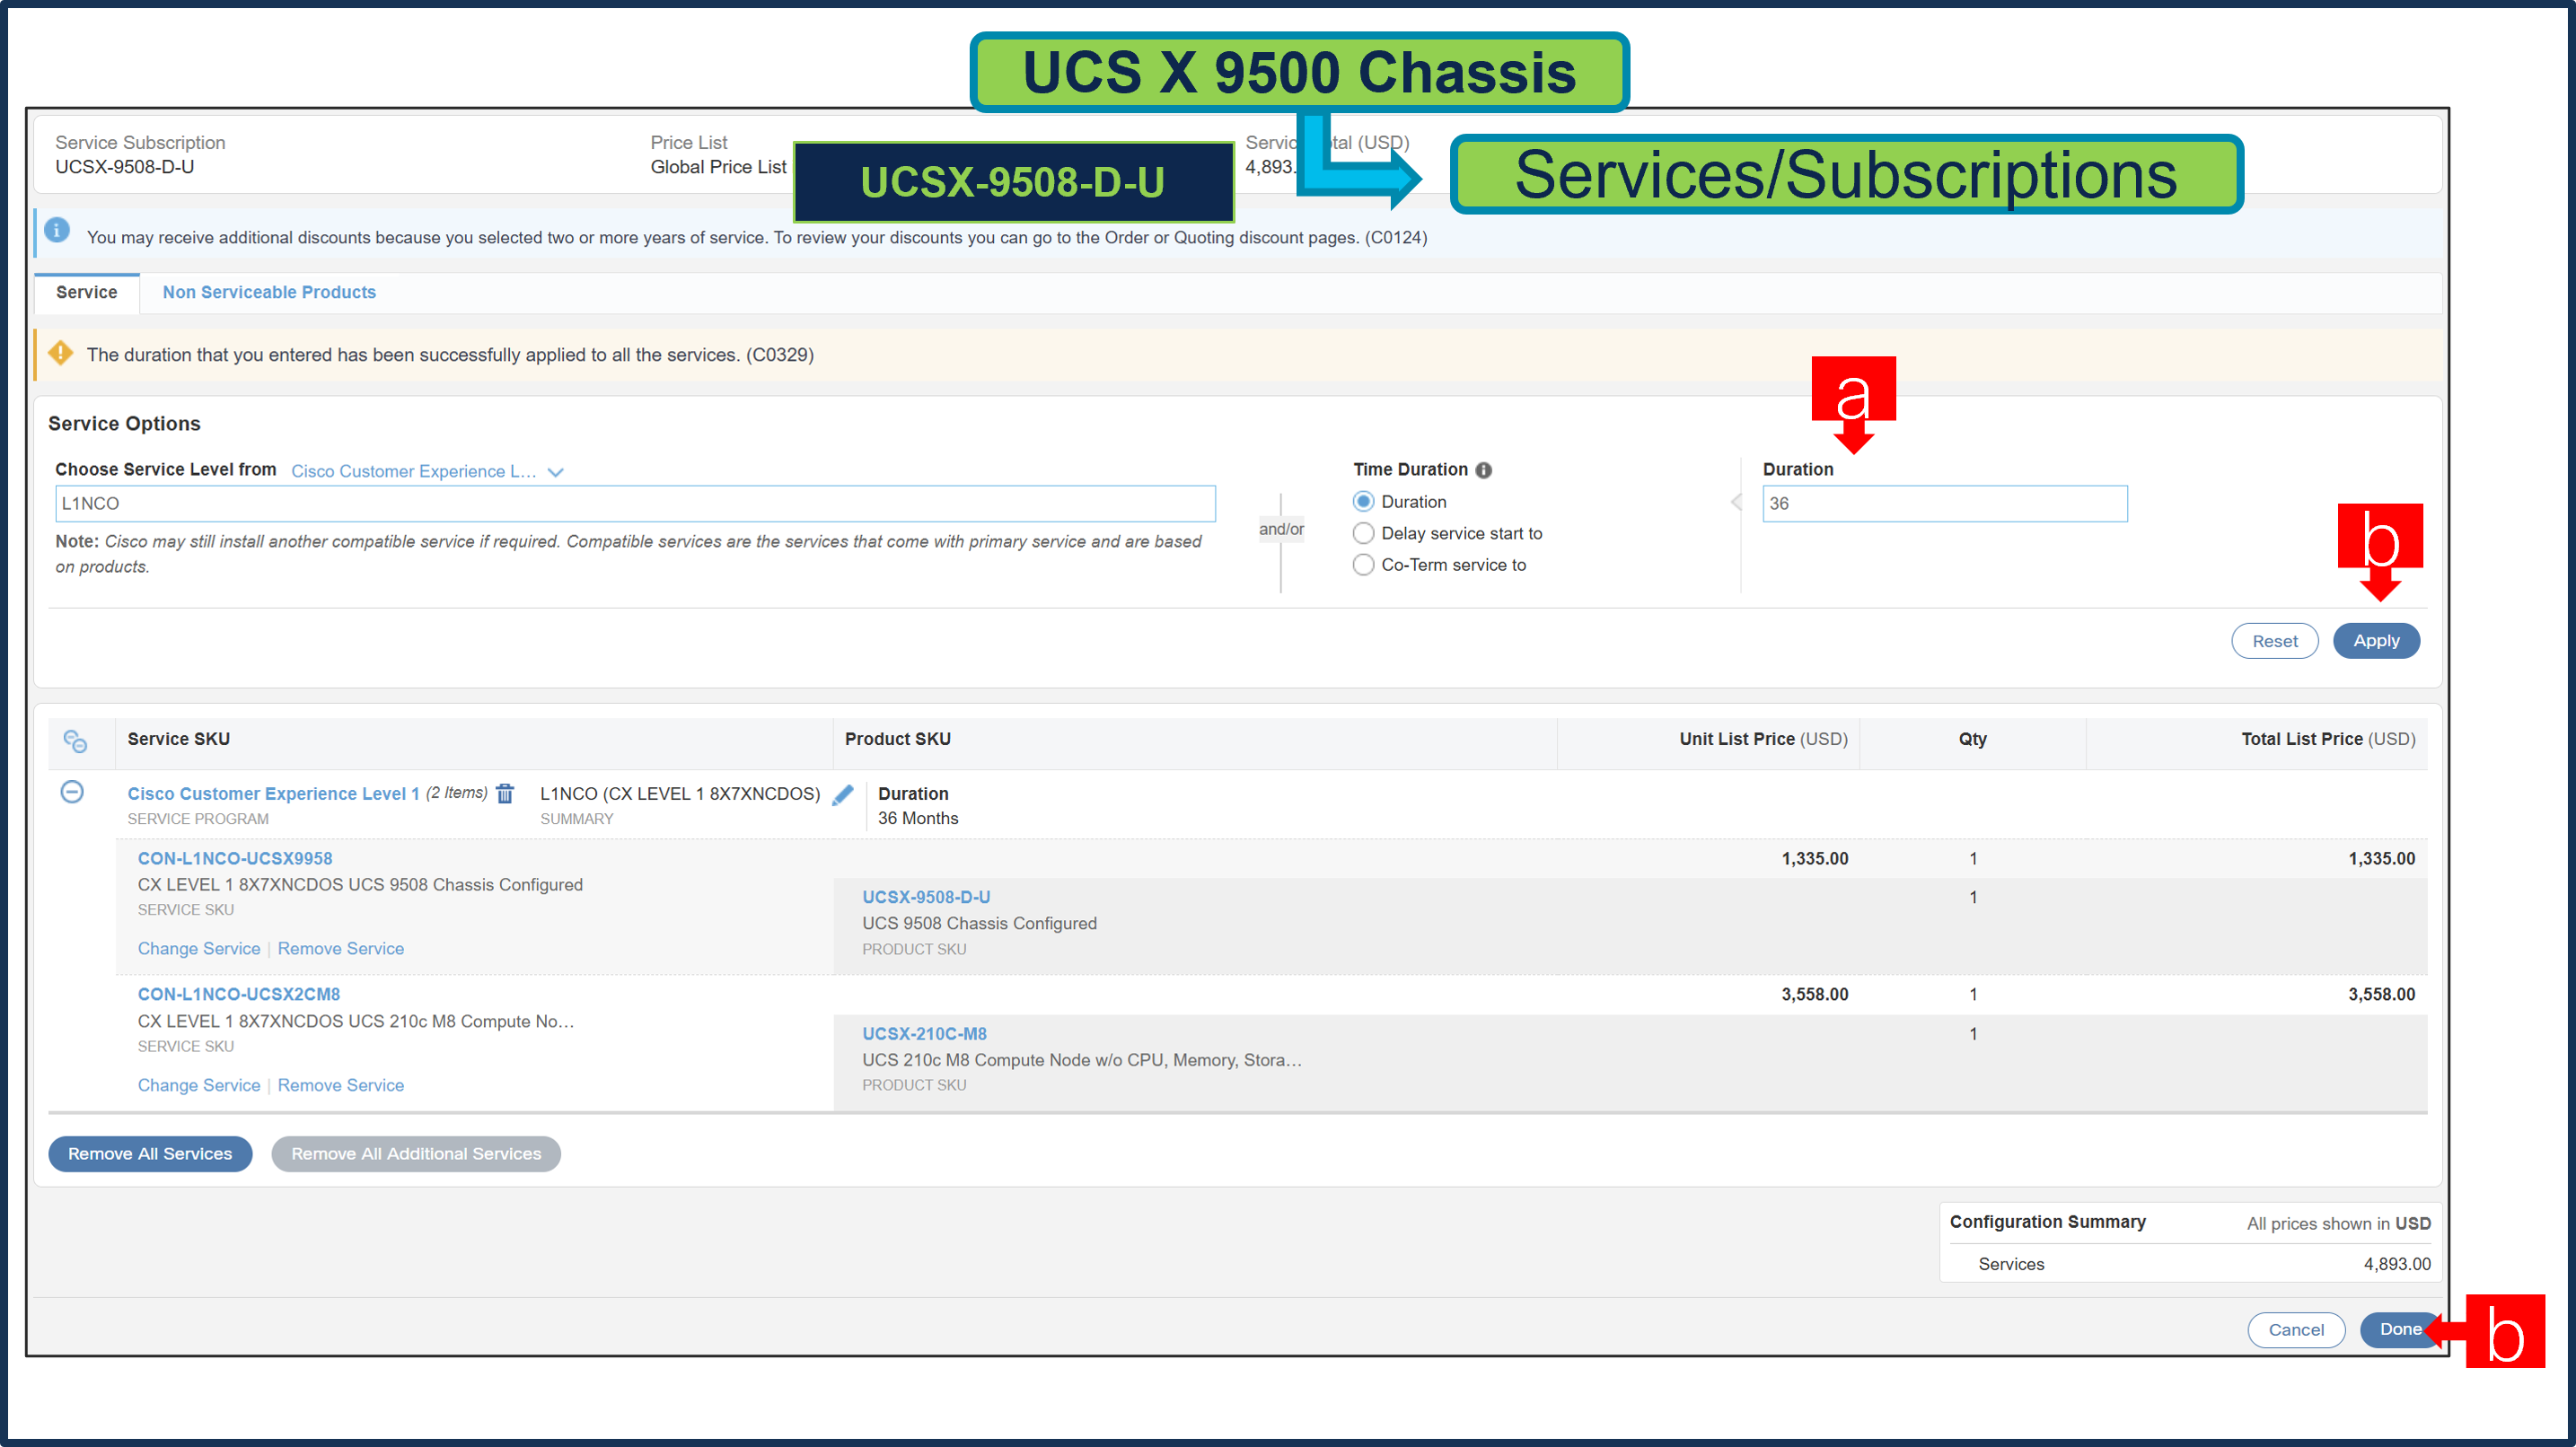
a. Enter the Term Duration
b. Click on “Apply” and “Done”
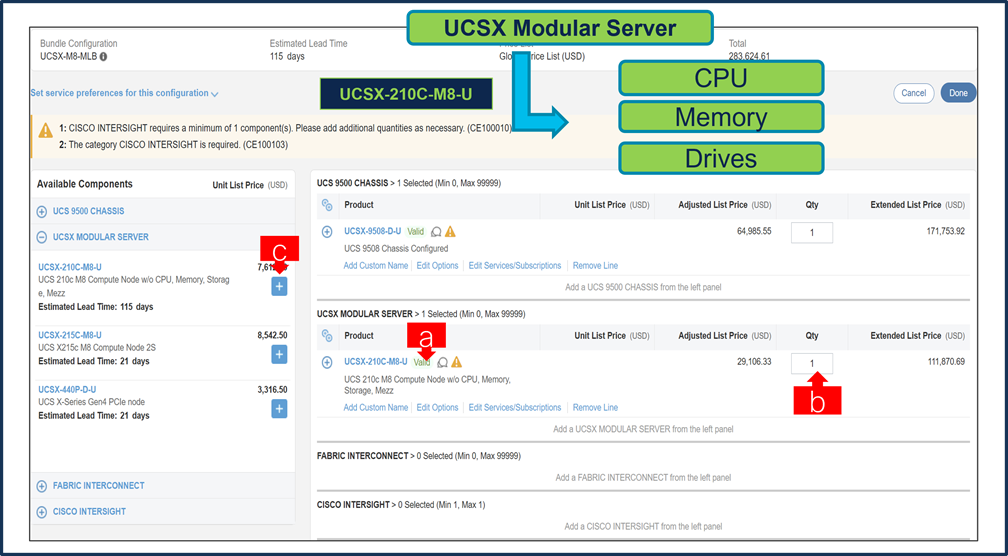
Step 19.
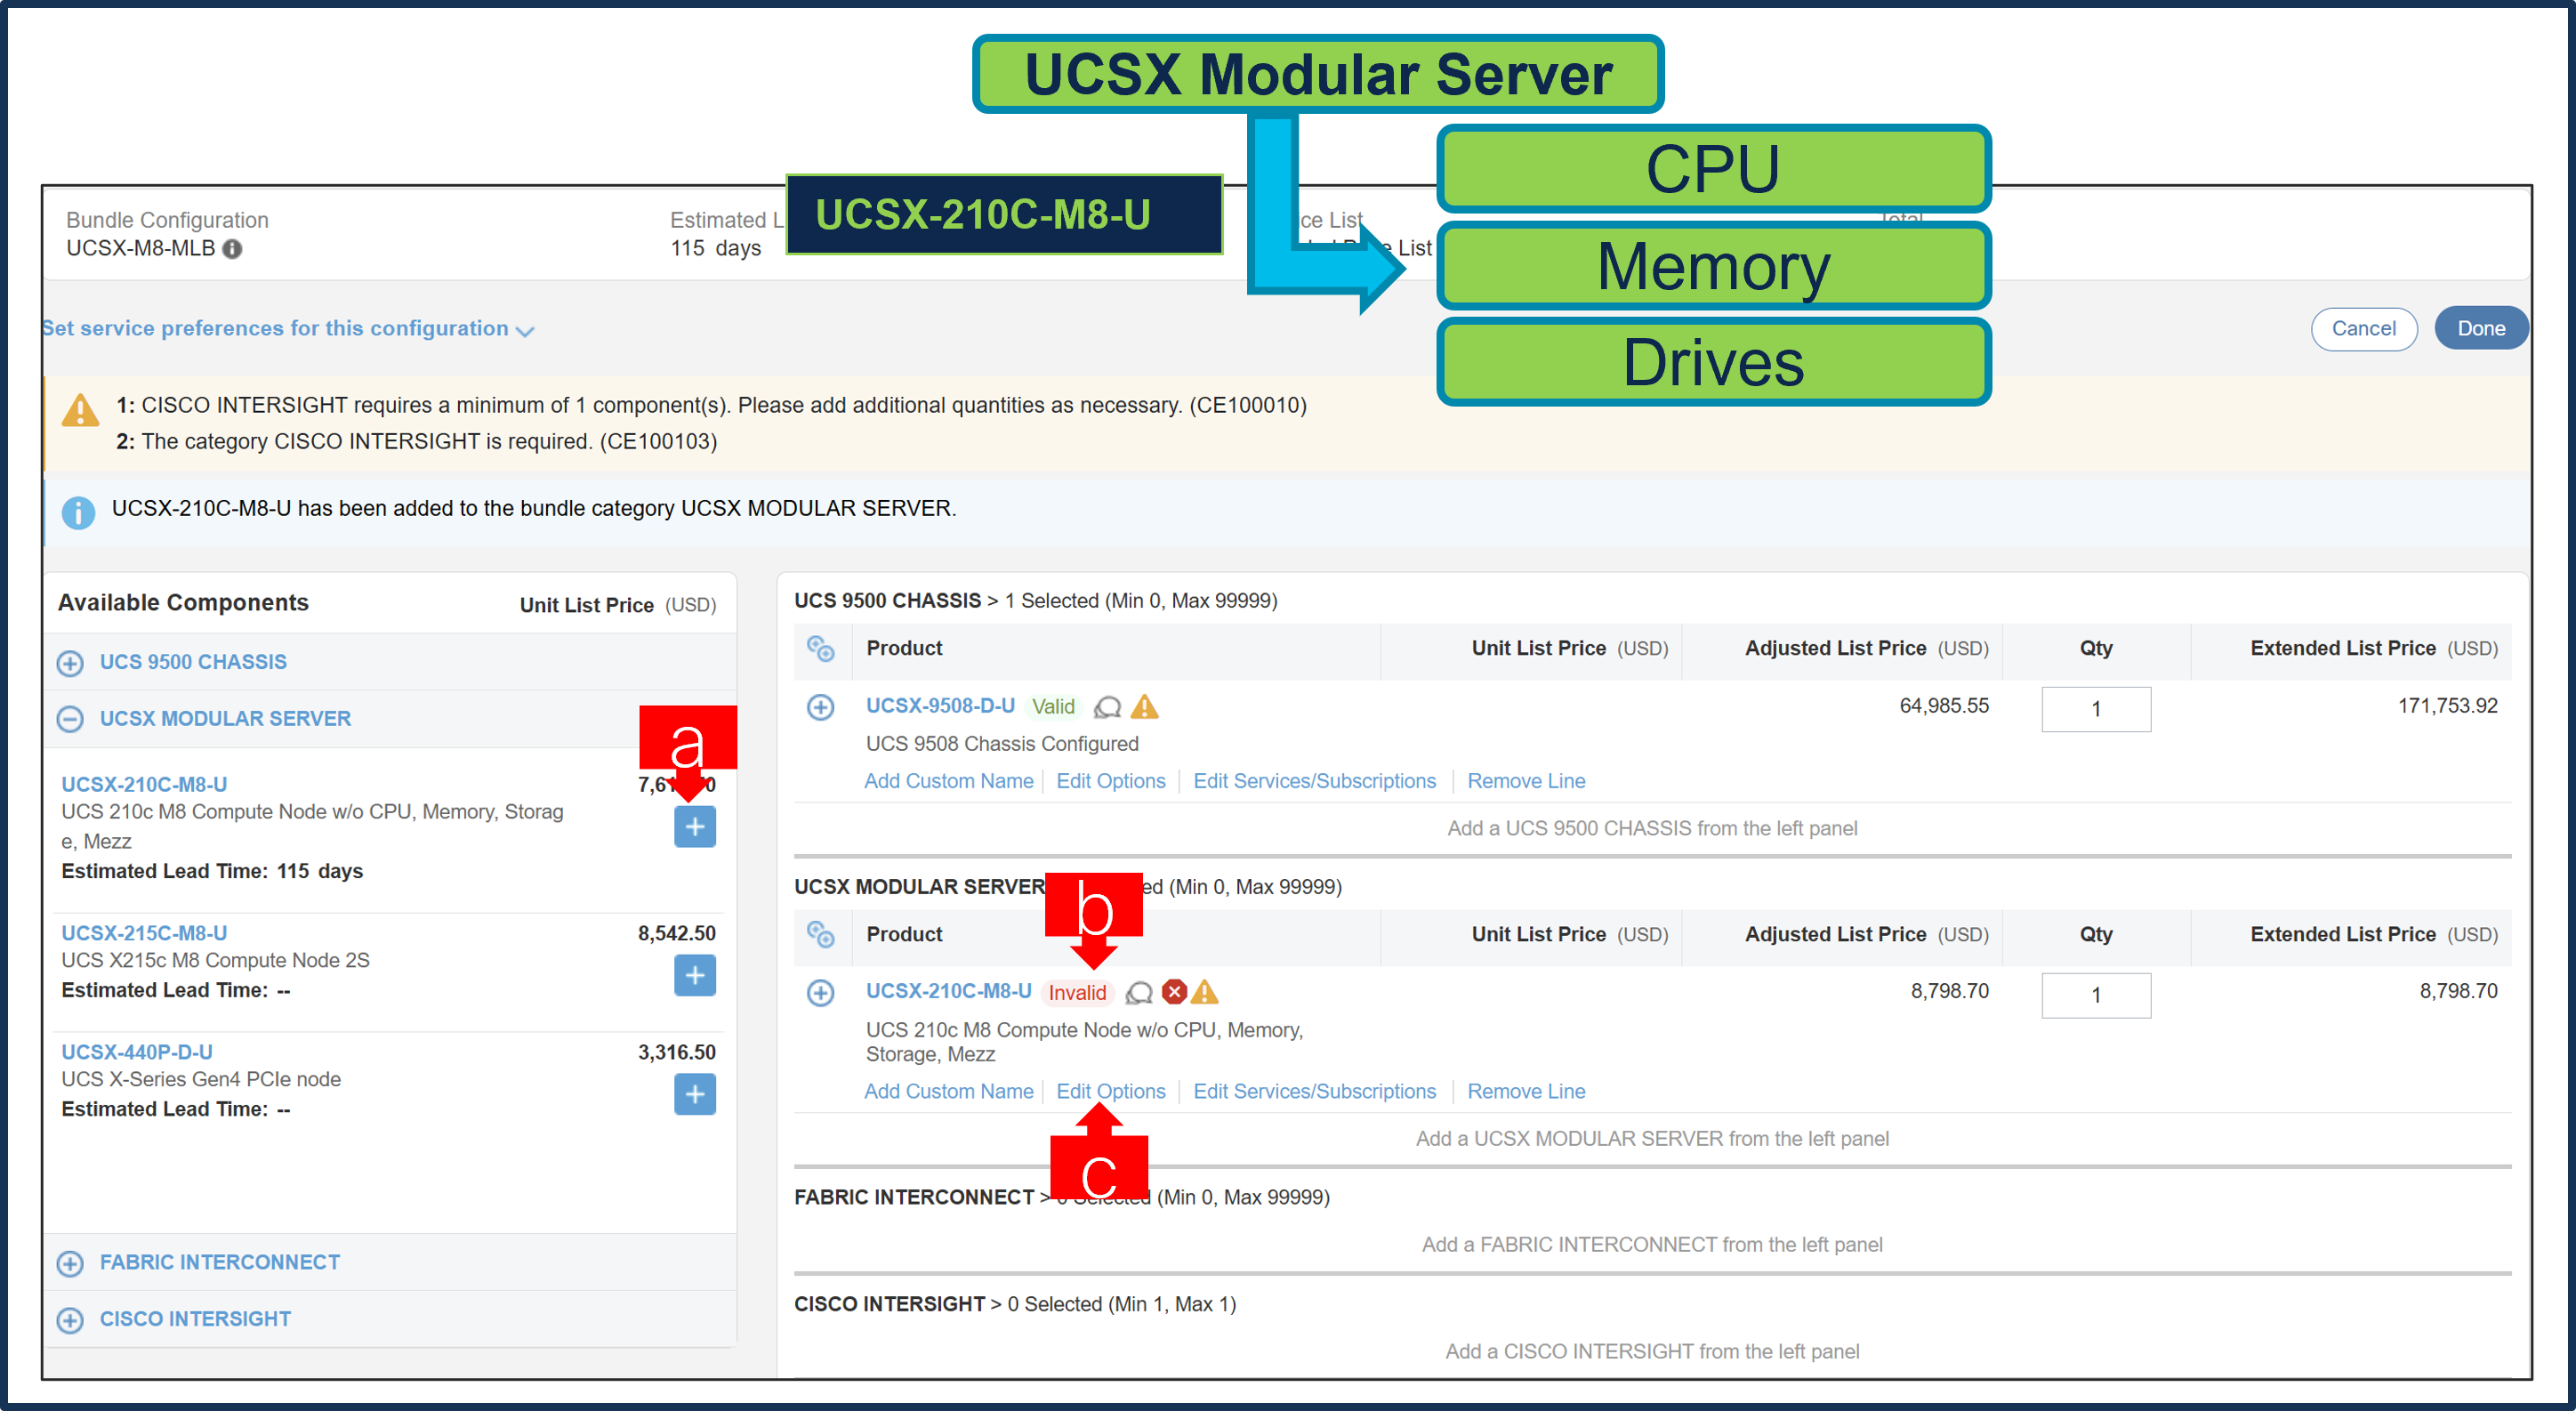
a. Select UCSX-210C-M8-U ATO from under MLB by clicking the “PLUS”.
b. Notice the UCSX-210C-M8-U ATO Status is invalid as further configuration needed.
c. Select ‘Edit Option’ to enter the configurator.
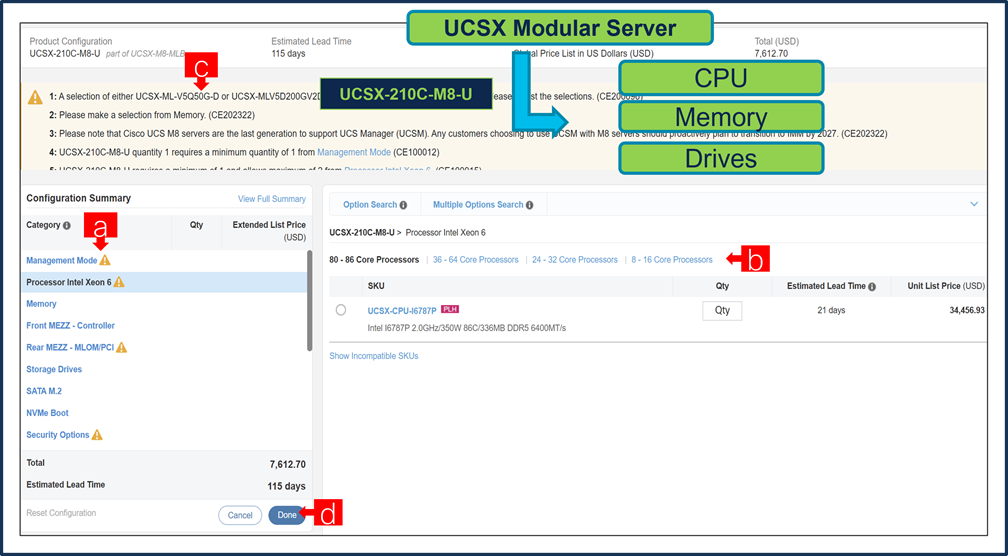
Step 20.
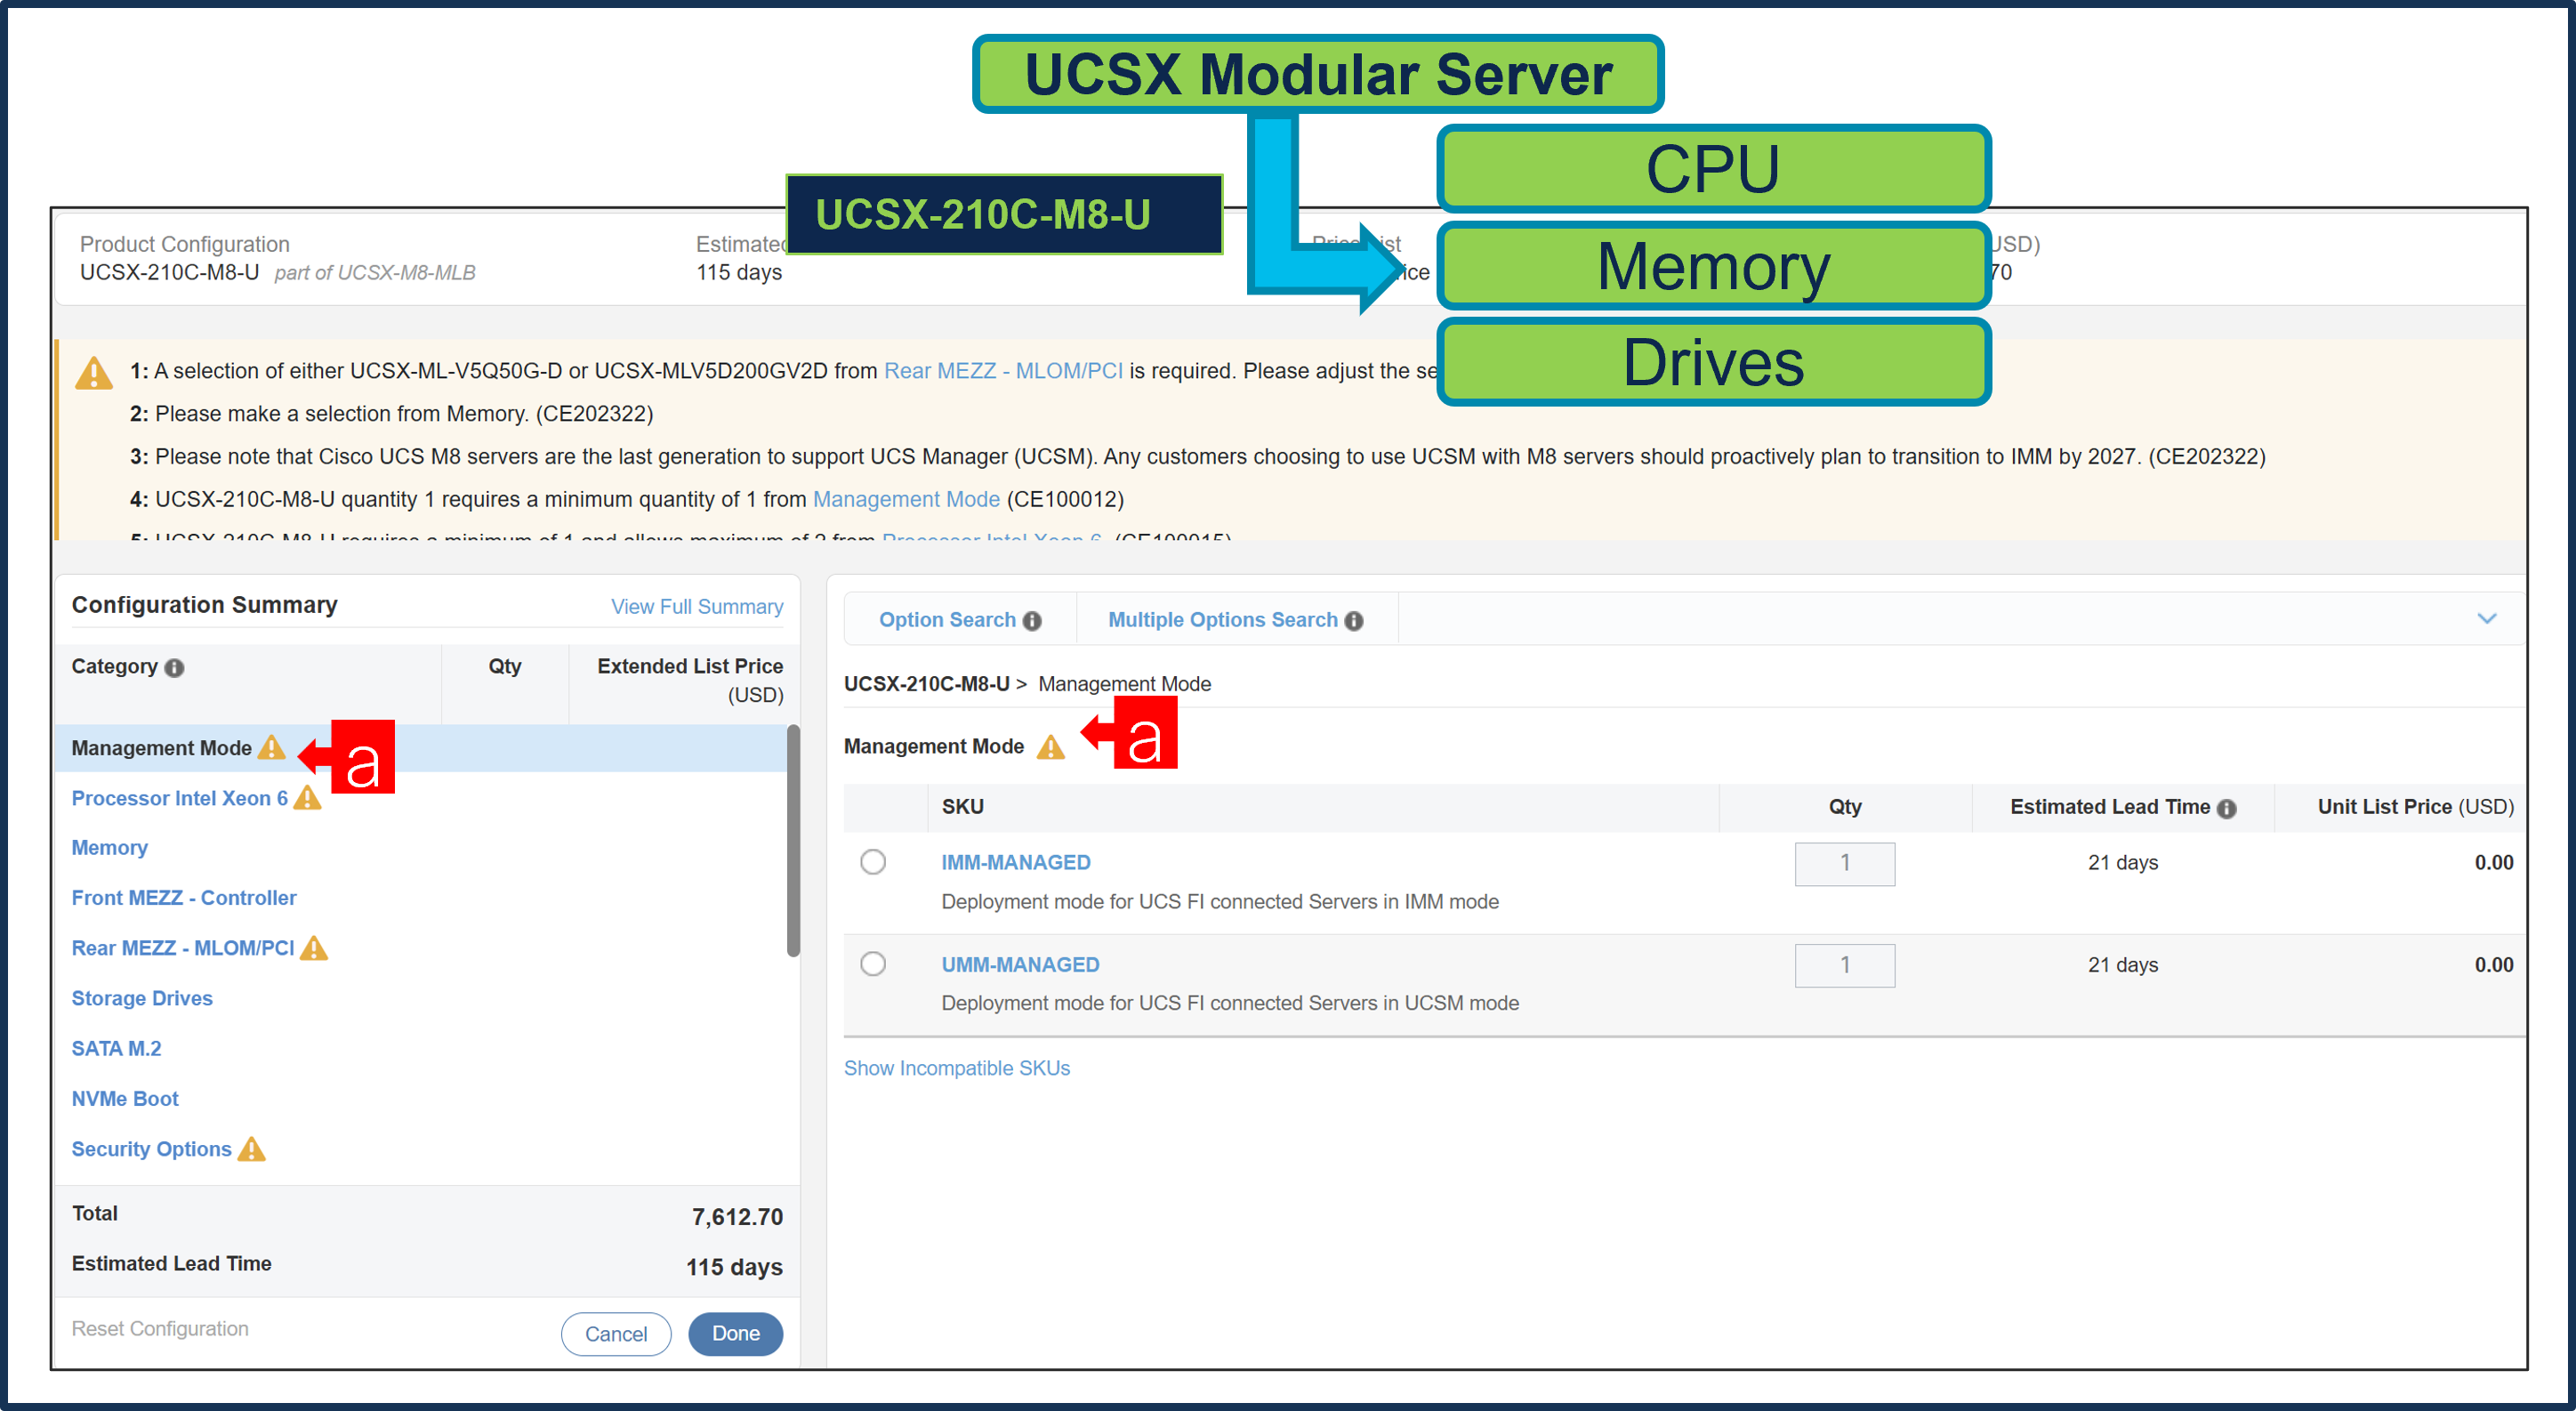
a. Users need to select Management Mode option based on how they plan to deploy the Server.
Step 21.

a. If any AI Capable PID is selected, then User need to make selection from AI Intent option class.
Step 22.
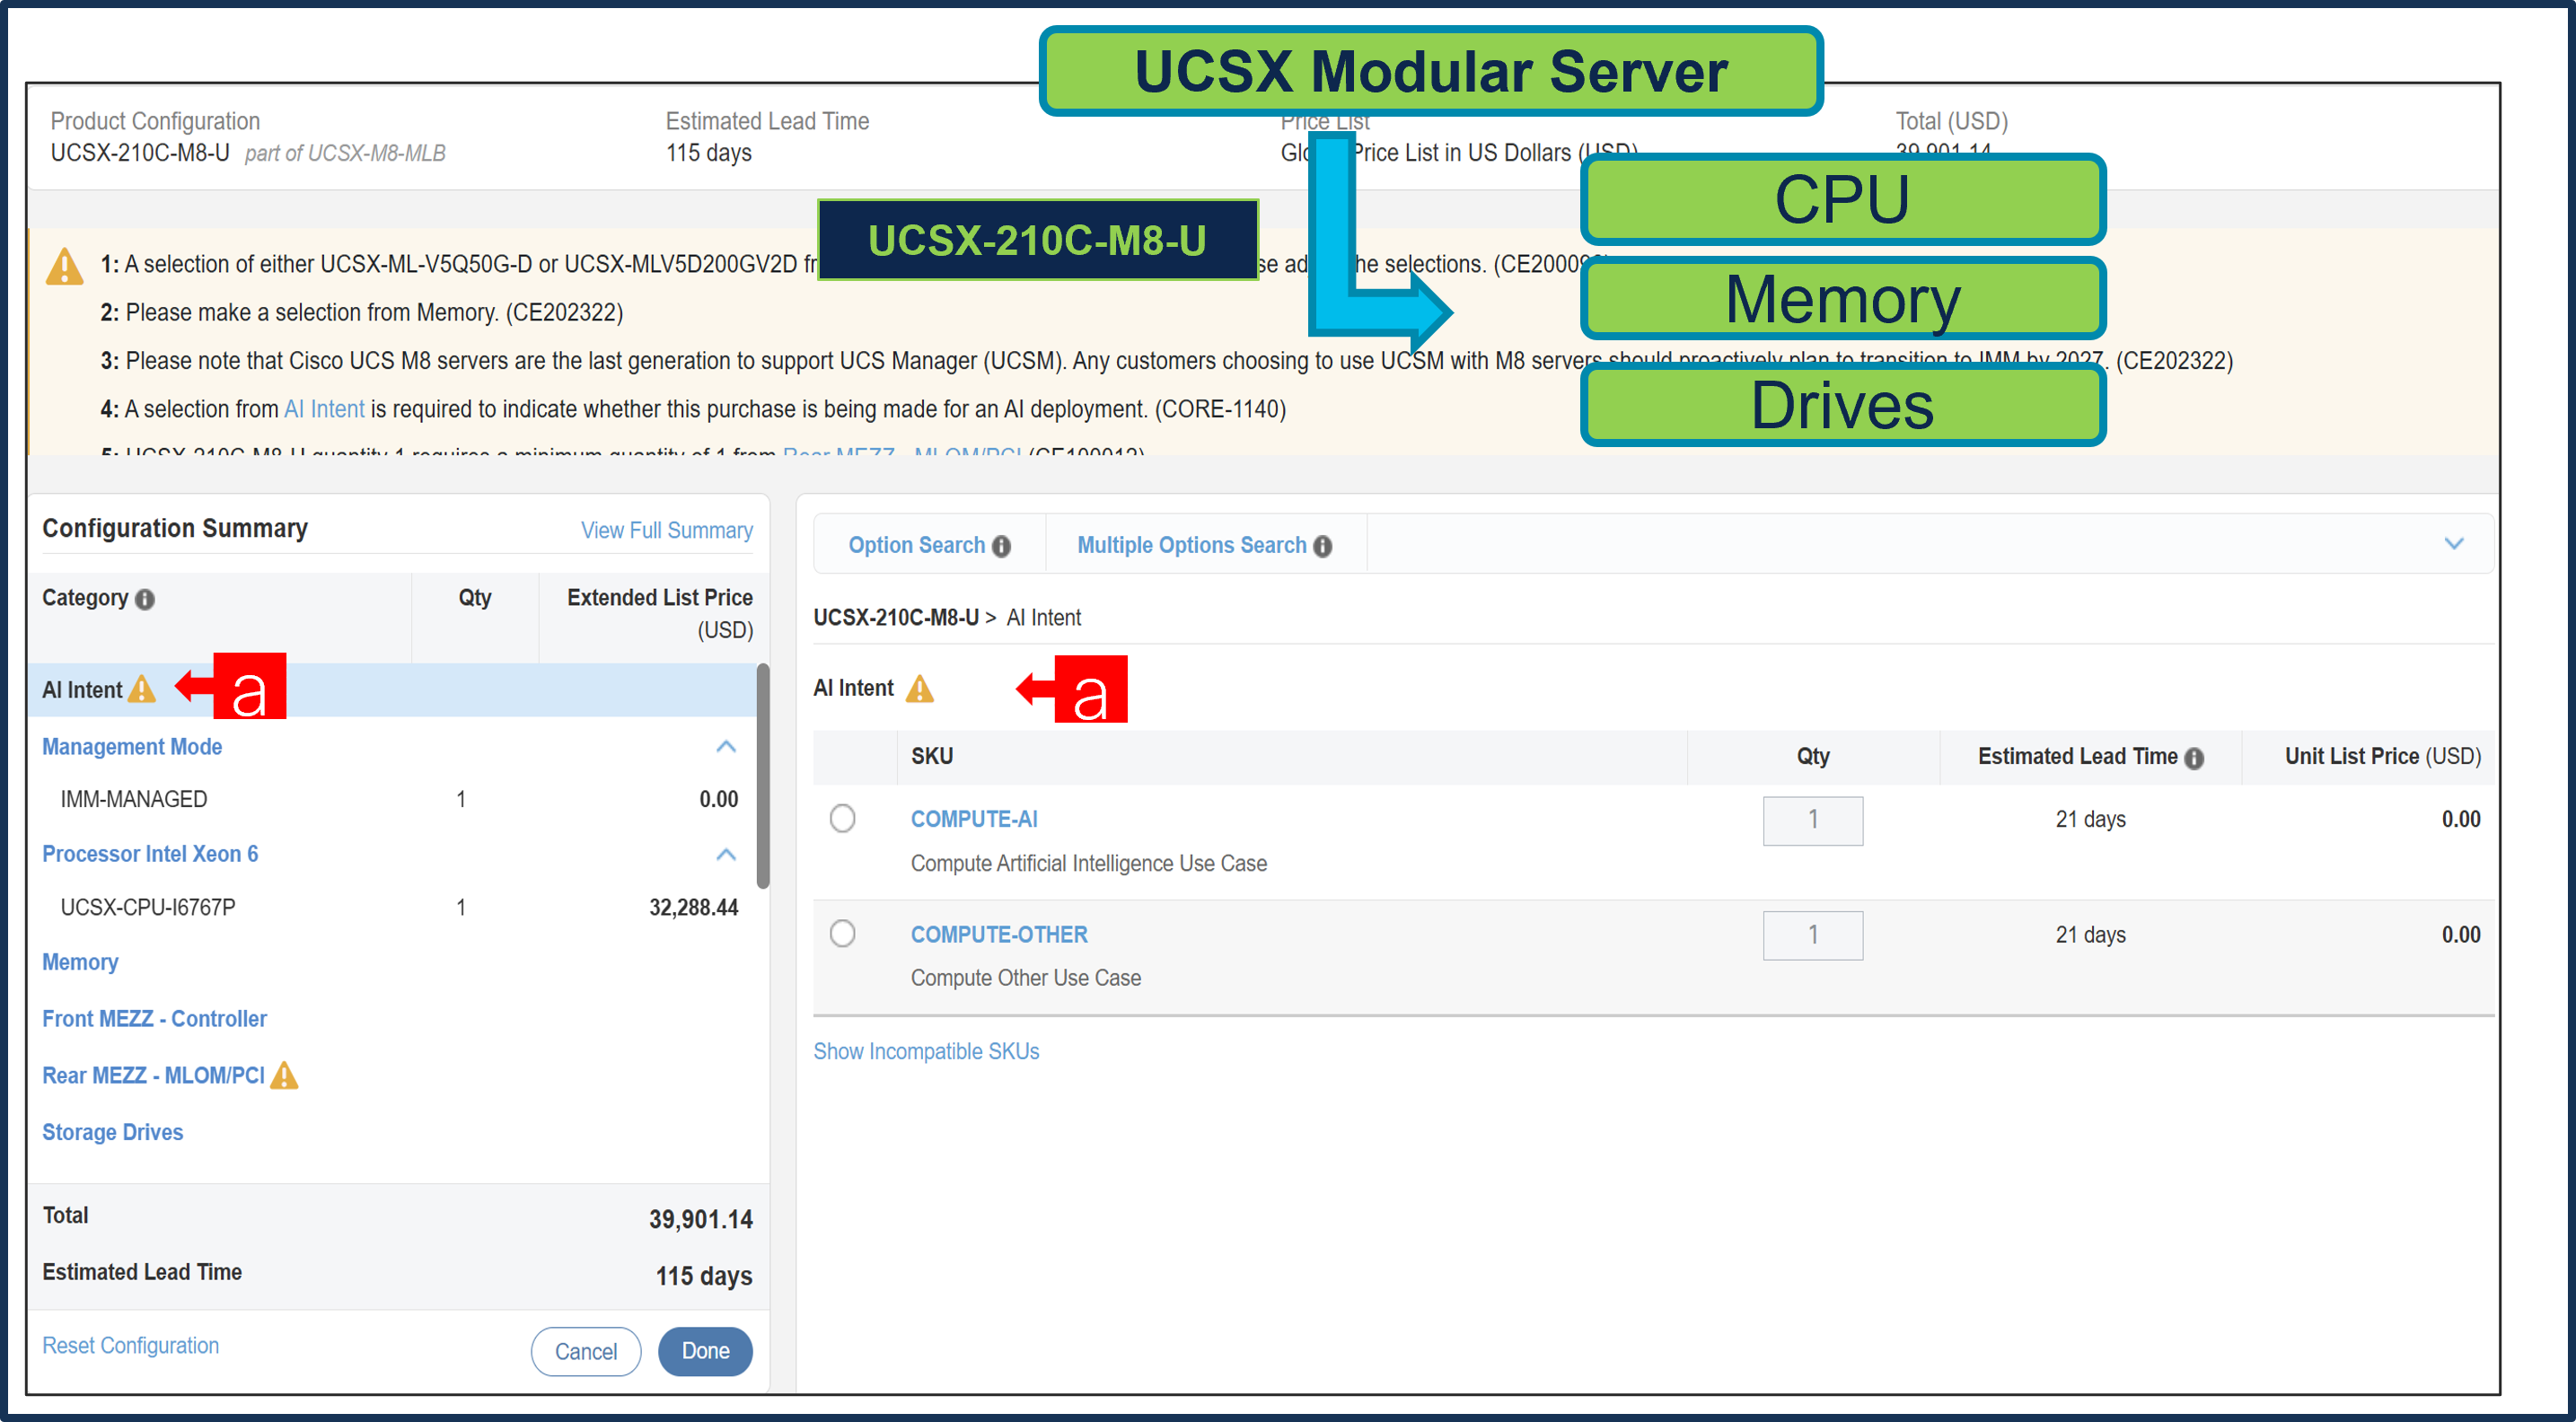
a. By making the right selection it provides information to Cisco that if Server is being intended to use AI features or not.
Step 23.
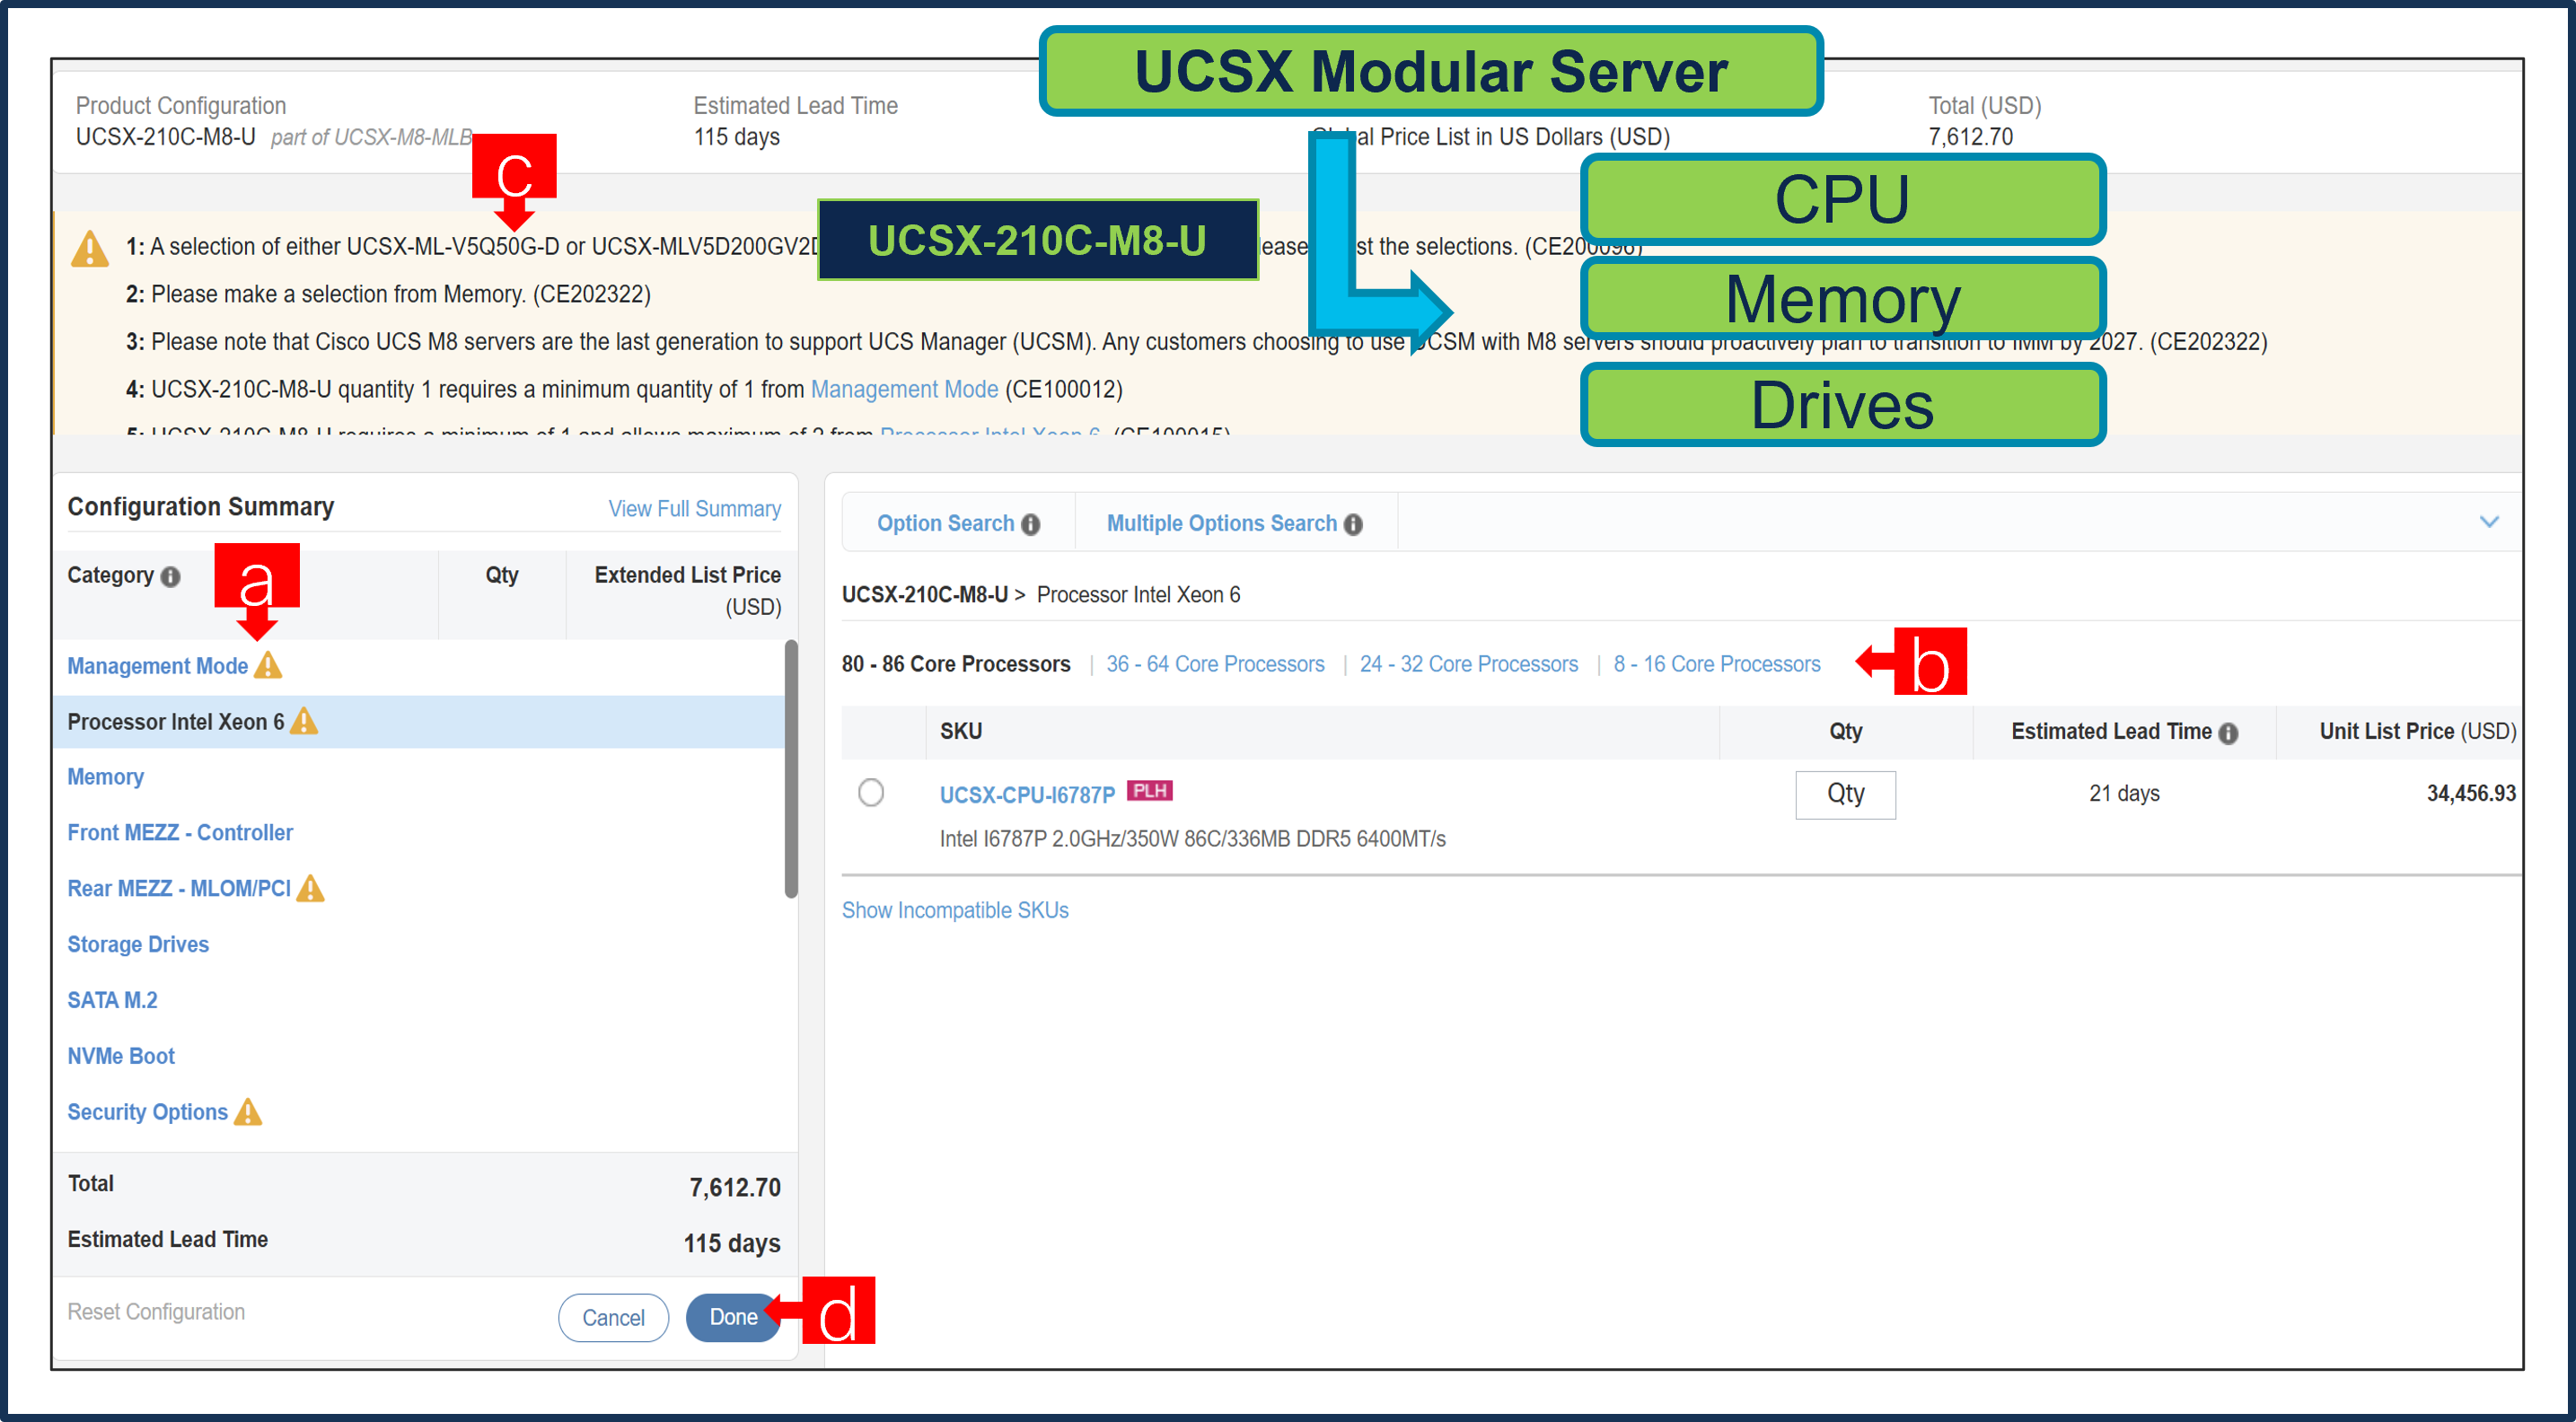
a. Configure UCSX-210C-M8-U by selecting peripherals from category window on the left.
b. PIDs are listed in the window on the right. Some PIDs like Processor, Memory and Storage Drives are grouped according to type or series; select from the grouped options located above SKU window on the right.
c. Follow warning messages to configure the minimum required option PIDs.
d. Click on “Done” when completed.
Step 24.
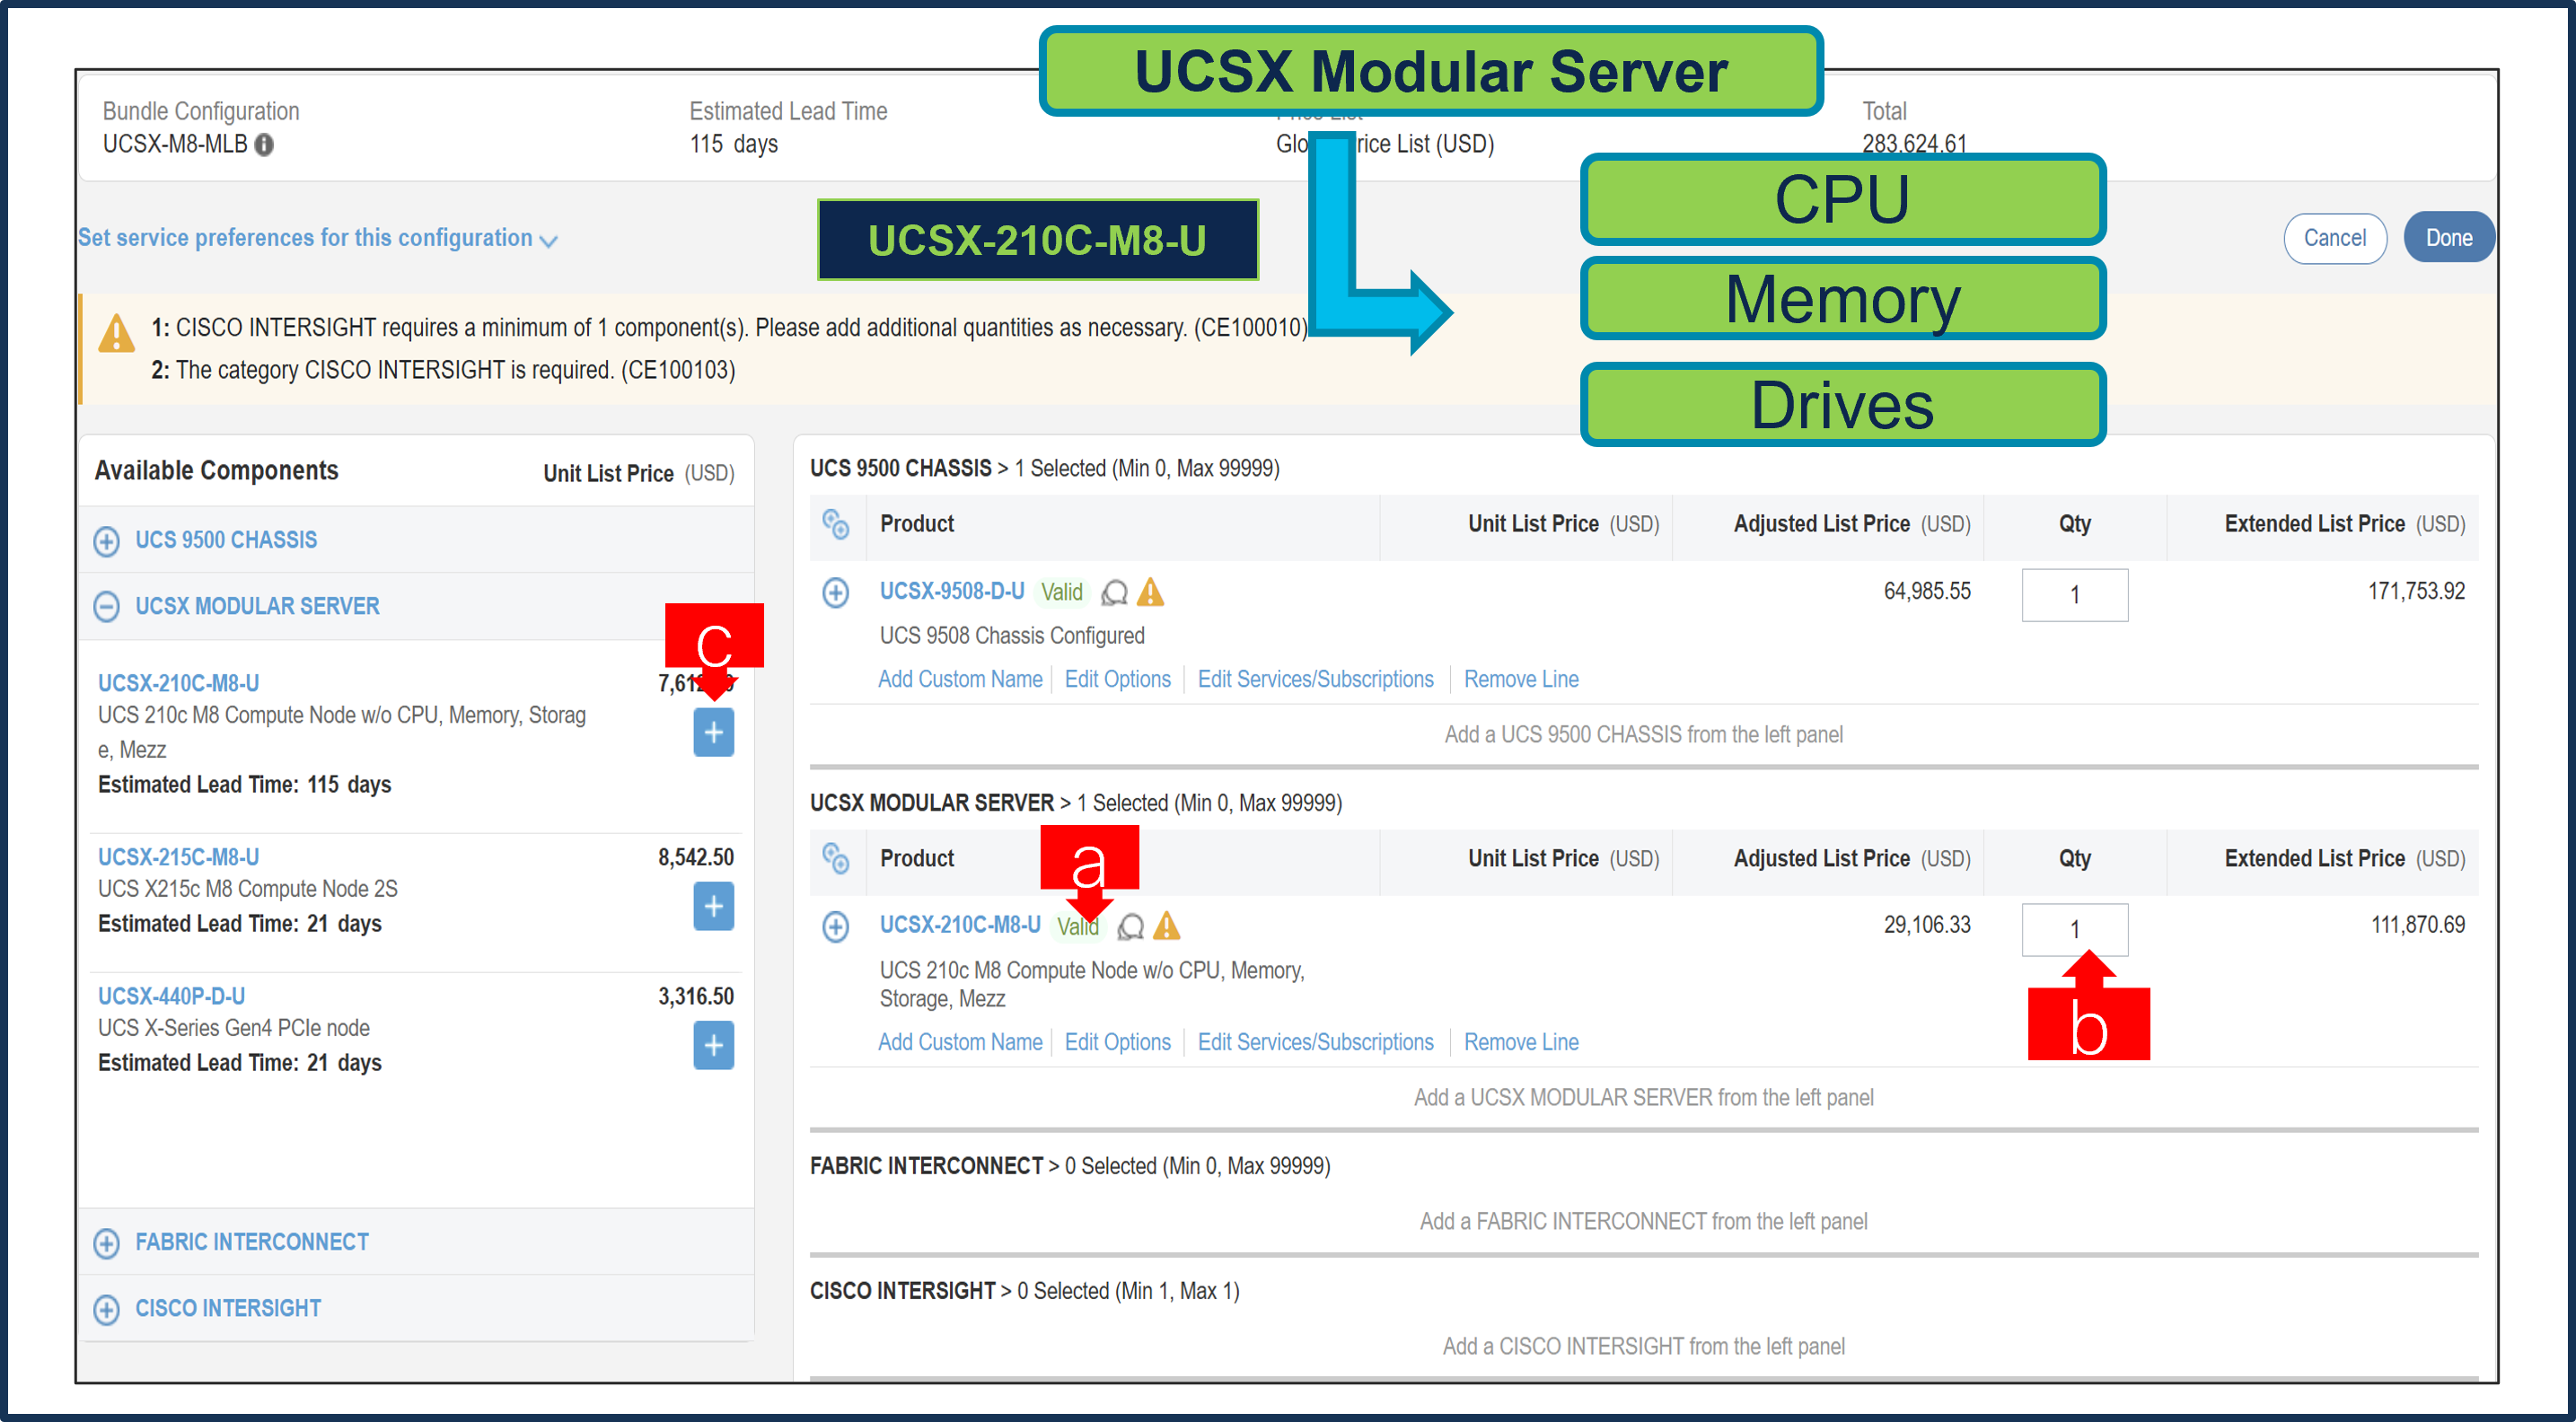
a. Note Status is now showing as “Valid”.
b. Increase the quantity for multiples of same configuration.
c. Click the “PLUS” to add and configure the same product with different option/quantities or select a different product.
Step 25.
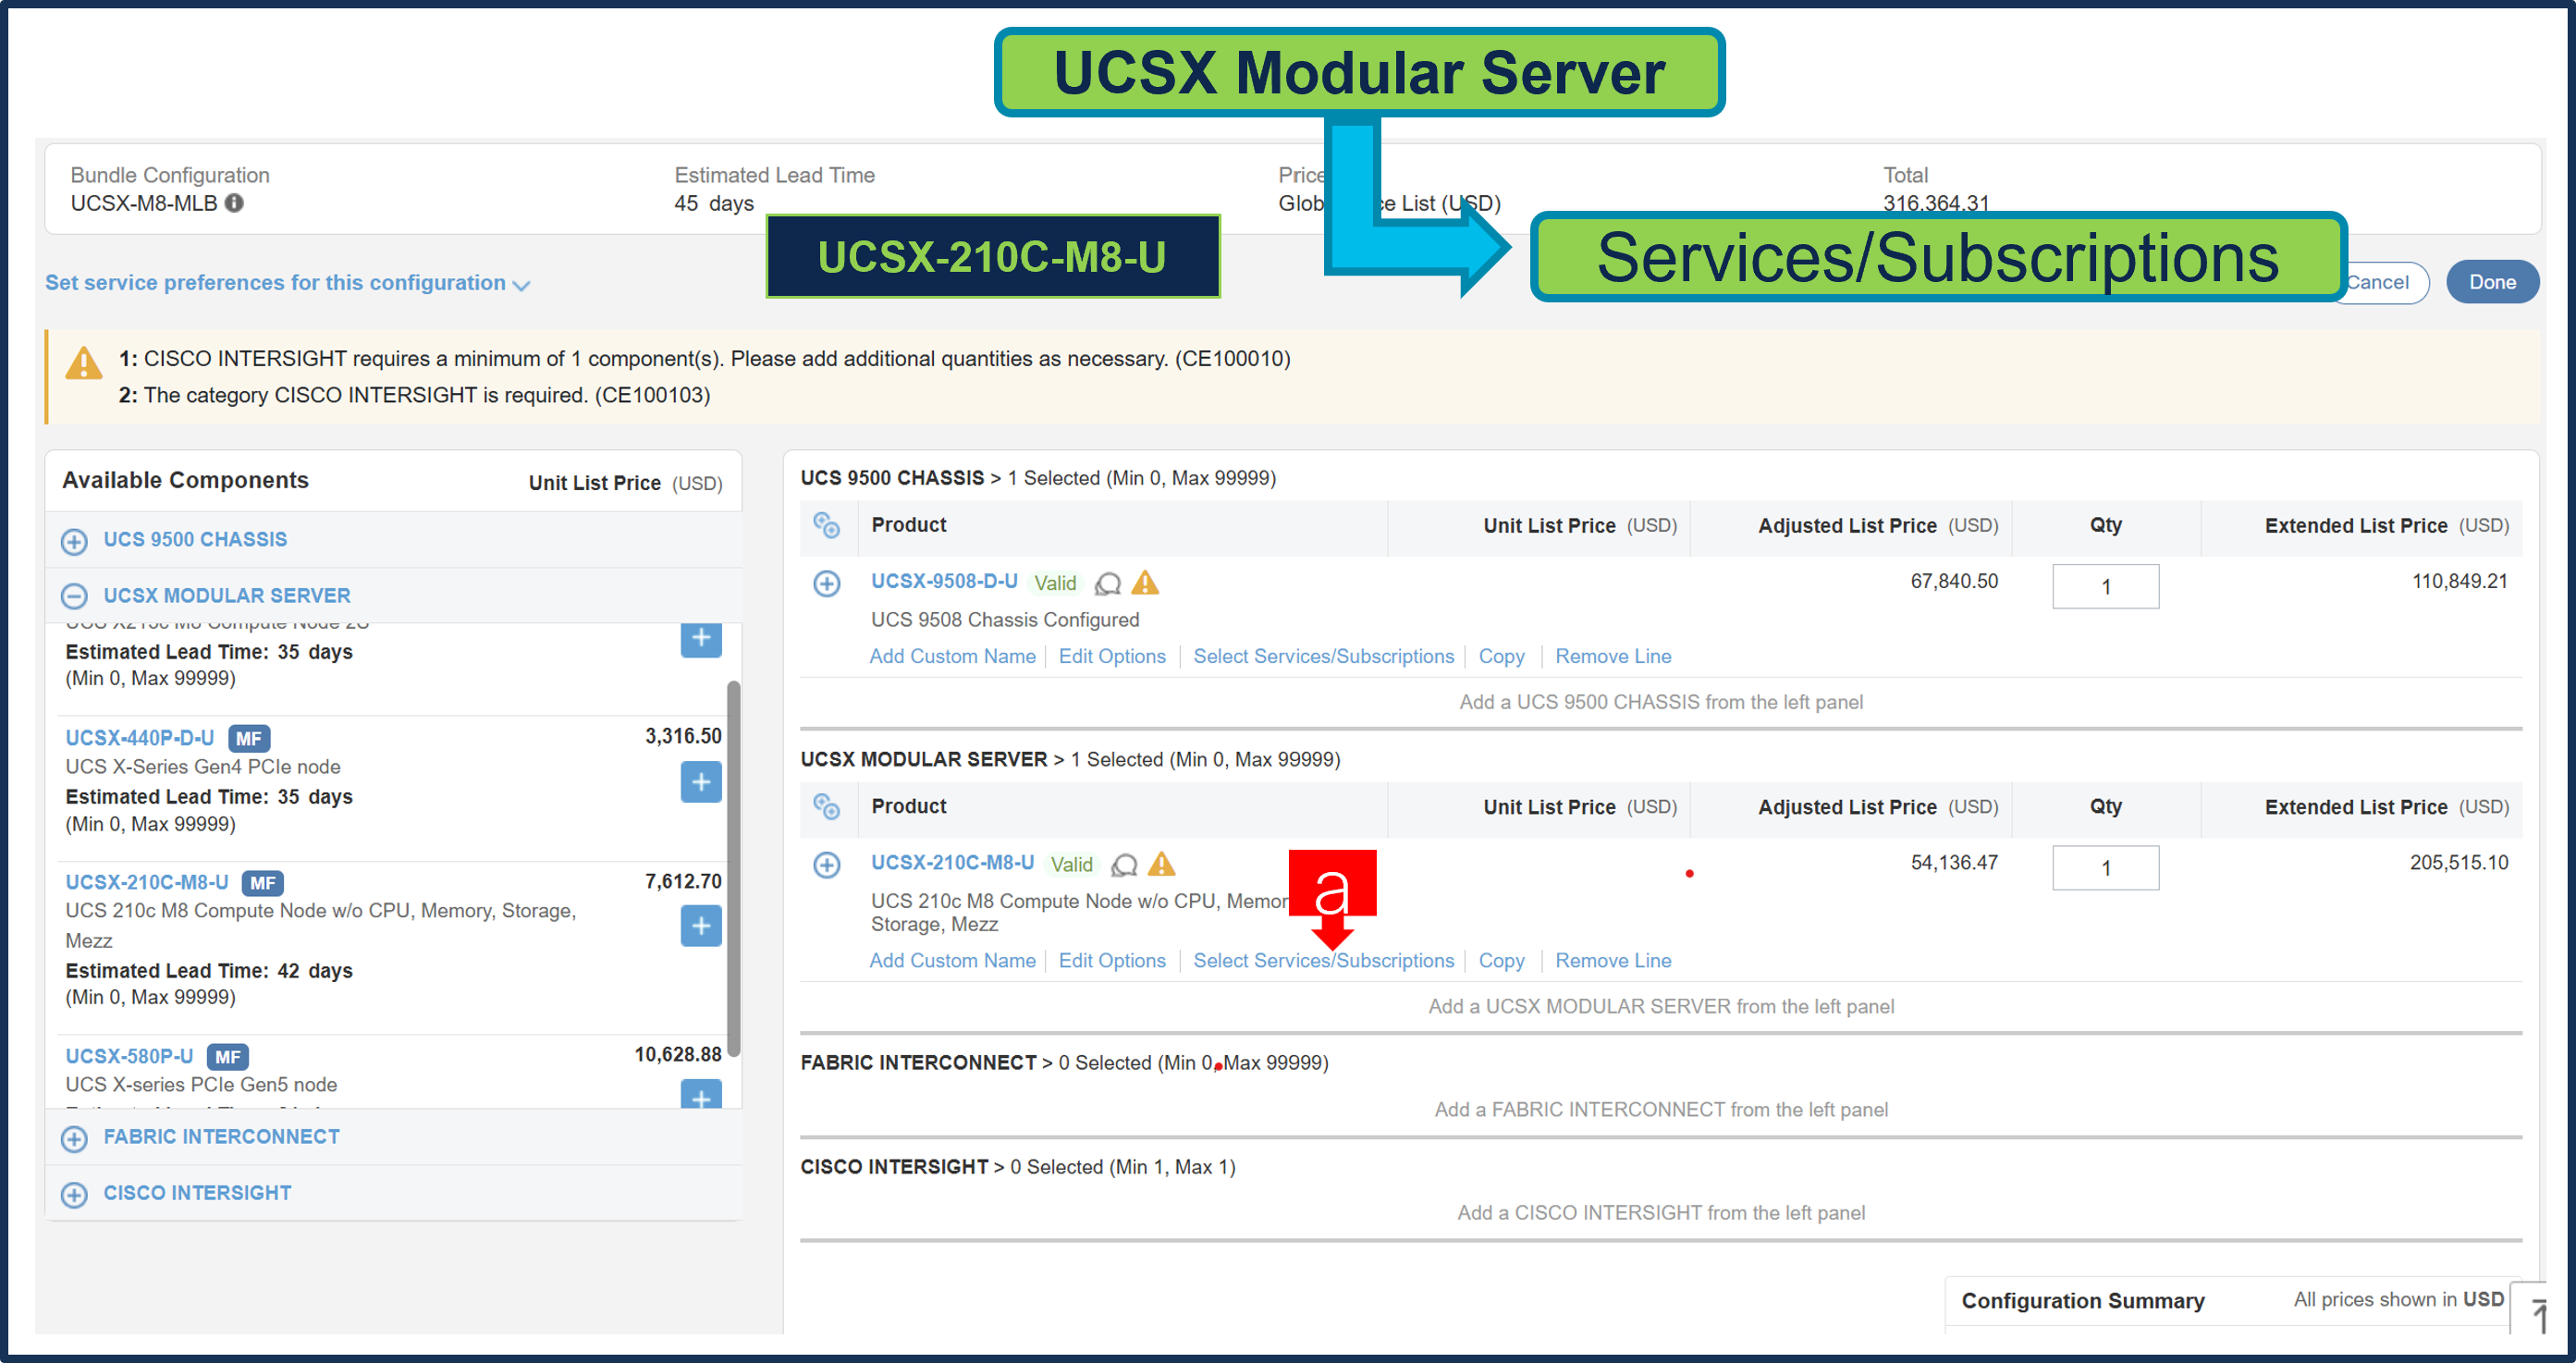
a. Click on “Edit Services/Subscriptions” to edit Term Duration for HW Support.
Note: It is recommended that Term Duration for HW Support must align with Software Subscription Duration.
Step 26.
a. Enter the Term Duration.
b. Click on “Apply” and “Done”
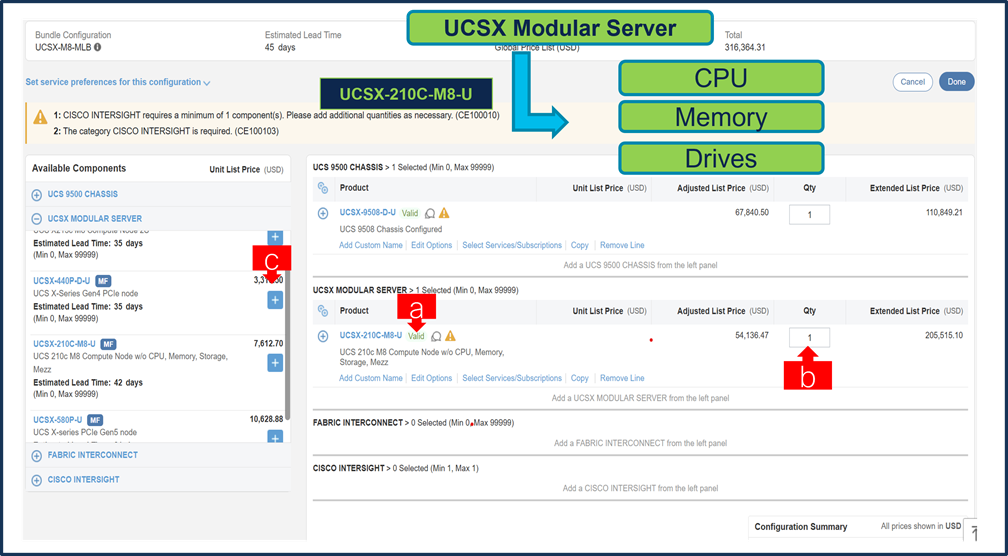
Step 27.
a. GPU PCIe Node: UCSX-440P-D-U is an optional selection, and user can select it by clicking plus
Step 28.

b. GPU PCIe Node: UCSX-580P-U is an optional selection, and user can select it by clicking plus
Step 29.

a. Fabric Interconnect is an optional selection, and user can select it by clicking plus
Step 30.
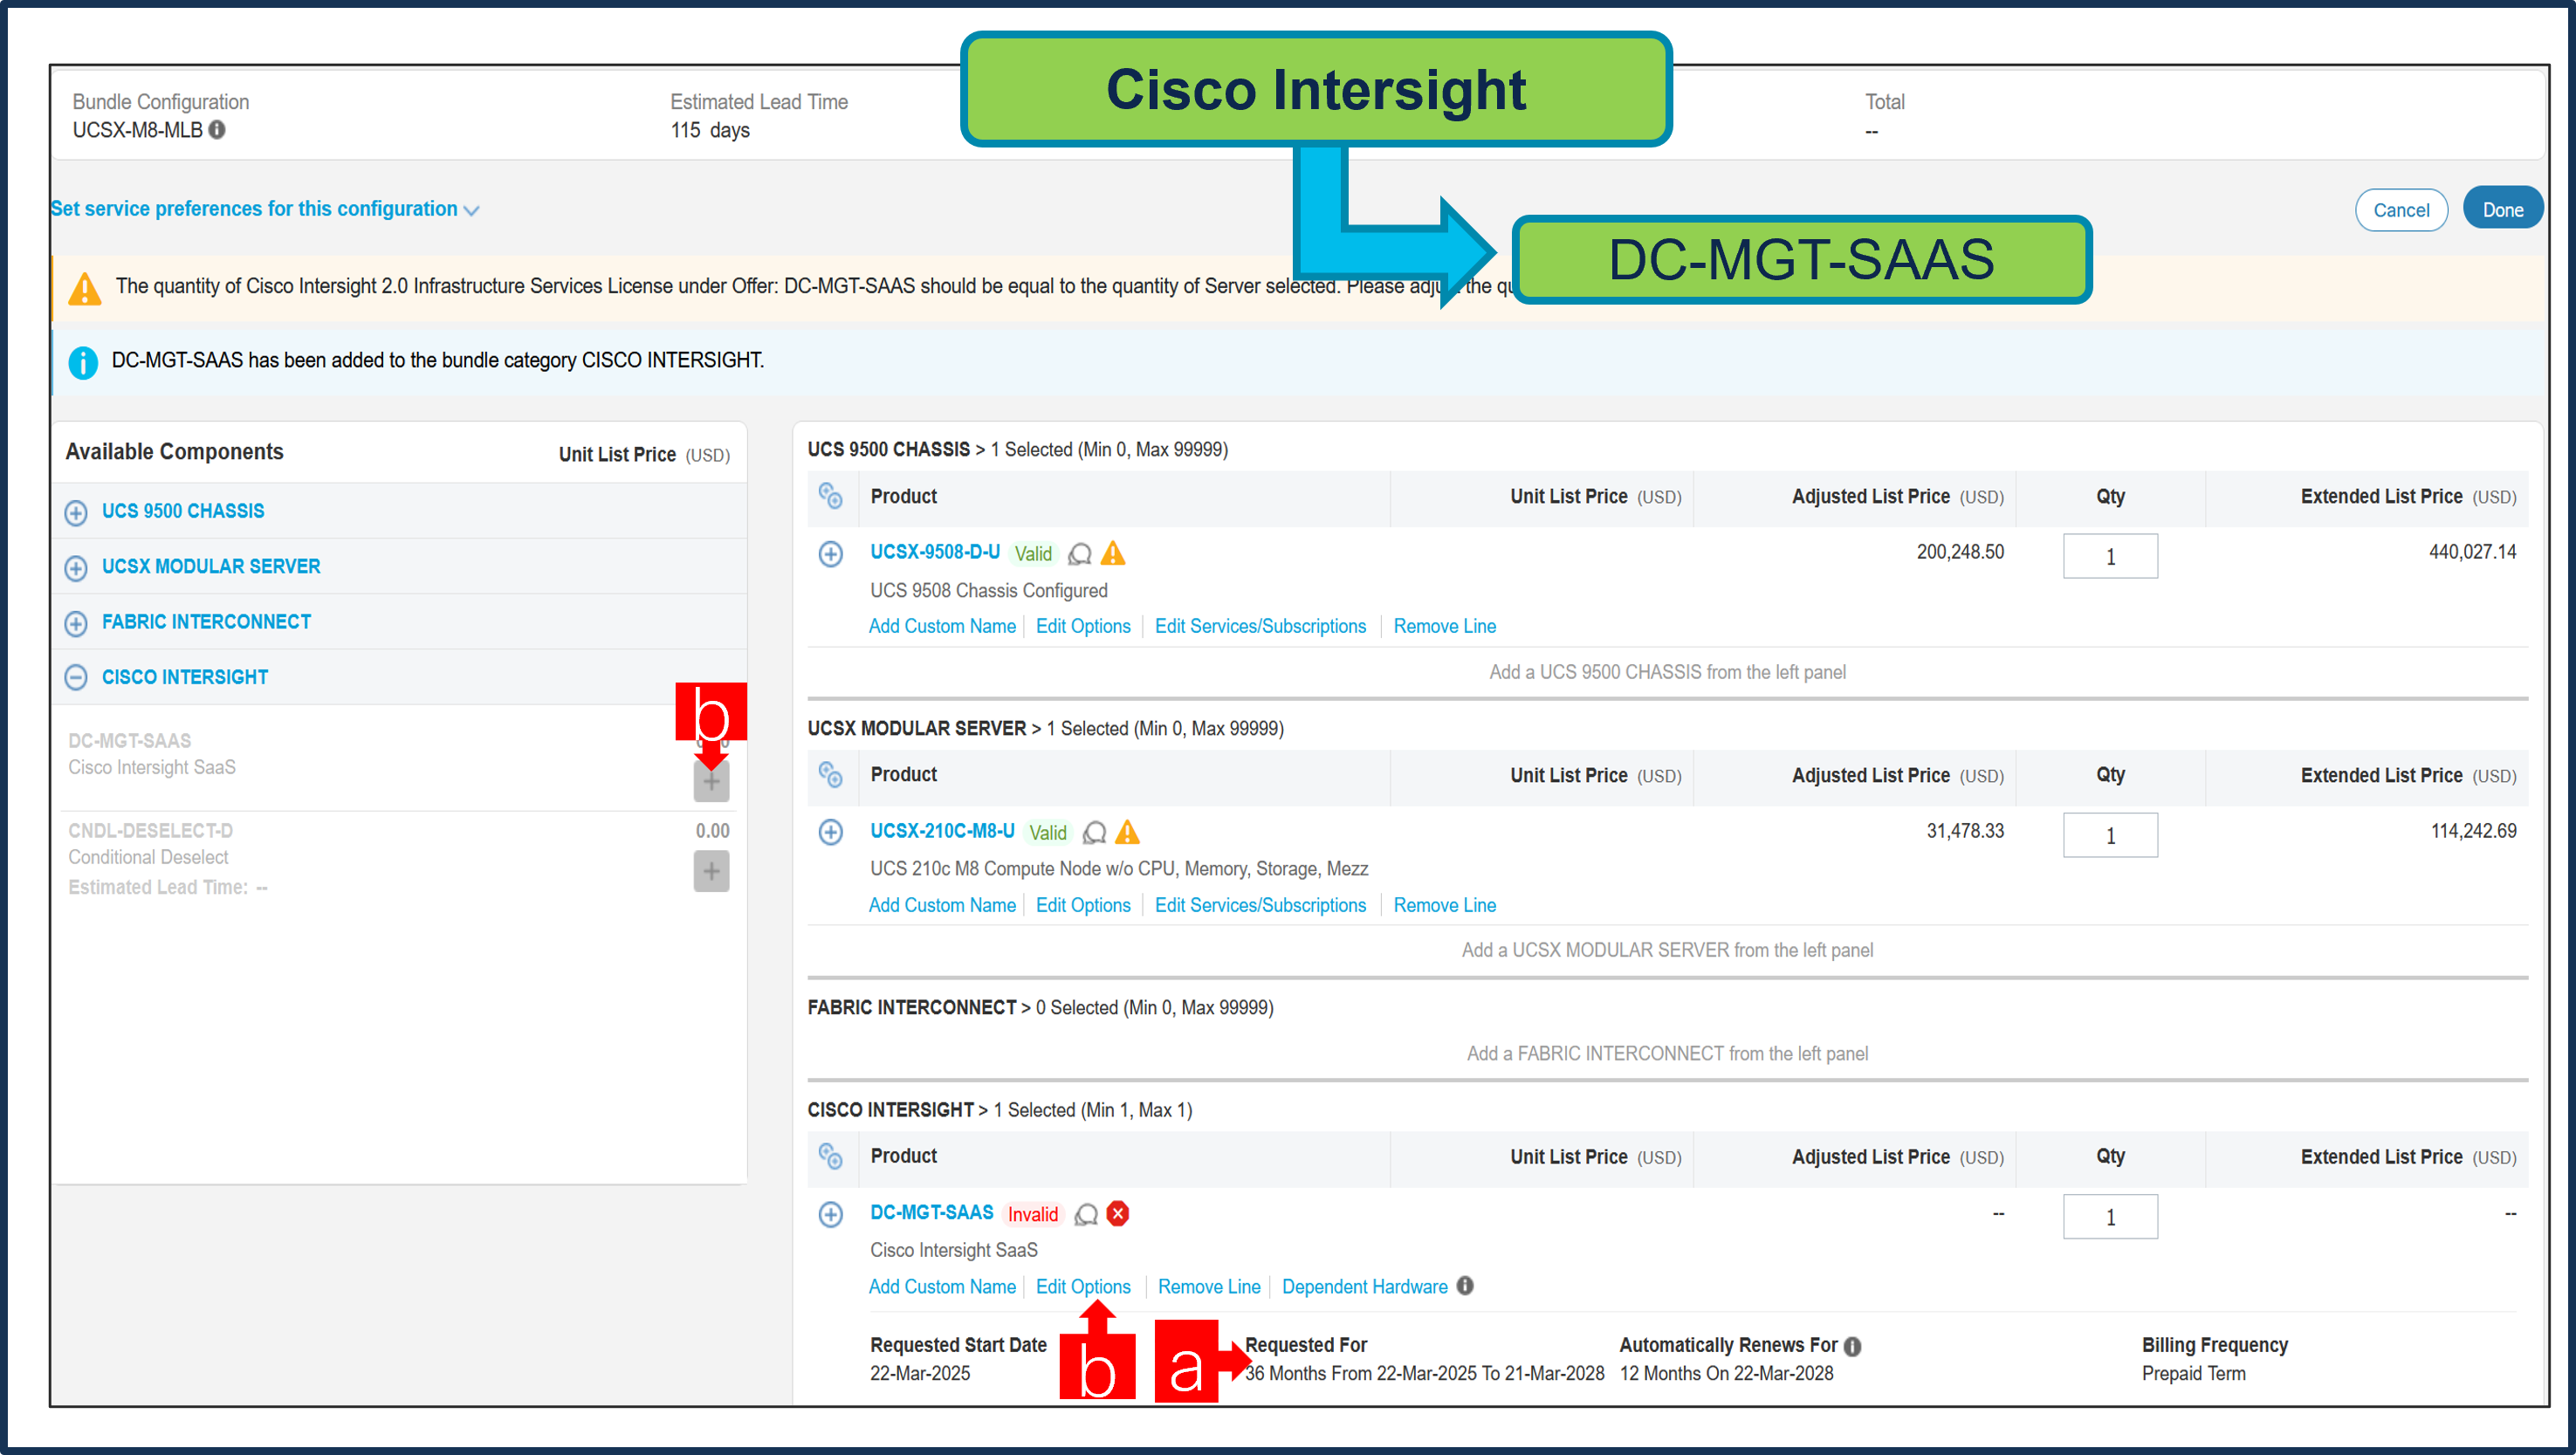
a. It is recommended that Term Duration for HW Support align with Software Subscription Duration.
b. Intersight is a required selection if you have not previously purchased Cisco Intersight Software. Please make selection by clicking “PLUS”. Click on “Edit Options” to configure.
Step 31.
a. Requested Start Date (RSD) is now dependent on HW Ship Date and will automatically starts when the HW ships. If you change the RSD, the Software will start either on the RSD you picked or the HW Ship Date whichever is later.
b. End Date (duration in months) is defaulted to 36 Months, Auto Renewal (on/off) is defaulted to On and Billing Frequency is defaulted to Prepaid Term. You can still change the setting accordingly.
Step 32.
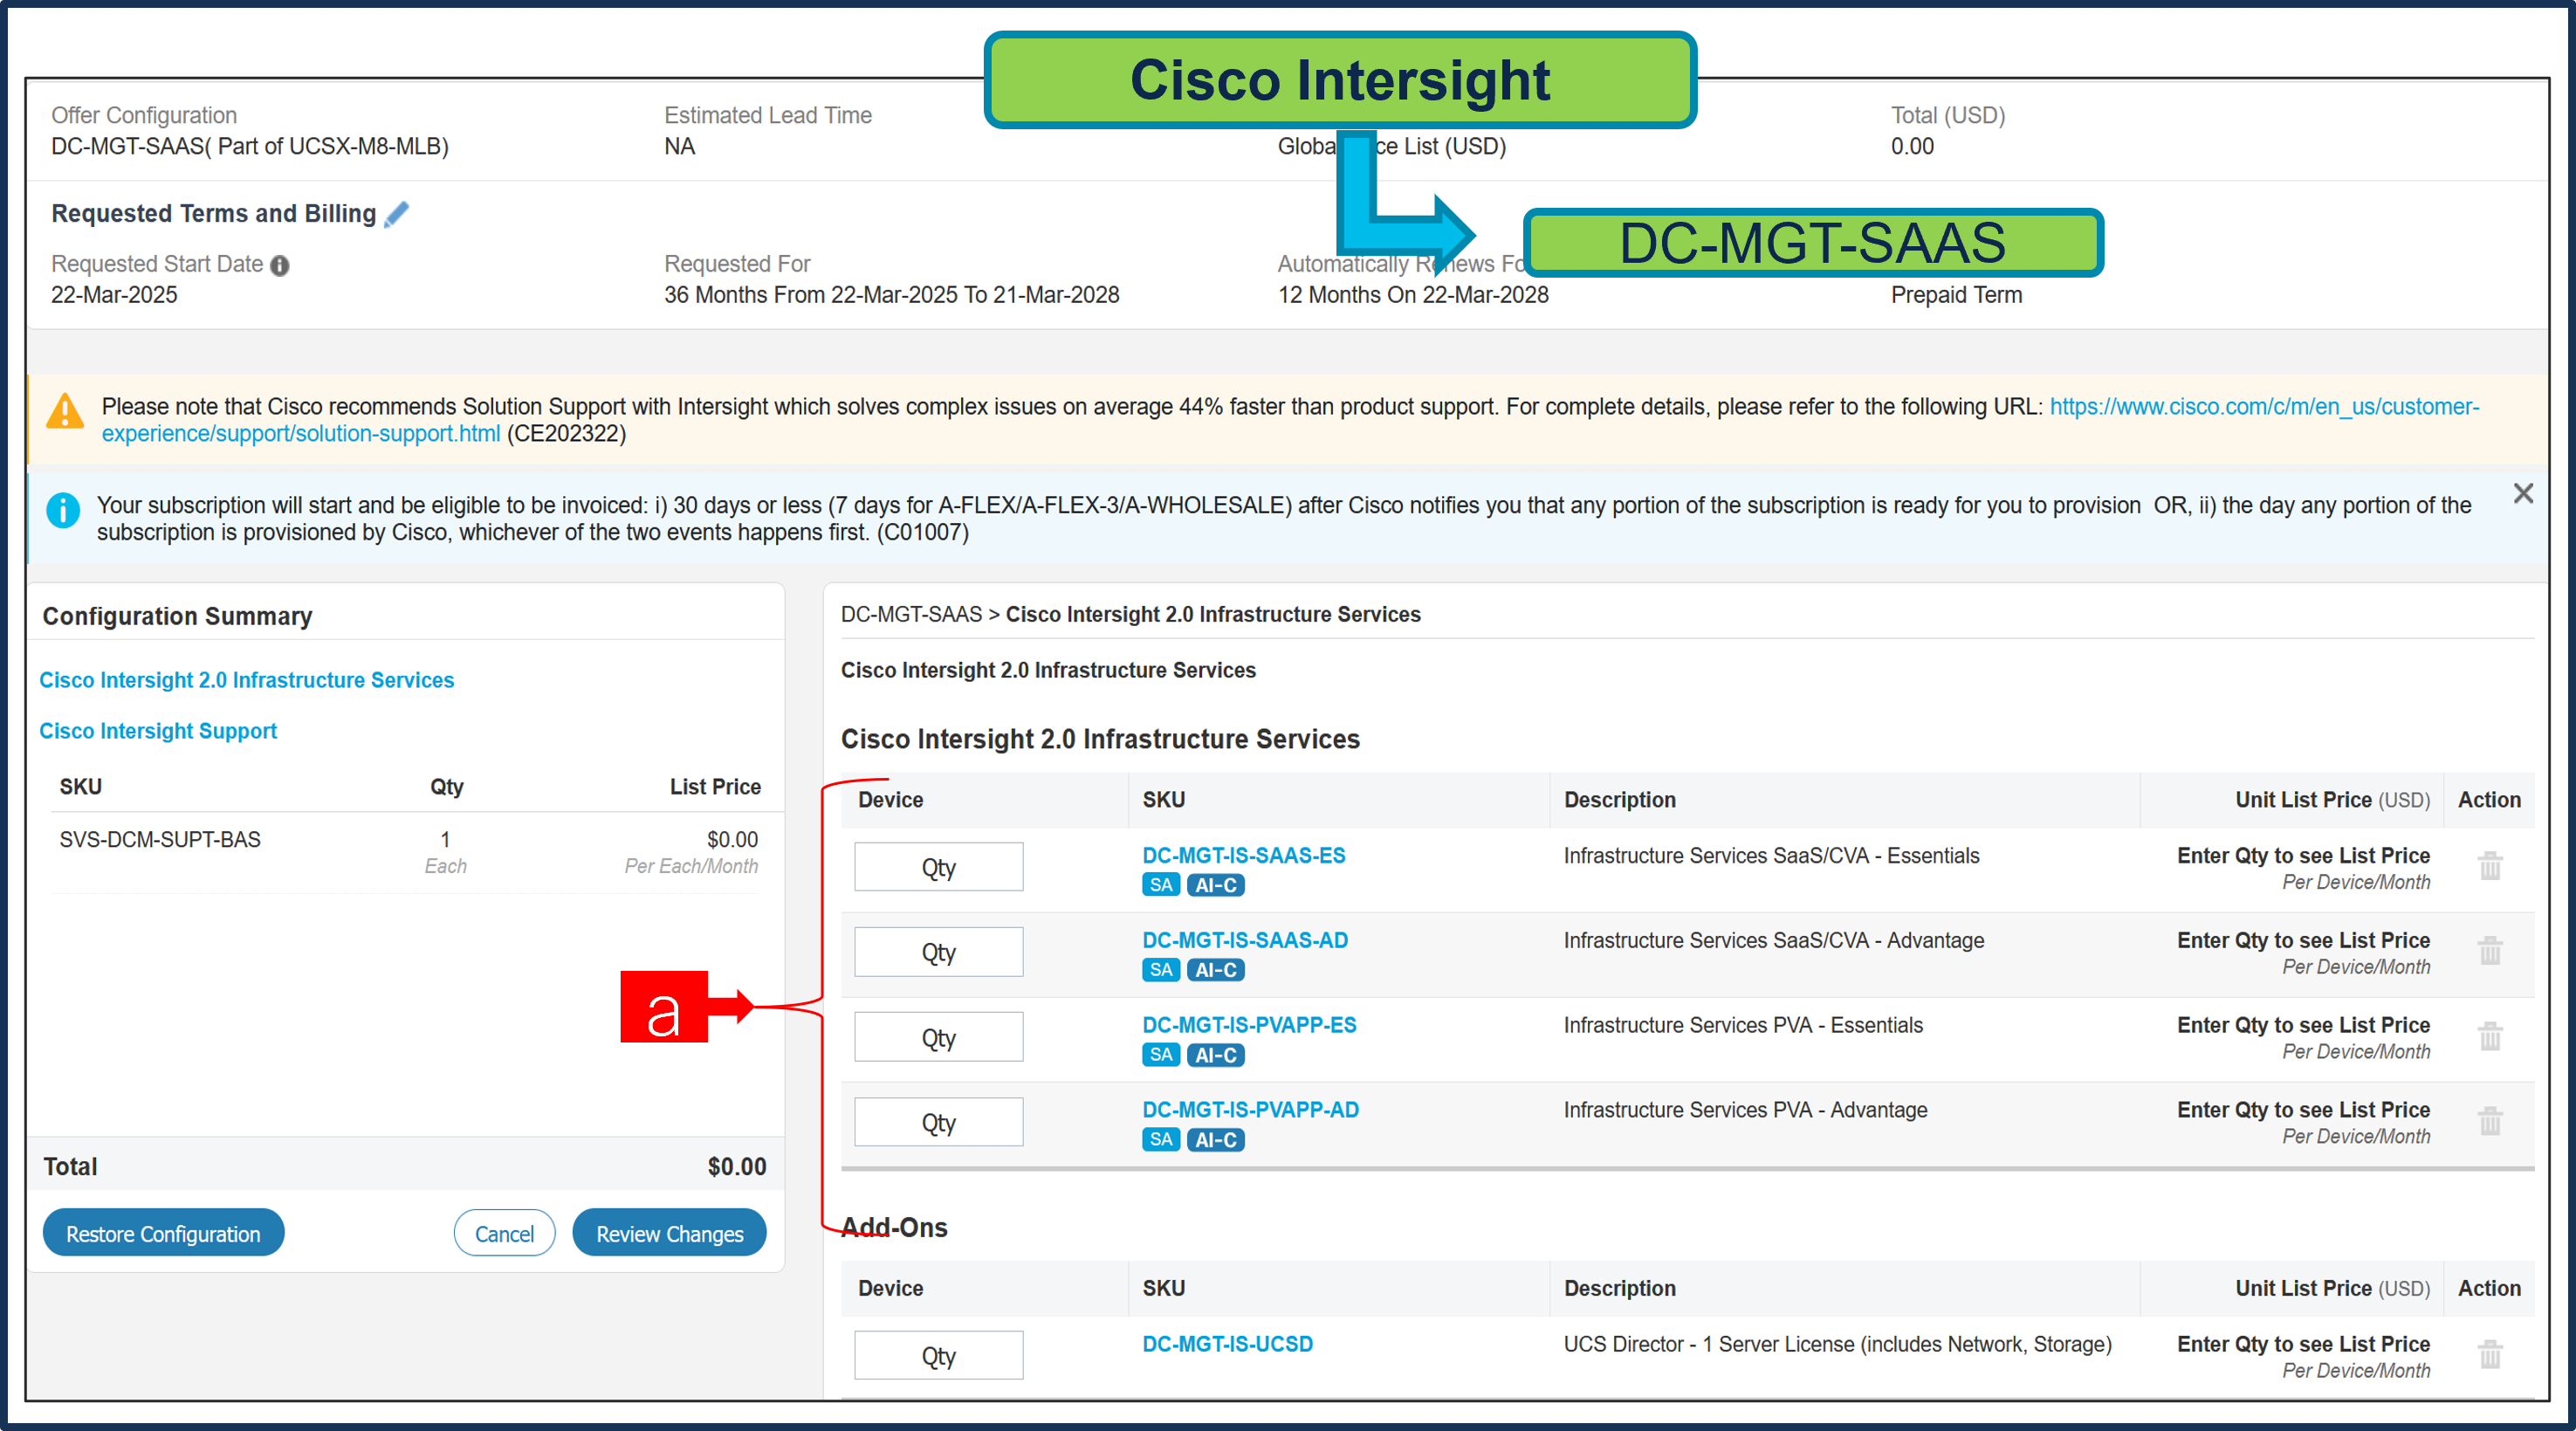
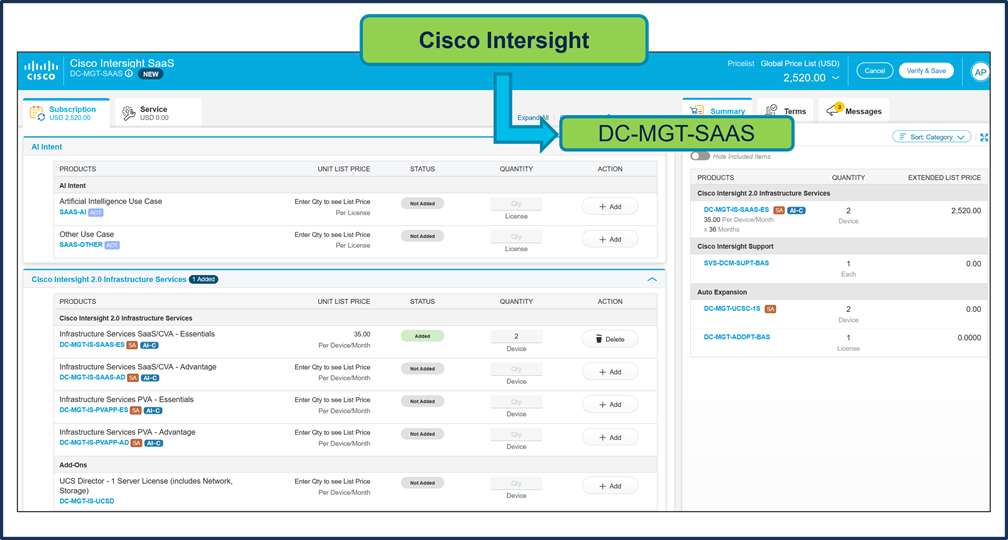
a. The quantity of Cisco Intersight 2.0 Infrastructure Services License under Offer: DC-MGT-SAAS should be equal to the quantity of Server selected. Enter the quantity.
Step 33.

a. User need to make selection from AI Intent Option Class.
Step 34.
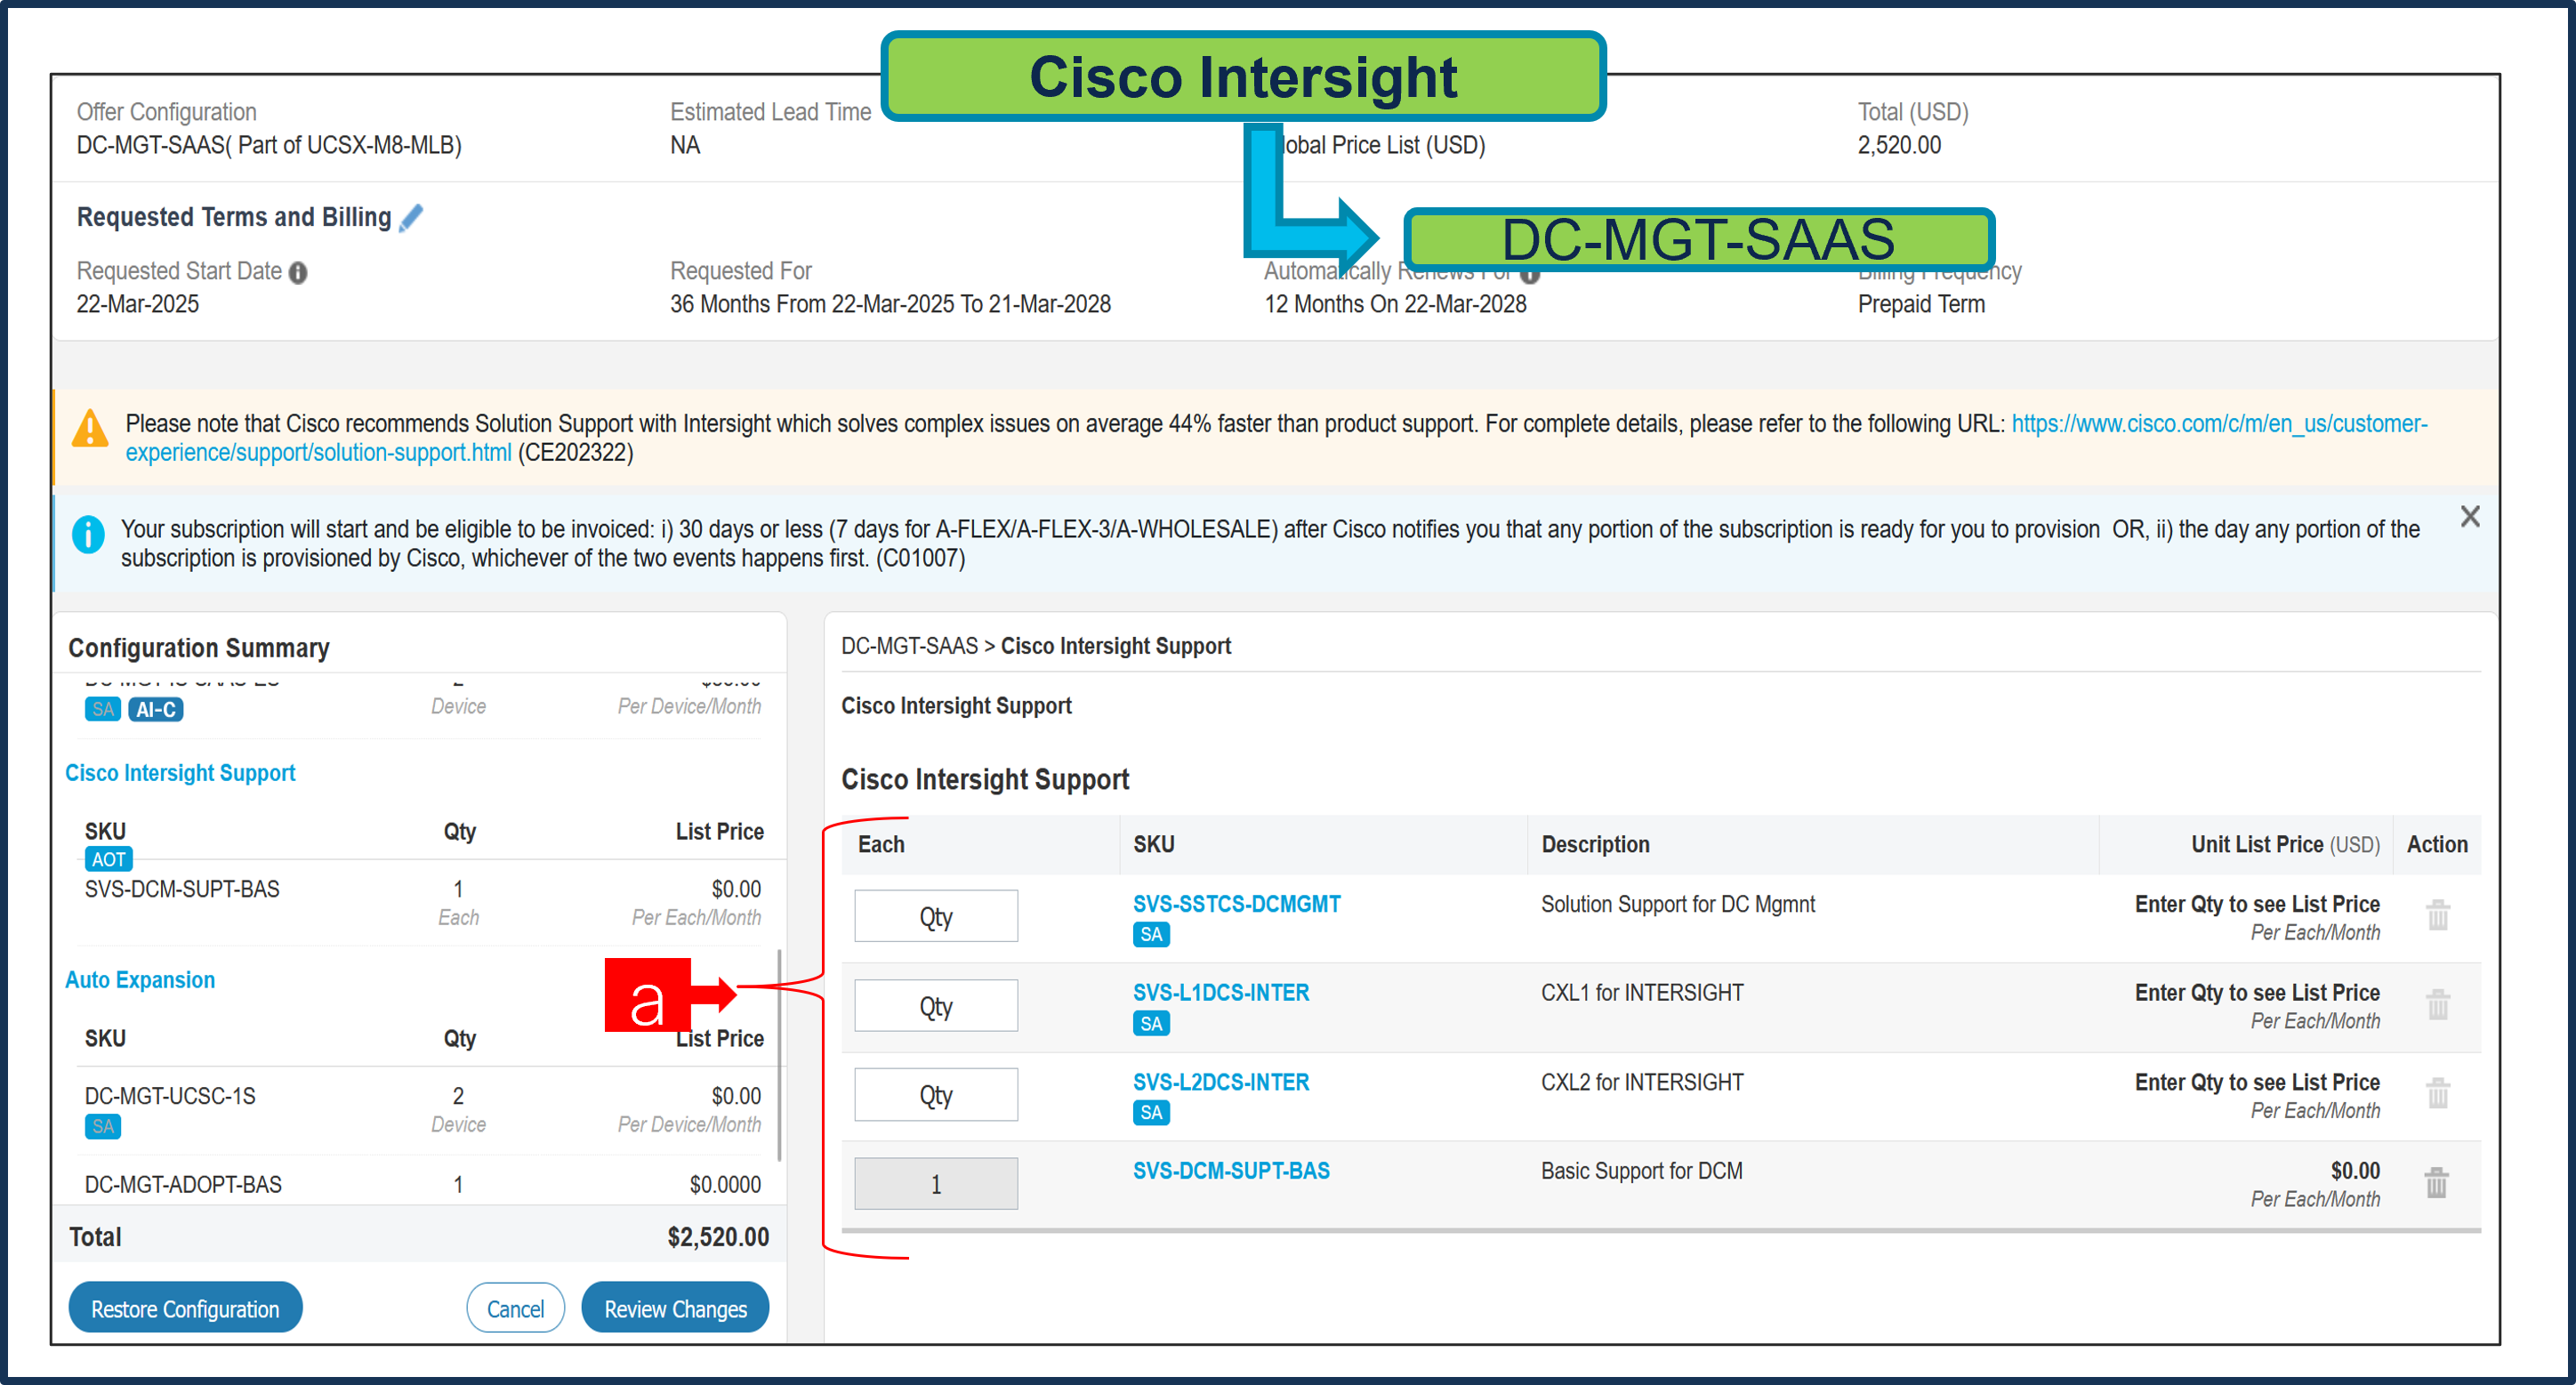
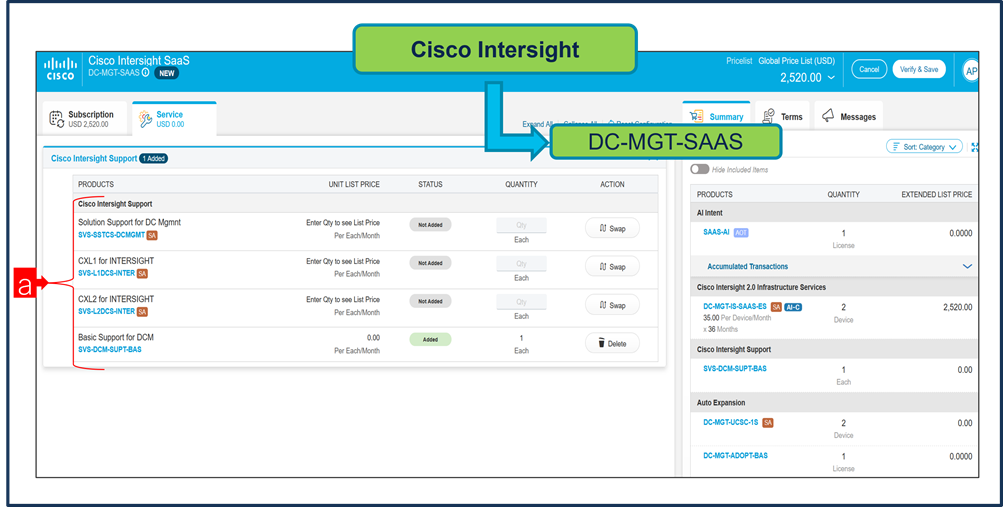
a. The Cisco Intersight License comes with separate Support. Basic Embedded Support is the default selection. It is recommended that Customer should upgrade to Solution Support or CX Success Track L1 or L2 for the HW.
Step 35.
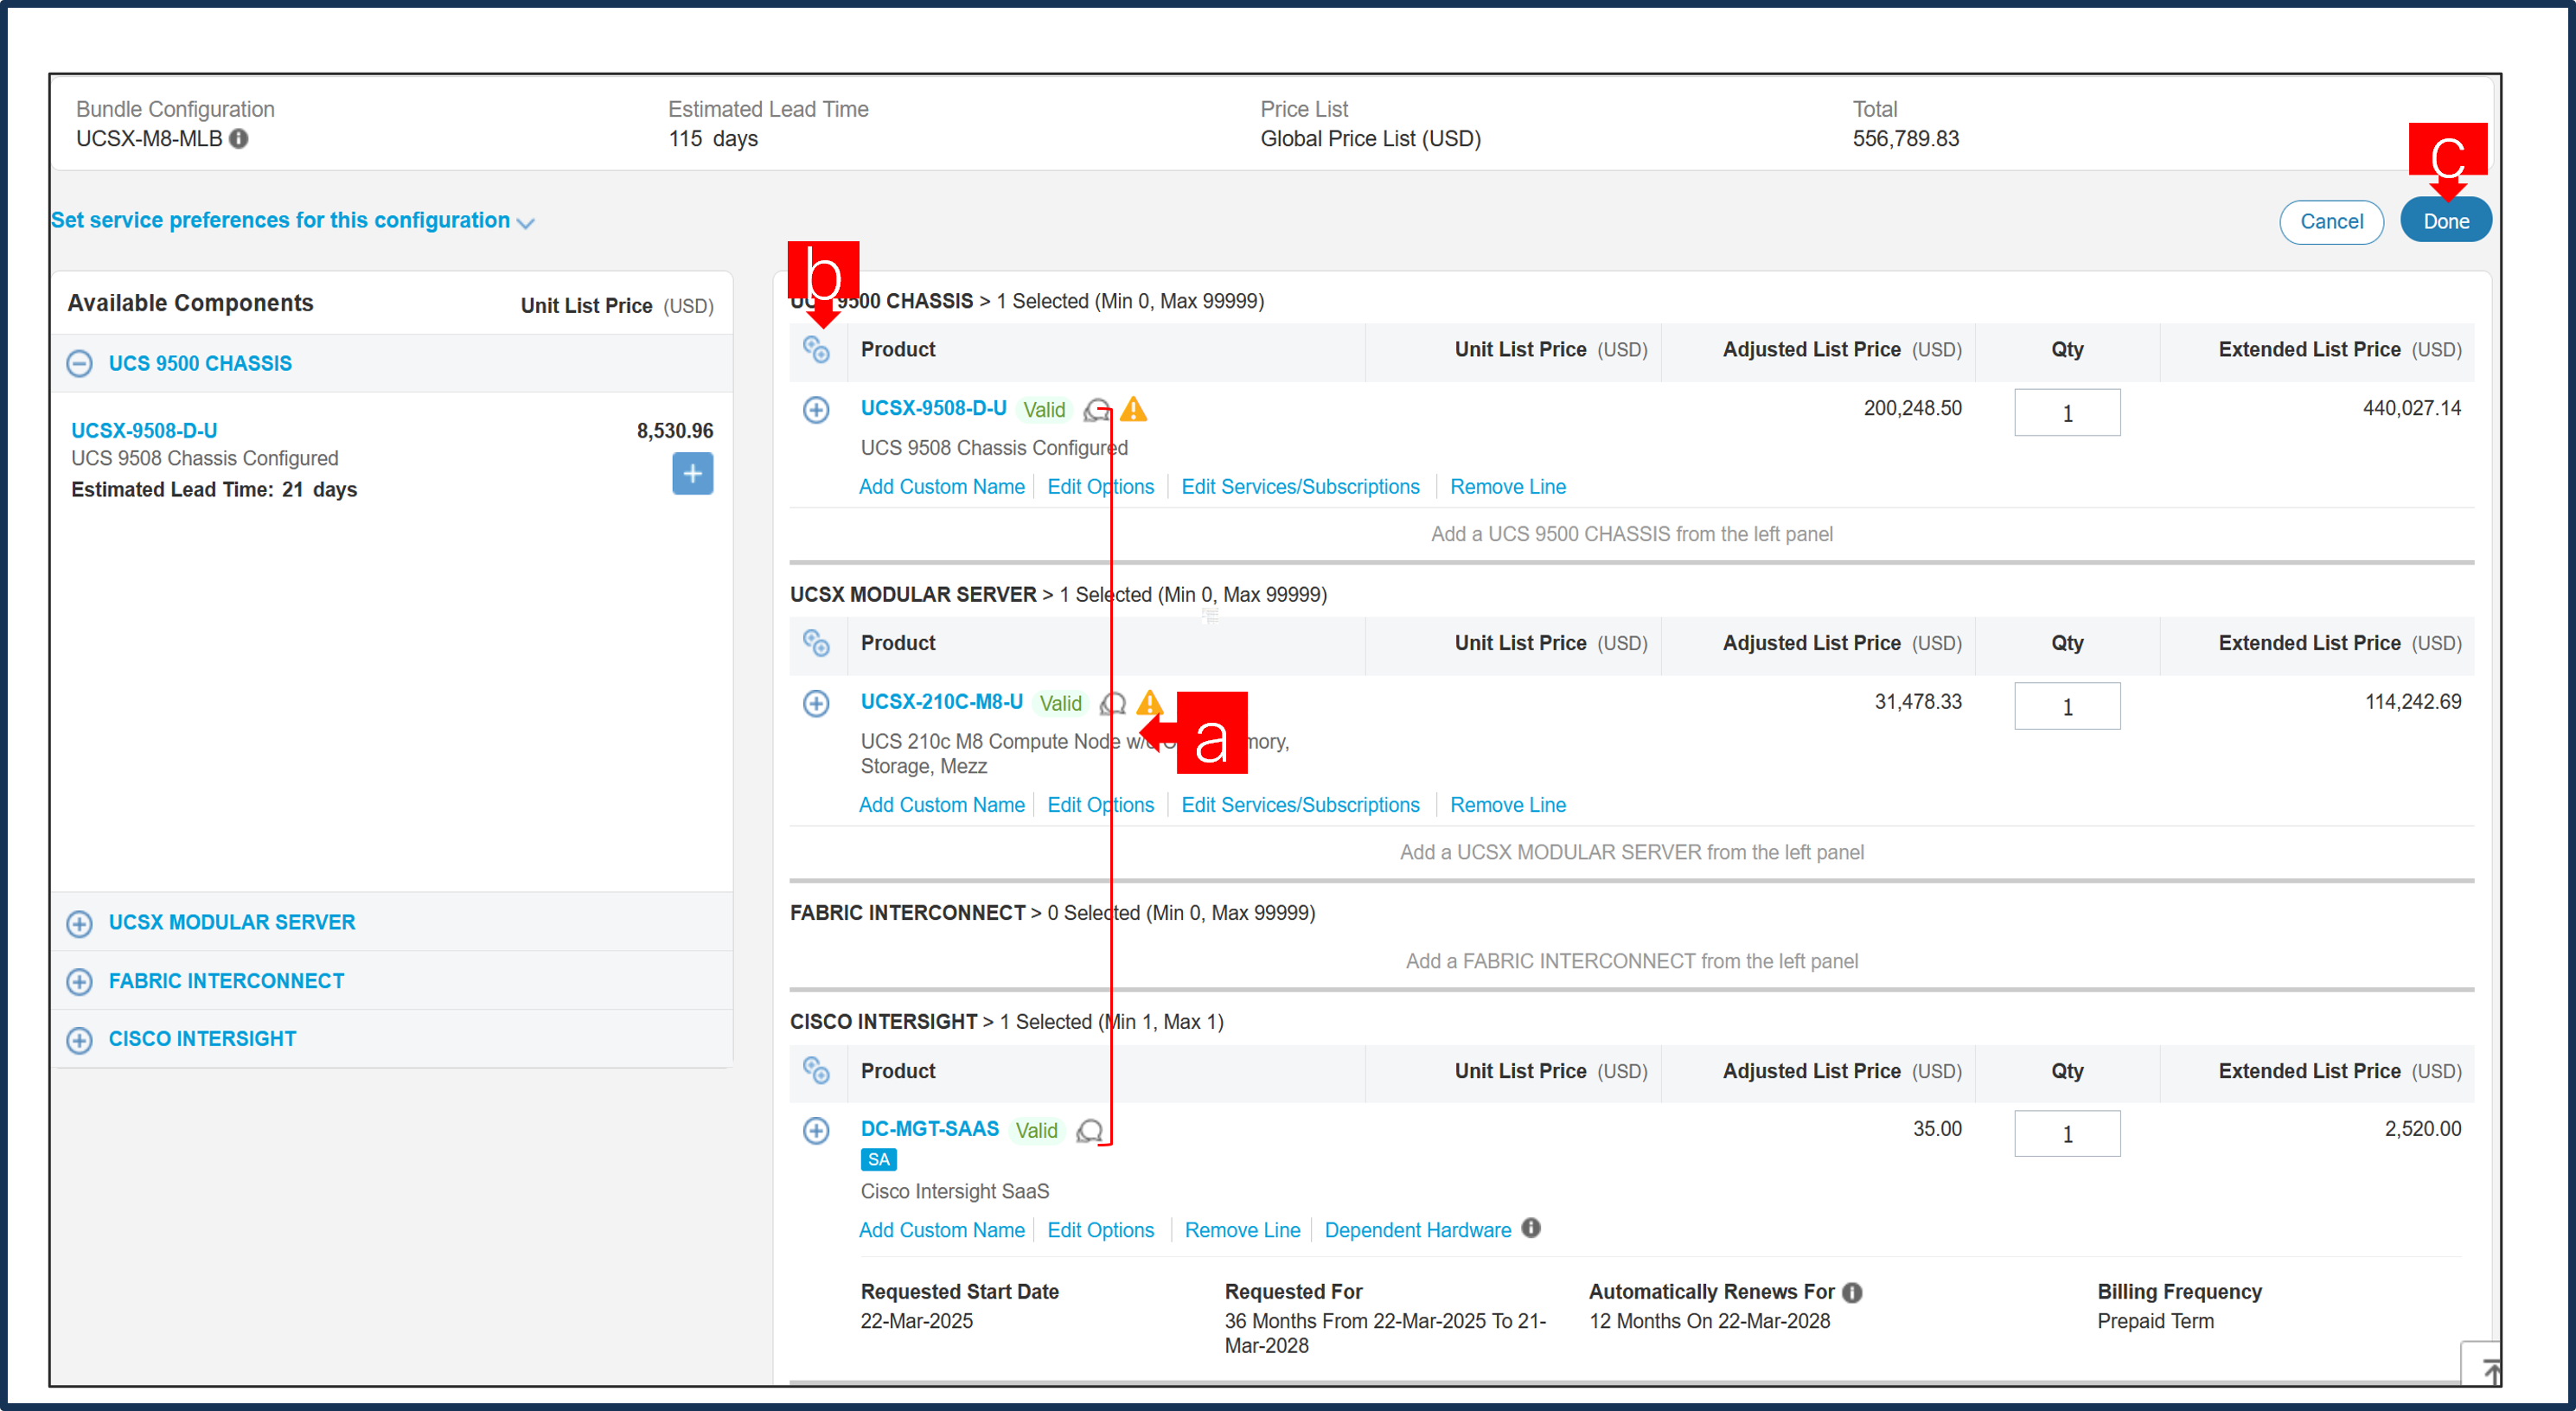
a. Configuration for MLB is completed when status of each Product is Valid and warning messages are cleared.
b. Click on the “PLUS” to expand and view the selections made for each Product.
c. Click on the “DONE” to complete the MLB Configuration.
Scenario 2: Customer With Enterprise Agreement for Cisco Intersight Software License
Step 1.
a. In CCW, search for MLB PID and click on “Add”
b. Click on “Select Options” to enter the configurator.
Step 2.
a. Select UCSX-9508-D-U ATO from under MLB by clicking the “PLUS”
b. Notice the UCSX-9508-D-U ATO Status is invalid as further configuration needed.
c. Click on “Edit Options” to enter the configurator.
Step 3.

a. Configure UCSX-9508-D-U by selecting Compute Node, Fabric Interconnect Module or Intelligent Fabric Module, Power Supply and Power Cables from category window on the left.
b. Follow warning messages to configure the minimum required selections under Chassis.
Step 4.
a. Compute Node is required selection and is further configurable.
b. User can select either Server: UCSX-215C-M8 or UCSX-210C-M8 or both together in same configuration.
Step 5.

a. Server: UCSX-210C-M8 can be selected in multiple QTY by changing the QTY in the box or you can select same server and configure differently within same chassis by clicking in ADD NEW button.
b. Here in this example, we have 2 instances of server selected with 1 QTY each.
c. Click on Server PID in the left to configure the particular instance.
Step 6.
a. Configuration of one server Instance can be copied to another instance. Click on Copy Button on the extreme right as shown here.
b. Select the particular instance and click Yes.
Step 7.
a. Click on Server PID in the left to configure it.
b. User need to select Management Mode option based on how they plan to deploy the Server.
Step 8.

a. If any AI Capable PID is selected, then User need to make selection from AI Intent option class.
Step 9.
a. By making the right selection it provides information to Cisco that if Server is being intended to use AI features or not.
Step 10.
a. Configure UCSX-210C-M8 by selecting Processor, Memory, Drives and other peripheral devices and PIDs are listed in the window on the right.
b. Follow warning messages to configure the minimum required selections under Server.
c. Click on “Done” when completed.
Step 11.

a. Configure GPU PCIe Node: UCSX-440P-D under Compute Node: UCSX-210C-M8.
b. Click on UCSX-440P-D to configure it further in Left Window.
c. Selection of X- Fabric Module: UCSX-F-9416-D under Chassis: UCSX-9508-D-U is required with UCSX-440P-D.
Step 12.
a. Configure GPU PCIe Node: UCSX-440P-D by selecting Riser, GPU and NVIDIA License on the Right Window.
Step 13.

a. Configure GPU PCIe Node: UCSX-580P under Chassis UCSX-9508-D-U
b. Click on UCSX-580P to configure it further in Left Window.
c. Selection of X- Fabric Module: UCSX-F-9516 under Chassis: UCSX-9508-D-U is required with UCSX-580P.
Note: GPU PCIe Node: UCSX-580P max quantity 2 per chassis allowed and consumes (2) Blade slots. GPU PCIe Node: UCSX-580P defaulted in slots 3 & 4 and/or 7 & 8.
Step 14.

a. Configure GPU PCIe Node: UCSX-580P by selecting GPU from Compute Node 1 Slots and/or Compute Node 2 Slots.
b. If a Slot is selected from either Compute Node 1 or 2 the same slot number cannot be repeated/selected.
c. Select NVIDIA License for GPUs when required.
Note: Note: Mixing GPUs in a single Compute Node is not allowed. Mixing GPU across Compute Node 1 & 2 is allowed.
Step 15.
a. NVL Bridge is only supported with GPU H200 NVL and minimum 2 GPUs required.
b. GPUs must be selected in consecutive slots 1 & 2 and/or 3 & 4 of the same Compute Node.
c. If selecting Compute Node 1 a Minimum 1 Server Node is required, If selecting from both Compute Node 1 and 2 then a minimum 2 Server Nodes are required.
Step 16.
a. Note Status is now showing as Valid.
b. Increase the quantity for multiples of same configuration.
c. Click the “PLUS” to add and configure the same product with different option/quantities or select a different product.
Step 17.
a. Click on “Edit Services/Subscriptions” to edit Term Duration for HW Support.
Note: It is recommended that Term Duration for HW Support must align with Software Subscription Duration.
Step 18.
a. Enter the Term Duration
b. Click on “Apply” and “Done”
Step 19.
a. Select UCSX-210C-M8-U ATO from under MLB by clicking the “PLUS”.
b. Notice the UCSX-210C-M8-U ATO Status is invalid as further configuration needed.
c. Select ‘Edit Option’ to enter the configurator.
Step 20.
a. Users need to select Management Mode option based on how they plan to deploy the Server.
Step 21.
a. If any AI Capable PID is selected, then User need to make selection from AI Intent option class.
Step 22.
a. By making the right selection it provides information to Cisco that if Server is being intended to use AI features or not.
Step 23.
a. Configure UCSX-210C-M8-U by selecting peripherals from category window on the left.
b. PIDs are listed in the window on the right. Some PIDs like Processor, Memory and Storage Drives are grouped according to type or series; select from the grouped options located above SKU window on the right.
c. Follow warning messages to configure the minimum required option PIDs.
d. Click on “Done” when completed.
Step 24.
a. Note Status is now showing as “Valid”.
b. Increase the quantity for multiples of same configuration.
c. Click the “PLUS” to add and configure the same product with different option/quantities or select a different product.
Step 25.
a. Click on “Edit Services/Subscriptions” to edit Term Duration for HW Support.
Note: It is recommended that Term Duration for HW Support must align with Software Subscription Duration.
Step 26.
a. Enter the Term Duration.
b. Click on “Apply” and “Done”
Step 27.
a. GPU PCIe Node: UCSX-440P-D-U is an optional selection, and user can select it by clicking plus
Step 28.
a. GPU PCIe Node: UCSX-580P-U is an optional selection, and user can select it by clicking plus
Step 29.
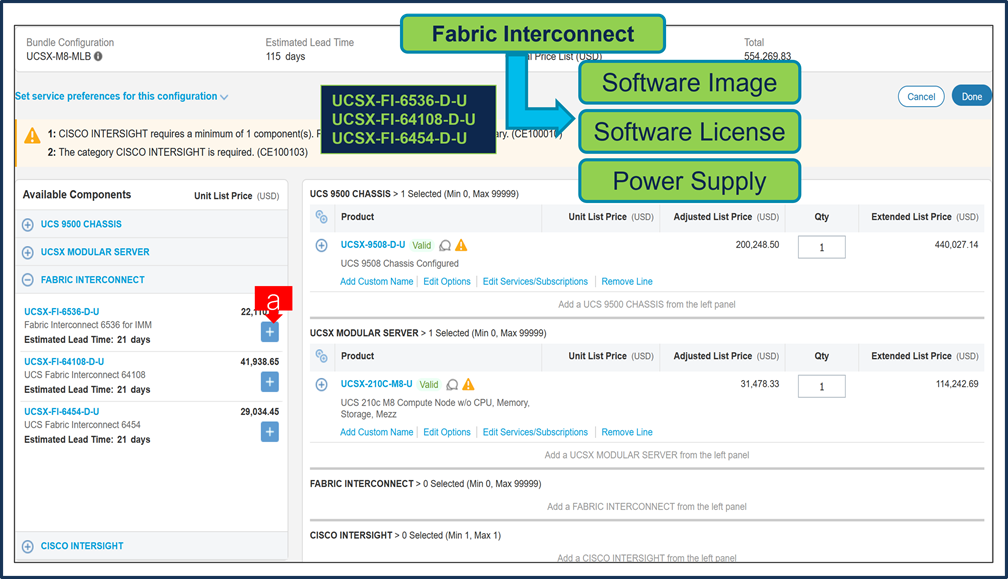
a. Fabric Interconnect is an optional selection, and user can select it by clicking plus
Step 30.

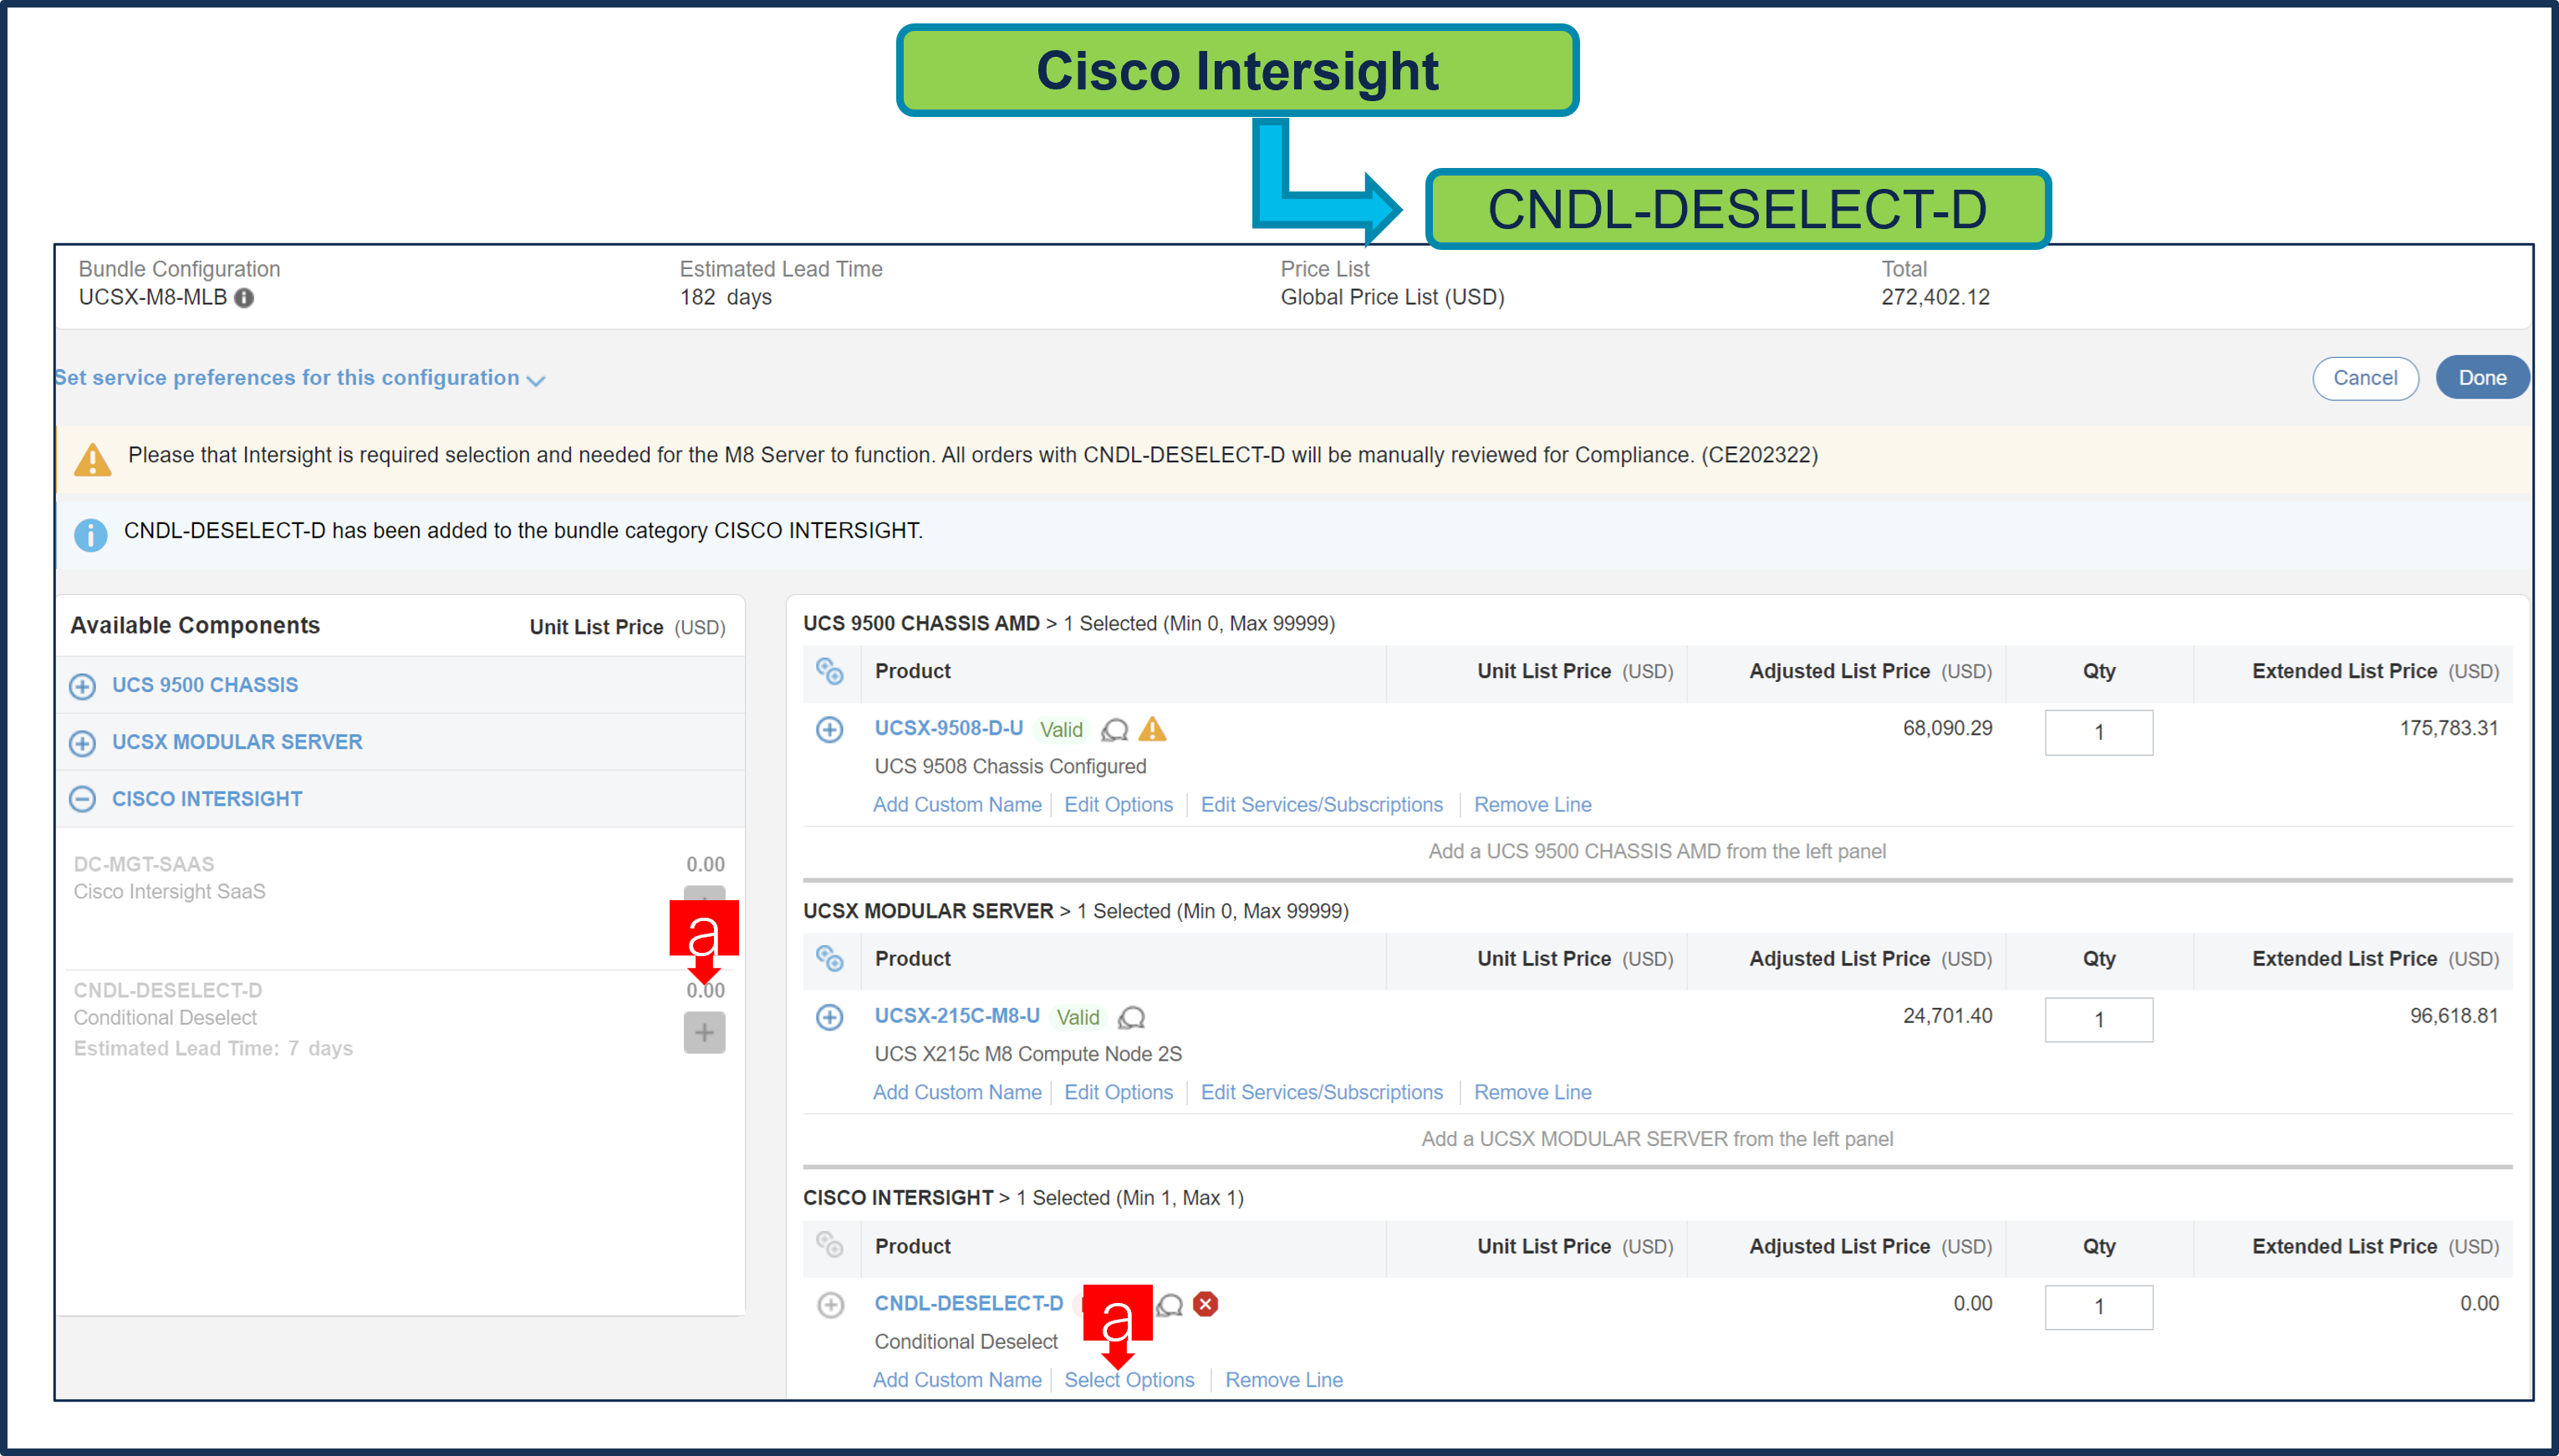
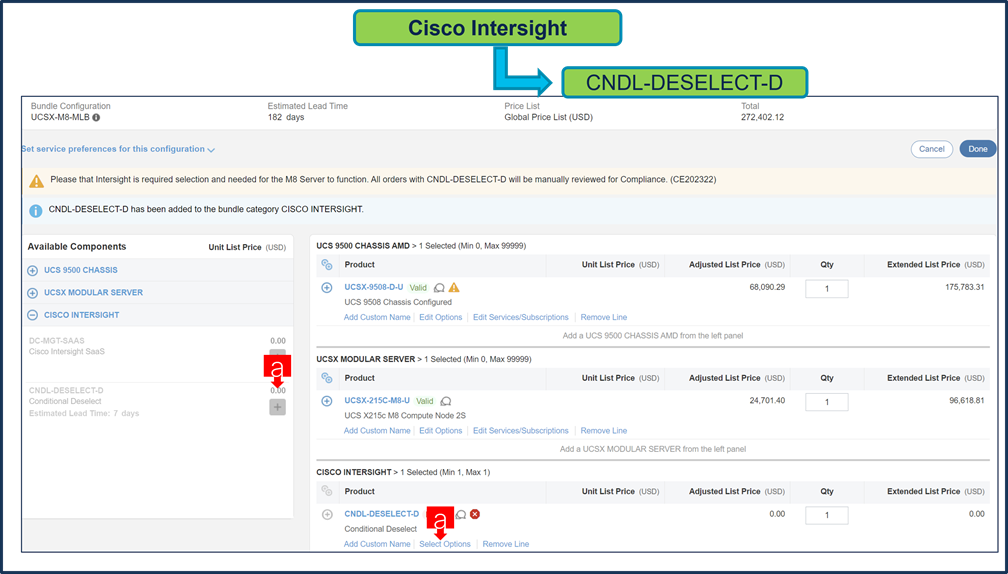
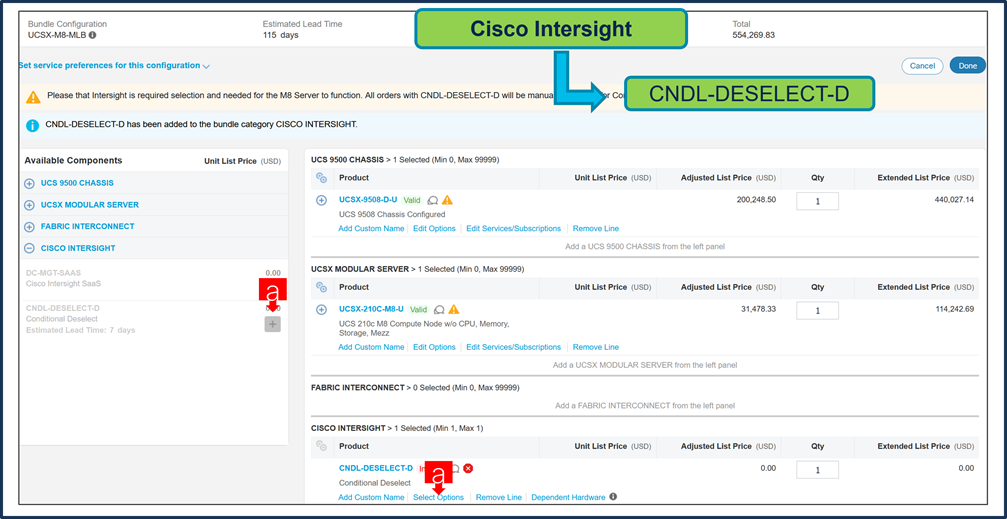
a. CNDL-DESELECT-D is meant to select only if Customer has already purchased Cisco Intersight License via EA Contract or order is for Disti Fulfillment.
Step 31.
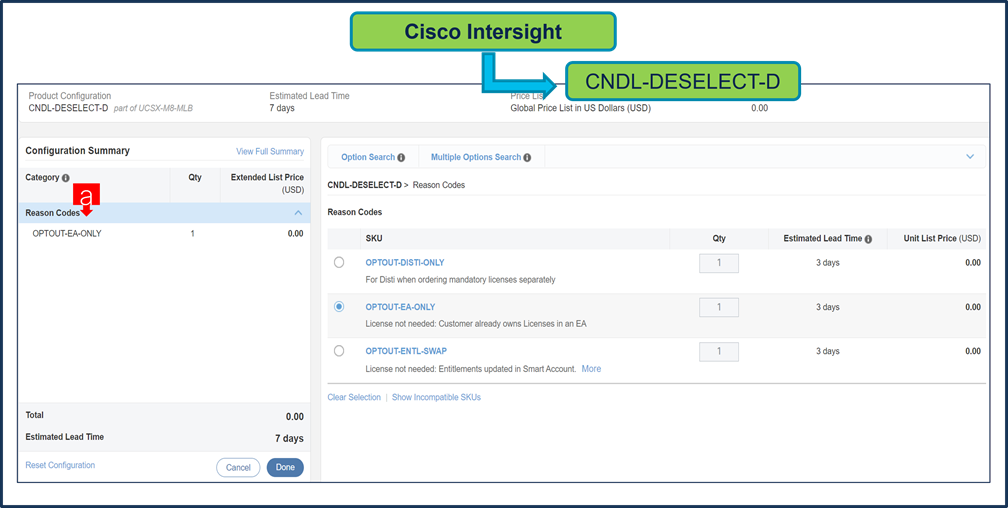
a. Please select appropriate Reason Code
Step 32.
a. Configuration for MLB is completed when status of each Product is Valid and warning messages are cleared.
b. Click on the “PLUS” to expand and view the selections made for each Product.
c. Click on the “DONE” to complete the MLB Configuration.
Buy Method Through Distributor (Eg: Direct Customer & Tier 1 Partners)
Scenario 1: Customer Without Enterprise Agreement for Cisco Intersight Software License
Step 1.

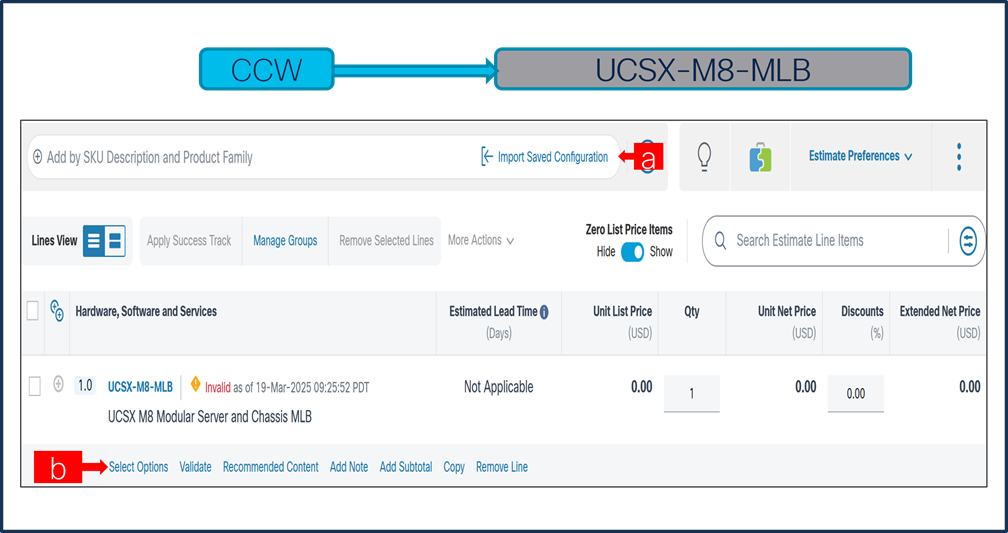
a. In CCW, search for MLB PID and click on “Add”
b. Click on “Select Options” to enter the configurator.
Step 2.
a. Select UCSX-9508-D-U ATO from under MLB by clicking the “PLUS”
b. Notice the UCSX-9508-D-U ATO Status is invalid as further configuration needed.
c. Click on “Edit Options” to enter the configurator.
Step 3.
a. Configure UCSX-9508-D-U by selecting Compute Node, Fabric Interconnect Module or Intelligent Fabric Module, Power Supply and Power Cables from category window on the left.
b. Follow warning messages to configure the minimum required selections under Chassis.
Step 4.
a. Compute Node is required selection and is further configurable.
b. User can select either Server: UCSX-215C-M8 or UCSX-210C-M8 or both together in same configuration.
Step 5.
a. Server: UCSX-210C-M8 can be selected in multiple QTY by changing the QTY in the box or you can select same server and configure differently within same chassis by clicking in ADD NEW button.
b. Here in this example, we have 2 instances of server selected with 1 QTY each.
c. Click on Server PID in the left to configure the particular instance.
Step 6.
a. Configuration of one server Instance can be copied to another instance. Click on Copy Button on the extreme right as shown here.
b. Select the particular instance and click Yes.
Step 7.
a. Click on Server PID in the left to configure it.
b. User need to select Management Mode option based on how they plan to deploy the Server.
Step 8.

a. If any AI Capable PID is selected, then User need to make selection from AI Intent option class.
Step 9.
a. By making the right selection it provides information to Cisco that if Server is being intended to use AI features or not.
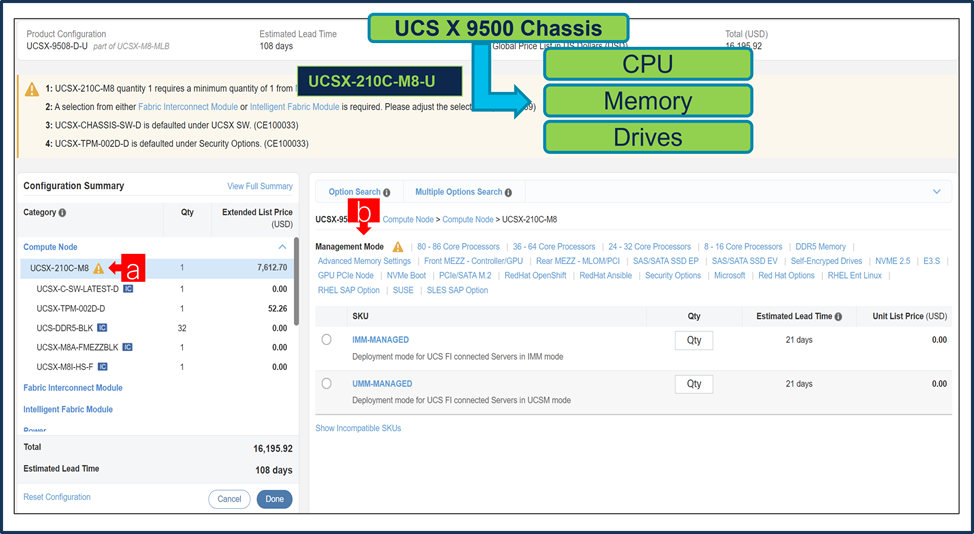
Step 10.
a. Configure UCSX-210C-M8 by selecting Processor, Memory, Drives and other peripheral devices and PIDs are listed in the window on the right.
b. Follow warning messages to configure the minimum required selections under Server.
c. Click on “Done” when completed.
Step 11.
a. Configure GPU PCIe Node: UCSX-440P-D under Compute Node: UCSX-210C-M8.
b. Click on UCSX-440P-D to configure it further in Left Window.
c. Selection of X- Fabric Module: UCSX-F-9416-D under Chassis: UCSX-9508-D-U is required with UCSX-440P-D.
Step 12.
a. Configure GPU PCIe Node: UCSX-440P-D by selecting Riser, GPU and NVIDIA License on the Right Window.
Step 13.
a. Configure GPU PCIe Node: UCSX-580P under Chassis UCSX-9508-D-U
b. Click on UCSX-580P to configure it further in Left Window.
c. Selection of X- Fabric Module: UCSX-F-9516 under Chassis: UCSX-9508-D-U is required with UCSX-580P.
Note: GPU PCIe Node: UCSX-580P max quantity 2 per chassis allowed and consumes (2) Blade slots. GPU PCIe Node: UCSX-580P defaulted in slots 3 & 4 and/or 7 & 8.
Step 14.
a. Configure GPU PCIe Node: UCSX-580P by selecting GPU from Compute Node 1 Slots and/or Compute Node 2 Slots.
b. If a Slot is selected from either Compute Node 1 or 2 the same slot number cannot be repeated/selected.
c. Select NVIDIA License for GPUs when required.
Note: Note: Mixing GPUs in a single Compute Node is not allowed. Mixing GPU across Compute Node 1 & 2 is allowed.
Step 15.
a. NVL Bridge is only supported with GPU H200 NVL and minimum 2 GPUs required.
b. GPUs must be selected in consecutive slots 1 & 2 and/or 3 & 4 of the same Compute Node.
c. If selecting Compute Node 1 a Minimum 1 Server Node is required, If selecting from both Compute Node 1 and 2 then a minimum 2 Server Nodes are required.
Step 16.
a. Note Status is now showing as Valid.
b. Increase the quantity for multiples of same configuration.
c. Click the “PLUS” to add and configure the same product with different option/quantities or select a different product.
Step 17.
a. Click on “Edit Services/Subscriptions” to edit Term Duration for HW Support.
Note: It is recommended that Term Duration for HW Support must align with Software Subscription Duration.
Step 18.
a. Enter the Term Duration
b. Click on “Apply” and “Done”
Step 19.
a. Select UCSX-210C-M8-U ATO from under MLB by clicking the “PLUS”.
b. Notice the UCSX-210C-M8-U ATO Status is invalid as further configuration needed.
c. Select ‘Edit Option’ to enter the configurator.
Step 20.
a. Users need to select Management Mode option based on how they plan to deploy the Server.
Step 21.
a. If any AI Capable PID is selected, then User need to make selection from AI Intent option class.
Step 22.
a. By making the right selection it provides information to Cisco that if Server is being intended to use AI features or not.
Step 23.
a. Configure UCSX-210C-M8-U by selecting peripherals from category window on the left.
b. PIDs are listed in the window on the right. Some PIDs like Processor, Memory and Storage Drives are grouped according to type or series; select from the grouped options located above SKU window on the right.
c. Follow warning messages to configure the minimum required option PIDs.
d. Click on “Done” when completed.
Step 24.
a. Note Status is now showing as “Valid”.
b. Increase the quantity for multiples of same configuration.
c. Click the “PLUS” to add and configure the same product with different option/quantities or select a different product.
Step 25.
a. Click on “Edit Services/Subscriptions” to edit Term Duration for HW Support.
Note: It is recommended that Term Duration for HW Support must align with Software Subscription Duration.
Step 26.
a. Enter the Term Duration.
b. Click on “Apply” and “Done”
Step 27.
a. GPU PCIe Node: UCSX-440P-D-U is an optional selection, and user can select it by clicking plus
Step 28.
a. GPU PCIe Node: UCSX-580P-U is an optional selection, and user can select it by clicking plus
Step 29.
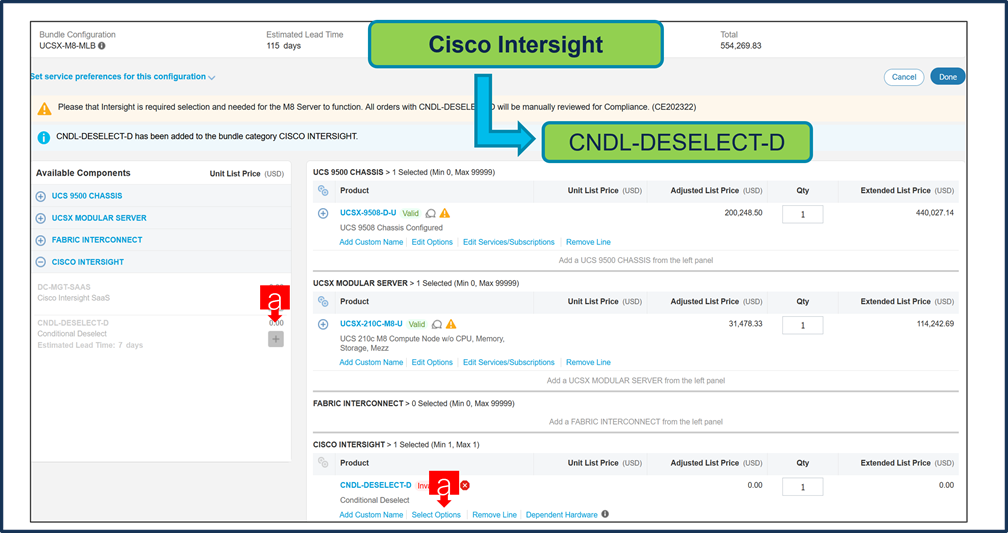
a. Fabric Interconnect is an optional selection, and user can select it by clicking plus
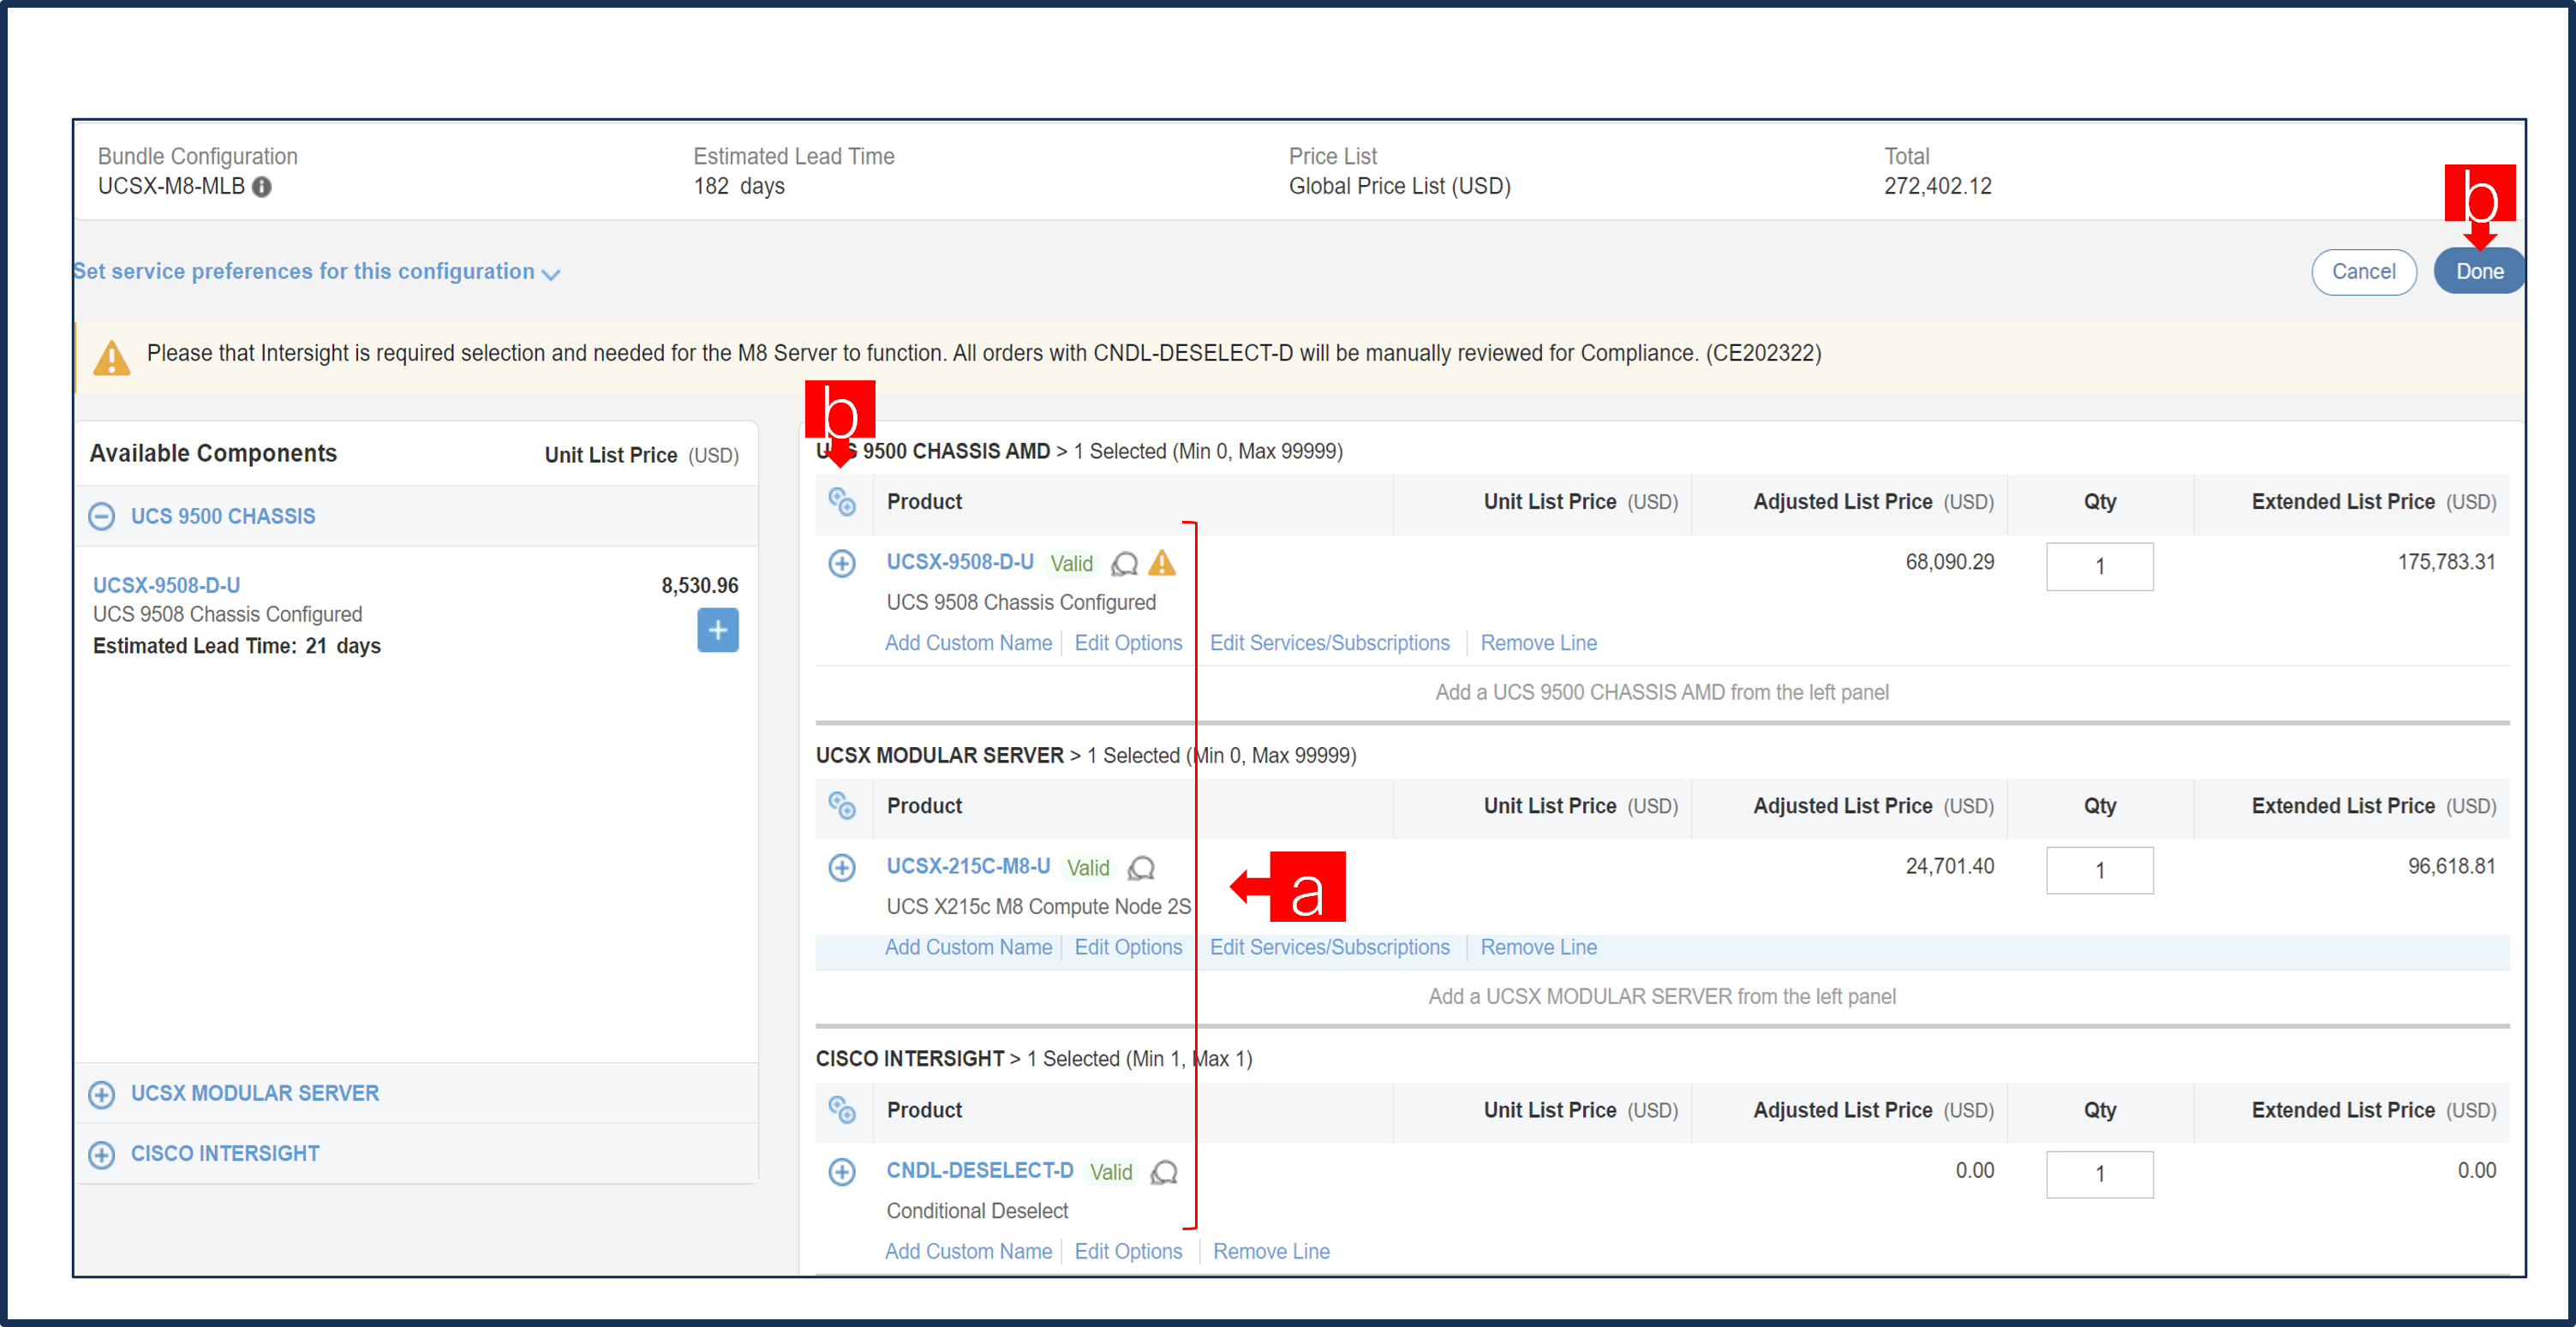
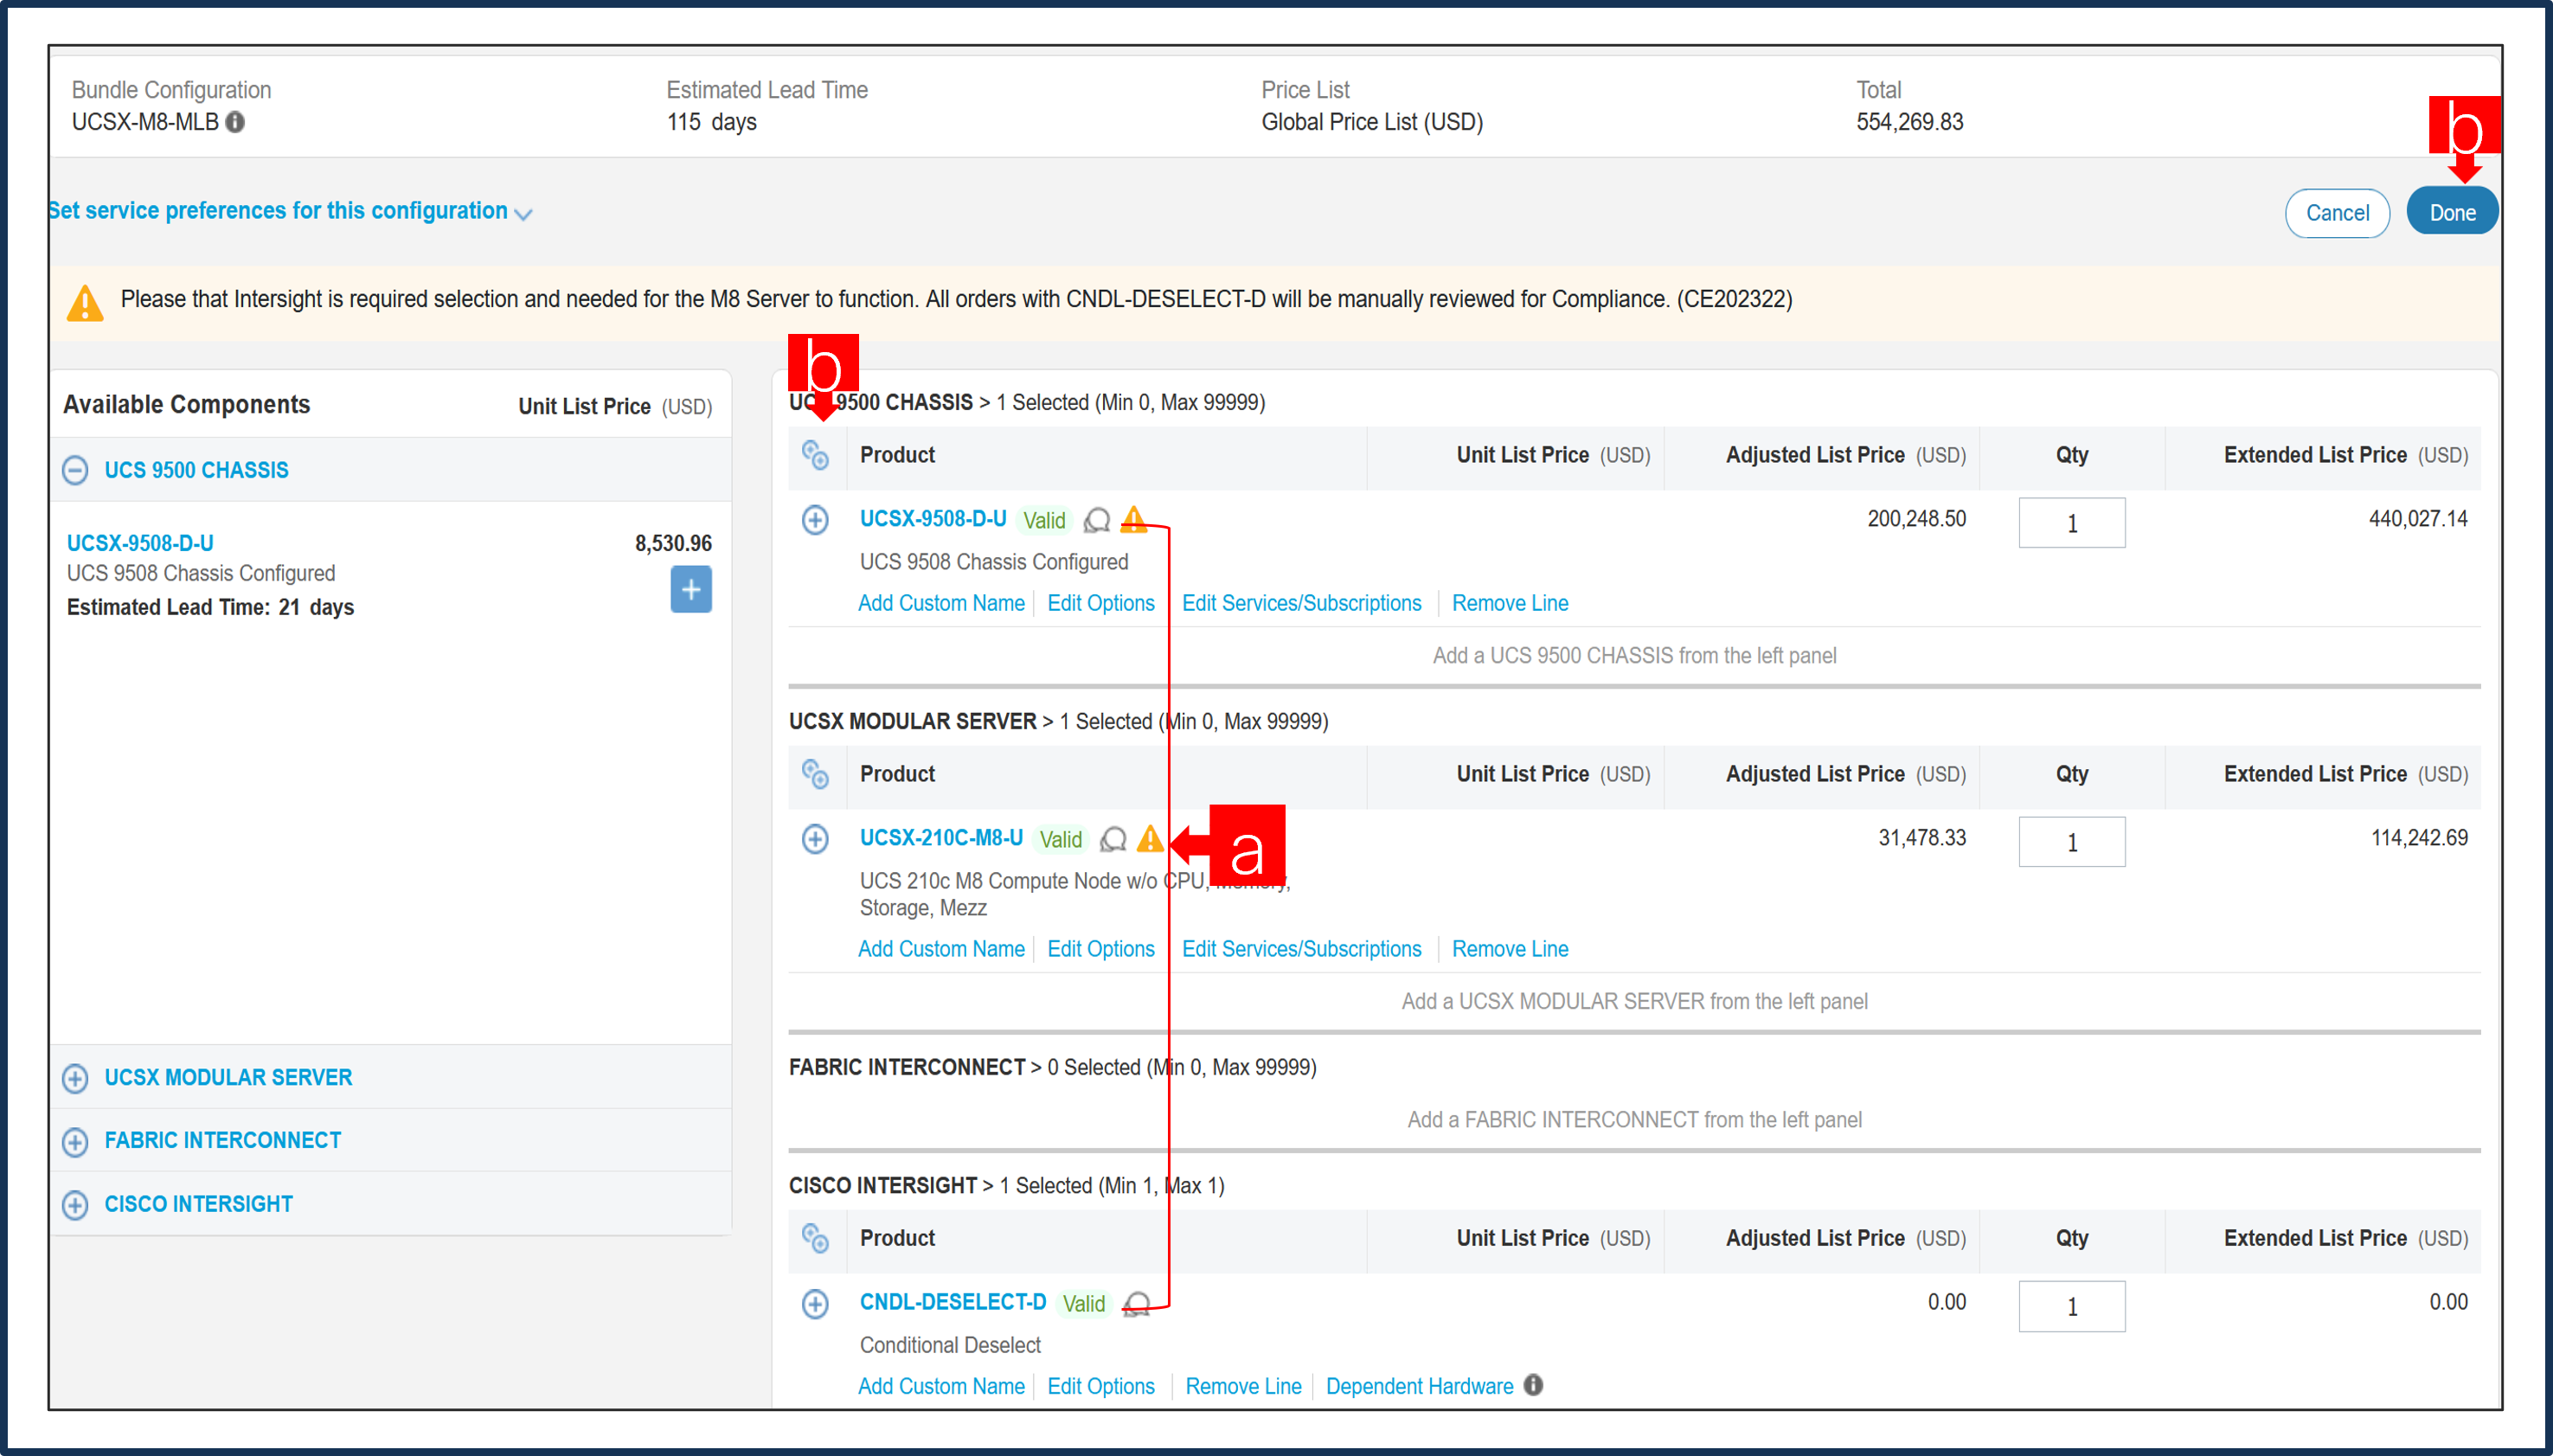
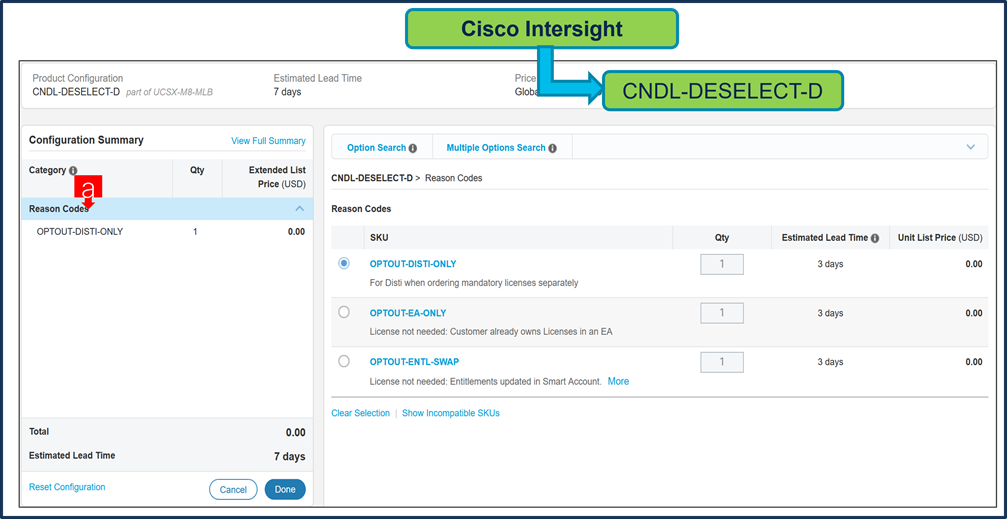
Step 30.

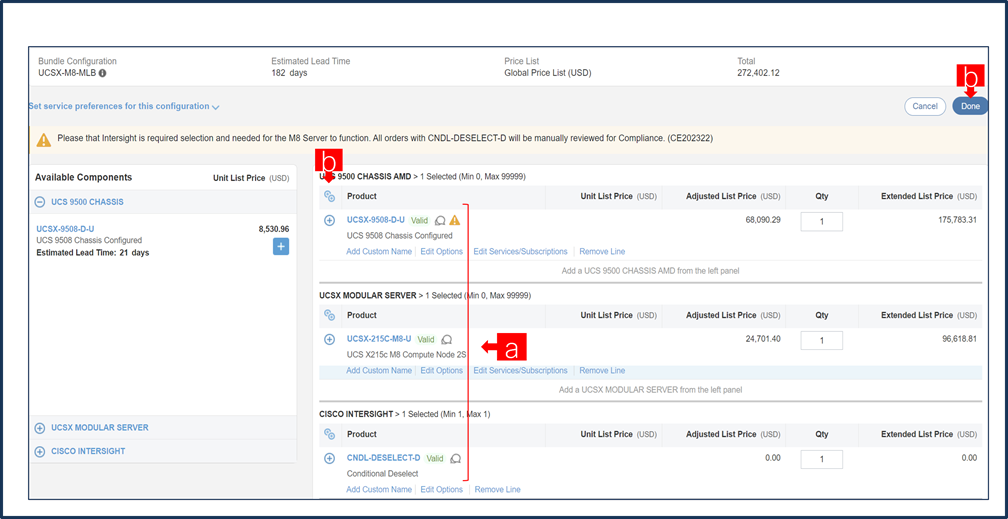
a. CNDL-DESELECT-D is meant to select only if Customer has already purchased Cisco Intersight License via EA Contract or order is for Disti Fulfillment.
Note: Please note that Intersight is required selection and needed for the M6 Server to function. All orders with CNDL-DESELECT-D will be manually reviewed for Compliance.
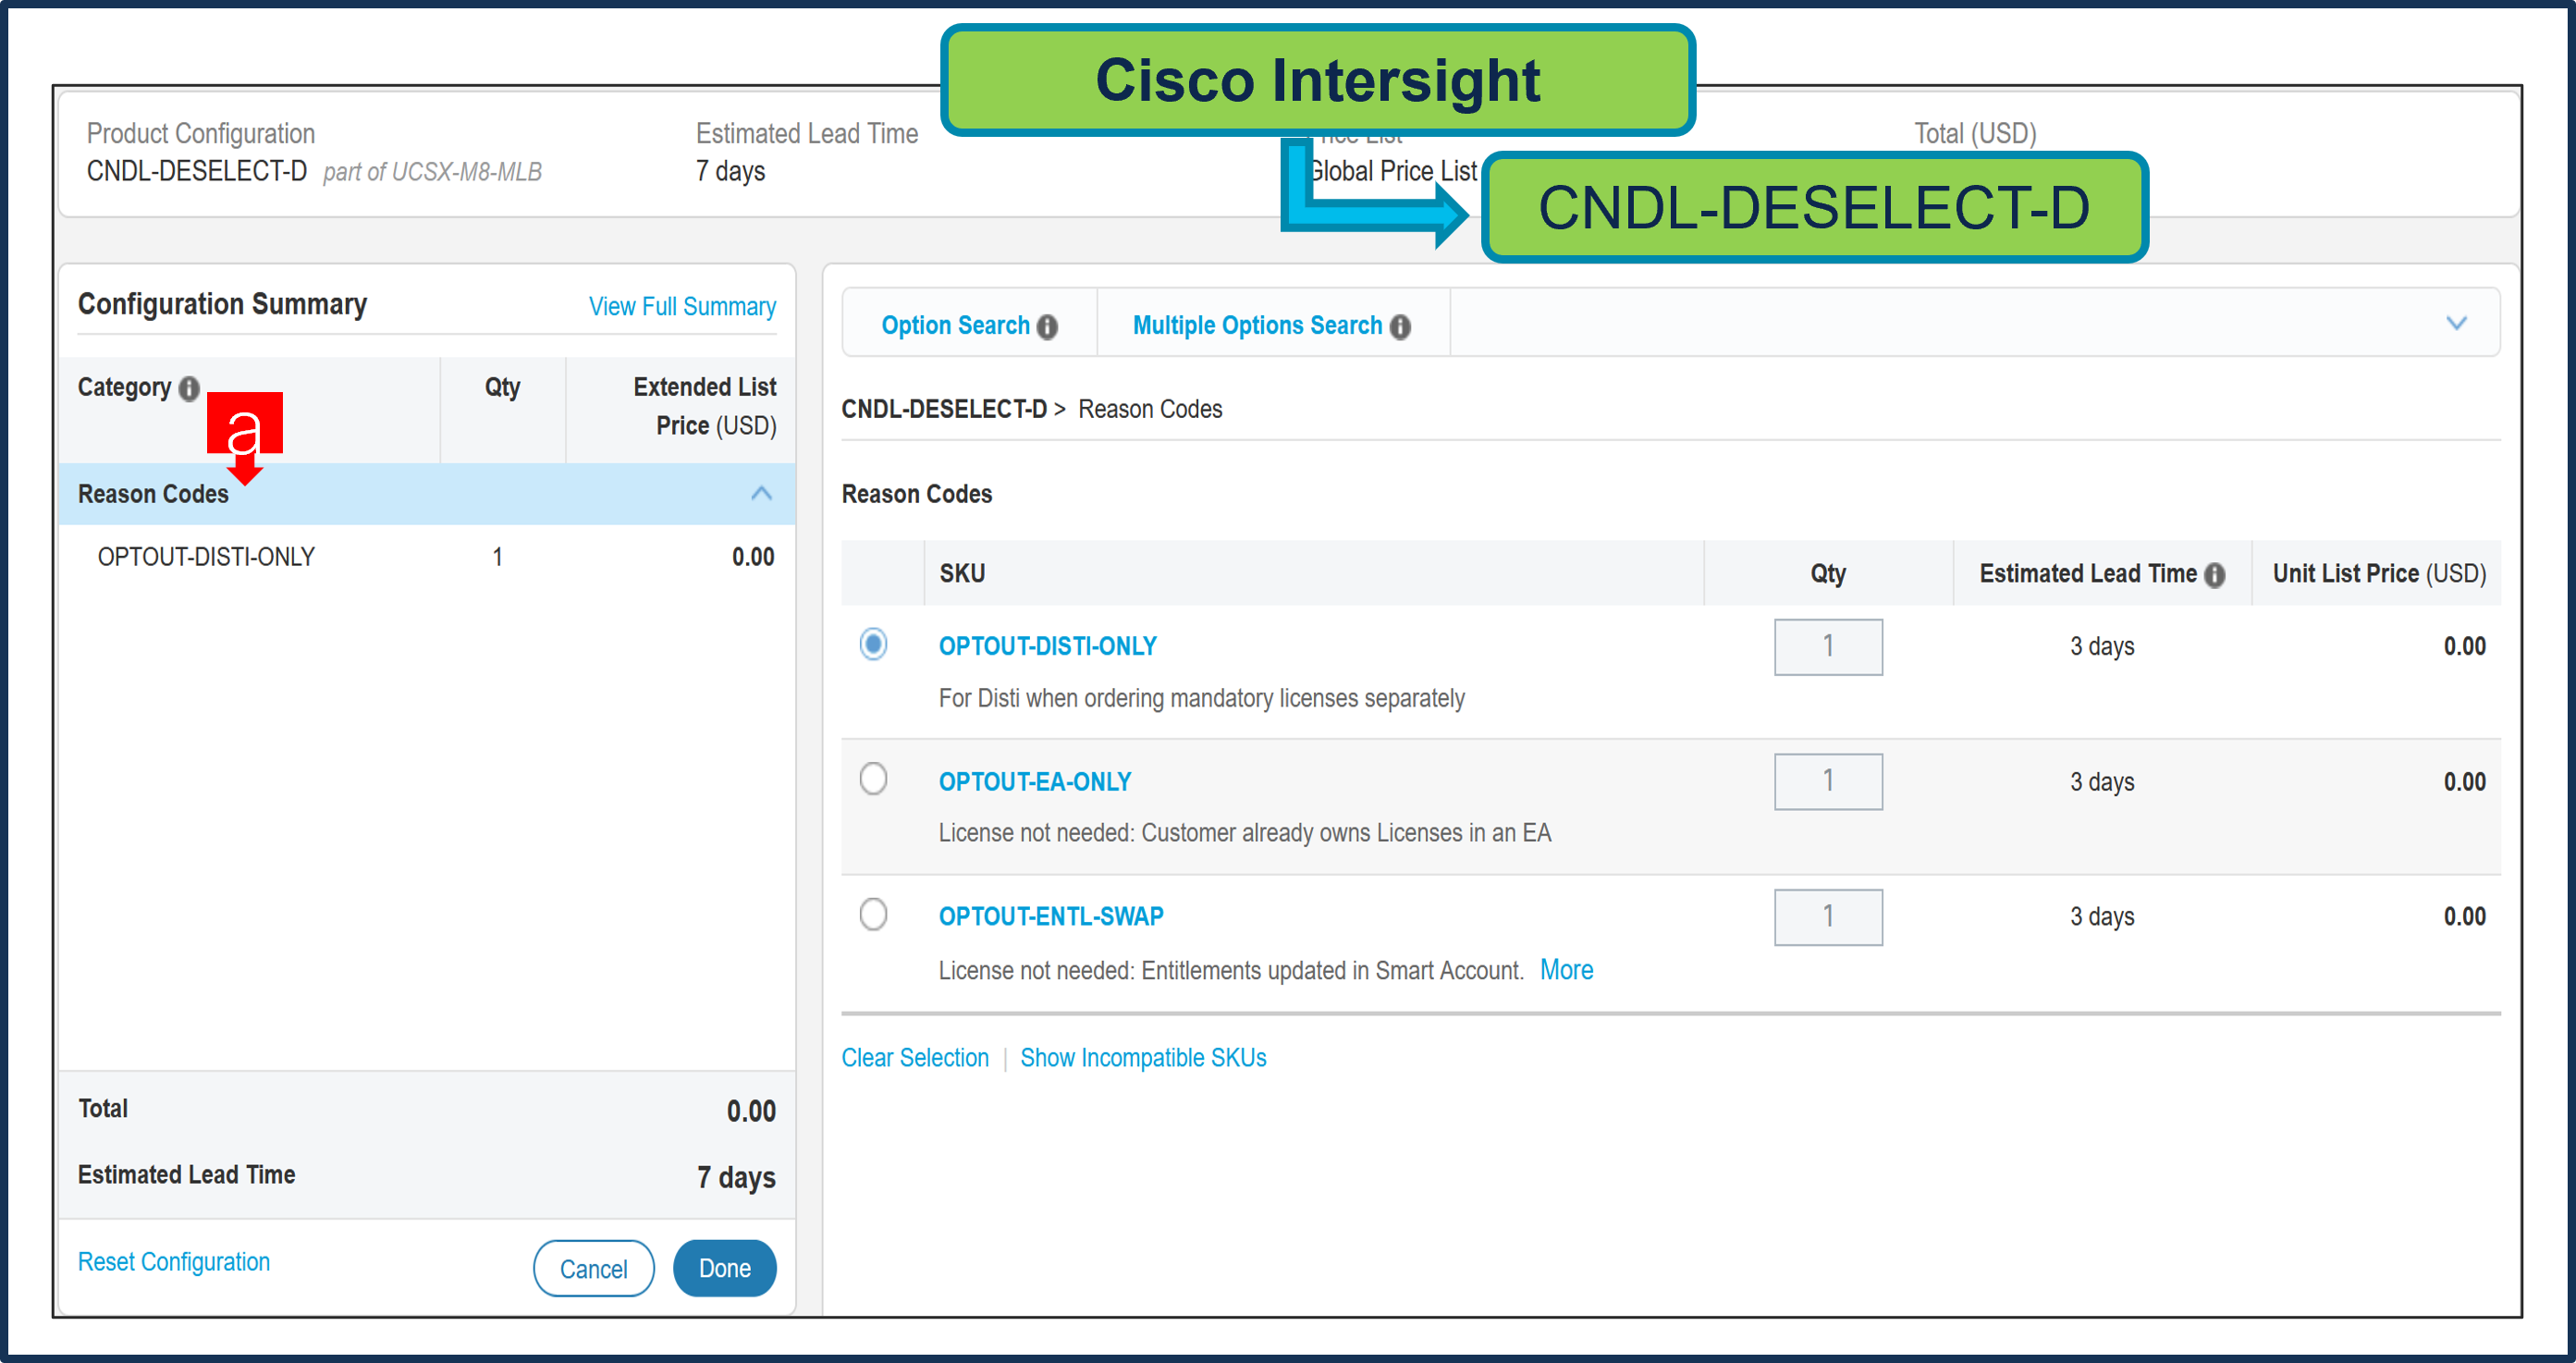
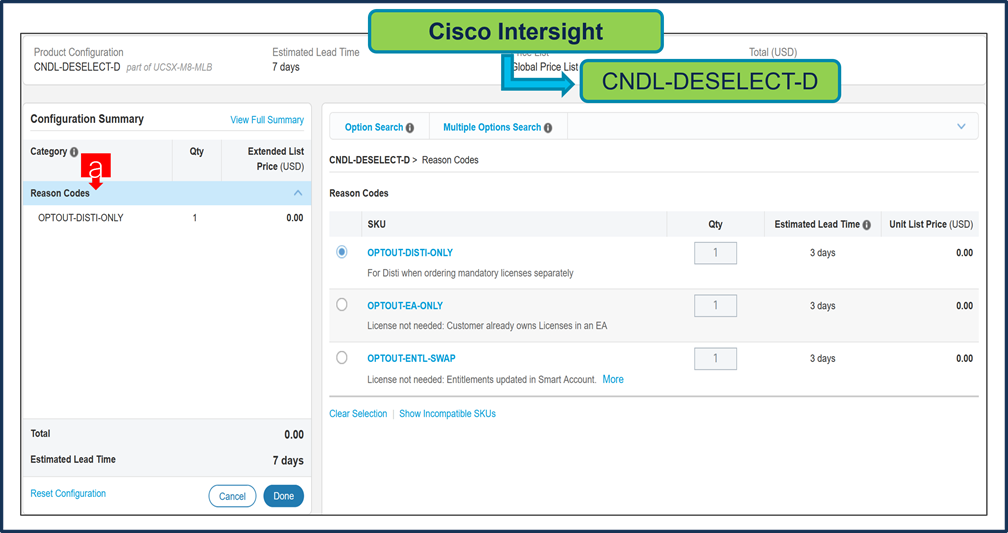
Step 31.
a. Please select appropriate Reason Code
Step 32.
a. Configuration for MLB is completed when status of each Product is Valid and warning messages are cleared.
b. Click on the “PLUS” to expand and view the selections made for each Product.
c. Click on the “DONE” to complete the MLB Configuration.
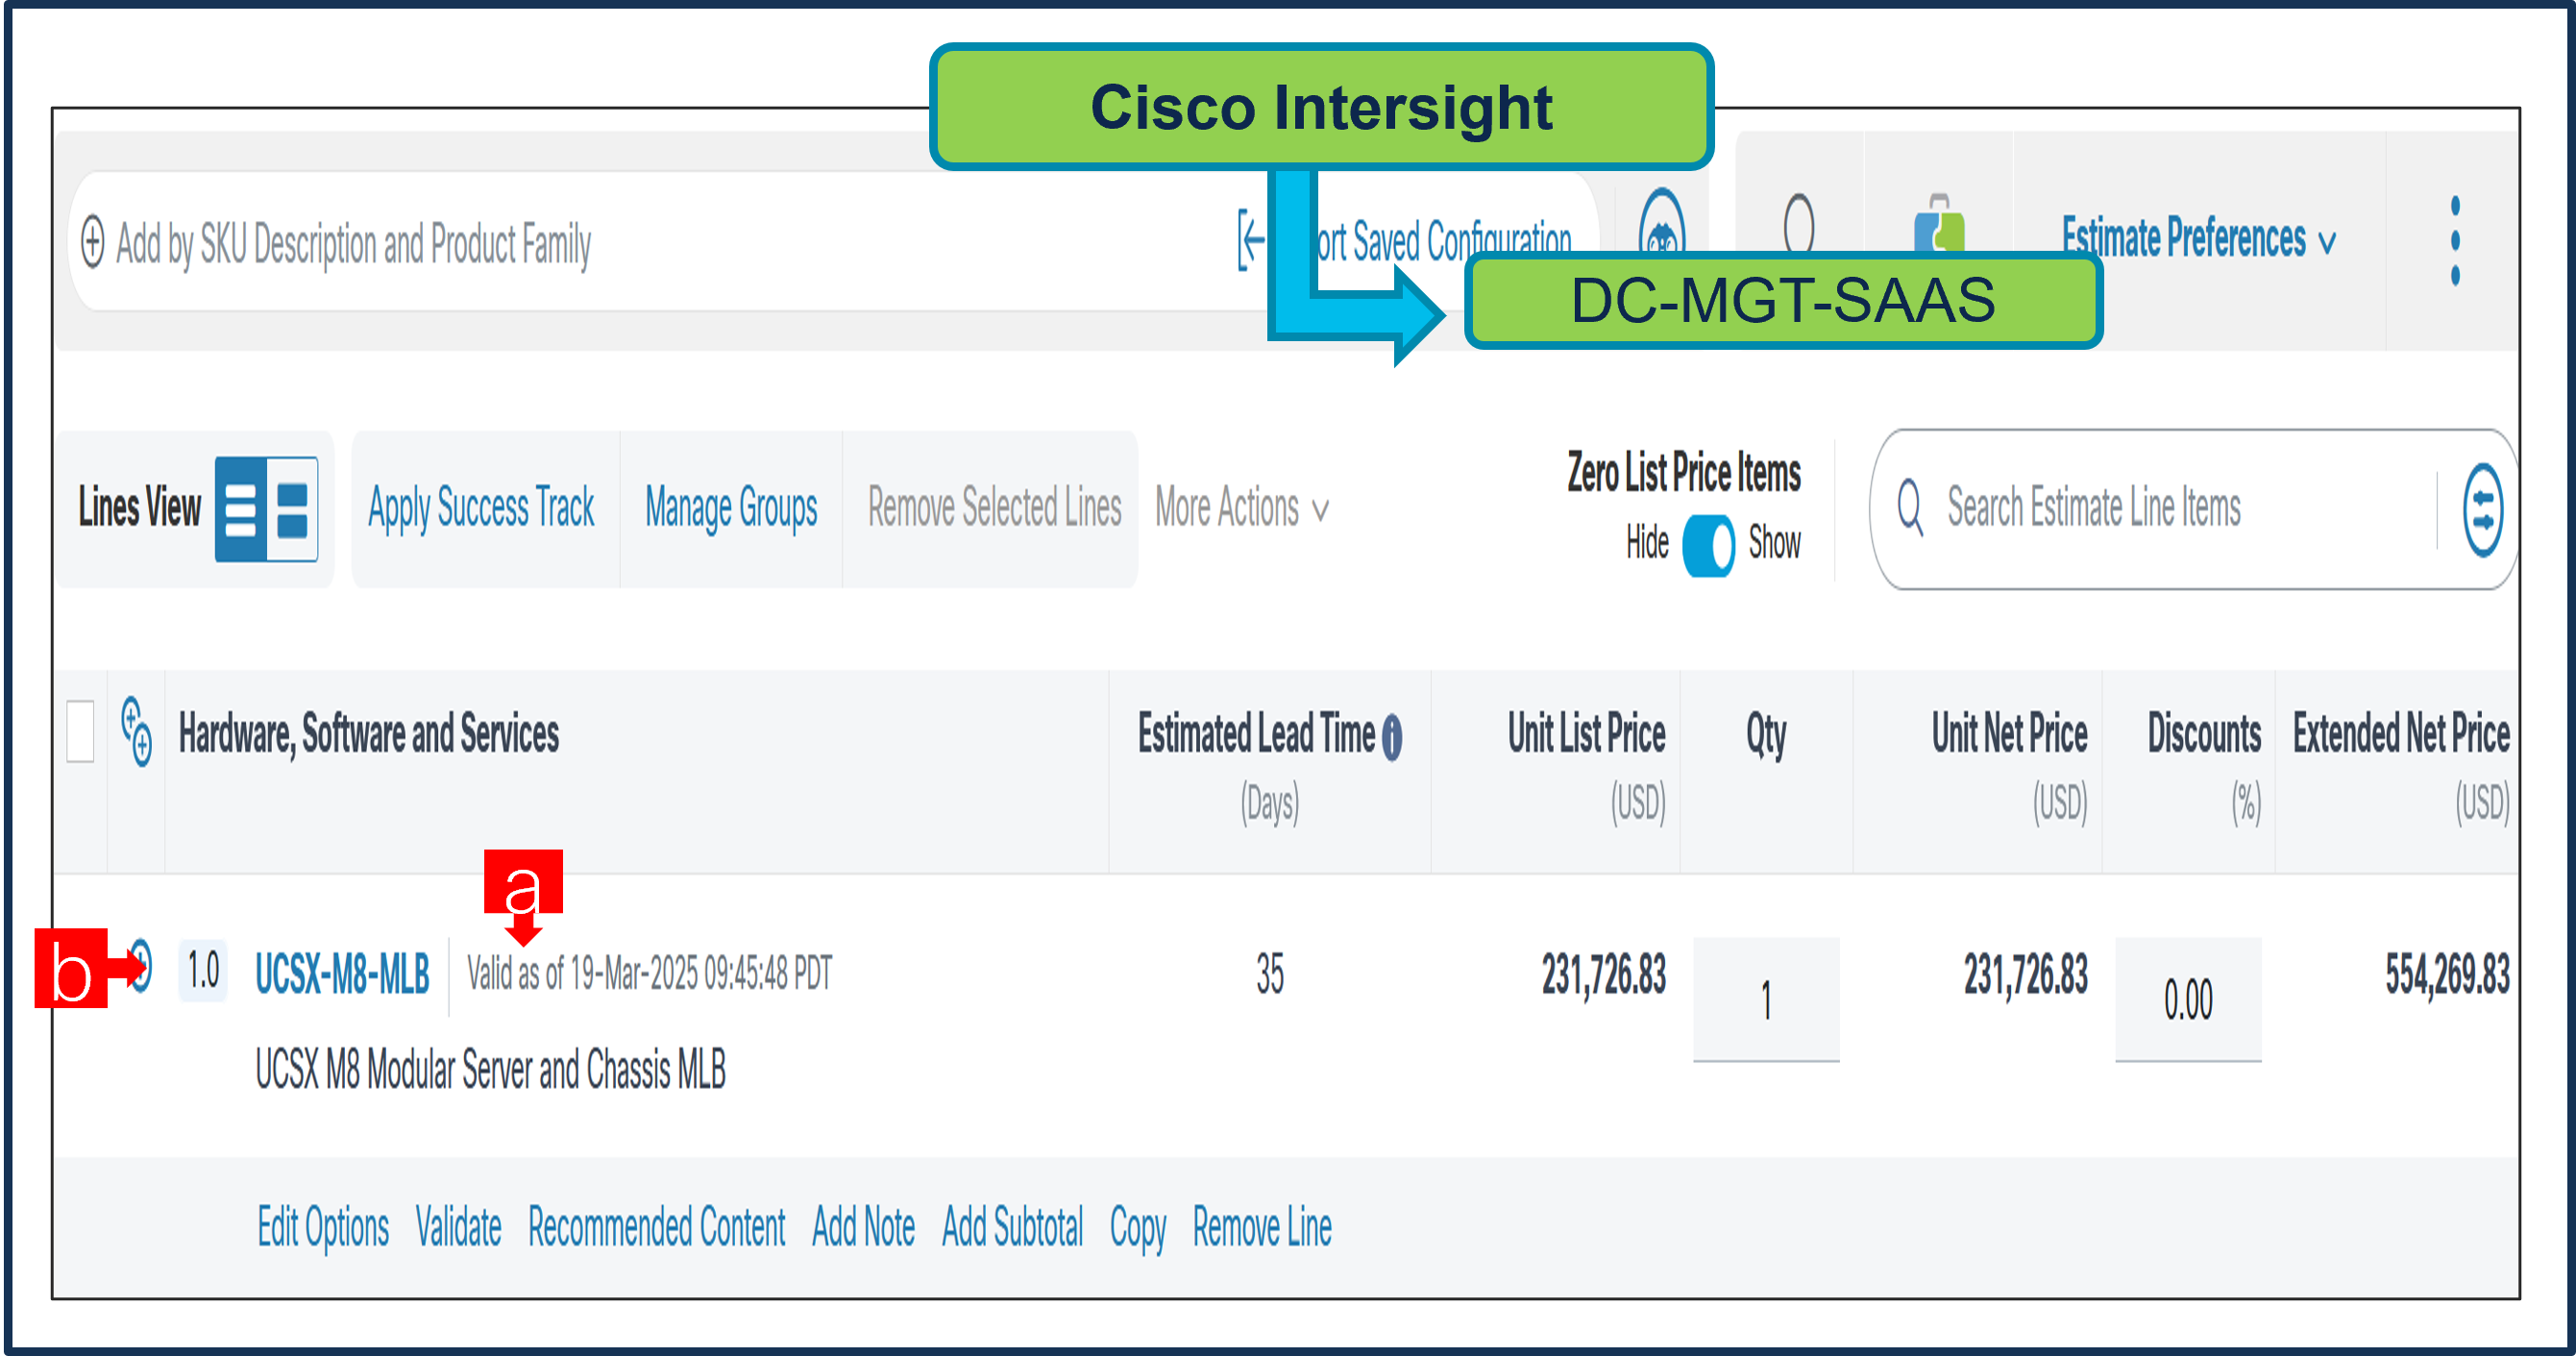
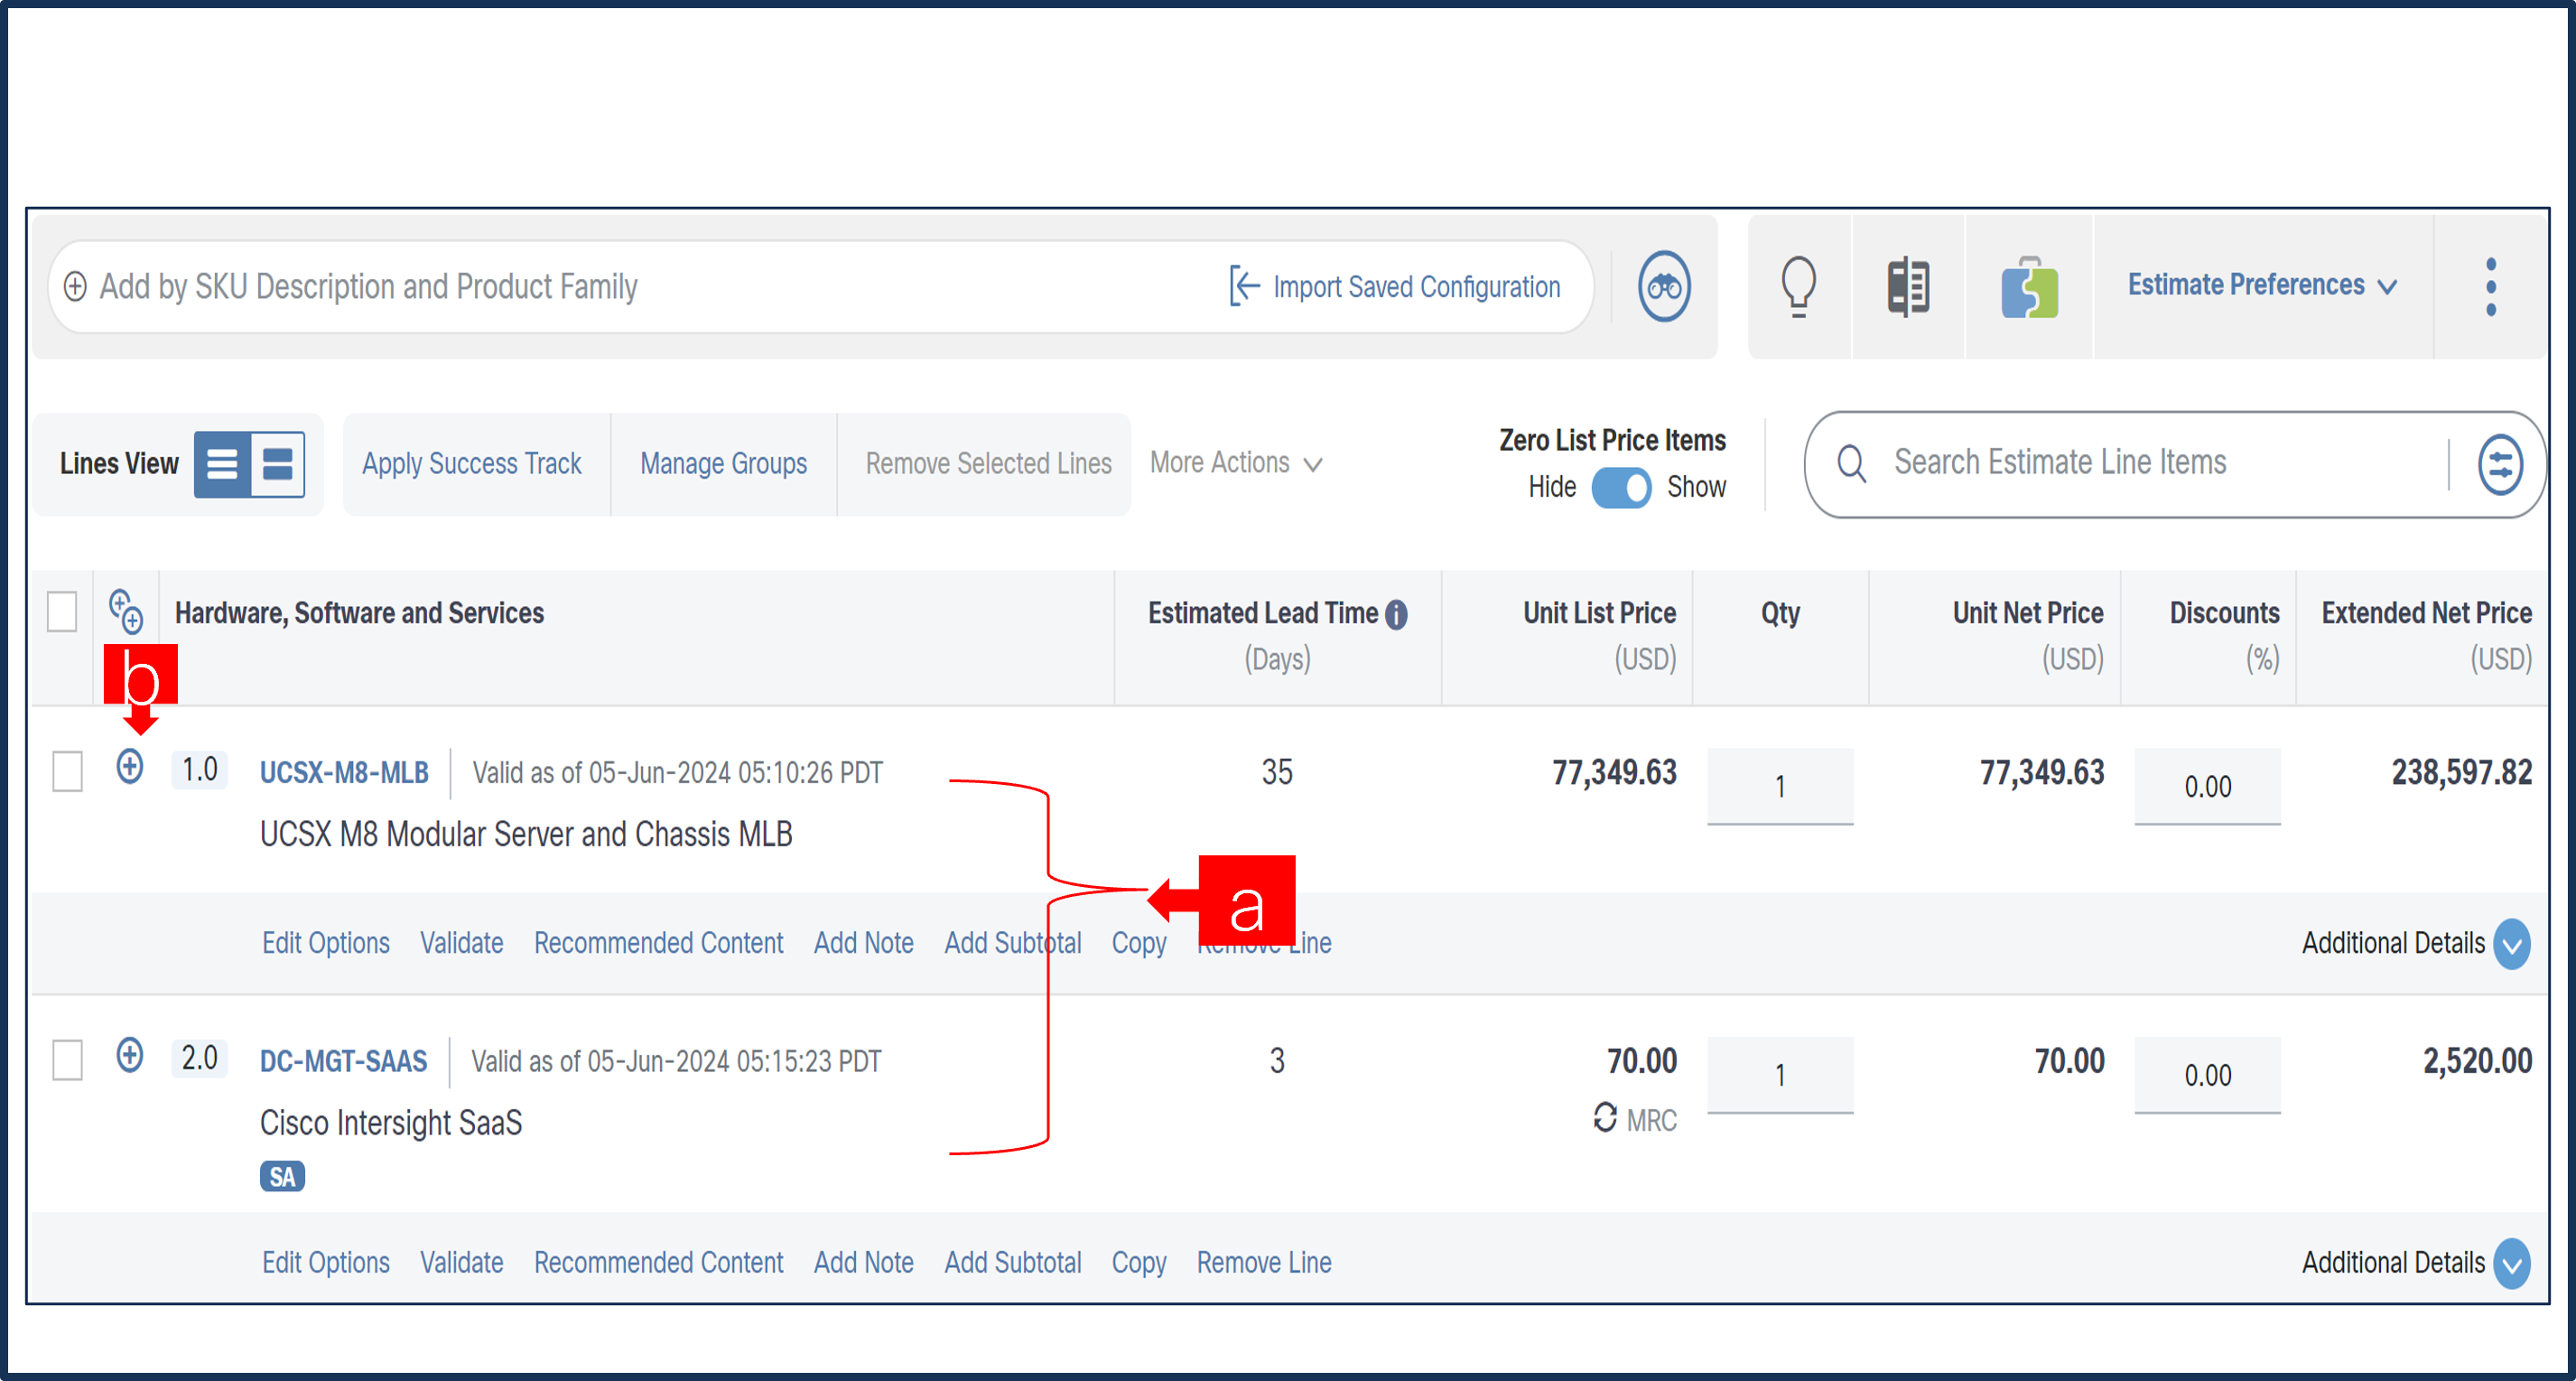
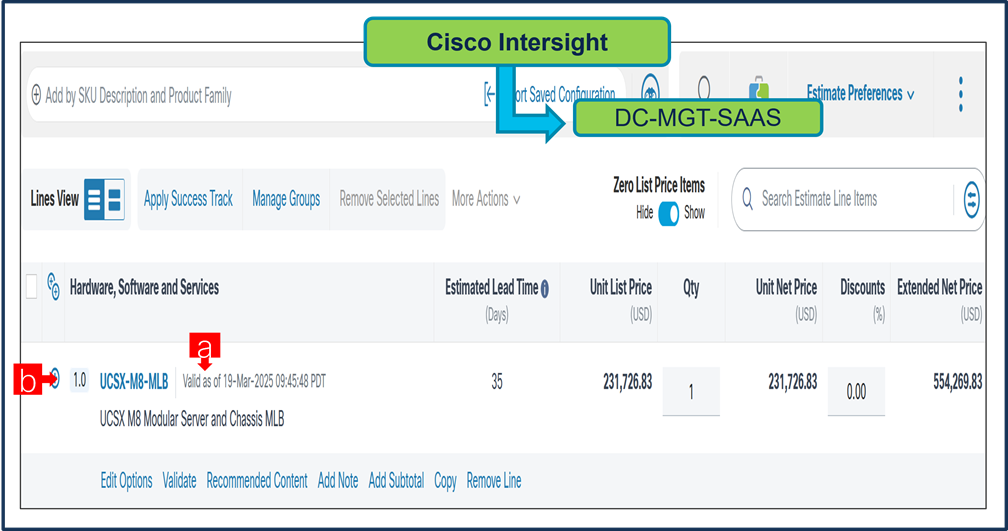
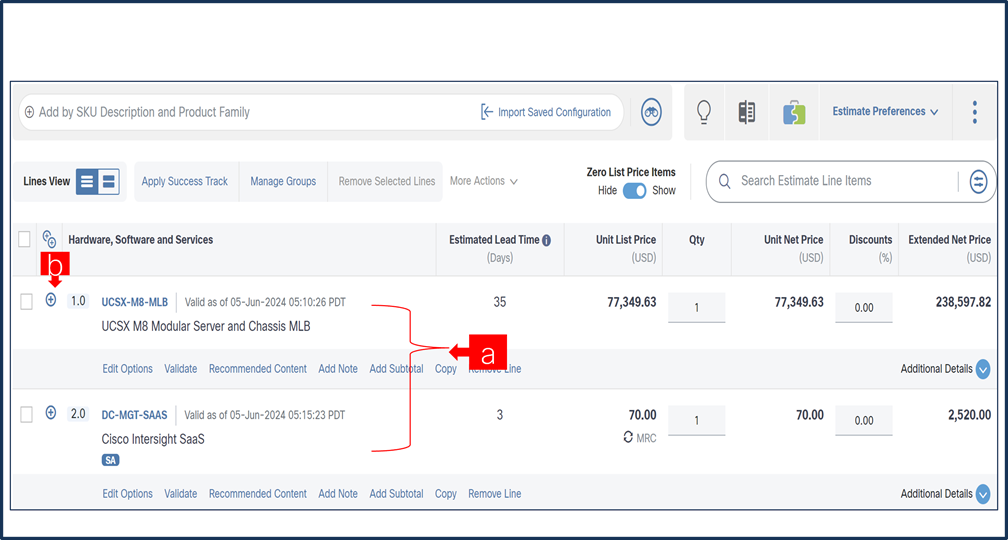
Step 33.
a. Configuration of UCSX-M8-MLB is now Valid and Line No. 1.0 represents HW only Configuration.
b. Intersight is a required selection, if you have not previously purchased Cisco Intersight Software and needs to added in Line 2.0 which will represent SW only Configuration.
Step 34.
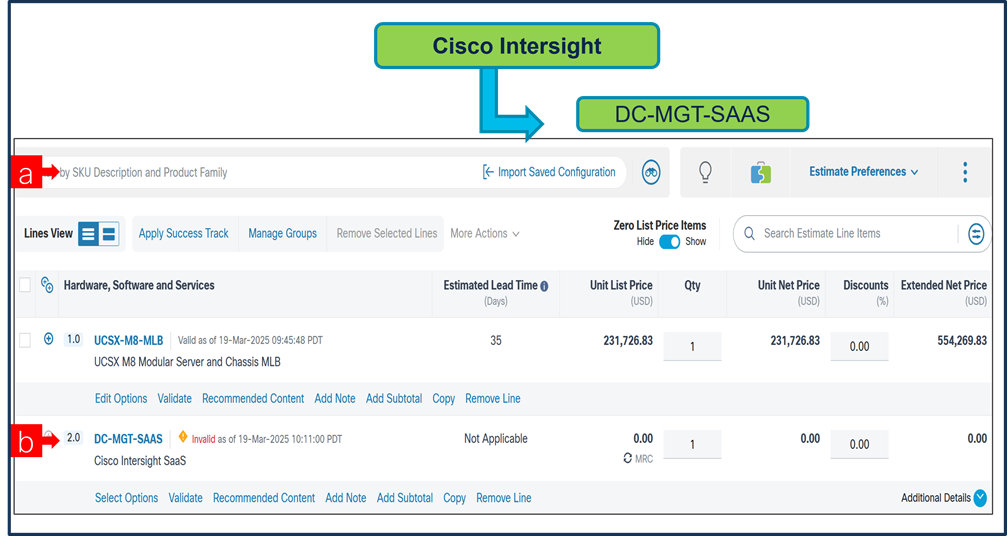
a. In CCW, search for DC-MGT-SAAS and click on “ADD”.
b. Intersight is a required selection, if you have not previously purchased Cisco Intersight Software. Click on Select Options to enter the configurator.
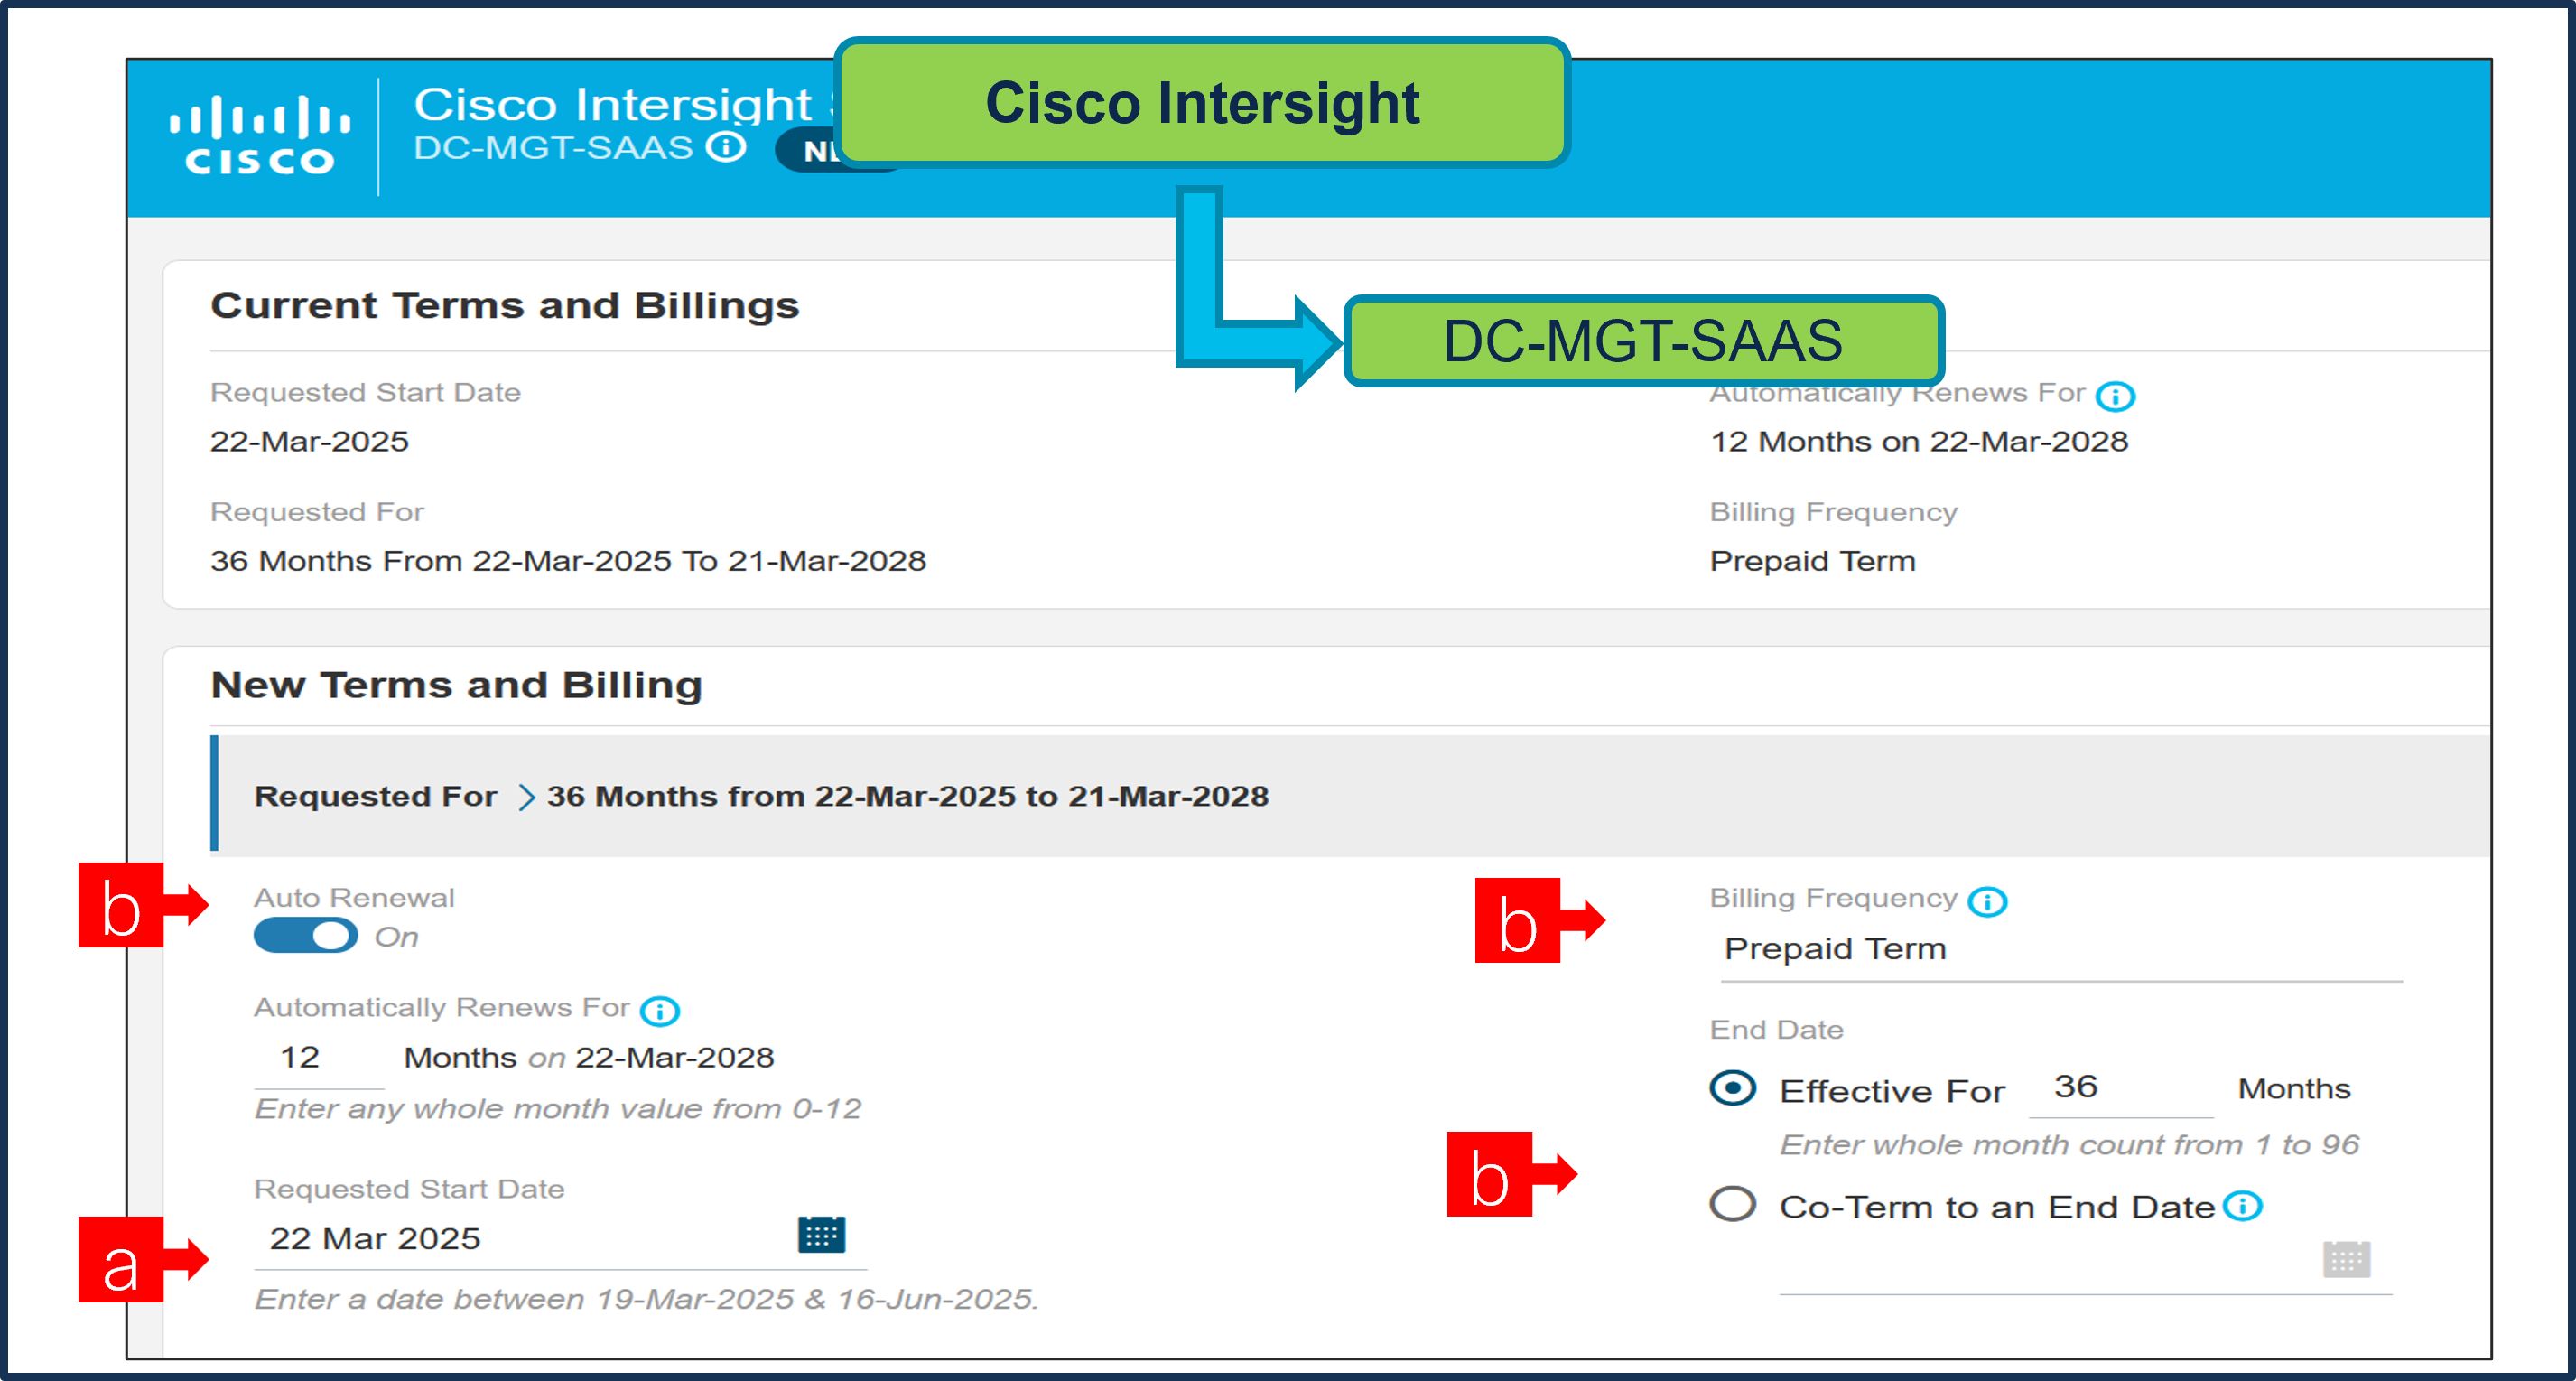
Step 35.
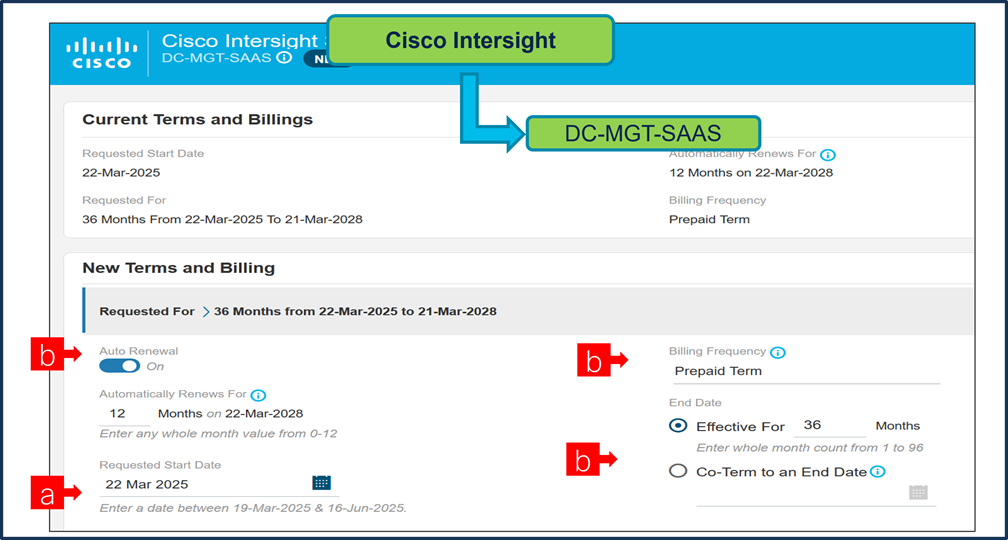
a. Requested Start Date (RSD) It is recommended that when you book your SaaS Product, you select a Request Start Date (RSD) 90 days into the future.
b. End Date (duration in months) is defaulted to 36 Months, Auto Renewal (on/off) is defaulted to On and Billing Frequency is defaulted to Prepaid Term. You can still change the setting accordingly.
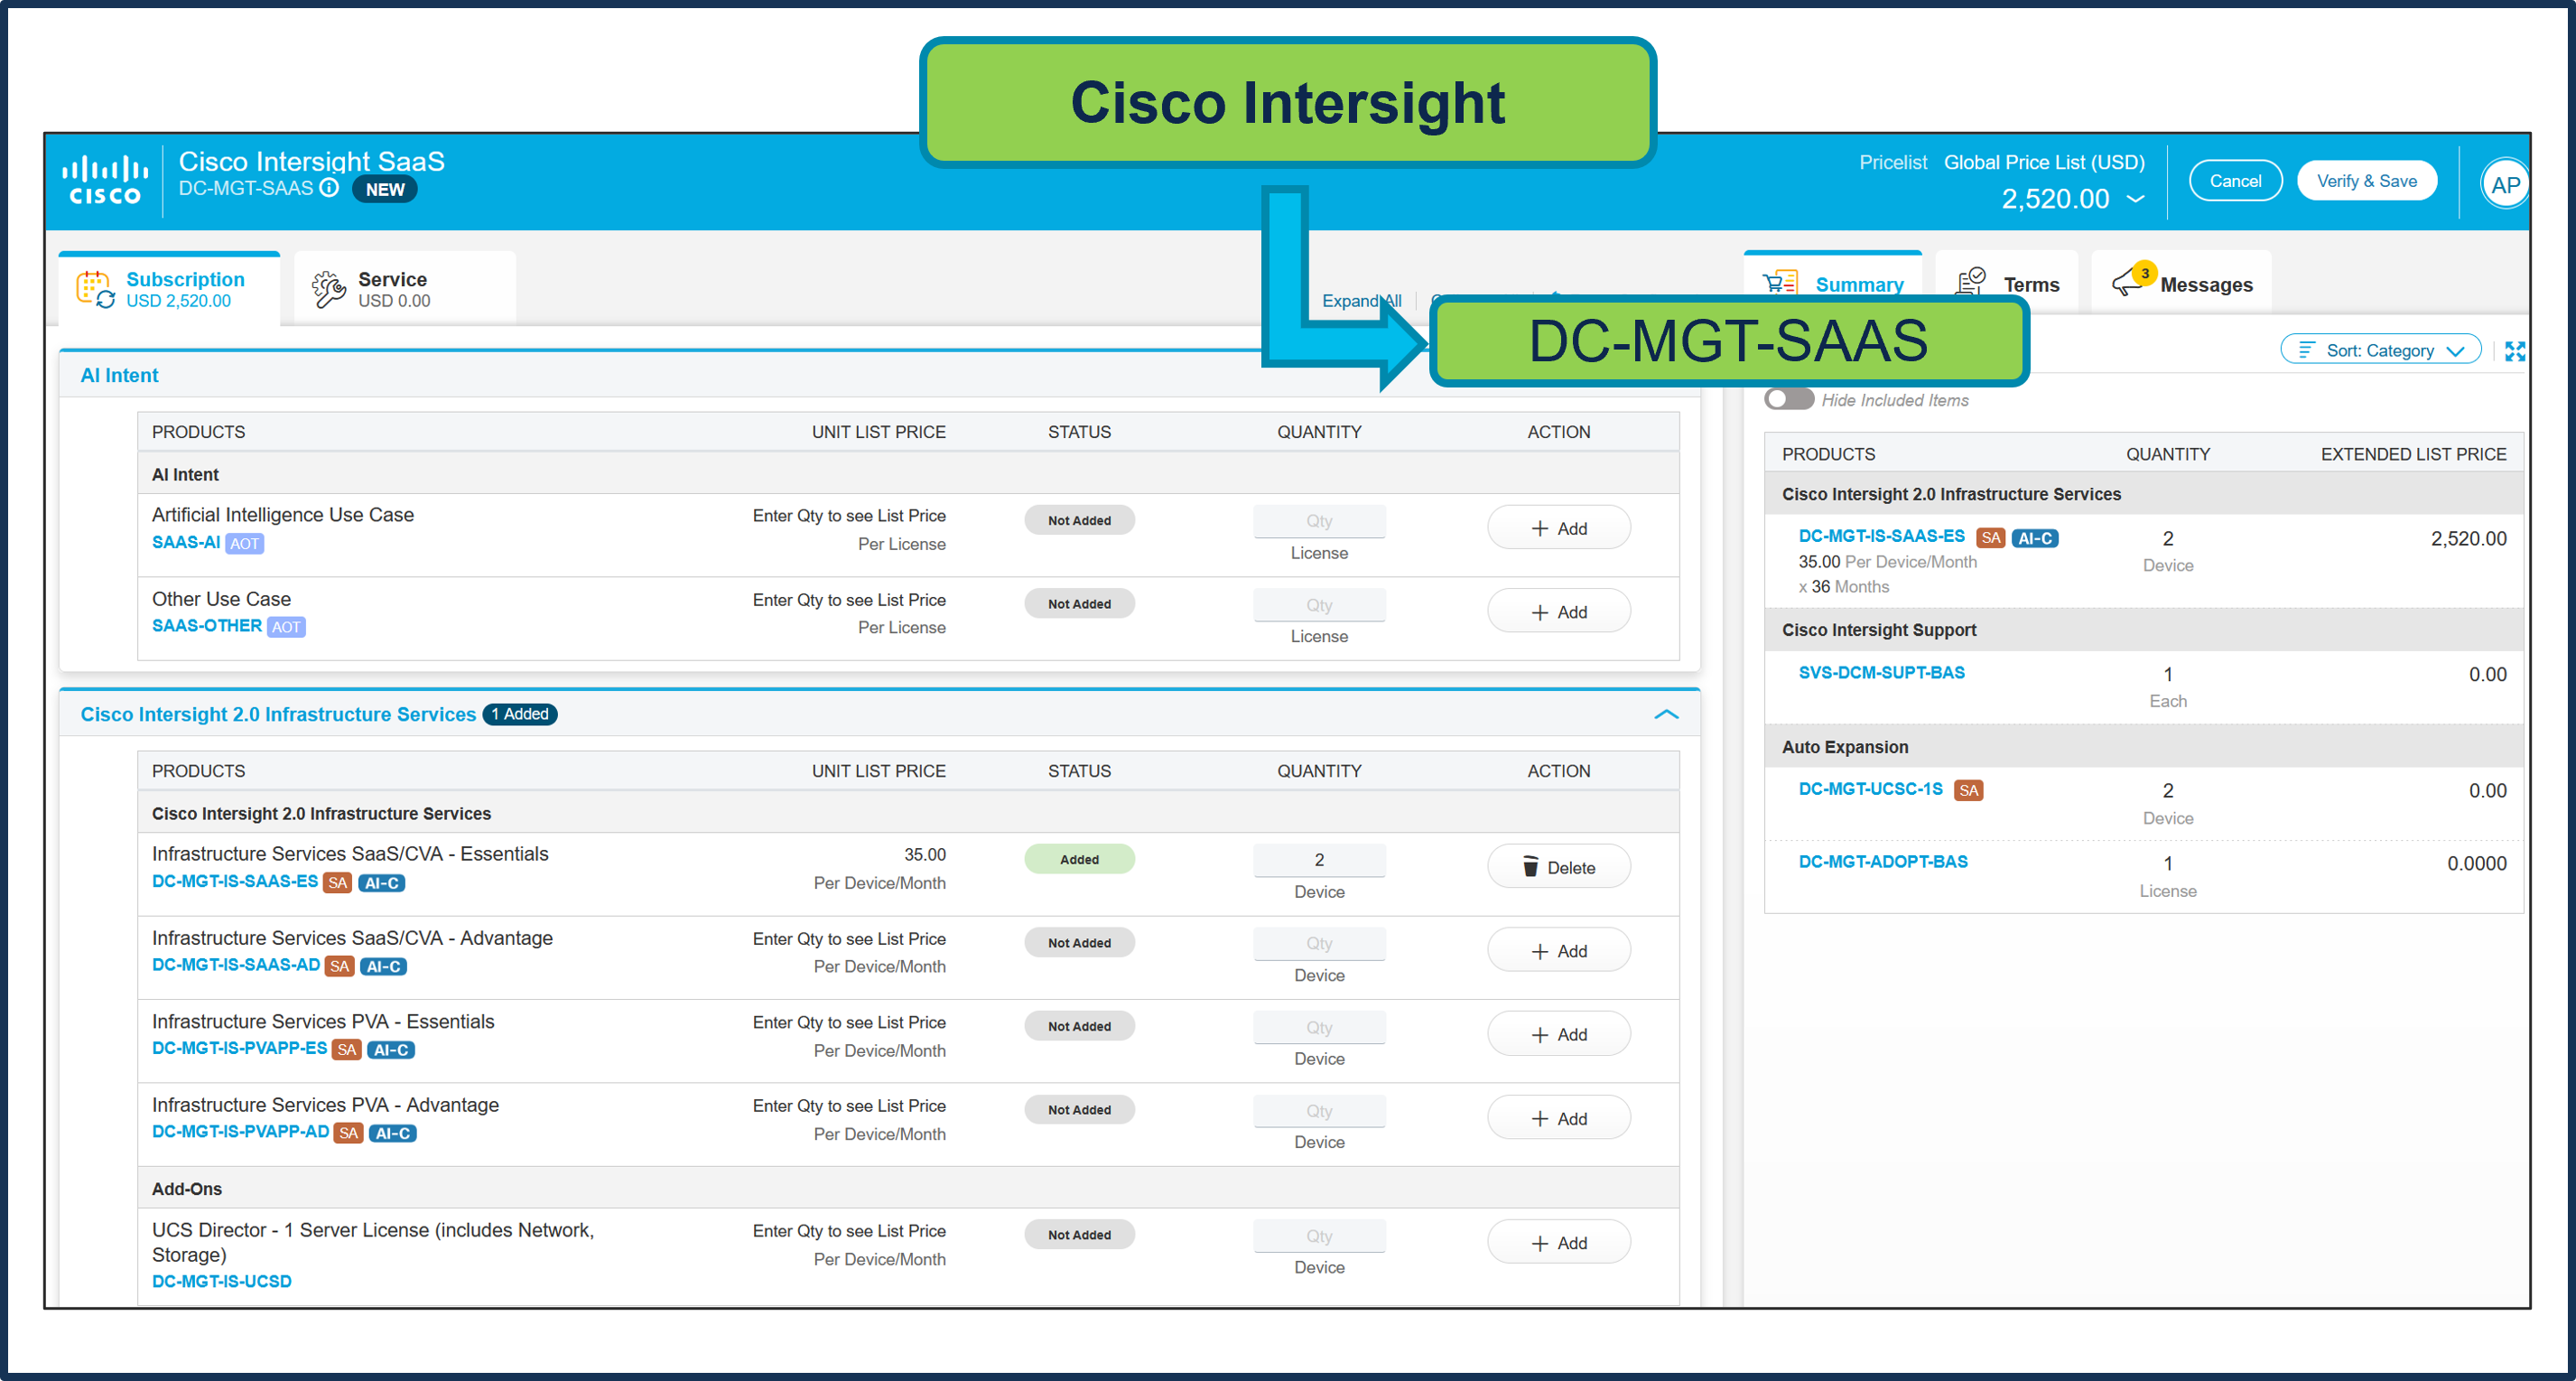
Step 36.
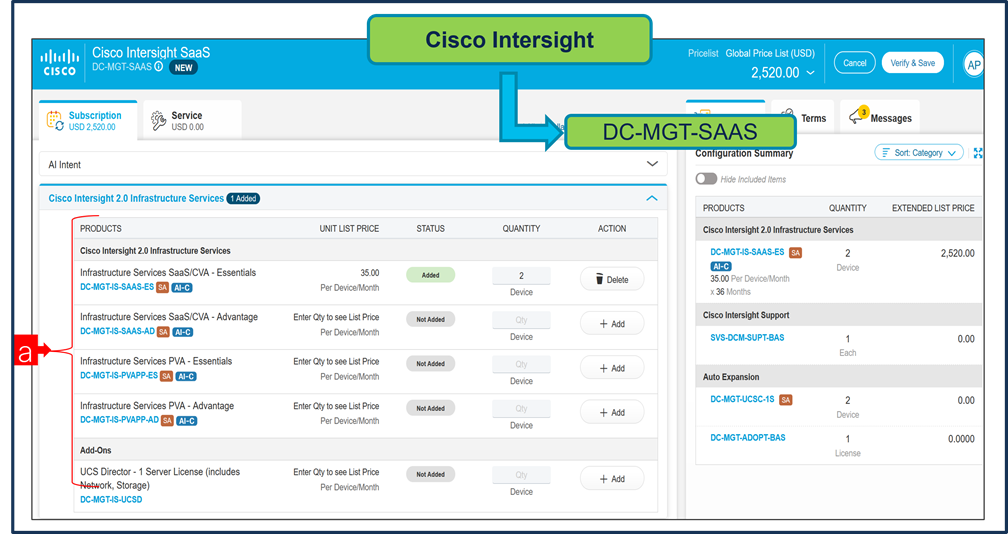
a. The quantity of Cisco Intersight 2.0 Infrastructure Services License under Offer: DC-MGT-SAAS should be equal to the quantity of Server selected. Enter the quantity.
Step 37.
a. User need to make selection from AI Intent Option Class.
Step 38.
a. The Cisco Intersight License comes with separate Support. Basic Embedded Support is the default selection. It is recommended that Customer should upgrade to Solution Support or CX Success Track L1 or L2 for the HW.
Step 39.
a. Configuration for UCSX-M8-MLB and DC-MGT-SAAS is now completed, and status of each Product is Valid.
b. Click on the “PLUS” to expand and view the selections made for each Product.
Scenario 2: Customer With Enterprise Agreement for Cisco Intersight Software License
Step 1.
a. In CCW, search for MLB PID and click on “Add”
b. Click on “Select Options” to enter the configurator.
Step 2.
a. Select UCSX-9508-D-U ATO from under MLB by clicking the “PLUS”
b. Notice the UCSX-9508-D-U ATO Status is invalid as further configuration needed.
c. Click on “Edit Options” to enter the configurator.
Step 3.
a. Configure UCSX-9508-D-U by selecting Compute Node, Fabric Interconnect Module or Intelligent Fabric Module, Power Supply and Power Cables from category window on the left.
b. Follow warning messages to configure the minimum required selections under Chassis.
Step 4.
a. Compute Node is required selection and is further configurable.
b. User can select either Server: UCSX-215C-M8 or UCSX-210C-M8 or both together in same configuration.
Step 5.
a. Server: UCSX-210C-M8 can be selected in multiple QTY by changing the QTY in the box or you can select same server and configure differently within same chassis by clicking in ADD NEW button.
b. Here in this example, we have 2 instances of server selected with 1 QTY each.
c. Click on Server PID in the left to configure the particular instance.
Step 6.
a. Configuration of one server Instance can be copied to another instance. Click on Copy Button on the extreme right as shown here.
b. Select the particular instance and click Yes.
Step 7.
a. Click on Server PID in the left to configure it.
b. User need to select Management Mode option based on how they plan to deploy the Server.
Step 8.
a. If any AI Capable PID is selected, then User need to make selection from AI Intent option class.
Step 9.
a. By making the right selection it provides information to Cisco that if Server is being intended to use AI features or not.
Step 10.
a. Configure UCSX-210C-M8 by selecting Processor, Memory, Drives and other peripheral devices and PIDs are listed in the window on the right.
b. Follow warning messages to configure the minimum required selections under Server.
c. Click on “Done” when completed.
Step 11.
a. Configure GPU PCIe Node: UCSX-440P-D under Compute Node: UCSX-210C-M8.
b. Click on UCSX-440P-D to configure it further in Left Window.
c. Selection of X- Fabric Module: UCSX-F-9416-D under Chassis: UCSX-9508-D-U is required with UCSX-440P-D.
Step 12.
a. Configure GPU PCIe Node: UCSX-440P-D by selecting Riser, GPU and NVIDIA License on the Right Window.
Step 13.
a. Configure GPU PCIe Node: UCSX-580P under Chassis UCSX-9508-D-U
b. Click on UCSX-580P to configure it further in Left Window.
c. Selection of X- Fabric Module: UCSX-F-9516 under Chassis: UCSX-9508-D-U is required with UCSX-580P.
Note: GPU PCIe Node: UCSX-580P max quantity 2 per chassis allowed and consumes (2) Blade slots. GPU PCIe Node: UCSX-580P defaulted in slots 3 & 4 and/or 7 & 8.
Step 14.
a. Configure GPU PCIe Node: UCSX-580P by selecting GPU from Compute Node 1 Slots and/or Compute Node 2 Slots.
b. If a Slot is selected from either Compute Node 1 or 2 the same slot number cannot be repeated/selected.
c. Select NVIDIA License for GPUs when required.
Note: Note: Mixing GPUs in a single Compute Node is not allowed. Mixing GPU across Compute Node 1 & 2 is allowed.
Step 15.
a. NVL Bridge is only supported with GPU H200 NVL and minimum 2 GPUs required.
b. GPUs must be selected in consecutive slots 1 & 2 and/or 3 & 4 of the same Compute Node.
c. If selecting Compute Node 1 a Minimum 1 Server Node is required, If selecting from both Compute Node 1 and 2 then a minimum 2 Server Nodes are required.
Step 16.
a. Note Status is now showing as Valid.
b. Increase the quantity for multiples of same configuration.
c. Click the “PLUS” to add and configure the same product with different option/quantities or select a different product.
Step 17.
a. Click on “Edit Services/Subscriptions” to edit Term Duration for HW Support.
Note: It is recommended that Term Duration for HW Support must align with Software Subscription Duration.
Step 18.
a. Enter the Term Duration
b. Click on “Apply” and “Done”
Step 19.
a. Select UCSX-210C-M8-U ATO from under MLB by clicking the “PLUS”.
b. Notice the UCSX-210C-M8-U ATO Status is invalid as further configuration needed.
c. Select ‘Edit Option’ to enter the configurator.
Step 20.
a. Users need to select Management Mode option based on how they plan to deploy the Server.
Step 21.
a. If any AI Capable PID is selected, then User need to make selection from AI Intent option class.
Step 22.
a. By making the right selection it provides information to Cisco that if Server is being intended to use AI features or not.
Step 23.
a. Configure UCSX-210C-M8-U by selecting peripherals from category window on the left.
b. PIDs are listed in the window on the right. Some PIDs like Processor, Memory and Storage Drives are grouped according to type or series; select from the grouped options located above SKU window on the right.
c. Follow warning messages to configure the minimum required option PIDs.
d. Click on “Done” when completed.
Step 24.
a. Note Status is now showing as “Valid”.
b. Increase the quantity for multiples of same configuration.
c. Click the “PLUS” to add and configure the same product with different option/quantities or select a different product.
Step 25.
a. Click on “Edit Services/Subscriptions” to edit Term Duration for HW Support.
Note: It is recommended that Term Duration for HW Support must align with Software Subscription Duration.
Step 26.
a. Enter the Term Duration.
b. Click on “Apply” and “Done”
Step 27.
a. GPU PCIe Node: UCSX-440P-D-U is an optional selection, and user can select it by clicking plus
Step 28.
a. GPU PCIe Node: UCSX-580P-U is an optional selection, and user can select it by clicking plus.
Step 29.
a. Fabric Interconnect is an optional selection, and user can select it by clicking plus
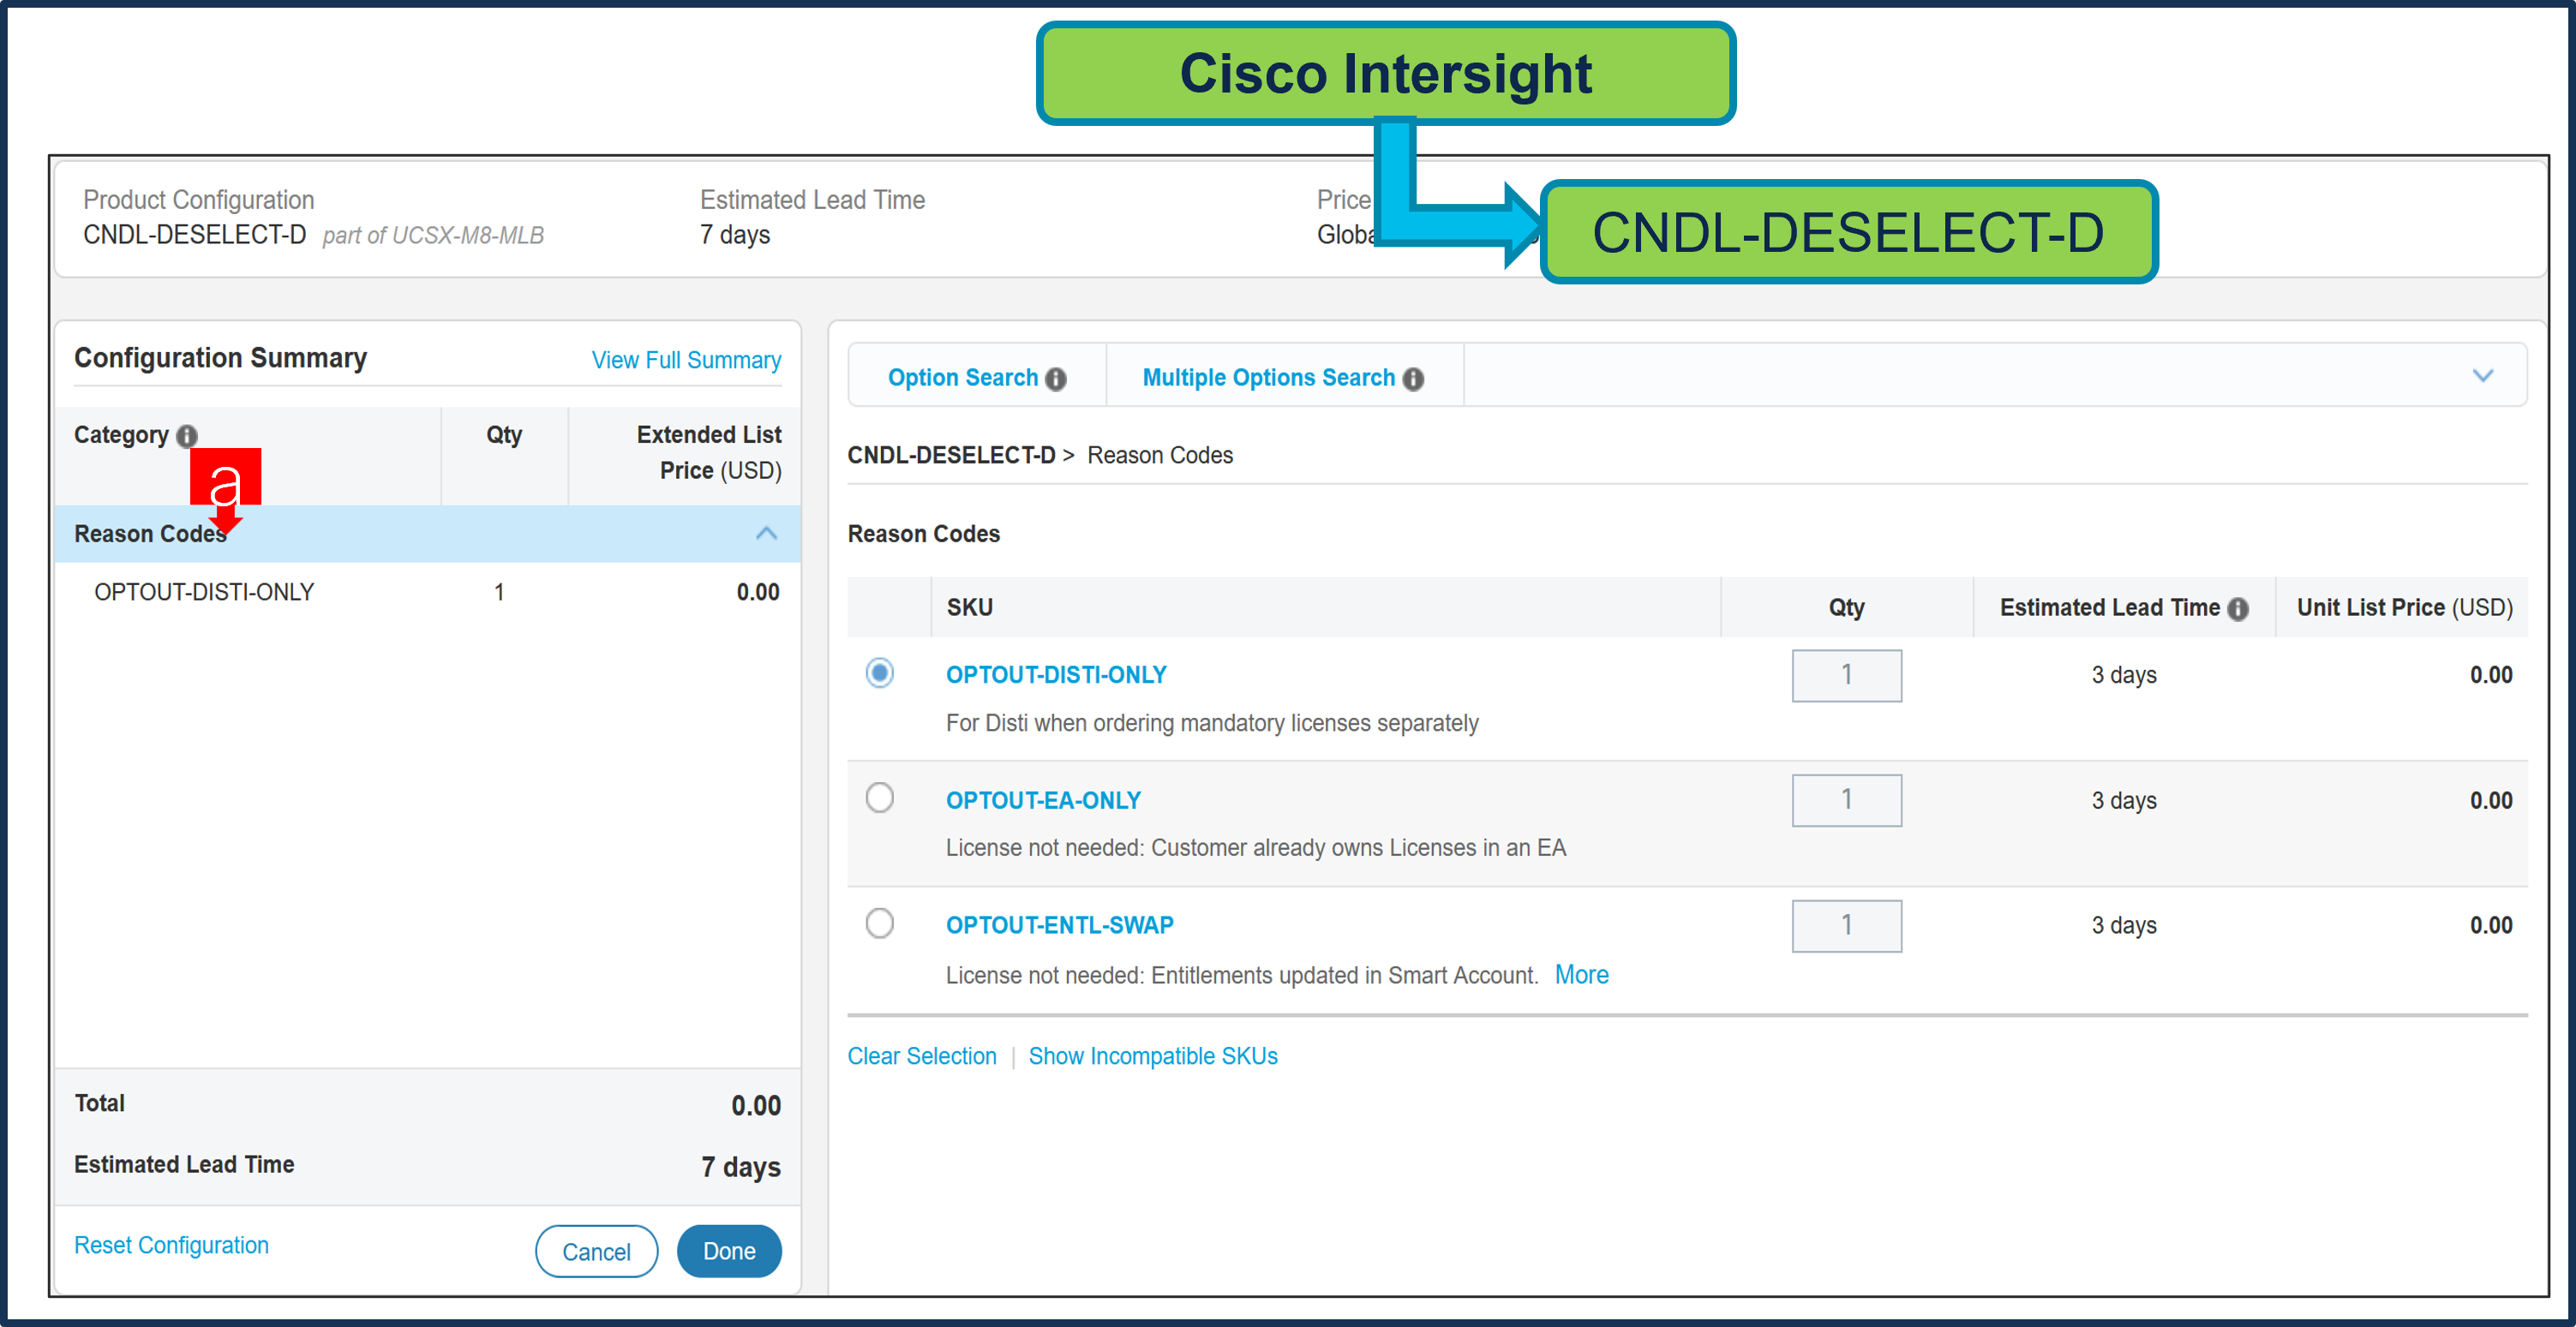
Step 30.

a. CNDL-DESELECT-D is meant to select only if Customer has already purchased Cisco Intersight License via EA Contract or order is for Disti Fulfillment.
Note: Please note that Intersight is required selection and needed for the M6 Server to function. All orders with CNDL-DESELECT-D will be manually reviewed for Compliance.
Step 31.

a. Please select appropriate Reason Code
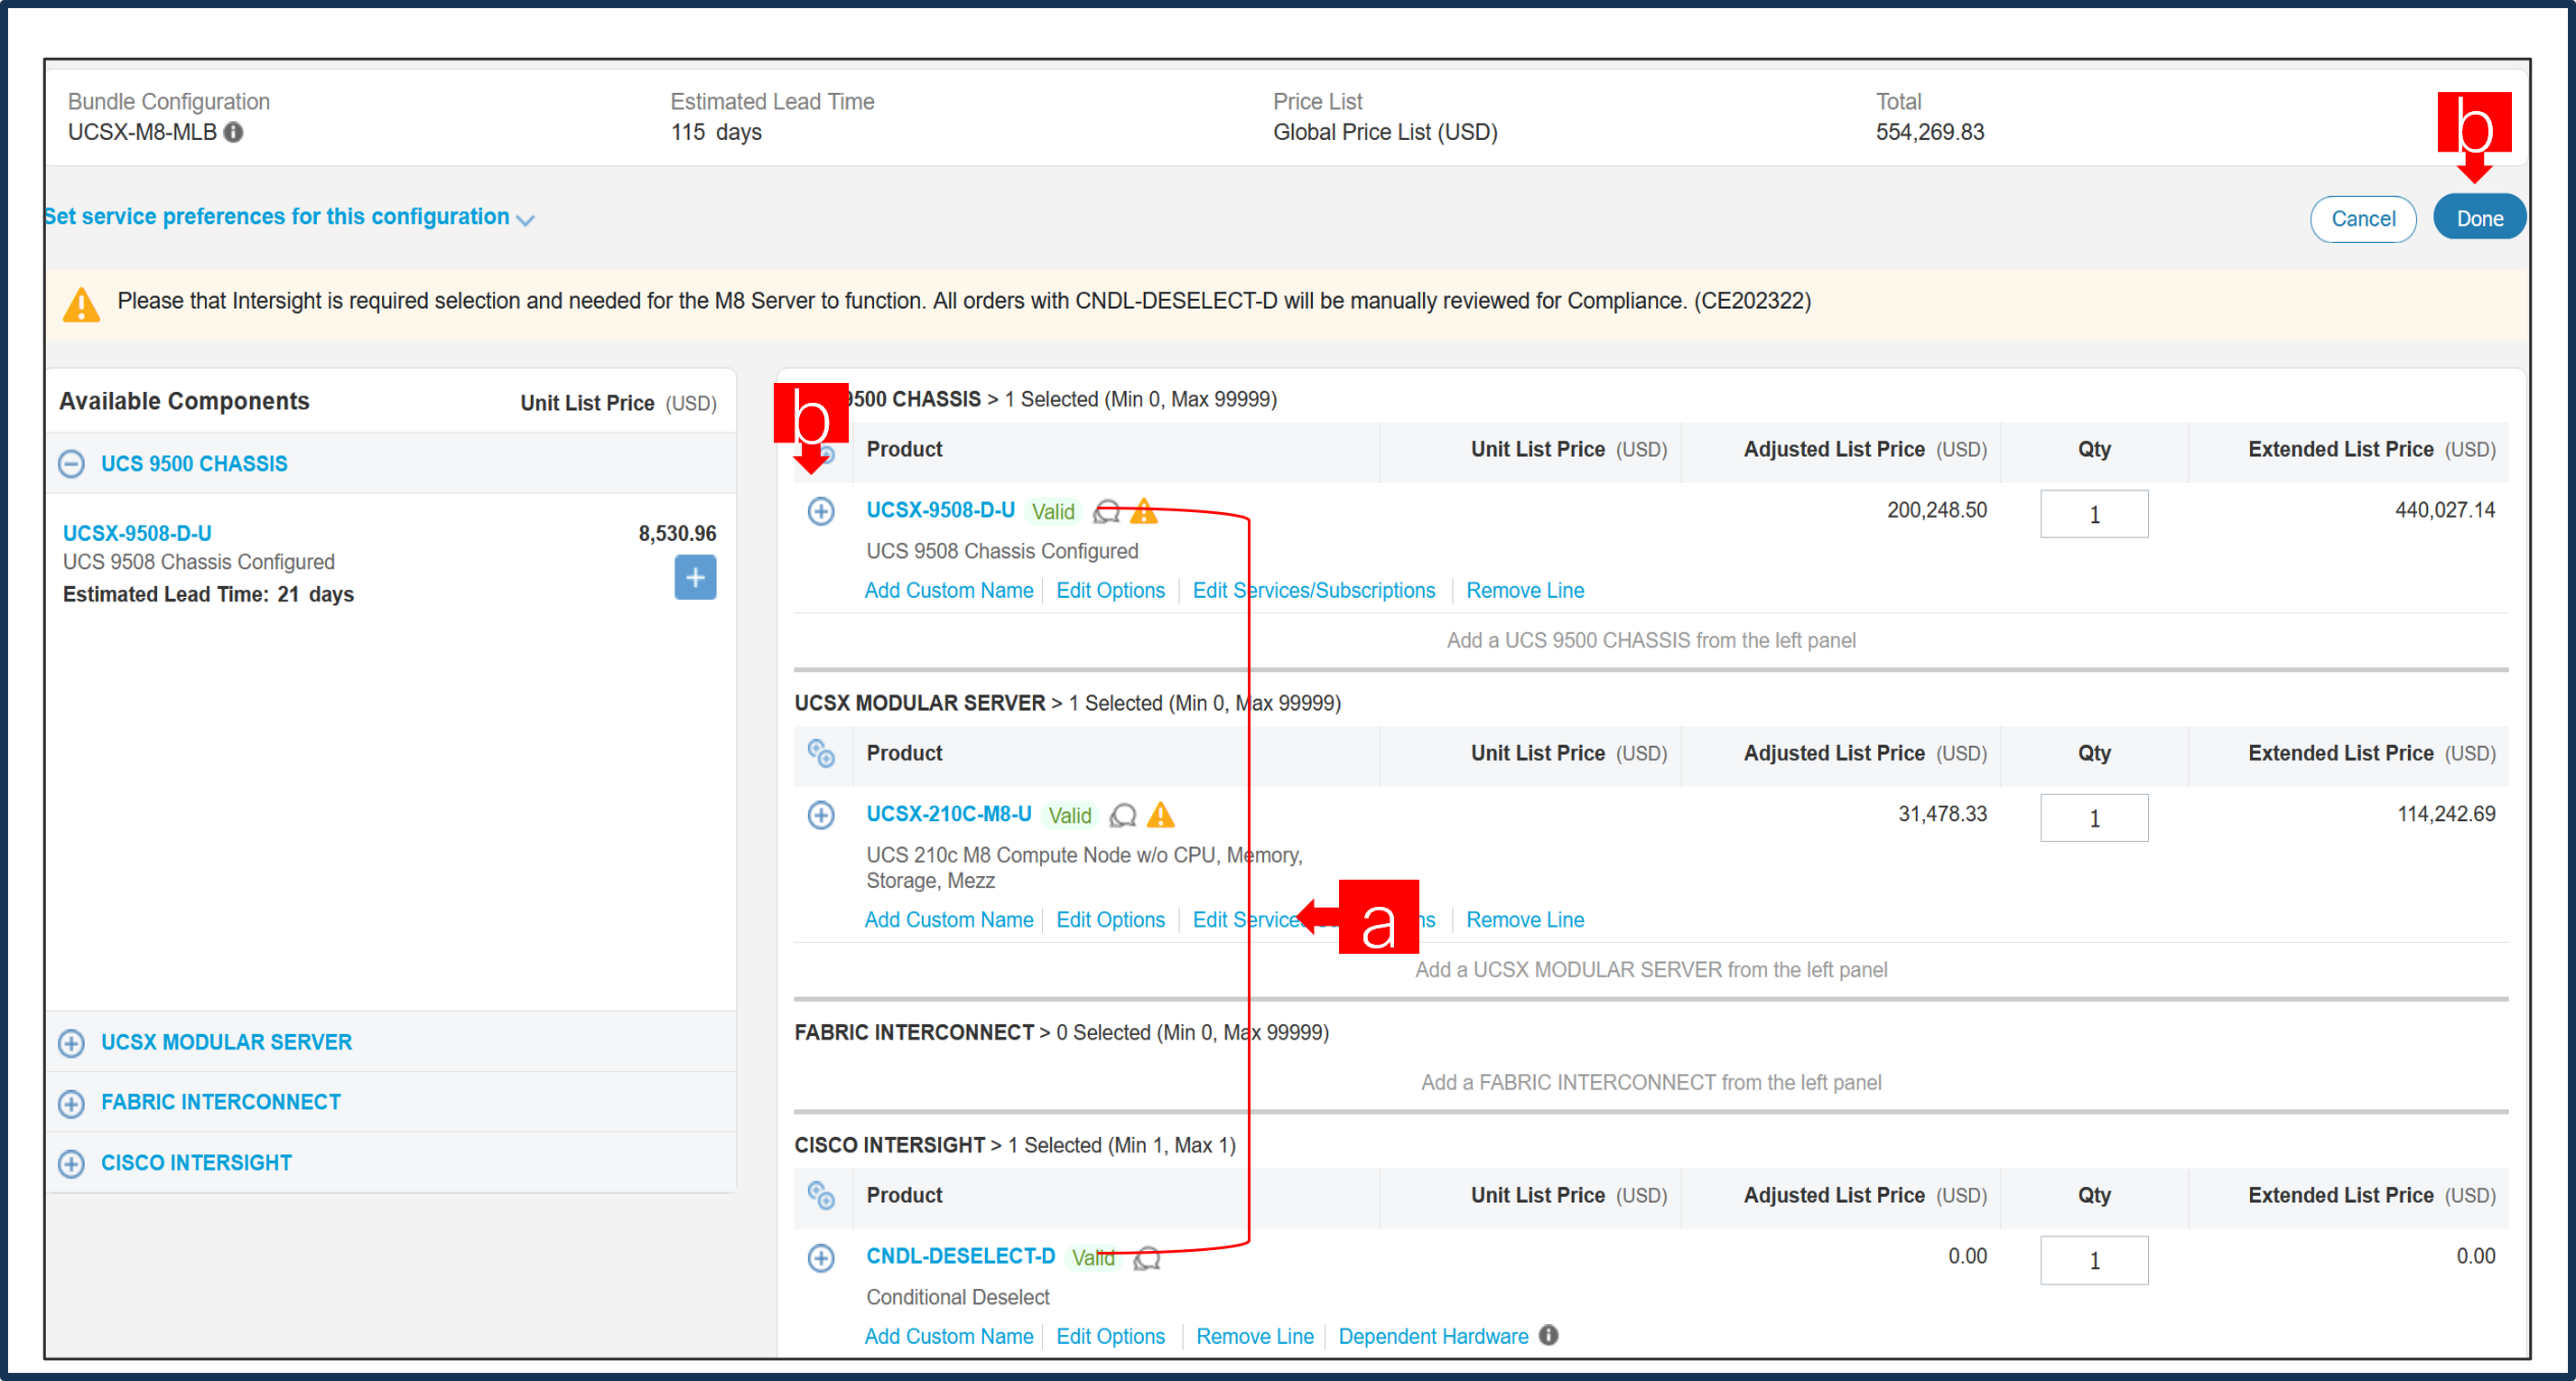
Step 32.

a. Configuration for MLB is completed when status of each Product is Valid and warning messages are cleared.
b. Click on the “PLUS” to expand and view the selections made for each Product.
c. Click on the “DONE” to complete the MLB Configuration.