Managing Storage Using RAID

This chapter includes the following sections:

RAID Options


Note


The RAID feature is applicable to E-Series Servers and the SM E-Series NCE. The RAID feature is not applicable to the EHWIC E-Series NCE and the NIM E-Series NCE.

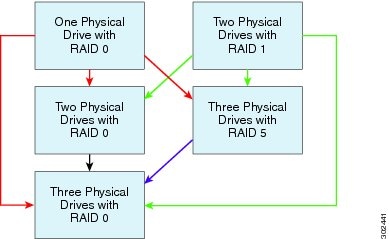
You can choose to store the E-Series Server data files on local Redundant Array of Inexpensive Disks (RAID). The following RAID levels are supported:

  • The single-wide E-Series Server supports RAID 0 and RAID 1 levels.

  • The double-wide E-Series Server supports RAID 0, RAID 1, and RAID 5 levels.

  • The double-wide E-Series Server with the PCIe option supports RAID 0 and RAID 1 levels.

RAID 0

With RAID 0, the data is stored evenly in stripe blocks across one or more disk drives without redundancy (mirroring). The data in all of the disk drives is different.

Figure 1. RAID 0

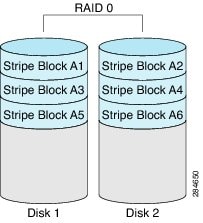
Compared to RAID 1, RAID 0 provides additional storage because both disk drives are used to store data. The performance is improved because the read and write operation occurs in parallel within the two disk drives.

However, there is no fault tolerance, error checking, hot spare, or hot-swapping. If one disk drive fails, the data in the entire array is destroyed. Because there is no error checking or hot-swapping, the array is susceptible to unrecoverable errors.

RAID 1

RAID 1 creates a mirrored set of disk drives, where the data in both the disk drives is identical, providing redundancy and high availability. If one disk drive fails, the other disk drive takes over, preserving the data.

RAID 1 also allows you to use a hot spare disk drive. The hot spare drive is always active and is held in readiness as a hot standby drive during a failover.

Figure 2. RAID 1

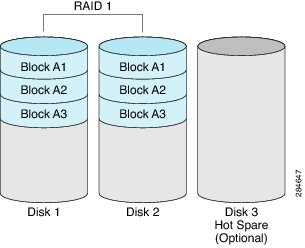
RAID 1 supports fault tolerance and hot-swapping. When one disk drive fails, you can remove the faulty disk drive and replace it with a new disk drive.

However, compared to RAID 0, there is less storage space because only half of the total potential disk space is available for storage and there is an impact on performance.

RAID 5

With RAID 5, the data is stored in stripe blocks with parity data staggered across all disk drives, providing redundancy at a low cost.

Figure 3. RAID 5

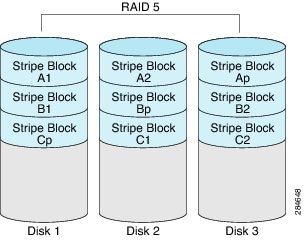
RAID 5 provides more data storage capacity than RAID 1 and better data protection than RAID 0. It also supports hot swapping; however, RAID 1 offers better performance.

RAID 10

RAID 10, a combination of RAID 0 and RAID 1, consists of striped data across mirrored spans. A RAID 10 drive group is a spanned drive group that creates a striped set from a series of mirrored drives. RAID 10 allows a maximum of eight spans. You must use an even number of drives in each RAID virtual drive in the span. The RAID 1 virtual drives must have the same stripe size. RAID 10 provides high data throughput and complete data redundancy but uses a larger number of spans.


Note


RAID 10 is supported on DoubleWide M3 servers.


Non-RAID

When the disk drives of a computer are not configured as RAID, the computer is in non-RAID mode. Non-RAID mode is also referred to as Just a Bunch of Disks or Just a Bunch of Drives (JBOD). Non-RAID mode does not support fault tolerance, error checking, hot-swapping, hot spare, or redundancy.

Summary of RAID Options

RAID Option Description Advantages Disadvantages

RAID 0

Data stored evenly in stripe blocks without redundancy

  • Better storage

  • Improved performance

  • No error checking

  • No fault tolerance

  • No hot-swapping

  • No redundancy

  • No hot spare

RAID 1

Mirrored set of disk drives and an optional hot spare disk drive

  • High availability

  • Fault tolerance

  • Hot spare

  • Hot-swapping

  • Less storage

  • Performance impact

RAID 5

Data stored in stripe blocks with parity data staggered across all disk drives

  • Better storage efficiency than RAID 1

  • Better fault tolerance than RAID 0

  • Low cost of redundancy

  • Hot-swapping

  • Slow performance

Non-RAID

Disk drives not configured for RAID

Also referred to as JBOD

  • Portable

  • No error checking

  • No fault tolerance

  • No hot-swapping

  • No redundancy

  • No hot spare

Configuring RAID


Note


The RAID feature is applicable to E-Series Servers and the SM E-Series NCE. The RAID feature is not applicable to the EHWIC E-Series NCE and the NIM E-Series NCE.

Use this procedure to configure the RAID level, strip size, host access privileges, drive caching, and initialization parameters on a virtual drive.

Procedure

  Command or Action Purpose

Step 1

Server# scope chassis

Enters the chassis command mode.

Step 2

Server /chassis # show storageadapter

Displays information about installed storage cards. This information allows you to determine the slot in which the storage card is installed.

Step 3

Server /chassis # scope storageadapter SLOT-5

Enters command mode for an installed storage card.

Step 4

Server /chassis/storageadapter # show physical-drive

Displays physical disk drives. This information allows you to determine the status of the physical drives.

Note


To configure RAID, the status of the physical drives must be unconfigured good. To change the state of the physical drive, see Changing the Physical Drive State.

Step 5

Server /chassis/storageadapter # create-virtualdrive {-r0 | -r1 | -r5} physical-drive-numbers [QuickInit | FullInit | NoInit] [RW | RO | Blocked] [DiskCacheUnchanged | DiskCacheEnable | DiskCacheDisable] [-strpsz64 | -strpsz32 | -strpsz16 | -strpsz8]

Creates a virtual drive with the specified RAID level on the physical drive. You can also specify the following options:

Note


The options are not case sensitive.

  • (Optional) Initialization options:

    • QuickInit—Controller initialization the drive quickly. You can start writing data into the virtual drive in a few seconds. This is the default option.

    • FullInit—Controller does a complete initialization of the new configuration. You cannot write data into the virtual drive until initialization is complete. If the drive is large, this can take a long time.

    • NoInit—Controller does not initialize the drives.

  • (Optional) Access policy options:

    • RW—The host has full access to the drive. This is the default option.

    • RO—The host can only read data from the drive.

    • Blocked—The host cannot access the drive.

  • (Optional) Drive cache options:

    • DriveCacheDisable—Caching is disabled on the physical drives.

      Note

       
      This is the default and recommended option.
    • DriveCacheUnchanged—The controller uses the caching policy specified on the physical drive. This is the default option.

    • DriveCacheEnable—Caching is enabled on the physical drives.

  • (Optional) Strip size options:

    • -strpsz64—This is the default option.

    • -strpsz32

    • -strpsz16

    • -strpsz8

    Caution


    The smaller strip sizes have a known problem with VMware vSphere Hypervisor™ installation; therefore, if you are installing the vSphere platform, we recommend that you use the strpsz64 option.

Step 6

Server /chassis/storageadapter # show virtual-drive

(Optional) Displays virtual drive information for the storage card. This information allows you to verify RAID configuration.

Example

This example shows how to configure RAID.

Server# scope chassis
Server /chassis # show storageadapter

PCI Slot Product      Name    Serial Number  Firmware Package Build   Product ID Cache Memory Size 
-------- ------------------------------ -------------- ------------------------ -------------- ---
SLOT-5   LSI MegaRAID SAS     2004 ROMB      20.10.1-0092             LSI Logic   0 MB  

Server /chassis # scope storageadapter SLOT-5

Server /chassis /storageadapter# show physical-drive

Slot Number  Controller Status               Manufacturer   Model        Drive  Firmware Coerced Size   Type  
----------- ---------- ------------------------------------ -------------- -------------- -------------- --- 
1            SLOT-5     unconfigured good    TOSHIBA        MBF2600RC    5704   571250 MB          HDD   
2            SLOT-5     unconfigured good    ATA            ST9500620NS  SN01   475883 MB          HDD 

Server /chassis /storageadapter # create-virtualdrive -r0 1 FullInit RW DiskCacheEnable -strpsz32
---
status: ok
----------------------
Server /chassis /storageadapter # show virtual-drive
Virtual Drive  Status               Name                     Size       RAID Level 
-------------- -------------------- ------------------------ ---------- ---------- 
0              Optimal                                       571250 MB  RAID 0     


What to do next

Make the disk drive bootable. See Making the Disk Drive Bootable.

Changing the Physical Drive State


Note


The RAID feature is applicable to E-Series Servers and the SM E-Series NCE. The RAID feature is not applicable to the EHWIC E-Series NCE and the NIM E-Series NCE.

Use this procedure to change the state of the physical drive. Options are: hotspare, jbod, or unconfigured good.

Procedure

  Command or Action Purpose

Step 1

Server# scope chassis

Enters the chassis command mode.

Step 2

Server /chassis # show storageadapter

Displays information about installed storage cards. This information allows you to determine the slot in which the storage card is installed.

Step 3

Server /chassis # scope storageadapter SLOT-5

Enters command mode for an installed storage card.

Step 4

Server /chassis/storageadapter # show physical-drive

Displays physical disk drives.

Step 5

Server /chassis/storageadapter # scope physical-drive slot-number

Enters command mode for the specified physical drive.

Step 6

Server /chassis/storageadapter /physical-drive # show detail

Displays information about the specified physical drive.

Step 7

Server /chassis/storageadapter /physical-drive # set state {unconfiguredgood | jbod | hotspare}

Changes the state of the physical drive. Options are: hotspare, jbod, or unconfigured good.

Step 8

Server /chassis/storageadapter /physical-drive* # commit

Commits the changes.

Step 9

Server /chassis/storageadapter /physical-drive # show detail

Displays information about the specified physical drive.

Example

This example shows how to change the state of the physical drive.

Server# scope chassis
Server /chassis # show storageadapter

PCI Slot Product      Name    Serial Number  Firmware Package Build   Product ID Cache Memory Size 
-------- ------------------------------ -------------- ------------------------ -------------- ---
SLOT-5   LSI MegaRAID SAS     2004 ROMB      20.10.1-0092             LSI Logic   0 MB  

Server /chassis# scope storageadapter SLOT-5
Server /chassis /storageadapter# show physical-drive

Slot Number  Controller Status               Manufacturer   Model        Drive  Firmware Coerced Size   Type  
----------- ---------- ------------------------------------ -------------- -------------- -------------- ----- 
1            SLOT-5     system               TOSHIBA        MBF2600RC    5704   571250 MB          HDD   
2            SLOT-5     unconfigured good    ATA            ST9500620NS  SN01   475883 MB          HDD   

Server /chassis /storageadapter# scope physical-drive 1
Server /chassis /storageadapter/physical-drive# show detail

Slot Number 1:
    Controller: SLOT-5
    Status: system
    Manufacturer: TOSHIBA
    Model: MBF2600RC
    Drive Firmware: 5704
    Coerced Size: 571250 MB
    Type: HDD

Server /chassis /storageadapter/physical-drive# set state hotspare
Server /chassis /storageadapter/physical-drive*# commit 
Server /chassis /storageadapter/physical-drive# show detail

Slot Number 1:
    Controller: SLOT-5
    Status: hotspare
    Manufacturer: TOSHIBA
    Model: MBF2600RC
    Drive Firmware: 5704
    Coerced Size: 571250 MB
    Type: HDD        

Deleting a Virtual Drive


Note


The RAID feature is applicable to E-Series Servers and the SM E-Series NCE. The RAID feature is not applicable to the EHWIC E-Series NCE and the NIM E-Series NCE.

Procedure

  Command or Action Purpose

Step 1

Server# scope chassis

Enters the chassis command mode.

Step 2

Server /chassis # scope storageadapter SLOT-5

Enters command mode for an installed storage card.

Step 3

Server /chassis/storageadapter # scope virtual-drive 0

Displays virtual drive information that includes the virtual drive number, which is required to delete the virtual drive.

Step 4

Server /chassis/storageadapter/virtual-drive # delete virtual-drive

Deletes the specified virtual drive.

Example

This example shows how to delete a virtual drive.

Server /chassis# scope storageadapter SLOT-5
Server /chassis /storageadapter # show virtual-drive
Virtual Drive  Status               Name                     Size       RAID Level 
-------------- -------------------- ------------------------ ---------- ---------- 
0              Optimal                                       571250 MB  RAID 0  
   
Server /chassis /storageadapter # delete virtual-drive 0
VD 0 is the boot drive.  It is hosting the server's operating system.
All data on the drive will be lost.
Are you sure you want to delete this virtual drive?
Enter 'yes' to confirm -> yes

Server /chassis /storageadapter *# commit          

Reconstructing the Virtual Drive Options


Note


The RAID feature is applicable to E-Series Servers and the SM E-Series NCE. The RAID feature is not applicable to the EHWIC E-Series NCE and the NIM E-Series NCE.

To migrate (reconstruct) the virtual drive to a new RAID level, you might need to add or remove physical drives. When you add or remove physical drives, the size of the virtual drive is either retained or increased.

You can retain or increase the size of the virtual drive, but you cannot decrease its size. For example, if you have two physical drives with RAID 0, you cannot migrate to RAID 1 with the same number of drives. Because with RAID 1, a mirrored set of disk drives are created, which reduces the size of the virtual drive to half of what it was before, which is not supported.


Note


The virtual drive reconstruction process might take several hours to complete. You can continue to use the system during the reconstruction process.


Options for Retaining the Size of the Virtual Drive

See the following figure and the table that follows for options that retain the size of the virtual drive when you migrate the virtual drive to a new RAID level.
Figure 4. Retaining the Virtual Drive Size Options


The following table lists the options that retain the size of the virtual drive and provides information about how many physical drives you must add or remove to migrate the virtual drive to a specific RAID level.

Table 1. Retaining the Virtual Drive Size

From:

Migrate to:

Add or Remove Disks

One physical drive with RAID 0

Two physical drives with RAID 1

Add one disk.

Two physical drives with RAID 1

One physical drive with RAID 0

Remove one disk.

Two physical drives with RAID 0

Three physical drives with RAID 5

Add one disk.

Three physical drives with RAID 5

Two physical drives with RAID 0

Remove one disk.

Options for Increasing the Size of the Virtual Drive

See the following figure and the table that follows for options that increase the size of the virtual drive when you migrate the virtual drive to a new RAID level.
Figure 5. Increasing the Virtual Drive Size Options


The following table lists the options that increase the size of the virtual drive and provides information about how many physical drives you must add or remove to migrate the virtual drive to a specific RAID level.

Table 2. Increasing the Virtual Drive Size

From:

Migrate to:

Add or Remove Disks

One physical drive with RAID 0

See the red arrows in the figure.

Two physical drives with RAID 0

Add one disk.

Three physical drives with RAID 5

Add two disks.

Three physical drives with RAID 0

Add two disks.

Two physical drives with RAID 1

See the green arrows in the figure.

Two physical drives with RAID 0

Three physical drives with RAID 5

Add one disk.

Three physical drives with RAID 0

Add one disk.

Two physical drives with RAID 0

See the black arrow in the figure.

Three physical drives with RAID 0

Add one disk.

Three physical drives with RAID 5

See the purple arrow in the figure.

Three physical drives with RAID 0

Reconstructing a Virtual Drive


Note


The RAID feature is applicable to E-Series Servers and the SM E-Series NCE. The RAID feature is not applicable to the EHWIC E-Series NCE and the NIM E-Series NCE.

Use this procedure to add or remove the physical drive in order to migrate the virtual drive to the specified RAID level.

Before you begin

See Reconstructing the Virtual Drive Options.

Procedure

  Command or Action Purpose

Step 1

Server# scope chassis

Enters the chassis command mode.

Step 2

Server /chassis # show storageadapter

Displays information about installed storage cards. This information allows you to determine the slot in which the storage card is installed.

Step 3

Server /chassis # scope storageadapter SLOT-5

Enters command mode for an installed storage card.

Step 4

Server /chassis/storageadapter # scope virtual-drive drive-number

Enters command mode for the specified virtual drive.

Step 5

Server /chassis/storageadapter /virtual-drive # reconstruct {-r0 | -r1 | -r5} [-add | -rmv] new-physical-drive-slot-number(s)

Adds or removes the physical drive to migrate the virtual drive to the new specified RAID level.
  • -r0 | -r1 | -r5—Available RAID levels are: RAID 0, RAID 1, or RAID 5.

  • -add | -rmv —Adds or removes the physical drive.

Step 6

Server /chassis/storageadapter /virtual-drive # show detail

Displays information about the specified virtual drive.

Example

This example shows how to migrate one of two discs that was initially configured as RAID 1 to RAID 0.

Server# scope chassis
Server /chassis # show storageadapter

PCI Slot Product      Name    Serial Number  Firmware Package Build   Product ID Cache Memory Size 
-------- ------------------------------ -------------- ------------------------ -------------- ---
SLOT-5   LSI MegaRAID SAS     2004 ROMB      20.10.1-0092             LSI Logic   0 MB  

Server /chassis# scope storageadapter SLOT-5
Server /chassis /storageadapter# scope virtual-drive 0
Server /chassis /storageadapter/virtual-drive# reconstruct -r0 -rmv 1
---
status: ok
...
Server /chassis /storageadapter/virtual-drive# show detail
Status: Optimal
    Status: Optimal
    Name: 
    Size: 475883 MB
    RAID Level: RAID 1
    Target ID: 0
    Stripe Size: 64 KB
    Drives Per Span: 2
    Span Depth: 1
    Access Policy: Read-Write
    Disk Cache Policy: Unchanged
    Write Cache Policy: Write Through
    Cache Policy: Direct
    Read Ahead Policy: None
    Auto Snapshot: false
    Auto Delete Oldest: true
    Allow Background Init: true
    ReConstruct Progress: 0 %
    ReConstruct Elapsed Seconds: 3 s        

Making the Disk Drive Bootable


Note


The RAID feature is applicable to E-Series Servers and the SM E-Series NCE. The RAID feature is not applicable to the EHWIC E-Series NCE and the NIM E-Series NCE.

After you configure RAID, you must make the disk drive bootable. Use this procedure to make the disk drive bootable.

Before you begin

Configure RAID on the disk drive.

Procedure

  Command or Action Purpose

Step 1

Server# scope chassis

Enters the chassis command mode.

Step 2

Server /chassis # scope storageadapter SLOT-5

Enters command mode for an installed storage card.

Step 3

Server /chassis # scope storageadapter SLOT-5

Enters command mode for an installed storage card.

Step 4

Server /chassis/storageadapter # scope virtual-drive 0

Displays virtual drive information that includes the virtual drive number, which you is required to set the virtual drive.

Step 5

Server /chassis/storageadapter /virtual-drive# set boot-drive

Makes the disk drive bootable.

Example

This example shows how to make the disk drive bootable using the CIMC CLI.

Server /chassis# scope storageadapter SLOT-5
Server /chassis /storageadapter# show physical-drive

Slot Number  Controller Status               Manufacturer   Model        Drive  Firmware Coerced Size   Type  
----------- ---------- ------------------------------------ -------------- -------------- -------------- ----- 
1            SLOT-5     system               TOSHIBA        MBF2600RC    5704   571250 MB          HDD   
2            SLOT-5     unconfigured good    ATA            ST9500620NS  SN01   475883 MB          HDD  
 
   Server /chassis /storageadapter# set boot-drive 0
Are you sure you want to set virtual drive 0 as the boot drive?
Enter 'yes' to confirm -> yes