Diagnostics

Maintenance Shell for Intersight Virtual Appliance and Intersight Assist

Cisco Intersight Virtual Appliance provides a diagnostic utility to monitor the installation and provide remediation steps to install the appliance successfully. This console-based utility helps in troubleshooting and addressing misconfiguration or networking issues during the appliance installation. The Maintenance Shell aims to:

  • Detect and display issues with the installation prerequisites.

  • Enable editing the inputs that are provided during the initial appliance deployment.

  • Assist with continuing the installation after you fix the settings or change inputs during the appliance deployment.

Check the status of your installation by visiting <https://fqdn-of-your-appliance> after the VM is powered ON. If you notice that your VM does not respond after about 15 minutes since power-on, use the Intersight Virtual Appliance Maintenance Shell to troubleshoot networking or misconfiguration issues. When the login prompt appears, the diagnostic account is ready. Use the following instructions to troubleshoot:

  1. Launch the Intersight Virtual Appliance Maintenance Shell using one of the following three options:

    • Open an SSH session

      1. SSH to the IP address of your Intersight Virtual Appliance.

      2. Log in as the admin user with username admin and enter the administrator password that you used during the appliance deployment.


      Note


      The use of SHA-1 for any cryptographic functionality in SSH is no longer supported.


    • Open a console window in your hypervisor

      1. From either VMWare vCenter or Microsoft Hyper-V Manager, navigate to your virtual machine and open a console window.

      2. Hit Alt-F2 to get the login screen.

      3. Log in as the admin user with username admin and enter the administrator password that you used during the appliance deployment.

    • Open a telnet session to a serial console

      1. In cases where opening an SSH session to the Intersight Virtual Appliance is not possible, use the information described in Configuring Cisco TAC Support Using a Serial Console to add a serial console to your Intersight Virtual Appliance VM.

      2. Telnet to the vCenter host IP at the PORT_NUMBER specified in the serial console setup.

      3. Log in as the admin user with username admin and enter the administrator password that you used during the appliance deployment.

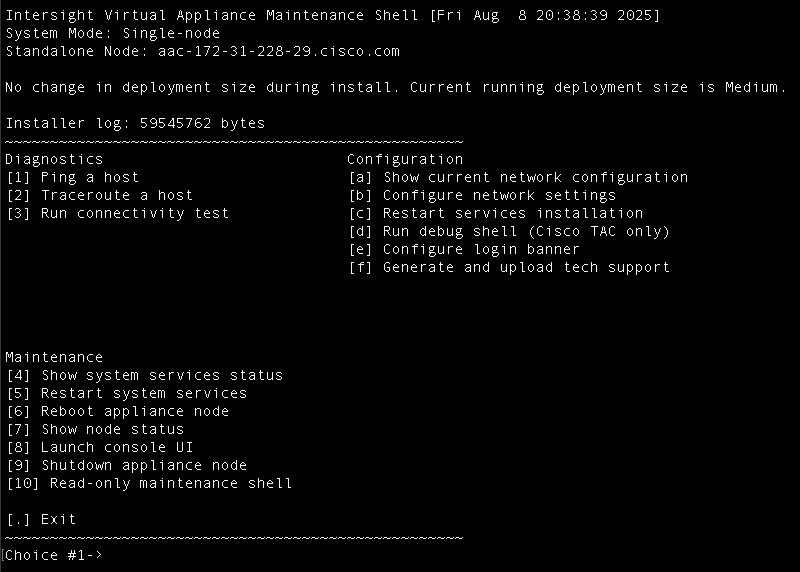
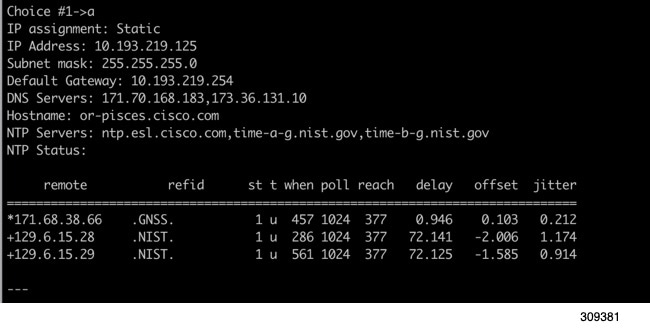
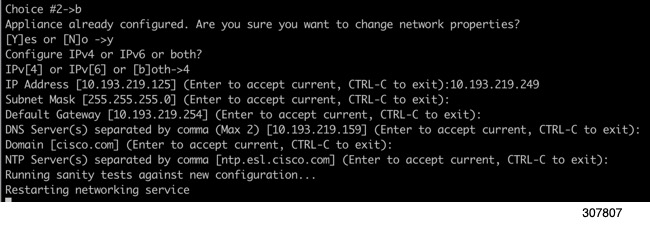
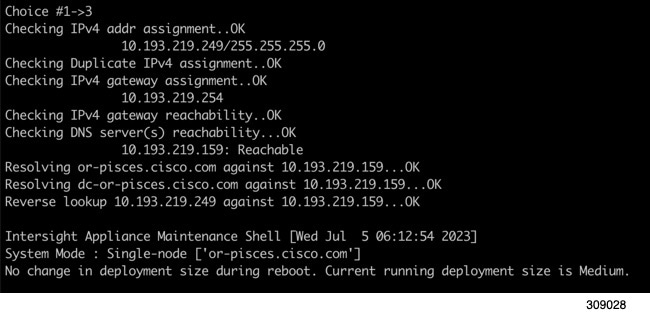
  2. Select one of the options listed in the following table to learn more about the command and the outcome of the command:

Intersight Appliance Maintenance Shell Options

Description

Diagnostic Options

  • [1] Ping a Host—This option lets you ping a host to check why the installation is unsuccessful even after all properties and requirements are entered correctly.

  • [2] Traceroute a host—This option displays all IP addresses that the host has traversed through.

  • [3] Run connectivity test—This option runs a connectivity test and pings every host in the path from your host to the DNS server. The tool runs a few tests to verify if the IP address is valid, and checks for duplicate IPs to determine if it is used in multiple instances. The Run connectivity test option reaches the DNS server to resolve any connectivity issues.

Configuration Options

  • [a] Show current network configuration—This option displays the existing configuration settings such as IP address, subnet mask, Default Gateway, DNS servers, Hostname, and NTP connection status to help you verify that all configuration settings are entered correctly. You can run the connectivity test (Option 3) to determine the status of the connectivity.

  • [b] Set network interface properties—This option displays the network interface properties that you have set. You can click enter to retain the existing properties or provide a different set of inputs. This option detects issues (if any) with the following properties:

    • An invalid or duplicate IP address—The IP address could be incorrect even if you have configured your hostname with the correct credentials.

    • Invalid subnet mask—An invalid subnet mask might allow you to navigate inside your own network, but could impact external traffic.

    • Incorrect or invalid Default Gateway—If the DNS server is outside your network, an invalid default gateway impacts the connectivity to external hosts.

      Changing IP Address—Using this option, an admin user (with username admin) can make the following changes:

      • Assign a new IP address on the same network, connect the appliance VM to a different network and assign an IP on that network.

      • Change the IP address of an appliance VM after migrating it to a different vCenter or Hyper-V Manager deployment.

        Attention


        You must ensure that the DNS server records (A, CNAME, and PTR) are updated before the change is initiated and the new IP address resolves to the same FQDN as before.

        You can choose to change either just the IPv4 address or the IPv6 address, or change both at the same time.

        Note that the appliance VM itself continues to be managed with the DNS name assigned to the IPv4 address of the appliance when it was first deployed. When you configure IPv6 addresses, it enables only the target claim of IPv6 endpoints.

        The IP change can take up to 15 minutes. Cisco recommends that you do not reboot the appliance VM during this time. After waiting for about 15 minutes, log back into the appliance from the UI.

      • For Multi-Node setup Only: For more information on how to change IPv4 address for a node in a multi-node cluster, see Changing IPv4 Address of HA Management Nodes in the Multi-Node Cluster and Changing IPv4 Address of Metrics Node in the Multi-Node Cluster.

  • [c] Restart installation services

    This option is useful when you fix the configuration on your network that was previously assumed to be working. A few examples are:

    • Missing PTR record for the IP you have chosen (static IP assignment).

    • VM connected to incorrect portgroup/vSwitch.

    • DHCP server not running when you chose an IP assignment via DHCP.

  • You can check the progress of the installation by visiting the url <fqdn-of-your-appliance-vm>.

  • [d] Run Debug (requires authentication)This utility is intended only for Cisco TAC to troubleshoot installation issues.

  • [e] Configure Logon Banner—This option enables you to configure a new banner message or edit an existing one to be displayed before the login screen.

  • [f] Generate and upload tech support—This option enables you to generate and upload tech support bundles.

Maintenance Options

Options in this sub-menu are intended for debugging and recovery and must be used as instructed by Cisco TAC. You can access this option as an admin user.

[4] Show system service status—This option provides a summary of the running/pending services and reports any errors. This option enables you to monitor the status of the appliance if the system is unresponsive or if there is a service disruption at any time.

[5] Restart system services—This option enables you to troubleshoot the appliance and restart the services running on it.

[6] Reboot virtual appliance node—This option stops services, reboots the appliance, and restores the services when the appliance reboots.

[7] Show node status—This option displays the fully qualified domain name of the appliance VM and their operational status.

[8] Launch console UI—This option enables you to launch the console UI from the maintenance shell.

[9] Shutdown appliance node—This option gracefully stops services and shuts down the appliance node from the maintenance shell.

[10] Read-only maintenance shell—This option launches a Linux bash shell in a primarily read-only environment. You cannot make changes to the Appliance from this shell, but you can perform read-only diagnostic actions to validate the appliance within your network environment. Common Linux commands such as curl, wget, dig, nslookup, ssh, scp, ping, and traceroute are available to help troubleshoot local networking issues.


Note


For [10] Read-only maintenance shell, tcpdump command is not directly available. Use the public-tcpdump command instead. To save packet captures, run public-tcpdump -w FILENAME.pcap to write PCAP files to your home directory, which you can then transfer to another machine for analysis using scp.

Relevant Log Files:

  • /var/log/ansible—Install and upgrade logs

  • /var/log/andro—Service logs from the application

  • /var/log/equinox—Device connector and first service to start


For a demonstration of the Intersight Connected Virtual Appliance Installation and troubleshooting, watch Cisco Intersight Appliance Installation and Debug.

Monitoring Virtual Appliance Sizing Option Messages

The Intersight Appliance Maintenance Shell displays the status updates about the deployment size determination and the subsequent action. You can monitor the status of the deployment in the console and take remedial actions as required. The messages listed in the table below explain the scenario and the particular resource requirements for deployment.

Initial Message

Final Message

Deploying <size> deployment size.

This message is displayed when the required resources are adequate, and the desired size is being deployed.

Note


After evaluating the resources requirement, you can choose to deploy in small, medium, or large configurations.

Deployed <size> deployment size.

Deploying <size > deployment size, after being under resourced.

This message is displayed when the existing deployment is under-resourced for the current deployment size, and upon restarting the VM after the necessary resources have been added. This deployment could be in either size.

Deployed <size> deployment size, after being under resourced.

Deployed <size> deployment size.

This message is displayed when the existing resources and the required resources are similar, and no upgrade is required.

No change in deployment size during reboot. Current running deployment size is Small.

Downgrading deployment size from Medium to Small.

This message is deployed when a medium deployment size is downgraded to a small deployment size.

Downgraded deployment size from Medium to Small.

Upgrading from Small to Medium.

This message is displayed when the deployment size is upgraded from small to medium deployment size.

Upgraded from Small to Medium.

Intersight Virtual Appliance Console UI

The Intersight Virtual Appliance Console UI displays read-only status related to the appliance VM and infrastructure. This information can be especially helpful when troubleshooting problems or just looking for a quick “at a glance” information about the appliance. The Console UI displays upon boot-up of the appliance installer image, at which point the information displayed is minimal. For detailed information about the installation progress, proceed to the web UI.

Note the following information about the Console UI:

  • The hypervisor provides the necessary authentication for viewing the appliance virtual console.

  • The Console UI displays system-level information at a high-level about the general state of the appliance. The Console UI does not replace the appliance web UI. For detailed information about the state or health of any individual appliance service, proceed to the web UI.

  • In addition to displaying relevant network information such as IP addresses and web UI URL, the Console UI displays common networking problems such as the required appliance DNS names not being resolvable.

  • The information displayed on the Console UI is read-only. The Console UI does not accept any input and does not perform any configuration changes to the appliance.

  • The information displayed on the Console UI is currently supported in US English only.

  • The Console UI is displayed on the default console screen. You can still log in as an admin user for the diagnostic shell, as an example, on alternate console screens.


    Note


    You can switch between the login console and the Console UI by using function keys; Alt+F2 to get to a login console and Alt+F1 to get back to the Console UI.


  • The Console UI is independent of the hypervisor on which the appliance runs.

The following list includes some of the high-level information that is displayed on the Console UI.

  • The appliance web UI URL.

  • The overall health of the appliance.

  • The version of the appliance.

  • The cloud connection and claim status of the appliance.

  • The cluster status (single-node versus multi-node) and node names of the appliance.

  • Whether an upgrade is pending or in-progress.

  • Network connectivity such as IPv4/IPv6 information, DNS, and NTP servers.

The Console UI also displays warning messages when the following errors are encountered.

  • Network link is down

  • Required CPU flags are not set (for example, AVX).

  • Disks are approaching maximum capacity.

  • A correct DNS A record is not found.

  • A correct DNS CNAME record is not found.

  • A correct DNS PTR record is not found.