Dashboard Settings

Configuring a Banner Message for Displaying Before the Login Screen

You can configure a banner message in Intersight Virtual Appliance. When enabled, the configured banner message will be displayed before the user login screen.

Procedure


Step 1

Log into Intersight Virtual Appliance as a user with account administrator role.

Step 2

Choose Settings > System > Banner Message.

Step 3

Click Configure.

The Configure Banner Message window displays.

Step 4

Update the following fields.

  • Show banner message before login—Enable this option.

  • Banner Title—Enter a title for the banner message. The length of the title cannot exceed 128 characters.

  • Banner Content—Enter the content for the banner message. The content in this field has to be less than 2000 characters.

Step 5

Click Save.

The configured banner message content along with the title is displayed in the Banner Message preview window.


Backing Up Data

Backing up Cisco Intersight Virtual Appliance regularly is essential. Without regular backups, there is no automatic way to reconstruct the configuration settings and recreate the profiles and policies. You can perform a regular backup once a day using a scheduled backup or create a backup on demand if there is a data loss or corruption event. Cisco Intersight Virtual Appliance enables you to take a full state backup of the data in the appliance and store it on a remote server. If there is a total site failure or other disaster recovery scenarios, the restore capability enables you to do a full state system restore from the backed-up system data.


Note


An appliance installer is required to restore the appliance from a backup. If a backup is taken from appliance release version N, it can only be restored using the latest installer that is less than or equal to version N. For example:

  • If you backup your appliance release version 1.1.0-0, you need the latest appliance installer version that is less than or equal to 1.1.0-0, which is 1.1.0-0.

  • If you backup your appliance release version 1.1.1-1, you need the latest appliance installer version that is less than or equal to 1.1.1-1, which is 1.1.1-0.

Hence, it is recommended that you retain the required downloaded appliance installer for the backup that you are creating. For more information, see Recovering Intersight Connected Virtual Appliance and Recovering Intersight Private Virtual Appliance.


The following options are available to backup data:

  • Create Backup—Creates a full state backup of the data in Cisco Intersight Virtual Appliance on demand and saves the backed-up data on a remote server.

  • Schedule Backup—Schedules a full state periodic backup of the data in the appliance based on the schedule and saves the backed-up data on a remote server.


Note


Multi-node Cluster for High Availability: There is no difference between a backup that is running on a multi-node appliance versus one that is running on a single-node appliance. The backup is done at the cluster level and not at the node level. The backup originates from one node, but there is no restriction on which node the backup originates from.

Multi-node cluster for Advantage Tier Metrics Data Collection:

  • When you take a backup of the Intersight Virtual Appliance, the metrics data is not backed up. Take a snapshot of the metrics node VM to backup the metrics data.

  • When you capture a snapshot of the Intersight Virtual Appliance VM, note the following storage size specifications:

    • Without Metrics Collection: The snapshot size on disk is 180 GB.

    • With Metrics Collection Enabled: The snapshot size on disk exceeds 1 TB.

    For more information, see Supported Configuration Limits.


Create Backup

You can create a full state periodic backup of the Intersight Virtual Appliance and save the backed-up file on a remote server. To create a backup, do the following:

Procedure


Step 1

Log into Intersight Virtual Appliance as a user with account administrator role.

Step 2

Choose Settings > System > Backup.

Step 3

Click Create Backup.

The Backup window displays.

Step 4

Enter the following details:

  • Protocol—Communication protocol option used in the backup process. Intersight Virtual Appliance currently supports CIFS (Common Internet File System), SCP (Secure Copy Protocol) and SFTP (Secure File Transfer Protocol) for backup. Enter the details of the remote server where you want to save the backed-up data.

  • Remote Host—The remote host for saving the backup files.

  • Remote Port—Remote TCP port on the backup server (applicable only for SCP and SFTP).

  • Remote Path—Directory where the backup files are saved.

    Note


    CIFS share names must contain alpha-numeric characters only and must conform to the regular expression such as ^(\w+)(/\w+)*/?$. It cannot contain spaces. In addition, when specifying folders under the CIFS share, forward slash (/) must be used as a separator. For example, backupshare/Intersight/Daily and backupshare/Monthly.

    Also, since the regular expression share names does not include a preceding forward slash, ensure that you enter the CIFs share name without an initial forward slash. For example, <share1/subdirectory1>.

  • Filename—Name of the backup file to restore.

  • Username—Username for authenticating the backup client to the backup server.

  • Password—Password for authenticating the backup client to the backup server.

  • Password Confirmation—Reenter the password to complete validation.

Step 5

Click Start Backup.


Scheduling Backup

Schedule Backup enables you to schedule a periodic backup of the data in the Intersight Appliance. The Appliance can store three copies of the backup locally on the appliance.

Procedure


Step 1

Log into Intersight Virtual Appliance as a user with account administrator role.

Step 2

Choose Settings > System > Backup.

Step 3

On the Schedule Backup window, enable Use Backup Schedule.

If you disable this option, you must enable the Use Backup Schedule option to schedule a backup.

Step 4

Provide the following details to complete creating the Backup Schedule.

  • Backup Schedule

    • Day of Week—Specify the day of the week when you want to schedule a data backup.

    • Time of Day—Specify the time on the selected day when you want to schedule a data backup. The Time of Day follows the browser time of your session and displays your local time of the day.

  • Backup Destination

    • Protocol—Communication protocol used in the backup process. Intersight Virtual Appliance currently supports CIFS (Common Internet File System), SCP (Secure Copy Protocol) and SFTP (Secure File Transfer Protocol) for backup.

    • Remote Port—Remote TCP port on the backup server (applicable only for SCP and SFTP).

  • Remote Host—The remote host for saving the backup files.

  • Remote Path—Directory location where the backup files are saved.

    Note


    CIFS share names must contain alpha-numeric characters only and must conform to the regular expression such as ^(\w+)(/\w+)*/?$. It cannot contain spaces. In addition, when specifying folders under the CIFS share, forward slash (/) must be used as a separator. For example, backupshare/Intersight/Daily and backupshare/Monthly.

    Also, since the regular expression share names does not include a preceding forward slash, ensure that you enter the CIFs share name without an initial forward slash. For example, <share1/subdirectory1>.

  • Filename—Name of the backup file to restore

  • Username—Username for authenticating the backup client to the backup server.

  • Password—Password for authenticating the backup client to the backup server.

  • Password Confirmation—Reenter the password

  • Backup Retention—Number of backups to retain

    Click Enable Backups Retention to enter the number of backups to retain on the remote server. The default number is 15. You can enter a number from 1 to 100.

    Note


    In order for the backup retention limits to function properly while using the SCP protocol, ensure that the SFTP protocol is also enabled on your remote host.

    For more information regarding the various backup retention scenarios, see Backup Retention Scenarios.

Step 5

Click Schedule Backup to complete the process.


Backup Retention Scenarios

The following table describes the various backup retention scenarios and the expected outcomes.

Table 1. Backup Retention Scenarios

Backup Retention Scenarios

Expected Outcomes

You enable backup retention, allow backups to accrue, and then disable backup retention.

The backups taken under the retention policy will not be deleted.

You enable backup retention, allow backups to accrue, and then disable backup retention. Now, you re-enable backup retention again.

The backups taken when retention was originally enabled will not be affected. Only backups taken after retention has been re-enabled will be part of the retention policy.

You change the file path or hostname in the retention policy.

The backups taken before the change will not be affected. Only backups taken after the policy change will be part of the latest retention policy.

You increase the number of backups

Backups will continue to accumulate as part of the retention policy until the maximum number of backups is reached, and then the oldest backup will be deleted.

You decrease the maximum number of backups from X to Y.

The older backups in the original retention policy will no longer be part of the policy. This means that the retention policy will be implemented only on the most recent backups for the number, Y. The backups before that will remain as-is.

For example: Suppose you had a retention count of 5 and then you decrease the retention count to 3. In this case, the oldest 2 backups in the original retention policy will not be affected. Retention policy will be enabled only on the 3 backups.

Configuring Metrics Collection

Metrics collection within the Intersight Virtual Appliance is disabled by default. After you install or upgrade Intersight Virtual Appliance, to start metrics collection, you must enable metrics collection in the Intersight Virtual Appliance on the Settings > System > Metrics screen.

In addition, the Metrics screen displays the active server count along with the threshold limits and disk usage.

After metrics collection is enabled for the Virtual Appliance, you can choose to enable or disable metrics collection on individual servers or all the servers in IMM or UMM domains. You can select the Collect metrics for new servers checkbox to automatically enable metrics collection for any new servers added to the domain.

To configure metrics collection, do the following:

  1. Log into Intersight Virtual Appliance as a user with the account administrator role.

  2. Choose Settings > System > Metrics.

  3. Click Configure.

  4. Use the Enable Metrics slider to enable or disable the metrics collection.


    Note


    • Enabling metrics collection results in the immediate triggering of metrics gathering from the endpoints.

    • Disabling metrics collection may result in a delay of up to one hour before the configuration changes are complete, and the collection of metrics stops.


  5. Select the Collect metrics for new servers checkbox to automatically enable metric collection for new servers added to the IMM or UMM domains.

  6. To enable metrics collection for all the servers of the IMM domain, select the corresponding checkbox.

  7. To select individual servers of a domain:

    1. Click the Edit icon in the Domains column.

    2. In the Select Servers screen, select the desired servers.

    3. Click Select.

  8. Click Configure.

Data Collected from Intersight Connected Virtual Appliance

Cisco Intersight Connected Virtual Appliance works in a connected mode and requires connectivity to hosted Intersight services. You must register the appliance with Intersight to manage your UCS or HyperFlex infrastructure.

If you enable the option to allow collecting additional information, Intersight may collect other details about the managed systems, beyond what is listed in the table Minimum Data Collected. When any of the options under Data Collection in the Security & Privacy screen of the appliance UI is enabled, Cisco reserves the right to collect more data for diagnosis and proactive troubleshooting purposes.

The tables below list the details of the minimum data collected by Intersight:

Table 2. Minimum Data Collected

Component

Details of Data Collected

From Intersight Virtual Appliance

  • The appliance ID (Serial Number)

  • The IP address of the appliance

  • The hostname of the appliance

  • The device connector version and public key on the appliance

Appliance Software Auto-Upgrade

Version of software components or the services running on the appliance

Appliance Health

  • CPU usage

  • Memory usage

  • Disk usage

  • Service statistics

Licensing

Server count

Information about the endpoint target

  • Serial number and PID (to support Connected TAC)

  • UCS Domain ID

  • Platform Type

Table 3. Data Collected During One-time Device Connector Upgrade

Component

Details of Data Collected

From the endpoint target, only if the one-time device connector upgrade is used

  • The endpoint target type - Cisco UCS Fabric Interconnect, Integrated Management Controller, Cisco HyperFlex System

  • One or more firmware versions of the endpoint

  • The serial number of the endpoint target

  • The IP address of the endpoint target

  • The hostname of the endpoint target

  • The endpoint device connector version and the public key

For information about Proactive Support, see Proactive Support enabled through Intersight.

For detailed information about the Proactive Support workflow, supported faults, configuring the advanced options, setting tags, and caveats, see Proactive RMA for Intersight Connected Devices.

Tech Support Diagnostic File Collection

When you open a case with Cisco TAC, Intersight collects Tech Support diagnostic files to assist with an open support case. The data collected could include (but is not limited to) hardware telemetry, system configuration, and any other details which aid in active troubleshooting of the TAC case. Tech Support collection is allowed to occur regardless of data collection options you specify. However, this information is not collected arbitrarily, but only when you open a case for a system requiring assistance with the system's support.

Updating Intersight Intelligence for Intersight Connected Virtual Appliance

Intersight Connected Virtual Appliance allows you to update Intersight intelligence such as Hardware Compatibility List (HCL) as soon as it becomes available, independent of the appliance software upgrade schedule. Updates for HCL include compatibility validation results and compliance status for server model, processor, firmware, adapters, operating system and drivers. For more information about HCL, see Compliance with Hardware Combability List (HCL).

Use the following instructions to update Intersight intelligence:

Procedure


Step 1

Log into Intersight Virtual Appliance as a user with account administrator role.

Step 2

Choose Settings > System > Appliance Updates.

Step 3

Click Update Settings.

The Update Settings window displays.

Step 4

Select Update Intersight Intelligence Immediately.

Step 5

Click Save.


Cloud Connection for Intersight Connected Virtual Appliance

Cisco Intersight Connected Virtual Appliance is connected to Cisco Intersight through an embedded device connector. The device connector provides a secure way for the connected targets to send information and receive control instructions from Cisco Intersight, using a secure Internet connection. You can view the following details of the connection to the Cloud and also configure the settings from the Device Connector screen.

  1. In the appliance UI, choose Settings > Networking > Cloud Connection.

    The Cloud Connection window displays.

    You can view details such as Device ID, Claim Code, Access Mode, and device connector status. For more information about configuring the device connector, status, and error conditions, see Configuring Device Connector in Resources.

  2. Click Settings and configure the following settings.

    • General—Enable Device Connector so that you can claim the appliance and leverage the capabilities of Cisco Intersight, and select an Access Mode. If the Device Connector option is disabled, no communication is allowed to Cisco Intersight. Click Save.

    • Proxy Configuration

      • Enable Enable Proxy. Add the Proxy Hostname or IP Address, and the Proxy Port. The proxy port must be in the range from 1 and 65535.

      • Enable Authentication and add a Username and Password for Authenticated Proxy. The proxy setting is automatically reset after restoring, and you must manually reset the appliance proxy.

        Click Save.

    • Certificate Manager—Import proxy certificates.

Configuring DNS

This task describes how to configure DNS settings in Cisco Intersight Virtual Appliance.

Note


Wildcard DNS sinkholing is not supported in Intersight Virtual Appliance.


Procedure


Step 1

Log into Intersight Virtual Appliance as a user with account administrator role.

Step 2

Choose Settings > Networking > DNS.

The details of the existing DNS settings display.

Step 3

Click Edit DNS.

Configure DNS window displays.

Step 4

Update the following properties.

  • Preferred IPv4 DNS Server—Provide the IP address of the primary DNS server.

  • Alternate IPv4 DNS Server—Provide the IP address of the secondary DNS server.

Step 5

Click Save.


Configuring NTP

It is mandatory to have at least one Network Time Protocol (NTP) server configured in Intersight Virtual Appliance to enable synchronizing the time on the appliance with the NTP servers. The authentication schema for the NTP servers can be either unauthenticated or authenticated. You can add up to 3 NTP servers during the initial setup of the appliance and edit them later, if necessary.

Use the information in the following task to configure an NTP server.

Procedure


Step 1

Log into Cisco Intersight Virtual Appliance as a user with account administrator role.

Step 2

Choose Settings > Networking > NTP.

The details of the existing NTP settings display.

Step 3

Click Configure.

Configure NTP window displays.

Step 4

Click Add NTP Server, to add a new NTP server.

  1. Click +.

  2. Enter a server hostname or an IP address for the Server Name and click Save to save the NTP server as an unauthenticated one.

  3. Enable the Enable NTP Authentication button to add the NTP server as an authenticated one.

    Enter the following information.

    • Server Name—Server hostname or IP address

    • Symmetric Key Type—Type of symmetric key to use for this server

    • Symmetric Key ID—Positive integer that identifies a cryptographic key used to authenticate NTP messages

    • Symmetric Key Value—Value of the symmetric key

  4. Click Save.

    To edit existing NTP server configurations, click + on any of the configured NTP servers, make your edits as needed, and save the edited configurations.


Configuring Syslog

Intersight Virtual Appliance provides you with the ability to configure up to five syslog servers. When you enable syslog server in Intersight Virtual Appliance, you can export the following types of logs and alarms based on the details provided when configuring the syslog server.

  • Web Server Logs—Web server access logs for all transactions involving user session activities.

  • Audit Logs—Audit logs for events such as login, logout, created, modified, and deleted, that are displayed in the Audit Logs screen in Intersight Virtual Appliance.

  • Alarms —All Intersight alarms, including appliance alarms, that provide alerts about a failure (fault) in the managed target or when a threshold has been crossed. For information about alarms in Intersight, see Alarms. For more information about alarms in Intersight Virtual Appliance, see the Alarms in Intersight Virtual Appliance table in Appliance Monitoring.


Attention


  • In Intersight Virtual Appliance, you can use the TLS, UDP, and TCP protocols to provide secure communication to the syslog server. However, it is strongly recommended that you use only TLS in your production environment.

  • UCS C-Series server-related faults such as power supply and fan failures are not forwarded by Intersight Virtual Appliance to a syslog server. Please configure the syslog server on the UCS C-Series CIMC side to handle forwarding of the UCS C-Series events and faults.


To configure a syslog server in Intersight Virtual Appliance, do the following:

Before you begin

Ensure that you have added the certificate for the syslog server where you want to send the web server log, audit logs, and alarms in Intersight Virtual Appliance. This certificate is used to verify TLS communication with the syslog server. For more information about how to add certificates, see Certificates.

  • If you plan on using FQDN in the Hostname/IP Address field while configuring the syslog server, set up the certificate for the syslog server with a proper FQDN entry in the Common Name or the DNS entry in the Subject Alternative Names. Enter this information in the Hostname/IP Address field while configuring the syslog.

  • If you plan on using either IPv4 or IPv6 address in the Hostname/IP Address field while configuring the syslog server, set up the certificate for the syslog server with the IP address in the Common Name. Enter this information in the Hostname/IP Address field while configuring the syslog server.

Procedure


Step 1

Log into Intersight Virtual Appliance as a user with account administrator role.

Step 2

Choose Settings > Networking > Syslog.

You can view the details of the existing syslog settings.

Step 3

Click Add Syslog Server.

The Add Syslog Server window displays.

Step 4

Update the following fields as needed.

  • Enable Syslog Server—When enabled, the Web Server Access Logs, Audit Logs, and Alarms are sent to the configured syslog server as per the configuration details provided in the Hostname/IP Address, Port, Protocol, and Minimum Severity of Alarms to Report fields. Note that the Minimum Severity of Alarms to Report field is applicable only for Alarms.

  • Web Server Access Logs—When enabled, you will be able to export the web server access logs for all transactions involving user session activities.

    Note


    It is highly recommended that you do not enable this option as it will quickly overpopulate your log files. This option is mainly made available for customers that require the ability to export web server access logs.

  • Audit Logs—When enabled, the audit logs for events such as login, logout, created, modified, and deleted, that are displayed on the Audit Logs screen are sent to the configured syslog server.

  • Alarms—When enabled, the Intersight alarms, including appliance alarms, that provide alerts about a failure (fault) in the managed target or when a threshold has been crossed are sent to the configured syslog server.

  • Hostname/IP Address—Enter either an FQDN, an IPv4 address, or an IPv6 address. This information must match the details that you provided in the certificate for the syslog server.

  • Port—Port to use for the syslog server

  • Protocol—Select a protocol from the drop-down list. It is strongly recommended that you use only TLS in your production environment.

  • Minimum Severity of Alarms to Report (Applicable for Alarms Only) —Select either Warning, Info, or Critical as the minimum severity level for alarms to be reported. When the alarms of selected severity and above are cleared at the endpoints, the notification for the same also gets exported to the syslog server.

Step 5

Click Add.


Configuring SMTP Settings for Email Notifications

Networking systems and software frequently create alarms that indicate a concerning event, or a trend has been detected. Email notifications automatically poll for recent alarms, determine their severity, and direct concerning ones to a user's email address based on a rule you create.

To configure email notifications in Intersight Virtual Appliance, perform the following two tasks:

  • Configure Simple Mail Transfer Protocol (SMTP) settings

  • Create notification rules

Configuring SMTP settings

To configure SMTP settings, perform the following steps:

  1. Log into Intersight Virtual Appliance as a user with account administrator role.

  2. Choose Settings > Networking > SMTP.

    You can view the details of the existing SMTP settings. If this session is your first instance of configuring SMTP for email notifications, the appliance displays default or no values in the fields.

  3. Click Configure.

  4. Enable the SMTP toggle button to configure email notifications.

  5. In the SMTP Server Address field, type the IP address or domain name of the server in your domain that sends email notifications.

  6. In the SMTP Port list, type or select the port number of the server that performs email notification forwarding.

    Port 25 is the standard SMTP Relay port. Ports 465 or 587 are secure mail routing ports. The value range for port selection is 1 through 65535, and the default is 25.

  7. In the SMTP Sender Name field, type the email address of the user that sends email notifications.

  8. (Optional) Enable the TLS toggle button.

    TLS is a form of authorization that provides security by verifying the certificate authority (CA) of the SMTP email server. To apply TLS security, select the CA you want to apply to from the list in the TLS region.

  9. (Optional) Enable the Authentication toggle button, if your SMTP server requires authentication, and provide the username and password used to authenticate to the SMTP server.

  10. Click Configure.

Once the configuration is complete, you can verify the SMTP settings by sending a test email.

  1. Click Test on the SMTP configuration screen.

  2. Add a valid email address in the Test pop-up screen for sending a test email.

  3. Click Send.

The result of trying to send a test email is displayed on the screen. If it is successful, you can confirm that you received the test email with the subject Cisco Intersight SMTP Configuration Test Email at the specified email address.


Note


The Test button is enabled only after the SMTP settings are configured. Also, emails are sent only for successful validations.


Next, complete the steps for creating notification rules.

Creating Notification Rules

Notifications are based on a rule you set for incoming alarms.

To configure an email notification rule, perform the following steps:

  1. In the appliance UI, choose Settings > System > Email Notifications.

    You can view the notification rule list populated with the existing rules.

    Each rule is used as both a condition for notification generation (Alarms column) and a notification destination (Email column). If this session is your first time creating a notification rule for the email address set in the SMTP Sender Name in the Configure SMTP screen, no existing rules display in the list. The list displays the following columns:

    • Name—The name of the rule.

    • Enabled—The administrative state of the rule. A Yes setting indicates the rule is active and will generate email notifications when the rule conditions are met. A No setting indicates the rule is inactive and will not generate email notifications.

    • Email—The email address to which notifications will be sent.

    • Alarms—The required severity of an event for it to generate a notification.

    • Last Updated—The last time the notification was configured, either during a creation or an editing session. The timestamp is in the following format: <day>:<hour>:<minute>.

  2. Click the Add Rule button in the upper right portion of the screen.

    The Add Rule screen displays.

  3. To configure a rule, the Enable Rule toggle button MUST be enabled.

  4. In the Name field, type a string of up to 32 characters that you want to be the name of the rule.

  5. In the Email field, type an email address to which you want generated email notifications sent. Click the (+) icon to enter additional email addresses for other destinations.


    Note


    You can create up to three email destinations for email notifications.


  6. In the Severity region, select an urgency level of an alarm you want to be reached for a notification email to be sent.

    The urgency levels for alarms are Critical (the most urgent), Warning (second-least urgent), and Info (no urgency). You can select one or multiple urgency levels. In the case of multiple Severity settings, the least urgent level will be the one, when reached, that triggers an email notification to be sent.

  7. Click Add.

    The following warning message is displayed.
    WARNING! Email notifications may contain sensitive data. Ensure the emails contain no typos and are approved to receive data.
  8. Click Continue.

    Intersight returns to the Notifications screen displaying the new rule in the list.

Limitations

Note the following restrictions for configuring email notifications.

  • You can configure up to three emails per rule.

  • You can configure up to five rules per account.

  • Events are collected in a sliding time window of 10 seconds. Intersight initially waits for a 10-second period where it polls for alarms. If an alarm or multiple alarms are detected in this initial period, Intersight waits an additional 10-second period to detect alarms. If it detects alarms in this period, additional periods occur until no alarms are detected. Once an additional 10-second period elapses with no alarms detected, Intersight bundles the discovered alarms into an alarm group and sends an email containing the alarms to the specified address.

  • An email address can be associated with up to 100 alarms, and the number of emails sent depends on how large the alarm group is. If an alarm group contains more than 100 alarms, an additional email is sent. Some events may generate 1,000 alarms. In that case, 10 emails are sent.

Configuring Email Notifications for Intersight Virtual Appliance Software Updates

Intersight Virtual Appliance allows you to configure email notifications when a new software update or a new patch update becomes available for installation and when a new software update or a patch update is completed.


Note


Ensure that you have configured SMTP settings before proceeding to configure email notifications for software updates. For information on how to configure SMTP settings, see Configuring SMTP Settings for Email Notifications.


  1. Log into Intersight Virtual Appliance as a user with an account administrator role.

  2. Choose Settings > System > Appliance Updates.

  3. Click Update Settings.

  4. Enable Email Notifications under Software Update Notifications.

  5. Choose when to send email notifications from the following options:

    • Updates Are Ready to Install

    • Updates Are Complete

  6. Enter up to 3 valid emails.

  7. Click Save.

Based on your selection for the notifications, emails are sent when an appliance software update or a patch update becomes available for installation and when a software update or a patch update is completed. To ensure that the configured users receive email notifications, and the emails do not end up in their Spam folder, it is recommended that the recipients add the sender's email address as per the SMTP configuration settings, to their "approved senders" list within their email client.

Single Sign-On with Intersight Virtual Appliance

Single Sign-On (SSO) authentication enables you to use a single set of credentials to log in to multiple applications. With SSO authentication, you can log in to Intersight with your corporate credentials. Intersight supports SSO through SAML 2.0, and acts as a service provider (SP), and enables integration with Identity Providers (IdPs) for SSO authentication.

To set up SSO through the appliance, you must log in to Cisco Intersight Virtual Appliance as a user with administrator role, download the SP metadata, and register your Identity Provider (IdP) in the Intersight Virtual Appliance.

IdP Requirements

The IdP you add to Intersight must support SAML 2.0 and a service provider initiated SSO. The most commonly used IdPs have different instructions to complete the setup.


Note


If you have a multi-node cluster setup for Intersight Virtual Appliance or if you are expanding from a single-node configuration to a multi-node cluster configuration, for some IdPs such as Okta you must manually configure the three SSOs, while for other IdPs such as ADFS you can directly import the xml file. For IdPs where the SSO configuration is a manual one, you must configure the three different SSO URLs specified in the metadata file downloaded from the appliance SSO screen. Once the three URLs are configured, you can proceed with the SSO login from any one of the three nodes.


Additional requirements for a multi-node cluster setup in appliance:

  • SLO (Single Logout) is supported for a multi-node setup in appliance, but there is only one SLO endpoint. If the node specified in the SLO URL is down, then SLO will not work. In this case, you will only be logged out of Intersight.

  • The IDP initiated SSO works only for the entity node.

For more information about setting up SSO with Intersight and examples of adding an Identity Provider, see, Single Sign On with Intersight. Click here to watch a video that shows how to enable Intersight Single Sign-On and set up a custom SAML 2.0 application in an external Identity Provider (IdP) with Intersight.

Certificates

To provide secure authentication to external targets (such as LDAP servers), you can add a third-party certificate from a trusted source that affirms the identity of your targets or add a self-signed certificate for secure HTTPS access of the appliance through the browser.

  • In a future release, Intersight Virtual Appliance will be phasing out support for certificates signed with the SHA-1 hash functions. It is strongly recommended that you upgrade your certificates to use signature algorithms with hash functions that are stronger than SHA-1, such as SHA-256, SHA-384, or SHA-512.

  • Certificates created for the LDAP server must include Subject Alternative Names (SANs) since the use of Common Name has been deprecated. Certificates without SANs will fail verification, resulting in connectivity issues.

Trusted Certificates

To provide secure authentication while connecting to external targets, you can add a third-party certificate from a trusted source or a self-signed certificate that affirms the identity of your targets. The third-party certificate is signed by the issuing trusted point, which can be a root certificate authority (CA), an intermediate CA, or a trust anchor that is part of a trust chain that leads to a root CA.

The Trusted Certificates table view that is accessible from Settings > Authentication > Certificates >Trusted displays the list of certificates that you added in Intersight.

Add Certificate

The following task provides details on how to add trusted certificates in Intersight Virtual Appliance.

  1. Log into Intersight Virtual Appliance as a user with account administrator role.

  2. Choose Settings > Authentication > Certificates > Trusted.

    The following details about the Trusted Certificates are displayed in the table view:

    • Name—Common name of the CA certificate

    • Issued By—Certificate issuing authority

    • Usage—Displays the number of targets using the certificate

    • Expires—The expiry date of the certificate

  3. Click Add Certificate to add a trusted certificate.

  4. Click Browse to select the certificate that is stored in your system and click Save. After the certificate is successfully imported, it is displayed in the Trusted Certificates table view.


    Important


    The trusted certificate that you want to import must be in base64 encoded X.509(PEM) format.


Adding SSL Certificates

To enable secure HTTPS access of the appliance through the browser, you can generate a Certificate Signing Request and import a certificate, or you can switch to a self-signed certificate. You can access these tasks by navigating to Settings > Authentication > Certificates > SSL.


Note


While migrating from a single-node deployment to a multi-node cluster configuration, if the SSL certificate is already generated on the single-node deployment, once the migration to the multi-node cluster configuration is complete and the cluster is in a Healthy state, then delete and regenerate the SSL certificate.


To create a Certificate Signing Request (CSR):

  1. In the appliance UI, choose Settings > Authentication > Certificates > SSL.

    The following details about the Current Certificate are displayed:

    • Name—Common name of the CA certificate

    • Added By—User that added the certificate to the account

    • Issued By—Certificate issuing authority

    • Expires—Expiration date of the certificate

    Click View All to display the View Certificate window. In addition to the details listed above, you can also view these details about the certificate: Fingerprints, Country, Locality, Organization, Organizational Unit, and the details of the Issuer Name, Organization, Common Name, and the Signature Algorithm.

  2. From the Action drop-down menu, select Create CSR.

    The Create Certificate Signing Request wizard displays. Enter the following details as required.

    • Organization—The legal name of your organization

    • Organizational Unit—The subdivision of your organization that handles the certificate. For example HR, IT etc

    • Locality—The city/town where your organization is located

    • State—The state where your organization is located

    • Country—The two-letter country code where your organization is located. For a complete list of the country codes, see ISO 3166

    • Email Address—An email address used to contact your organization

    • Modulus—Modulus of the RSA private key used to sign the CSR

  3. Click Create CSR.

When you click Create CSR, a new Certificate Signing Request (CSR) is generated. You can select one of the following options:

  • Download CSR—Allows you to download and store the CSR locally to obtain a trusted certificate from a Certificate Authority (CA).


    Note


    Use only the appliance FQDN in the Subject Alternative Names (SAN) field during the certificate-issue request process. Do not enter hostnames or IP addresses in the SAN field while obtaining a trusted certificate for Intersight Appliance and Intersight Assist from a Certificate Authority.


  • Delete CSR—Delete the CSR if you do not want to use it to generate a trusted certificate.

  • Apply Certificate—After the CA issues a certificate, click Apply to paste the contents of the certificate in the Certificate field in the Apply Certificate window. You can also click the Upload button and upload a certificate. Click Apply to complete the process. The CA-issued certificate can be in .csr, .pem or .crt format.

To switch to a self-signed certificate:

  1. In the appliance UI, choose Settings > Authentication > Certificates > SSL.

  2. From the Action drop-down menu, select Switch to Self-Signed.

    A popup window appears warning you that switching to self-signed certificates will take a few minutes.

  3. Click Apply to proceed.

  • Cisco recommends that you use CA signed certificates to access the appliance. The latest browsers may disable access to the appliance if self-signed certificates are used. Intersight Virtual Appliance provides the option to switch to a self-signed certificate to extend the validity of the certificate, if the self-signed certificate provided by Cisco expires.

  • When you choose to switch to a self-signed certificate, the current SSL certificate will be replaced by the newly generated self-signed certificate. You can verify if the new certificate is applied by clicking the lock or the warning icon preceding the URL in the address (location) bar of your browser. After the refresh, you will be taken directly to the Settings > Certificates page without having to log into the appliance once again.

Configuring LDAP Settings

Intersight Virtual Appliance supports LDAP/AD based remote authentication. You can configure the appliance to authenticate a user login using LDAP. You can configure multiple LDAP domains and choose a domain for the login.

An LDAP user can log into Intersight Virtual Appliance with email ID or username and select the corresponding domain in which the LDAP user is configured. You can add up to 6 LDAP domains per Intersight Account. You can view the list of configured LDAP domains in Settings > Authentication > LDAP/AD table view. Watch this video to learn how to integrate your virtual appliance with the LDAP/AD services.

To set up LDAP authentication in Intersight Virtual Appliance, do the following:

Procedure


Step 1

Log into Intersight Virtual Appliance as a user with account administrator role.

Step 2

Choose Settings > Authentication > LDAP/AD > Configure LDAP.

Configure LDAP window displays.

Step 3

On the Configure LDAP page, add the corresponding details in the fields that are listed below, and click Save.

  • Name—Enter a name to easily identify the LDAP domain that you are configuring.

  • Base DN—Enter a Base Distinguished Name (DN) for the server. For example, DC=Intersight, DC=com.

  • Bind DN—Enter a DN used to authenticate against LDAP server and the password for the user.

  • Group Attribute—Enter the Group member attribute to which an LDAP entry belongs. Cisco Intersight Virtual Appliance uses this Group attribute to map/assign Intersight roles to the user. The default value is member and you can change it from Edit LDAP settings.

  • Password—Enter a DN password for the user.

  • Nested Group Search—When enabled, an extended search runs through the chain of ancestry all the way to the root and returns all the groups and subgroups that each of the groups and subgroups belong to, recursively.

  • Enable Encryption—You must enable Encryption to secure communication over the LDAP server. If encryption is enabled, a trusted root certificate must be added. For more information, see Adding Certificates.

    Note

     
    • In a future release, Intersight Virtual Appliance will be phasing out support for certificates signed with the SHA-1 hash functions. It is strongly recommended that you upgrade your certificates to use signature algorithms with hash functions that are stronger than SHA-1, such as SHA-256, SHA-384, or SHA-512.

    • Certificates created for the LDAP server must include Subject Alternative Names (SANs) since the use of Common Name has been deprecated. Certificates without SANs will fail verification, resulting in connectivity issues.

  • Configure LDAP Servers—Add up to three LDAP Server IP addresses or hostnames, and a corresponding LDAP Server port for each LDAP Server.

Attention

 
  • LDAPS is supported on Port 636 and Port 3269. All other ports support LDAP on TLS.

  • Intersight Virtual Appliance uses the email ID or username to log in an LDAP user. If you want to use email ID to log in to the appliance, configure the mail attribute in the LDAP server. If you want to use the username, use the sAMAccountName configured for that user in the LDAP server.

  • After you add the required details to configure LDAP settings, wait for the DeployApplianceLDAP workflow to complete before you add a User or Group to assign appropriate roles to LDAP users. You can check the status of the workflow in Requests. For more information, see Adding a User or Adding a Group.

  • If you are using the Intersight API to configure the Appliance LDAP login, ensure that the LDAP policies are tagged appliance.management:true. This is automatically done for the users configuring the LDAP under Settings.

After you add the required details to configure LDAP settings, wait for the DeployApplianceLDAP workflow to complete before you log in as an LDAP user. You can check the status of the workflow in Requests.

To verify the LDAP configuration settings:

  1. Click on the ellipsis in the row for which you want to verify the LDAP configuration settings.

  2. Click Test Configuration.

    The Test LDAP/AD Configuration pop-up screen appears.

  3. Add a valid username or email address and password.

  4. Click Test.

Once the test completes, the results displayed in the Configuration Status column are as follows:

  • Verified—Indicates that the LDAP configuration has been verified successfully. Hover on it to see the number of user groups of the test user.

  • Failed—Indicates that the LDAP configuration verification test failed. Hover on it to read the error message.

  • Unverified—Indicates that a test has not been run on a configured LDAP server.


Configuring Password Policy for Local Users

This task provides details on how to configure password policy for local users in Intersight Virtual Appliance.

Procedure


Step 1

Log into Intersight Virtual Appliance as a user with account administrator role.

Step 2

Choose Settings > Authentication > Local Users Password Policy.

You can view the details of the existing password policy.

Step 3

Click Configure.

The Configure Local Users window displays.

Step 4

Configure the password policy by updating the following password policy options as needed.

Password Policy Options

Allowed Range/Default Value

Minimum Length of Password

8-127 characters

Default is 8

Minimum Number of Required Upper Case Characters

1-64 characters

Default is 1

Minimum Number of Required Lower Case Characters

1-64 characters

Default is 1

Minimum Number of Required Numeric Characters

1-64 characters

Default is 1

Minimum Number of Special Characters

0-64 characters

Default is 0

Note


Special characters include punctuation and symbol characters.

Number of Previous Passwords Disallowed

0-10

Default is 0

Minimum Number of Characters Different from Previous Password

0-15

Default is 0

Note


Differences from the previous password are verified based on the same character location within the specified password.

Minimum Days Allowed Between Password Changes

0-7 days

Default is 0

Note


If you specify a value of 0 for this password policy option, then the user is not limited on time between password changes.

Time Duration for Incorrect Login Attempts (Seconds)

300 - 3600 seconds (5 – 60 minutes)

Default is 1800 seconds (30 minutes)

Time duration is tracked for consecutive incorrect login attempts. Users will be locked out if they exceed the configured number of max incorrect login attempts during this duration.

For more information about the lockout capability, see Locking Out Local Users Accounts.

Max Consecutive Incorrect Login Attempts Allowed

3 -10

Default is 5

Users will be locked out after exceeding the max consecutive incorrect login attempts allowed within the configured time duration.

Enable Lockout for Admin User

Default is false.

Determines if the user lockout feature must be enabled for the local “admin” user. This option is always enabled for other local users.

For more information about the lockout capability, see Locking Out Local Users Accounts.

Lockout Time Period (Seconds)

60 – 3600 seconds (1 – 60 minutes)

Default is 900 (15 minutes)

Duration, in seconds, during which a local user account will remain locked. The account is automatically unlocked after the configured lockout time period elapses.

Step 5

Click Save.

You can verify the password policy changes with the next password change.


Adding a User

Intersight Virtual Appliance allows you to override Group role assignments to users. On the User page, you can view a list of the Users added to an account. The list displays the Name, Identity Provider, Email, Role, and the Last Login Time for a user. You can add Remote Users as well as Local Users. Note that you can add up to 100 Local Users.

  • Remote Users—authenticated via IDP (LDAP and SSO)

  • Local Users—authenticated via Intersight Virtual Appliance


Attention


You must be an Account Administrator or User Access Administrator to create a user or assign user roles.


Use these instructions to add a user in Intersight Virtual Appliance:

Procedure


Step 1

Log into Cisco Intersight Virtual Appliance as a user with account administrator role.

Step 2

Choose Settings > User Permissions > Users.

Step 3

In the Add User window, add the following details:

You have the option of adding a Remote User or a Local User. Note that you can add up to 100 Local Users.

To add a Remote User, enter the following details:

  • Identity Provider—Select the Identity Provider that you want to add to this account. This can be any one of the Intersight validated Identity Providers. For more information, see Validated Identity Providers in the Supported Systems page in <Your FQDN>/help.

    If you add an LDAP user, you must add them under the appropriate Identity Provider (IDP). The name of the IDP will be the same as the LDAP Domain Name that you have configured in LDAP Settings.

  • User ID—Enter a valid email ID or username used to register the account with the Identity Provider. The username must be the same as the sAMAccountName that is configured on the LDAP server. If you are using email to log in, ensure that the email ID is the same as configured in the mail attribute on the LDAP server.

  • Role—You can assign one role for a remote user account. For more information, see Roles and Privileges.

To add a local user, enter the following details:

  • First Name—First name of the local user

  • Last Name—Last name of the local user

  • User ID—Enter an email ID or username which is used by the local user to log into the appliance.

  • Password—Enter a valid password as per the local user password policy.

  • Role—You can assign multiple roles to a local user account. For more information, see Roles and Privileges.

Step 4

Click Save to add the new user to your account.

Attention


The UserID and password that is entered while adding the new local user must be conveyed to the new local user directly as there is no mechanism currently in Intersight Virtual Appliance to automatically notify the login credentials to the new local user. Once the new local user logs in using these credentials, a prompt appears that mandates the new local user to change the password.

Local users can change their passwords any time by navigating to Profile Menu in the top right of the screen and then clicking Change Password.


Locking Out Local Users Accounts

Consecutive incorrect login attempts within a configured time duration are tracked for local users and the accounts will be locked out if they exceed the configured number of maximum incorrect login attempts during this duration. Once the local user account is locked, the Local User table displays a warning icon next to the user. The account is automatically unlocked after the configured lockout period elapses. The Account Administrator or the User Access Administrator can unlock the account by resetting the password during the configured lockout period.


Note


The lockout capability:

  • Applies to only local users and does not apply to remote users.

  • Applies to local “admin” user only if the setting is enabled.


Resetting the Password of Local Users

Account Administrators can reset the password of local users. User Access Administrators can also reset the password of local users except for users with the role of Account Administrator.

To reset the password of a local user:

  1. Log into Intersight Virtual Appliance as a user with account administrator role.

  2. Choose Settings > User Permissions > Users.

  3. Select the local user that you want to reset the password.

  4. Click the pencil icon and change the password.

  5. Click Save.


Attention


When an Account Administrator resets the password for the local “admin” user, only the GUI password is changed. The SSH password of the local “admin” user remains unchanged. The local “admin” user must log into the appliance using the newly reset password. Once the local “admin” user is logged in, a prompt appears that mandates the local “admin” user to change the password, which then resets both the GUI and the SSH passwords.


Adding a Group

A Group represents a collection of users with a specific role, permissions, and privileges. You can create multiple user groups to assign common roles and privileges to a set of users. On the Group page, you can view a list of the Groups added to an account. The list displays the Name, Identity Provider, Role, and the Group Name in Identity Provider. Use these instructions to add a group:

Procedure


Step 1

Log into Intersight Virtual Appliance as a user with account administrator role.

Step 2

Choose Settings > User Permissions > Groups.

Step 3

Click the Add Group button at the top right. The Add Group window displays.

Step 4

In the Add Group window, add the following details:

  • Identity Provider—Select the Identity Provider you want to add to this account. This can be any one of the Intersight validated Identity Providers. For more information, see Validated Identity Providers in the Supported Systems page in <Your FQDN>/help. You must select the appropriate LDAP domain for groups that would log in with their LDAP credentials.

  • Name—Enter a name to identify the group in Intersight.

  • Group Name in Identity Provider—Enter the user group name you have added in the Identity Provider. Group name must be in the LDAP distinguished name (DN) format. For example:

    cn=Finance,cn=Users,dc=example,dc=com
  • Role—You can assign one of the following System Defined roles to a user group as well as assign User Defined Roles.

    • Account Administrator—In this role, members of the group can claim targets, cross launch element managers, create profiles and policies, collect tech support bundles, and make configuration changes to the claimed targets or the account.

    • Read-Only—In this role, members of the group can view details, and status of the claimed targets within the account. However, you cannot make any configuration changes to the claimed targets or the account.

    • Device Technician—In this role, members of the group can claim a target in Intersight and view a list of the claimed targets in the Targets table view.

    • Device Administrator—In this role, members of the group can claim a target in Intersight, view a list of the claimed targets, and delete (unclaim) a target.

    • Server Administrator—In this role, members of the group can perform all server actions including firmware upgrade, collect tech support bundles, set server tags, create, edit, and deploy a server profile or policy, and view server details.

    • HyperFlex Cluster Administrator—In this role, members of the group can create, edit, and deploy a HyperFlex cluster profile, upgrade a cluster, set cluster tags, view cluster dashboard and summary, collect tech support bundles, monitor alarms, and launch and manage HX Connect.

    • User Access Administrator—In this role, members of the group can view account details, perform all User Access related actions, including adding a User, adding a Group, setting up Identity Providers and Single Sign-On, generate API keys related to the account.

Attention


You must be an Account Administrator or User Access Administrator to create a group or assign user roles.

Step 5

Click Save to add the new group to the account.


Adding a Role

Creating a User Defined Role

In addition to the system-defined roles in Intersight, you can create a user-defined role. On the Roles page, you can view a list of the roles added to an account. This list displays the Name, Type, Usage, Scope, and a Description of the roles. Use these instructions to create a user-defined role:


Attention


Only users with Account Administrator or User Access Administrator privileges can create a user-defined role.


  1. Log into Cisco Intersight.

  2. Choose Settings > User Permissions > Roles.

  3. From Roles, click Create Role.

  4. Enter a Name to identify the role in Intersight and a Description of the usage of the role.

    You can choose to retain the default account level settings for Session Timeout, Idle Timeout, and Concurrent Sessions, or you can choose to customize these settings.

  5. Under Session & Idle Timeout settings, you can choose to do one of the following:

    • Enable Use Account Default Settings—This option is enabled by default. You can inherit the session timeout values from the Account level settings. The values will be used as the default settings during role creation. To check the account level Session Timeout and Idle Timeout details, navigate to System > Account Details.

    • Disable Use Account Default Settings—You can disable this option to set values for the following fields at the Role level.

      • Session Timeout (Seconds) is the session expiry duration in seconds. The minimum value is 300 seconds, and the maximum value is 31536000 seconds (1 year). The system default value is 57600 seconds.

      • Idle Timeout (Seconds) is the interval for the web session in seconds. When a session is not refreshed for this duration, the session is marked as idle and removed. The minimum value is 300 seconds, and the maximum value is 18000 seconds (5 hours). The system default value is 1800 seconds.

      • Maximum Number of Concurrent Sessions (Sessions) is the number of concurrent sessions allowed in an account or permission. The minimum number of sessions is 1 and maximum number of sessions is 128. The default value is 128.

  6. Click Next.

  7. Select a Scope to delegate the user access to resources in the account. You can choose to give a user access to the entire account or restrict access to a selected organization.

    • All—User has access to all account resources. Add Privileges to assign roles to the user. The selected privileges will be applied to the entire account.

    • Organization—User has access to the specified organizations only. Select one or more Organizations from the drop-down list and Add Privileges to assign roles to the user. For more information on Privileges, see the Roles section.

  8. Click Create to add the new User Defined Role to the account.

Switching an Account or Role

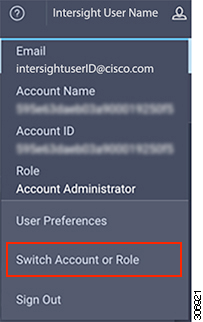
You can switch between accounts or roles in Cisco Intersight without logging out of the application. If you are logged into multiple accounts or roles, the Profile menu in the Intersight dashboard provides the option to Switch Account or Role.


Note


  • The Switch Account or Role option is not available if you are authorized to access a single account and have only one role mapped to that account.

  • If you use the account URL to log in to Intersight, the Switch Account and Role option enables you to switch only between roles within the same account.

  • At the time of switching, accounts are re-evaluated based on the attributes returned by the Identity Provider (IdP) after authentication. The users added to the account are also re-authenticated for their roles by the Identity Provider. Therefore, before you switch between accounts, if Intersight detects that there is a change in your account or role, it appears in the Select Account and Role list.

  • For Intersight Virtual Appliance, you must configure LDAP or log in with SSO to view the Switch Account or Role option.


Use the following steps to switch accounts:

  1. Navigate to Profile > Switch Account or Role.

    Select Account and Role window displays.

  2. In the Select Account and Role window, select the account (or role) that you want to switch to. You will be logged in to the new account.

  3. To change the role, navigate to Settings > User Permissions > Users, and select the user that you want to change the role for, and click the Edit icon.

  4. In the Edit User window, select the role and click Save.

Adding an Organization

Creating an Organization

On the Organizations page, you can view a list of organizations added to an account. This list displays the Name, Memberships, Usage, and Description. Use these instructions to add an organization:


Attention


Only users with Account Administrator privileges can create organizations. Users with User Access Administrator privileges cannot create organizations but can view them in the User Account and assign the organizations to roles.


  1. Log into Cisco Intersight.

  2. Choose System > Organizations.

  3. Click Create Organization.

  4. Enter a Name to identify the organization in Intersight and a Description about the usage of the organization.

  5. Under Memberships, you can choose to assign access to all resources or restrict access to a selective group of resources. Select one of the following options for memberships:

    • Custom—From the list of targets available in the account, select the required targets, to allocate a set of physical resources to the organization.


      Important


      Profiles and Policies that are created within a custom organization are applicable only to the targets in the same organization.


    • All—All the targets available in the account will be included in this organization.

  6. Click Create to add the new organization to the account.

To learn more about Organizations and how to leverage them to support multi-tenancy in an account, see the Role Based Access Control under Resources in the Help Center or <https://your fqdn.com>/help.

Generating and Managing API Keys

An API key is used to register your application with Cisco Intersight.

Procedure


Step 1

Log into Cisco Intersight Virtual Appliance as a user with account administrator role.

Step 2

Choose Settings > API Settings > Keys.

Step 3

In the Generate New API Key screen, enter the purpose for the API Key, and click Generate. The API Key ID and RSA Private Key are displayed.

Step 4

Save the private key information in a .pem file.

Note


Make sure to save it in a location accessible from your scripts.


OAuth2 Tokens

You can view a list of OAuth2 tokens used by an application to access Intersight and the corresponding target details in the OAuth2 section under API.

Procedure


Step 1

Log into Cisco Intersight Virtual Appliance as a user with account administrator role.

Step 2

Choose Settings > API Settings > OAuth2 Tokens.

A table view of the OAuth2 tokens with the Application Name that uses the tokens, the Device Model, Login and Expiration time, the Client IP address, the User Role, and the Email ID is displayed.


Device Connector Requirements

You can claim a target in Cisco Intersight Virtual Appliance through the embedded device connector. Before you claim a target, ensure that the device connector requirements are met. The following table lists the software compatibility and the supported device connector versions for Intersight Virtual Appliance:

Table 4. Device Connector Requirements

Component

Minimum software version for Connected Virtual Appliance

Minimum software version for Private Virtual Appliance

Supported Device Connector version

Minimum supported versions that include supported Device Connectors

Cisco UCS Manager

3.2(1)

4.0(2a)

1.0.9-2290

4.0(2a)

Cisco IMC Software

For M5 Servers: 3.1(3a)

For M4 Servers: 3.0(4)

4.0(2d)

1.0.9-335

4.0(2d)

HyperFlex Connect and Data Platform

2.6

3.5(2a)

1.0.9-1335

3.5(2a)

CIsco UCS Director

6.7.2.0

6.7.2.0

1.0.9-911

6.7.2.0

Device Connector Upgrade

When the Device Connector on an endpoint is not at the compatible version, you can upgrade it in the following ways:

  • Perform a complete firmware upgrade to the version that has the supported Device Connector. This process could involve updating your configuration settings.

  • Manually upgrade the Device Connector. This option is supported only on Cisco UCS Manager. For more information, See Manual Upgrade.

  • Cisco Intersight Virtual Appliance supports upgrading the device connector from the cloud. When the target claim process detects that the device connector at the endpoint is not at the compatible version, it triggers an upgrade of the device connector from Intersight cloud. To facilitate this upgrade, port 80 must be open between the appliance and the endpoint target. The HTTPS proxy running on port 80 requires that your firewall settings allow communication through port 80.

    Device Connector upgrade from Intersight Cloud is optional. During the upgrade from the cloud, some target data (server inventory) from the appliance leaves your premises. When you choose this option, the following data leaves your premises:

    • The endpoint target type - Cisco UCS Fabric Interconnect, Integrated Management Controller, Cisco HyperFlex System, Cisco UCS Director

    • The firmware version(s) of the endpoint

    • The serial number(s) of the endpoint target

    • The IP address of the endpoint target

    • The hostname of the endpoint target

    • The endpoint device connector version and the public key


    Attention


    Target claim could fail if the device connector is at an older version that does not support the appliance, and you have disabled the data collection option during the initial setup. This failure is caused due to details about the endpoint being required to leave the premises for the one-time upgrade to work. To avoid a target claim failure, select the Enable Data Collection option temporarily or upgrade the device connector in the other methods mentioned above.


Manual Upgrade of Device Connector (applicable only to Cisco UCS Fabric Interconnect)

If you do not want to share the target data as part of the automatic device connector upgrade, you can choose to manually upgrade the device connector on a Cisco UCS Fabric Interconnect. Use these instructions to upgrade the device connector:

Log in to your UCS Fabric Interconnect as an admin user and run the following command:
UCS-A# connect local-mgmt
UCS-A(local-mgmt)# copy scp://username@10.100.100.100/filepath/filename.bin workspace:/
UCS-A(local-mgmt)# update-device-connector workspace:/filename.bin 
Update Started
Updating Device Connector on local Fabric interconnect
Successfully updated device connector on local Fabric interconnect
UCS-A(local-mgmt)#

Configuring Account Settings

This task provides details on how to configure account settings in Intersight Virtual Appliance.

Procedure


Step 1

Log into Intersight Virtual Appliance as a user with account administrator role.

Step 2

Choose System > Account Details.

You can view the details of the existing account settings.

Step 3

Click Configure.

The Configure Account Settings window displays.

Step 4

Update the following fields as needed.

  • Account Name—Name of the account.

  • Default Idle Timeout (Seconds)—Provide the idle timeout interval for the web session in seconds. The system default value is 18,000 seconds (5 hours).

  • Default Session Timeout (Seconds)—Provide the session expiry duration in seconds. The system default is 57,600 (16 hours).

  • Maximum Concurrent Sessions per User (Sessions)—Provide the maximum number of concurrent sessions allowed per user. The system default as well as the maximum number of concurrent sessions is 32.

  • Audit Logs Retention Period (Months)—Provide the time-period for audit logs retention. The system default is 48 months. The allowed range is between 6 months and 48 months. The Audit logs deletion task is set to run on a daily basis at 6.00 AM UTC, and all the audit logs that meet the retention period set in this field will automatically start getting deleted at this time. Once deleted, audit logs cannot be retrieved.

  • Default Authentication Method—Choose from Local, SSO, and LDAP.

  • Default LDAP Domain—Choose from the available appliance LDAP configurations.

  • OAuth Applications without Expiry—Enables Account Admin to allow the creation of OAuth applications that do not have an expiration date. By default, this option is disabled, as a never-expiring OAuth application is a security threat.

  • OAuth Applications Maximum Expiration Time—The maximum allowed expiration period for an OAuth 2.0 application in this account. The maximum allowed expiration period is 360 days. The default expiration period is 180 days.

  • API Keys without Expiry—Enables Account Admin to allow the creation of API keys that do not have an expiration date. By default, this option is disabled, as a never-expiring API key is a security threat.

  • API Keys Maximum Expiration Time—The maximum allowed expiration period for an API key in this account. The maximum allowed expiration period is 360 days. The default expiration period is 180 days.

  • Tags—The tags created for the account.

Step 5

Click Save.


Intersight Virtual Appliance Monitoring

Intersight Virtual Appliance provides an overview of the appliance and health status and displays alarms when predefined limits are exceeded or when a threshold is raised.

In the appliance UI, choose System > Appliance Details to view the following details:

  • Health—Overall status of the appliance

  • Hostname—Your FQDN or hostname

  • Version—Installed version of the appliance software

  • Node—A table view of the list of appliance nodes in Cisco Intersight Virtual Appliance. You can search for a specific node by Hostname, Operational Status, Node Type (node types include Management, HA Management, Standalone, or Metrics), Deployment Size, IP Address, Gateway, or Netmask. You can view the alarms on the right pane and filter them by their severity.

Intersight Virtual Appliance monitors certain critical parameters and raises alarms when predefined limits are exceeded or when a threshold is raised. The appliance currently reports system-level and node-level alarms. The following table shows the alarm levels and their descriptions:

Table 5. Alarms in Intersight Virtual Appliance

Level

Component

Description

Comments

System

Node

Critical: A node is down

One alarm per node

System

Node

Critical: A node is not ready for service deployment.

One alarm per node

Node

CPU Usage

Warning: CPU usage above threshold

One alarm per node. Threshold: 75%

Node

Memory Usage

Warning: Memory usage above threshold

One alarm per node. Threshold: 75%

Node

File System Disk Usage

Warning: File System disk usage above threshold

One alarm per file system. Threshold: 75%

Node

File System Disk Usage

Critical: File System disk usage above threshold

One alarm per file system. Threshold: 90%

System

Number of service instances running

Warning: Number of service instances running less than expected

One alarm per service

System

Number of service instances ready

Warning: Number of service instances ready less than expected

One alarm per service

System

Web certificate

Warning: Web certificate expires within 120 days

Critical: Web certificate expires within 90 days

One alarm per appliance

System

Device certificate

Warning: Device certificate expires within 120 days

Critical: Device certificate expires within 90 days

One alarm per appliance

System

Appliance Backup

Warning: An Intersight Appliance backup has not been created within the past week. Please schedule or create a new backup.

One alarm per appliance

System

Appliance Backup

Critical: The most recent Intersight Appliance backup failed. Please schedule or create another backup.

One alarm per appliance

System

Cloud Connectivity

Warning: Connection to Intersight cloud has been down for more than 30 days

Critical: Connection to Intersight cloud has been down for more than 60 days

Highly Critical: Connection to Intersight cloud has been down for more than 90 days; claiming new devices is not permitted until connection is restored.

One alarm per appliance

Node

Network Link Connectivity

Warning: The latency between cluster nodes is greater than 10ms

One alarm per link per node


Note


Cisco UCS C-Series server-related faults such as power supply and fan failures are not forwarded by Intersight Virtual Appliance to an external syslog server. Please configure the external syslog server on the UCS C-Series CIMC side to handle the forwarding of the UCS C-Series events and faults.


Intersight Virtual Appliance Settings

You can monitor the appliance status, backup and restore data, upgrade the appliance software, configure network settings, add users and groups, and more on the Intersight Virtual Appliance Settings page.

Settings Option

Description

System > Account Details

View account details such as account name, account ID, access link, license type, default idle timeout, maximum number of concurrent sessions per user, and default session timeout.

You can also configure account settings such as default idle timeout, default session timeout, and maximum number of concurrent sessions per user. For more information, see Configuring Account Settings.

System > Access Details

Displays the details of the user including the name, account name, email ID, role, idle timeout, session timeout, maximum concurrent sessions per user, login time, a brief description of the role, and a table view of the users and their privileges that is displayed in the bottom of this screen.

System > Appliance Details

View the status of the appliance connection, view details including the appliance Health, Hostname, Version number, and Cluster status. A list of the connected Nodes displays the Hostnames, Operational Status, Node Type (node types include Management, HA Management, Standalone, or Metrics), IP address, Gateway, and Netmask for the connected nodes. You can also view the Alarms on the connected nodes.

Settings > System > Backup

Create a full state backup of the appliance and save the image on a remote server. You can also schedule a backup from this page. For detailed instructions, see Create Backup and Schedule Backup.

You can recover the appliance configuration from a backup file using the instructions in Recovering Intersight Connected Virtual Appliance and Recovering Intersight Private Virtual Appliance.

Settings > System > Banners

View the configuration details of the banners. When enabled, the configured banner will be displayed before the user login screen. For more information, see Configuring a Banner Message for Displaying Before the Login Screen.

Settings > System > Appliance Updates

View details of the current software version of the appliance, including the version number, the installed components, messages about the installation, and the Fingerprint of the installed software.

For more information about updating the Intersight Virtual Appliance software, see Updating the Intersight Virtual Appliance Software.

Settings > Networking > Cloud Connection

Note


This setting is applicable only for Connected Virtual Appliance deployments.

View the status of the appliance connection to Intersight, the Access Mode, Device ID, and the Claim Code. From the Settings Menu in the Device Connector window, you can add an HTTPS Proxy. For more information, see Cloud Connection for Intersight Connected Virtual Appliance.

Settings > Networking > DNS

Configure DNS settings and add IPv4 DNS Server Addresses and Alternate IPv4 addresses of the DNS Servers. For more information, see Configuring DNS.

Settings > Networking > NTP

Configure NTP servers as well as edit existing NTP server settings. For more information, see Configuring NTP.

Settings > Networking > Syslog

Configure the syslog server settings including enabling and disabling sending audit logs and information of alarms to the syslog servers. For more information, see Configuring Syslog.

Settings > Authentication > LDAP/AD

Create and configure the settings for LDAP servers, DNS parameters, Binding methods, Search parameters, and Group Authorization preferences. For more information, see Configuring LDAP Settings.

Settings > Authentication > Single Sign-On

Set up Single Sign-on (SSO) authentication. SSO enables you to use a single set of credentials to log in to multiple applications. With SSO authentication, you can log in to Intersight with your corporate credentials instead of your Cisco ID. For more information about Single Sign-On in Intersight, see Single Sign-On with Intersight Virtual Appliance.

Settings > Authentication > Certificates

Add a trusted certificate to verify TLS communication with the LDAP or HTTPS server. You can generate a Certificate Signing request or Generate a Self-Signed Certificate. For more information, see Certificates.

Settings > Authentication > Local Users Password Policy

View details of the current password policy configuration or configure a new password policy. For more information, see Configuring Password Policy for Local Users.

Settings > User Permissions > Users

View the users or add new users to allow access to Intersight using their email, specify identity provider and permission settings. For more information, see Adding a User.

Settings > User Permissions > Groups

View the user Groups or add a new group for Single Sign-On or LDAP-based authentication. For more information, see Adding a Group.

Settings > User Permissions > Roles

View the existing roles or create a custom role and assign privileges. For more information, see Adding a Role.

System > Organizations

View the list of organizations or create a new organization to manage access to your logical and physical resources. For more information, see Adding an Organization.

Settings > API Settings > Keys

View a list of the existing API Keys in the account or generate a new API Key. For more information, see API Keys.

SettingsAPI SettingsOAuth2 Tokens

View a list of OAuth2 tokens and the details of the Apps and the associated targets.