Managing Recordings
Contents
Logging into the Recording Server
To log in to the Cisco TelePresence Recording Server using Cisco TelePresence Touch 12:
Step 2![]() Tap the Recordings button in the secondary button bar.
Tap the Recordings button in the secondary button bar.

The Recording Log In page appears with the keyboard activated, as shown in Figure 5-1.
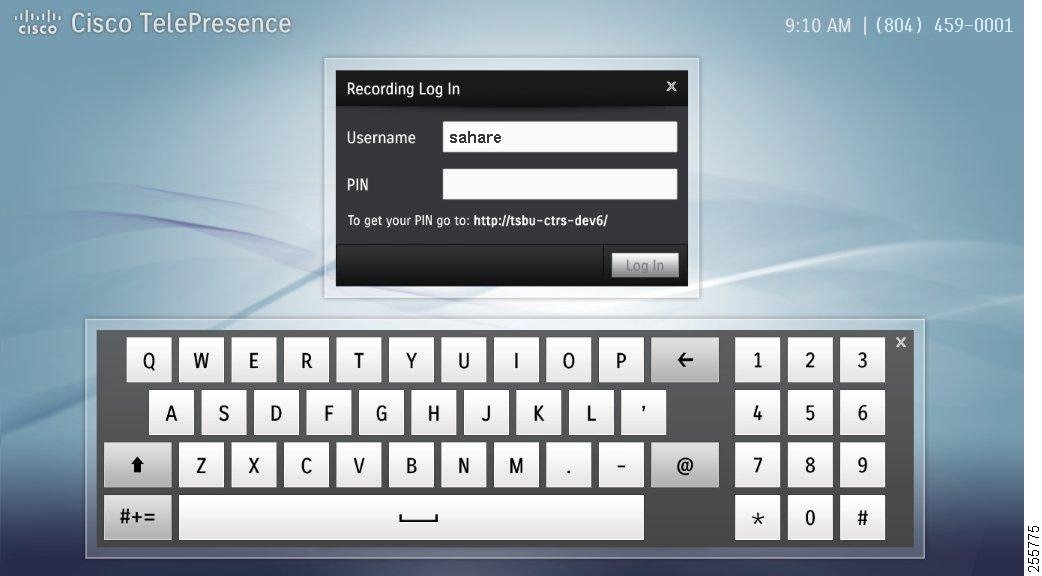
Step 3![]() Tap once in the Username field to bring up the keyboard and tap your username. The Username field updates as you type.
Tap once in the Username field to bring up the keyboard and tap your username. The Username field updates as you type.

Tip![]() You can configure the recording server to remember your user name. See Setting Your PIN in the Cisco TelePresence Video Portal.
You can configure the recording server to remember your user name. See Setting Your PIN in the Cisco TelePresence Video Portal.
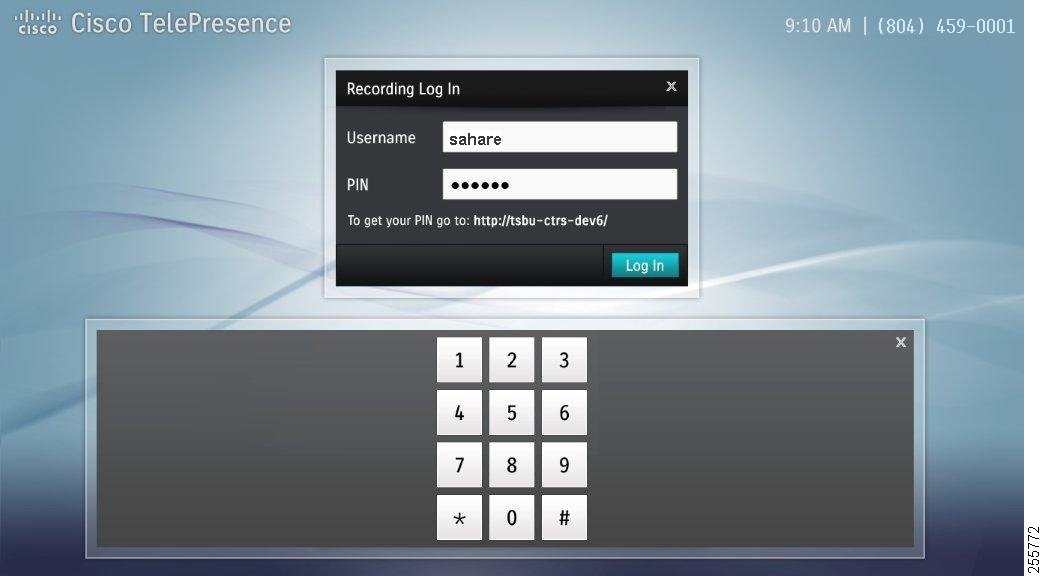
Step 4![]() Tap once in the PIN field to bring up the keypad and tap your PIN, as shown in Figure 5-2.
Tap once in the PIN field to bring up the keypad and tap your PIN, as shown in Figure 5-2.
Figure 5-2 Recording Log In—PIN Field
If this is your first time logging into the recording server, create a new PIN by going to the provided URL in the Recording Log In window. Follow these steps in the Cisco TelePresence Video Portal:
Setting Your PIN in the Cisco TelePresence Video Portal
a.![]() Click Continue to this website.
Click Continue to this website.
Tip The Cisco TelePresence Video Portal requires Adobe Flash player. Click Yes to install Adobe Flash player if prompted. Select the check box to accept the Flash Player License Agreement and click Install. Click Done to complete the installation.
b.![]() Enter your user name and choose a password that consists of six nonsequential, non-repeating digits.
Enter your user name and choose a password that consists of six nonsequential, non-repeating digits.
c.![]() Select the check box to allow the system to remember your user name.
Select the check box to allow the system to remember your user name.
d.![]() When you have finished setting your preferences in the Cisco TelePresence Video Portal, return to the Cisco TelePresence Touch 12 to continue the log in process.
When you have finished setting your preferences in the Cisco TelePresence Video Portal, return to the Cisco TelePresence Touch 12 to continue the log in process.
Step 5![]() Tap your PIN using the numbered keypad. The numbered keypad is automatically dismissed when six digits have been entered.
Tap your PIN using the numbered keypad. The numbered keypad is automatically dismissed when six digits have been entered.
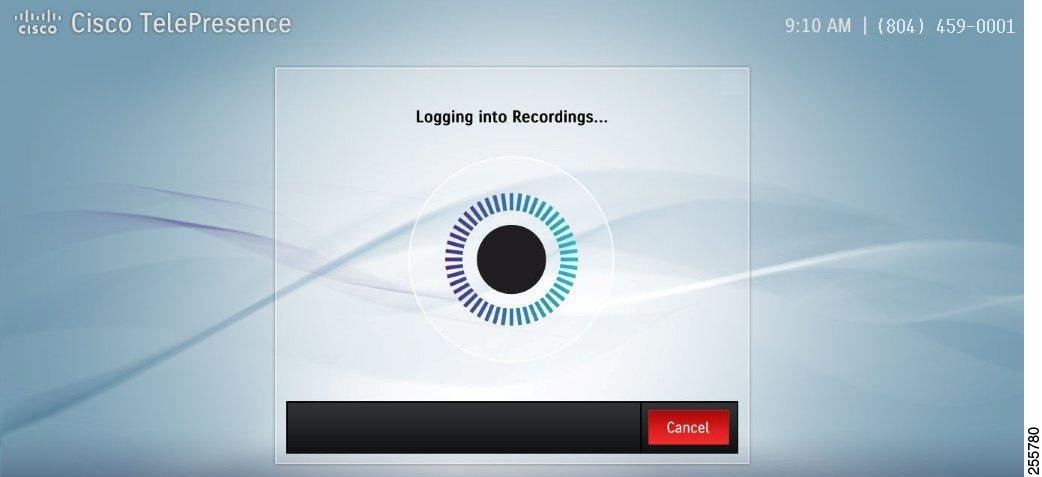
Step 6![]() Tap Log In. The login screen appears, as shown in Figure 5-3.
Tap Log In. The login screen appears, as shown in Figure 5-3.
Figure 5-3 Logging into Recordings
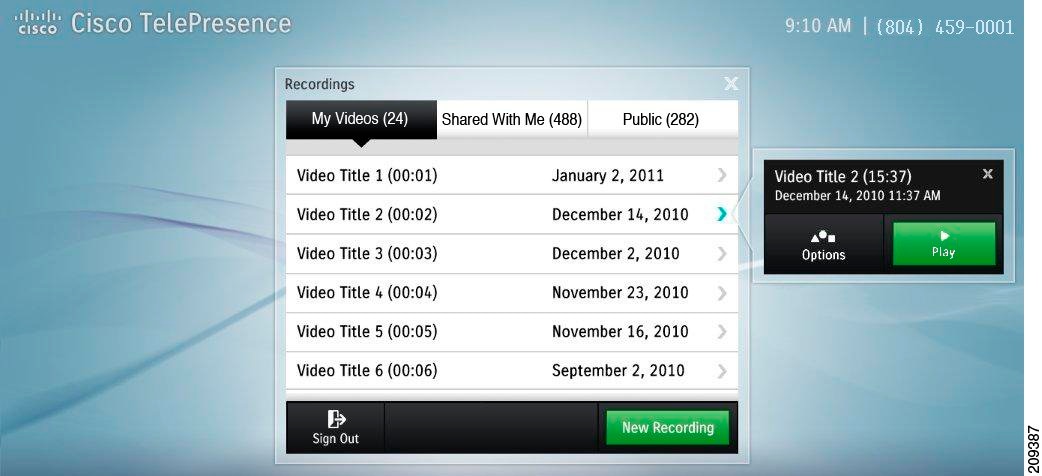
Step 7![]() When the system has finished logging you in, the Recordings window appears with the My Videos tab selected, as shown in Figure 5-4.
When the system has finished logging you in, the Recordings window appears with the My Videos tab selected, as shown in Figure 5-4.
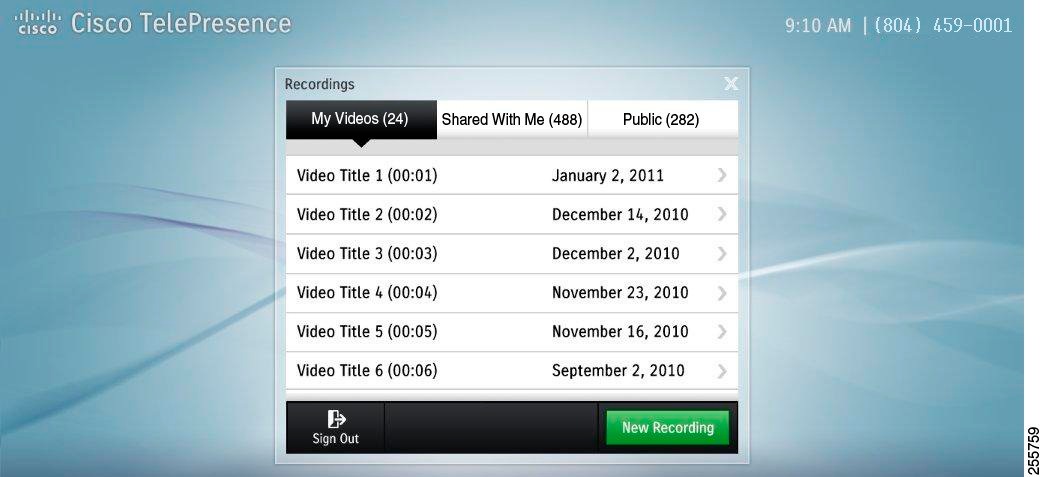
Step 8![]() Proceed to any of the following tasks from the My Videos tab:
Proceed to any of the following tasks from the My Videos tab:
Recording a Meeting
To record a video of your meeting:
Step 1![]() Tap the New Recording button. The Connecting screen appears, as shown in Figure 5-5.
Tap the New Recording button. The Connecting screen appears, as shown in Figure 5-5.
Figure 5-5 Recording Server Connecting

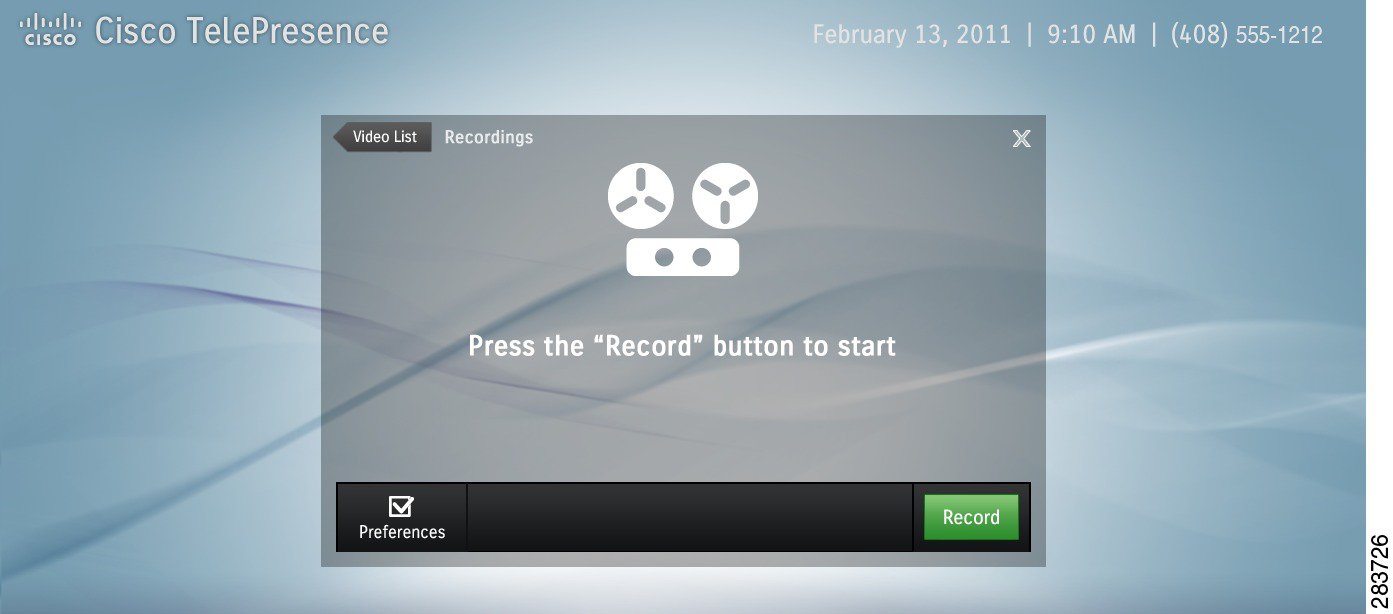
The Recording screen appears, as shown in Figure 5-6. By default self view pops up automatically before you begin recording and is automatically dismissed once recording begins.
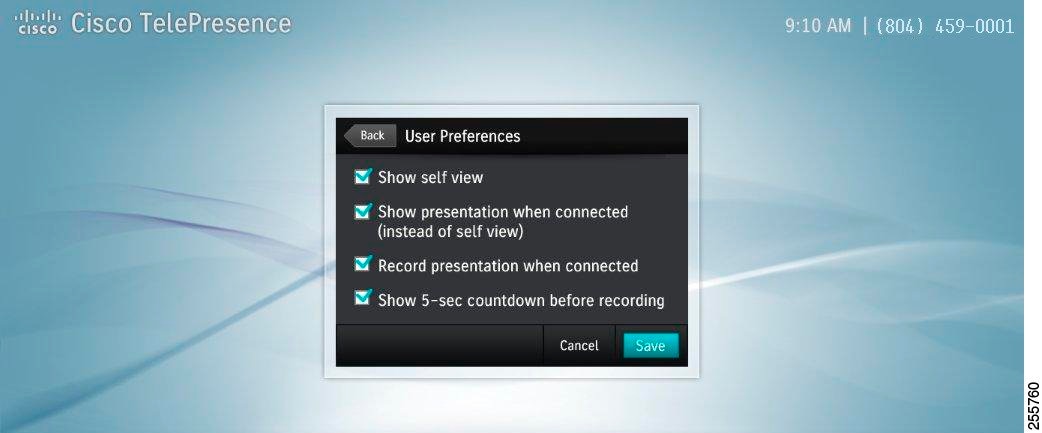
Step 2![]() If desired, prepare for presentation (if available on the system), and adjust other preference settings by tapping the Preferences button. Figure 5-7 shows possible Preference options, which include:
If desired, prepare for presentation (if available on the system), and adjust other preference settings by tapping the Preferences button. Figure 5-7 shows possible Preference options, which include:
- Show self view—Allows you to see yourself while you record.
- Show presentation when connected (instead of self view)—The presentation is displayed on-screen as a talking point while recording but is not recorded.
- Record presentation when connected—Records video and presentation together.
- Show 5-second countdown before recording—An on-screen timer counts down the seconds before recording begins.
Step 3![]() Tap the box to check the desired options and then tap Save.
Tap the box to check the desired options and then tap Save.
Step 4![]() When you are ready to begin recording, tap the New Recording button (see Figure 5-6).
When you are ready to begin recording, tap the New Recording button (see Figure 5-6).
The Connecting screen appears while the system connects to the Cisco TelePresence Recording Server. The Recording in Progress screen then appears on the Cisco TelePresence Touch 12, as shown in Figure 5-8.
Tip![]() If you are not ready to record, tap the Video List arrow to return to the My Videos tab. To dismiss the Recordings window without signing out, tap the X in the upper right corner. To exit the recording feature entirely, tap Sign Out.
If you are not ready to record, tap the Video List arrow to return to the My Videos tab. To dismiss the Recordings window without signing out, tap the X in the upper right corner. To exit the recording feature entirely, tap Sign Out.
Figure 5-8 Recording in Progress
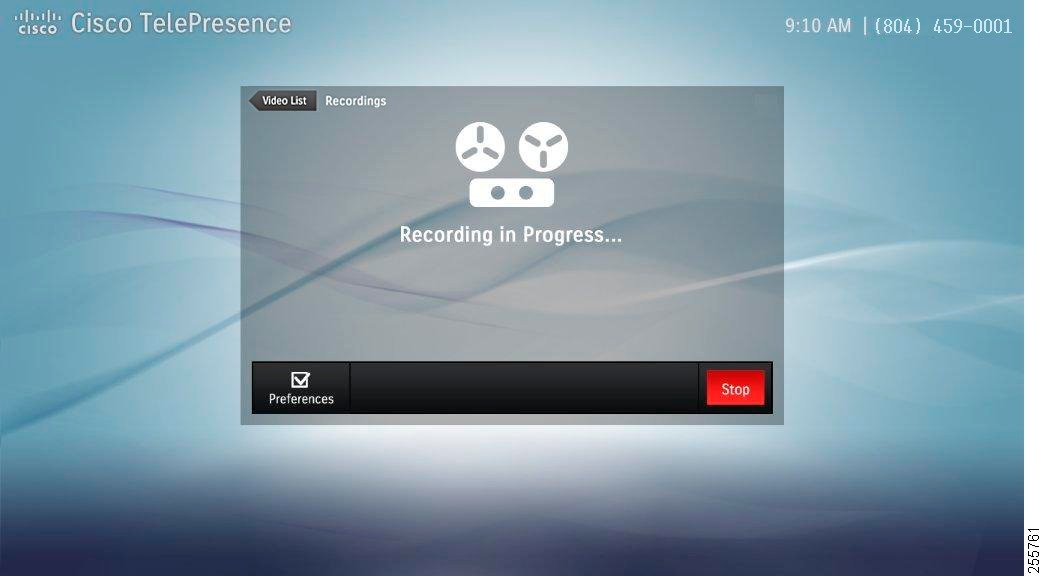
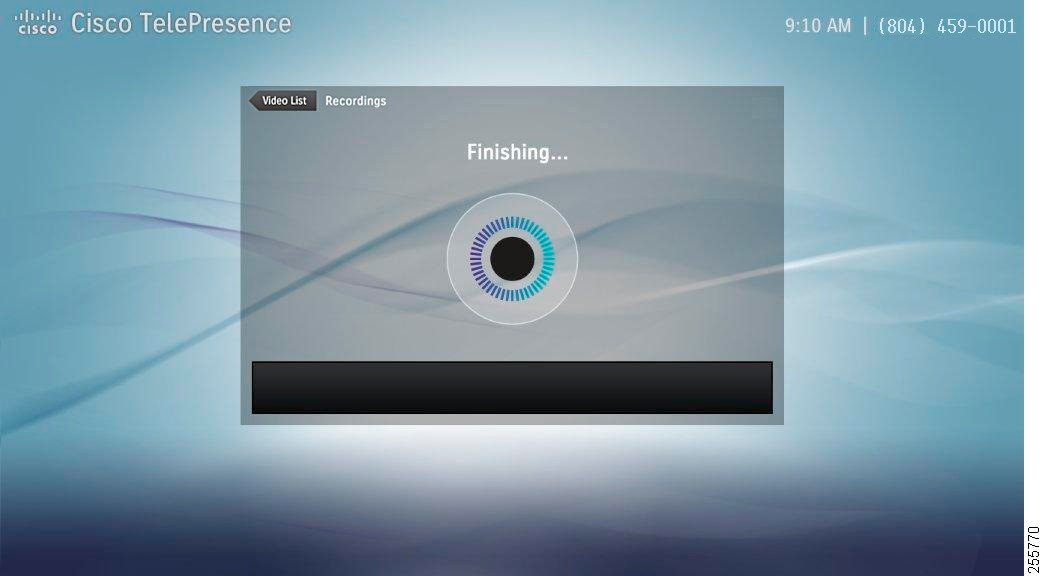
Step 5![]() Tap the Stop button at any time to end the recording. The Finishing screen appears, as shown in Figure 5-9. Finishing may take up to one minute to complete.
Tap the Stop button at any time to end the recording. The Finishing screen appears, as shown in Figure 5-9. Finishing may take up to one minute to complete.
Figure 5-9 Finishing Recording
Step 6![]() In the Edit Information window (Figure 5-10), enter a title for your video by tapping in the Video Title field to bring up the keyboard. If you choose not to title your video, it will be labeled “Untitled Video.”
In the Edit Information window (Figure 5-10), enter a title for your video by tapping in the Video Title field to bring up the keyboard. If you choose not to title your video, it will be labeled “Untitled Video.”
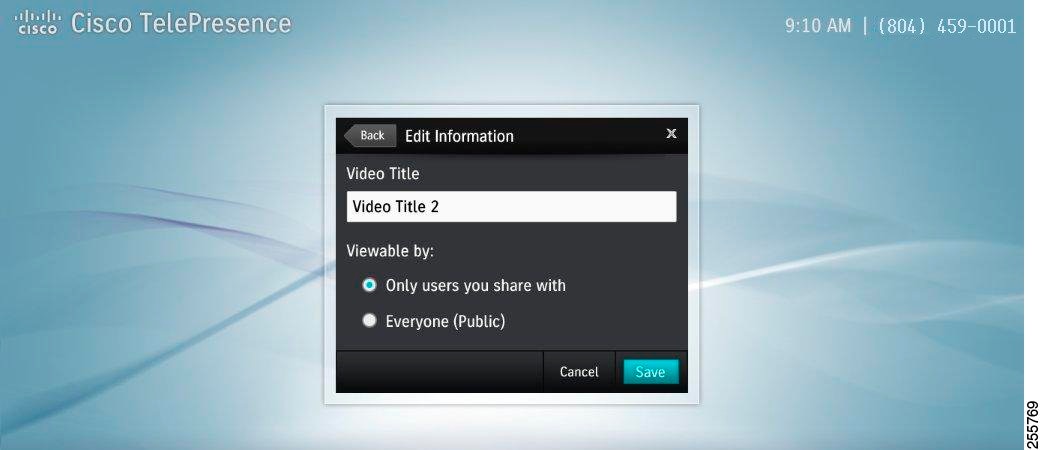
Step 7![]() Choose who will see your video by tapping an option in the Viewable by: column, then tap the Save button.
Choose who will see your video by tapping an option in the Viewable by: column, then tap the Save button.
Tip![]() The “Only users you share with” option includes a list of users that have already been configured in the Cisco TelePresence Recording Server Portal. Contact your system administrator for more information.
The “Only users you share with” option includes a list of users that have already been configured in the Cisco TelePresence Recording Server Portal. Contact your system administrator for more information.
After you have saved your video, a confirmation screen appears, as shown in Figure 5-11.
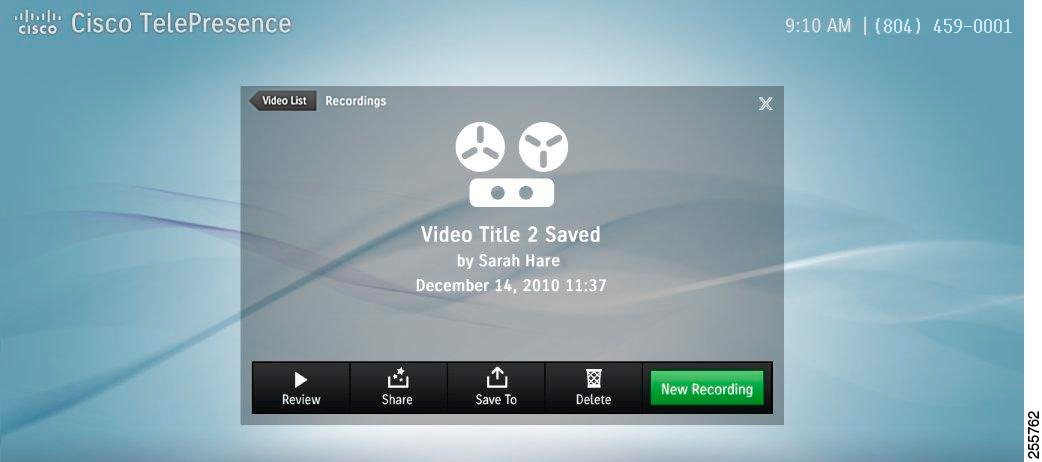
You have several choices for managing your new video, as described in the next sections of this chapter.
Reviewing a Video
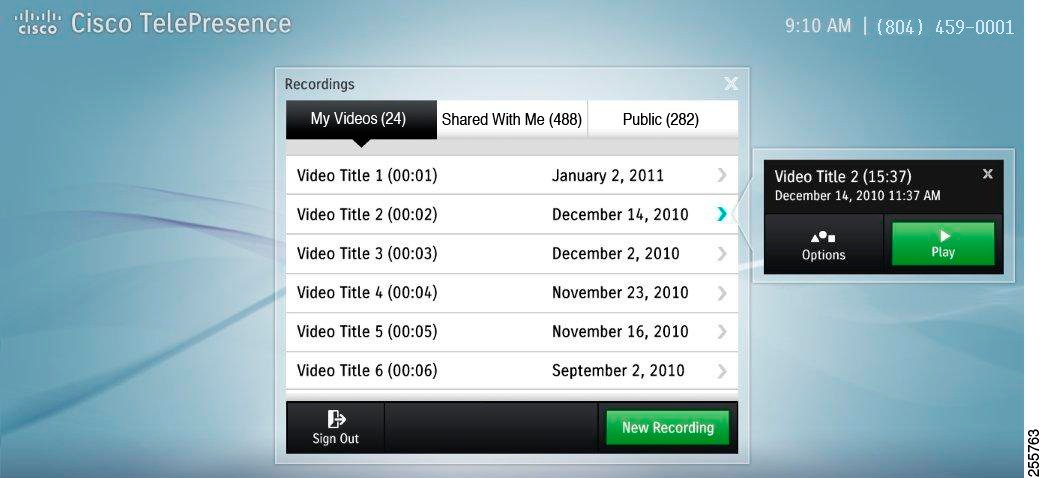
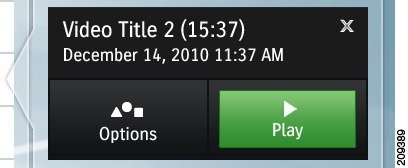
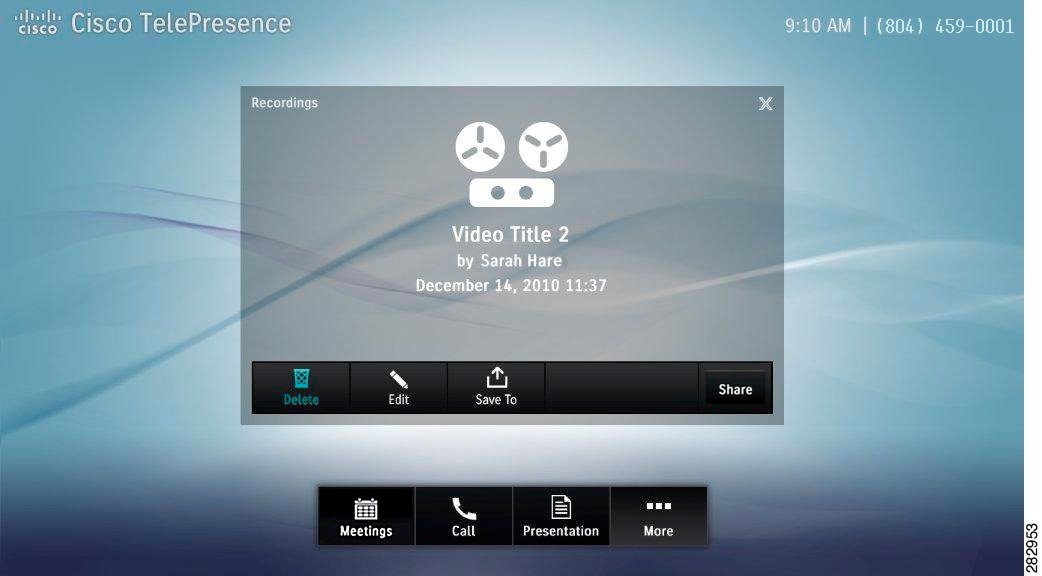
Step 1![]() From the Recordings > My Videos list, tap to select a video that you would like to review. The Video Card for the selected video appears, as shown in Figure 5-12.
From the Recordings > My Videos list, tap to select a video that you would like to review. The Video Card for the selected video appears, as shown in Figure 5-12.
Figure 5-12 Video Card—Play Video
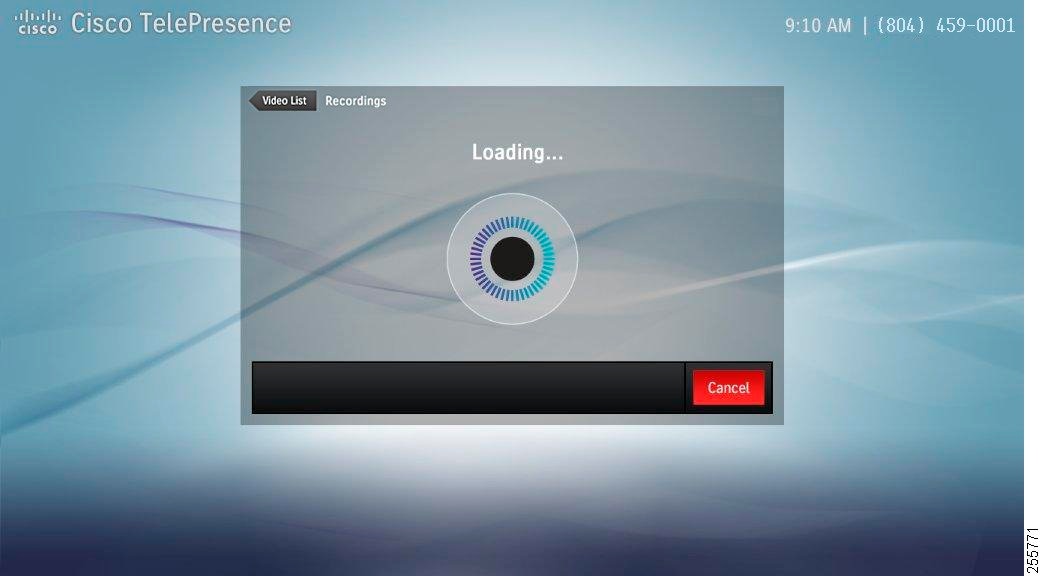
Step 2![]() Tap the Play button on the Video Card. The video loads, as shown in Figure 5-13.
Tap the Play button on the Video Card. The video loads, as shown in Figure 5-13.
Step 3![]() The video begins playing on the CTS main display. As the video plays back, a progress bar is shown on the Cisco TelePresence Touch 12 and you can skip forward, skip backwards, or pause and resume playback, as shown in Figure 5-14.
The video begins playing on the CTS main display. As the video plays back, a progress bar is shown on the Cisco TelePresence Touch 12 and you can skip forward, skip backwards, or pause and resume playback, as shown in Figure 5-14.
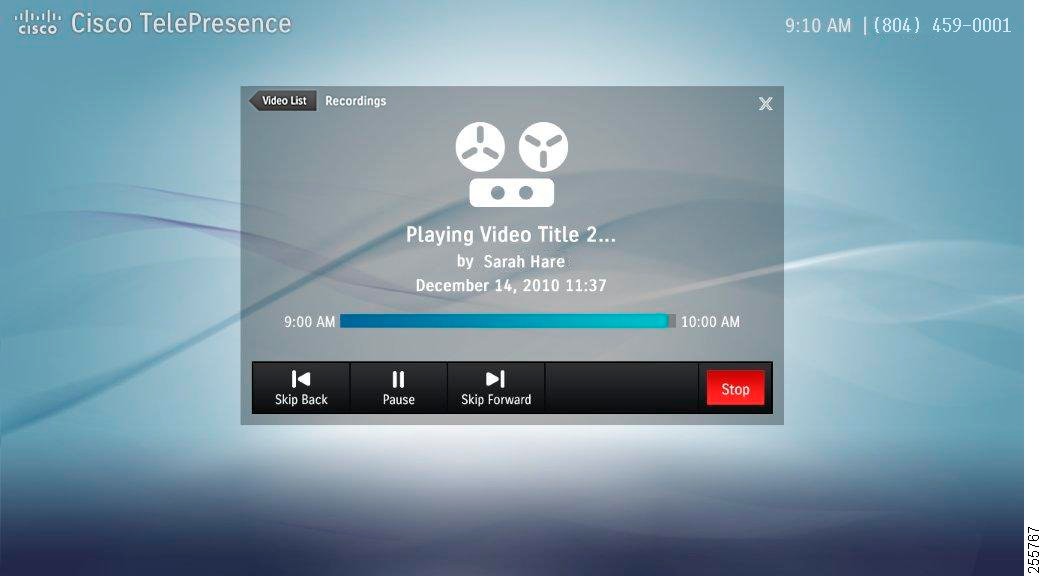
Step 4![]() Tap the Stop button to stop video playback.
Tap the Stop button to stop video playback.
Sharing a Video
Step 1![]() From the Recordings > My Videos list, tap to select a video that you would like to share. The Video Card for the selected video appears, as shown in Figure 5-15.
From the Recordings > My Videos list, tap to select a video that you would like to share. The Video Card for the selected video appears, as shown in Figure 5-15.
Figure 5-15 Video Card—Sharing Options
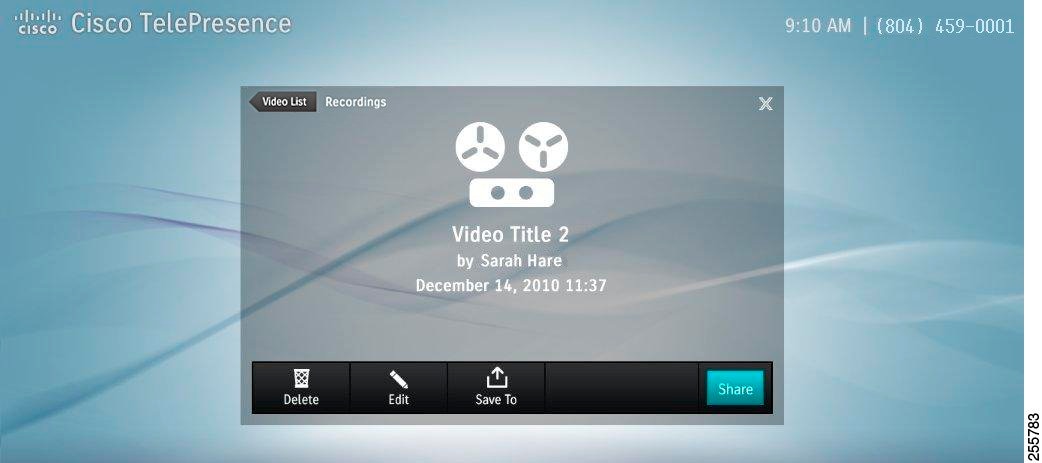
Step 2![]() Tap the Options button to bring up the video details screen.
Tap the Options button to bring up the video details screen.
Step 3![]() Then tap the Share button, as shown in Figure 5-16.
Then tap the Share button, as shown in Figure 5-16.
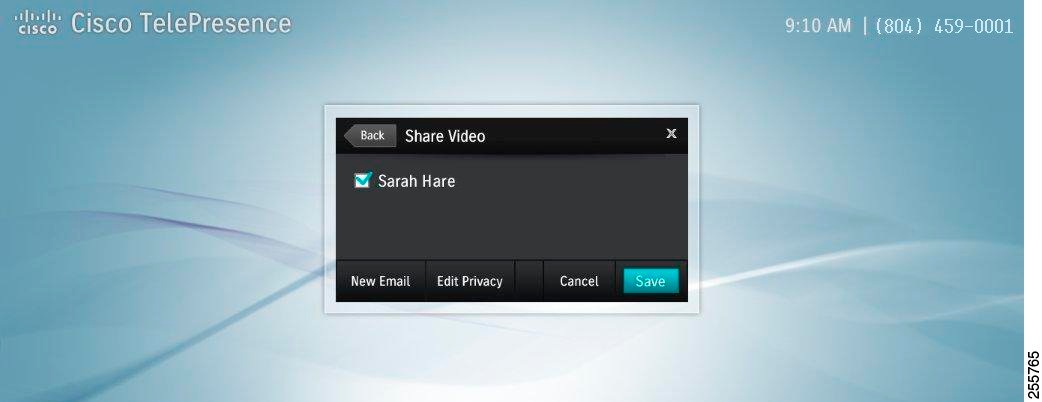
If you have a list of users that have already been configured in the Cisco TelePresence Recording Server Portal, they will appear in the Share Video window, as shown in Figure 5-17
Figure 5-17 Share Video—Favorites
Step 4![]() Tap the box next to the contact name to check it, then tap the Save button.
Tap the box next to the contact name to check it, then tap the Save button.
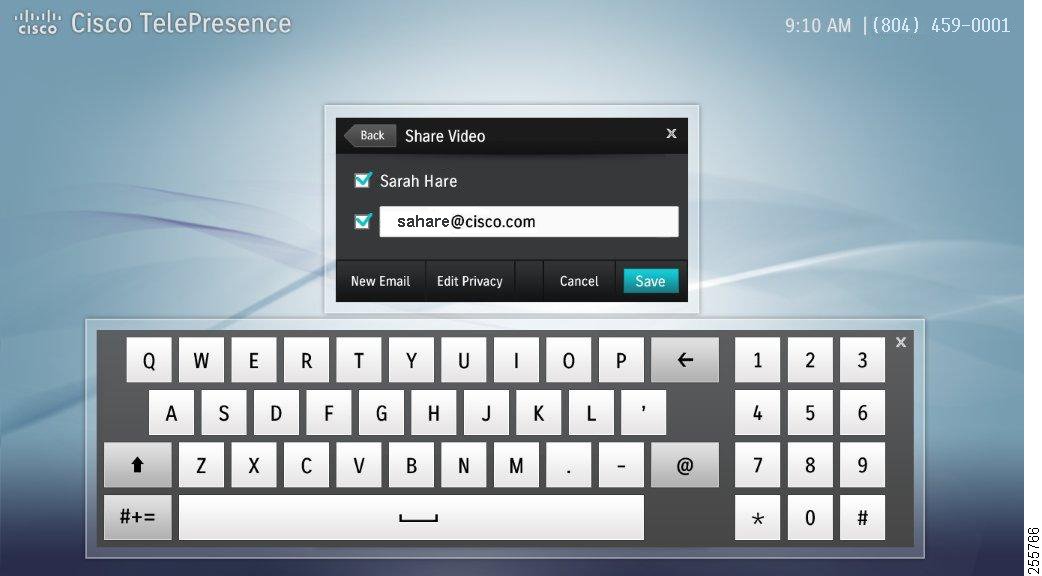
Step 5![]() If you want to share with someone who is not on your list in the Cisco TelePresence Recording Server Video portal, tap the New Email button to bring up the keyboard.
If you want to share with someone who is not on your list in the Cisco TelePresence Recording Server Video portal, tap the New Email button to bring up the keyboard.
Step 6![]() Tap a new contact email. The email field updates as you type, as shown in Figure 5-18.
Tap a new contact email. The email field updates as you type, as shown in Figure 5-18.
Tip![]() You must enter a full email address in the format contactname@yourcompany.com.
You must enter a full email address in the format contactname@yourcompany.com.
Figure 5-18 Share Video—Enter a New Email
Step 7![]() Before you save a new contact entry, you can tap the Edit Privacy button, which allows you to choose who will see your video, as shown in Figure 5-19.
Before you save a new contact entry, you can tap the Edit Privacy button, which allows you to choose who will see your video, as shown in Figure 5-19.
Step 8![]() Tap the Save button to save privacy settings in the Edit Privacy window then tap Save in the Share Video window to save your new contact email.
Tap the Save button to save privacy settings in the Edit Privacy window then tap Save in the Share Video window to save your new contact email.
You may continue to add new contacts by tapping the New Email button and entering email addresses.
Tip![]() The keyboard is dismissed automatically when email entries are verified in the system. If an email is not verified, an error message appears and the keyboard remains open for you to retry your entry.
The keyboard is dismissed automatically when email entries are verified in the system. If an email is not verified, an error message appears and the keyboard remains open for you to retry your entry.
Saving a Video to Show and Share
To save to the Show and Share server:
Step 1![]() From the Recordings > My Videos list, tap to select a video that you would like to save to Show and Share. The Video Card for the selected video appears, as shown in Figure 5-15.
From the Recordings > My Videos list, tap to select a video that you would like to save to Show and Share. The Video Card for the selected video appears, as shown in Figure 5-15.
Figure 5-20 Video Card—Options
Step 2![]() Tap the Options button to bring up the video details screen, as shown in Figure 5-21.
Tap the Options button to bring up the video details screen, as shown in Figure 5-21.

Step 3![]() Tap the Save To button to bring up the Save to Show and Share window, as shown in Figure 5-22.
Tap the Save To button to bring up the Save to Show and Share window, as shown in Figure 5-22.
Figure 5-22 Save to Show and Share—Edit Information
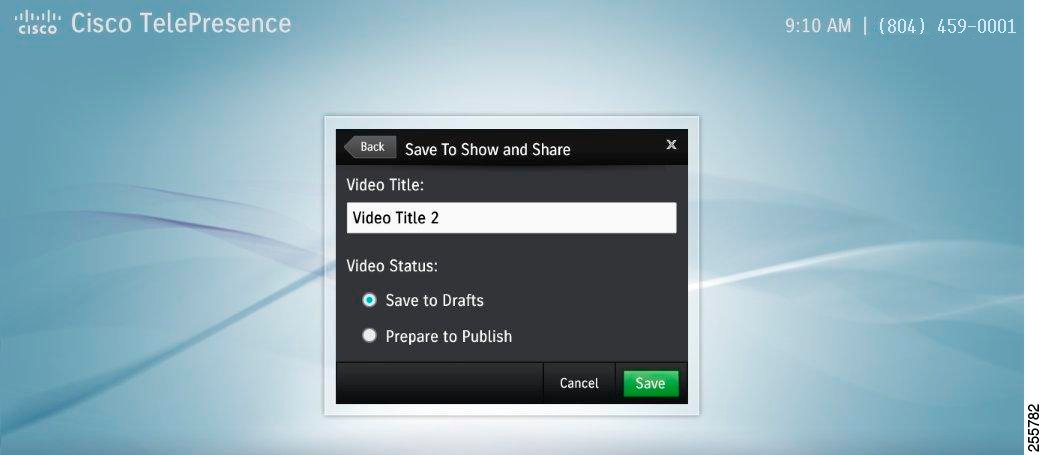
Step 4![]() Tap in the Video Title field to edit the video title. The keyboard appears and the field is filled as you type.
Tap in the Video Title field to edit the video title. The keyboard appears and the field is filled as you type.
Choose your Video Status settings by tapping one of the available radio buttons, then tap the Save button. A confirmation screen appears that tells you where you can find your saved video, as shown in Figure 5-23.
Tip![]() Saving the video may take a few minutes.
Saving the video may take a few minutes.
Figure 5-23 Saving to Show and Share

Step 5![]() Tap the Dismiss button to close the dialog.
Tap the Dismiss button to close the dialog.
Managing Saved Recordings in My Videos
Manage videos in the following ways:
Edit a Video From My Videos
To edit a video from My Videos:
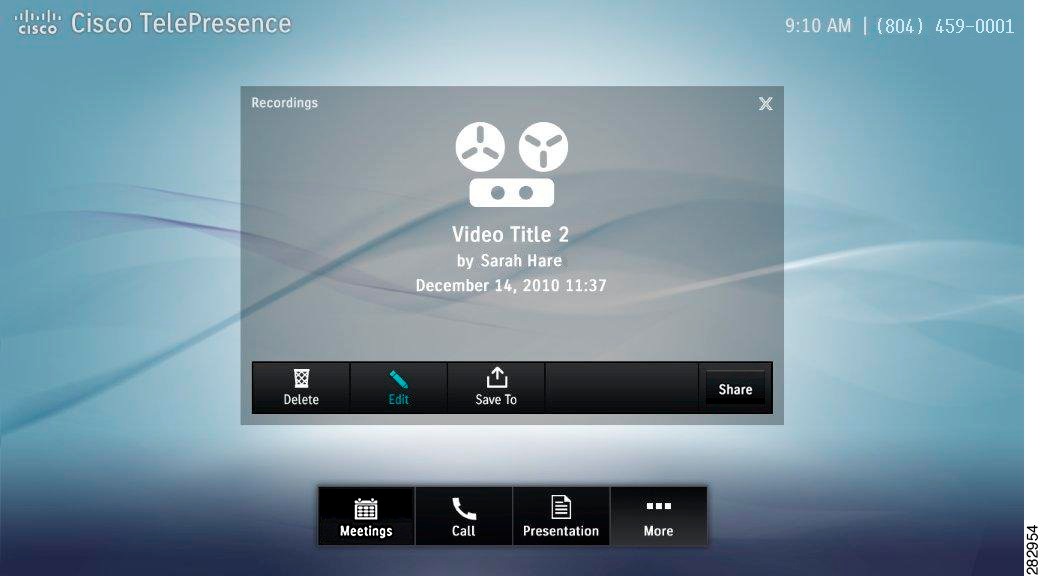
Step 1![]() From the Recordings > My Videos tab, tap to select a video that you would like to edit. The Video Card for the selected video appears, as shown in Figure 5-24.
From the Recordings > My Videos tab, tap to select a video that you would like to edit. The Video Card for the selected video appears, as shown in Figure 5-24.
Figure 5-24 Video Card—Options
Step 2![]() Tap the Options button to bring up the video details screen, as shown in Figure 5-25.
Tap the Options button to bring up the video details screen, as shown in Figure 5-25.
Step 3![]() Tap the Edit button to bring up the Edit Information window. Change the video title or to select viewing settings, as shown in Figure 5-26.
Tap the Edit button to bring up the Edit Information window. Change the video title or to select viewing settings, as shown in Figure 5-26.
Figure 5-26 Edit Video Information
Step 4![]() Tap Save to save your settings.
Tap Save to save your settings.
Delete a Video From My Videos
To delete a video from My Videos:
Step 1![]() From the Recordings > My Videos tab, tap to select a video that you would like to delete. The Video Card for the selected video appears, as shown in Figure 5-27.
From the Recordings > My Videos tab, tap to select a video that you would like to delete. The Video Card for the selected video appears, as shown in Figure 5-27.
Figure 5-27 Video Card—Options
Step 2![]() Tap the Options button to bring up the video details screen, as shown in Figure 5-27.
Tap the Options button to bring up the video details screen, as shown in Figure 5-27.
Step 3![]() Tap the Delete button. A confirmation message appears and you are returned to the video list.
Tap the Delete button. A confirmation message appears and you are returned to the video list.
Managing Videos in Shared With Me
To play or remove a video from Shared With Me:
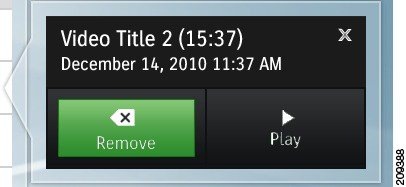
Step 1![]() From the Recordings > Shared With Me tab, tap to select a video that you would like to play or remove. The Video Card for the selected video appears, as shown in Figure 5-29.
From the Recordings > Shared With Me tab, tap to select a video that you would like to play or remove. The Video Card for the selected video appears, as shown in Figure 5-29.
Figure 5-29 Recordings Shared With Me List
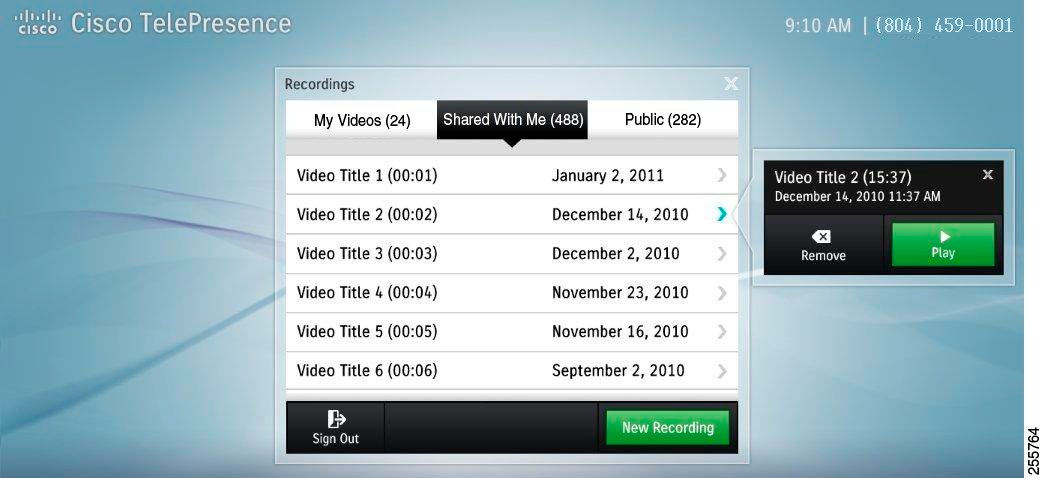
Step 2![]() Tap the Play button in the Video Card, as shown in Figure 5-29.
Tap the Play button in the Video Card, as shown in Figure 5-29.
Step 3![]() Tap the Remove button in the Video Card.
Tap the Remove button in the Video Card.
Managing Public Videos
Step 1![]() From the Recordings > Public tab, tap to select a video that you would like to play. The Video Card for the selected video appears.
From the Recordings > Public tab, tap to select a video that you would like to play. The Video Card for the selected video appears.
Step 2![]() Tap Play to play the video.
Tap Play to play the video.

Cisco TelePresence Touch 12 Recording Tips
Table 5-1 describes system tips for using recording features with the Cisco TelePresence Touch 12.
|
|
|

|
|---|---|---|
| While you are recording a meeting, incoming calls go directly to voice mail. |
||
 Feedback