Upgrade Guide for IE 9300 Rugged Series Switches

Introduction

This document describes upgrade methods for IE 9300 Rugged Series Switches.

Requirements

There are no specific requirements for this document.

Components Used

This document contains information related to the software and hardware versions of the IE 9300 Rugged Series Switches.


Note


Consult the appropriate configuration guide for the commands that are used in order to enable these features on other Cisco platforms.


The information in this document was created from the devices in a specific lab environment. All of the devices used in this document started with a cleared (default) configuration. If your network is live, ensure that you understand the potential impact of any command.

Background Information

This document covers new and old upgrade procedures for IE 9300 Rugged Series Switches that use either BUNDLE or INSTALL modes.

Software Installation Modes Overview

Bundle Mode

Bundle mode is a fancy way to say that switch runs the traditional way of Cisco IOS®. You boot a .bin file that contains everything you need to run the Cisco IOS. As per traditional Cisco IOS, you have a boot statement that points to the .bin file you want to load and that gets loaded at the time of boot.

Switch#show boot
---------------------------
Switch 1
---------------------------
Current Boot Variables:
BOOT variable = flash:ie9k_iosxe.17.12.02.SPA.bin;
Boot Variables on next reload:
BOOT variable does not exist
Manual Boot = no
Enable Break = no
Boot Mode = DEVICE
iPXE Timeout = 0

You must set this boot statement with the boot system command. The next time you reload, the switch boots into 17.12.03 rather than 17.12.02.

Switch#configure terminal
Enter configuration commands, one per line.  End with CNTL/Z.
Switch(config)#no boot system
Switch(config)#boot system flash:ie9k_iosxe.17.12.03.SPA.bin
Switch(config)#end
Switch#show run | i boot
boot system switch all flash:ie9k_iosxe.17.12.03.SPA.bin
Switch#show boot
---------------------------
Switch 1
---------------------------
Current Boot Variables:
BOOT variable = flash:ie9k_iosxe.17.12.03.SPA.bin;
Boot Variables on next reload:
BOOT variable does not exist
Manual Boot = yes
Enable Break = no
Boot Mode = DEVICE
iPXE Timeout = 0

Note


When the switches are stacked boot system command set on active switch will be applicable to all members of the stack automatically. In the above example, show run | i boot displays “boot system switch all” which means its applicable for all the switches of the stack.


Install Mode

Install mode is the newer and recommended mode to run. This breaks the .bin file up into smaller .pkg files that must be loaded into memory independently of each other, and allows you to boot faster and utilize memory better. The .bin file that you download from software.cisco.com has all the .pkg files you need inside.


Note


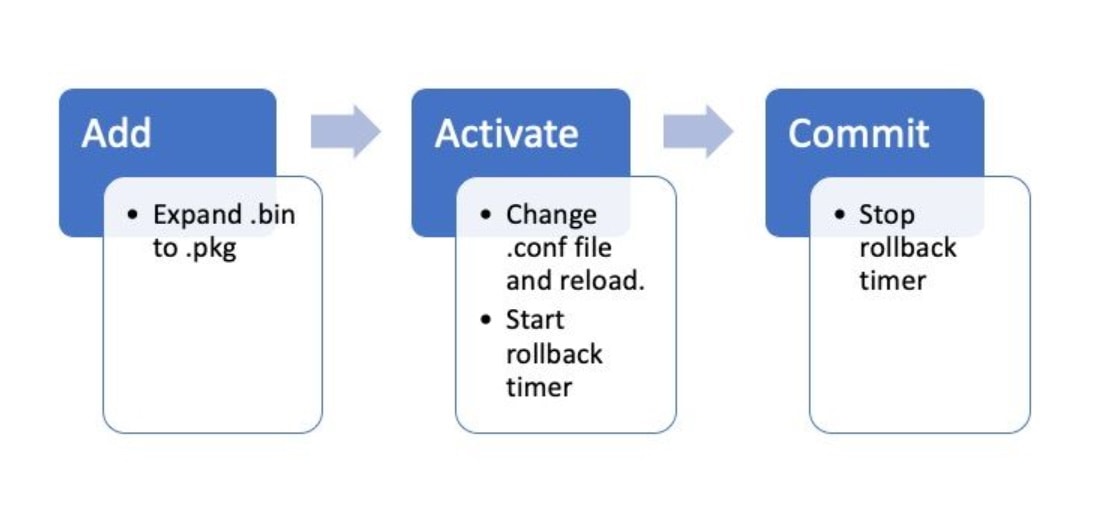
Think of the .bin file as a .zip file. It is able be extracted to obtain the .pkg files. There is also a configuration file that is used to indicate what .pkg files are needed. This is the process that is used when you boot in install mode.


  1. The boot statement is looked at to determine what configuration file to load (usually packages .conf).

  2. The configuration file is opened and used to sort out what .pkg files to load.

  3. The .pkg files are loaded and Cisco IOS completes the boot process.

  • The .conf file is just a text file that is used as a pointer, and you are able open it up and look at it from the CLI.The packages.conf file example shown below is set to load IOS version 17.12.03.


Note


This is done automatically and you never have to edit this file directly. However, you can check what package files the .conf file is pointed to before you do a reload to ensure it is pointed to the right ones.


Switch#more packages.conf
#! /usr/binos/bin/packages_conf.sh
<..snip..>
boot   rp 0 0   rp_boot ie9k-rpboot.17.12.03.SPA.pkg
iso   rp 0 0   rp_base ie9k-rpbase.17.12.03.SPA.pkg
iso   rp 0 0   rp_daemons ie9k-rpbase.17.12.03.SPA.pkg
iso   rp 0 0   rp_iosd ie9k-rpbase.17.12.03.SPA.pkg
iso   rp 0 0   rp_security ie9k-rpbase.17.12.03.SPA.pkg
iso   rp 0 0   rp_webui ie9k-webui.17.12.03.SPA.pkg
iso   rp 0 0   srdriver ie9k-srdriver.17.12.03.SPA.pkg
iso   fp 0 0   fp ie9k-rpbase.17.12.03.SPA.pkg
iso   cc 0 0   cc ie9k-rpbase.17.12.03.SPA.pkg
iso   cc 0 0   cc_srdriver ie9k-srdriver.17.12.03.SPA.pkg
#
# -start- superpackage .pkginfo
#
# pkginfo: Name: rp_super
# pkginfo: BuildTime: 2023-12-07_18.25
# pkginfo: ReleaseDate: Fri-08-Dec-23-02:07
# pkginfo: .BuildArch: arm64
# pkginfo: BootArchitecture: arm64
# pkginfo: .BootArch: arm64
# pkginfo: RouteProcessor: ie9k
# pkginfo: Platform: IE9K
# pkginfo: User: mcpre
# pkginfo: PackageName: universalk9
# pkginfo: Build: 17.12.03
# pkginfo: .SupportedBoards: ie9k
# pkginfo: .InstallModel: 
# pkginfo: .PackageRole: rp_super
# pkginfo: .RestartRole: rp_super
# pkginfo: .UnifiedPlatformList: condor,sonic,clarke_lite,clarke_adv
# pkginfo: CardTypes: 
# pkginfo: .CardTypes: 
# pkginfo: .BuildPath: /nobackup/mcpre/s2c-build-ws/binos/linkfarm/ie9k_universalk9-stage/img/rp_super_universalk9
# pkginfo: .Version: 17.12.03.0.1264.1702002330..IOSXE
# pkginfo: .InstallVersion: 1.0.0
# pkginfo: .InstallCapCommitSupport: yes
# pkginfo: .PKGUID: 11f3b996a6be59e1e4c1b5303df410901527196c
#
# -end- superpackage .pkginfo

When you perform an upgrade in install mode, the process is always the same.

  1. Copy the new .bin file onto the switch.

  2. Extract the .pkg files from the .bin file.

  3. Update the .conf file and reload the device into the new version.

Most of the time all these steps can be accomplished with a single command .


Note


By default all IE-9300 series switches ships in install mode.


To verify the mode the switch is operating on currently use the show version command.

<../snip>
cisco IE-9320-22S2C4X (ARM64) processor with 587715K/3071K bytes of memory.
Processor board ID FDO2713JK6Z
4 Virtual Ethernet interfaces
48 Gigabit Ethernet interfaces
8 Ten Gigabit Ethernet interfaces
2048K bytes of non-volatile configuration memory.
4013980K bytes of physical memory.
523264K bytes of Crash Files at crashinfo:.
523264K bytes of Crash Files at crashinfo-2:.
2650112K bytes of Flash at flash:.
2650112K bytes of Flash at flash-2:.
3883008K bytes of SD Flash at sdflash:.
3883008K bytes of SD Flash at sdflash-2:.
Base Ethernet MAC Address          : 90:eb:50:31:2c:00
Motherboard Assembly Number        : 73-102471-08
Motherboard Serial Number          : FDO271204UJ
Model Revision Number              : 08
Motherboard Revision Number        : 02
Model Number                       : IE-9320-22S2C4X
System Serial Number               : FDO2713JK6Z
Switch Ports Model              SW Version        SW Image              Mode   
------ ----- -----              ----------        ----------            ----   
*    1 29    IE-9320-22S2C4X    17.12.01          IE9K_IOSXE            INSTALL
     2 29    IE-9320-22S2C4X    17.12.01          IE9K_IOSXE            INSTALL

Upgrade Methods

Autoupgrade

Before you begin


Note


This is applicable only when switches are stacked.


If your active switch runs in install mode, your best bet is to use auto upgrade. This allows the active switch to upgrade the Standby switch regardless of what image is loaded onto the standby (bundle/install/etc). However, you must boot the standby into some valid image for the process to start. Auto upgrade does not recover a switch from rommon.

Procedure


Step 1

Enable this command so that the switch automatically upgrades a standby switch if it detects a mismatch.

software auto-upgrade enable

Step 2

Or you are able to run the upgrade manually.

install autoupgrade

Install Mode

This next section talks about use of the install commands.

Process Overview

As discussed, the upgrade is a 4 part process. However, the commands for steps 2-4 are a little cryptic so here is what each command does.

Install Mode Commands

Restrictions

Your boot statement must always be packages.conf in install mode. If you try to change the boot statement to another .conf file while you are in the middle of an upgrade, it could cause the upgrade to fail. If you have already run the ADD command, you need to activate the package you added or clean it out to start over. Do not change your boot statement to an inactive package.

Summary

If you would like to move your switch from Bundle mode to Install mode, you need to first change your boot statement to packages.conf if it is not already then add the .bin file. This means you must copy the new .bin file onto flash either from TFTP or USB or a SD-card. If you have issues copying the file onto the switch because there is not enough space, see the cleanup section of this document to clear out files that are not needed.

  • These commands complete the upgrade and you do not need to do any of the other steps. However, if you do not want to complete the upgrade in one step, it is possible to break it down into each individual step.

    configure terminal
    no boot system
    boot system flash:packages.conf
    end
    write
    install add file flash:<new .bin file> activate commit

Note


When you are migrating from Bundle mode to Install mode for the first time, your only option is the one step install i.e. Use the install add file flash:<new .bin file> activate commit for upgrade.

Below error would be thrown if you opt to do the installation in separate steps

install_add: Adding IMG
 [1] Switch 1 FAILED: Booted in bundle mode. For Bundle-to-Install mode conversion, please use one-shot CLI - install add file <> activate commit


Note


When the switches are stacked boot system command set on active switch will be applicable to all members of the stack automatically.


Install Add
  • When you first start your upgrade you only have your current version.

    Switch#show install summary  
    [ Switch 1 ] Installed Package(s) Information:
    State (St): I - Inactive, U - Activated & Uncommitted,
                C - Activated & Committed, D - Deactivated & Uncommitted
    --------------------------------------------------------------------------------
    Type  St   Filename/Version
    --------------------------------------------------------------------------------
    IMG   C    17.12.01.0.286 
    --------------------------------------------------------------------------------
    Auto abort timer: inactive
    --------------------------------------------------------------------------------
    
  • In order to get started, you must add the new version to the list of versions that you want to work with.

    install add file flash:ie9k_iosxe.17.12.03.SPA.bin
  • Once it is added, you can see the .pkg file in flash and it lists 17.12.03 as an inactive version.

    Switch#dir | include .pkg
    55345   -rw-        540016640   Dec 8 2023 02:37:41 +00:00  ie9k-rpbase.17.13.01.SPA.pkg
    55349   -rw-         14827520   Dec 8 2023 02:36:20 +00:00  ie9k-webui.17.13.01.SPA.pkg
    55346   -rw-          4841472   Dec 8 2023 02:36:17 +00:00  ie9k-srdriver.17.13.01.SPA.pkg
    55328   -rw-         63996816  Apr 24 2024 05:15:28 +00:00  ie9k-rpboot.17.12.03.SPA.pkg
    55331   -rw-        513676280  May 28 2024 06:06:17 +00:00  ie9k-rpbase.17.12.03.SPA.pkg
    55333   -rw-         14345208  May 28 2024 06:04:52 +00:00  ie9k-webui.17.12.03.SPA.pkg
    55332   -rw-          4637692  May 28 2024 06:04:49 +00:00  ie9k-srdriver.17.12.03.SPA.pkg
    55322   -rw-         57870972   Jan 1 2000 10:22:03 +00:00  ie9k-rpboot.17.13.01.SPA.pkg
    Switch#show install inactive
    [ R0 R1 ] Inactive Package(s) Information:
    State (St): I - Inactive, U - Activated & Uncommitted,
                C - Activated & Committed, D - Deactivated & Uncommitted
    --------------------------------------------------------------------------------
    Type  St   Filename/Version
    --------------------------------------------------------------------------------
    IMG   I    17.12.03.0.1264 <-- Installed but still Inactive (I)
Install Activate
  • The next step is to activate the new version. This means reload the switch and load the new version. This edits the .conf file to point to the new .pkg files.

    install activate
  • It asks you to confirm if you want to reload before the device reloads.

    Switch#show install summary
    [ R0 R1 ] Installed Package(s) Information:
    State (St): I - Inactive, U - Activated & Uncommitted,
                C - Activated & Committed, D - Deactivated & Uncommitted
    --------------------------------------------------------------------------------
    Type  St   Filename/Version
    --------------------------------------------------------------------------------
    IMG   U    17.12.03.0.1264
    
    --------------------------------------------------------------------------------
    Auto abort timer: active on install_activate, time before rollback - 01:52:08   <--- when this hits zero, the device reloads back to original version.
    --------------------------------------------------------------------------------
    Switch#show install uncommitted
    [ R0 R1 ] Uncommitted Package(s) Information:
    State (St): I - Inactive, U - Activated & Uncommitted,
                C - Activated & Committed, D - Deactivated & Uncommitted
    --------------------------------------------------------------------------------
    Type  St   Filename/Version
    --------------------------------------------------------------------------------
    IMG   U    17.12.03.0.1264

    Above table show the version 17.12.03 has been activated but not yet committed.


    Note


    Install activate starts a timer in background known as rollback timer with a default of 120 Minutes. The upgrade should be committed before the timer expires.


Install Commit
  • To stop the rollback timer and finish the upgrade process, you need to commit the new version.

    install commit
  • This is the last step in the upgrade process and your new version now shows as the active committed version.

    Switch#show install summary
    [ R0 R1 ] Installed Package(s) Information:
    State (St): I - Inactive, U - Activated & Uncommitted,
                C - Activated & Committed, D - Deactivated & Uncommitted
    --------------------------------------------------------------------------------
    Type  St   Filename/Version
    --------------------------------------------------------------------------------
    IMG   C    17.12.03.0.1264  <--- Now Active and Committed
    
    --------------------------------------------------------------------------------
    Auto abort timer: inactive
    --------------------------------------------------------------------------------
Install Abort

After you have run the activate command and before you commit, if you decide there is something wrong with the new version, you can abort the upgrade. This causes the device to reload again back to the previous version.

install abort
Prompt Level

It is possible to set the prompt-level to none at the end of a install command and it does not ask you yes/no for any questions (normally at the end of the commit command of the upgrade, it asks you if you want to reload). If you set the prompt-level to none, the switch reloads as soon as it is ready to do so.

install add file flash:ie9k_iosxe.17.12.03.SPA.bin activate commit prompt-level none
Auto Abort Timer
  • If an upgrade takes too long, the switch assumes something went wrong and it goes ahead and aborts the upgrade. The default timer is 120 minutes, but you can stop the timer manually if you need to.

    install auto-abort-timer stop
  • You can set the rollback timer when you do the activate step.

    Switch#install activate auto-abort-timer ?
      <30-1200>  Number of minutes the abort-timer is set for

If the upgrade of the switch goes well without any issues.

Bundle Mode

This section describes the classic method of software upgrade with the use of a boot statement that point to the .bin file (versus a .pkg file).


Warning


If you want to upgrade a switch to bundle mode, ensure you have copied the .bin to EVERY switch in the stack!


After you have loaded the Cisco IOS file, all you need to do is change the boot statement and reload.

configure terminal
no boot system
boot system flash:<new filename>
end
write
reload

V-Mismatch


Note


This is applicable only when switches are stacked.


If you get a V-mismatch, this means the software that runs on the switch is different than the active. If you are in install mode, you have the option to resolve this with auto-upgrade. If you are in bundle mode, this is a little tricky to resolve.

Switch#show switch
Switch/Stack Mac Address : f8b7.e206.4900 - Local Mac Address
Mac persistency wait time: Indefinite
                                             H/W   Current
Switch#   Role    Mac Address     Priority Version  State
-------------------------------------------------------------------------------------
 1       Member   701f.5300.fa00     15     V01     V-Mismatch  <---Indicates a version mismatch
*2       Active   f8b7.e206.4900     14     V01     Ready
  • OPTION #1. Remove the mismatched switch from the stack and upgrade it to the correct version then re-add it back to the stack.

  • OPTION #2. You cannot change the boot statement on a mismatched switch. However, if you have access to console and can access the switch rommon, it is possible to manually boot into the correct version.


    Caution


    Ensure you have console access to the switch before you try this, to ensure you are able to recover the switch.


Steps for option #2.

  1. Stack the switch and let it boot to V-Mismatch state.

  2. Delete old images from this switch that you do not want (flash: file system is accessible even if it is mismatched).

  3. Copy the new .bin file you do want to flash.

  4. Power cycle just this switch (it fails to boot since the image is deleted and this drops a switch into rommon).

  5. (From console) manually boot the new image you copied to flash.

  6. Once booted to right image, config is synced from Active.

Switch#dir ?
  /all             List all files
  /recursive       List files recursively
  all-filesystems  List files on all filesystems
  cns:             Directory or file name
  crashinfo-1:     Directory or file name
  crashinfo-2:     Directory or file name
  crashinfo:       Directory or file name
  flash-1:         Directory or file name   <----Flash for switch #1
  flash-2:         Directory or file name   <----Flash for switch #2
  flash:           Directory or file name
  • Use this command once you are in rommon.

    switch: boot flash:ie9k_iosxe.17.12.03.SPA.bin <-- Image you copied that Active is running
  • OPTION #3. The first two options are usually able to recover the switch that is mismatched without the need to bring down the stack. However, if this is a new deployment or the you are okay to reload the whole stack, you have the option to copy the file from the mismatched switch to the rest of the switches and make the rest of the switches match the new switch rather than the other way around. This option could be useful if it is a new deployment and you do not have physical access, as you can accomplish this all from telnet. Once they are in sync, you can upgrade all of them to the right version.

Recover from Rommon

If you get stuck in rommon with no valid image, you have the option to boot the device via SD-Flash or USB.


Note


Console access is required for this option.


  • OPTION #1: you can boot right from a sd-card with the command:

    boot sdflash:ie9k_iosxe.17.12.03.SPA.bin
  • OPTION #2: you can boot right from a USB with the command:

    boot usbflash1:ie9k_iosxe.17.12.03.SPA.bin

Note


More info on rommon recovery is found at the this link: recover_from_corrupt_or_missing_file_image_or_in_rommon_mode .