Configuring QoS
This document describes how to configure quality of service (QoS) by using the modular QoS command-line interface (CLI), or MQC, commands on the Cisco IE-3X00 and ESS3300 switch platforms. With QoS, you can provide preferential treatment to certain types of traffic at the expense of others. When QoS is not configured, the switch offers best-effort service to each packet, regardless of the packet contents or size. It sends the packets without any assurance of reliability, delay bounds, or throughput. MQC provides a comprehensive hierarchical configuration framework for prioritizing or limiting specific streams of traffic
Modular QoS CLI
Modular QoS CLI (MQC) allows users to create traffic policies and attach these policies to interfaces. A traffic policy contains a traffic class and one or more QoS features. You use a traffic class to classify traffic, and the QoS features in the traffic policy determine how to treat the classified traffic.
Modular QoS CLI configuration includes these steps:
Step 1. Define a traffic class.
Use the class-map [match-all | match-any] class-map-name global configuration command to define a traffic class and to enter class-map configuration mode. A traffic class contains three elements: a name, an instruction on how to evaluate the configured match commands (if more than one match command is configured in the class map), and a series of match commands
-
You name the traffic class in the class-map command line to enter class-map configuration mode.
-
You can optionally include keywords to evaluate these match commands by entering class-map match-any or class-map match-all. If you specify match-any, the traffic being evaluated must match one of the specified criteria. If you specify match-all, the traffic being evaluated must match all of the specified criteria. A match-all class map can contain only one match statement, but a match-any class map can contain multiple match statements.
If you do not enter match-all or match-any, the default is to match all.
-
You use the match class-map configuration commands to specify criteria for classifying packets. If a packet matches the specified criteria, that packet is considered a member of the class and is forwarded according to the QoS specifications set in the traffic policy. Packets that fail to meet any of the matching criteria are classified as members of the default traffic class.
Step 2. Create a traffic policy to associate the traffic class with one or more QoS features.
You use the policy-map policy-map-name global configuration command to create a traffic policy and to enter policy-map configuration mode. A traffic policy defines the QoS features to associate with the specified traffic class. A traffic policy contains three elements: a name, a traffic class (specified with the class policy-map configuration command), and the QoS policies configured in the class.
-
You name the traffic policy in the policy-map command line to enter policy-map configuration mode.
-
In policy-map configuration mode, enter the name of the traffic class used to classify traffic to the specified policy, and enter policy-map class configuration mode.
-
In policy-map class configuration mode, you can enter the QoS features to apply to the classified traffic. These include using the set, police, or police aggregate commands for input policy maps or the bandwidth, priority, queue-limit or shape average commands for output policy maps.
 Note |
A packet can match only one traffic class within a traffic policy. If a packet matches more than one traffic class in the traffic policy, the first traffic class defined in the policy is used. To configure more than one match criterion for packets, you can associate multiple traffic classes with a single traffic policy. |
Step 3. Attach the traffic policy to an interface.
You use the service-policy interface configuration command to attach the policy map to an interface for packets entering or leaving the interface. You must specify whether the traffic policy characteristics should be applied to incoming or outgoing packets. For example, entering the service-policy output class1 interface configuration command attaches all the characteristics of the traffic policy named class1 to the specified interface. All packets leaving the specified interface are evaluated according to the criteria specified in the traffic policy named class1.
Note |
If you enter the no policy-map configuration command or the no policy-map policy-map-name global configuration command to delete a policy map that is attached to an interface, the policy map is then detached and deleted. |
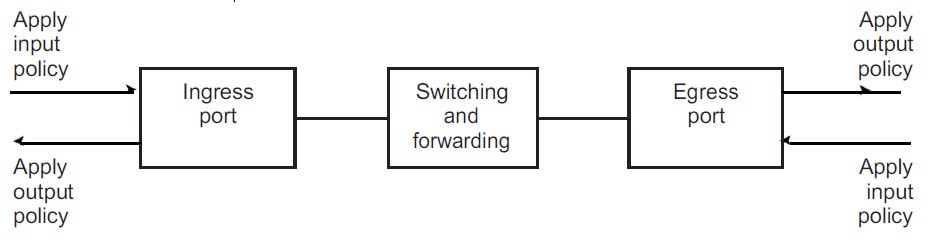
Input and Output Policies
Policy maps are either input policy maps or output policy maps, attached to packets as they enter or leave the switch by service policies applied to interfaces. Input policy maps perform policing and marking on received traffic. Policed packets can be dropped or reduced in priority (marked down) if they exceed the maximum permitted rates. Output policy maps perform scheduling and queuing on traffic as it leaves the switch.
Input policies and output policies have the same basic structure; the difference is in the characteristics that they regulate. You can configure a maximum of 200 policy maps.
Input Policy Maps
Input policy map classification criteria include matching a CoS, DSCP, or matching an access control list (ACL). Input policy maps can have any of these actions:
-
Setting or marking a CoS, or DSCP
-
Policing
The class class-default is used in a policy map for any traffic that does not explicitly match any other class in the policy map. Input policy maps do not support queuing and scheduling keywords, such as bandwidth, queue-limit, priority, and shape average.
An input policy map can have a maximum of 11 classes plus class-default. You can configure a maximum of 11 classes in an input policy.
Output Policy Maps
Output policy map classification criteria include matching a CoS, or DSCP. Output policy maps can have any of these actions:
-
Queuing (queue-limit)
-
Scheduling (bandwidth, priority, and shape average)
Output policy maps do not support matching of access groups.
Output policies do not support marking or policing (except in the case of priority with policing). There is no egress packet marking on the switch (no set command in an output policy)
The class class-default is used in a policy map for any traffic that does not explicitly match any other class in the policy map. There can be a maximum of eight classes in the output policy map (including class-default) because egress ports have a maximum of eight queues.
You can attach an output policy map to any or all ports on the switch. The switch supports configuration and attachment of a unique output policy map for each port. However, these output policy maps can contain only three unique configurations of queue limits. These three unique queue-limit configurations can be included in as many output policy maps as there are ports on the switch. There are no limitations on the configurations of bandwidth, priority, or shaping.
Classification
Classification distinguishes one kind of traffic from another by examining the fields in the packet header. When a packet is received, the switch examines the header and identifies all key packet fields. A packet can be classified based on an ACL, on the DSCP, or CoS.
-
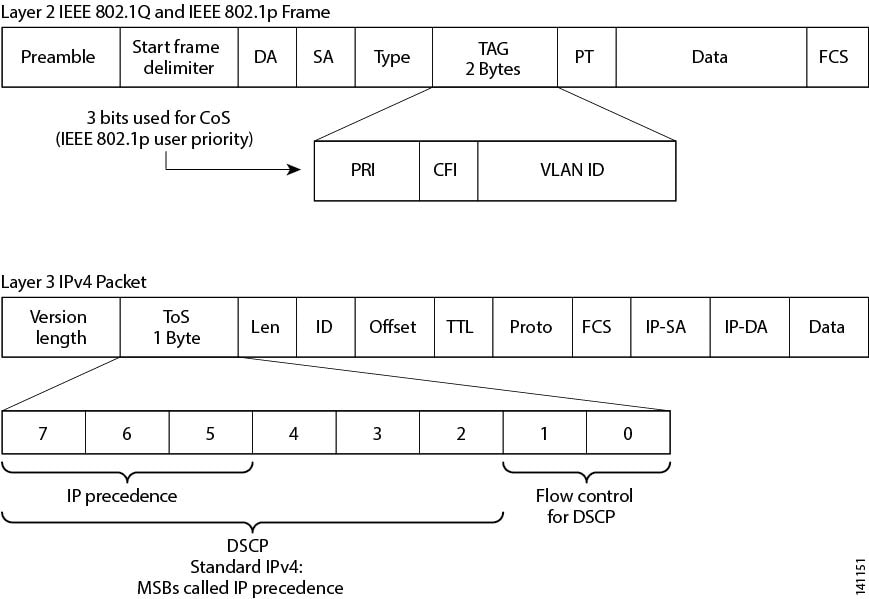
On ports configured as Layer 2 IEEE 802.1Q trunks, all traffic is in 802.1Q frames except for traffic in the native VLAN. Layer 2 802.1Q frame headers have a 2-byte Tag Control Information field that carries the CoS value, called the User Priority bits, in the three most-significant bits, and the VLAN ID value in the 12 least-significant bits. Other frame types cannot carry Layer 2 CoS values.
-
Layer 2 CoS values range from 0 to 7.
-
Both IPv4 and IPv6 packets can carry a DSCP value. QoS supports only the use of DSCP values.
-
Use match on DSCP to classify IPv6 packets.
These sections contain additional information about classification:
Classification Based on Layer 2 CoS
Class Maps
As explained previously, you use an MQC class map to name a specific traffic flow (or class) and to isolate it from all other traffic. A class map defines the criteria used to match against a specific traffic flow to further classify it. If you have more than one type of traffic that you want to classify, you can create another class map and use a different name. When you enter the class-map command with a class-map name, the switch enters the class-map configuration mode. In this mode, you define the match criterion for the traffic by using the match class-map configuration command. After a packet is matched against the class-map criteria, it is acted on by the associated action specified in a policy map.
You can match more than one criterion for classification. You can use the class map match-any class-map name global configuration command to define a classification with any of the listed criteria.
Note |
If you do not enter match-all or match-any, the default is to match all. A match-all class map cannot have more than one classification criterion (match statement). A class map with no match condition has a default of match all. |
The match Command
To configure the type of content used to classify packets, you use the match class-map configuration command to specify the classification criteria. If a packet matches the configured criteria, it belongs to a specific class and is forwarded according to the specified policy. For example, you can use the match class-map command with CoS and IP DSCP values. These values are referred to as markings on a packet. You can also match an access group.
-
In an input policy map, you cannot mix policy-map and class-map to classify IP and non-IP packets within the same policy-map.
-
In an output policy map, no two class maps can have the same match criteria. For example, two different class maps cannot define a class that matches the same DSCP values.
Switch(config)# class-map match-any example
Switch(config-cmap)# match ip dscp 32
Switch(config-cmap)# match ip dscp 40
Switch(config-cmap)# exit
Classification Based on IP DSCP
When you classify IPv4 traffic based on IP DSCP value, and enter the match ip dscp class-map configuration command, you have several classification options:
-
Entering a specific DSCP value (0 to 63).
-
Using the Default service, which corresponds to an IP precedence and DSCP value of 0. The default per-hop behavior (PHB) is usually best-effort service.
-
Using Assured Forwarding (AF) by entering the binary representation of the DSCP value. AF sets the relative probability that a specific class of packets is forwarded when congestion occurs and the traffic does not exceed the maximum permitted rate. AF per-hop behavior provides delivery of IP packets in four different AF classes: AF11-13, AF21-23, AF31-33, and AF41-43. Each AF class could be allocated a specific amount of buffer space and drop probabilities, specified by the binary form of the DSCP number. When congestion occurs, the drop precedence of a packet determines the relative importance of the packet within the class. An AF41 provides the best probability of a packet being forwarded from one end of the network to the other.
-
Entering Class Selector (CS) service values of 1 to 7, corresponding to IP precedence bits in the ToS field of the packet.
-
Using Expedited Forwarding (EF) to specify a low-latency path. This corresponds to a DSCP value of 46. EF services use priority queuing to preempt lower priority traffic classes.
This display shows the available classification options:
Switch(config-cmap)# match ip dscp ?
<0-63> Differentiated services codepoint value
af11 Match packets with AF11 dscp (001010)
af12 Match packets with AF12 dscp (001100)
af13 Match packets with AF13 dscp (001110)
af21 Match packets with AF21 dscp (010010)
af22 Match packets with AF22 dscp (010100)
af23 Match packets with AF23 dscp (010110)
af31 Match packets with AF31 dscp (011010)
af32 Match packets with AF32 dscp (011100)
af33 Match packets with AF33 dscp (011110)
af41 Match packets with AF41 dscp (100010)
af42 Match packets with AF42 dscp (100100)
af43 Match packets with AF43 dscp (100110)
cs1 Match packets with CS1(precedence 1) dscp (001000)
cs2 Match packets with CS2(precedence 2) dscp (010000)
cs3 Match packets with CS3(precedence 3) dscp (011000)
cs4 Match packets with CS4(precedence 4) dscp (100000)
cs5 Match packets with CS5(precedence 5) dscp (101000)
cs6 Match packets with CS6(precedence 6) dscp (110000)
cs7 Match packets with CS7(precedence 7) dscp (111000)
default Match packets with default dscp (000000)
ef Match packets with EF dscp (101110)
For more information on DSCP prioritization, see RFC-2597 (AF per-hop behavior), RFC-2598 (EF), or RFC-2475 (DSCP).
Classification Comparisons
Table 1 shows suggested IP DSCP, IP precedence, and CoS values for typical traffic types.
|
Traffic Type |
DSCP per-hop |
DSCP (decimal) |
IP Precedence |
CoS |
|---|---|---|---|---|
|
Voice-bearer - Traffic in a priority queue or the queue with the highest service weight and lowest drop priority. |
EF |
46 |
5 |
5 |
|
Voice control - Signaling traffic, related to call setup, from a voice gateway or a voice application server. |
AF31 |
26 |
3 |
3 |
|
Video conferencing - in most networks, video conferencing over IP has similar loss, delay, and delay variation requirements as voice over IP traffic. |
AF41 |
34 |
4 |
4 |
|
Streaming video - relatively high bandwidth applications with a high tolerance for loss, delay, and delay variation. Usually considered more important than regular background applications such as e-mail and web browsing. |
AF13 |
14 |
1 |
1 |
|
Mission critical date (gold data) - delay-sensitive applications critical to the operation of an enterprise. Level 1 Level 2 Level 3 |
- - AF21 AF22 AF23 |
- - 18 20 22 |
- - 2 2 2 |
- - 2 2 2 |
|
Less critical data (silver data) - noncritical, but relatively important data. Level 1 Level 2 Level 3 |
- - AF11 AF12 AF13 |
- - 10 12 14 |
- - 1 1 1 |
- - 1 1 1 |
|
Best-effort data (bronze data) - other traffic, including all Default 0 0 0 non interactive traffic, regardless of importance. |
Default |
0 |
0 |
0 |
|
Less than best-effort data—noncritical, bandwidth-intensive data traffic given the least preference. This is the first traffic type to be dropped. Level 1 Level 2 Level 3 |
- |
- - - 2 4 6 |
- - - 0 0 0 |
- - - 0 0 0 |
Classification Based on QoS ACLs
Packets can also be classified in input policy maps based on an ACL lookup. To classify based on ACL lookup, you first create an IPv4, IPv6, or MAC ACL. Configure a class map and use the match access-group {acl-number | acl name} class-map configuration command, and attach the class map to a policy map.
Maximum number of aces under every ACL is 256, including marking action rule configured in an input service policy and implicit rule.
Note |
You cannot configure match access-group for an output policy map. |
You can use IP standard, IP extended, or Layer 2 MAC ACLs to define a group of packets with the same characteristics (a class). You use the access-list global configuration command to configure IP ACLS to classify IP traffic based on Layer 3 and Layer 4 parameters. You use the mac access-list extended global configuration command to configure Layer 2 MAC ACLs to classify IP and non-IP traffic based on Layer 2 parameters.
Note |
You cannot match IP fragments against configured IP extended ACLs to enforce QoS. IP fragments are sent as best-effort. IP fragments are denoted by fields in the IP header. |
You can use only ACLs with a permit action in a match access-group command. ACLs with a deny action are never matched in a QoS policy.
Note |
Only one access-group is supported per class for an input policy map. |
In this example, the class maps in the policy map specify matching criteria for voice, data, and video traffic, and the policy map sets the action for input policing each type of traffic.
Switch(config)# policy-map policy-1
Switch(config-pmap)# class dscp-63
Switch(config-pmap-c)# police cir 10000000 bc 50000
Switch(config-pmap-c)# conform-action transmit
Switch(config-pmap-c)# exceed-action set-cos-transmit 5
Switch(config-pmap-c)# exit
Switch(config-pmap)# class dscp-1
Switch(config-pmap-c)# set cos 0
Switch(config-pmap-c)# exit
Switch(config-pmap)# class dscp-23
Switch(config-pmap-c)# set cos 4
Switch(config-pmap-c)# exit
Classification Based on Layer 2 CoS
You can use the match command to classify Layer 2 traffic based on the CoS value, which ranges from 0 to 7.
Note: A match cos command is supported only on Layer 2 802.1Q trunk ports.
This example shows how to create a class map to match a CoS value of 5:
Switch(config)# class-map premium
Switch(config-cmap)# match cos 5
Switch(config-cmap)# exit
Policing
After a packet is classified, you can use policing as shown in to regulate the class of traffic. The policing function limits the amount of bandwidth available to a specific traffic flow or prevents a traffic type from using excessive bandwidth and system resources. A policer identifies a packet as in or out of profile by comparing the rate of the inbound traffic to the configuration profile of the policer and traffic class. Packets that exceed the permitted average rate or burst rate are out of profile or nonconforming. These packets are dropped or modified (marked for further processing), depending on the policer configuration.
Policing is used primarily on receiving interfaces. You can attach a policy map with a policer only in an input service policy. Policing is not allowed in an output policy map.

Individual Policing
Individual policing applies only to input policy maps. In policy-map configuration mode, you enter the class command followed by class-map name, and enter policy-map class configuration mode.
Cisco Industrial Ethernet Switches support 1-rate, 2-color ingress policing and 2-rate, 3-color policing for individual or aggregate policing.
Note |
There are two limitations to ‘set’ and ‘police’ in ingress policies:
|
For 1-rate, 2-color policing, you use the police policy-map class configuration command to define the policer, the committed rate limitations of the traffic, committed burst size limitations of the traffic, and the action to take for a class of traffic that is below the limits (conform-action) and above the limits (exceed-action). If you do not specify burst size (bc), the system calculates an appropriate burst size value. The calculated value is appropriate for most applications.
When you configure a 2-rate policer, in addition to configuring the committed information rate (CIR) for updating the first token bucket, you also configure the peak information rate (PIR) at which the second token bucket is updated. If you do not configure a PIR, the policer is a standard 1-rate, 2-color policer.
For 2-rate, 3-color policing, you can then optionally set actions to perform on packets that conform to the specified CIR and PIR (conform-action), packets that conform to the PIR, but not the CIR (exceed-action), and packets that exceed the PIR value (violate-action).
-
If you set the CIR value equal to the PIR, a traffic rate that is less than or equal to the CIR is in the conform range. Traffic that exceeds the CIR is in the violate range.
-
If you set the PIR greater than the CIR, a traffic rate less than the CIR is in the conform range. A traffic rate that exceeds the CIR but is less than or equal to the PIR is in the exceed range. A traffic rate that exceeds the PIR is in the violate range.
-
If you do not configure a PIR, the policer is configured as a 1-rate, 2-color policer.
Setting the burst sizes too low can reduce throughput in situations with bursty traffic. Setting burst sizes too high can allow too high a traffic rate.
Note |
The switch supports byte counters for byte-level statistics for conform, exceed, and violate classes in the show policy-map interface privileged EXEC command output. |
To make the policy map effective, you attach it to a physical port by using the service-policy input interface configuration command. Policing is done only on received traffic, so you can only attach a policer to an input service policy.
You can use the conform-action and exceed-action policy-map class configuration commands or the conform-action and exceed-action policy-map class police configuration commands to specify the action to take when the packet conforms to or exceeds the specified traffic rate.
Conform actions are to send the packet without modifications, or to drop the packet. Exceed actions are to drop the packet, to send the packet without modification, to set a new CoS, DSCP, or IP DSCP to a value.
You can use the conform-action, exceed-action, and violate-action policy-map class configuration commands or the conform-action, exceed-action, and violate-action policy-map class police configuration commands to specify the action to take when the packet conforms to or exceeds the specified traffic rates.
You can configure multiple conform and exceed actions simultaneously for each service class. You can configure multiple conform, exceed, and violate actions simultaneously for each service class.
To configure multiple actions in a class, you can enter multiple conform or exceed action entries conform, exceed, or violate action entries in policy-map class police configuration mode, as in this example:
Switch(config)# policy-map map1
Switch(config-pmap)# class class1
Switch(config-pmap-c)# police 100000 500000
Switch(config-pmap-c-police)# conform-action transmit
Switch(config-pmap-c-police)# exceed-action set-cos-transmit 2
Switch(config-pmap-c-police)# exit
Switch(config-pmap-c)# exit
Switch(config-pmap)# exit
Marking
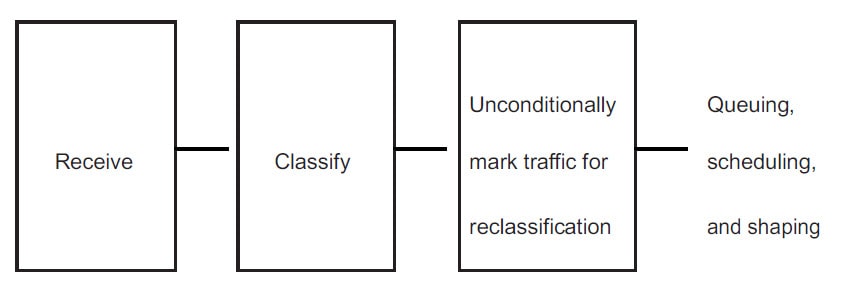
You can use packet marking in input policy maps to set or modify the attributes for traffic belonging to a specific class. After network traffic is organized into classes, you use marking to identify certain traffic types for unique handling. For example, you can change the CoS value in a class or set IP DSCP values for a specific type of traffic. These new values are then used to determine how the traffic should be treated.
Traffic marking is typically performed on a specific traffic type at the ingress port. The marking action can cause the CoS, DSCP, or precedence bits to be rewritten or left unchanged, depending on the configuration. This can increase or decrease the priority of a packet in accordance with the policy used in the QoS domain so that other QoS functions can use the marking information to judge the relative and absolute importance of the packet. The marking function can use information from the policing function or directly from the classification function.
You can specify and mark traffic by using the set commands in a policy map for all supported QoS markings (CoS and IP DSCP). A set command unconditionally marks the packets that match a specific class. You then attach the policy map to an interface as an input policy map.
You can simultaneously configure actions to modify DSCP, precedence, and COS markings in the packet for the same actions.
The following figure shows the steps for marking traffic.
This example uses a policy map to remark a packet. The first marking (the set command) applies to the QoS default class map that matches all traffic not matched by class AF31-AF33 and sets all traffic to an IP DSCP value of 1. The second marking sets the traffic in classes AF31 to AF33 to an IP DSCP of 3.
Switch(config)# policy-map Example
Switch(config-pmap)# class class-default
Switch(config-pmap-c)# set ip dscp 1
Switch(config-pmap-c)# exit
Switch(config-pmap)# class AF31-AF33
Switch(config-pmap-c)# set ip dscp 3
Switch(config-pmap-c)# exit
Switch(config-pmap)# exit
Switch(config)# interface gigabitethernet1/1
Switch(config-if)# service-policy input Example
Switch(config-if)# exit
Congestion Management and Scheduling
Cisco Modular QoS CLI (MQC) provides several related mechanisms to control outgoing traffic flow. They are implemented in output policy maps to control output traffic queues.
Congestion management features allow you to control congestion by determining the order in which packets are sent out an interface based on priorities assigned to those packets. Congestion management entails the creation of queues, assignment of packets to those queues based on the classification of the packet, and scheduling of the packets in a queue for transmission.
You can use different scheduling mechanisms to provide a guaranteed bandwidth to a particular class of traffic while also serving other traffic in a fair way. You can limit the maximum bandwidth that can be consumed by a particular class of traffic and ensure that delay-sensitive traffic in a low-latency queue is sent before traffic in other queues.
The switch supports these scheduling mechanisms:
Traffic shaping
You use the shape average policy-map class command to configure average rate shaping. This command configures a maximum bandwidth for a particular class. The queue bandwidth is restricted to this value even though the port has more bandwidth available. This command supports configuring shape average by either a percentage or by a target bit rate value.
Class-based-weighted-fair-queuing (CBWFQ)
You can use the bandwidth policy-map class configuration command to control the bandwidth allocated to a specific class. Minimum bandwidth can be specified as a percentage of total bandwidth or of remaining bandwidth.
This command supports the following bandwidth configurations:
-
Bandwidth percent—You can use the bandwidth percent policy-map class command to allocate a minimum bandwidth to a particular class. The total sum cannot exceed 100 percent. If the total sum is less than 100 percent, then the rest of the bandwidth is divided equally among all bandwidth queues.
-
Bandwidth Remaining—You use the bandwidth remaining policy-map class command to create a ratio for sharing unused bandwidth in specified queues. Any unused bandwidth will be used by these specific queues in the ratio that is specified by the configuration. Use this command when the priority command is also used for certain queues in the policy.
Priority queuing or class-based priority queuing
You use the priority policy-map class configuration command to specify the priority of a type of traffic over other types of traffic. You can specify strict priority for the known remaining bandwidth among the other traffic queues.
-
To configure strict priority, use only the priority policy-map class configuration command to configure the priority queue. Use the bandwidth remaining percent policy-map class configuration command for the other traffic classes to allocate the excess bandwidth in the desired ratios.
-
To configure priority with unconditional policing, configure the priority queue by using the priority policy-map class configuration command and the police policy-map class configuration command to unconditionally rate-limit the priority queue. In this case, you can configure the other traffic classes with shape average, depending on requirements.
Traffic Shaping
Traffic shaping is a traffic-control mechanism similar to traffic policing. While traffic policing is used in input policy maps, traffic shaping occurs as traffic leaves an interface. The switch can apply class-based shaping to classes of traffic leaving an interface and port shaping to all traffic leaving an interface. Configuring a queue for traffic shaping sets the maximum bandwidth or peak information rate (PIR) of the queue.
Shaping has a buffer associated with it that ensures that packets which do not have enough tokens are buffered as opposed to being immediately dropped. The number of buffers available to the subset of traffic being shaped is limited and is computed based on a variety of factors.
Note |
Shape and priority cannot be configured within the same class in an output policy-map. However, shape and bandwidth can be configured together. |
Class-Based Shaping
Class-based shaping uses the shape average policy-map class configuration command to limit the rate of data transmission as the number of bits per second to be used for the committed information rate for a class of traffic. The switch supports 8 queues per port on the transmit side. The eighth queue is always default queue for class class-default, unclassified traffic.
Switch(config-pmap)# class class-default
Switch(config-pmap-c)# shape average 90000000
Switch(config-pmap-c)# exit
Switch(config)# interface gigabitethernet1/1
Switch(config-if)# service-policy output out-policy
Switch(config-if)# exit
Class-Based Weighted Fair Queuing
You can configure class-based weighted fair queuing (CBWFQ) to set the relative precedence of a queue by allocating a portion of the total bandwidth that is available for the port. You use the bandwidth policy-map class configuration command to set the output bandwidth for a class of traffic as a percentage of total bandwidth, or a percentage of remaining bandwidth.
-
When you use the bandwidth policy-map class configuration command to configure a class of traffic as a percentage of total bandwidth, this represents the minimum bandwidth guarantee (CIR) for that traffic class. This means that the traffic class gets at least the bandwidth indicated by the command, but is not limited to that bandwidth. Any excess bandwidth on the port is allocated to each class in the same ratio in which the CIR rates are configured.
You cannot configure bandwidth as a percentage of total bandwidth when strict priority (priority without police) is configured for another class in the output policy.
-
When you use the bandwidth policy-map class configuration command to configure a class of traffic as a percentage of remaining bandwidth, this represents the portion of the excess bandwidth of the port that is allocated to the class. This means that the class is allocated bandwidth only if there is excess bandwidth on the port, and if there is no minimum bandwidth guarantee for this traffic class.
You can configure bandwidth as percentage of remaining bandwidth only when strict priority (priority without police) is configured for another class in the output policy map.
Note |
You cannot configure bandwidth and traffic shaping (shape average) or priority queuing (priority) for the same class in an output policy map. |
Note |
When you configure CIR bandwidth for a class as a percentage of the total bandwidth, any excess bandwidth remaining after servicing the CIR of all the classes in the policy map is divided among the classes in the same proportion as the CIR rates. If the CIR rate of a class is configured as 0, that class is also not eligible for any excess bandwidth and as a result receives no bandwidth. |
Priority Queuing
You can use the priority policy-map class configuration command to ensure that a particular class of traffic is given preferential treatment. With strict priority queuing, the priority queue is constantly serviced. All packets in the queue are scheduled and sent until the queue is empty. Priority queuing allows traffic for the associated class to be sent before packets in other queues are sent.
Note |
You should exercise care when using the priority command. Excessive use of strict priority queuing might cause congestion in other queues. |
The switch supports strict priority queuing or priority used with the policy-map class submode command.
Strict priority queuing (priority without police) assigns a traffic class to a low-latency queue to ensure that packets in this class have the lowest possible latency. When this is configured, the priority queue is continually serviced until it is empty, possibly at the expense of packets in other queues.
Priority queuing has these restrictions:
-
You can associate the priority command with a single unique class for all attached output polices on the switch.
-
You cannot configure priority and any other scheduling action (shape average or bandwidth) in the same class.
-
You cannot configure priority queuing for the class-default of an output policy map.
This example shows how to configure the class out-class1 as a strict priority queue so that all packets in that class are sent before any other class of traffic. Other traffic queues are configured so that out-class-2 gets 50 percent of the remaining bandwidth and out-class3 gets 20 percent of the remaining bandwidth. The class class-default receives the remaining 30 percent with no guarantees.
Switch(config)# policy-map policy1
Switch(config-pmap)# class out-class1
Switch(config-pmap-c)# priority
Switch(config-pmap-c)# exit
Switch(config-pmap)# class out-class2
Switch(config-pmap-c)# bandwidth remaining percent 50
Switch(config-pmap-c)# exit
Switch(config-pmap)# class out-class3
Switch(config-pmap-c)# bandwidth remaining percent 20
Switch(config-pmap-c)# exit
Switch(config-pmap)# exit
Congestion Avoidance and Queuing
Congestion avoidance uses algorithms such as tail drop to control the number of packets entering the queuing and scheduling stage to avoid congestion and network bottlenecks. You set the queue size limits depending on the markings of the packets in the queue. Each packet that travels through the switch can be assigned to a specific queue and threshold. For example, specific DSCP or CoS values can be mapped to a specific egress queue and threshold. You can specify the queue maximum threshold for the tail drop as number of packets.
Congestion avoidance selects the priority queue to which the packet is enqueued, and then implements the tail-drop mechanisms for individual queues. The tail-drop mechanism uses drop precedence associated with the packet, buffer occupancy levels, and configured thresholds to decide whether to discard the packet.
The following figure shows an example of tail drop operating on a queue with a maximum depth of 999 buffers. Two drop thresholds are allowed per queue. 999 buffers is the maximum for the queue. 600 buffers is the threshold setting for just DSCP 7, which is a subset of the classifiers matched by class "class_dscp_low". The default setting for the queue maximum is 1000 buffers. The maximum queue-limit can only be made smaller.
When the queue becomes congested and fills up with 600 or more buffers, and a new packet arrives marked with DSCP 7, the frame is subject to the 600 buffer limit threshold. The frame is tail dropped because the 600 buffer threshold would be exceeded.
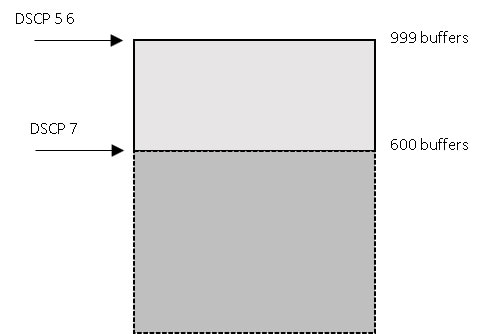
The CLI for this example is shown below.
class-map match-any class_dscp_low
match dscp 5  6  7

policy-map p1
class class_dscp_low
  bandwidth percent 50
  queue-limit 999
  queue-limit dscp 7 600
Queue Limit Configuration
Tail drop is configured by using the queue-limit command in policy-map class sub mode. The command adjusts the queue size (buffer size) associated with a particular class of traffic. You configure the threshold as the number of buffers, where each buffer is a fixed unit of 256 bytes, or as a percentage for the traffic class. Setting a queue limit establishes a drop threshold for the associated traffic when congestion occurs.
Note |
You cannot configure queue size by using the queue-limit command in policy-map class sub mode without first configuring a scheduling action (bandwidth, shape average, or priority). The only exception to this is when you configure queue-limit for the class-default of an output policy map. |
The switch supports up to three unique queue-limit configurations across all output policy maps. Within any queue definition in an output policy map, you can define a maximum of two thresholds. The first is the maximum for the queue. The default queue depth is 1000 buffers. The second is a threshold for a subset of the classifiers (COS or DSCP). However, multiple policy maps can share the same queue-limits. When two policy maps share a queue-limit configuration, all threshold values must be the same for the classes in both policy maps.
You can use these same queue-limit values in multiple output policy maps on the switch. However, changing one of the queue-limit values in a class creates a new, unique queue-limit configuration. You can attach only three unique queue-limit configurations in output policy maps to interfaces at any one time. If you attempt to attach an output policy map with a fourth unique queue-limit configuration, you see this error message:
QoS: Configuration failed. Maximum number of allowable unique queue-limit configurations exceeded.
Note |
When you configure a queue limit for a class in an output policy map, all other output policy maps must use the same match criteria for a class. Only the queue-limit threshold values can be different. For example, when you configure class A queue limit thresholds for dscp 30 and dscp 50 in policy map PM1, and you configure class A queue limits in policy map PM2, you must use dscp 30 and dscp 50 as match criteria. You cannot use dscp 20 and dscp 40. The threshold values can be different, but different threshold values creates a new queue-limit configuration. |
By default, the total amount of buffer space is divided equally among all ports and all queues per port, which is adequate for most applications. You can decrease the queue size for latency-sensitive traffic or increase the queue size for bursty traffic.
Note |
When you use the queue-limit command to configure queue thresholds for a class, the thresholds must be less than or equal to the queue maximum threshold. |
When you configure queue limit, the range for the number of buffers is from 32 to 999, in multiples of 16, where each buffer is a fixed unit of 256 bytes.
Note |
For optimal performance, we strongly recommend that you configure the queue-limit to 272 buffers or less. |
Queue bandwidth and queue size (queue limit) are configured separately and are not interdependent. You should consider the type of traffic being sent when you configure bandwidth and queue-limit:
-
A larger queue limit can better accommodate bursty traffic without packet loss, but at the cost of increased latency.
-
A smaller queue limit reduces latency but is more appropriate for steady traffic flows than for bursty traffic.
-
Very small queue sizes are typically used to optimize priority queuing. For traffic that is priority queued, the buffer size usually needs to accommodate only a few packets; large queue sizes that increase latency are not usually necessary. For high-priority latency-sensitive packets, configure a relatively large bandwidth value along with a relatively small queue size.
These restrictions apply to WTD qualifiers:
-
You can configure only one threshold value for WTD qualifiers (cos, dscp) by using the queue-limit command. However, there is no limit to the number of qualifiers that you can map to these thresholds. You can configure a second threshold value to set the maximum queue by using the queue-limit command with no qualifiers.
-
A WTD qualifier in the queue-limit command must be the same as at least one match criteria in the associated class map.
You can configure and attach as many output policy maps as there are switch ports, but only two unique queue-limit configurations are allowed. When another output policy map uses the same queue-limit and class configurations, even if the bandwidth percentages are different, it is considered to be the same queue-limit configuration.
Default QoS Configuration
There are no policy maps, class maps, or policers configured. At the egress port, all traffic goes to queues assigned a profile index based on CoS and DSCP values.
The packets are not modified (the CoS and DSCP values in the packet are not changed). Traffic is switched in pass-through mode without any rewrites and classified as best effort without any policing.
Restrictions and Limitations
-
You can configure QoS only on physical ports.
-
On a port configured for QoS, all traffic received through the port is classified, policed, and marked according to the input policy map attached to the port. On a trunk port configured for QoS, traffic in all VLANs received through the port is classified, policed, and marked according to the policy map attached to the port.
-
QOS is not supported on logical ports (EtherChannel)
-
Control traffic (such as spanning-tree bridge protocol data units [BPDUs] and routing update packets) received by the switch are subject to all ingress QoS processing.
-
All control packets such as CDP, LLDP, STP, and so on are marked for forwarding from queue 6 of egress ports. Hence, extra packets are included in port counter statistics.
-
You are likely to lose data when you change queue settings; therefore, try to make changes when traffic is at a minimum.
-
When you try to attach a new policy to an interface and this brings the number of policer instances to more than 1024 minus 1 more than the number of interfaces on the switch, you receive an error message, and the configuration fails.
The following table summarizes QoS support and configuration limits.
|
Feature |
Restriction / Limits |
|---|---|
|
QOS groups |
Not supported. |
|
Hierarchical QoS (HQoS) |
Not supported. |
|
Class maps |
|
|
No. of Class-maps in a policy-map |
11 + class default for ingress policies, and 7 + class default for egress policies. |
|
ACLs for QoS |
|
|
No.of ACEs in a policy-map |
256 (Across all classes in a policy). |
|
Match-all with multiple match criteria |
Not supported. |
|
Classmap matching on access-group of different types |
Within a policymap, classmaps matching on access-group of different types is not supported. All classmaps should be matching on the same type of access-group, (mac or ipv4 or ipv6), not a combination of these. |
|
set and police in ingress policies |
|
|
Individual policers |
|
|
bandwidth qos-reference (value) |
No support for this interface level QOS command. |
|
Policer and Marking |
Supported in ingress direction only. |
|
Queueing and scheduling (bandwidth, shaper, priority, queue-limit) |
Supported in egress direction only. |
|
Egress policy maps |
Class maps in egress policy maps do not match on access-group. |
Note |
Refer to previous sections with the description of features listed in the table above for complete information on restrictions and limitations. |
Configuring QoS
Before configuring QoS, review Restrictions and Limitations. You must also have a thorough understanding of these factors:
-
The types of applications used and the traffic patterns on your network.
-
Traffic characteristics and needs of your network. Is the traffic bursty? Do you need to reserve bandwidth for voice and video streams?
-
Bandwidth requirements and speed of the network.
-
Location of congestion points in the network.
These sections describe how to classify, police, and mark incoming traffic, and schedule and queue outgoing traffic.
Depending on your network configuration, you must perform one or more of these tasks:
Using CoS and DSCP to Classify Traffic
This example shows how to create a class map example to define a class that matches any of the listed criteria. In this example, if a packet is received with the DSCP equal to 32 or a 40, the packet is identified (classified) by the class map.
Switch(config)# class-map match-any example
Switch(config-cmap)# match ip dscp 32
Switch(config-cmap)# match ip dscp 40
Switch(config-cmap)# exit
This example defines a class to match packets with a CoS value of 2:
switch(config)# class-map class-cos
switch (config-cmap)# match cos 2
switch (config-cmap) # exit
Using ACLs to Classify Traffic
You can classify IP traffic by using IP standard or IP extended Access Control Lists (ACLs). You can classify IP and non-IP traffic by using Layer 2 MAC ACLs.
The maximum number of Access Control Entries (ACEs) under every ACL is 256, including marking action rule configured in an input service policy and implicit rule.
IPv4 ACLs with range, lt, gt, and neq operations on TCP/UDP source/destination ports are supported. Each range rule consumes 2 port-comparators. The number of port comparators used for each per port comparison option is as follows:
-
Range: Range of TCP/UDP ports—2
-
LT: “Lesser than” port #—1
-
GT: “Greater than” port #—1
-
NEQ: “Not Equal to” port #—1
See Restrictions and Limitations for use of these port comparators.
Creating IP Standard ACLs
Beginning in privileged EXEC mode, follow these steps to create an IP standard ACL for IP traffic:
Note |
Choose from Step 2 OR Step 3 below. |
Procedure
| Command or Action | Purpose | |||
|---|---|---|---|---|
|
Step 1 |
configure terminal |
Enter global configuration mode. |
||
|
Step 2 |
access-list access-list-number permit source [source-wildcard] |
Create an IP standard ACL, repeating the command as many times as necessary.
|
||
|
Step 3 |
ip access-list standard name |
Define a standard IPv4 access list using a name, and enter access-list configuration mode. The name can be a number from 1 to 99. In access-list configuration mode, enter permit source [source-wildcard] |
||
|
Step 4 |
end |
Return to privileged EXEC mode. |
||
|
Step 5 |
show access-lists |
Verify your entries. |
||
|
Step 6 |
copy running-config startup-config |
(Optional) Save your entries in the configuration file. |
What to do next
To delete an access list, use the no access-list access-list-number global configuration command.
This example shows how to allow access for only those hosts on the three specified networks. The wild card bits apply to the host portions of the network addresses.
Switch(config)# access-list 1 permit 192.5.255.0 0.0.0.255
Switch(config)# access-list 1 permit 128.88.0.0 0.0.255.255
Switch(config)# access-list 1 permit 36.0.0.0 0.0.0.255
Creating IP Extended ACLs
Beginning in privileged EXEC mode, follow these steps to create an IP extended ACL for IP traffic::
Procedure
| Command or Action | Purpose | |||
|---|---|---|---|---|
|
Step 1 |
configure terminal |
Enter global configuration mode. |
||
|
Step 2 |
access-list access-list-number permit protocol {source source-wildcard destination destination-wildcard} precedence precedence] tos tos dscp dscp |
Create an IP extended ACL. Repeat the step as many times as necessary.
You can specify source, destination, and wildcards as:
Other keywords are optional and have these meanings:
|
||
|
Step 3 |
ip access-list extended name |
Define an extended IPv4 access list using a name, and enter access-list configuration mode. The name can be a number from 100 to 199. In access-list configuration mode, enter permit protocol {source-wildcard destination destination-wildcard} precedence precedence tos tos dscp dscp as defined in the previous step. |
||
|
Step 4 |
end |
Return to privileged EXEC mode. |
||
|
Step 5 |
show access-lists |
Verify your entries. |
||
|
Step 6 |
copy running-config startup-config |
(Optional) Save your entries in the configuration file. |
What to do next
To delete an access list, use the no access-list access-list-number global configuration command.
This example shows how to create an ACL that permits IP traffic from any source to any destination that has the DSCP value set to 32:
Switch(config)# access-list 100 permit ip any any dscp 32
This example shows how to create an ACL that permits IP traffic from a source host at 10.1.1.1 to a destination host at 10.1.1.2 with a precedence value of 5:
Switch(config)# access-list 100 permit ip host 10.1.1.1 host 10.1.1.2 precedence 5
This example shows how to create access list 103 and configure the class map called class1. The class1 has one match criterion, which is access list 103. It permits traffic from any host to any destination and includes range, lt, gt operator with specific source/destination port:
Switch(config)# access-list 103 permit udp any any lt 102
Switch(config)# access-list 103 permit tcp any any gt 1024
Switch(config)# access-list 103 permit tcp any any range 5555 5560
Switch(config)# access-list 103 permit udp any any range 2327 2499

Switch(config)# class-map match-any class1
Switch(config-cmap)# match access-group 103
Switch(config-cmap)#exit

Switch(config)# policy-map child
Switch(config-pmap)# class 1
Switch(config-pmap-c)# set ip dscp 1
Switch(config-pmap-c)# exit
Creating Layer 2 MAC ACLs
Beginning in privileged EXEC mode, follow these steps to create a Layer 2 MAC ACL for non-IP traffic:
Procedure
| Command or Action | Purpose | |
|---|---|---|
|
Step 1 |
configure terminal |
Enter global configuration mode. |
|
Step 2 |
mac access-list extended name |
Create a Layer 2 MAC ACL by specifying the name of the list and enter extended MAC ACL configuration mode. |
|
Step 3 |
permit {host src-MAC-addr mask | any | host dst-MAC-addr | dst-MAC-addr mask}[type mask] |
Always use the permit keyword for ACLs used as match criteria in QoS policies.
|
|
Step 4 |
end |
Return to privileged EXEC mode. |
|
Step 5 |
show access-lists [access-list-number | access-list-name] |
Verify your entries. |
|
Step 6 |
copy running-config startup-config |
(Optional) Save your entries in the configuration file. |
What to do next
To delete an access list, use the no mac access-list extended access-list-name global configuration command.
This example shows how to create a Layer 2 MAC ACL with two permit statements. The first statement allows traffic from the host with MAC address 0001.0000.0001 to the host with MAC address 0002.0000.0001. The second statement allows only Ethertype XNS-IDP traffic from the host with MAC address 0001.0000.0002 to the host with MAC address 0002.0000.0002.
Switch(config)# mac access-list extended maclist1
Switch(config-ext-macl)# permit 0001.0000.0001 0.0.0 0002.0000.0001 0.0.0
Switch(config-ext-macl)# permit 0001.0000.0002 0.0.0 0002.0000.0002 0.0.0 xns-idp
Switch(config-ext-macl)# exit
Using Class Maps to Define a Traffic Class
You use the class-map global configuration command to name and to isolate a specific traffic flow (or class) from all other traffic. A class map defines the criteria to use to match against a specific traffic flow to further classify it. Match statements can include criteria such as an ACL, CoS value and DSCP values. You define match criterion with one or more match statements entered in the class-map configuration mode.
Follow these guidelines when configuring class maps:
-
A match-all class map cannot have more than one classification criterion (one match statement), but a match-any class map can contain multiple match statements.
-
The match cos command is supported only on Layer 2 802.1Q trunk ports.
-
For an input policy map, you cannot configure an IP classification (match ip dscp, match access-group for an IP ACL) and a non-IP classification (match cos or match access-group for a MAC ACL) in the same policy map or class map.
-
In an output policy map, no two class maps can have the same classification criteria; that is, the same match qualifiers and values.
-
The maximum number of class maps on the switch is 1024.
Beginning in privileged EXEC mode, follow these steps to create a Layer 2 MAC ACL for non-IP traffic:
Procedure
| Command or Action | Purpose | |||
|---|---|---|---|---|
|
Step 1 |
configure terminal |
Enter global configuration mode. |
||
|
Step 2 |
class-map [match-all | match-any] class-map-name |
Create a class map, and enter class-map configuration mode. By default, no class maps are defined.
If no matching statements are specified, the default is match-all.
|
||
|
Step 3 |
match {access-group acl-index-or-name | cos cos-list | ip dscp dscp-list} |
Define the match criterion to classify traffic. By default, no match criterion is defined.
|
||
|
Step 4 |
end |
Return to privileged EXEC mode. |
||
|
Step 5 |
show class-map |
Verify your entries. |
||
|
Step 6 |
copy running-config startup-config |
(Optional) Save your entries in the configuration file. |
What to do next
Use the no form of the appropriate command to delete an existing class map or remove a match criterion.
This example shows how to create access list 103 and configure the class map called class1. The class1 has one match criterion, which is access list 103. It permits traffic from any host to any destination that matches a DSCP value of 10.
Switch(config)# access-list 103 permit any any dscp 10
Switch(config)# class-map class1
Switch(config-cmap)# match access-group 103
Switch(config-cmap)# exit
This example shows how to create a class map called class2, which matches incoming traffic with DSCP values of 10, 11, and 12.
Switch(config)# class-map match-any class2
Switch(config-cmap)# match ip dscp 10 11 12
Switch(config-cmap)# exit
Attaching a Traffic Policy to an Interface
You use the service-policy interface configuration command to attach a traffic policy to an interface and to specify the direction in which the policy should be applied: either an input policy map for incoming traffic or an output policy map for outgoing traffic. Input and output policy maps support different QoS features.
You can attach a service policy only to a physical port. You can attach only one input policy map and one output policy map per port.
Note |
If you enter the no policy-map configuration command or the no policy-map policy-map-name global configuration command to delete a policy map that is attached to an interface, a warning message appears that lists any interfaces from which the policy map is being detached. The policy map is then detached and deleted. For example: |
Beginning in privileged EXEC mode, follow these steps to attach a policy map to a port:
Procedure
| Command or Action | Purpose | |
|---|---|---|
|
Step 1 |
configure terminal |
Enter global configuration mode. |
|
Step 2 |
interface interface-id |
Specify the port to attach to the policy map, and enter interface configuration mode. Valid interfaces are physical ports. |
|
Step 3 |
service-policy {input | output} policy-map-name |
Specify the policy-map name and whether it is an input policy map or an output policy map. |
|
Step 4 |
end |
Return to privileged EXEC mode. |
|
Step 5 |
show policy-map interface [interface-id] |
Verify your entries. |
|
Step 6 |
copy running-config startup-config |
(Optional) Save your entries in the configuration file. |
What to do next
To remove the policy map and port association, use the no service-policy {input | output} policy-map-name interface configuration command.
Configuring Input Policy Maps
Policy maps specify which traffic class to act on and what actions to take. All traffic that fails to meet matching criteria of a traffic class belongs to the default class. Input policy maps regulate traffic entering the switch. In an input policy, you can match CoS, DSCP, or ACLs, and configure individual policing, aggregate policing, or marking to a CoS or DSCP value.
Follow these guidelines when configuring input policy maps:
-
You can attach only one input policy map per port.
-
The maximum number of policy maps configured on the switch is 193.
-
The total number of configurable policer profiles on the switch is 193
-
The maximum number of classes in each input policy map is 7 plus class-default.
-
The number of input policy maps that can be attached in a switch is limited by the availability of hardware resources. If you attempt to attach an input policy map that causes any hardware resource limitation to be exceeded, the configuration fails.
-
After you have attached a single-level policy map to an interface by using the service-policy input interface configuration command, you can modify the policy without detaching it from the interface. You can add or delete classification criteria, add or delete classes, add or delete actions, or change the parameters of the configured actions (policers, rates, mapping, marking, and so on).
-
On an 802.1Q tunnel port, you can use only an input policy map with Layer 2 classification based on MAC ACLs to classify traffic. Input policy maps with Layer 3 classification or with Layer 2 classification based on CoS or VLAN ID are not supported on tunnel ports.
-
Input policy maps support policing and marking, not scheduling or queuing. You cannot configure bandwidth, priority, queue-limit, or shape average in input policy maps.
These sections describe how to configure different types of input policy maps:
Configuring Input Policy Maps with Individual Policing
You use the police policy-map class configuration command to configure individual policers to define the committed rate limitations, committed burst size limitations of the traffic, and the action to take for a class of traffic.
Follow these guidelines when configuring individual policers:
-
Policing is supported only on input policy maps.
-
The switch supports a maximum of 200 policers.
-
Policing is supported only on the ingress port.
-
The number of policer instances on the switch can be 1024 minus 1 more than the number interfaces. The switch supports a maximum of 200 policer profiles.
-
If you do not configure a violate-action, by default the violate class is assigned the same action as the exceed-action.
Follow these guidelines when configuring class maps:
-
A match-all class map cannot have more than one classification criterion (one match statement), but a match-any class map can contain multiple match statements.
-
The match cos command is supported only on Layer 2 802.1Q trunk ports.
-
For an input policy map, you cannot configure an IP classification (match ip dscp, match access-group for an IP ACL) and a non-IP classification (match cos or match access-group for a MAC ACL) in the same policy map or class map.
-
In an output policy map, no two class maps can have the same classification criteria; that is, the same match qualifiers and values.
-
The maximum number of class maps on the switch is 1024.
Note |
In the procedure below, perform Step 5, 6, OR 7. Also, perform Step 8, OR Step 9. |
Beginning in privileged EXEC mode, follow these steps to create an input policy map with individual policing:
Procedure
| Command or Action | Purpose | |||||
|---|---|---|---|---|---|---|
|
Step 1 |
configure terminal |
Enter global configuration mode. |
||||
|
Step 2 |
policy-map policy-map-name |
Create a policy map by entering the policy map name, and enter policy-map configuration mode. By default, no class maps are defined. |
||||
|
Step 3 |
class {class-map-name | class-default} |
Enter a class-map name or class-default to match all unclassified packets, and enter policy-map class configuration mode. If you enter a class-map name, you must have already created the class map by using the class-map global configuration command. |
||||
|
Step 4 |
police {rate-bps | cir cir-bps} [burst-bytes |bc burst-bytes] |
Define a policer for the class of traffic.
|
||||
|
Step 5 |
conform-action [drop | transmit] |
(Optional) Enter the action to be taken on packets that conform to the CIR. |
||||
|
Step 6 |
exceed-action cos {cos_value | cos [table ] | dscp [table ]} |
(Optional) Enter the action to be taken on packets that conform to the CIR.
|
||||
|
Step 7 |
exceed-action [ip] dscp {dscp_value | cos [table ] | dscp [table ]} |
(Optional) Enter the action to be taken on packets that conform to the CIR.
|
||||
|
Step 8 |
exit |
Return to policy-map configuration mode. |
||||
|
Step 9 |
exit |
Return to global configuration mode. |
||||
|
Step 10 |
interface interface-id |
Enter interface configuration mode for the interface to which you want to attach the policy. . |
||||
|
Step 11 |
service-policy input policy-map-name |
Attach the policy map (created in Step 2) to the ingress interface. |
||||
|
Step 12 |
end |
Exit privileged EXEC mode. |
||||
|
Step 13 |
show policy-map [policy-map-name [class class-map-name]] |
Verify your entries. |
||||
|
Step 14 |
copy running-config startup-config |
(Optional) Save your entries in the configuration file. |
What to do next
If you enter the no policy-map configuration command or the no policy-map policy-map-name global configuration command to delete a policy map that is attached to an interface, a warning message appears that lists any interfaces from which the policy map is being detached. The policy map is then detached and deleted. For example:
Warning: Detaching Policy test1 from Interface GigabitEthernet1/17To configure multiple actions in a class, you can enter multiple conform or exceed action entries conform, exceed, or violate action entries in policy-map class police configuration mode, as in this example:
Switch(config)# policy-map map1
Switch(config-pmap)# class class1
Switch(config-pmap-c)# police 100000 500000
Switch(config-pmap-c-police)# conform-action transmit
Switch(config-pmap-c-police)# exceed-action set-cos-transmit 2
Switch(config-pmap-c-police)# exit
Switch(config-pmap-c)# exit
Switch(config-pmap)# exit
Configuring Input Policy Maps with Individual 2-rate, 3-color Policing
Beginning in privileged EXEC mode, follow these steps to create an input policy map with individual 2-rate, 3-color policing:
Note |
In the procedure below, perform Step 5, 6, OR 7. |
Procedure
| Command or Action | Purpose | |
|---|---|---|
|
Step 1 |
configure terminal |
Enter global configuration mode. |
|
Step 2 |
policy-map policy-map-name |
Create a policy map by entering the policy map name, and enter policy-map configuration mode. By default, no class maps are defined. |
|
Step 3 |
class {class-map-name | class-default} |
Enter a class-map name or class-default to match all unclassified packets, and enter policy-map class configuration mode. If you enter a class-map name, you must have already created the class map by using the class-map global configuration command. |
|
Step 4 |
police{rate-bps | cir {cir-bps} [burst-bytes] [bc [conform-burst] [pir pir-bps [be peak-burst]] |
Define a policer using one or two rates—committed information rate (CIR) and peak information rate (PIR) for the class of traffic. By default, no policer is defined.
|
|
Step 5 |
conform-action [drop | transmit] |
(Optional) Enter the action to be taken on packets that conform to the CIR. |
|
Step 6 |
exceed-action [drop | set-cos-transmit {cos_value | [cos ]} | set-dscp-transmit {dscp_value | [dscp]} |
|
|
Step 7 |
violate-action [drop | transmit] |
|
|
Step 8 |
exit |
Return to policy-map configuration mode. |
|
Step 9 |
exit |
Return to global configuration mode. |
|
Step 10 |
interface interface-id |
Enter interface configuration mode for the interface to which you want to attach the policy. . |
|
Step 11 |
service-policy input policy-map-name |
Attach the policy map (created in Step 2) to the ingress interface. |
|
Step 12 |
end |
Exit privileged EXEC mode. |
|
Step 13 |
show policy-map [policy-map-name | interface] |
Verify your entries. |
|
Step 14 |
copy running-config startup-config |
(Optional) Save your entries in the configuration file. |
What to do next
Use the no form of the appropriate command to delete an existing policy map, class map, or policer.
This example shows how to configure 2-rate, 3-color policing using policy-map configuration mode.
Switch(config)# class-map cos-4
Switch(config-cmap)# match cos 4
Switch(config-cmap)# exit
Switch(config)# policy-map in-policy
Switch(config-pmap)# class cos-4
Switch(config-pmap-c)# police cir 5000000 pir 8000000 conform-action transmit exceed-action set-dscp-transmit 24 violate-action drop
Switch(config-pmap-c)# exit
Switch(config-pmap)# exit
Switch(config)# interface gigabitethernet1/1
Switch(config-if)# service-policy input in-policy
Switch(config-if)# exit
This example shows how to create the same configuration using policy-map class police configuration mode.
Switch(config)# class-map cos-4
Switch(config-cmap)# match cos 4
Switch(config-cmap)# exit
Switch(config)# policy-map in-policy
Switch(config-pmap)# class cos-4
Switch(config-pmap-c)# police cir 5000000 pir 8000000
Switch(config-pmap-c-police)# conform-action transmit
Switch(config-pmap-c-police)# exceed-action set-dscp-transmit 24
Switch(config-pmap-c-police)# violate-action drop
Switch(config-pmap-c-police)# end
This example shows how to create a traffic classification with a CoS value of 4, create a policy map, and attach it to an ingress port. The average traffic rate is limited to 10000000 b/s with a burst size of 10000 bytes:
Switch(config)# class-map video-class
Switch(config-cmap)# match cos 4
Switch(config-cmap)# exit
Switch(config)# policy-map video-policy
Switch(config-pmap)# class video-class
Switch(config-pmap-c)# police cir 10000000 bc 10000
Switch(config-pmap-c)# exit
Switch(config-pmap)# exit
Switch(config)# interface gigabitethernet1/1
Switch(config-if)# service-policy input video-policy
Switch(config-if)# exit
This example shows how to use policy-map class police configuration mode to set multiple exceed action. The policy map sets a committed information rate of 23000 bits per second (bps) and a conform burst size of 10000 bytes. The policy map includes conform action and exceed actions (for DSCP and for Layer 2 CoS).
Switch(config)# class-map cos-set-1
Switch(config-cmap)# match cos 3
Switch(config-cmap)# exit
Switch(config)# policy-map map1
Switch(config-pmap)# class cos-set-1
Switch(config-pmap-c)# police cir 23000 bc 10000
Switch(config-pmap-c-police)# conform-action transmit
Switch(config-pmap-c-police)# exceed-action set-dscp-transmit 48
Switch(config-pmap-c-police)# exceed-action set-cos-transmit 5
Switch(config-pmap-c-police)# exit
Switch(config-pmap)# exit
Switch(config)# interface gigabitethernet1/1
Switch(config-if)# service-policy input map1
Switch(config-if)# exit
Configuring Input Policy Maps with Marking
You use the set policy-map class configuration command to set or modify the attributes for traffic belonging to a specific class:.
Beginning in privileged EXEC mode, follow these steps to create an input policy map that marks traffic:
Procedure
| Command or Action | Purpose | |
|---|---|---|
|
Step 1 |
configure terminal |
Enter global configuration mode. |
|
Step 2 |
policy-map policy-map-name |
Create a policy map by entering the policy map name, and enter policy-map configuration mode. |
|
Step 3 |
class {class-map-name | class-default} |
Enter a class-map name, or class-default to match all unclassified packets, and enter policy-map class configuration mode. If you enter a class-map name, you must have already created the class map by using the class-map global configuration command. |
|
Step 4 |
Choose from one of the following:
|
Mark traffic by setting a new value in the packet.
|
|
Step 5 |
exit |
Return to policy-map configuration mode. |
|
Step 6 |
exit |
Return to global configuration mode. |
|
Step 7 |
interface interface-id |
Enter interface configuration mode for the interface to which you want to attach the policy. |
|
Step 8 |
service-policy input policy-map-name |
Attach the policy map (created in Step 2) to the ingress interface. |
|
Step 9 |
end |
Return to privileged EXEC mode. |
|
Step 10 |
show policy-map [policy-map-name [class class-map-name]] |
Verify your entries. |
|
Step 11 |
copy running-config startup-config |
(Optional) Save your entries in the configuration file. |
What to do next
Use the no form of the appropriate command to delete a policy map or remove an assigned CoS or DSCP value.
This example uses a policy map to remark a packet. The first marking (the set command) applies to the QoS default class map that matches all traffic not matched by class AF31-AF33 and sets all traffic to an IP DSCP value of 1. The second marking sets the traffic in classes AF31 to AF33 to an IP DSCP of 3.
Switch(config)# policy-map Example
Switch(config-pmap)# class class-default
Switch(config-pmap-c)# set ip dscp 1
Switch(config-pmap-c)# exit
Switch(config-pmap)# class AF31-AF33
Switch(config-pmap-c)# set ip dscp 3
Switch(config-pmap-c)# exit
Switch(config-pmap)# exit
Switch(config)# interface Gi1/3
Switch(config-if)# service-policy input Example
Switch(config-if)# exit
In this example, the class maps in the policy map specify matching criteria for voice, data, and video traffic, and the policy map sets the action for input policing each type of traffic.
Switch(config)# policy-map policy-1
Switch(config-pmap)# class dscp-63 voice
Switch(config-pmap-c)# police cir 10000000 bc 50000
Switch(config-pmap-c)# conform-action transmit
Switch(config-pmap-c)# exceed-action set-cos-transmit 5
Switch(config-pmap-c)# exit
Switch(config-pmap)# class dscp-1 data
Switch(config-pmap-c)# set cos 0
Switch(config-pmap-c)# exit
Switch(config-pmap)# class dscp-23 video
Switch(config-pmap-c)# set cos 4
Switch(config-pmap-c)# exit
Configuring Output Policy Maps
You use output policy maps to manage congestion avoidance, queuing, and scheduling of packets leaving the switch. The switch has four egress queues, and you use output policy maps to control the queue traffic. You configure shaping, queue-limit, and bandwidth on these queues. You can use high priority (class-based priority queuing). Policing is not supported on output policy maps, except when configuring priority with police for class-based priority queuing. Output policy map classification criteria are matching a CoS, or DSCP.
Follow these guidelines when configuring output policy maps on physical ports:
-
Output policy maps can have a maximum of eight classes, including the class class-default.
-
Classmaps in an output policy map cannot use access-groups.
-
All output policy maps must use the same set of classes, although the actions for each class can differ for each output policy map.
-
You cannot configure class-based priority queuing under the class class-default in an output policy map.
-
In an output policy map, unless priority queuing is configured, the class default receives a minimum bandwidth guarantee equal to the unconfigured bandwidth on the port.
-
After you have attached an output policy map to an interface by using the service-policy interface configuration command, you can change only the parameters of the configured actions (rates, percentages, and so on) or add or delete classification criteria of the class map while the policy map is attached to the interface. To add or delete a class or action, you must detach the policy map from all interfaces, modify it, and then reattach it to interfaces.
If you anticipate that you might need three classes in a policy map, you should define three classes when you create the policy map, even if you are not ready to use all three at that time. You cannot add a class to a policy map after it has been attached to an interface.
-
We recommend configuring the interface to operate a fixed port speed if there's an output policy-map applied that has dependencies on port bandwith. Use the interface level command to fix the port speed and remove the auto negotiation of speed. You can leave the negotiation of duplex. If an output policy-map is configured on a port that is set to auto negotiate speed, and the speed negotiates to a value rate that invalidates the output policy-map, the port is put into error-disabled state.
-
You can attach only one output policy map per port.
-
The maximum number of policy maps configured on the switch is 256.
These sections describe how to configure different types of output policy maps:
Configuring Output Policy Maps with Class-Based-Weighted-Queuing
You use the bandwidth policy-map class configuration command to configure class-based weighted fair queuing (CBWFQ). CBWFQ sets the relative precedence of a queue by allocating a portion of the total bandwidth that is available for the port.
Follow these guidelines when configuring CBWFQ:
Cisco recommends configuring the interface to operate a fixed port speed if there is an output policy-map applied that has dependencies on port bandwith. Use the interface level command to fix the port speed, and remove the auto negotiation of speed. You can leave the negotiation of duplex. If an output policy-map is configured on a port that is set to auto negotiate speed, and the speed negotiates to a value rate that invalidates the output policy-map, the port is put into error-disabled state.
Beginning in privileged EXEC mode, follow these steps to use CBWFQ to control bandwidth allocated to a traffic class by specifying a minimum bandwidth as a bit rate or a percentage:
Procedure
| Command or Action | Purpose | |
|---|---|---|
|
Step 1 |
configure terminal |
Enter global configuration mode. |
|
Step 2 |
policy-map policy-map-name |
Create a policy map by entering the policy map name, and enter policy-map configuration mode. |
|
Step 3 |
class {class-map-name | class-default} |
Enter a child class-map name or class-default to match all unclassified packets, and enter policy-map class configuration mode. |
|
Step 4 |
bandwidth {rate | percent value | remaining value} |
Set output bandwidth limits for the policy-map class.
|
|
Step 5 |
exit |
Return to policy-map configuration mode. |
|
Step 6 |
exit |
Return to global configuration mode.. |
|
Step 7 |
interface interface-id |
Enter interface configuration mode for the interface to which you want to attach the policy. |
|
Step 8 |
service-policy output policy-map-name |
Attach the policy map (created in Step 2) to the egress interface.. |
|
Step 9 |
end |
Return to privileged EXEC mode. |
|
Step 10 |
show policy-map [policy-map-name [class class-map-name]] |
Verify your entries. |
|
Step 11 |
copy running-config startup-config |
(Optional) Save your entries in the configuration file. |
What to do next
After you have created an output policy map, you attach it to an egress port.
Use the no form of the appropriate command to delete an existing policy map, class map, or bandwidth configuration.
Note : If you enter the no policy-map configuration command or the no policy-map policy-map-name global configuration command to delete a policy map that is attached to an interface, a warning message appears that lists any interfaces from which the policy map is being detached. The policy map is then detached and deleted. For example:
Warning: Detaching Policy test1 from Interface GigabitEthernet1/17
This example shows how to set the precedence of a queue by allocating 25 percent of the total available bandwidth to the traffic class defined by the class map:
Switch(config)# policy-map gold_policy
Switch(config-pmap)# class out_class-1
Switch(config-pmap-c)# bandwidth percent 25
Switch(config-pmap-c)# exit
Switch(config-pmap)# exit
Switch(config)# interface GigabitEthernet1/17
Switch(config-if)# service-policy output gold_policy
Switch(config-if)# exit
Configuring Output Policy Maps with Port Shaping
Port shaping is applied to all traffic leaving an interface. It uses a policy map with only class default when the maximum bandwidth for the port is specified by using the shape average command.
Beginning in privileged EXEC mode, follow these steps to use port shaping to configure the maximum permitted average rate for a class of traffic:
Procedure
| Command or Action | Purpose | |
|---|---|---|
|
Step 1 |
configure terminal |
Enter global configuration mode. |
|
Step 2 |
policy-map policy-map-name |
Create a policy map by entering the policy map name, and enter policy-map configuration mode. |
|
Step 3 |
class class-default |
Enter a policy-map class configuration mode for the default class. |
|
Step 4 |
shape average target bps |
Specify the average class-based shaping rate. For target bps, specify the average bit rate in bits per second. The range is from 64000 to 1000000000. |
|
Step 5 |
interface interface-id |
Enter interface configuration mode for the interface to which you want to attach the policy. |
|
Step 6 |
service-policy output policy-map-name |
Attach the policy map (created in Step 2) to the egress interface. |
|
Step 7 |
end |
Return to privileged EXEC mode. |
|
Step 8 |
end |
Return to privileged EXEC mode. |
|
Step 9 |
show policy-map [policy-map-name [class class-map-name]] |
Verify your entries. |
|
Step 10 |
copy running-config startup-config |
(Optional) Save your entries in the configuration file. |
What to do next
Use the no form of the appropriate command to delete an existing hierarchical policy map, to delete a port shaping configuration, or to remove the policy map from the hierarchical policy map.
This example shows how to configure port shaping by configuring a hierarchical policy map that shapes a port to 900 Mbps, allocated according to the out-policy policy map configured in the previous example.
Switch(config)# policy-map out-policy
Switch(config-pmap)# class class-default
Switch(config-pmap-c)# shape average 90000000
Switch(config-pmap-c)# exit
Switch(config)# interface gigabitethernet1/1
Switch(config-if)# service-policy output out-policy
Switch(config-if)# exit
Configuring Output Policy Maps with Class-Based Priority Queuing
You can use the priority policy-map class configuration command to ensure that a particular class of traffic is given preferential treatment. With strict priority queuing, the priority queue is constantly serviced; all packets in the queue are scheduled and sent until the queue is empty. Excessive use of the priority queues can possibly delay packets in other queues and create unnecessary congestion.
You can configure strict priority queuing (priority without police), or you can configure an unconditional priority policer (priority with police). Follow these guidelines when configuring priority queuing:
-
You can associate the priority command with a single unique class for all attached output policies on the switch.
-
When you configure a traffic class as a priority queue, you can configure only police and queue-limit as other queuing actions for the same class. You cannot configure bandwidth or shape average with priority queues in the same class.
-
You cannot associate the priority command with the class-default of the output policy map.
-
When you configure priority queuing without policing for a traffic class, you can only configure the other queues for sharing by using the bandwidth remaining percent policy-map class configuration command to allocate excess bandwidth. This command does not guarantee the allocated bandwidth, but does ensure the rate of distribution.
Beginning in privileged EXEC mode, follow these steps to configure a strict priority queue:
Procedure
| Command or Action | Purpose | |||
|---|---|---|---|---|
|
Step 1 |
configure terminal |
Enter global configuration mode. |
||
|
Step 2 |
class-map class-map-name |
Create classes for three egress queues. Enter match conditions classification for each class. |
||
|
Step 3 |
policy-map policy-map-name |
Create a policy map by entering the policy map name, and enter policy-map configuration mode. |
||
|
Step 4 |
class class-map-name |
Enter the name of the priority class (created by using the class-map global configuration command), and enter policy-map class configuration mode for the priority class. |
||
|
Step 5 |
priority |
Set the strict scheduling priority for this class.
|
||
|
Step 6 |
exit |
Exit policy-map class configuration mode for the priority class. |
||
|
Step 7 |
class class-map-name |
Enter the name of a nonpriority class, and enter policy-map class configuration mode for that class. |
||
|
Step 8 |
bandwidth remaining percent value |
Set output bandwidth limits for the policy-map class as a percentage of the remaining bandwidth. The range is 1 to 100 percent. |
||
|
Step 9 |
exit |
Exit policy-map class configuration mode for the class. |
||
|
Step 10 |
exit |
Return to global configuration mode.. |
||
|
Step 11 |
interface interface-id |
Enter interface configuration mode for the interface to which you want to attach the policy. |
||
|
Step 12 |
service-policy output policy-map-name |
Attach the policy map (created in Step 3) to the egress interface. |
||
|
Step 13 |
end |
Return to privileged EXEC mode. |
||
|
Step 14 |
show policy-map |
Verify your entries. |
||
|
Step 15 |
copy running-config startup-config |
(Optional) Save your entries in the configuration file. |
What to do next
After you have created an output policy map, you attach it to an egress port.
Use the no form of the appropriate command to delete an existing policy map or class map or to cancel strict priority queuing for the priority class or the bandwidth setting for the other classes.
This example shows how to configure the class out-class1 as a strict priority queue so that all packets in that class are sent before any other class of traffic. Other traffic queues are configured so that out-class-2 gets 50 percent of the remaining bandwidth and out-class3 gets 20 percent of the remaining bandwidth. The class class-default receives the remaining 30 percent with no guarantees.
Switch(config)# policy-map policy1
Switch(config-pmap)# class out-class1
Switch(config-pmap-c)# priority
Switch(config-pmap-c)# exit
Switch(config-pmap)# class out-class2
Switch(config-pmap-c)# bandwidth remaining percent 50
Switch(config-pmap-c)# exit
Switch(config-pmap)# class out-class3
Switch(config-pmap-c)# bandwidth remaining percent 20
Switch(config-pmap-c)# exit
Switch(config-pmap)# exit
Switch(config)# interface GigabitEthernet1/17
Switch(config-if)# service-policy output policy1
Switch(config-if)# exit
Configuring Output Policy Maps with Weighted Tail Drop
Weighted tail drop (WTD) adjusts the queue size (buffer size) associated with a traffic class. You configure WTD by using the queue-limit policy-map class configuration command.
Follow these guidelines when configuring WTD:
-
Configuring WTD with the queue-limit command is supported only when you first configure a scheduling action, such as bandwidth, shape average, or priority. The exception to this is when you are configuring queue-limit in the class-default.
-
You can configure and attach as many output policy maps as there are ports, but you can attach only three unique queue-limit configurations in output policy maps to interfaces at any one time. Multiple output policy maps can use the same queue-limit configuration. Changing one of the queue-limit values in a class creates a new, unique queue-limit configuration.
-
When you configure a queue limit for a class in an output policy map, all other output policy maps must use the same match criteria for a class. Only the queue-limit threshold values can be different. For example, when you configure class A queue limit thresholds for dscp 30 and dscp 50 in policy map PM1, and you configure class A queue limits in policy map PM2, you must use dscp 30 and dscp 50 as qualifiers. You cannot use dscp 20 and dscp 40. The threshold values can be different, but different threshold values creates a new queue-limit configuration.
-
When you use the queue-limit command to configure queue thresholds for a class, the WTD thresholds must be less than or equal to the queue-limit threshold configured with no qualifier. A queue size configured with no qualifier must be larger than any queue sizes configured with qualifiers.
-
You cannot configure more than one unique threshold value for the WTD qualifiers (cos or dscp) in the queue-limit command. However, there is no limit to the number of qualifiers that you can map to those thresholds. You can configure a second unique threshold value to set the maximum queue, using the queue-limit command with no qualifiers.
-
In an output policy map, when you configure a queue-limit for a unique class, all other output policy maps must use the same format of qualifier type and qualifier value. Only queue-limit threshold values can be different. For example, when you configure class A queue-limit thresholds for dscp 30 and dscp 50 in policy-map1, and you configure class A queue-limits in policy-map 2, you must use dscp 30 and dscp 50 as qualifiers. You cannot use dscp 20 and dscp 40. The threshold values can be different, but different threshold values would create a new unique queue-limit configuration.
Beginning in privileged EXEC mode, follow these steps to use WTD to adjust the queue size for a traffic class:
Procedure
| Command or Action | Purpose | |||||
|---|---|---|---|---|---|---|
|
Step 1 |
configure terminal |
Enter global configuration mode. |
||||
|
Step 2 |
policy-map policy-map-name |
Create a policy map by entering the policy map name, and enter policy-map configuration mode. |
||||
|
Step 3 |
class {class-map-name | class-default} |
Enter a policy-map class configuration mode for the default class.. |
||||
|
Step 4 |
bandwidth {rate | percent value | remaining percent value} |
Configure a scheduling action for the traffic class. |
||||
|
Step 5 |
queue-limit [cos value | dscp value] number-of-packets [packets] |
Specify the queue size for the traffic class.
The value is specified in packets by default, but the packets keyword is optional.
|
||||
|
Step 6 |
exit |
Return to global configuration mode. |
||||
|
Step 7 |
exit |
Return to global configuration mode. |
||||
|
Step 8 |
interface interface-id |
Enter interface configuration mode for the interface to which you want to attach the policy. |
||||
|
Step 9 |
service-policy output policy-map-name |
Attach the policy map (created in Step 2) to the egress interface.
|
||||
|
Step 10 |
end |
Return to privileged EXEC mode. |
||||
|
Step 11 |
show policy-map [policy-map-name [class class-map-name]] |
Verify your entries. |
||||
|
Step 12 |
copy running-config startup-config |
(Optional) Save your entries in the configuration file. |
What to do next
After you have created an output policy map, you attach it to an egress port.
Use the no form of the appropriate command to delete an existing policy map or class map or to delete a WTD configuration.
This example shows a policy map with a specified bandwidth and queue size. Traffic that is not DSCP 30 is assigned a queue limit of 112 packets. Traffic with a DSCP value of 30 is assigned a queue-limit of 48 packets. All traffic not belonging to the class traffic is classified into class-default, which is configured with 10 percent of the total available bandwidth and a large queue size of 256 packets.
Switch(config)# policy-map gold-policy
Switch(config-pmap)# class traffic
Switch(config-pmap-c)# bandwidth percent 50
Switch(config-pmap-c)# queue-limit 112
Switch(config-pmap-c)# queue-limit dscp 30 48
Switch(config-pmap-c)# exit
Switch(config-pmap)# exit
Switch(config-pmap)# class class-default
Switch(config-pmap-c)# bandwidth percent 10
Switch(config-pmap-c)# queue-limit 256
Switch(config-pmap-c)# exit
Switch(config-pmap)# exit
Switch(config)# interface GigabitEthernet1/17
Switch(config-if)# service-policy output gold-policy
Switch(config-if)# exit
This example configures class A to match DSCP values and a policy map, PM1. The DSCP values of 30, 40, 50, and 60 are mapped to the maximum threshold of 112 packets.
Switch(config)# class-map match-any classA
Switch(config-cmap)# match ip dscp 30 40 50 60
Switch(config-cmap)# exit
Switch(config)# policy-map PM1
Switch(config-pmap)# class classA
Switch(config-pmap-c)# bandwidth percent 50
Switch(config-pmap-c)# queue-limit 112
Switch(config-pmap-c)# exit
Switch(config-pmap)# exit
Switch(config)# interface gigabitethernet 1/1
Switch(config-if)# service-policy output PM1
Switch(config-if)# exit
This example shows how to configure bandwidth and queue limit so that out-class1, out-class2, out-class3, and class-default get a minimum of 40, 20, 10 and 10 percent of the traffic bandwidth, respectively. The corresponding queue-sizes are set to 48, 32, 16 and 272 (256-byte) packets:
Switch(config)# policy-map out-policy
Switch(config-pmap)# class outclass1
Switch(config-pmap-c)# bandwidth percent 40
Switch(config-pmap-c)# queue-limit 48
Switch(config-pmap-c)# exit
Switch(config-pmap)# class outclass2
Switch(config-pmap-c)# bandwidth percent 20
Switch(config-pmap-c)# queue-limit 32
Switch(config-pmap-c)# exit
Switch(config-pmap)# class outclass3
Switch(config-pmap-c)# bandwidth percent 10
Switch(config-pmap-c)# queue-limit 16
Switch(config-pmap-c)# exit
Switch(config-pmap)# class class-default
Switch(config-pmap-c)# bandwidth percent 10
Switch(config-pmap-c)# queue-limit 272
Switch(config-pmap-c)# exit
Switch(config-pmap)# exit
Switch(config)# interface gigabitethernet 1/1
Switch(config-if)# service-policy output out-policy
Switch(config-if)# exit
Displaying QoS Information
To display QoS information, use one or more of the privileged EXEC commands in Table.
This section contains the following topics:
Commands for Displaying Standard QoS Information:
|
Command |
Purpose |
|---|---|
|
show class-map [class-map-name] |
Display QoS class-map information for all class maps or the specified class map. |
|
show policer aggregate [aggregate-policer-name] |
Display information about all aggregate policers or the specified aggregate policer. |
|
show policy-map [policy-map-name | interface [interface-id] [input | output] [class class-name]] |
Display QoS policy map information for the specified policy map name, interface, input or output policy maps, or policy-map class. |
|
show running-config |
Display the configured class maps, policy maps, table maps, and aggregate policers. |
To test full-path QoS in both directions on an interface, you can configure Ethernet terminal loopback by entering the ethernet loopback facility interface configuration command. In terminal loopback mode, the port appears to be up but the link is actually down and no packets are sent out. Configuration changes on the port immediately affect the traffic being looped back.
QoS Statistics
There are several ways to display QoS input and output policy-map statistics.
For input policy maps, you can use the show policy-map interface [interface-id] privileged EXEC command to display per-class per-policer conform and exceed statistics. Policer conform statistics are the number of packets that conform to the configured policer profile; policer exceed statistics are the number of packets that exceed the configured policer profile. The switch does not support per-class classification statistics, but you can determine these statistics by configuring policing at line rate for the class. In this case, no packets exceed the configured policer profile, and the policer conform statistics would equal the class classification statistics.
For output policy maps, you can use the show policy-map interface [interface-id] command to display per-class classification statistics that show the total number of packets that match the specified class. This count includes the total number of packets that are sent and dropped for that class. You can use the same command to view the per-class tail drop statistics.
For details on queue and packets processed details use the CLI command show platform hardware qos asic 0 port [port id].
Portid can be obtained from the CLI show platform pm port-map:
Example:
Switch#show platform pm port-map
interface gid gpn asic slot unit gpn-idb
-------------------------------------------
Te1/1 1 1 0/25 1 1 Yes
Te1/2 2 2 0/27 1 2 Yes
Gi1/3 3 3 0/2 1 3 Yes
Gi1/4 4 4 0/3 1 4 Yes
Gi1/5 5 5 0/0 1 5 Yes
Gi1/6 6 6 0/1 1 6 Yes
Gi1/7 7 7 0/6 1 7 Yes
Gi1/8 8 8 0/7 1 8 Yes
Gi1/9 9 9 0/4 1 9 Yes
Gi1/10 10 10 0/5 1 10 Yes
Gi2/1 11 11 0/10 2 1 Yes
Gi2/2 12 12 0/11 2 2 Yes
Gi2/3 13 13 0/8 2 3 Yes
Gi2/4 14 14 0/9 2 4 Yes
Gi2/5 15 15 0/14 2 5 Yes
Gi2/6 16 16 0/15 2 6 Yes
Gi2/7 17 17 0/12 2 7 Yes
Gi2/8 18 18 0/13 2 8 Yes
Gi2/9 19 19 0/18 2 9 Yes
Gi2/10 20 20 0/19 2 10 Yes
Gi2/11 21 21 0/16 2 11 Yes
Gi2/12 22 22 0/17 2 12 Yes
Gi2/13 23 23 0/22 2 13 Yes
Gi2/14 24 24 0/23 2 14 Yes
Gi2/15 25 25 0/20 2 15 Yes
Gi2/16 26 26 0/21 2 16 Yes
Switch#
Switch#show platform hardware qos asic 0 port 1
Dumping QoS settings for port 1Port | Trust | Modify | Modify | Default | Default| Mode | DSCP | UP | QosProfile | UP---- |------ | ------ | ------ | ---------- | -------1 | L2+L3 | No | No | 65 | 0Queue[0]: Thresh[0]:0 Drops[0]:0 Thresh[1]:0 Drops[1]:0 Thresh[2]:22 Drops[2]:0Queue[1]: Thresh[0]:0 Drops[0]:0 Thresh[1]:0 Drops[1]:0 Thresh[2]:0 Drops[2]:0Queue[2]: Thresh[0]:0 Drops[0]:0 Thresh[1]:0 Drops[1]:0 Thresh[2]:0 Drops[2]:0Queue[3]: Thresh[0]:0 Drops[0]:0 Thresh[1]:0 Drops[1]:0 Thresh[2]:0 Drops[2]:0Queue[4]: Thresh[0]:0 Drops[0]:0 Thresh[1]:0 Drops[1]:0 Thresh[2]:0 Drops[2]:0Queue[5]: Thresh[0]:0 Drops[0]:0 Thresh[1]:0 Drops[1]:0 Thresh[2]:68 Drops[2]:99932Queue[6]: Thresh[0]:0 Drops[0]:0 Thresh[1]:0 Drops[1]:0 Thresh[2]:196 Drops[2]:99932Queue[7]: Thresh[0]:0 Drops[0]:0 Thresh[1]:0 Drops[1]:0 Thresh[2]:104455 Drops[2]:0
Dumping Ingress QoS stats 0

class [0]:    in_class_policer:
				redCntr_packets 0
				yellowCntr_packets 0
				greenCntr_packets 0

class [1]:    in_class_policer:
				redCntr_packets 0
				yellowCntr_packets 0
				greenCntr_packets 0

class [2]:    in_class_policer:
				redCntr_packets 0
				yellowCntr_packets 0
				greenCntr_packets 0

class [3]:    in_class_policer:
				redCntr_packets 0
				yellowCntr_packets 0
				greenCntr_packets 0

class [4]:    in_class_policer:
				redCntr_packets 0
				yellowCntr_packets 0
				greenCntr_packets 0

class [5]:    in_class_policer:
				redCntr_packets 0
				yellowCntr_packets 0
				greenCntr_packets 0

class [6]:    in_class_policer:
				redCntr_packets 0
				yellowCntr_packets 0
				greenCntr_packets 0

class [7]:    in_class_policer:
				redCntr_packets 0
				yellowCntr_packets 0
				greenCntr_packets 0
Switch#
 Feedback