Configuring SSM

Prerequisites for Configuring SSM

The following are the prerequisites for configuring source-specific multicast (SSM) and SSM mapping:

  • To use SSM and SSM mapping, you must enable IP Services feature set on 3560-CX switches.

  • Before you configure SSM mapping, you must perform the following tasks:

    • Enable IP multicast routing.

    • Enable PIM sparse mode.

    • Configure SSM.

  • Before you configure static SSM mapping, you must configure access control lists (ACLs) that define the group ranges to be mapped to source addresses.

  • Before you can configure and use SSM mapping with DNS lookups, you need to add records to a running DNS server. If you do not already have a DNS server running, you need to install one.


    Note

    You can use a product such as Cisco Network Registrar to add records to a running DNS server.

Restrictions for Configuring SSM

The following are the restrictions for configuring SSM:

  • To run SSM with IGMPv3, SSM must be supported in the Cisco IOS router, the host where the application is running, and the application itself.

  • Existing applications in a network predating SSM will not work within the SSM range unless they are modified to support (S, G) channel subscriptions. Therefore, enabling SSM in a network may cause problems for existing applications if they use addresses within the designated SSM range.

  • IGMP Snooping—IGMPv3 uses new membership report messages that might not be correctly recognized by older IGMP snooping switches.

  • Address management is still necessary to some degree when SSM is used with Layer 2 switching mechanisms. Cisco Group Management Protocol (CGMP), IGMP snooping, or Router-Port Group Management Protocol (RGMP) support only group-specific filtering, not (S, G) channel-specific filtering. If different receivers in a switched network request different (S, G) channels sharing the same group, they do not benefit from these existing mechanisms. Instead, both receivers receive all (S, G) channel traffic and filter out the unwanted traffic on input. Because SSM can re-use the group addresses in the SSM range for many independent applications, this situation can lead to decreased traffic filtering in a switched network. For this reason, it is important to use random IP addresses from the SSM range for an application to minimize the chance for re-use of a single address within the SSM range between different applications. For example, an application service providing a set of television channels should, even with SSM, use a different group for each television (S, G) channel. This setup guarantees that multiple receivers to different channels within the same application service never experience traffic aliasing in networks that include Layer 2 devices.

  • In PIM-SSM, the last hop router will continue to periodically send (S, G) join messages if appropriate (S, G) subscriptions are on the interfaces. Therefore, as long as receivers send (S, G) subscriptions, the shortest path tree (SPT) state from the receivers to the source will be maintained, even if the source is not sending traffic for longer periods of time (or even never).

    The opposite situation occurs with PIM-SM, where (S, G) state is maintained only if the source is sending traffic and receivers are joining the group. If a source stops sending traffic for more than 3 minutes in PIM-SM, the (S, G) state is deleted and only reestablished after packets from the source arrive again through the RPT (rendezvous point tree). Because no mechanism in PIM-SSM notifies a receiver that a source is active, the network must maintain the (S, G) state in PIM-SSM as long as receivers are requesting receipt of that channel.

The following are the restrictions for configuring SSM mapping:

  • The SSM Mapping feature does not share the benefit of full SSM. SSM mapping takes a group G join from a host and identifies this group with an application associated with one or more sources, therefore, it can only support one such application per group G. Nevertheless, full SSM applications may still share the same group also used in SSM mapping.

  • Enable IGMPv3 with care on the last hop router when you rely solely on SSM mapping as a transition solution for full SSM.

Information About SSM and SSM Mapping

SSM Components

SSM is a datagram delivery model that best supports one-to-many applications, also known as broadcast applications.

SSM is a core networking technology for Cisco's implementation of IP multicast solutions targeted for audio and video broadcast application environments and is described in RFC 3569. The following components together support the implementation of SSM:

  • Protocol Independent Multicast source-specific mode (PIM-SSM)

  • Internet Group Management Protocol Version 3 (IGMPv3)

Protocol Independent Multicast (PIM) SSM, or PIM-SSM, is the routing protocol that supports the implementation of SSM and is derived from PIM sparse mode (PIM-SM). IGMP is the Internet Engineering Task Force (IETF) standards track protocol used for hosts to signal multicast group membership to routers. IGMP Version 3 supports source filtering, which is required for SSM. IGMP For SSM to run with IGMPv3, SSM must be supported in the router, the host where the application is running, and the application itself.

How SSM Differs from Internet Standard Multicast

The standard IP multicast infrastructure in the Internet and many enterprise intranets is based on the PIM-SM protocol and Multicast Source Discovery Protocol (MSDP). These protocols have proved to be reliable, extensive, and efficient. However, they are bound to the complexity and functionality limitations of the Internet Standard Multicast (ISM) service model. For example, with ISM, the network must maintain knowledge about which hosts in the network are actively sending multicast traffic. With SSM, this information is provided by receivers through the source addresses relayed to the last-hop devices by IGMPv3. SSM is an incremental response to the issues associated with ISM and is intended to coexist in the network with the protocols developed for ISM. In general, SSM provides IP multicast service for applications that utilize SSM.

ISM service is described in RFC 1112. This service consists of the delivery of IP datagrams from any source to a group of receivers called the multicast host group. The datagram traffic for the multicast host group consists of datagrams with an arbitrary IP unicast source address S and the multicast group address G as the IP destination address. Systems will receive this traffic by becoming members of the host group. Membership in a host group simply requires signaling the host group through IGMP Version 1, 2, or 3.

In SSM, delivery of datagrams is based on (S, G) channels. Traffic for one (S, G) channel consists of datagrams with an IP unicast source address S and the multicast group address G as the IP destination address. Systems will receive this traffic by becoming members of the (S, G) channel. In both SSM and ISM, no signaling is required to become a source. However, in SSM, receivers must subscribe or unsubscribe to (S, G) channels to receive or not receive traffic from specific sources. In other words, receivers can receive traffic only from (S, G) channels to which they are subscribed, whereas in ISM, receivers need not know the IP addresses of sources from which they receive their traffic. The proposed standard approach for channel subscription signaling utilizes IGMP INCLUDE mode membership reports, which are supported only in IGMP Version 3.

SSM can coexist with the ISM service by applying the SSM delivery model to a configured subset of the IP multicast group address range. The Internet Assigned Numbers Authority (IANA) has reserved the address range from 232.0.0.0 through 232.255.255.255 for SSM applications and protocols. The software allows SSM configuration for an arbitrary subset of the IP multicast address range from 224.0.0.0 through 239.255.255.255. When an SSM range is defined, an existing IP multicast receiver application will not receive any traffic when it tries to use addresses in the SSM range unless the application is modified to use explicit (S, G) channel subscription or is SSM-enabled through a URL Rendezvous Directory (URD).

SSM Operations

An established network in which IP multicast service is based on PIM-SM can support SSM services. SSM can also be deployed alone in a network without the full range of protocols that are required for interdomain PIM-SM. That is, SSM does not require an RP, so there is no need for an RP mechanism such as Auto-RP, MSDP, or bootstrap router (BSR).

If SSM is deployed in a network that is already configured for PIM-SM, then only the last-hop routers must be upgraded to a software image that supports SSM. Routers that are not directly connected to receivers do not have to upgrade to a software image that supports SSM. In general, these non-last-hop routers must only run PIM-SM in the SSM range. They may need additional access control configuration to suppress MSDP signaling, registering, or PIM-SM shared-tree operations from occurring within the SSM range.

The SSM mode of operation is enabled by configuring the SSM range using the ip pim ssm global configuration command. This configuration has the following effects:

  • For groups within the SSM range, (S, G) channel subscriptions are accepted through IGMPv3 INCLUDE mode membership reports.

  • PIM operations within the SSM range of addresses change to PIM-SSM, a mode derived from PIM-SM. In this mode, only PIM (S, G) Join and Prune messages are generated by the router. Incoming messages related to rendezvous point tree (RPT) operations are ignored or rejected, and incoming PIM register messages are immediately answered with Register-Stop messages. PIM-SSM is backward-compatible with PIM-SM unless a router is a last-hop router. Therefore, routers that are not last-hop routers can run PIM-SM for SSM groups (for example, if they do not yet support SSM).

  • For groups within the SSM range, no MSDP Source-Active (SA) messages within the SSM range will be accepted, generated, or forwarded.

IGMPv3 Host Signaling

IGMPv3 is the third version of the IETF standards track protocol in which hosts signal membership to last-hop routers of multicast groups. IGMPv3 introduces the ability for hosts to signal group membership that allows filtering capabilities with respect to sources. A host can signal either that it wants to receive traffic from all sources sending to a group except for some specific sources (a mode called EXCLUDE) or that it wants to receive traffic only from some specific sources sending to the group (a mode called INCLUDE).

IGMPv3 can operate with both ISM and SSM. In ISM, both EXCLUDE and INCLUDE mode reports are accepted by the last-hop router. In SSM, only INCLUDE mode reports are accepted by the last-hop router.

Benefits of Source Specific Multicast

IP Multicast Address Management Not Required

In the ISM service, applications must acquire a unique IP multicast group address because traffic distribution is based only on the IP multicast group address used. If two applications with different sources and receivers use the same IP multicast group address, then receivers of both applications will receive traffic from the senders of both applications. Even though the receivers, if programmed appropriately, can filter out the unwanted traffic, this situation would cause generally unacceptable levels of unwanted traffic.

Allocating a unique IP multicast group address for an application is still a problem. Most short-lived applications use mechanisms like Session Description Protocol (SDP) and Session Announcement Protocol (SAP) to get a random address, a solution that does not work well with a rising number of applications in the Internet. The best current solution for long-lived applications is described in RFC 2770, but this solution suffers from the restriction that each autonomous system is limited to only 255 usable IP multicast addresses.

In SSM, traffic from each source is forwarded between routers in the network independent of traffic from other sources. Thus different sources can reuse multicast group addresses in the SSM range.

Denial of Service Attacks from Unwanted Sources Inhibited

In SSM, multicast traffic from each individual source will be transported across the network only if it was requested (through IGMPv3, IGMP v3lite, or URD memberships) from a receiver. In contrast, ISM forwards traffic from any active source sending to a multicast group to all receivers requesting that multicast group. In Internet broadcast applications, this ISM behavior is highly undesirable because it allows unwanted sources to easily disturb the actual Internet broadcast source by simply sending traffic to the same multicast group. This situation depletes bandwidth at the receiver side with unwanted traffic and thus disrupts the undisturbed reception of the Internet broadcast. In SSM, this type of denial of service (DoS) attack cannot be made by simply sending traffic to a multicast group.

Easy to Install and Manage

SSM is easy to install and provision in a network because it does not require the network to maintain which active sources are sending to multicast groups. This requirement exists in ISM (with IGMPv1, IGMPv2, or IGMPv3).

The current standard solutions for ISM service are PIM-SM and MSDP. Rendezvous point (RP) management in PIM-SM (including the necessity for Auto-RP or BSR) and MSDP is required only for the network to learn about active sources. This management is not necessary in SSM, which makes SSM easier than ISM to install and manage, and therefore easier than ISM to operationally scale in deployment. Another factor that contributes to the ease of installation of SSM is the fact that it can leverage preexisting PIM-SM networks and requires only the upgrade of last hop routers to support IGMPv3, IGMP v3lite, or URD.

Ideal for Internet Broadcast Applications

The three benefits previously described make SSM ideal for Internet broadcast-style applications for the following reasons:

  • The ability to provide Internet broadcast services through SSM without the need for unique IP multicast addresses allows content providers to easily offer their service (IP multicast address allocation has been a serious problem for content providers in the past).

  • The prevention against DoS attacks is an important factor for Internet broadcast services because, with their exposure to a large number of receivers, they are the most common targets for such attacks.

  • The ease of installation and operation of SSM makes it ideal for network operators, especially in those cases where content needs to be forwarded between multiple independent PIM domains (because there is no need to manage MSDP for SSM between PIM domains).

SSM Mapping Overview

SSM mapping supports SSM transition when supporting SSM on the end system is impossible or unwanted due to administrative or technical reasons. Using SSM to deliver live streaming video to legacy STBs that do not support IGMPv3 is a typical application of SSM mapping.

In a typical STB deployment, each TV channel uses one separate IP multicast group and has one active server host sending the TV channel. A single server may of course send multiple TV channels, but each to a different group. In this network environment, if a router receives an IGMPv1 or IGMPv2 membership report for a particular group G, the report implicitly addresses the well-known TV server for the TV channel associated with the multicast group.

SSM mapping introduces a means for the last hop router to discover sources sending to groups. When SSM mapping is configured, if a router receives an IGMPv1 or IGMPv2 membership report for a particular group G, the router translates this report into one or more (S, G) channel memberships for the well-known sources associated with this group.

When the router receives an IGMPv1 or IGMPv2 membership report for group G, the router uses SSM mapping to determine one or more source IP addresses for group G. SSM mapping then translates the membership report as an IGMPv3 report INCLUDE (G, [S1, G], [S2, G]...[Sn, G] and continues as if it had received an IGMPv3 report. The router then sends out PIM joins toward (S1, G) to (Sn, G) and continues to be joined to these groups as long as it continues to receive the IGMPv1 or IGMPv2 membership reports and as long as the SSM mapping for the group remains the same. SSM mapping, thus, enables you to leverage SSM for video delivery to legacy STBs that do not support IGMPv3 or for applications that do not take advantage of the IGMPv3 host stack.

SSM mapping enables the last hop router to determine the source addresses either by a statically configured table on the router or by consulting a DNS server. When the statically configured table is changed, or when the DNS mapping changes, the router will leave the current sources associated with the joined groups.

Static SSM Mapping

SSM static mapping enables you to configure the last hop router to use a static map to determine the sources sending to groups. Static SSM mapping requires that you configure access lists (ACLs) to define group ranges. The groups permitted by those ACLs then can be mapped to sources using the ip igmp static ssm-map global configuration command.

You can configure static SSM mapping in smaller networks when a DNS is not needed or to locally override DNS mappings that may be temporarily incorrect. When configured, static SSM mappings take precedence over DNS mappings.

DNS-Based SSM Mapping

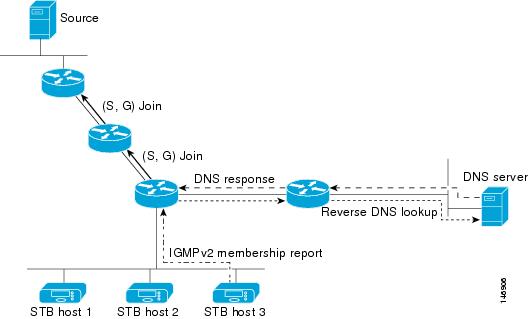
DNS-based SSM mapping enables you to configure the last hop router to perform a reverse DNS lookup to determine sources sending to groups (see the figure below). When DNS-based SSM mapping is configured, the router constructs a domain name that includes the group address G and performs a reverse lookup into the DNS. The router looks up IP address resource records (IP A RRs) to be returned for this constructed domain name and uses the returned IP addresses as the source addresses associated with this group. SSM mapping supports up to 20 sources for each group. The router joins all sources configured for a group.

Figure 1. DNS-Based SSM-Mapping

The SSM mapping mechanism that enables the last hop router to join multiple sources for a group can be used to provide source redundancy for a TV broadcast. In this context, the redundancy is provided by the last hop router using SSM mapping to join two video sources simultaneously for the same TV channel. However, to prevent the last hop router from duplicating the video traffic, it is necessary that the video sources utilize a server-side switchover mechanism where one video source is active while the other backup video source is passive. The passive source waits until an active source failure is detected before sending the video traffic for the TV channel. The server-side switchover mechanism, thus, ensures that only one of the servers is actively sending the video traffic for the TV channel.

To look up one or more source addresses for a group G that includes G1, G2, G3, and G4, the following DNS resource records (RRs) must be configured on the DNS server:

G4.G3.G2.G1 [multicast-domain ] [timeout ]

IN A source-address-1

IN A source-address-2

IN A source-address-n

The multicast-domain argument is a configurable DNS prefix. The default DNS prefix is in-addr.arpa. You should only use the default prefix when your installation is either separate from the internet or if the group names that you map are global scope group addresses (RFC 2770 type addresses that you configure for SSM) that you own.

The timeout argument configures the length of time for which the router performing SSM mapping will cache the DNS lookup. This argument is optional and defaults to the timeout of the zone in which this entry is configured. The timeout indicates how long the router will keep the current mapping before querying the DNS server for this group. The timeout is derived from the cache time of the DNS RR entry and can be configured for each group/source entry on the DNS server. You can configure this time for larger values if you want to minimize the number of DNS queries generated by the router. Configure this time for a low value if you want to be able to quickly update all routers with new source addresses.


Note

Refer to your DNS server documentation for more information about configuring DNS RRs.


To configure DNS-based SSM mapping in the software, you must configure a few global commands but no per-channel specific configuration is needed. There is no change to the configuration for SSM mapping if additional channels are added. When DNS-based SSM mapping is configured, the mappings are handled entirely by one or more DNS servers. All DNS techniques for configuration and redundancy management can be applied to the entries needed for DNS-based SSM mapping.

SSM Mapping Benefits

  • The SSM Mapping feature provides almost the same ease of network installation and management as a pure SSM solution based on IGMPv3. Some additional configuration is necessary to enable SSM mapping.

  • The SSM benefit of inhibition of DoS attacks applies when SSM mapping is configured. When SSM mapping is configured the only segment of the network that may still be vulnerable to DoS attacks are receivers on the LAN connected to the last hop router. Since those receivers may still be using IGMPv1 and IGMPv2, they are vulnerable to attacks from unwanted sources on the same LAN. SSM mapping, however, does protect those receivers (and the network path leading towards them) from multicast traffic from unwanted sources anywhere else in the network.

  • Address assignment within a network using SSM mapping needs to be coordinated, but it does not need assignment from outside authorities, even if the content from the network is to be transited into other networks.

How to Configure SSM and SSM Mapping

Configuring SSM

Follow these steps to configure SSM:

This procedure is optional.

Before you begin

If you want to use an access list to define the Source Specific Multicast (SSM) range, configure the access list before you reference the access list in the ip pim ssm command.

SUMMARY STEPS

  1. enable
  2. configure terminal
  3. ip pim ssm [default | range access-list]
  4. interface type number
  5. ip pim {sparse-mode | sparse-dense-mode}
  6. ip igmp version 3
  7. end
  8. show running-config
  9. copy running-config startup-config

DETAILED STEPS

  Command or Action Purpose
Step 1

enable

Example:


SwitchDevice> enable

Enables privileged EXEC mode.

  • Enter your password if prompted.

Step 2

configure terminal

Example:


SwitchDevice# configure terminal

Enters global configuration mode.

Step 3

ip pim ssm [default | range access-list]

Example:


SwitchDevice(config)# ip pim ssm range 20

Defines the SSM range of IP multicast addresses.

Step 4

interface type number

Example:


SwitchDevice(config)# interface gigabitethernet 
1/0/1

Selects an interface that is connected to hosts on which IGMPv3 can be enabled, and enters the interface configuration mode.

Step 5

ip pim {sparse-mode | sparse-dense-mode}

Example:


SwitchDevice(config-if)# ip pim sparse-dense-mode

Enables PIM on an interface. You must use either sparse mode or sparse-dense mode.

Step 6

ip igmp version 3

Example:


SwitchDevice(config-if)# ip igmp version 3

Enables IGMPv3 on this interface. The default version of IGMP is set to Version 2.

Step 7

end

Example:


SwitchDevice(config)# end

Returns to privileged EXEC mode.

Step 8

show running-config

Example:


SwitchDevice# show running-config 

Verifies your entries.

Step 9

copy running-config startup-config

Example:


SwitchDevice# copy running-config startup-config 

(Optional) Saves your entries in the configuration file.

Configuring SSM Mapping

Configuring Static SSM Mapping

Follow these steps to configure static SSM Mapping:

SUMMARY STEPS

  1. enable
  2. configure terminal
  3. ip igmp ssm-map enable
  4. no ip igmp ssm-map query dns
  5. ip igmp ssm-map static access-list source-address
  6. end
  7. show running-config
  8. copy running-config startup-config

DETAILED STEPS

  Command or Action Purpose
Step 1

enable

Example:


SwitchDevice> enable

Enables privileged EXEC mode.

  • Enter your password if prompted.

Step 2

configure terminal

Example:


SwitchDevice# configure terminal

Enters global configuration mode.

Step 3

ip igmp ssm-map enable

Example:


SwitchDevice(config)# ip igmp ssm-map enable

Enables SSM mapping for groups in the configured SSM range.

Note 

By default, this command enables DNS-based SSM mapping.

Step 4

no ip igmp ssm-map query dns

Example:


SwitchDevice(config)# no ip igmp ssm-map query dns

(Optional) Disables DNS-based SSM mapping.

Note 

Disable DNS-based SSM mapping if you only want to rely on static SSM mapping. By default, the ip igmp ssm-map command enables DNS-based SSM mapping.

Step 5

ip igmp ssm-map static access-list source-address

Example:


SwitchDevice(config)# ip igmp ssm-map static 11 172.16.8.11

Configures static SSM mapping.

  • The ACL supplied for the access-list argument defines the groups to be mapped to the source IP address entered for the source-address argument.

Note 

You can configure additional static SSM mappings. If additional SSM mappings are configured and the router receives an IGMPv1 or IGMPv2 membership report for a group in the SSM range, the switch determines the source addresses associated with the group by walking each configured ip igmp ssm-map static command. The switch associates up to 20 sources per group.

Repeat Step to configure additional static SSM mappings, if required.

Step 6

end

Example:


SwitchDevice(config)# end

Returns to privileged EXEC mode.

Step 7

show running-config

Example:


SwitchDevice# show running-config 

Verifies your entries.

Step 8

copy running-config startup-config

Example:


SwitchDevice# copy running-config startup-config 

(Optional) Saves your entries in the configuration file.

Configuring DNS-Based SSM Mapping (CLI)

Perform this task to configure the last hop router to perform DNS lookups to learn the IP addresses of sources sending to a group.

Before you begin

  • Enable IP multicast routing, enable PIM sparse mode, and configure SSM before performing this task. For more information, see the "Configuring Basic Multicast"module.

  • Before you can configure and use SSM mapping with DNS lookups, you need to be able to add records to a running DNS server. If you do not already have a DNS server running, you need to install one.

SUMMARY STEPS

  1. enable
  2. configure terminal
  3. ip igmp ssm-map enable
  4. ip igmp ssm-map query dns
  5. ip domain multicast domain-prefix
  6. ipname-server server-address1 [server-address2 server-address6 ]
  7. Repeat Step 6 to configure additional DNS servers for redundancy, if required.
  8. end
  9. show running-config
  10. copy running-config startup-config

DETAILED STEPS

  Command or Action Purpose
Step 1

enable

Example:

Device# enable

Enables privileged EXEC mode.

Enter your password if prompted.

Step 2

configure terminal

Example:

Device# configure terminal

Enters global configuration mode.

Step 3

ip igmp ssm-map enable

Example:

Device(config)# ip igmp ssm-map enable

Enables SSM mapping for groups in a configured SSM range.

Step 4

ip igmp ssm-map query dns

Example:

Device(config)# ip igmp ssm-map query dns

(Optional) Enables DNS-based SSM mapping.

  • By default, the ip igmp ssm-map command enables DNS-based SSM mapping. Only the no form of this command is saved to the running configuration.

Note 

Use this command to reenable DNS-based SSM mapping if DNS-based SSM mapping is disabled.

Step 5

ip domain multicast domain-prefix

Example:


Device(config)# ip domain multicast ssm-map.cisco.com

(Optional) Changes the domain prefix used by the Cisco IOS XE software for DNS-based SSM mapping.

  • By default, the software uses the ip-addr.arpa domain prefix.

Step 6

ipname-server server-address1 [server-address2 server-address6 ]

Example:


Device(config)# ip name-server 10.48.81.21

Specifies the address of one or more name servers to use for name and address resolution.

Step 7

Repeat Step 6 to configure additional DNS servers for redundancy, if required.

--

Step 8

end

Example:


Device(config-if)# end 

Returns to privileged EXEC mode.

Step 9

show running-config

Example:

Device# show running-config 

Verifies your entries.

Step 10

copy running-config startup-config

Example:

Device# copy running-config startup-config 

(Optional) Saves your entries in the configuration file.

Configuring Static Traffic Forwarding with SSM Mapping

Follow these steps to configure static traffic forwarding with SSM mapping on the last hop router:

SUMMARY STEPS

  1. enable
  2. configure terminal
  3. interface interface-id
  4. ip igmp static-group group-address source ssm-map
  5. end
  6. show running-config
  7. copy running-config startup-config

DETAILED STEPS

  Command or Action Purpose
Step 1

enable

Example:


SwitchDevice> enable

Enables privileged EXEC mode.

  • Enter your password if prompted.

Step 2

configure terminal

Example:


SwitchDevice# configure terminal

Enters global configuration mode.

Step 3

interface interface-id

Example:


SwitchDevice(config)# interface 
gigabitethernet 1/0/1

Selects an interface on which to statically forward traffic for a multicast group using SSM mapping, and enters interface configuration mode.

Note 

Static forwarding of traffic with SSM mapping works with either DNS-based SSM mapping or statically configured SSM mapping.

Step 4

ip igmp static-group group-address source ssm-map

Example:


SwitchDevice(config-if)# ip igmp 
static-group 239.1.2.1 source 
ssm-map

Configures SSM mapping to statically forward a (S, G) channel from the interface.

Use this command if you want to statically forward SSM traffic for certain groups. Use DNS-based SSM mapping to determine the source addresses of the channels.

Step 5

end

Example:


SwitchDevice(config)# end

Returns to privileged EXEC mode.

Step 6

show running-config

Example:


SwitchDevice# show running-config 

Verifies your entries.

Step 7

copy running-config startup-config

Example:


SwitchDevice# copy running-config startup-config 

(Optional) Saves your entries in the configuration file.

Verifying SSM Mapping Configuration and Operation

Follow these steps to verify SSM mapping configuration and operation:

SUMMARY STEPS

  1. enable
  2. show ip igmp ssm-mapping
  3. show ip igmp ssm-mapping group-address
  4. show ip igmp groups [group-name | group-address | interface-type interface-number ] [detail ]
  5. show host
  6. debug ip igmp group-address

DETAILED STEPS

  Command or Action Purpose
Step 1

enable

Example:


SwitchDevice> enable

Enables privileged EXEC mode.

  • Enter your password if prompted.

Step 2

show ip igmp ssm-mapping

Example:


SwitchDevice# show ip igmp ssm-mapping
SSM Mapping  : Enabled
DNS Lookup   : Enabled
Mcast domain : ssm-map.cisco.com
Name servers : 10.0.0.3
               10.0.0.4

(Optional) Displays information about SSM mapping configuration.

Step 3

show ip igmp ssm-mapping group-address

Example:


SwitchDevice# show ip igmp ssm-mapping 232.1.1.4
Group address: 232.1.1.4
Database     : DNS
DNS name     : 4.1.1.232.ssm-map.cisco.com
Expire time  : 860000
Source list  : 172.16.8.5
             : 172.16.8.6

(Optional) Displays the sources that SSM mapping uses for a particular group.

The example here shows information about the configured DNS-based SSM mapping. Here the router has used DNS-based mapping to map group 232.1.1.4 to sources 172.16.8.5 and 172.16.8.6. The timeout for this entry is 860000 milliseconds (860 seconds).

Step 4

show ip igmp groups [group-name | group-address | interface-type interface-number ] [detail ]

Example:


SwitchDevice# show ip igmp group 232.1.1.4 detail
            Interface:      GigabitEthernet2/0/0
            Group:          232.1.1.4 SSM 
            Uptime:         00:03:20
            Group mode:     INCLUDE
            Last reporter:  0.0.0.0
            CSR Grp Exp:    00:02:59
            Group source list: (C - Cisco Src Report, U - URD, R - Remote,
                                S - Static, M - SSM Mapping)
              Source Address   Uptime    v3 Exp   CSR Exp   Fwd  Flags
              172.16.8.3       00:03:20  stopped   00:02:59  Yes  CM
              172.16.8.4       00:03:20  stopped   00:02:59  Yes  CM
              172.16.8.5       00:03:20  stopped   00:02:59  Yes  CM
              172.16.8.6       00:03:20  stopped   00:02:59  Yes  CM

(Optional) Displays the multicast groups with receivers that are directly connected to the router and that were learned through IGMP.

In the example the “M” flag indicates that SSM mapping is configured.

Step 5

show host

Example:


SwitchDevice# show host 
Default domain is cisco.com 
Name/address lookup uses domain service 
Name servers are 10.48.81.21 
Codes: UN - unknown, EX - expired, OK - OK, ?? - revalidate 
       temp - temporary, perm - permanent 
       NA - Not Applicable None - Not defined
Host                      Port   Flags      Age   Type    Address(es)
10.0.0.0.ssm-map.cisco.c  None  (temp, OK)   0     IP     172.16.8.5 
                                                          172.16.8.6 
                                                          172.16.8.3 

(Optional) Displays the default domain name, the style of name lookup service, a list of name server hosts, and the cached list of hostnames and addresses.

Step 6

debug ip igmp group-address

Example:

SwitchDevice# debug ip igmp 
IGMP(0): Convert IGMPv2 report (*,232.1.2.3) to IGMPv3 with 2 source(s) using STATIC.
SwitchDevice# debug ip igmp 
IGMP(0): Convert IGMPv2 report (*,232.1.2.3) to IGMPv3 with 2 source(s) using DNS.
SwitchDevice# debug ip igmp 
IGMP(0): DNS source lookup failed for (*, 232.1.2.3), IGMPv2 report failed

(Optional) Displays the IGMP packets received and sent and IGMP host-related events.

In the first example, the output indicates that the router is converting an IGMPv2 join for group G into an IGMPv3 join.

In the second example, the output indicates that a DNS lookup has succeeded.

In the third example, the output indicates that DNS-based SSM mapping is enabled and a DNS lookup has failed:

Monitoring SSM and SSM Mapping

Monitoring SSM

To monitor SSM, use the following commands in privileged EXEC mode, as needed:

Command

Purpose


SwitchDevice# show ip igmp groups detail 

Displays the (S, G) channel subscription through IGMPv3.


SwitchDevice# show ip mroute 

Displays whether a multicast group supports SSM service or whether a source-specific host report was received.

Monitoring SSM Mapping

Use the privileged EXEC commands in the following table to monitor SSM mapping.

Table 1. SSM Mapping Monitoring Commands

Command

Purpose

SwitchDevice# show ip igmp ssm-mapping

Displays information about SSM mapping.

SwitchDevice#show ip igmp ssm-mapping group-address

Displays the sources that SSM mapping uses for a particular group.

SwitchDevice#show ip igmp groups [group-name | group-address | interface-type interface-number] [detail]

Displays the multicast groups with receivers that are directly connected to the router and that were learned through IGMP.

SwitchDevice#show host

Displays the default domain name, the style of name lookup service, a list of name server hosts, and the cached list of hostnames and addresses.

SwitchDevice#debug ip igmp group-address

Displays the IGMP packets received and sent and IGMP host-related events.

Configuration Examples for SSM and SSM Mapping

SSM with IGMPv3 Example

The following example shows how to configure a device (running IGMPv3) for SSM:


ip multicast-routing 
!
interface GigabitEthernet3/1/0 
 ip address 172.21.200.203 255.255.255.0 
 description backbone interface 
	ip pim sparse-mode 
! 
interface GigabitEthernet3/2/0 
	ip address 131.108.1.2 255.255.255.0 
	ip pim sparse-mode 
	description ethernet connected to hosts 
	ip igmp version 3 
! 
ip pim ssm default 

SSM Filtering Example

The following example shows how to configure filtering on legacy RP routers running software releases that do not support SSM routing. This filtering will suppress all unwanted PIM-SM and MSDP traffic in the SSM range. Without this filtering, SSM will still operate, but there may be additional RPT traffic if legacy first hop and last hop routers exist in the network.


ip access-list extended  no-ssm-range
  deny   ip any 232.0.0.0 0.255.255.255 ! SSM range
  permit ip any any
! Deny registering in SSM range
ip pim accept-register list no-ssm-range
ip access-list extended msdp-nono-list
  deny   ip any 232.0.0.0 0.255.255.255 ! SSM Range
  ! .
  ! .
  ! .
  ! See ftp://ftpeng.cisco.com/ipmulticast/config-notes/msdp-sa-filter.txt for other SA
  ! messages that typically need to be filtered.
  permit ip any any
! Filter generated SA messages in SSM range. This configuration is only needed if there
! are directly connected sources to this router. The “ip pim accept-register” command
! filters remote sources.
ip msdp redistribute list msdp-nono-list
! Filter received SA messages in SSM range. “Filtered on receipt” means messages are
! neither processed or forwarded. Needs to be configured for each MSDP peer.
ip msdp sa-filter in msdp-peer1 list msdp-nono-list
! .
! .
! .
ip msdp sa-filter in msdp-peerN list msdp-nono-list

SSM Mapping Example

The following configuration example shows a router configuration for SSM mapping. This example also displays a range of other IGMP and SSM configuration options to show compatibility between features. Do not use this configuration example as a model unless you understand all of the features used in the example.


Note

Address assignment in the global SSM range 232.0.0.0/8 should be random. If you copy parts or all of this sample configuration, make sure to select a random address range but not 232.1.1.x as shown in this example. Using a random address range minimizes the possibility of address collision and may prevent conflicts when other SSM content is imported while SSM mapping is used.


!
no ip domain lookup
ip domain multicast ssm.map.cisco.com
ip name-server 10.48.81.21
!
!
ip multicast-routing distributed
ip igmp ssm-map enable
ip igmp ssm-map static 10 172.16.8.10
ip igmp ssm-map static 11 172.16.8.11
!
!
.
.
.
!
interface GigabitEthernet0/0/0
 description Sample IGMP Interface Configuration for SSM-Mapping Example
 ip address 10.20.1.2 255.0.0.0
 ip pim sparse-mode
 ip igmp last-member-query-interval 100
 ip igmp static-group 232.1.2.1 source ssm-map
 ip igmp version 3
 ip igmp explicit-tracking
 ip igmp limit 2
 ip igmp v3lite
 ip urd   
!
.
.
.
!
ip pim ssm default
!
access-list 10 permit 232.1.2.10
access-list 11 permit 232.1.2.0 0.0.0.255
!

This table describes the significant commands shown in the SSM mapping configuration example.

Table 2. SSM Mapping Configuration Example Command Descriptions

Command

Description

no ip domain lookup

Disables IP DNS-based hostname-to-address translation.

Note 

The no ip domain-list command is shown in the configuration only to demonstrate that disabling IP DNS-based hostname-to-address translation does not conflict with configuring SSM mapping. If this command is enabled, the Cisco IOS XE software will try to resolve unknown strings as hostnames.

ip domain multicast ssm-map.cisco.com

Specifies ssm-map.cisco.com as the domain prefix for SSM mapping.

ip name-server 10.48.81.21

Specifies 10.48.81.21 as the IP address of the DNS server to be used by SSM mapping and any other service in the software that utilizes DNS.

ip multicast-routing

Enables IP multicast routing.

ip igmp ssm-map enable

Enables SSM mapping.

ip igmp ssm-map static 10 172.16.8.10

Configures the groups permitted by ACL 10 to use source address 172.16.8.10.

  • In this example, ACL 10 permits all groups in the 232.1.2.0/25 range except 232.1.2.10.

ip igmp ssm-map static 11 172.16.8.11

Configures the groups permitted by ACL 11 to use source address 172.16.8.11.

  • In this example, ACL 11 permits group 232.1.2.10.

ip pim sparse-mode

Enables PIM sparse mode.

ip igmp last-member-query-interval 100

Reduces the leave latency for IGMPv2 hosts.

Note 

This command is not required for configuring SSM mapping; however, configuring this command can be beneficial for IGMPv2 hosts relying on SSM mapping.

ip igmp static-group 232.1.2.1 source ssm-map

Configures SSM mapping to be used to determine the sources associated with group 232.1.2.1. The resulting (S, G) channels are statically forwarded.

ip igmp version 3

Enables IGMPv3 on this interface.

Note 

This command is shown in the configuration only to demonstrate that IGMPv3 can be configured simultaneously with SSM mapping; however, it is not required.

ip igmp explicit-tracking

Minimizes the leave latency for IGMPv3 host leaving a multicast channel.

Note 

This command is not required for configuring SSM mapping.

ip igmp limit 2

Limits the number of IGMP states resulting from IGMP membership states on a per-interface basis.

Note 

This command is not required for configuring SSM mapping.

ip igmp v3lite

Enables the acceptance and processing of IGMP v3lite membership reports on this interface.

Note 

This command is shown in the configuration only to demonstrate that IGMP v3lite can be configured simultaneously with SSM mapping; however, it is not required.

ip urd

Enables interception of TCP packets sent to the reserved URD port 465 on an interface and processing of URD channel subscription reports.

Note 

This command is shown in the configuration only to demonstrate that URD can be configured simultaneously with SSM mapping; however, it is not required.

ip pim ssm default

Configures SSM service.

The default keyword defines the SSM range access list as 232/8.

access-list 10 permit 232.1.2.10 access-list 11 permit 232.1.2.0 0.0.0.255

Configures the ACLs to be used for static SSM mapping.

Note 

These are the ACLs that are referenced by the ip igmp ssm-map static commands in this configuration example.

DNS Server Configuration Example

To configure DNS-based SSM mapping, you need to create a DNS server zone or add records to an existing zone. If the routers that are using DNS-based SSM mapping are also using DNS for other purposes besides SSM mapping, you should use a normally-configured DNS server. If DNS-based SSM mapping is the only DNS implementation being used on the router, you can configure a fake DNS setup with an empty root zone, or a root zone that points back to itself.

The following example shows how to create a zone and import the zone data using Network Registrar:


Router> zone 1.1.232.ssm-map.cisco.com. create primary file=named.ssm-map
100 Ok
Router> dns reload
100 Ok

The following example shows how to import the zone files from a named.conf file for BIND 8:


Router> ::import named.conf /etc/named.conf
Router> dns reload
100 Ok:

Note

Network Registrar version 8.0 and later support import BIND 8 format definitions.