Configuring IEEE 802.1x Port-Based Authentication

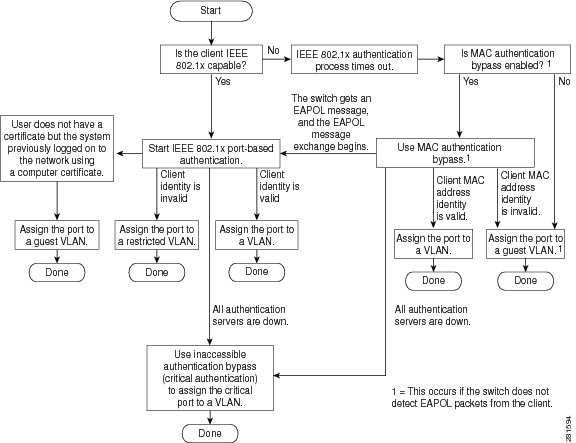
Prerequisites for 802.1x Port-Based Authentication

The following tasks must be completed before implementing the IEEE 802.1X Port-Based Authentication feature:

  • IEEE 802.1X must be enabled on the device port.

  • The device must have a RADIUS configuration and be connected to the Cisco secure access control server (ACS). You should understand the concepts of the RADIUS protocol and have an understanding of how to create and apply access control lists (ACLs).

  • EAP support must be enabled on the RADIUS server.

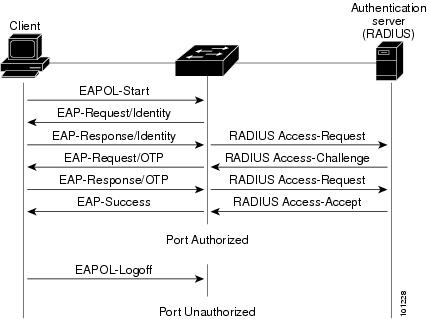
  • You must configure the IEEE 802.1X supplicant to send an EAP-logoff (Stop) message to the device when the user logs off. If you do not configure the IEEE 802.1X supplicant, an EAP-logoff message is not sent to the device and the accompanying accounting Stop message is not sent to the authentication server.

  • Authentication, authorization, and accounting (AAA) must be configured on the port for all network-related service requests. The authentication method list must be enabled and specified. A method list describes the sequence and authentication method to be queried to authenticate a user.

  • The port must be successfully authenticated.

Information About IEEE 802.1x Port-Based Authentication

802.1x Port-Based Authentication Overview

The 802.1x standard defines a client-server-based access control and authentication protocol that prevents unauthorized clients from connecting to a LAN through publicly accessible ports unless they are properly authenticated. The authentication server authenticates each client connected to a switch port before making available any services offered by the device or the LAN.


Note


TACACS is not supported with 802.1x authentication.

Until the client is authenticated, 802.1x access control allows only Extensible Authentication Protocol over LAN (EAPOL), Cisco Discovery Protocol, and Spanning Tree Protocol (STP) traffic through the port to which the client is connected. After authentication is successful, normal traffic can pass through the port.

The following table below the maximum number of each client session supported:

Client session

Maximum sessions supported

Maximum dot1x or MAB client sessions

2000

Maximum web-based authentication sessions

2000

Maximum dot1x sessions with critical-auth VLAN enabled and server re-initialized

2000

Maximum MAB sessions with various session features applied

2000

Maximum dot1x sessions with service templates or session features applied

2000

Port-Based Authentication Process

To configure IEEE 802.1X port-based authentication, you must enable authentication, authorization, and accounting (AAA) and specify the authentication method list. A method list describes the sequence and authentication method to be queried to authenticate a user.

The AAA process begins with authentication. When 802.1x port-based authentication is enabled and the client supports 802.1x-compliant client software, these events occur:

  • If the client identity is valid and the 802.1x authentication succeeds, the device grants the client access to the network.

  • If 802.1x authentication times out while waiting for an EAPOL message exchange and MAC authentication bypass is enabled, the device can use the client MAC address for authorization. If the client MAC address is valid and the authorization succeeds, the device grants the client access to the network. If the client MAC address is invalid and the authorization fails, the device assigns the client to a guest VLAN that provides limited services if a guest VLAN is configured.

  • If the device gets an invalid identity from an 802.1x-capable client and a restricted VLAN is specified, the device can assign the client to a restricted VLAN that provides limited services.

  • If the RADIUS authentication server is unavailable (down) and inaccessible authentication bypass is enabled, the device grants the client access to the network by putting the port in the critical-authentication state in the RADIUS-configured or the user-specified access VLAN.


    Note


    Inaccessible authentication bypass is also referred to as critical authentication or the AAA fail policy.


If Multi Domain Authentication (MDA) is enabled on a port, this flow can be used with some exceptions that are applicable to voice authorization.

Figure 1. Authentication Flowchart. This figure shows the authentication process.

The device re-authenticates a client when one of these situations occurs:

  • Periodic re-authentication is enabled, and the re-authentication timer expires.

    You can configure the re-authentication timer to use a device-specific value or to be based on values from the RADIUS server.

    After 802.1x authentication using a RADIUS server is configured, the device uses timers based on the Session-Timeout RADIUS attribute (Attribute[27]) and the Termination-Action RADIUS attribute (Attribute [29]).

    The Session-Timeout RADIUS attribute (Attribute[27]) specifies the time after which re-authentication occurs.

    The Termination-Action RADIUS attribute (Attribute [29]) specifies the action to take during re-authentication. The actions are Initialize and ReAuthenticate. When the Initialize action is set (the attribute value is DEFAULT), the 802.1x session ends, and connectivity is lost during re-authentication. When the ReAuthenticate action is set (the attribute value is RADIUS-Request), the session is not affected during re-authentication.

  • You manually re-authenticate the client by entering the dot1x re-authenticate interface interface-id privileged EXEC command.

Port-Based Authentication Initiation and Message Exchange

During 802.1x authentication, the device or the client can initiate authentication. If you enable authentication on a port by using the authentication port-control auto interface configuration command, the device initiates authentication when the link state changes from down to up or periodically as long as the port remains up and unauthenticated. The device sends an EAP-request/identity frame to the client to request its identity. Upon receipt of the frame, the client responds with an EAP-response/identity frame.

However, if during bootup, the client does not receive an EAP-request/identity frame from the device, the client can initiate authentication by sending an EAPOL-start frame, which prompts the device to request the client’s identity.


Note


If 802.1x authentication is not enabled or supported on the network access device, any EAPOL frames from the client are dropped. If the client does not receive an EAP-request/identity frame after three attempts to start authentication, the client sends frames as if the port is in the authorized state. A port in the authorized state effectively means that the client has been successfully authenticated.


When the client supplies its identity, the device begins its role as the intermediary, passing EAP frames between the client and the authentication server until authentication succeeds or fails. If the authentication succeeds, the port becomes authorized. If the authentication fails, authentication can be retried, the port might be assigned to a VLAN that provides limited services, or network access is not granted.

The specific exchange of EAP frames depends on the authentication method being used.

Figure 2. Message Exchange. This figure shows a message exchange initiated by the client when the client uses the One-Time-Password (OTP) authentication method with a RADIUS server.

If 802.1x authentication times out while waiting for an EAPOL message exchange and MAC authentication bypass is enabled, the device can authorize the client when the device detects an Ethernet packet from the client. The device uses the MAC address of the client as its identity and includes this information in the RADIUS-access/request frame that is sent to the RADIUS server. After the server sends the device the RADIUS-access/accept frame (authorization is successful), the port becomes authorized. If authorization fails and a guest VLAN is specified, the device assigns the port to the guest VLAN. If the device detects an EAPOL packet while waiting for an Ethernet packet, the device stops the MAC authentication bypass process and starts 802.1x authentication.

Figure 3. Message Exchange During MAC Authentication Bypass. This figure shows the message exchange during MAC authentication bypass.

Port-Based Authentication Methods

Table 1. 802.1x Features

Authentication method

Mode

Single host

Multiple host

MDA

Multiple Authentication

802.1x

VLAN assignment

Per-user ACL

Filter-ID attribute

Downloadable ACL

Redirect URL

VLAN assignment

VLAN assignment

Per-user ACL

Filter-ID attribute

Downloadable ACL

Redirect URL

VLAN assignment

Per-user ACL

Filter-ID attribute

Downloadable ACL

Redirect URL

MAC authentication bypass

VLAN assignment

Per-user ACL

Filter-ID attribute

Downloadable ACL

Redirect URL

VLAN assignment

VLAN assignment

Per-user ACL

Filter-ID attribute

Downloadable ACL

Redirect URL

VLAN assignment

Per-user ACL

Filter-ID attribute

Downloadable ACL

Redirect URL

Standalone web authentication

Proxy ACL, Filter-ID attribute, downloadable ACL

NAC Layer 2 IP validation

Filter-ID attribute

Downloadable ACL

Redirect URL

Filter-ID attribute

Downloadable ACL

Redirect URL

Filter-ID attribute

Downloadable ACL

Redirect URL

Filter-ID attribute

Downloadable ACL

Redirect URL

Web authentication as fallback method

Note


For clients that do not support 802.1x authentication.

Proxy ACL

Filter-ID attribute

Downloadable ACL

Proxy ACL

Filter-ID attribute

Downloadable ACL

Proxy ACL

Filter-ID attribute

Downloadable ACL

Proxy ACL

Filter-ID attribute

Downloadable ACL

Port-Based Authentication Manager CLI Commands

The authentication-manager interface-configuration commands control all the authentication methods, such as 802.1x, MAC authentication bypass, and web authentication. The authentication manager commands determine the priority and order of authentication methods applied to a connected host.

These commands control generic authentication features, such as host-mode, violation mode, and the authentication timer. Generic authentication commands include the authentication host-mode , authentication violation , and authentication timer interface configuration commands.

To disable dot1x on a device, remove the configuration globally by using the no dot1x system-auth-control command, and also remove it from all configured interfaces.


Note


If 802.1x authentication is globally disabled, other authentication methods are still enabled on that port, such as web authentication.


The authentication manager commands provide the same functionality as earlier 802.1x commands.

When filtering out verbose system messages generated by the authentication manager, the filtered content typically relates to authentication success. You can also filter verbose messages for 802.1x authentication and MAB authentication. There is a separate command for each authentication method:

  • The no authentication logging verbose global configuration command filters verbose messages from the authentication manager.

  • The no dot1x logging verbose global configuration command filters 802.1x authentication verbose messages.

  • The no mab logging verbose global configuration command filters MAC authentication bypass (MAB) verbose messages

Per-User ACLs and Filter-IDs


Note


You can only set any as the source in the ACL.

Note


For any ACL that is configured for multiple-host mode, the source portion of statement must be any. (For example, permit icmp any host 10.10.1.1 .)

Note


Using role-based ACLs as filter-ID is not recommended.


You must specify any in the source ports of any defined ACL. Otherwise, the ACL cannot be applied and authorization fails. Single host is the only exception to support backward compatibility.

More than one host can be authenticated on MDA-enabled and multiauth ports. The ACL policy applied for one host does not effect the traffic of another host. If only one host is authenticated on a multi-host port, and the other hosts gain network access without authentication, the ACL policy for the first host can be applied to the other connected hosts by specifying any in the source address.

Ports in Authorized and Unauthorized States

During 802.1x authentication, depending on the switch port state, the switch can grant a client access to the network. The port starts in the unauthorized state. While in this state, the port that is not configured as a voice VLAN port disallows all ingress and egress traffic except for 802.1x authentication, Cisco Discovery Protocol, and STP packets. When a client is successfully authenticated, the port changes to the authorized state, allowing all traffic for the client to flow normally. If the port is configured as a voice VLAN port, the port allows VoIP traffic and 802.1x protocol packets before the client is successfully authenticated.


Note


Cisco Discovery Protocol bypass is not supported and may cause a port to go into err-disabled state.

If a client that does not support 802.1x authentication connects to an unauthorized 802.1x port, the switch requests the client’s identity. In this situation, the client does not respond to the request, the port remains in the unauthorized state, and the client is not granted access to the network.

In contrast, when an 802.1x-enabled client connects to a port that is not running the 802.1x standard, the client initiates the authentication process by sending the EAPOL-start frame. When no response is received, the client sends the request for a fixed number of times. Because no response is received, the client begins sending frames as if the port is in the authorized state.

You control the port authorization state by using the authentication port-control interface configuration command and these keywords:

  • force-authorized : Disables 802.1x authentication and causes the port to change to the authorized state without any authentication exchange required. The port sends and receives normal traffic without 802.1x-based authentication of the client. This is the default setting.

  • force-unauthorized : Causes the port to remain in the unauthorized state, ignoring all attempts by the client to authenticate. The switch cannot provide authentication services to the client through the port.

  • auto : Enables 802.1x authentication and causes the port to begin in the unauthorized state, allowing only EAPOL frames to be sent and received through the port. The authentication process begins when the link state of the port changes from down to up or when an EAPOL-start frame is received. The switch requests the identity of the client and begins relaying authentication messages between the client and the authentication server. Each client attempting to access the network is uniquely identified by the switch by using the client MAC address.

If the client is successfully authenticated (receives an Accept frame from the authentication server), the port state changes to authorized, and all frames from the authenticated client are allowed through the port. If the authentication fails, the port remains in the unauthorized state, but authentication can be retried. If the authentication server cannot be reached, the switch can resend the request. If no response is received from the server after the specified number of attempts, authentication fails, and network access is not granted.

When a client logs off, it sends an EAPOL-logoff message, causing the switch port to change to the unauthorized state.

If the link state of a port changes from up to down, or if an EAPOL-logoff frame is received, the port returns to the unauthorized state.

802.1x Host Mode

You can configure an 802.1x port for single-host or for multiple-hosts mode. In single-host mode, only one client can be connected to the 802.1x-enabled port. The device detects the client by sending an EAPOL frame when the port link state changes to the up state. If a client leaves or is replaced with another client, the device changes the port link state to down, and the port returns to the unauthorized state.

In multiple-hosts mode, you can attach multiple hosts to a single 802.1x-enabled port. In this mode, only one of the attached clients must be authorized for all clients to be granted network access. If the port becomes unauthorized (re-authentication fails or an EAPOL-logoff message is received), the device denies network access to all of the attached clients.

In this topology, the wireless access point is responsible for authenticating the clients attached to it, and it also acts as a client to the device.

Figure 4. Multiple Host Mode Example


Note


For all host modes, the line protocol stays up before authorization when port-based authentication is configured.

The device supports multidomain authentication (MDA), which allows both a data device and a voice device, such as an IP Phone (Cisco or non-Cisco), to connect to the same device port.

802.1x Multiple Authentication Mode

Cisco Catalyst 1000 Series Switches do no support the Multiple Authentication Per User VLAN Assignment feature. It is not possible to assign multiple VLANs, or one VLAN per user, in the data domain. Segmentation between devices to be authenticated and authorized using 802.1x/MAB on a single port can be achieved by defining a single data VLAN and a single voice VLAN. VLAN assignment will follow the conditions described in this section.

Multiple-authentication (multi-auth) mode allows multiple authenticated clients on the data VLAN and voice VLAN. Each host is individually authenticated. There is no limit to the number of data or voice device that can be authenticated on a multi-auth port.

If a hub or access point is connected to an 802.1x-enabled port, each connected client must be authenticated. For non-802.1x devices, you can use MAC authentication bypass or web authentication as the per-host authentication fallback method to authenticate different hosts with different methods on a single port.


Note


When a port is in multiple-authentication mode, the authentication-failed VLAN features do not activate.

You can assign a RADIUS-server-supplied VLAN in multi-auth mode, under the following conditions:

  • The host is the first host authorized on the port, and the RADIUS server supplies VLAN information

  • Subsequent hosts are authorized with a VLAN that matches the operational VLAN.

  • A host is authorized on the port with no VLAN assignment, and subsequent hosts either have no VLAN assignment, or their VLAN information matches the operational VLAN.

  • The first host authorized on the port has a group VLAN assignment, and subsequent hosts either have no VLAN assignment, or their group VLAN matches the group VLAN on the port. Subsequent hosts must use the same VLAN from the VLAN group as the first host. If a VLAN list is used, all hosts are subject to the conditions specified in the VLAN list.

  • After a VLAN is assigned to a host on the port, subsequent hosts must have matching VLAN information or be denied access to the port.

  • You cannot configure a guest VLAN or an auth-fail VLAN in multi-auth mode.

  • The behavior of the critical-auth VLAN is not changed for multi-auth mode. When a host tries to authenticate and the server is not reachable, all authorized hosts are reinitialized in the configured VLAN.

MAC Move

When a MAC address is authenticated on one switch port, that address is not allowed on another authentication manager-enabled port of the switch. If the switch detects that same MAC address on another authentication manager-enabled port, the address is not allowed.

There are situations where a MAC address might need to move from one port to another on the same switch. For example, when there is another device (for example a hub or an IP phone) between an authenticated host and a switch port, you might want to disconnect the host from the device and connect it directly to another port on the same switch.

You can globally enable MAC move so the device is re-authenticated on the new port. When a host moves to a second port, the session on the first port is deleted, and the host is re-authenticated on the new port. MAC move is supported on all host modes. (The authenticated host can move to any port on the switch, no matter which host mode is enabled on the that port.) When a MAC address moves from one port to another, the switch terminates the authenticated session on the original port and initiates a new authentication sequence on the new port. The MAC move feature applies to both voice and data hosts.


Note


In open authentication mode, a MAC address is immediately moved from the original port to the new port, with no requirement for authorization on the new port.


MAC Replace

The MAC Replace feature can be configured to address the violation that occurs when a host attempts to connect to a port where another host was previously authenticated.


Note


This feature does not apply to ports in multi-auth mode, because violations are not triggered in that mode. It does not apply to ports in multiple host mode, because in that mode, only the first host requires authentication.


If you configure the authentication violation interface configuration command with the replace keyword, the authentication process on a port in multidomain mode is:

  • A new MAC address is received on a port with an existing authenticated MAC address.

  • The authentication manager replaces the MAC address of the current data host on the port with the new MAC address.

  • The authentication manager initiates the authentication process for the new MAC address.

  • If the authentication manager determines that the new host is a voice host, the original voice host is removed.

If a port is in open authentication mode, any new MAC address is immediately added to the MAC address table.

802.1x Accounting

The 802.1x standard defines how users are authorized and authenticated for network access but does not keep track of network usage. 802.1x accounting is disabled by default. You can enable 802.1x accounting to monitor this activity on 802.1x-enabled ports:

  • User successfully authenticates.

  • User logs off.

  • Link-down occurs.

  • Re-authentication successfully occurs.

  • Re-authentication fails.

The device does not log 802.1x accounting information. Instead, it sends this information to the RADIUS server, which must be configured to log accounting messages.

802.1x Accounting Attribute-Value Pairs

The information sent to the RADIUS server is represented in the form of Attribute-Value (AV) pairs. These AV pairs provide data for different applications. (For example, a billing application might require information that is in the Acct-Input-Octets or the Acct-Output-Octets attributes of a RADIUS packet.)

AV pairs are automatically sent by a device that is configured for 802.1x accounting. Three types of RADIUS accounting packets are sent by a device:

  • START: Sent when a new user session starts

  • INTERIM: Sent during an existing session for updates

  • STOP: Sent when a session terminates

You can view the AV pairs that are being sent by the device by entering the debug radius accounting privileged EXEC command.

This table lists the AV pairs and when they are sent are sent by the device.

Table 2. Accounting AV Pairs

Attribute Number

AV Pair Name

START

INTERIM

STOP

Attribute[1]

User-Name

Always

Always

Always

Attribute[4]

NAS-IP-Address

Always

Always

Always

Attribute[5]

NAS-Port

Always

Always

Always

Attribute[8]

Framed-IP-Address

Never

Sometimes1

Sometimes

Attribute[25]

Class

Always

Always

Always

Attribute[30]

Called-Station-ID

Always

Always

Always

Attribute[31]

Calling-Station-ID

Always

Always

Always

Attribute[40]

Acct-Status-Type

Always

Always

Always

Attribute[41]

Acct-Delay-Time

Always

Always

Always

Attribute[42]

Acct-Input-Octets

Never

Always

Always

Attribute[43]

Acct-Output-Octets

Never

Always

Always

Attribute[47]

Acct-Input-Packets

Never

Always

Always

Attribute[48]

Acct-Output-Packets

Never

Always

Always

Attribute[44]

Acct-Session-ID

Always

Always

Always

Attribute[45]

Acct-Authentic

Always

Always

Always

Attribute[46]

Acct-Session-Time

Never

Always

Always

Attribute[49]

Acct-Terminate-Cause

Never

Never

Always

Attribute[61]

NAS-Port-Type

Always

Always

Always

1 The Framed-IP-Address AV pair is sent when a valid static IP address is configured or w when a Dynamic Host Control Protocol (DHCP) binding exists for the host in the DHCP snooping bindings table.

Device-to-RADIUS-Server Communication

RADIUS security servers are identified by their hostname or IP address, hostname and specific UDP port numbers, or IP address and specific UDP port numbers. The combination of the IP address and UDP port number creates a unique identifier, which enables RADIUS requests to be sent to multiple UDP ports on a server at the same IP address. If two different host entries on the same RADIUS server are configured for the same service—for example, authentication—the second host entry configured acts as the fail-over backup to the first one. The RADIUS host entries are tried in the order that they were configured.

802.1x Authentication

These are the 802.1x authentication configuration guidelines:

  • When 802.1x authentication is enabled, ports are authenticated before any other Layer 2 or Layer 3 features are enabled.

  • If the VLAN to which an 802.1x-enabled port is assigned changes, this change is transparent and does not affect the device. For example, this change occurs if a port is assigned to a RADIUS server-assigned VLAN and is then assigned to a different VLAN after re-authentication.

    If the VLAN to which an 802.1x port is assigned to shut down, disabled, or removed, the port becomes unauthorized. For example, the port is unauthorized after the access VLAN to which a port is assigned shuts down or is removed.

  • The 802.1x protocol is supported on Layer 2 static-access ports, voice VLAN ports, and Layer 3 routed ports, but it is not supported on these port types:

    • Dynamic ports: A port in dynamic mode can negotiate with its neighbor to become a trunk port. If you try to enable 802.1x authentication on a dynamic port, an error message appears, and 802.1x authentication is not enabled. If you try to change the mode of an 802.1x-enabled port to dynamic, an error message appears, and the port mode is not changed.

    • EtherChannel port: Do not configure a port that is an active or a not-yet-active member of an EtherChannel as an 802.1x port. If you try to enable 802.1x authentication on an EtherChannel port, an error message appears, and 802.1x authentication is not enabled.

    • Switched Port Analyzer (SPAN) destination ports: You can enable 802.1x authentication on a port that is a SPAN destination port. However, 802.1x authentication is disabled until the port is removed as a SPAN destination port. You can enable 802.1x authentication on a SPAN source port.

  • Before globally enabling 802.1x authentication on a device by entering the dot1x system-auth-control global configuration command, remove the EtherChannel configuration from the interfaces on which 802.1x authentication and EtherChannel are configured.

Default 802.1x Authentication Configuration

Table 3. Default 802.1x Authentication Configuration

Feature

Default Setting

Device 802.1x enable state

Disabled.

Per-port 802.1x enable state

Disabled (force-authorized).

The port sends and receives normal traffic without 802.1x-based authentication of the client.

AAA

Disabled.

RADIUS server

  • IP address

  • UDP authentication port

  • Default accounting port

  • Key

  • None specified.

  • 1645.

  • 1646.

  • None specified.

Host mode

Single-host mode.

Control direction

Bidirectional control.

Periodic re-authentication

Disabled.

Number of seconds between re-authentication attempts

3600 seconds.

Re-authentication number

2 times (number of times that the device restarts the authentication process before the port changes to the unauthorized state).

Quiet period

60 seconds (number of seconds that the device remains in the quiet state following a failed authentication exchange with the client).

Retransmission time

30 seconds (number of seconds that the device should wait for a response to an EAP request/identity frame from the client before resending the request).

Maximum retransmission number

2 times (number of times that the device will send an EAP-request/identity frame before restarting the authentication process).

Client timeout period

30 seconds (when relaying a request from the authentication server to the client, the amount of time the device waits for a response before resending the request to the client.)

Authentication server timeout period

30 seconds (when relaying a response from the client to the authentication server, the amount of time the device waits for a reply before resending the response to the server.)

You can change this timeout period by using the dot1x timeout server-timeout interface configuration command.

Inactivity timeout

Disabled.

Guest VLAN

None specified.

Inaccessible authentication bypass

Disabled.

Restricted VLAN

None specified.

Authenticator (switch) mode

None specified.

MAC authentication bypass

Disabled.

Voice-aware security

Disabled.

Flexible Authentication Ordering

You can use flexible authentication ordering to configure the order of methods that a port uses to authenticate a new host. The IEEE 802.1X Flexible Authentication feature supports three authentication methods:

  • dot1X: IEEE 802.1X authentication is a Layer 2 authentication method.

  • mab: MAC authentication bypass is a Layer 2 authentication method.

  • webauth: Web authentication is a Layer 3 authentication method.

Using these features, you can control which ports use which authentication methods, and you can control the failover sequencing of methods on those ports. For example, MAC authentication bypass and 802.1x can be the primary or secondary authentication methods, and web authentication can be the fallback method if either or both of those authentication attempts fail.

The IEEE 802.1X Flexible Authentication feature supports the following host modes:

  • multi-auth: Multi-authentication allows one authentication on a voice VLAN and multiple authentications on the data VLAN.

  • multi-domain: Multidomain authentication allows two authentications, one on the voice VLAN and one on the data VLAN.

802.1x Authentication with Guest VLAN

You can configure a guest VLAN for each 802.1x port on the device to provide limited services to clients, such as downloading the 802.1x client. These clients might be upgrading their system for 802.1x authentication, and some hosts, such as Windows 98 systems, might not be IEEE 802.1x-capable.

When you enable a guest VLAN on an 802.1x port, the device assigns clients to a guest VLAN when the device does not receive a response to its EAP request/identity frame or when EAPOL packets are not sent by the client.

The device maintains the EAPOL packet history. If an EAPOL packet is detected on the interface during the lifetime of the link, the device determines that the device connected to that interface is an IEEE 802.1x-capable supplicant, and the interface does not change to the guest VLAN state. EAPOL history is cleared if the interface link status goes down. If no EAPOL packet is detected on the interface, the interface changes to the guest VLAN state.

If the device is trying to authorize an 802.1x-capable voice device and the AAA server is unavailable, the authorization attempt fails, but the detection of the EAPOL packet is saved in the EAPOL history. When the AAA server becomes available, the device authorizes the voice device. However, the device no longer allows other devices access to the guest VLAN. To prevent this situation, use one of these command sequences:

  • Enter the authentication event no-response action authorize vlan vlan-id interface configuration command to allow access to the guest VLAN.

  • Enter the shutdown interface configuration command followed by the no shutdown interface configuration command to restart the port.

If devices send EAPOL packets to the device during the lifetime of the link, the device no longer allows clients that fail authentication access to the guest VLAN.


Note


If an EAPOL packet is detected after the interface has changed to the guest VLAN, the interface reverts to an unauthorized state, and 802.1x authentication restarts.


Any number of 802.1x-incapable clients are allowed access when the device port is moved to the guest VLAN. If an 802.1x-capable client joins the same port on which the guest VLAN is configured, the port is put into the unauthorized state in the user-configured access VLAN, and authentication is restarted.

Guest VLANs are supported on 802.1x ports in single host, multiple host, multi-auth and multi-domain modes.

The device supports MAC authentication bypass. When MAC authentication bypass is enabled on an 802.1x port, the device can authorize clients based on the client MAC address when IEEE 802.1x authentication times out while waiting for an EAPOL message exchange. After detecting a client on an 802.1x port, the device waits for an Ethernet packet from the client. The device sends the authentication server a RADIUS-access/request frame with a username and password based on the MAC address. If authorization succeeds, the device grants the client access to the network. If authorization fails, the device assigns the port to the guest VLAN if one is specified.

802.1x Authentication with Restricted VLAN

You can configure a restricted VLAN (also referred to as an authentication failed VLAN) for each IEEE 802.1x port on a device to provide limited services to clients that cannot access the guest VLAN. These clients are 802.1x-compliant and cannot access another VLAN because they fail the authentication process. A restricted VLAN allows users without valid credentials in an authentication server (typically, visitors to an enterprise) to access a limited set of services. The administrator can control the services available to the restricted VLAN.


Note


You can configure a VLAN to be both the guest VLAN and the restricted VLAN if you want to provide the same services to both types of users.


Without this feature, the client attempts and fails authentication indefinitely, and the device port remains in the spanning-tree blocking state. With this feature, you can configure the device port to be in the restricted VLAN after a specified number of authentication attempts (the default value is 3 attempts).

The authenticator counts the failed authentication attempts for the client. When this count exceeds the configured maximum number of authentication attempts, the port moves to the restricted VLAN. The failed attempt count increments when the RADIUS server replies with either an EAP failure or an empty response without an EAP packet. When the port moves into the restricted VLAN, the failed attempt counter resets.

Users who fail authentication remain in the restricted VLAN until the next re-authentication attempt. A port in the restricted VLAN tries to re-authenticate at configured intervals (the default is 60 seconds). If re-authentication fails, the port remains in the restricted VLAN. If re-authentication is successful, the port moves either to the configured VLAN or to a VLAN sent by the RADIUS server. You can disable re-authentication. If you do this, the only way to restart the authentication process is for the port to receive a link down or EAP logoff event. We recommend that you keep re-authentication enabled if a client might connect through a hub. When a client disconnects from the hub, the port might not receive the link down or EAP logoff event.

After a port moves to the restricted VLAN, a simulated EAP success message is sent to the client. This prevents clients from indefinitely attempting authentication. Some clients (for example, devices running Windows XP) cannot implement DHCP without EAP success.

Restricted VLANs are supported on 802.1x ports in all host modes and on Layer 2 ports.

Other security port features such as dynamic ARP Inspection, DHCP snooping, and IP source guard can be configured independently on a restricted VLAN.

802.1X Auth Fail VLAN

You can configure an auth fail VLAN for each 802.1X port on a device to provide limited services to clients that cannot access the guest VLAN. These clients are 802.1X-compliant and cannot access another VLAN because they fail the authentication process. An auth fail VLAN allows users without valid credentials in an authentication server (typically, visitors to an enterprise) to access a limited set of services. The administrator can control the services available to the auth fail VLAN.


Note


You can configure a VLAN to be both the guest VLAN and the auth fail VLAN if you want to provide the same services to both types of users.


Without this feature, the client attempts and fails authentication indefinitely, and the device port remains in the spanning-tree blocking state. With this feature, you can configure the device port to be in the auth fail VLAN after a specified number of authentication attempts (the default value is 3 attempts).

The authenticator counts the failed authentication attempts for the client. When this count exceeds the configured maximum number of authentication attempts, the port moves to the auth fail VLAN. The failed attempt count increments when the RADIUS server replies with either an EAP failure or an empty response without an EAP packet. When the port moves into the auth fail VLAN, the failed attempt counter resets.

Users who fail authentication remain in the auth fail VLAN until the next re-authentication attempt. A port in the auth fail VLAN tries to re-authenticate at configured intervals (the default is 60 seconds). If re-authentication fails, the port remains in the auth fail VLAN. If re-authentication is successful, the port moves either to the configured VLAN or to a VLAN sent by the RADIUS server. You can disable re-authentication. If you do this, the only way to restart the authentication process is for the port to receive a link down or EAP logoff event. It is recommended that you keep re-authentication enabled if a client might connect through a hub. When a client disconnects from the hub, the port might not receive the link down or EAP logoff event.

After a port moves to the auth fail VLAN, a simulated EAP success message is sent to the client. This prevents clients from indefinitely attempting authentication.

As a prerequisite, the device must be connected to a Cisco secure Access Control System (ACS) and RADIUS authentication, authorization, and accounting (AAA) must be configured for Web authentication. If appropriate, you must enable ACL download.

Open1x Authentication

Open1x authentication allows a device access to a port before that device is authenticated. When open authentication is configured, a new host can pass traffic according to the access control list (ACL) defined on the port. After the host is authenticated, the policies configured on the RADIUS server are applied to that host.

You can configure open authentication with these scenarios:

  • Single-host mode with open authentication: Only one user is allowed network access before and after authentication.

  • MDA mode with open authentication: Only one user in the voice domain and one user in the data domain are allowed.

  • Multiple-hosts mode with open authentication: Any host can access the network.

  • Multiple-authentication mode with open authentication: Similar to MDA, except multiple hosts can be authenticated.


    Note


    If open authentication is configured, it takes precedence over other authentication controls. This means that if you use the authentication open interface configuration command, the port will grant access to the host irrespective of the authentication port-control interface configuration command.


Limiting Login for Users

The Limiting Login feature helps network administrators to limit the login attempt of users to a network. When a user fails to successfully login to a network within a configurable number of attempts within a configurable time limit, this user can be blocked. This feature is enabled only for local users and not for remote users. You need to configure the aaa authentication rejected command in global configuration mode to enable this feature.

802.1x Authentication with Inaccessible Authentication Bypass

Use the inaccessible authentication bypass feature, also referred to as critical authentication or the AAA fail policy, when the device cannot reach the configured RADIUS servers and new hosts cannot be authenticated. You can configure the device to connect those hosts to critical ports.

When a new host tries to connect to the critical port, that host is moved to a user-specified access VLAN, the critical VLAN. The administrator gives limited authentication to the hosts.

When the device tries to authenticate a host connected to a critical port, the device checks the status of the configured RADIUS server. If a server is available, the device can authenticate the host. However, if all the RADIUS servers are unavailable, the device grants network access to the host and puts the port in the critical-authentication state, which is a special case of the authentication state.


Note


If critical authentication is configured on interface, then vlan used for critical authorization (critical vlan) should be active on the device. If the critical vlan is inactive (or) down, critical authentication session will keep trying to enable the inactive VLAN and fail repeatedly. This can lead to large amount of memory holding.


Inaccessible Authentication Bypass Authentication Results

The behavior of the inaccessible authentication bypass feature depends on the authorization state of the port:

  • If the port is unauthorized when a host connected to a critical port tries to authenticate and all servers are unavailable, the device puts the port in the critical-authentication state in the RADIUS-configured or user-specified access VLAN.

  • If the port is already authorized and re-authentication occurs, the device puts the critical port in the critical-authentication state in the current VLAN, which might be the one previously assigned by the RADIUS server.

  • If the RADIUS server becomes unavailable during an authentication exchange, the current exchange times out, and the device puts the critical port in the critical-authentication state during the next authentication attempt.

You can configure the critical port to reinitialize hosts and move them out of the critical VLAN when the RADIUS server is again available. When this is configured, all critical ports in the critical-authentication state are automatically re-authenticated.

Inaccessible Authentication Bypass Feature Interactions

Inaccessible authentication bypass interacts with these features:

  • Guest VLAN: Inaccessible authentication bypass is compatible with guest VLAN. When a guest VLAN is enabled on 8021.x port, the features interact as follows:

    • If at least one RADIUS server is available, the device assigns a client to a guest VLAN when the device does not receive a response to its EAP request/identity frame or when EAPOL packets are not sent by the client.

    • If all the RADIUS servers are not available and the client is connected to a critical port, the device authenticates the client and puts the critical port in the critical-authentication state in the RADIUS-configured or user-specified access VLAN.

    • If all the RADIUS servers are not available and the client is not connected to a critical port, the device might not assign clients to the guest VLAN if one is configured.

    • If all the RADIUS servers are not available and if a client is connected to a critical port and was previously assigned to a guest VLAN, the device keeps the port in the guest VLAN.

  • Restricted VLAN: If the port is already authorized in a restricted VLAN and the RADIUS servers are unavailable, the device puts the critical port in the critical-authentication state in the restricted VLAN.

  • 802.1x accounting: Accounting is not affected if the RADIUS servers are unavailable.

  • Voice VLAN: Inaccessible authentication bypass is compatible with voice VLAN, but the RADIUS-configured or user-specified access VLAN and the voice VLAN must be different.

  • Remote Switched Port Analyzer (RSPAN): Do not configure an RSPAN VLAN as the RADIUS-configured or user-specified access VLAN for inaccessible authentication bypass.

Inaccessible Authentication Bypass Support on Multiple-Authentication Ports

When a port is configured on any host mode and the AAA server is unavailable, the port is then configured to multihost mode and moved to the critical VLAN. To support this inaccessible bypass on multiple-authentication (multi-auth) ports, use the authentication event server dead action reinitialize vlan vlan-id command. When a new host tries to connect to the critical port, that port is reinitialized and all the connected hosts are moved to the user-specified access VLAN.

This command is supported on all host modes.

VLAN Assignment, Guest VLAN, Restricted VLAN, and Inaccessible Authentication Bypass

The following are configuration guidelines for VLAN assignment, guest VLAN, restricted VLAN, and inaccessible authentication bypass:

  • When 802.1x authentication is enabled on a port, you cannot configure a port VLAN that is equal to a voice VLAN.

  • The 802.1x authentication with VLAN assignment feature is not supported on trunk ports, or dynamic ports.

  • You can configure any VLAN except a voice VLAN as an 802.1x guest VLAN. The guest VLAN feature is not supported on internal VLANs (routed ports) or trunk ports; it is supported only on access ports.

  • After you configure a guest VLAN for an 802.1x port to which a DHCP client is connected, you might need to get a host IP address from a DHCP server. You can change the settings for restarting the 802.1x authentication process on the device before the DHCP process on the client times out and tries to get a host IP address from the DHCP server. Decrease the settings for the 802.1x authentication process (authentication timer inactivity and authentication timer reauthentication interface configuration commands). The amount to decrease the settings depends on the connected 802.1x client type.

  • When configuring the inaccessible authentication bypass feature, follow these guidelines:

    • The feature is supported on 802.1x port in single-host mode and multihosts mode.

    • You can configure the inaccessible authentication bypass feature and the restricted VLAN on an 802.1x port. If the device tries to re-authenticate a critical port in a restricted VLAN and all the RADIUS servers are unavailable, the device changes the port state to the critical authentication state and remains in the restricted VLAN.

  • You can configure any VLAN except a voice VLAN as an 802.1x restricted VLAN. The restricted VLAN feature is not supported on internal VLANs (routed ports) or trunk ports; it is supported only on access ports.

IEEE 802.1x Authentication with MAC Authentication Bypass

You can configure the device to authorize clients based on the client MAC address by using the MAC authentication bypass feature. For example, you can enable this feature on IEEE 802.1x ports connected to devices such as printers.

If IEEE 802.1x authentication times out while waiting for an EAPOL response from the client, the device tries to authorize the client by using MAC authentication bypass.

When the MAC authentication bypass feature is enabled on an IEEE 802.1x port, the device uses the MAC address as the client identity. The authentication server has a database of client MAC addresses that are allowed network access. After detecting a client on an IEEE 802.1x port, the device waits for an Ethernet packet from the client. The device sends the authentication server a RADIUS-access/request frame with a username and password based on the MAC address. If authorization succeeds, the device grants the client access to the network. If authorization fails, the device assigns the port to the guest VLAN if one is configured. This process works for most client devices; however, it does not work for clients that use an alternate MAC address format. You can configure how MAB authentication is performed for clients with MAC addresses that deviate from the standard format or where the RADIUS configuration requires the user name and password to differ.

If an EAPOL packet is detected on the interface during the lifetime of the link, the device determines that the device connected to that interface is an 802.1x-capable supplicant and uses 802.1x authentication (not MAC authentication bypass) to authorize the interface. EAPOL history is cleared if the interface link status goes down.

If the device already authorized a port by using MAC authentication bypass and detects an IEEE 802.1x supplicant, the device does not unauthorize the client connected to the port. When re-authentication occurs, the device uses the authentication or re-authentication methods configured on the port, if the previous session ended because the Termination-Action RADIUS attribute value is DEFAULT.

Clients that were authorized with MAC authentication bypass can be re-authenticated. The re-authentication process is the same as that for clients that were authenticated with IEEE 802.1x. During re-authentication, the port remains in the previously assigned VLAN. If re-authentication is successful, the device keeps the port in the same VLAN. If re-authentication fails, the device assigns the port to the guest VLAN, if one is configured.

If re-authentication is based on the Session-Timeout RADIUS attribute (Attribute[27]) and the Termination-Action RADIUS attribute (Attribute [29]) and if the Termination-Action RADIUS attribute (Attribute [29]) action is Initialize (the attribute value is DEFAULT), the MAC authentication bypass session ends, and connectivity is lost during re-authentication. If MAC authentication bypass is enabled and the IEEE 802.1x authentication times out, the device uses the MAC authentication bypass feature to initiate re-authorization. For more information about these AV pairs, see RFC 3580, “IEEE 802.1X Remote Authentication Dial In User Service (RADIUS).”

MAC authentication bypass interacts with the features:

  • IEEE 802.1x authentication: You can enable MAC authentication bypass only if 802.1x authentication is enabled on the port .

  • Guest VLAN: If a client has an invalid MAC address identity, the device assigns the client to a guest VLAN if one is configured.

  • Restricted VLAN: This feature is not supported when the client connected to an IEEE 802.lx port is authenticated with MAC authentication bypass.

  • Port security

  • Voice VLAN

MAC Authentication Bypass Guidelines

This section describes the MAC authentication bypass configuration guidelines:

  • Unless otherwise stated, the MAC authentication bypass guidelines are the same as the 802.1x authentication guidelines.

  • If you disable MAC authentication bypass from a port after the port has been authorized with its MAC address, the port state is not affected.

  • If the port is in the unauthorized state and the client MAC address is not the authentication-server database, the port remains in the unauthorized state. However, if the client MAC address is added to the database, the device can use MAC authentication bypass to re-authorize the port.

  • If the port is in the authorized state, the port remains in this state until re-authorization occurs.

  • You can configure a timeout period for hosts that are connected by MAC authentication bypass but are inactive. The range is 1to 65535 seconds.

Maximum Number of Allowed Devices Per Port

The maximum number of devices allowed on an 802.1x-enabled port are as follows:

  • In single-host mode, only one device is allowed on the access VLAN. If the port is also configured with a voice VLAN, an unlimited number of Cisco IP phones can send and receive traffic through the voice VLAN.

  • In multidomain authentication (MDA) mode, one device is allowed for the access VLAN, and one IP phone is allowed for the voice VLAN.

  • In multihost mode, only one 802.1x supplicant is allowed on the port, but an unlimited number of non-802.1x hosts are allowed on the access VLAN. An unlimited number of devices are allowed on the voice VLAN.

IEEE 802.1x Authentication with Voice VLAN Ports

A voice VLAN port is a special access port associated with two VLAN identifiers:

  • VVID to carry voice traffic to and from the IP phone. The VVID is used to configure the IP phone connected to the port.

  • PVID to carry the data traffic to and from the workstation connected to the device through the IP phone. The PVID is the native VLAN of the port.

The IP phone uses the VVID for its voice traffic, regardless of the authorization state of the port. This allows the phone to work independently of IEEE 802.1x authentication.

In single-host mode, only the IP phone is allowed on the voice VLAN. In multiple-hosts mode, additional clients can send traffic on the voice VLAN after a supplicant is authenticated on the PVID. When multiple-hosts mode is enabled, the supplicant authentication affects both the PVID and the VVID.

A voice VLAN port becomes active when there is a link, and the device MAC address appears after the first Cisco Discovery Protocol message from the IP phone. Cisco IP phones do not relay Cisco Discovery Protocol messages from other devices. As a result, if several IP phones are connected in series, the device recognizes only the one directly connected to it. When IEEE 802.1x authentication is enabled on a voice VLAN port, the device drops packets from unrecognized IP phones more than one hop away.

When IEEE 802.1x authentication is enabled on a device port, you can configure an access port VLAN that is also a voice VLAN.

When IP phones are connected to an 802.1x-enabled device port that is in single host mode, the device grants the phones network access without authenticating them. We recommend that you use multidomain authentication (MDA) on the port to authenticate both a data device and a voice device, such as an IP phone


Note


If you enable IEEE 802.1x authentication on an access port on which a voice VLAN is configured and to which a Cisco IP Phone is connected, the Cisco IP phone loses connectivity to the device for up to 30 seconds.


IEEE 802.1x Authentication with Port Security

IEEE 802.1x enforces a single MAC address per port (or per VLAN when MDA is configured for IP telephony), port security is redundant and in some cases may interfere with expected IEEE 802.1x operations.

We do not recommend enabling port security when IEEE 802.1x is enabled.

Port-Based Authentication Process

To configure IEEE 802.1X port-based authentication, you must enable authentication, authorization, and accounting (AAA) and specify the authentication method list. A method list describes the sequence and authentication method to be queried to authenticate a user.

The AAA process begins with authentication. When 802.1x port-based authentication is enabled and the client supports 802.1x-compliant client software, these events occur:

  • If the client identity is valid and the 802.1x authentication succeeds, the device grants the client access to the network.

  • If 802.1x authentication times out while waiting for an EAPOL message exchange and MAC authentication bypass is enabled, the device can use the client MAC address for authorization. If the client MAC address is valid and the authorization succeeds, the device grants the client access to the network. If the client MAC address is invalid and the authorization fails, the device assigns the client to a guest VLAN that provides limited services if a guest VLAN is configured.

  • If the device gets an invalid identity from an 802.1x-capable client and a restricted VLAN is specified, the device can assign the client to a restricted VLAN that provides limited services.

  • If the RADIUS authentication server is unavailable (down) and inaccessible authentication bypass is enabled, the device grants the client access to the network by putting the port in the critical-authentication state in the RADIUS-configured or the user-specified access VLAN.


    Note


    Inaccessible authentication bypass is also referred to as critical authentication or the AAA fail policy.


If Multi Domain Authentication (MDA) is enabled on a port, this flow can be used with some exceptions that are applicable to voice authorization.

Figure 5. Authentication Flowchart. This figure shows the authentication process.

The device re-authenticates a client when one of these situations occurs:

  • Periodic re-authentication is enabled, and the re-authentication timer expires.

    You can configure the re-authentication timer to use a device-specific value or to be based on values from the RADIUS server.

    After 802.1x authentication using a RADIUS server is configured, the device uses timers based on the Session-Timeout RADIUS attribute (Attribute[27]) and the Termination-Action RADIUS attribute (Attribute [29]).

    The Session-Timeout RADIUS attribute (Attribute[27]) specifies the time after which re-authentication occurs.

    The Termination-Action RADIUS attribute (Attribute [29]) specifies the action to take during re-authentication. The actions are Initialize and ReAuthenticate. When the Initialize action is set (the attribute value is DEFAULT), the 802.1x session ends, and connectivity is lost during re-authentication. When the ReAuthenticate action is set (the attribute value is RADIUS-Request), the session is not affected during re-authentication.

  • You manually re-authenticate the client by entering the dot1x re-authenticate interface interface-id privileged EXEC command.

Port-Based Authentication Initiation and Message Exchange

During 802.1x authentication, the device or the client can initiate authentication. If you enable authentication on a port by using the authentication port-control auto interface configuration command, the device initiates authentication when the link state changes from down to up or periodically as long as the port remains up and unauthenticated. The device sends an EAP-request/identity frame to the client to request its identity. Upon receipt of the frame, the client responds with an EAP-response/identity frame.

However, if during bootup, the client does not receive an EAP-request/identity frame from the device, the client can initiate authentication by sending an EAPOL-start frame, which prompts the device to request the client’s identity.


Note


If 802.1x authentication is not enabled or supported on the network access device, any EAPOL frames from the client are dropped. If the client does not receive an EAP-request/identity frame after three attempts to start authentication, the client sends frames as if the port is in the authorized state. A port in the authorized state effectively means that the client has been successfully authenticated.


When the client supplies its identity, the device begins its role as the intermediary, passing EAP frames between the client and the authentication server until authentication succeeds or fails. If the authentication succeeds, the port becomes authorized. If the authentication fails, authentication can be retried, the port might be assigned to a VLAN that provides limited services, or network access is not granted.

The specific exchange of EAP frames depends on the authentication method being used.

Figure 6. Message Exchange. This figure shows a message exchange initiated by the client when the client uses the One-Time-Password (OTP) authentication method with a RADIUS server.

If 802.1x authentication times out while waiting for an EAPOL message exchange and MAC authentication bypass is enabled, the device can authorize the client when the device detects an Ethernet packet from the client. The device uses the MAC address of the client as its identity and includes this information in the RADIUS-access/request frame that is sent to the RADIUS server. After the server sends the device the RADIUS-access/accept frame (authorization is successful), the port becomes authorized. If authorization fails and a guest VLAN is specified, the device assigns the port to the guest VLAN. If the device detects an EAPOL packet while waiting for an Ethernet packet, the device stops the MAC authentication bypass process and starts 802.1x authentication.

Figure 7. Message Exchange During MAC Authentication Bypass. This figure shows the message exchange during MAC authentication bypass.

802.1x User Distribution

You can configure 802.1x user distribution to load-balance users with the same group name across multiple different VLANs.

The VLANs are either supplied by the RADIUS server or configured through the device CLI under a VLAN group name.

  • Configure the RADIUS server to send more than one VLAN name for a user. The multiple VLAN names can be sent as part of the response to the user. The 802.1x user distribution tracks all the users in a particular VLAN and achieves load balancing by moving the authorized user to the least populated VLAN.

  • Configure the RADIUS server to send a VLAN group name for a user. The VLAN group name can be sent as part of the response to the user. You can search for the selected VLAN group name among the VLAN group names that you configured by using the device CLI. If the VLAN group name is found, the corresponding VLANs under this VLAN group name are searched to find the least populated VLAN. Load balancing is achieved by moving the corresponding authorized user to that VLAN.


    Note


    The RADIUS server can send the VLAN information in any combination of VLAN IDs, VLAN names, or VLAN groups.


802.1x User Distribution Configuration Guidelines

  • Confirm that at least one VLAN is mapped to the VLAN group.

  • You can map more than one VLAN to a VLAN group.

  • You can modify the VLAN group by adding or deleting a VLAN.

  • When you clear an existing VLAN from the VLAN group name, none of the authenticated ports in the VLAN are cleared, but the mappings are removed from the existing VLAN group.

  • If you clear the last VLAN from the VLAN group name, the VLAN group is cleared.

  • You can clear a VLAN group even when the active VLANs are mapped to the group. When you clear a VLAN group, none of the ports or users that are in the authenticated state in any VLAN within the group are cleared, but the VLAN mappings to the VLAN group are cleared.

Per-User ACLs and Filter-IDs


Note


You can only set any as the source in the ACL.

Note


For any ACL that is configured for multiple-host mode, the source portion of statement must be any. (For example, permit icmp any host 10.10.1.1 .)

Note


Using role-based ACLs as filter-ID is not recommended.


You must specify any in the source ports of any defined ACL. Otherwise, the ACL cannot be applied and authorization fails. Single host is the only exception to support backward compatibility.

More than one host can be authenticated on MDA-enabled and multiauth ports. The ACL policy applied for one host does not effect the traffic of another host. If only one host is authenticated on a multi-host port, and the other hosts gain network access without authentication, the ACL policy for the first host can be applied to the other connected hosts by specifying any in the source address.

Per-User ACLs Authentication through 802.1x/MAB/WebAuth Users

You can enable per-user access control lists (ACLs) to provide different levels of network access and service to an 802.1x-authenticated user. When the RADIUS server authenticates a user connected to an 802.1x port, it retrieves the ACL attributes based on the user identity and sends them to the device. The device applies the attributes to the 802.1x port for the duration of the user session. The device removes the per-user ACL configuration when the session is over, if authentication fails, or if a link-down condition occurs. The device does not save RADIUS-specified ACLs in the running configuration. When the port is unauthorized, the device removes the ACL from the port.

RADIUS supports per-user attributes, including vendor-specific attributes. These vendor-specific attributes (VSAs) are in octet-string format and are passed to the device during the authentication process. The VSAs used for per-user ACLs are inacl#<n> for the ingress direction and outacl#<n> for the egress direction. MAC ACLs are supported only in the ingress direction. The device supports VSAs only in the ingress direction. It does not support port ACLs in the egress direction on Layer 2 ports.

Use only the extended ACL syntax style to define the per-user configuration stored on the RADIUS server. When the definitions are passed from the RADIUS server, they are created by using the extended naming convention. However, if you use the Filter-ID attribute, it can point to a standard ACL.

You can use the Filter-ID attribute to specify an inbound or outbound ACL that is already configured on the device. The attribute contains the ACL number followed by .in for ingress filtering or .out for egress filtering. If the RADIUS server does not allow the .in or .out syntax, the access list is applied to the outbound ACL by default. The user is marked unauthorized if the Filter-ID sent from the RADIUS server is not configured on the device. Because of limited support of Cisco IOS access lists on the device, the Filter-ID attribute is supported only for IP ACLs numbered in the range of 1 to 199 (IP standard ACLs) and 1300 to 2699 (IP extended ACLs).

The maximum size of the per-user ACL is 4000 ASCII characters but is limited by the maximum size of RADIUS-server per-user ACLs.

You must meet the following prerequisites to configure per-user ACLs:

  • Enable AAA authentication.

  • Enable AAA authorization by using the network keyword to allow interface configuration from the RADIUS server.

  • Enable 802.1x authentication.

  • Configure the user profile and VSAs on the RADIUS server.

Voice-Aware 802.1x Security

Use the Voice-Aware 802.1x security feature to configure the device to disable only the VLAN on which a security violation occurs, whether it is a data or voice VLAN. Prior to this feature, when an attempt to authenticate the data client caused a security violation, the entire port shut down, resulting in a complete loss of connectivity.

Use this feature in IP phone deployments where a PC is connected to the IP phone. A security violation found on the data VLAN results in the shutdown of only the data VLAN. The traffic on the voice VLAN flows through the device without interruption.

How to Configure IEEE 802.1x Port-Based Authentication

Configuring 802.1x Port-Based Authentication

Beginning in privileged EXEC mode, follow these steps to configure 802.1x port-based authentication:

Procedure

  Command or Action Purpose

Step 1

enable

Example:


Device> enable

Enables privileged EXEC mode.

Enter your password if prompted.

Step 2

configure terminal

Example:


Device# configure terminal

Enters global configuration mode.

Step 3

aaa new-model

Example:


Device(config)# aaa new-model

Enables AAA.

Step 4

aaa authentication dot1x {default} method1

Example:


Device(config)# aaa authentication dot1x default group radius

Creates an 802.1x authentication method list.

  • To create a default list that is used when a named list is not specified in the authentication command, use the default keyword followed by the method that is to be used in default situations. The default method list is automatically applied to all ports.

  • For method1, enter the group radius keywords to use the list of all RADIUS servers for authentication.

Note


Though other keywords are visible in the command-line help string, only the group radius keywords are supported.

Step 5

dot1x system-auth-control

Example:


Device(config)# dot1x system-auth-control

Enables 802.1x authentication globally on the device.

Step 6

aaa authorization network {default} group radius

Example:


Device(config)# aaa authorization network default group radius

(Optional) Configures the device to use user-RADIUS authorization for all network-related service requests, such as per-user ACLs or VLAN assignment.

Step 7

radius server server-name

Example:


Device(config)# radius server server1

(Optional) Specifies the name for the RADIUS server configuration, and enters RADIUS server configuration mode.

Step 8

address ipv4 ip address auth-port port number acct-port port number

Example:


Device(config-radius-server)# address ipv4 10.1.10.1 auth-port 1645 acct-port 1682

(Optional) Specifies the RADIUS server.

Step 9

key string

Example:


Device(config-radius-server)# key rad123

(Optional) Specifies the authentication and encryption key used between the device and the RADIUS daemon running on the RADIUS server.

Step 10

exit

Example:


Device(config-radius-server)# exit

Exits RADIUS server configuration mode and returns to global configuration mode.

Step 11

interface type number

Example:


Device(config)# interface gigabitethernet 1/0/2
Or
Device(config)# interface fastethernet 1/0/2

Specifies the port connected to the client that is to be enabled for IEEE 802.1x authentication, and enters interface configuration mode.

Step 12

switchport mode access

Example:


Device(config-if)# switchport mode access

(Optional) Sets the port to access mode only if you configured the RADIUS server in Step 6 and Step 7.

Step 13

authentication port-control auto

Example:


Device(config-if)# authentication port-control auto

Enables 802.1x authentication on the port.

Step 14

dot1x pae authenticator

Example:


Device(config-if)# dot1x pae authenticator

Sets the interface Port Access Entity to act only as an authenticator and ignore messages meant for a supplicant.

Step 15

end

Example:


Device(config-if)# end

Exits interface configuration mode and returns to privileged EXEC mode.

Disabling 802.1x Authentication on the Port

You can disable 802.1x authentication on the port by using the no dot1x pae interface configuration command.

Beginning in privileged EXEC mode, follow these steps to disable 802.1x authentication on the port. This procedure is optional.

Procedure

  Command or Action Purpose

Step 1

enable

Example:


Device> enable 

Enables privileged EXEC mode.

  • Enter your password if prompted.

Step 2

configure terminal

Example:


Device# configure terminal

Enters global configuration mode.

Step 3

interface type number

Example:


Device(config)# interface gigabitethernet 1/0/2
Or
Device(config)# interface fastethernet 1/0/2

Specifies the port to be configured, and enters interface configuration mode.

Step 4

switchport mode access

Example:


Device(config-if)# switchport mode access

(Optional) Sets the port to access mode only if you configured the RADIUS server.

Step 5

no dot1x pae authenticator

Example:


Device(config-if)# no dot1x pae authenticator

Disables 802.1x authentication on the port.

Step 6

end

Example:


Device(config-if)# end

Exits interface configuration mode and returns to privileged EXEC mode.

Resetting the 802.1x Authentication Configuration to the Default Values

Beginning in privileged EXEC mode, follow these steps to reset the 802.1x authentication configuration to the default values. This procedure is optional.

Procedure

  Command or Action Purpose

Step 1

enable

Example:


Device> enable 

Enables privileged EXEC mode.

  • Enter your password if prompted.

Step 2

configure terminal

Example:


Device# configure terminal

Enters global configuration mode.

Step 3

interface type number

Example:


Device(config)# interface gigabitethernet 1/0/1
Or
Device(config)# interface fastethernet 0/1

Specifies the port to be configured, and enters interface configuration mode.

Step 4

dot1x default

Example:


Device(config-if)# dot1x default

Resets the 802.1x parameters to the default values.

Step 5

end

Example:


Device(config-if)# end

Exits interface configuration mode and returns to privileged EXEC mode.

Configuring Periodic Re-Authentication

You can enable periodic 802.1x client re-authentication and specify how often it occurs. If you do not specify a time period before enabling re-authentication, the number of seconds between attempts is 3600.

Beginning in privileged EXEC mode, follow these steps to enable periodic re-authentication of the client and to configure the number of seconds between re-authentication attempts. This procedure is optional.

Procedure

  Command or Action Purpose

Step 1

enable

Example:


Device> enable 

Enables privileged EXEC mode.

  • Enter your password if prompted.

Step 2

configure terminal

Example:


Device# configure terminal

Enters global configuration mode.

Step 3

interface type number

Example:


Device(config)# interface gigabitethernet 1/0/1
Or
Device(config)# interface fastethernet 1/0/1

Specifies the port to be configured, and enters interface configuration mode.

Step 4

authentication periodic

Example:


Device(config-if)# authentication periodic

Enables periodic re-authentication of the client, which is disabled by default.

Note


The default value is 3600 seconds. To change the value of the reauthentication timer or to have the device use a RADIUS-provided session timeout, enter the authentication timer reauthenticate command.

Step 5

authentication timer {{[inactivity | reauthenticate | restart | unauthorized]} {value}}

Example:


Device(config-if)# authentication timer reauthenticate 180

Sets the number of seconds between re-authentication attempts.

The authentication timer keywords have these meanings:

  • inactivity : Interval in seconds after which if there is no activity from the client then it is unauthorized

  • reauthenticate : Time in seconds after which an automatic re-authentication attempt is initiated

  • restart value : Interval in seconds after which an attempt is made to authenticate an unauthorized port

  • unauthorized value : Interval in seconds after which an unauthorized session will get deleted

This command affects the behavior of the device only if periodic re-authentication is enabled.

Step 6

end

Example:


Device(config-if)# end

Exits interface configuration mode and returns to privileged EXEC mode.

Setting the Re-Authentication Number

You can also change the number of times that the device restarts the authentication process before the port changes to the unauthorized state.


Note


You should change the default value of this command only to adjust for unusual circumstances such as unreliable links or specific behavioral problems with certain clients and authentication servers.


Beginning in privileged EXEC mode, follow these steps to set the re-authentication number. This procedure is optional.

Procedure

  Command or Action Purpose

Step 1

enable

Example:


Device> enable 

Enables privileged EXEC mode.

  • Enter your password if prompted.

Step 2

configure terminal

Example:


Device# configure terminal

Enters global configuration mode.

Step 3

interface type number

Example:


Device(config)# interface gigabitethernet 1/0/2
Or
Device(config)# interface fastethernet 1/0/2

Specifies the port to be configured, and enters interface configuration mode.

Step 4

switchport mode access

Example:


Device(config-if)# switchport mode access

Sets the port to access mode only if you previously configured the RADIUS server.

Step 5

dot1x max-req count

Example:


Device(config-if)# dot1x max-req 4

Sets the number of times that the device restarts the authentication process before the port changes to the unauthorized state. The range is 0 to 10; the default is 2.

Step 6

end

Example:


Device(config-if)# end

Exits interface configuration mode and returns to privileged EXEC mode.

Setting the Device-to-Client Frame-Retransmission Number

In addition to changing the device-to-client retransmission time, you can change the number of times that the device sends an EAP-request/identity frame (assuming no response is received) to the client before restarting the authentication process.


Note


You should change the default value of this command only to adjust for unusual circumstances such as unreliable links or specific behavioral problems with certain clients and authentication servers.


Beginning in privileged EXEC mode, follow these steps to set the device-to-client frame-retransmission number. This procedure is optional.

Procedure

  Command or Action Purpose

Step 1

enable

Example:


Device> enable 

Enables privileged EXEC mode.

  • Enter your password if prompted.

Step 2

configure terminal

Example:


Device# configure terminal

Enters global configuration mode.

Step 3

interface type number

Example:


Device(config)# interface gigabitethernet 1/0/2
Or
Device(config)# interface fastethernet 1/0/2

Specifies the port to be configured, and enters interface configuration mode.

Step 4

dot1x max-reauth-req count

Example:


Device(config-if)# dot1x max-reauth-req 5

Sets the number of times that the device sends an EAP-request/identity frame to the client before restarting the authentication process. The range is 1 to 10; the default is 2.

Step 5

end

Example:


Device(config-if)# end

Exits interface configuration mode and returns to privileged EXEC mode.

Changing the Switch-to-Client Retransmission Time

The client responds to the EAP-request/identity frame from the device with an EAP-response/identity frame. If the device does not receive this response, it waits a set period of time (known as the retransmission time) and then resends the frame.


Note


You should change the default value of this command only to adjust for unusual circumstances such as unreliable links or specific behavioral problems with certain clients and authentication servers.


Follow these steps to change the amount of time that the device waits for client notification. This procedure is optional.

Procedure

  Command or Action Purpose

Step 1

enable

Example:


Device> enable 

Enables privileged EXEC mode.

  • Enter your password if prompted.

Step 2

configure terminal

Example:


Device# configure terminal

Enters global configuration mode.

Step 3

interface interface-type interface-number

Example:

Example:


Device(config)# interface gigabitethernet 1/0/1
Or
Device(config)# interface fastethernet 1/0/1

Specifies the port to be configured, and enters interface configuration mode.

Step 4

authentication timer reauthenticate seconds

Example:


Device(config-if)# authentication timer reauthenticate 60

Sets the number of seconds that the switch waits for a response to an EAP-request/identity frame from the client before resending the request.

  • The range is 1 to 65535 seconds; the default is 5.

Step 5

end

Example:


Device(config-if)# end

Exits interface configuration mode and returns to privileged EXEC mode.

Step 6

show authentication sessions interface type number

Example:

Example:


Device# show authentication sessions gigabitethernet 1/0/1
Or
Device# show authentication sessions fastethernet 1/0/1

Displays information about current Auth-Manager sessions for the specified interface.

Configuring the Host Mode

Beginning in privileged EXEC mode, follow these steps to allow multiple hosts (clients) on an IEEE 802.1x-authorized port that has the authentication port-control interface configuration command set to auto . Use the multi-domain keyword to configure and enable multidomain authentication (MDA), which allows both a host and a voice device, such as an IP phone (Cisco or non-Cisco), on the same switch port. This procedure is optional.

Procedure

  Command or Action Purpose

Step 1

enable

Example:


Device> enable 

Enables privileged EXEC mode.

  • Enter your password if prompted.

Step 2

configure terminal

Example:


Device# configure terminal

Enters global configuration mode.

Step 3

interface type number

Example:


Device(config)# interface gigabitethernet 1/0/2
Or
Device(config)# interface fastethernet 1/0/2

Specifies the port to be configured, and enters interface configuration mode.

Step 4

authentication host-mode [multi-auth | multi-domain | multi-host | single-host]

Example:


Device(config-if)# authentication host-mode multi-host

Allows multiple hosts (clients) on an 802.1x-authorized port.

The keywords have these meanings:

  • multi-auth : Allows multiple authenticated clients on both the voice VLAN and data VLAN.

    Note


    The multi-auth keyword is only available with the authentication host-mode command.

  • multi-host : Allows multiple hosts on an 802.1x-authorized port after a single host has been authenticated.

  • multi-domain :Allows both a host and a voice device, such as an IP phone (Cisco or non-Cisco), to be authenticated on an IEEE 802.1x-authorized port.

    Note


    You must configure the voice VLAN for the IP phone when the host mode is set to multi-domain .

Make sure that the authentication port-control interface configuration command is set to auto for the specified interface.

Step 5

end

Example:


Device(config-if)# end

Exits interface configuration mode and returns to privileged EXEC mode.

Enabling MAC Move

MAC move allows an authenticated host to move from one port on the device to another.

Beginning in privileged EXEC mode, follow these steps to globally enable MAC move on the device. This procedure is optional.

Procedure

  Command or Action Purpose

Step 1

enable

Example:


Device> enable 

Enables privileged EXEC mode.

  • Enter your password if prompted.

Step 2

configure terminal

Example:


Device# configure terminal

Enters global configuration mode.

Step 3

authentication mac-move permit

Example:


Device(config)# authentication mac-move permit

Enables MAC move on the device. Default is deny.

  • In Session Aware Networking mode, the default CLI is access-session mac-move deny . To enable Mac Move in Session Aware Networking, use the no access-session mac-move global configuration command.

  • In legacy mode (IBNS 1.0), default value for mac-move is deny and in C3PL mode (IBNS 2.0) default value is permit .

Step 4

end

Example:


Device(config)# end

Exits global configuration mode and returns to privileged EXEC mode.

Enabling MAC Replace

MAC replace allows a host to replace an authenticated host on a port.

Beginning in privileged EXEC mode, follow these steps to enable MAC replace on an interface. This procedure is optional.

Procedure

  Command or Action Purpose

Step 1

enable

Example:


Device> enable 

Enables privileged EXEC mode.

  • Enter your password if prompted.

Step 2

configure terminal

Example:


Device# configure terminal

Enters global configuration mode.

Step 3

interface type number

Example:


Device(config)# interface gigabitethernet 1/0/2
Or
Device(config)# interface fastethernet 1/0/2

Specifies the port to be configured, and enters interface configuration mode.

Step 4

authentication violation {protect | replace | restrict | shutdown}

Example:


Device(config-if)# authentication violation replace

Use the replace keyword to enable MAC replace on the interface. The port removes the current session and initiates authentication with the new host.

The other keywords have these effects:

  • protect : the port drops packets with unexpected MAC addresses without generating a system message.

  • restrict : violating packets are dropped by the CPU and a system message is generated.

  • shutdown : the port is error disabled when it receives an unexpected MAC address.

Step 5

end

Example:


Device(config-if)# end

Exits interface configuration mode and returns to privileged EXEC mode.

Configuring 802.1x Accounting

Enabling AAA system accounting with 802.1x accounting allows system reload events to be sent to the accounting RADIUS server for logging. The server can then infer that all active 802.1x sessions are closed.

Because RADIUS uses the unreliable UDP transport protocol, accounting messages might be lost due to poor network conditions. If the device does not receive the accounting response message from the RADIUS server after a configurable number of retransmissions of an accounting request, this system message appears:


Accounting message %s for session %s failed to receive Accounting Response.

When the stop message is not sent successfully, this message appears:


00:09:55: %RADIUS-4-RADIUS_DEAD: RADIUS server 172.20.246.201:1645,1646 is not responding.


Note


You must configure the RADIUS server to perform accounting tasks, such as logging start, stop, and interim-update messages and time stamps.


Procedure

  Command or Action Purpose

Step 1

enable

Example:


Device> enable 

Enables privileged EXEC mode.

  • Enter your password if prompted.

Step 2

configure terminal

Example:


Device# configure terminal

Enters global configuration mode.

Step 3

interface type number

Example:


Device(config)# interface gigabitethernet 1/0/3
Or
Device(config)# interface fastethernet 1/0/3

Specifies the port to be configured, and enters interface configuration mode.

Step 4

aaa accounting dot1x default start-stop group radius

Example:


Device(config-if)# aaa accounting dot1x default start-stop group radius

Enables 802.1x accounting using the list of all RADIUS servers.

Step 5

aaa accounting system default start-stop group radius

Example:


Device(config-if)# aaa accounting system default start-stop group radius

(Optional) Enables system accounting (using the list of all RADIUS servers) and generates system accounting reload event messages when the device reloads.

Step 6

end

Example:


Device(config-if)# end

Exits interface configuration mode and returns to privileged EXEC mode.

Configuring the Device-to-RADIUS-Server Communication

You must enable authentication, authorization, and accounting (AAA) and specify the authentication method list. A method list describes the sequence and authentication method to be queried to authenticate a user.

You can globally configure the timeout, retransmission, and encryption key values for all RADIUS servers by using the radius server global configuration command. If you want to configure these options on a per-server basis, use the radius-server timeout and radius-server retransmit global configuration commands.

You also need to configure some settings on the RADIUS server. These settings include the IP address of the device and the key string to be shared by both the server and the device. For more information, see the RADIUS server documentation.

Follow these steps to configure the RADIUS server parameters on the device. This procedure is required.

Procedure

  Command or Action Purpose

Step 1

enable

Example:


Device> enable

Enables privileged EXEC mode.

  • Enter your password if prompted.

Step 2

configure terminal

Example:


Device# configure terminal

Enters global configuration mode.

Step 3

radius server server-name

Example:


Device(config)# radius server server1

(Optional) Specifies the name for the RADIUS server configuration, and enters RADIUS server configuration mode.

Step 4

address ipv4 ip address auth-port port number acct-port port number

Example:


Device(config-radius-server)# address ipv4 10.1.10.1 auth-port 1645 acct-port 1682

(Optional) Specifies the RADIUS server.

Step 5

key string

Example:


Device(config-radius-server)# key rad123

(Optional) Specifies the authentication and encryption key used between the device and the RADIUS daemon running on the RADIUS server.

Step 6

end

Example:


Device(config-radius-server)# end

Exits global configuration mode and returns to privileged EXEC mode.

Configuring 802.1x Authentication

To allow per-user ACLs or VLAN assignment, you must enable AAA authorization to configure the device for all network-related service requests.

This is the 802.1x AAA process:

Before you begin

To configure 802.1x port-based authentication, you must enable authentication, authorization, and accounting (AAA) and specify the authentication method list. A method list describes the sequence and authentication method to be queried to authenticate a user.

Procedure

  Command or Action Purpose

Step 1

A user connects to a port on the device.

Step 2

Authentication is performed.

Step 3

VLAN assignment is enabled, as appropriate, based on the RADIUS server configuration.

Step 4

The device sends a start message to an accounting server.

Step 5

Re-authentication is performed, as necessary.

Step 6

The device sends an interim accounting update to the accounting server that is based on the result of re-authentication.

Step 7

The user disconnects from the port.

Step 8

The device sends a stop message to the accounting server.

Configuring the Number of Authentication Retries

You can configure the maximum number of authentication attempts allowed before a user is assigned to the restricted VLAN by using the authentication event retry retry count interface configuration command. The range of allowable authentication attempts is 1 to 3. The default is 3 attempts.

Perform this optional task to configure the maximum number of allowed authentication attempts.

Procedure

  Command or Action Purpose

Step 1

enable

Example:


Device> enable 

Enables privileged EXEC mode.

  • Enter your password if prompted.

Step 2

configure terminal

Example:


Device# configure terminal

Enters global configuration mode.

Step 3

interface type number

Example:


Device(config)# interface gigabitethernet 1/0/1
Or
Device(config)# interface fastethernet 1/0/1

Specifies the port to be configured, and enters interface configuration mode.

Step 4

access-session port-control auto

Example:


Device(config-if)# access-session port-control auto

Enables 802.1X authentication on the port.

Step 5

authentication event fail action authorize vlan vlan-id

Example:


Device(config-if)# authentication event fail action authorize vlan 40

Specifies an active VLAN as an 802.1X auth-fail VLAN. The range is 1 to 4094.

Step 6

authentication event failretry retry-count

Example:


Device(config-if)# authentication event fail retry 4

Specifies a number of authentication attempts before a port moves to the auth-fail VLAN. The range is 0 to 5, and the default is 2 attempts after the initial failed event.

Step 7

end

Example:


Device(config-if)# end

Exits interface configuration mode and returns to privileged EXEC mode.

Example

The following example shows how to set 2 as the number of authentication attempts allowed before the port moves to the auth-fail VLAN:

Device(config-if)# authentication event retry 2

Configuring Flexible Authentication Ordering

The examples used in the instructions below changes the order of Flexible Authentication Ordering so that MAB is attempted before IEEE 802.1X authentication (dot1x). MAB is configured as the first authentication method, so MAB will have priority over all other authentication methods.


Note


Before changing the default order and priority of these authentication methods, however, you should understand the potential consequences of those changes. See http://www.cisco.com/en/US/prod/collateral/iosswrel/ps6537/ps6586/ps6638/application_note_c27-573287_ps6638_Products_White_Paper.html for details.


Beginning in privileged EXEC mode, follow these steps:

Procedure

  Command or Action Purpose

Step 1

enable

Example:


Device> enable 

Enables privileged EXEC mode.

  • Enter your password if prompted.

Step 2

configure terminal

Example:


Device# configure terminal

Enters global configuration mode.

Step 3

interface type number

Example:


Device(config)# interface gigabitethernet 1/0/1
Or
Device(config)# interface fastethernet 1/0/1

Specifies the port to be configured, and enters interface configuration mode.

Step 4

switchport mode access

Example:


Device(config-if)# switchport mode access

Sets the port to access mode only if you previously configured the RADIUS server.

Step 5

authentication order [ dot1x | mab ] | {webauth}

Example:


Device(config-if)# authentication order mab dot1x

(Optional) Sets the order of authentication methods used on a port.

Step 6

authentication priority [ dot1x | mab ] | {webauth}

Example:


Device(config-if)# authentication priority mab dot1x

(Optional) Adds an authentication method to the port-priority list.

Step 7

end

Example:


Device(config-if)# end

Exits interface configuration mode and returns to privileged EXEC mode.

Configuring a Guest VLAN

When you configure a guest VLAN, clients that are not 802.1x-capable are put into the guest VLAN when the server does not receive a response to its EAP request/identity frame. Clients that are 802.1x-capable but that fail authentication are not granted network access. The device supports guest VLANs in single-host or multiple-hosts mode.

Beginning in privileged EXEC mode, follow these steps to configure a guest VLAN. This procedure is optional.

Procedure

  Command or Action Purpose

Step 1

enable

Example:


Device> enable 

Enables privileged EXEC mode.

  • Enter your password if prompted.

Step 2

configure terminal

Example:


Device# configure terminal

Enters global configuration mode.

Step 3

interface type number

Example:


Device(config)# interface gigabitethernet 1/0/1
Or
Device(config)# interface fastethernet 1/0/1

Specifies the port to be configured, and enters interface configuration mode.

Step 4

authentication event no-response action authorize vlan vlan-id

Example:


Device(config-if)# authentication event no-response action authorize vlan 2

Specifies an active VLAN as an 802.1x guest VLAN. The range is 1 to 4094.

You can configure any active VLAN except an internal VLAN (routed port), an RSPAN VLAN or a voice VLAN as an 802.1x guest VLAN.

Step 5

end

Example:


Device(config-if)# end

Exits interface configuration mode and returns to privileged EXEC mode.

Configuring a Restricted VLAN

When you configure a restricted VLAN on a device, clients that are IEEE 802.1x-compliant are moved into the restricted VLAN when the authentication server does not receive a valid username and password. The device supports restricted VLANs only in single-host mode.

Beginning in privileged EXEC mode, follow these steps to configure a restricted VLAN. This procedure is optional.

Procedure

  Command or Action Purpose

Step 1

enable

Example:


Device> enable 

Enables privileged EXEC mode.

  • Enter your password if prompted.

Step 2

configure terminal

Example:


Device# configure terminal

Enters global configuration mode.

Step 3

interface type number

Example:


Device(config)# interface gigabitethernet 1/0/1
Or
Device(config)# interface fastethernet 1/0/1

Specifies the port to be configured, and enters interface configuration mode.

Step 4

authentication port-control auto

Example:


Device(config-if)# authentication port-control auto

Enables 802.1x authentication on the port.

Step 5

authentication event fail action authorize vlan vlan-id

Example:


Device(config-if)# authentication event fail action authorize vlan 2

Specifies an active VLAN as an 802.1x restricted VLAN. The range is 1 to 4094.

  • You can configure any active VLAN except an internal VLAN (routed port), an RSPAN VLAN or a voice VLAN as an 802.1x restricted VLAN.

Step 6

end

Example:


Device(config-if)# end

Exits interface configuration mode and returns to privileged EXEC mode.

Configuring 802.1X Auth-Fail VLAN

Perform this task to configure an auth-fail VLAN.

Procedure

  Command or Action Purpose

Step 1

enable

Example:


Device> enable 

Enables privileged EXEC mode.

  • Enter your password if prompted.

Step 2

configure terminal

Example:


Device# configure terminal

Enters global configuration mode.

Step 3

interface type slot/port

Example:


Device(config)# interface gigabitethernet 1/0/1
Or
Device(config)# interface fastethernet 1/0/1

Specifies the port to be configured, and enters interface configuration mode.

Step 4

access-session port-control auto

Example:


Device(config-if)# access-session port-control auto

Enables 802.1X authentication on the port.

Step 5

authentication event fail action authorize vlan vlan-id

Example:


Device(config-if)# authentication event fail action authorize vlan 40

Specifies an active VLAN as an 802.1X auth fail VLAN. The range is 1 to 4094.

Step 6

end

Example:


Device(config-if)# end

Returns to privileged EXEC mode.

Step 7

show access-session interface interface-id

Example:


Device# show access-session interface gigabitethernet 1/0/1
Or
Device# show access-session interface fastethernet 1/0/1

(Optional) Verify your entries.

Step 8

copy running-config startup-config

Example:


Device# copy running-config startup-config

(Optional) Saves your entries in the configuration file.

What to do next

To disable and remove the auth-fail VLAN, use the no authentication event fail interface configuration command. The port returns to the default state.

Configuring Open1x

Beginning in privileged EXEC mode, follow these steps to enable manual control of the port authorization state:

Procedure

  Command or Action Purpose

Step 1

enable

Example:


Device> enable 

Enables privileged EXEC mode.

  • Enter your password if prompted.

Step 2

configure terminal

Example:


Device# configure terminal

Enters global configuration mode.

Step 3

interface type number

Example:


Device(config)# interface gigabitethernet 1/0/1
Or
Device(config)# interface fastethernet 1/0/1

Specifies the port to be configured, and enters interface configuration mode.

Step 4

switchport mode access

Example:


Device(config-if)# switchport mode access

Sets the port to access mode only if you configured the RADIUS server.

Step 5

authentication control-direction {both | in}

Example:


Device(config-if)# authentication control-direction both

(Optional) Configures the port control as unidirectional or bidirectional.

Step 6

authentication fallback name

Example:


Device(config-if)# authentication fallback profile1

(Optional) Configures a port to use web authentication as a fallback method for clients that do not support 802.1x authentication.

Step 7

authentication host-mode [multi-auth | multi-domain | multi-host | single-host]

Example:


Device(config-if)# authentication host-mode multi-auth

(Optional) Sets the authorization manager mode on a port.

Step 8

authentication open

Example:


Device(config-if)# authentication open

(Optional) Enables or disable open access on a port.

Step 9

authentication order [ dot1x | mab ] | {webauth}

Example:


Device(config-if)# authentication order dot1x webauth

(Optional) Sets the order of authentication methods used on a port.

Step 10

authentication periodic

Example:


Device(config-if)# authentication periodic

(Optional) Enables or disable reauthentication on a port.

Step 11

authentication port-control {auto | force-authorized | force-un authorized}

Example:


Device(config-if)# authentication port-control auto

(Optional) Enables manual control of the port authorization state.

Step 12

end

Example:


Device(config-if)# end

Exits interface configuration mode and returns to privileged EXEC mode.

Configuring Limiting Login for Users

Procedure

  Command or Action Purpose

Step 1

enable

Example:

Device> enable

Enables privileged EXEC mode.

  • Enter your password if prompted.

Step 2

configure terminal

Example:

Device# configure terminal

Enters global configuration mode.

Step 3

aaa new-model

Example:

Device(config)# aaa new-model

Enables the authentication, authorization, and accounting (AAA) access control model.

Step 4

aaa authentication login default local

Example:

Device(config)# aaa authentication login default local

Sets the authentication, authorization, and accounting (AAA) authentication by using the default authentication methods.

Step 5

aaa authentication rejected n in m ban x

Example:

Device(config)# aaa authentication rejected 3 in 20 ban 300

Configures the time period for which an user is blocked, if the user fails to successfully login within the specified time and login attempts.

  • n : Specifies the number of times a user can try to login.

  • m : Specifies the number of seconds within which an user can try to login.

  • x : Specifies the time period an user is banned if the user fails to successfully login.

Step 6

end

Example:

Device(config)# end

Exits global configuration mode and returns to privileged EXEC mode.

Step 7

show aaa local user blocked

Example:

Device# show aaa local user blocked

Displays the list of local users who were blocked.

Step 8

clear aaa local user blocked username username

Example:

Device# clear aaa local user blocked username user1

Clears the information about the blocked local user.

Example

The following is sample output from the show aaa local user blocked command:

Device# show aaa local user blocked

       Local-user                  State

       user1                       Watched (till 11:34:42 IST Feb 5 2015)


Configuring 802.1x Inaccessible Authentication Bypass with Critical Voice VLAN

Beginning in privileged EXEC mode, follow these steps to configure critical voice VLAN on a port and enable the inaccessible authentication bypass feature.

Procedure

  Command or Action Purpose

Step 1

enable

Example:


Device> enable 

Enables privileged EXEC mode.

  • Enter your password if prompted.

Step 2

configure terminal

Example:


Device# configure terminal

Enters global configuration mode.

Step 3

aaa new-model

Example:


Device(config)# aaa new-model

Enables AAA.

Step 4

radius-server dead-criteria{time seconds } [tries number]

Example:


Device(config)# radius-server dead-criteria time 20 tries 10

Sets the conditions that determine when a RADIUS server is considered unavailable or down (dead).

  • time :1 to 120 seconds. The device dynamically determines a default seconds value between 10 and 60.

  • number : 1 to 100 tries. The device dynamically determines a default tries number between 10 and 100.

Step 5

radius-server deadtime minutes

Example:


Device(config)# radius-server deadtime 60

(Optional) Sets the number of minutes during which a RADIUS server is not sent requests.

  • The range is from 0 to 1440 minutes (24 hours). The default is 0 minutes.

Step 6

radius server server-name

Example:


Device(config)# radius server server1

(Optional) Specifies the name for the RADIUS server configuration, and enters RADIUS server configuration mode.

Step 7

address ipv4 ip address auth-port port number acct-port port number

Example:


Device(config-radius-server)# address ipv4 10.1.10.1 auth-port 1645 acct-port 1682

(Optional) Specifies the RADIUS server.

Step 8

key string

Example:


Device(config-radius-server)# key rad123

(Optional) Specifies the authentication and encryption key used between the device and the RADIUS daemon running on the RADIUS server.

Step 9

dot1x critical {eapol | recovery delay milliseconds}

Example:


Device(config)# dot1x critical eapol
Device(config)# dot1x critical recovery delay 2000

(Optional) Configure the parameters for inaccessible authentication bypass:

  • eapol : Specify that the device sends an EAPOL-Success message when the device successfully authenticates the critical port.

  • recovery delay milliseconds : Set the recovery delay period during which the device waits to re-initialize a critical port when a RADIUS server that was unavailable becomes available. The range is from 1 to 10000 milliseconds. The default is 1000 milliseconds (a port can be re-initialized every second).

Step 10

interface type number

Example:


Device(config)# interface gigabitethernet 1/0/1
Or
Device(config)# interface fastethernet 1/0/1

Specify the port to be configured, and enters interface configuration mode.

Step 11

authentication event server dead action {authorize | reinitialize} vlan vlan-id]

Example:


Device(config-if)# authentication event server dead action 
reinitialicze vlan 20

Use these keywords to move hosts on the port if the RADIUS server is unreachable:

  • authorize : Move any new hosts trying to authenticate to the user-specified critical VLAN.

  • reinitialize : Move all authorized hosts on the port to the user-specified critical VLAN.

Step 12

switchport voice vlan vlan-id

Example:


Device(config-if)# switchport voice vlan  

Specifies the voice VLAN for the port. The voice VLAN cannot be the same as the critical data VLAN configured in Step 6.

Step 13

authentication event server dead action authorize voice

Example:


Device(config-if)#  authentication event server dead action 
authorize voice

Configures critical voice VLAN to move data traffic on the port to the voice VLAN if the RADIUS server is unreachable.

Step 14

end

Example:


Device(config-if)# end

Exits interface configuration mode and returns to privileged EXEC mode.

Step 15

show authentication interface type number

Example:


Device# show authentication interface gigabitethernet 1/0/1
Or
Device# show authentication interface fastethernet 1/0/1

(Optional) Verify your entries.

What to do next

To return to the RADIUS server default settings, use the no radius-server dead-criteria , no radius-server deadtime , and the no radius server global configuration commands. To disable inaccessible authentication bypass, use the no authentication event server dead action interface configuration command. To disable critical voice VLAN, use the no authentication event server dead action authorize voice interface configuration command.

Configuring MAC Authentication Bypass

Beginning in privileged EXEC mode, follow these steps to enable MAC authentication bypass. This procedure is optional.

Procedure

  Command or Action Purpose

Step 1

enable

Example:


Device> enable 

Enables privileged EXEC mode.

  • Enter your password if prompted.

Step 2

configure terminal

Example:


Device# configure terminal

Enters global configuration mode.

Step 3

interface type number

Example:


Device(config)# interface gigabitethernet 1/0/2
Or
Device(config)# interface fastethernet 1/0/2

Specifies the port to be configured, and enters interface configuration mode.

Step 4

authentication port-control auto

Example:


Device(config-if)# authentication port-control auto

Enables 802.1x authentication on the port.

Step 5

mab [eap]

Example:


Device(config-if)# mab

Enables MAC authentication bypass.

(Optional) Use the eap keyword to configure the device to use EAP for authorization.

Step 6

end

Example:


Device(config-if)# end

Exits interface configuration mode and returns to privileged EXEC mode.

Formatting a MAC Authentication Bypass Username and Password

Use the optional mab request format command to format the MAB username and password in a style accepted by the authentication server. The username and password are usually the MAC address of the client. Some authentication server configurations require the password to be different from the username.

Beginning in privileged EXEC mode, follow these steps to format MAC authentication bypass username and passwords.

Procedure

  Command or Action Purpose

Step 1

enable

Example:


Device> enable 

Enables privileged EXEC mode.

  • Enter your password if prompted.

Step 2

configure terminal

Example:


Device# configure terminal

Enters global configuration mode.

Step 3

mab request format attribute 1 groupsize {1 | 2 | 4 |12} [separator {- | : | .} {lowercase | uppercase}]

Example:


Device(config)# mab request format attribute 1 groupsize 12

Specifies the format of the MAC address in the User-Name attribute of MAB-generated Access-Request packets.

  • 1 : Sets the username format of the 12 hex digits of the MAC address.

  • groupsize : The number of hex nibbles to concatenate before insertion of a separator. A valid groupsize must be either 1, 2, 4, or 12.

  • separator : The character that separates the hex nibbles according to group size. A valid separator must be either a hyphen, colon, or period. No separator is used for a group size of 12.

  • {lowercase | uppercase} : Specifies if non-numeric hex nibbles should be in lowercase or uppercase.

Step 4

mab request format attribute2 {0 | 7} text

Example:


Device(config)# mab request format attribute 2 7 A02f44E18B12

  • 2 : Specifies a custom (nondefault) value for the User-Password attribute in MAB-generated Access-Request packets.

  • 0 : Specifies a clear-text password to follow.

  • 7 : Specifies an encrypted password to follow.

  • text : Specifies the password to be used in the User-Password attribute.

Note


When you send configuration information in e-mail, remove type 7 password information. The show tech-support command removes this information from its output by default.

Step 5

end

Example:


Device(config)# end

Exits global configuration mode and returns to privileged EXEC mode.

Configuring Number of Authentication Attempts on a Restricted VLAN

You can configure the maximum number of authentication attempts allowed before a user is assigned to the restricted VLAN by using the authentication event retry retry count interface configuration command. The range of allowable authentication attempts is 1 to 3. The default is 3 attempts.

Beginning in privileged EXEC mode, follow these steps to configure the maximum number of allowed authentication attempts. This procedure is optional.

Procedure

  Command or Action Purpose

Step 1

enable

Example:


Device> enable 

Enables privileged EXEC mode.

  • Enter your password if prompted.

Step 2

configure terminal

Example:


Device# configure terminal

Enters global configuration mode.

Step 3

interface type number

Example:


Device(config)# interface gigabitethernet 1/0/2
Or
Device(config)# interface fastethernet 1/0/2

Specifies the port to be configured, and enters interface configuration mode.

Step 4

authentication port-control auto

Example:


Device(config-if)# authentication port-control auto

Enables 802.1x authentication on the port.

Step 5

authentication event fail action authorize vlan vlan-id

Example:


Device(config-if)# authentication event fail action authorize vlan 8

Specifies an active VLAN as an 802.1x restricted VLAN. The range is 1 to 4094.

  • You can configure any active VLAN except an internal VLAN (routed port), an RSPAN VLAN or a voice VLAN as an 802.1x restricted VLAN.

Step 6

authentication event retry retry count

Example:


Device(config-if)# authentication event retry 2

Specifies a number of authentication attempts to allow before a port moves to the restricted VLAN. The range is 1 to 3, and the default is 3.

Step 7

end

Example:


Device(config-if)# end

Exits interface configuration mode and returns to privileged EXEC mode.

Configuring VLAN ID-Based MAC Authentication

Beginning in privileged EXEC mode, follow these steps:

Procedure

  Command or Action Purpose

Step 1

enable

Example:


Device> enable 

Enables privileged EXEC mode.

  • Enter your password if prompted.

Step 2

configure terminal

Example:


Device# configure terminal

Enters global configuration mode.

Step 3

mab request format attribute 32 vlan access-vlan

Example:


Device(config)# mab request format attribute 32 vlan access-vlan

Enables VLAN ID-based MAC authentication.

Step 4

end

Example:


Device(config)# end

Exits global configuration mode and returns to privileged EXEC mode.

Changing the Quiet Period

When a device cannot authenticate the client, the device remains idle for a set period of time and then tries again. The authentication timer restart interface configuration command controls the idle period. A failed authentication of the client might occur because the client provided an invalid password. You can provide a faster response time to the user by entering a number smaller than the default.

Beginning in privileged EXEC mode, follow these steps to change the quiet period. This procedure is optional.

Procedure

  Command or Action Purpose

Step 1

enable

Example:


Device> enable 

Enables privileged EXEC mode.

  • Enter your password if prompted.

Step 2

configure terminal

Example:


Device# configure terminal

Enters global configuration mode.

Step 3

interface interface-type interface-number

Example:


Device(config)# interface gigabitethernet 1/0/2
Or
Device(config)# interface fastethernet 1/0/2

Specifies the port to be configured, and enters interface configuration mode.

Step 4

authentication timer restart seconds

Example:


Device(config-if)# authentication timer restart 30

Sets the number of seconds that the switch remains in the quiet state following a failed authentication exchange with the client.

  • The range is 1 to 65535 seconds; the default is 60.

Step 5

end

Example:


Device(config-if)# end

Exits interface configuration mode and returns to privileged EXEC mode.

Step 6

show authentication sessions interface interface-type interface-number

Example:

Example:


Device# show authentication sessions interface gigabitethernet 1/0/2
Or
Device# show authentication sessions interface fastethernet 1/0/2

Displays information about current Auth-Manager sessions.

Configuring 802.1x Violation Modes

You can configure an 802.1x port so that it shuts down, generates a syslog error, or discards packets from a new device when:

  • A device connects to an 802.1x-enabled port

  • The maximum number of allowed about devices have been authenticated on the port

Beginning in privileged EXEC mode, follow these steps to configure the security violation actions on the device:

Procedure

  Command or Action Purpose

Step 1

enable

Example:


Device> enable 

Enables privileged EXEC mode.

  • Enter your password if prompted.

Step 2

configure terminal

Example:


Device# configure terminal

Enters global configuration mode.

Step 3

aaa new-model

Example:


Device(config)# aaa new-model

Enables AAA.

Step 4

aaa authentication dot1x {default} method1

Example:


Device(config)# aaa authentication dot1x default group radius

Creates an 802.1x authentication method list.

  • To create a default list that is used when a named list is not specified in the authentication command, use the default keyword followed by the method that is to be used in default situations. The default method list is automatically applied to all ports.

  • For method1 , enter the group radius keywords to use the list of all RADIUS servers for authentication.

Step 5

interface type number

Example:


Device(config)# interface gigabitethernet 1/0/2
Or
Device(config)# interface fastethernet 1/0/2

Specifies the port connected to the client that is to be enabled for IEEE 802.1x authentication, and enters interface configuration mode.

Step 6

switchport mode access

Example:


Device(config-if)# switchport mode access

Sets the port to access mode.

Step 7

authentication violation {shutdown | restrict | protect | replace}

Example:


Device(config-if)# authentication violation restrict

Configures the violation mode. The keywords have these meanings:

  • shutdown : Error; disable the port.

  • restrict : Generates a syslog error.

  • protect : Drops packets from any new device that sends traffic to the port.

  • replace : Removes the current session and authenticates with the new host.

Step 8

end

Example:


Device(config-if)# end

Exits interface configuration mode and returns to privileged EXEC mode.

Configuring Voice-Aware 802.1x Security

You use the voice-aware 802.1x security feature on the device to disable only the VLAN on which a security violation occurs, whether it is a data or voice VLAN. You can use this feature in IP phone deployments where a PC is connected to the IP phone. A security violation found on the data VLAN results in the shutdown of only the data VLAN. The traffic on the voice VLAN flows through the device without interruption.

Follow these guidelines to configure voice-aware 802.1x voice security on the device:

  • You enable voice-aware 802.1x security by entering the errdisable detect cause security-violation shutdown vlan global configuration command. You disable voice-aware 802.1x security by entering the no version of this command. This command applies to all 802.1x-configured ports in the device.


    Note


    If you do not include the shutdown vlan keywords, the entire port is shut down when it enters the error-disabled state.


  • If you use the errdisable recovery cause security-violation global configuration command to configure error-disabled recovery, the port is automatically re-enabled. If error-disabled recovery is not configured for the port, you re-enable it by using the shutdown and no shutdown interface configuration commands.

  • You can re-enable individual VLANs by using the clear errdisable interface interface-id vlan [vlan-list] privileged EXEC command. If you do not specify a range, all VLANs on the port are enabled.

Beginning in privileged EXEC mode, follow these steps to enable voice-aware 802.1x security:

Procedure

  Command or Action Purpose

Step 1

enable

Example:


Device> enable 

Enables privileged EXEC mode.

  • Enter your password if prompted.

Step 2

configure terminal

Example:


Device# configure terminal

Enters global configuration mode.

Step 3

errdisable detect cause security-violation shutdown vlan

Example:


Device(config)# errdisable detect cause security-violation shutdown vlan

Shuts down any VLAN on which a security violation error occurs.

Note

 
If the shutdown vlan keywords are not included, the entire port enters the error-disabled state and shuts down.

Step 4

exit

Example:


Device(config)# exit
Exits global configuration mode and returns to privileged EXEC mode.

Step 5

clear errdisable interfaceinterface-type interface-number vlan [vlan-list]

Example:


Device(config)# clear errdisable interface gigabitethernet 1/0/2 vlan
Or
Device(config)# clear errdisable interface fastethernet 1/0/2 vlan
(Optional) Reenables individual VLANs that have been error disabled.
  • For the interface-type interface-number arguments, specify the port on which to reenable the individual VLANs.

  • (Optional) For the[vlan-list] argument, specify a list of VLANs to be re-enabled. If the VLAN list is not specified, all VLANs are re-enabled.

Step 6

show errdisable detect

Example:


Device# show errdisable detect
Displays the error-disable detection status.

Configuration Examples for IEEE 802.1x Port-Based Authentication

Example: Configuring Inaccessible Authentication Bypass

This example shows how to configure the inaccessible authentication bypass feature:


Device> enable
Device# configure terminal
Device(config)# radius-server dead-criteria time 30 tries 20
Device(config)# radius-server deadtime 60
Device(config)# radius server server1
Device(config-radius-server)# address ipv4 10.1.10.1 auth-port 1645 acct-port 1682
Device(config-radius-server)# key rad123
Device(config-radius-server)# exit
Device(config)# dot1x critical eapol
Device(config)# dot1x critical recovery delay 2000
Device(config)# interface gigabitethernet 1/0/1
Device(config-if)# dot1x critical
Device(config-if)# dot1x critical recovery action reinitialize
Device(config-if)# dot1x critical vlan 20
Device(config-if)# end

Example: Per-User ACLs Authentication through 802.1x/MAB/WebAuth Users

The following example shows how to configure a device for a downloadable policy:


Device> enable
Device# configure terminal
Device(config)# aaa new-model
Device(config)# aaa authorization network default local group radius
Device(config)# ip device tracking
Device(config)# ip access-list extended default_acl
Device(config-ext-nacl)# permit ip any any
Device(config-ext-nacl)# exit
Device(config)# radius-server vsa send authentication
Device(config)# interface fastEthernet 2/13
Device(config-if)# ip access-group default_acl in
Device(config-if)# end

Additional References

Related Documents

Related Topic

Document Title

For complete syntax and usage information for the commands used in this chapter.

Consolidated Platform Command Reference, Cisco IOS Release 15.2(7)Ex (Catalyst 1000 Switches)

Standards and RFCs

Standard/RFC Title

RFC 3580

IEEE 802.1X Remote Authentication Dial In User Service (RADIUS) Usage Guidelines

Technical Assistance

Description Link

The Cisco Support website provides extensive online resources, including documentation and tools for troubleshooting and resolving technical issues with Cisco products and technologies.

To receive security and technical information about your products, you can subscribe to various services, such as the Product Alert Tool (accessed from Field Notices), the Cisco Technical Services Newsletter, and Really Simple Syndication (RSS) Feeds.

Access to most tools on the Cisco Support website requires a Cisco.com user ID and password.

http://www.cisco.com/support

Feature History for IEEE 802.1x Port-Based Authentication

This table provides release and related information for features explained in this module.

These features are available on all releases subsequent to the one they were introduced in, unless noted otherwise.

Release

Feature

Feature Information

Cisco IOS Release 15.2(7)E1

IEEE 802.1x Port-Based Authentication

IEEE 802.1x authentication prevents unauthorized devices (clients) from gaining access to the network.

Use Cisco Feature Navigator to find information about platform and software image support. To access Cisco Feature Navigator, go to http://www.cisco.com/go/cfn.