- Index
- New and Changed Information
- Preface
- Overview
- Installing and Launching the DCNM Server
- Installing and Launching the DCNM Client
- Using the DCNM Client
- Administering DCNM Server Users
- Administering Device Discovery
- Administering Devices and Credentials
- Administering DCNM Licensed Devices
- Working with Topology
- Managing Events
- Working with Inventory
- Configuring SPAN
- Managing Device Software Images
- Working with Configuration Change Management
- Administering Auto-Synchronization with Devices
- Administering Statistical Data Collection
- Administering DCNM Server Log Settings
- Maintaining the DCNM Database
- Troubleshooting DCNM
- Information About Configuration Change Management
- Licensing Requirements for Configuration Change Management
- Prerequisites for Configuration Change Management
- Guidelines and Limitations for Configuration Change Management
- Working with the Version Browser
- Viewing the Archival Status of a Device
- Viewing the Archival History of a Device
- Browsing and Commenting on Configuration Versions
- Archiving the Current Running Configuration of a Device
- Viewing an Archived Configuration Version
- Comparing Configuration Versions
- Using the Version Comparison Tools
- Merging Configuration Differences
- Performing a Configuration Rollback
- Viewing the Rollback History of a Device
- Deleting All Archived Configurations for a Device
- Configuring Archival Jobs
- Configuring Archival Settings
- Field Descriptions for Configuration Change Management
- Additional References
- Feature History for Configuration Change Management
Working with Configuration Change Management
This chapter describes how to use the Configuration Change Management feature.
This chapter includes the following sections:
•![]() Information About Configuration Change Management
Information About Configuration Change Management
•![]() Licensing Requirements for Configuration Change Management
Licensing Requirements for Configuration Change Management
•![]() Prerequisites for Configuration Change Management
Prerequisites for Configuration Change Management
•![]() Guidelines and Limitations for Configuration Change Management
Guidelines and Limitations for Configuration Change Management
•![]() Working with the Version Browser
Working with the Version Browser
•![]() Configuring Archival Settings
Configuring Archival Settings
•![]() Field Descriptions for Configuration Change Management
Field Descriptions for Configuration Change Management
•![]() Feature History for Configuration Change Management
Feature History for Configuration Change Management
Information About Configuration Change Management
The Configuration Change Management feature allows you to keep an archive of configurations from managed devices. You can view and compare archived configurations. You can roll back the running configuration of a managed device to any archived configuration version available for the device in Cisco Data Center Network Manager (DCNM).
This section includes the following topics:
Version Browser
The Version Browser feature allows you to see information about archived configurations, view and compare specific configuration versions, and merge changes from one configuration version to another. After you modify a configuration by merging changes, you can save the modified configuration as a text file on a file system available to the computer that you are using to run the DCNM client.
From the Version Browser, you can initiate a configuration rollback for a device, using any of the archived configurations available in DCNM for the device. DCNM uses the rollback feature available in Cisco NX-OS. For more information about the Cisco NX-OS rollback feature, see the Cisco NX-OS System Management Configuration Guide, Release 4.1.
Archival Jobs
The Archival Jobs feature allows you to control the automated archival of the running configuration on managed devices. You can add, edit, and delete custom archival jobs. A job consists of settings that determine when the job runs and a list of managed devices included in the job. You can choose to archive configurations at a regular interval, at a scheduled time on selected days, or whenever DCNM detects configuration changes on a device. You can also comment on a job.
The Default archival job always exists. You cannot delete it. By default, it is disabled.
Devices can be assigned to one archival job only. If you assign a device to an archival job, DCNM removes the device from the job that it was previously assigned to.
If a managed device is not assigned to a custom archival job, DCNM automatically assigns it to the Default archival job.
Archival Settings
The Archival Settings feature allows you to configure settings related to configuration change management, including the number of configuration versions that DCNM stores for each managed device, how many rollback and archival history entries DCNM stores for each managed device, and which file server DCNM uses during a configuration rollback.
Virtualization Support
DCNM treats each virtual device context (VDC) on a Cisco NX-OS device as a separate device; therefore, DCNM archives the running configurations of each VDC provided that DCNM has successfully discovered the VDC and views it as a managed device.
Licensing Requirements for Configuration Change Management
The following table shows the licensing requirements for this feature:
|
|
|
|---|---|
DCNM |
Configuration Change Management requires a LAN Enterprise license. For information about obtaining and installing a DCNM LAN Enterprise license, see the "Installing Licenses" section on page 2-7. |
Prerequisites for Configuration Change Management
The Configuration Change Management feature has the following prerequisites:
•![]() The Configuration Change Management feature supports only devices that are managed by DCNM, which means that DCNM must have successfully discovered the device.
The Configuration Change Management feature supports only devices that are managed by DCNM, which means that DCNM must have successfully discovered the device.
•![]() The Configuration Change Management feature supports only devices that you have added to the list of DCNM-licensed devices.
The Configuration Change Management feature supports only devices that you have added to the list of DCNM-licensed devices.
•![]() Devices must be reachable by DCNM when DCNM attempts to archive the configuration or to perform a configuration rollback. An archival job or configuration rollback fails if the device is unreachable by DCNM.
Devices must be reachable by DCNM when DCNM attempts to archive the configuration or to perform a configuration rollback. An archival job or configuration rollback fails if the device is unreachable by DCNM.
Guidelines and Limitations for Configuration Change Management
Configuration Change Management has the following configuration guidelines and limitations:
•![]() You can archive a maximum of 50 configuration versions per managed device.
You can archive a maximum of 50 configuration versions per managed device.
•![]() Configure archival jobs and archival settings based upon the needs of your organization.
Configure archival jobs and archival settings based upon the needs of your organization.
•![]() We recommend enabling the Default archival job and configuring the job to run at the lowest frequency that your backup policy tolerates.
We recommend enabling the Default archival job and configuring the job to run at the lowest frequency that your backup policy tolerates.
Working with the Version Browser
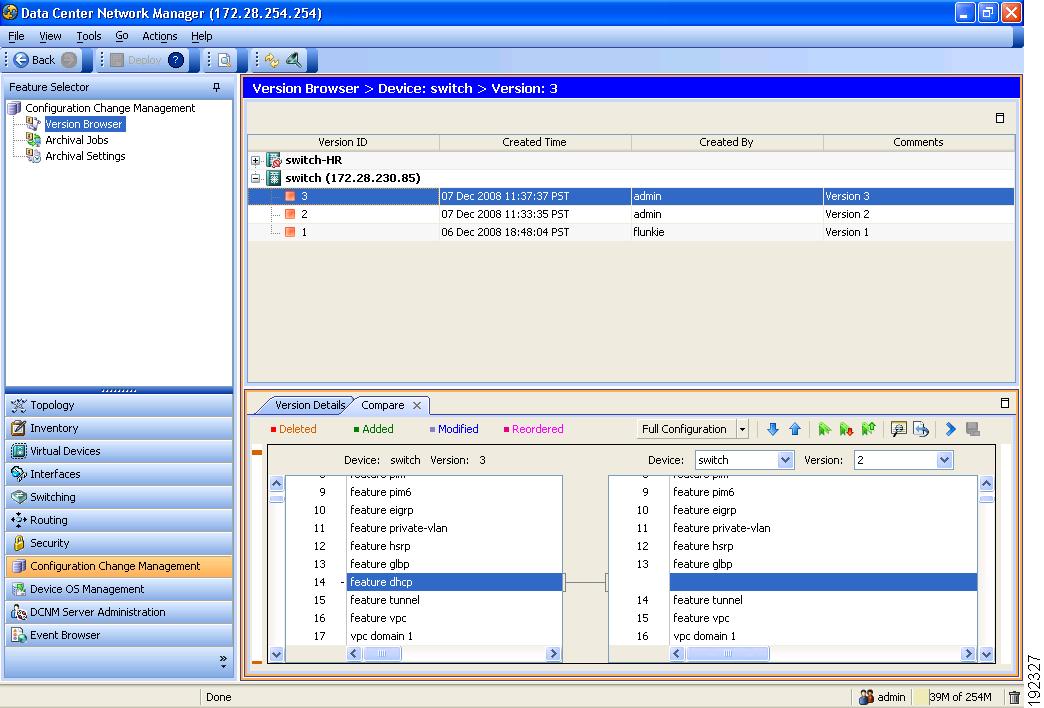
Figure 14-1 shows the Version Browser content pane.
Figure 14-1 Version Browser Content Pane
This section includes the following topics:
•![]() Viewing the Archival Status of a Device
Viewing the Archival Status of a Device
•![]() Viewing the Archival History of a Device
Viewing the Archival History of a Device
•![]() Browsing and Commenting on Configuration Versions
Browsing and Commenting on Configuration Versions
•![]() Archiving the Current Running Configuration of a Device
Archiving the Current Running Configuration of a Device
•![]() Viewing an Archived Configuration Version
Viewing an Archived Configuration Version
•![]() Comparing Configuration Versions
Comparing Configuration Versions
•![]() Using the Version Comparison Tools
Using the Version Comparison Tools
•![]() Merging Configuration Differences
Merging Configuration Differences
•![]() Performing a Configuration Rollback
Performing a Configuration Rollback
•![]() Viewing the Rollback History of a Device
Viewing the Rollback History of a Device
•![]() Deleting All Archived Configurations for a Device
Deleting All Archived Configurations for a Device
Viewing the Archival Status of a Device
You can view the archival status of a device. The archival status for a device includes the following information:
•![]() Whether the archival job that includes the device is enabled or disabled.
Whether the archival job that includes the device is enabled or disabled.
•![]() The schedule for the archival job that includes the device.
The schedule for the archival job that includes the device.
•![]() The Job ID of the archival job that includes the device.
The Job ID of the archival job that includes the device.
BEFORE YOU BEGIN
A managed device must be on the list of DCNM-licensed devices before you can use it with Configuration Change Management. Only licensed devices appear in the Version Browser.
DETAILED STEPS
To view the archival status of a device, follow these steps:
Step 1 ![]() From the Feature Selector pane, choose Configuration Change Management > Version Browser.
From the Feature Selector pane, choose Configuration Change Management > Version Browser.
The Summary pane displays a table of devices.
Step 2 ![]() Click the device that has the archival status that you want to view.
Click the device that has the archival status that you want to view.
The Details pane displays archive-related information about the device, including an Archival Status section.
If the archival job that includes the device is enabled, a View Schedule link appears.
If the archival job that includes the device is disabled, a Enable Archival Schedule link appears.
Step 3 ![]() (Optional) If you want to view the details of the archival job that includes the device, click the View Schedule link or the Enable Archival Schedule link. For more information, see the "Viewing Details of an Archival Job" section.
(Optional) If you want to view the details of the archival job that includes the device, click the View Schedule link or the Enable Archival Schedule link. For more information, see the "Viewing Details of an Archival Job" section.
Viewing the Archival History of a Device
You can view the archival history of a device. The archival history records each attempt to create a new archival configuration version from the current running configuration of a device
BEFORE YOU BEGIN
A managed device must be on the list of DCNM-licensed devices before you can use it with Configuration Change Management. Only licensed devices appear in the Version Browser.
DETAILED STEPS
To view the archival history of a device, follow these steps:
Step 1 ![]() From the Feature Selector pane, choose Configuration Change Management > Version Browser.
From the Feature Selector pane, choose Configuration Change Management > Version Browser.
The Summary pane displays a table of devices.
Step 2 ![]() Click the device that has archival history that you want to view.
Click the device that has archival history that you want to view.
The Details pane displays archive-related information about the device, including an Archival History section.
Step 3 ![]() (Optional) If necessary, click the Archival History section to expand it.
(Optional) If necessary, click the Archival History section to expand it.
The Archival History section displays a table of information about every attempt made to create a new archival configuration version for the device.
Browsing and Commenting on Configuration Versions
You can browse the archived configuration versions for managed devices. Browsing allows you to see information about all versions of an archived configuration.
You can also add, change, or delete comments on any version of an archived configuration.
BEFORE YOU BEGIN
A managed device must be on the list of DCNM-licensed devices before you can use it with Configuration Change Management. Only licensed devices appear in the Version Browser.
The archived configuration versions that you want to browse or comment on must exist in DCNM.
DETAILED STEPS
To browse and comment on configuration versions, follow these steps:
Step 1 ![]() From the Feature Selector pane, choose Configuration Change Management > Version Browser.
From the Feature Selector pane, choose Configuration Change Management > Version Browser.
The Summary pane displays a table of devices.
Step 2 ![]() Double-click the device that has archived configuration versions that you want to browse.
Double-click the device that has archived configuration versions that you want to browse.
A list of archived configuration versions appears below the device that you double-clicked. For each version, the Summary pane shows the version ID, the date and time that DCNM created the version, the DCNM user who created the version, and comments about the version.
Step 3 ![]() (Optional) If you want to comment on a version, follow these steps:
(Optional) If you want to comment on a version, follow these steps:
a. ![]() Click the version that you want to update with comments.
Click the version that you want to update with comments.
The Details pane shows the Version Details tab, which contains the same information about the version that appears in the Summary pane, except that the Comments box is available for you to use.
b. ![]() Click in the Comments box and enter your comments.
Click in the Comments box and enter your comments.
c. ![]() From the menu bar, choose File > Deploy to save your changes to the DCNM server.
From the menu bar, choose File > Deploy to save your changes to the DCNM server.
Archiving the Current Running Configuration of a Device
You can archive the current running configuration of a managed device.
Archiving the current running configuration succeeds only if the most recent archived version in DCNM is different than the current running configuration.
BEFORE YOU BEGIN
The device must be managed and reachable.
A managed device must be on the list of DCNM-licensed devices before you can use it with Configuration Change Management. Only licensed devices appear in the Version Browser.
DETAILED STEPS
To archive the current running configuration of a managed device, follow these steps:
Step 1 ![]() From the Feature Selector pane, choose Configuration Change Management > Version Browser.
From the Feature Selector pane, choose Configuration Change Management > Version Browser.
The Summary pane displays a table of devices.
Step 2 ![]() Click the device that has a running configuration that you want to archive now.
Click the device that has a running configuration that you want to archive now.
Step 3 ![]() From the menu bar, choose Actions > Archive Configuration.
From the menu bar, choose Actions > Archive Configuration.
Step 4 ![]() To confirm that DCNM successfully archived the configuration, view the list of archived configuration versions for the device. If necessary, double-click the device to open the list. The new version should appear at the top of the list.
To confirm that DCNM successfully archived the configuration, view the list of archived configuration versions for the device. If necessary, double-click the device to open the list. The new version should appear at the top of the list.

Note ![]() If a message box notifies you that archiving the configuration was skipped, then DCNM did not detect differences between the current running configuration and the most recent archived configuration version for the device. To close the message box, click OK.
If a message box notifies you that archiving the configuration was skipped, then DCNM did not detect differences between the current running configuration and the most recent archived configuration version for the device. To close the message box, click OK.
Viewing an Archived Configuration Version
You can view a version of an archived configuration.
BEFORE YOU BEGIN
A managed device must be on the list of DCNM-licensed devices before you can use it with Configuration Change Management. Only licensed devices appear in the Version Browser.
The archived configuration version that you want to view must exist in DCNM.
DETAILED STEPS
To view a version of an archived configuration, follow these steps:
Step 1 ![]() From the Feature Selector pane, choose Configuration Change Management > Version Browser.
From the Feature Selector pane, choose Configuration Change Management > Version Browser.
The Summary pane displays a table of devices.
Step 2 ![]() Click the device that has an archived configuration version that you want to view.
Click the device that has an archived configuration version that you want to view.
Step 3 ![]() (Optional) If necessary, to view the list of archived configuration versions for the device, double-click the device.
(Optional) If necessary, to view the list of archived configuration versions for the device, double-click the device.
Step 4 ![]() Click the version of the archived configuration that you want to view.
Click the version of the archived configuration that you want to view.
Step 5 ![]() From the menu bar, choose Actions > View Configuration.
From the menu bar, choose Actions > View Configuration.
In the Details pane, the Configuration tab displays the configuration version that you selected.

Tip ![]() You can search the text of the configuration. To do so, press Ctrl + F.
You can search the text of the configuration. To do so, press Ctrl + F.
Comparing Configuration Versions
You can compare two configuration versions. The configurations that you can compare can be any two archived configuration version in DCNM, including archived configurations from different managed devices. You can also compare an archived configuration version to the running configuration or the startup configuration of a managed device.
BEFORE YOU BEGIN
A managed device must be on the list of DCNM-licensed devices before you can use it with Configuration Change Management. Only licensed devices appear in the Version Browser.
If you are comparing archived configuration versions, the two versions must exist in DCNM.
If you are comparing an archived configuration version to a running configuration or startup configuration on a managed device, the device must be reachable by DCNM.
DETAILED STEPS
To compare an archived configuration version to another configuration version, follow these steps:
Step 1 ![]() From the Feature Selector pane, choose Configuration Change Management > Version Browser.
From the Feature Selector pane, choose Configuration Change Management > Version Browser.
The Summary pane displays a table of devices.
Step 2 ![]() Double-click the device that has an archived configuration version that you want to compare to another configuration version.
Double-click the device that has an archived configuration version that you want to compare to another configuration version.
Step 3 ![]() (Optional) If necessary, to view the list of archived configurations for the device, double-click the device.
(Optional) If necessary, to view the list of archived configurations for the device, double-click the device.
Step 4 ![]() Click the archived configuration version that you want to compare to another configuration version.
Click the archived configuration version that you want to compare to another configuration version.
Step 5 ![]() Use the following table to compare the selected version to the configuration version that you want:
Use the following table to compare the selected version to the configuration version that you want:
 icon.
icon.
In the Details pane, the Compare tab displays the two configuration versions in side-by-side panes.
Step 6 ![]() Use the version comparison tools as needed. For more information, see the "Using the Version Comparison Tools" section.
Use the version comparison tools as needed. For more information, see the "Using the Version Comparison Tools" section.
Using the Version Comparison Tools
When you use the Version Browser to compare configuration versions, the Compare tab in the Details pane has many options to assist you with the comparison.
Note ![]() You must be comparing two configurations to use the version comparison tools. For more information, see the "Comparing Configuration Versions" section.
You must be comparing two configurations to use the version comparison tools. For more information, see the "Comparing Configuration Versions" section.
Use the options described in the following table to assist you compare two configuration versions.
|
|
|
|---|---|
|
From the list, choose the desired viewing option, as follows: • • |
|
Click the |
|
Click the |
|
1. 2. A bookmark icon appears beside the line number. |
|
1. 2. The configurations in both panes jump to the next bookmarked line. |
|
1. 2. The configurations in both panes jump to the previous bookmarked line. |
|
Use this option to choose the archived configuration version shown in the right configuration pane. 1. 2. 3. The right configuration pane displays the configuration version that you specified. |
|
Click the • • • • |
|
Use this option to copy a difference from the configuration in the left configuration pane into the configuration in the right pane. For detailed steps, see the "Merging Configuration Differences" section. |
|
Click the |
 Full vs. Delta View
  —Shows only the sections of each configuration that differ.
  Bookmark
  Next Bookmark
  Prev Bookmark
Merging Configuration Differences
While you are comparing two configuration versions, you can merge lines that contain differences. The merge feature allows you to merge a whole line shown in the left configuration pane into the configuration that is shown in the right configuration pane.
BEFORE YOU BEGIN
You must be comparing two configuration versions that have differences.
Ensure that the configuration version that you want to want to merge the changes into appears in the right configuration pane.
DETAILED STEPS
To merge configuration differences, follow these steps:
Step 1 ![]() Use the
Use the  icon and the
  icon as needed to jump to the line that you want to merge from the left configuration pane into the right configuration pane.
Tip ![]() The
The  icon becomes available only when you use the icon and the icon to locate differences.
Step 2 ![]() Click the icon.
Click the icon.
The selected configuration line in the left pane replaces the selected line in the right pane.
Step 3 ![]() Repeat Step 1 and Step 2 as often as needed.
Repeat Step 1 and Step 2 as often as needed.
Tip ![]() If you want to undo all merges, click the
If you want to undo all merges, click the  icon.
icon.
Step 4 ![]() (Optional) If you would like to save a copy of the configuration in the left pane as an ASCII text file, click the
(Optional) If you would like to save a copy of the configuration in the left pane as an ASCII text file, click the  icon and use the Save dialog box to save the configuration to a filename and location that you specify.
Performing a Configuration Rollback
You can roll back the configuration of a managed device to any previous version that is archived by DCNM. A rollback replaces the running configuration of the managed device with an archived configuration version that you specify.
BEFORE YOU BEGIN
A managed device must be on the list of DCNM-licensed devices before you can use it with Configuration Change Management. Only licensed devices appear in the Version Browser.
The archived configuration version that you want to use in the rollback must exist in DCNM.
DETAILED STEPS
To perform a configuration rollback, follow these steps:
Step 1 ![]() From the Feature Selector pane, choose Configuration Change Management > Version Browser.
From the Feature Selector pane, choose Configuration Change Management > Version Browser.
The Summary pane displays a table of devices.
Step 2 ![]() Click the device for which you want to perform a configuration rollback.
Click the device for which you want to perform a configuration rollback.
The Details pane displays archival information about the device, including a Rollback History section.
Step 3 ![]() (Optional) If necessary, to view the list of archived configurations for the device, double-click the device.
(Optional) If necessary, to view the list of archived configurations for the device, double-click the device.
Step 4 ![]() Click the version of the archived configuration that you want to use as the running configuration on the device.
Click the version of the archived configuration that you want to use as the running configuration on the device.
Step 5 ![]() Do one of the following:
Do one of the following:
•![]() If you want to save the configuration version that you selected as the startup configuration on the device, choose one of the following rollback options:
If you want to save the configuration version that you selected as the startup configuration on the device, choose one of the following rollback options:
–![]() If you want DCNM to restore the original running configuration of the device if any configuration command fails during the rollback, from the menu bar, choose Actions > Rollback and Save as Start-up > Restore Original Config on Error (Atomic).
If you want DCNM to restore the original running configuration of the device if any configuration command fails during the rollback, from the menu bar, choose Actions > Rollback and Save as Start-up > Restore Original Config on Error (Atomic).
–![]() If you want DCNM to ignore configuration errors during rollback, from the menu bar, choose Actions > Rollback and Save as Start-up > Skip Errors and Rollback (Best Effort).
If you want DCNM to ignore configuration errors during rollback, from the menu bar, choose Actions > Rollback and Save as Start-up > Skip Errors and Rollback (Best Effort).
–![]() If you want DCNM to stop the rollback at the first configuration error, from the menu bar, choose Actions > Rollback and Save as Start-up > Stop Rollback at First Error.
If you want DCNM to stop the rollback at the first configuration error, from the menu bar, choose Actions > Rollback and Save as Start-up > Stop Rollback at First Error.
•![]() If you want the rollback to proceed without affecting the startup configuration currently on the device, choose one of the following rollback options:
If you want the rollback to proceed without affecting the startup configuration currently on the device, choose one of the following rollback options:
–![]() If you want DCNM to restore the original running configuration of the device if any configuration command fails during the rollback, from the menu bar, choose Actions > Rollback > Restore Original Config on Error (Atomic).
If you want DCNM to restore the original running configuration of the device if any configuration command fails during the rollback, from the menu bar, choose Actions > Rollback > Restore Original Config on Error (Atomic).
–![]() If you want DCNM to ignore configuration errors during rollback, from the menu bar, choose Actions > Rollback > Skip Errors and Rollback (Best Effort).
If you want DCNM to ignore configuration errors during rollback, from the menu bar, choose Actions > Rollback > Skip Errors and Rollback (Best Effort).
–![]() If you want DCNM to stop the rollback at the first configuration error, from the menu bar, choose Actions > Rollback > Stop Rollback at First Error.
If you want DCNM to stop the rollback at the first configuration error, from the menu bar, choose Actions > Rollback > Stop Rollback at First Error.
DCNM begins the rollback operation.
Viewing the Rollback History of a Device
You can view the rollback history of a device.
BEFORE YOU BEGIN
A managed device must be on the list of DCNM-licensed devices before you can use it with Configuration Change Management. Only licensed devices appear in the Version Browser.
DETAILED STEPS
To view the rollback history of a device, follow these steps:
Step 1 ![]() From the Feature Selector pane, choose Configuration Change Management > Version Browser.
From the Feature Selector pane, choose Configuration Change Management > Version Browser.
The Summary pane displays a table of devices.
Step 2 ![]() Click the device for which you want to view rollback history.
Click the device for which you want to view rollback history.
The Details pane displays archival information about the device, including a Rollback History section.
Step 3 ![]() (Optional) If necessary, double-click the Rollback History section to expand it.
(Optional) If necessary, double-click the Rollback History section to expand it.
In the Rollback History section, a table of rollback history events appears. If no configuration rollbacks have occurred on the device, the table is empty.
Deleting All Archived Configurations for a Device
You can delete all the archived configuration versions of a device.
Note ![]() You cannot delete a specific version of an archived configuration.
You cannot delete a specific version of an archived configuration.
BEFOREYOU BEGIN
Be certain that you do not want any of the archived configuration version for the device. You cannot undo the deletion and the DCNM client does not confirm your choice to delete the archived configuration versions.
DETAILED STEPS
To delete all archived configurations for a device, follow these steps:
Step 1 ![]() From the Feature Selector pane, choose Configuration Change Management > Version Browser.
From the Feature Selector pane, choose Configuration Change Management > Version Browser.
The Summary pane displays a table of devices.
Step 2 ![]() Click the device that has archived configurations that you want to delete.
Click the device that has archived configurations that you want to delete.
Step 3 ![]() Verify that you clicked the correct device.
Verify that you clicked the correct device.
Note ![]() The next step deletes the archived configuration versions without confirming your choice.
The next step deletes the archived configuration versions without confirming your choice.
Step 4 ![]() From the menu bar, choose Actions > Delete All Versions.
From the menu bar, choose Actions > Delete All Versions.
The archived configurations for the selected device disappear from the Summary pane.
Configuring Archival Jobs
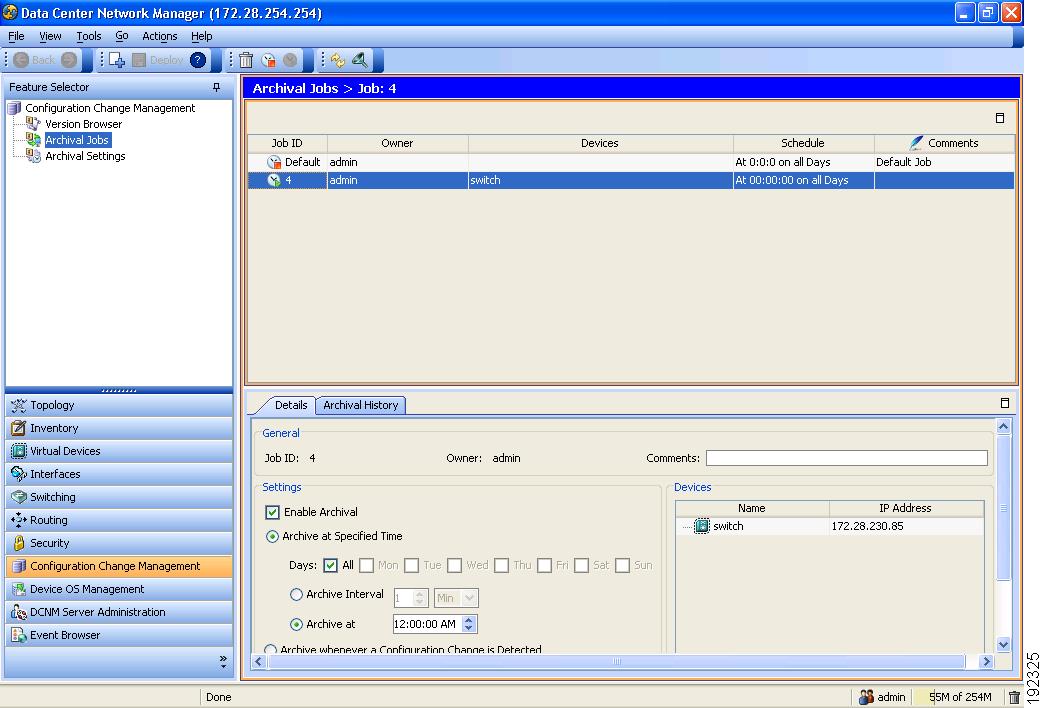
Figure 14-1 shows the Archival Jobs content pane.
Figure 14-2 Archival Jobs Content Pane
This section includes the following topics:
•![]() Enabling and Disabling an Archival Job
Enabling and Disabling an Archival Job
•![]() Viewing Details of an Archival Job
Viewing Details of an Archival Job
•![]() Viewing the History of an Archival Job
Viewing the History of an Archival Job
Configuring an Archival Job
You can create an archival job or make changes to an existing archival job.
Note ![]() By default, a new archival job is enabled.
By default, a new archival job is enabled.
BEFORE YOU BEGIN
A managed device must be on the list of DCNM-licensed devices before you can use it with Configuration Change Management. You can include only licensed devices in an archival job.
DETAILED STEPS
To configure an archival job, follow these steps:
Step 1 ![]() From the Feature Selector pane, choose Configuration Change Management > Archival Jobs.
From the Feature Selector pane, choose Configuration Change Management > Archival Jobs.
The Summary pane displays a table of archival jobs.
Step 2 ![]() Do one of the following:
Do one of the following:
•![]() If you want to create an archival job, from the menu bar, choose File > New Job.
If you want to create an archival job, from the menu bar, choose File > New Job.
•![]() If you want to make changes to an existing archival job, in the Summary pane, click the job that you want to change.
If you want to make changes to an existing archival job, in the Summary pane, click the job that you want to change.
The Details pane shows the Details tab and Archival History tab for the job.
Step 3 ![]() (Optional) If necessary, in the Details pane, click the Details tab.
(Optional) If necessary, in the Details pane, click the Details tab.
Step 4 ![]() (Optional) In the Comments field, enter your comments about the job.
(Optional) In the Comments field, enter your comments about the job.
Step 5 ![]() (Optional) If you want the job to archive configurations at a specific time, follow these steps:
(Optional) If you want the job to archive configurations at a specific time, follow these steps:
a. ![]() Click the Archive at Specified Time radio button.
Click the Archive at Specified Time radio button.
b. ![]() In the row of Days check boxes, check the check box for each day that you want the archival job to be active.
In the row of Days check boxes, check the check box for each day that you want the archival job to be active.
c. ![]() Do one of the following:
Do one of the following:
–![]() If you want the job to archive configurations at a regular interval, click the Archive Interval radio button and use the adjacent box and list to specify the interval. You can specify an interval in minutes or hours. The maximum interval is either 59 minutes or 23 hours.
If you want the job to archive configurations at a regular interval, click the Archive Interval radio button and use the adjacent box and list to specify the interval. You can specify an interval in minutes or hours. The maximum interval is either 59 minutes or 23 hours.
–![]() If you want the job to archive configurations once on each day that the job is active, click the Archive at radio button and use the adjacent box to specify the time that you want the job to start.
If you want the job to archive configurations once on each day that the job is active, click the Archive at radio button and use the adjacent box to specify the time that you want the job to start.
Step 6 ![]() (Optional) If you want the job to archive configurations at any time that DCNM detects a change to the configuration of a device included in the job, click the Archive whenever a Configuration Change is Detected radio button.
(Optional) If you want the job to archive configurations at any time that DCNM detects a change to the configuration of a device included in the job, click the Archive whenever a Configuration Change is Detected radio button.
Step 7 ![]() If you want to add one or more devices to the archival job, follow these steps:
If you want to add one or more devices to the archival job, follow these steps:
a. ![]() Under Device, right-click in a blank area and choose Add New Device.
Under Device, right-click in a blank area and choose Add New Device.
A dialog box shows available and selected devices.
a. ![]() For each device that you want to add, under Available Devices, click the device and click Add.
For each device that you want to add, under Available Devices, click the device and click Add.
Tip ![]() To add all devices to the job, click Add All.
To add all devices to the job, click Add All.
b. ![]() Click OK.
Click OK.
The devices that you added appear under Devices.
Step 8 ![]() If you want to remove a device from an archival job, follow these steps:
If you want to remove a device from an archival job, follow these steps:
a. ![]() Under Devices, click the device that you want to remove from the job.
Under Devices, click the device that you want to remove from the job.
b. ![]() Right-click the device and choose Remove Device.
Right-click the device and choose Remove Device.
The device that you removed no longer appears under Devices.
Step 9 ![]() From the menu bar, choose File > Deploy to save your changes to the DCNM server.
From the menu bar, choose File > Deploy to save your changes to the DCNM server.
If you created an archival job, it is enabled by default. If you changed an existing archival job, whether it is enabled or disabled does not change.
Enabling and Disabling an Archival Job
You can enable or disable any archival job.
DETAILED STEPS
To enable or disable an archival job, follow these steps:
Step 1 ![]() From the Feature Selector pane, choose Configuration Change Management > Archival Jobs.
From the Feature Selector pane, choose Configuration Change Management > Archival Jobs.
The Summary pane displays a table of archival jobs. In the Job ID column, enabled jobs show a green triangle and disabled jobs show a red square.
Step 2 ![]() In the Summary pane, click the archival job that you want to enable or disable.
In the Summary pane, click the archival job that you want to enable or disable.
Step 3 ![]() Do one of the following:
Do one of the following:
•![]() To enable the job, from the menu bar, choose Actions > Enable. The icon in the Job ID column changes to show a green triangle.
To enable the job, from the menu bar, choose Actions > Enable. The icon in the Job ID column changes to show a green triangle.
•![]() To disable the job, from the menu bar, choose Actions > Disable. The icon in the Job ID column changes to show a red square.
To disable the job, from the menu bar, choose Actions > Disable. The icon in the Job ID column changes to show a red square.
You do not need to save your changes.
Deleting an Archival Job
You can delete an archival job, except the Default archival job. When you delete an archival job, any devices included in the deleted job are automatically added to the Default archival job.
BEFORE YOU BEGIN
At least one custom archival job must exist in DCNM. You cannot delete the Default archival job.
DETAILED STEPS
To delete an archival job, follow these steps:
Step 1 ![]() From the Feature Selector pane, choose Configuration Change Management > Archival Jobs.
From the Feature Selector pane, choose Configuration Change Management > Archival Jobs.
The Summary pane displays a table of archival jobs.
Step 2 ![]() In the Summary pane, click the archival job that you want to delete.
In the Summary pane, click the archival job that you want to delete.
Step 3 ![]() From the menu bar, choose Actions > Delete.
From the menu bar, choose Actions > Delete.
The archival job disappears from the Summary pane.
Devices that were included in the deleted job are automatically added to the Default archival job.
You do not need to save your changes.
Viewing Details of an Archival Job
You can view the details of an archival job, which include the job ID, the owner of the job, comments about the job, the job schedule, and the devices included in the job.
DETAILED STEPS
To view the details of an archival job, follow these steps:
Step 1 ![]() From the Feature Selector pane, choose Configuration Change Management > Archival Jobs.
From the Feature Selector pane, choose Configuration Change Management > Archival Jobs.
The Summary pane displays a table of archival jobs.
Step 2 ![]() In the Summary pane, click the archival job that has details that you want to view.
In the Summary pane, click the archival job that has details that you want to view.
The Details pane displays information about the archival job, including a Details tab.
Step 3 ![]() (Optional) If necessary, in the Details pane, click the Details tab.
(Optional) If necessary, in the Details pane, click the Details tab.
The Details pane displays information and settings for the archival job that you selected.
Viewing the History of an Archival Job
You can view the history of an archival job.
BEFORE YOU BEGIN
The archival job must have occurred at least once; otherwise, there are no archival history entries to view.
DETAILED STEPS
To view history of an archival job, follow these steps:
Step 1 ![]() From the Feature Selector pane, choose Configuration Change Management > Archival Jobs.
From the Feature Selector pane, choose Configuration Change Management > Archival Jobs.
The Summary pane displays a table of archival jobs.
Step 2 ![]() In the Summary pane, click the archival job that has archival history that you want to view.
In the Summary pane, click the archival job that has archival history that you want to view.
The Details pane displays information about the archival job, including an Archival History tab.
Step 3 ![]() In the Details pane, click the Archival History tab.
In the Details pane, click the Archival History tab.
The Details pane displays a list of archival history entries, ordered by the date and time when the entry occurred. If
Step 4 ![]() (Optional) To see additional details about an archival history entry, in the Status column, click the plus symbol (+) to expand the entry.
(Optional) To see additional details about an archival history entry, in the Status column, click the plus symbol (+) to expand the entry.
The expanded entry lists information for each device included in the entry.
Configuring Archival Settings
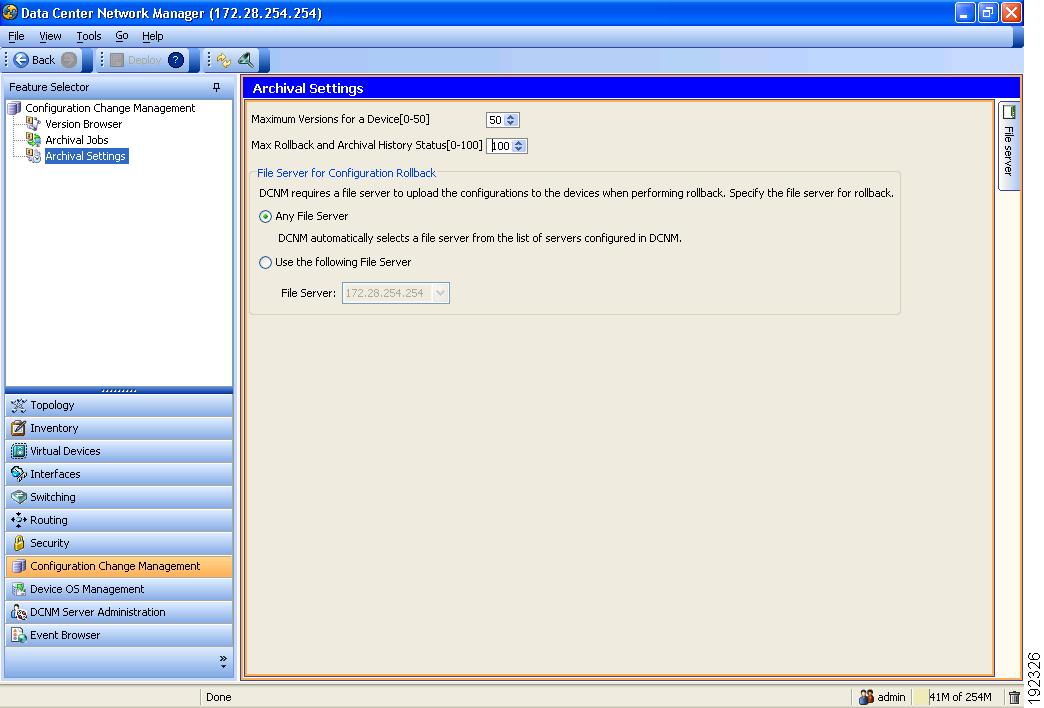
Figure 14-3 shows the Archival Settings content pane.
Figure 14-3 Archival Settings Content Pane
This section includes the following topics:
•![]() Configuring Version and History Settings
Configuring Version and History Settings
•![]() Configuring the Rollback File Server Setting
Configuring the Rollback File Server Setting
Configuring Version and History Settings
You can configure the following settings about configuration versions and history:
•![]() Maximum number of configuration versions that DCNM archives per managed device.
Maximum number of configuration versions that DCNM archives per managed device.
•![]() Maximum number of rollback history and archival history status entries that DCNM retains per managed device.
Maximum number of rollback history and archival history status entries that DCNM retains per managed device.
DETAILED STEPS
To configure version and history settings, follow these steps:
Step 1 ![]() From the Feature Selector pane, choose Configuration Change Management > Archival Settings.
From the Feature Selector pane, choose Configuration Change Management > Archival Settings.
The Contents pane displays the Archival Settings fields.
Step 2 ![]() (Optional) Use the Maximum Version for a Device [0 - 50] box to configure the maximum number of configuration versions that DCNM should archive for each managed device.
(Optional) Use the Maximum Version for a Device [0 - 50] box to configure the maximum number of configuration versions that DCNM should archive for each managed device.
Step 3 ![]() (Optional) Use the Max Rollback and Archival History Status [0 - 100] box to configure the maximum number of rollback history and archival history status entries that DCNM retains for each managed device.
(Optional) Use the Max Rollback and Archival History Status [0 - 100] box to configure the maximum number of rollback history and archival history status entries that DCNM retains for each managed device.
Step 4 ![]() From the menu bar, choose File > Deploy to save your changes to the DCNM server.
From the menu bar, choose File > Deploy to save your changes to the DCNM server.
Configuring the Rollback File Server Setting
You can configure whether DCNM uses a specific file server during a configuration rollback or whether it uses any available file server that you have configured.
BEFORE YOU BEGIN
You must configure at least one file server in DCNM. For more information, see the "Adding a File Server" section on page 13-13.
DETAILED STEPS
To configure the rollback file server settings, follow these steps:
Step 1 ![]() From the Feature Selector pane, choose Configuration Change Management > Archival Settings.
From the Feature Selector pane, choose Configuration Change Management > Archival Settings.
The Contents pane displays the Archival Settings fields.
Step 2 ![]() (Optional) If you want DCNM to use any available file server during a configuration rollback, under File Server for Configuration Rollback, click the Any File Server radio button.
(Optional) If you want DCNM to use any available file server during a configuration rollback, under File Server for Configuration Rollback, click the Any File Server radio button.
Step 3 ![]() (Optional) If you want to specify a file server that DCNM should use during a configuration rollback, follow these steps:
(Optional) If you want to specify a file server that DCNM should use during a configuration rollback, follow these steps:
a. ![]() Under File Server for Configuration Rollback, click the Use the following File Server radio button.
Under File Server for Configuration Rollback, click the Use the following File Server radio button.
b. ![]() From the File Server drop-down list, choose the file server.
From the File Server drop-down list, choose the file server.
Step 4 ![]() From the menu bar, choose File > Deploy to save your changes to the DCNM server.
From the menu bar, choose File > Deploy to save your changes to the DCNM server.
Field Descriptions for Configuration Change Management
This section includes the field descriptions for the three features available in the Feature Selector drawer for Configuration Change Management:
•![]() Field Descriptions for the Version Browser
Field Descriptions for the Version Browser
•![]() Field Descriptions for Archival Jobs
Field Descriptions for Archival Jobs
•![]() Field Descriptions for the Archival Settings Contents Pane
Field Descriptions for the Archival Settings Contents Pane
Field Descriptions for the Version Browser
This section includes the following field descriptions for the Device OS Management feature:
•![]() Device: Details: Archival Status Section
Device: Details: Archival Status Section
•![]() Device: Details: Rollback History Section
Device: Details: Rollback History Section
•![]() Device: Details: Archival History Section
Device: Details: Archival History Section
Device: Details: Archival Status Section
Device: Details: Rollback History Section
Device: Details: Archival History Section
Version: Version Details Tab
Version: Compare Tab
Field Descriptions for Archival Jobs
This section includes the following field descriptions for the Archival Jobs feature:
•![]() Archival Job: Archival History Tab
Archival Job: Archival History Tab
Archival Job: Details Tab
Archival Job: Archival History Tab
Field Descriptions for the Archival Settings Contents Pane
Additional References
For additional information related to configuration change management, see the following sections:
Related Documents
|
|
|
|---|---|
File servers in DCNM |
|
Configuration rollbacks in Cisco NX-OS |
Cisco NX-OS System Management Configuration Guide, Release 4.1 |
Standards
|
|
|
|---|---|
No new or modified standards are supported by this feature, and support for existing standards has not been modified by this feature. |
— |
Feature History for Configuration Change Management
Table 14-9 lists the release history for this feature.
 Feedback