Configuring DHCP

This chapter describes how to configure the Dynamic Host Configuration Protocol (DHCP) on a Cisco NX-OS device.

This chapter includes the following sections:

About the DHCP Relay Agent

DHCP Relay Agent

You can configure the device to run a DHCP relay agent, which forwards DHCP packets between clients and servers. This feature is useful when clients and servers are not on the same physical subnet. Relay agents receive DHCP messages and then generate a new DHCP message to send out on another interface. The relay agent sets the gateway address (giaddr field of the DHCP packet) and, if configured, adds the relay agent information option (Option 82) in the packet and forwards it to the DHCP server. The reply from the server is forwarded back to the client after removing Option 82.

After you enable Option 82, the device uses the binary ifindex format by default. If needed, you can change the Option 82 setting to use an encoded string format instead.


Note


When the device relays a DHCP request that already includes Option 82 information, the device forwards the request with the original Option 82 information without altering it.


DHCP Relay Agent Option 82

You can enable the device to insert and remove Option 82 information on DHCP packets that are forwarded by the relay agent.

Figure 1. DHCP Relay Agent in a Metropolitan Ethernet Network.

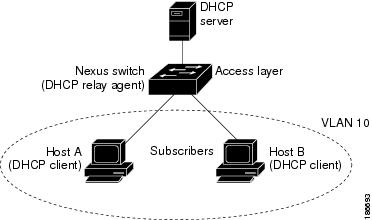
This figure shows an example of a metropolitan Ethernet network in which a centralized DHCP server assigns IP addresses to subscribers connected to the device at the access layer. Because the DHCP clients and their associated DHCP server do not reside on the same IP network or subnet, a DHCP relay agent is configured with a helper address to enable broadcast forwarding and to transfer DHCP messages between the clients and the server.

When you enable Option 82 for the DHCP relay agent on the Cisco NX-OS device, the following sequence of events occurs:

  1. The host (DHCP client) generates a DHCP request and broadcasts it on the network.

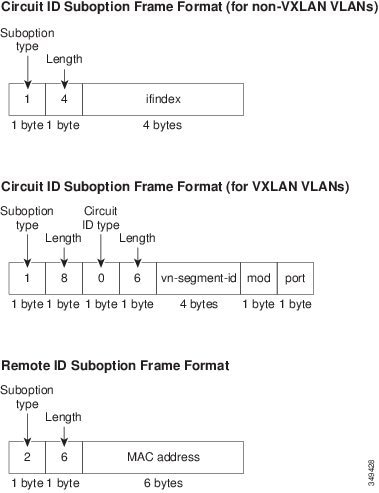
  2. When the Cisco NX-OS device receives the DHCP request, it adds the Option 82 information in the packet. The Option 82 information contains the device MAC address (the remote ID suboption) and the port identifier ifindex (for non-VXLAN VLANs) or vn-segment-id-mod-port (for VXLAN VLANs), from which the packet is received (the circuit ID suboption). In DHCP relay, the circuit ID is filled with the ifindex of the SVI or Layer 3 interface on which DHCP relay is configured.

  3. The device adds the IP address of the relay agent to the DHCP packet.

  4. The device forwards the DHCP request that includes the Option 82 field to the DHCP server.

  5. The DHCP server receives the packet. If the server is Option 82 capable, it can use the remote ID, the circuit ID, or both to assign IP addresses and implement policies, such as restricting the number of IP addresses that can be assigned to a single remote ID or circuit ID. The DHCP server echoes the Option 82 field in the DHCP reply.

  6. The DHCP server unicasts the reply to the Cisco NX-OS device if the request was relayed to the server by the device. The Cisco NX-OS device verifies that it originally inserted the Option 82 data by inspecting the remote ID and possibly the circuit ID fields. The Cisco NX-OS device removes the Option 82 field and forwards the packet to the interface that connects to the DHCP client that sent the DHCP request.

This figure shows the packet formats for the circuit ID suboption and the remote ID suboption.

Figure 2. Suboption Packet Formats

VRF Support for the DHCP Relay Agent

You can configure the DHCP relay agent to forward DHCP broadcast messages from clients in a virtual routing and forwarding (VRF) instance to DHCP servers in a different VRF. By using a single DHCP server to provide DHCP support to clients in multiple VRFs, you can conserve IP addresses by using a single IP address pool rather than one for each VRF. For general information about VRFs, see the Cisco Nexus 9000 Series NX-OS Unicast Routing Configuration Guide.

Enabling VRF support for the DHCP relay agent requires that you enable Option 82 for the DHCP relay agent.

If a DHCP request arrives on an interface that you have configured with a DHCP relay address and VRF information and the address of the DCHP server belongs to a network on an interface that is a member of a different VRF, the device inserts Option 82 information in the request and forwards it to the DHCP server in the server VRF. The Option 82 information includes the following:

VPN identifier

Name of the VRF that the interface that receives the DHCP request is a member of.

Link selection

Subnet address of the interface that receives the DHCP request. When DHCP smart relay is enabled, the link selection is filled with the subnet of the active giaddr.

Server identifier override

IP address of the interface that receives the DHCP request. When DHCP smart relay is enabled, the server identifier is filled with the active giaddr.


Note


The DHCP server must support the VPN identifier, link selection, and server identifier override options.


When the device receives the DHCP response message, it strips off the Option 82 information and forwards the response to the DHCP client in the client VRF.

DHCP Smart Relay Agent

When the DHCP relay agent receives broadcast DHCP request packets from a host, it sets giaddr to the primary address of the inbound interface and forwards the packets to the server. The server allocates IP addresses from the giaddr subnet pool until the pool is exhausted and ignores further requests.

You can configure the DHCP smart relay agent to allocate IP addresses from the secondary IP address subnet pool if the first subnet pool is exhausted or the server ignores further requests. This enhancement is useful if the number of hosts is greater than the number of IP addresses in the pool or if multiple subnets are configured on an interface using secondary addresses.

About the DHCPv6 Relay Agent

DHCPv6 Relay Agent

You can configure the device to run a DHCPv6 relay agent, which forwards DHCPv6 packets between clients and servers. This feature is useful when clients and servers are not on the same physical subnet. Relay agents receive DHCPv6 messages and then generate a new DHCPv6 message to send out on another interface. The relay agent sets the gateway address (giaddr field of the DHCPv6 packet) and forwards it to the DHCPv6 server.

VRF Support for the DHCPv6 Relay Agent

You can configure the DHCPv6 relay agent to forward DHCPv6 broadcast messages from clients in a virtual routing and forwarding (VRF) instance to DHCPv6 servers in a different VRF. By using a single DHCPv6 server to provide DHCP support to clients in multiple VRFs, you can conserve IP addresses by using a single IP address pool rather than one for each VRF. For general information about VRFs, see the Cisco Nexus 9000 Series NX-OS Unicast Routing Configuration Guide.

Licensing Requirements for DHCP

This table shows the licensing requirements for DHCP.

Product

License Requirement

Cisco NX-OS

DHCP requires no license. Any feature not included in a license package is bundled with the nx-os image and is provided at no extra charge to you. For an explanation of the Cisco NX-OS licensing scheme, see the Cisco NX-OS Licensing Guide.

Prerequisites for DHCP

DHCP has the following prerequisite:

  • You should be familiar with DHCP before you configure DHCP snooping or the DHCP relay agent.

Guidelines and Limitations for DHCP

DHCP has the following configuration guidelines and limitations:

  • For secure POAP, make sure that DHCP snooping is enabled and firewall rules are set to block unintended or malicious DHCP servers.

  • Cisco Nexus 9000 Series switches do not support the relaying of bootp packets. However, the switches do support bootp packets that are Layer 2 switched.

  • DHCP subnet broadcast is not supported.

  • DHCP snooping should not be followed by DHCP relay in the network (DHCP snooping does not work when the DHCP relay is configured on the same Nexus device).

  • If an ingress router ACL is configured on a Layer 3 interface that you are configuring with a DHCP server address, make sure that the router ACL permits DHCP traffic between DHCP servers and DHCP hosts.

  • If you use DHCP relay where DHCP clients and servers are in different VRFs, use only one DHCP server within a VRF.

  • Make sure that the DHCP configuration is synchronized across the switches in a vPC link. Otherwise, a run-time error can occur, resulting in dropped packets.

  • DHCP smart relay is limited to the first 100 IP addresses of the interface on which it is enabled.

  • You must configure a helper address on the interface in order to use DHCP smart relay.

  • In a vPC environment with DHCP smart relay enabled, the subnet of the primary and secondary addresses of an interface should be the same on both Cisco NX-OS devices.

  • When you configure DHCPv6 server addresses on an interface, a destination interface cannot be used with global IPv6 addresses.


Note


For DHCP configuration limits, see the Cisco Nexus 9000 Series NX-OS Verified Scalability Guide.

Default Settings for DHCP

This table lists the default settings for DHCP parameters.

Table 1. Default DHCP Parameters

Parameters

Default

DHCP feature

Disabled

DHCP relay agent

Enabled

DHCPv6 relay agent

Enabled

VRF support for the DHCP relay agent

Disabled

VRF support for the DHCPv6 relay agent

Disabled

DHCP Option 82 for relay agent

Disabled

DHCP smart relay agent

Disabled

DHCP server IP address

None

Configuring DHCP

Minimum DHCP Configuration

Procedure


Step 1

Enable the DHCP feature.

When the DHCP feature is disabled, you cannot configure DHCP snooping.

Step 2

Enable DHCP snooping globally.

Step 3

Enable DHCP snooping on at least one VLAN.

By default, DHCP snooping is disabled on all VLANs.

Step 4

Make sure that the DHCP server is connected to the device using a trusted interface.

Step 5

(Optional) Enable the DHCP relay agent.

Step 6

(Optional) If DHCP servers and clients are in different VRFs, do the following:

  1. Enable Option 82 for the DHCP relay agent.

  2. Enable VRF support for the DHCP relay agent.

Step 7

(Optional) Configure an interface with the IP address of the DHCP server.


Enabling or Disabling the DHCP Feature

You can enable or disable the DHCP feature on the device. By default, DHCP is disabled.

When the DHCP feature is disabled, you cannot configure the DHCP relay agent, DHCP snooping, or any of the features that depend on DHCP. In addition, all DHCP configuration is removed from the device.

SUMMARY STEPS

  1. configure terminal
  2. [no] feature dhcp
  3. (Optional) show running-config dhcp
  4. (Optional) copy running-config startup-config

DETAILED STEPS

  Command or Action Purpose

Step 1

configure terminal

Example:

switch# configure terminal
switch(config)#

Enters global configuration mode.

Step 2

[no] feature dhcp

Example:

switch(config)# feature dhcp

Enables the DHCP feature. The no option disables the DHCP feature and erases all DHCP configuration.

Step 3

(Optional) show running-config dhcp

Example:

switch(config)# show running-config dhcp
(Optional)

Displays the DHCP configuration.

Step 4

(Optional) copy running-config startup-config

Example:

switch(config)# copy running-config startup-config
(Optional)

Copies the running configuration to the startup configuration.

Enabling or Disabling the DHCP Relay Agent

You can enable or disable the DHCP relay agent. By default, the DHCP relay agent is enabled.

Before you begin

Ensure that the DHCP feature is enabled.

SUMMARY STEPS

  1. configure terminal
  2. [no] ip dhcp relay
  3. (Optional) show ip dhcp relay
  4. (Optional) show running-config dhcp
  5. (Optional) copy running-config startup-config

DETAILED STEPS

  Command or Action Purpose

Step 1

configure terminal

Example:

switch# configure terminal
switch(config)#

Enters global configuration mode.

Step 2

[no] ip dhcp relay

Example:

switch(config)# ip dhcp relay

Enables the DHCP relay agent. The no option disables the DHCP relay agent.

Step 3

(Optional) show ip dhcp relay

Example:

switch(config)# show ip dhcp relay
(Optional)

Displays the DHCP relay configuration.

Step 4

(Optional) show running-config dhcp

Example:

switch(config)# show running-config dhcp
(Optional)

Displays the DHCP configuration.

Step 5

(Optional) copy running-config startup-config

Example:

switch(config)# copy running-config startup-config
(Optional)

Copies the running configuration to the startup configuration.

Enabling or Disabling Option 82 for the DHCP Relay Agent

You can enable or disable the device to insert and remove Option 82 information on DHCP packets forwarded by the relay agent.

By default, the DHCP relay agent does not include Option 82 information in DHCP packets.

Before you begin

Ensure that the DHCP feature is enabled.

SUMMARY STEPS

  1. switch# configure terminal
  2. switch(config)# [no] ip dhcp relay information option
  3. (Optional) switch(config)# show ip dhcp relay
  4. (Optional) switch(config)# show running-config dhcp
  5. (Optional) switch(config)# copy running-config startup-config

DETAILED STEPS

  Command or Action Purpose

Step 1

switch# configure terminal

Enters global configuration mode.

Step 2

switch(config)# [no] ip dhcp relay information option

Enables the DHCP relay agent to insert and remove Option 82 information on the packets that it forwards. The Option 82 information is in binary ifindex format by default. The no option disables this behavior.

Step 3

(Optional) switch(config)# show ip dhcp relay

(Optional)

Displays the DHCP relay configuration.

Step 4

(Optional) switch(config)# show running-config dhcp

(Optional)

Displays the DHCP configuration.

Step 5

(Optional) switch(config)# copy running-config startup-config

(Optional)

Saves the change persistently through reboots and restarts by copying the running configuration to the startup configuration.

Enabling or Disabling VRF Support for the DHCP Relay Agent

You can configure the device to support the relaying of DHCP requests that arrive on an interface in one VRF to a DHCP server in a different VRF.

Before you begin

You must enable Option 82 for the DHCP relay agent.

SUMMARY STEPS

  1. configure terminal
  2. [no] ip dhcp relay information option vpn
  3. [no] ip dhcp relay sub-option type cisco
  4. (Optional) show ip dhcp relay
  5. (Optional) show running-config dhcp
  6. (Optional) copy running-config startup-config

DETAILED STEPS

  Command or Action Purpose

Step 1

configure terminal

Example:

switch# configure terminal
switch(config)#

Enters global configuration mode.

Step 2

[no] ip dhcp relay information option vpn

Example:

switch(config)# ip dhcp relay information option vpn

Enables VRF support for the DHCP relay agent. The no option disables this behavior.

Step 3

[no] ip dhcp relay sub-option type cisco

Example:

switch(config)# ip dhcp relay sub-option type cisco

Enables DHCP to use Cisco proprietary numbers 150, 152, and 151 when filling the link selection, server ID override, and VRF name/VPN ID relay agent Option 82 suboptions. The no option causes DHCP to use RFC numbers 5, 11, and 151 for the link selection, server ID override, and VRF name/VPN ID suboptions.

Step 4

(Optional) show ip dhcp relay

Example:

switch(config)# show ip dhcp relay
(Optional)

Displays the DHCP relay configuration.

Step 5

(Optional) show running-config dhcp

Example:

switch(config)# show running-config dhcp
(Optional)

Displays the DHCP configuration.

Step 6

(Optional) copy running-config startup-config

Example:

switch(config)# copy running-config startup-config
(Optional)

Copies the running configuration to the startup configuration.

Configuring DHCP Server Addresses on an Interface

You can configure DHCP server IP addresses on an interface. When an inbound DHCP BOOTREQUEST packet arrives on the interface, the relay agent forwards the packet to all DHCP server IP addresses specified. The relay agent forwards replies from all DHCP servers to the host that sent the request.

Before you begin

Ensure that the DHCP feature is enabled.

Ensure that the DHCP server is correctly configured.

Determine the IP address for each DHCP server that you want to configure on the interface.

If the DHCP server is in a different VRF than the interface, ensure that you have enabled VRF support.


Note


If an ingress router ACL is configured on an interface that you are configuring with a DHCP server address, ensure that the router ACL permits DHCP traffic between DHCP servers and DHCP hosts.


SUMMARY STEPS

  1. configure terminal
  2. Do one of the following options:
    • interface ethernet slot/port[. number]
    • interface vlan vlan-id
    • interface port-channel channel-id[.subchannel-id]
  3. ip dhcp relay address IP-address [use-vrf vrf-name]
  4. (Optional) show ip dhcp relay address
  5. (Optional) show running-config dhcp
  6. (Optional) copy running-config startup-config

DETAILED STEPS

  Command or Action Purpose

Step 1

configure terminal

Example:

switch# configure terminal
switch(config)#

Enters global configuration mode.

Step 2

Do one of the following options:

  • interface ethernet slot/port[. number]
  • interface vlan vlan-id
  • interface port-channel channel-id[.subchannel-id]

Example:

switch(config)# interface ethernet 2/3
switch(config-if)#
  • Enters interface configuration mode, where slot / port is the physical Ethernet interface that you want to configure with a DHCP server IP address. If you want to configure a subinterface, include the number argument to specify the subinterface number.

  • Enters interface configuration mode, where vlan-id is the ID of the VLAN that you want to configure with a DHCP server IP address.

  • Enters interface configuration mode, where channel-id is the ID of the port channel that you want to configure with a DHCP server IP address. If you want to configure a subchannel, include the subchannel-id argument to specify the subchannel ID.

Step 3

ip dhcp relay address IP-address [use-vrf vrf-name]

Example:

switch(config-if)# ip dhcp relay address 10.132.7.120 use-vrf red

Configures an IP address for a DHCP server to which the relay agent forwards BOOTREQUEST packets received on this interface.

To configure more than one IP address, use the ip dhcp relay address command once per address.

Step 4

(Optional) show ip dhcp relay address

Example:

switch(config-if)# show ip dhcp relay address
(Optional)

Displays all the configured DHCP server addresses.

Step 5

(Optional) show running-config dhcp

Example:

switch(config-if)# show running-config dhcp
(Optional)

Displays the DHCP configuration.

Step 6

(Optional) copy running-config startup-config

Example:

switch(config-if)# copy running-config startup-config
(Optional)

Copies the running configuration to the startup configuration.

Enabling or Disabling DHCP Smart Relay Globally

You can enable or disable DHCP smart relay globally on the device.

Before you begin

Ensure that the DHCP feature is enabled.

Ensure that the DHCP relay agent is enabled.

SUMMARY STEPS

  1. configure terminal
  2. [no] ip dhcp smart-relay global
  3. (Optional) show ip dhcp relay
  4. (Optional) show running-config dhcp
  5. (Optional) copy running-config startup-config

DETAILED STEPS

  Command or Action Purpose

Step 1

configure terminal

Example:

switch# configure terminal
switch(config)#

Enters global configuration mode.

Step 2

[no] ip dhcp smart-relay global

Example:

switch(config)# ip dhcp smart-relay global

Enables DHCP smart relay globally. The no form of this command disables DHCP smart relay.

Step 3

(Optional) show ip dhcp relay

Example:

switch(config)# show ip dhcp relay
(Optional)

Displays the DHCP smart relay configuration.

Step 4

(Optional) show running-config dhcp

Example:

switch(config)# show running-config dhcp
(Optional)

Displays the DHCP configuration.

Step 5

(Optional) copy running-config startup-config

Example:

switch(config)# copy running-config startup-config
(Optional)

Copies the running configuration to the startup configuration.

Enabling or Disabling DHCP Smart Relay on a Layer 3 Interface

You can enable or disable DHCP smart relay on Layer 3 interfaces.

Before you begin

Ensure that the DHCP feature is enabled.

Ensure that the DHCP relay agent is enabled.

SUMMARY STEPS

  1. configure terminal
  2. interface interface slot/port
  3. [no] ip dhcp smart-relay
  4. exit
  5. exit
  6. (Optional) show ip dhcp relay
  7. (Optional) show running-config dhcp
  8. (Optional) copy running-config startup-config

DETAILED STEPS

  Command or Action Purpose

Step 1

configure terminal

Example:

switch# configure terminal
switch(config)#

Enters global configuration mode.

Step 2

interface interface slot/port

Example:

switch(config)# interface ethernet 2/3
switch(config-if)#

Enters interface configuration mode, where slot/port is the interface for which you want to enable or disable DHCP smart relay.

Step 3

[no] ip dhcp smart-relay

Example:

switch(config-if)# ip dhcp smart-relay

Enables DHCP smart relay on the interface. The no form of this command disables DHCP smart relay on the interface.

Step 4

exit

Example:

switch(config-if)# exit
switch(config)#

Exits interface configuration mode.

Step 5

exit

Example:

switch(config)# exit
switch#

Exits global configuration mode.

Step 6

(Optional) show ip dhcp relay

Example:

switch# show ip dhcp relay
(Optional)

Displays the DHCP smart relay configuration.

Step 7

(Optional) show running-config dhcp

Example:

switch# show running-config dhcp
(Optional)

Displays the DHCP configuration.

Step 8

(Optional) copy running-config startup-config

Example:

switch# copy running-config startup-config
(Optional)

Copies the running configuration to the startup configuration.

Configuring DHCPv6

Enabling or Disabling the DHCPv6 Relay Agent

You can enable or disable the DHCPv6 relay agent. By default, the DHCPv6 relay agent is enabled.

Before you begin

Ensure that the DHCP feature is enabled.

SUMMARY STEPS

  1. configure terminal
  2. [no] ipv6 dhcp relay
  3. (Optional) show ipv6 dhcp relay [interface interface]
  4. (Optional) show running-config dhcp
  5. (Optional) copy running-config startup-config

DETAILED STEPS

  Command or Action Purpose

Step 1

configure terminal

Example:

switch# configure terminal
switch(config)#

Enters global configuration mode.

Step 2

[no] ipv6 dhcp relay

Example:

switch(config)# ipv6 dhcp relay

Enables the DHCPv6 relay agent. The no option disables the relay agent.

Step 3

(Optional) show ipv6 dhcp relay [interface interface]

Example:

switch(config)# show ipv6 dhcp relay
(Optional)

Displays the DHCPv6 relay configuration.

Step 4

(Optional) show running-config dhcp

Example:

switch(config)# show running-config dhcp
(Optional)

Displays the DHCP configuration.

Step 5

(Optional) copy running-config startup-config

Example:

switch(config)# copy running-config startup-config
(Optional)

Copies the running configuration to the startup configuration.

Enabling or Disabling VRF Support for the DHCPv6 Relay Agent

You can configure the device to support the relaying of DHCPv6 requests that arrive on an interface in one VRF to a DHCPv6 server in a different VRF.

Before you begin

Ensure that the DHCP feature is enabled.

Ensure that the DHCPv6 relay agent is enabled.

SUMMARY STEPS

  1. configure terminal
  2. [no] ipv6 dhcp relay option vpn
  3. [no] ipv6 dhcp relay option type cisco
  4. (Optional) show ipv6 dhcp relay [interface interface]
  5. (Optional) show running-config dhcp
  6. (Optional) copy running-config startup-config

DETAILED STEPS

  Command or Action Purpose

Step 1

configure terminal

Example:

switch# configure terminal
switch(config)#

Enters global configuration mode.

Step 2

[no] ipv6 dhcp relay option vpn

Example:

switch(config)# ipv6 dhcp relay option vpn

Enables VRF support for the DHCPv6 relay agent. The no option disables this behavior.

Step 3

[no] ipv6 dhcp relay option type cisco

Example:

switch(config)# ipv6 dhcp relay option type cisco

Causes the DHCPv6 relay agent to insert virtual subnet selection (VSS) details as part of the vendor-specific option. The no option causes the DHCPv6 relay agent to insert VSS details as part of the VSS option (68), which is defined in RFC-6607. This command is useful when you want to use DHCPv6 servers that do not support RFC-6607 but allocate IPv6 addresses based on the client VRF name.

Step 4

(Optional) show ipv6 dhcp relay [interface interface]

Example:

switch(config)# show ipv6 dhcp relay
(Optional)

Displays the DHCPv6 relay configuration.

Step 5

(Optional) show running-config dhcp

Example:

switch(config)# show running-config dhcp
(Optional)

Displays the DHCP configuration.

Step 6

(Optional) copy running-config startup-config

Example:

switch(config)# copy running-config startup-config
(Optional)

Copies the running configuration to the startup configuration.

Configuring DHCPv6 Server Addresses on an Interface

You can configure DHCPv6 server IP addresses on an interface. When an inbound DHCP BOOTREQUEST packet arrives on the interface, the relay agent forwards the packet to all DHCPv6 server IP addresses specified. The relay agent forwards replies from all DHCPv6 servers to the host that sent the request.

Before you begin

Ensure that the DHCP feature is enabled.

Ensure that the DHCPv6 server is correctly configured.

Determine the IP address for each DHCPv6 server that you want to configure on the interface.

If the DHCPv6 server is in a different VRF than the interface, ensure that you have enabled VRF support.


Note


If an ingress router ACL is configured on an interface that you are configuring with a DHCPv6 server address, ensure that the router ACL permits DHCP traffic between DHCPv6 servers and DHCP hosts.


SUMMARY STEPS

  1. configure terminal
  2. Do one of the following options:
    • interface ethernet slot/port
    • interface port-channel channel-id
  3. [no] ipv6 dhcp relay address IPv6-address [use-vrf vrf-name] [interface interface]
  4. (Optional) show running-config dhcp
  5. (Optional) copy running-config startup-config

DETAILED STEPS

  Command or Action Purpose

Step 1

configure terminal

Example:

switch# configure terminal
switch(config)#

Enters global configuration mode.

Step 2

Do one of the following options:

  • interface ethernet slot/port
  • interface port-channel channel-id

Example:

switch(config)# interface ethernet 2/3
switch(config-if)#
  • Enters interface configuration mode, where slot / port is the physical Ethernet interface that you want to configure with a DHCPv6 server IP address.

  • Enters interface configuration mode, where channel-id is the ID of the port channel that you want to configure with a DHCPv6 server IP address.

Step 3

[no] ipv6 dhcp relay address IPv6-address [use-vrf vrf-name] [interface interface]

Example:

switch(config-if)# ipv6 dhcp relay address FF02:1::FF0E:8C6C use-vrf red

Configures an IP address for a DHCPv6 server to which the relay agent forwards BOOTREQUEST packets received on this interface.

Use the use-vrf option to specify the VRF name of the server if it is in a different VRF and the other argument interface is used to specify the output interface for the destination.

The server address can either be a link-scoped unicast or multicast address or a global or site-local unicast or multicast address. The interface option is mandatory for a link-scoped server address and multicast address. It is not allowed for a global or site-scoped server address.

To configure more than one IP address, use the ipv6 dhcp relay address command once per address.

Step 4

(Optional) show running-config dhcp

Example:

switch(config-if)# show running-config dhcp
(Optional)

Displays the DHCPv6 configuration.

Step 5

(Optional) copy running-config startup-config

Example:

switch(config-if)# copy running-config startup-config
(Optional)

Copies the running configuration to the startup configuration.

Configuring the DHCPv6 Relay Source Interface

You can configure the source interface for the DHCPv6 relay agent. By default, the DHCPv6 relay agent uses the relay agent address as the source address of the outgoing packet. Configuring the source interface enables you to use a more stable address (such as the loopback interface address) as the source address of relayed messages.

Before you begin

Ensure that the DHCP feature is enabled.

Ensure that the DHCPv6 relay agent is enabled.

SUMMARY STEPS

  1. configure terminal
  2. [no] ipv6 dhcp relay source-interface interface
  3. (Optional) show ipv6 dhcp relay [interface interface]
  4. (Optional) show running-config dhcp show running-config dhcp
  5. (Optional) copy running-config startup-config

DETAILED STEPS

  Command or Action Purpose

Step 1

configure terminal

Example:

switch# configure terminal
switch(config)#

Enters global configuration mode.

Step 2

[no] ipv6 dhcp relay source-interface interface

Example:

switch(config)# ipv6 dhcp relay source-interface loopback 2

Configures the source interface for the DHCPv6 relay agent.

Note


The DHCPv6 relay source interface can be configured globally, per interface, or both. When both the global and interface levels are configured, the interface-level configuration overrides the global configuration.

Step 3

(Optional) show ipv6 dhcp relay [interface interface]

Example:

switch(config)# show ipv6 dhcp relay
(Optional)

Displays the DHCPv6 relay configuration.

Step 4

(Optional) show running-config dhcp show running-config dhcp

Example:

switch(config)# show running-config dhcp
(Optional)

Displays the DHCP configuration.

Step 5

(Optional) copy running-config startup-config

Example:

switch(config)# copy running-config startup-config
(Optional)

Copies the running configuration to the startup configuration.

Verifying the DHCP Configuration

To display DHCP configuration information, perform one of the following tasks:

Command

Purpose

show ip dhcp relay

Displays the DHCP relay configuration.

show ipv6 dhcp relay [ interface interface ]

Displays the DHCPv6 relay global or interface-level configuration.

show ip dhcp relay address

Displays all the DHCP server addresses configured on the device.

show running-config dhcp [all]

Displays the DHCP configuration in the running configuration.

Note

 
The show running-config dhcp command displays the ip dhcp relay and the ipv6 dhcp relay commands, although these are configured by default.

show startup-config dhcp [all]

Displays the DHCP configuration in the startup configuration.

Monitoring DHCP

Use the show ip dhcp relay statistics [interface interface] command to monitor DHCP relay statistics at the global or interface level.

Use the show ipv6 dhcp relay statistics [interface interface] command to monitor DHCPv6 relay statistics at the global or interface level.

Clearing DHCP Relay Statistics

Use the clear ip dhcp relay statistics command to clear the global DHCP relay statistics.

Use the clear ip dhcp relay statistics interface interface command to clear the DHCP relay statistics for a particular interface.

Use the clear ip dhcp global statistics command to clear the DHCP statistics globally.

Clearing DHCPv6 Relay Statistics

Use the clear ipv6 dhcp relay statistics command to clear the global DHCPv6 relay statistics.

Use the clear ipv6 dhcp relay statistics interface interface command to clear the DHCPv6 relay statistics for a particular interface.

Configuration Examples for DHCP

This example shows how to enable the DHCP relay agent and configure the DHCP server IP address for Ethernet interface 2/3, where the DHCP server IP address is 10.132.7.120 and the DHCP server is in the VRF instance named red:

feature dhcp
ip dhcp relay 
ip dhcp relay information option
ip dhcp relay information option vpn

interface ethernet 2/3
  ip dhcp relay address 10.132.7.120 use-vrf red

This example shows how to enable and use the DHCP smart relay agent. In this example, the device forwards the DHCP broadcast packets received on Ethernet interface 2/2 to the DHCP server (10.55.11.3), inserting 192.168.100.1 in the giaddr field. If the DHCP server has a pool configured for the 192.168.100.0/24 network, it responds. If the server does not respond, the device sends two more requests using 192.168.100.1 in the giaddr field. If the device still does not receive a response, it starts using 172.16.31.254 in the giaddr field instead.

feature dhcp
ip dhcp relay
ip dhcp smart-relay global

interface ethernet 2/2
		ip address 192.168.100.1/24
		ip address 172.16.31.254/24 secondary
		ip dhcp relay address 10.55.11.3

Additional References for DHCP

Related Documents

Related Topic

Document Title

vPCs

Cisco Nexus 9000 Series NX-OS Interfaces Configuration Guide

VRFs and Layer 3 virtualization

Cisco Nexus 9000 Series NX-OS Unicast Routing Configuration Guide

Standards

Standards

Title

RFC-2131

Dynamic Host Configuration Protocol (http://tools.ietf.org/html/rfc2131)

RFC-3046

DHCP Relay Agent Information Option (http://tools.ietf.org/html/rfc3046)

RFC-6607

Virtual Subnet Selection Options for DHCPv4 and DHCPv6 (http://tools.ietf.org/html/rfc6607)