Connecting the Switch to the Network

Setting Up the Management Interface

The RJ-45 and SFP management ports provide out-of-band management, which enables you to use the command-line interface (CLI) to manage the switch by its IP address. You can use one of these ports depending on the cable and connecters that you are using to connect the management interface to the network.

Before you begin

The switch must be powered on.

Procedure


Step 1

Connect the management cable into the management port on the switch. For shorter connections, you can use a cable with RJ-45 connectors. For longer connections, you can use an optical cable with SFP transceivers (LH or SX type).

Note


Use only one of these management ports—the switch does not support the use of both management ports.

Step 2

Connect the other end of the cable to a 10/100/1000 or SFP port on a network device.


What to do next

You are ready to connect the interface ports on each of the line cards to the network.

Uplink Connections

The uplink ports support 1-, 10-, 25-, 40-, and 100-Gigabit Ethernet as follows:

  • The leftmost four ports support 100-Gigabits for cables that have QSFP28 transceivers. The rightmost two ports are not used in this case.

  • Two of the leftmost ports support 100-Gigabits for cables that have QSFP28 transceivers and the other four ports support 40-Gigabits when using cables with QSFP+ transceivers.

  • All six ports support 40-Gigabits for cables that have QSFP+ transceivers.

  • All six ports support 1- and 10-Gigabits when using QSFP-to-SFP adapters and SFP+ transceivers.

  • Ports 50 and 52 also provide 4x10- or 4x25-Gigabit Ethernet breakout support.

For a list of transceivers and cables used by this switch for uplink connections, see http://www.cisco.com/c/en/us/support/interfaces-modules/transceiver-modules/products-device-support-tables-list.html.

By default, the 40-Gigabit uplink ports operate at 40 Gbps, but you can use the speed 10000 command to change the administrative speed to 10 Gbps. If you change the speed, you must also use a QSFP-to-SFP adapter and a supported SFP+ transceiver in each of the converted SFP+ ports. To return the administrative speed to 40 Gigabits, use the no speed 10000 command.


Warning


Statement 1051—Laser Radiation

Invisible laser radiation may be emitted from disconnected fibers or connectors. Do not stare into beams or view directly with optical instruments.


Guidelines for Connecting Ports

You can uplink six 40-Gigabit QSFP+ ports or four 100-Gigabit QSFP28 ports to other devices and downlink 48 10/25-Gigabit SFP+ ports to other devices.

For information about the transceivers currently being used with the switch, use the show inventory all command.

Prevent damage to the fiber-optic cables that can separate from their cables. Keep the transceivers disconnected from their fiber-optic cables when installing the transceiver in the line card. Before removing such a transceiver from the switch, remove the cable from the transceiver.

To maximize the effectiveness and life of your transceivers and optical cables, do the following:

  • Wear an ESD-preventative wrist strap that is connected to an earth ground whenever handling transceivers. The switch is typically grounded during installation and provides an ESD port to which you can connect your wrist strap.

  • Do not remove and insert a transceiver more often than is necessary. Repeated removals and insertions can shorten its useful life.

  • Keep the transceivers and fiber-optic cables clean and dust free to maintain high signal accuracy and to prevent damage to the connectors. Contamination causes increased attenuation (loss of light), and should be kept below 0.35 dB.

    • Clean these parts before installation to prevent dust from scratching the fiber-optic cable ends.

    • Clean the connectors regularly; the required frequency of cleaning depends upon the environment. In addition, clean connectors if they are exposed to dust or accidentally touched. Both wet and dry cleaning techniques can be effective; refer to your site's fiber-optic connection cleaning procedures.

    • Do not touch the ends of connectors. Touching the ends can leave fingerprints and cause other contamination.

  • Inspect routinely for dust and damage. If you suspect damage, clean and then inspect fiber ends under a microscope to determine if damage has occurred.

  • To minimize the chance of damaging transceivers when installing them, slide them gently into their switch slots. Never force transceivers all the way into the slots. If the transceiver stops part way into the slot, it might be upside down. Remove the transceiver before turning it over and reinstalling it. If positioned correctly, the transceiver slides all the way into the slot and clicks when fully installed.


Warning


Statement 1051—Laser Radiation

Invisible laser radiation may be emitted from disconnected fibers or connectors. Do not stare into beams or view directly with optical instruments.


Warning


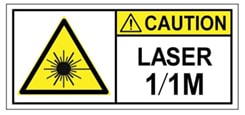
Statement 1055—Class 1/1M Laser

Invisible laser radiation is present. Do not expose to users of telescopic optics. This applies to Class 1/1M laser products.


Warning


Statement 1056—Unterminated Fiber Cable

Invisible laser radiation may be emitted from the end of the unterminated fiber cable or connector. Do not view directly with optical instruments. Viewing the laser output with certain optical instruments, for example, eye loupes, magnifiers, and microscopes, within a distance of 100 mm, may pose an eye hazard.


Maintaining Transceivers and Optical Cables

Transceivers and fiber-optic cables must be kept clean and dust free to maintain high signal accuracy and prevent damage to the connectors. Contamination increases attenuation (loss of light) and should be below 0.35 dB.

Consider the following maintenance guidelines:

  • Transceivers are static sensitive. To prevent ESD damage, wear an ESD-preventative wrist strap that is connected to the grounded chassis.

  • Do not remove and insert a transceiver more often than is necessary. Repeated removals and insertions can shorten its useful life.

  • Keep all optical connections covered when not in use. Clean them before using to prevent dust from scratching the fiber-optic cable ends.

  • Do not touch the ends of connectors. Touching the ends can leave fingerprints and cause other contamination.

  • Clean the connectors regularly; the required frequency of cleaning depends upon the environment. In addition, clean connectors if they are exposed to dust or accidentally touched. Both wet and dry cleaning techniques can be effective; refer to the fiber-optic connection cleaning procedures for your site.

  • Inspect routinely for dust and damage. If you suspect damage, clean and then inspect fiber ends under a microscope to determine if damage has occurred.