Using Modular QoS CLI

This chapter contains the following sections:

About MQC

Cisco Modular Quality of Service Command Line Interface (MQC) provides a language to define QoS policies.

You configure QoS policies by following these three steps:

  1. Define traffic classes.

  2. Associate policies and actions with each traffic class.

  3. Attach policies to logical or physical interfaces.

MQC provides a command type to define traffic classes and policies:

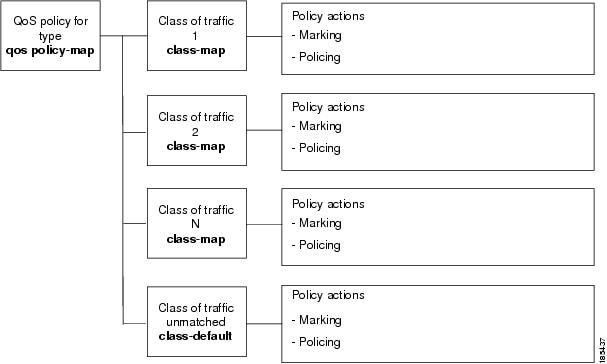
  • policy-map—Defines a policy map that represents a set of policies to be applied on a class-by-class basis to class maps.

    The policy map defines a set of actions to take on the associated traffic class, such as limiting the bandwidth or dropping packets.

You define the following class-map and policy-map object types when you create them:

  • network qos—Defines MQC objects that you can use for system level-related actions.

  • qos—Defines MQC objects that you can use for marking and policing.

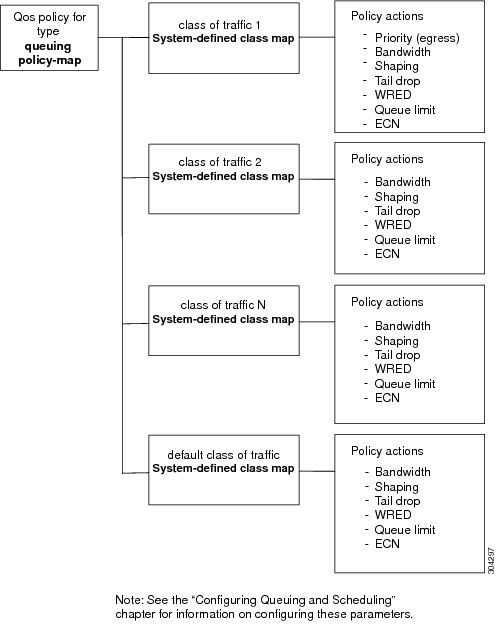
  • queuing—Defines MQC objects that you can use for queuing and scheduling.


Note

The qos type is the default.

Egress QoS policies are not supported on the subinterfaces.


You can attach policies to ports, port channels, or subinterfaces by using the service-policy command.

You can view all or individual values for MQC objects by using the show class-map and show policy-map commands.


Caution

In the interface configuration mode, the device can accept QoS and access control list (ACL) commands irrespective of the line card on which the interface host is up or down. However, you cannot enter the interface submode when the line card is down because the device does not accept any preconfiguration information.


Guidelines and Limitations for Modular QoS CLI

Modular QoS CLI has the following guidelines and limitations:

  • On devices with R-Series line cards, data forwarding is not supported when configured with 4q mode policies. Instead, configure the device with 8q mode policies.

System Classes

The system QoS is a type of MQC target. You use a service policy to associate a policy map with the system qos target. A system QoS policy applies to all interfaces on the device unless a specific interface has an overriding service-policy configuration. The system QoS policies are used to define system classes, the classes of traffic across the entire device, and their attributes.

If service policies are configured at the interface level, the interface-level policy always takes precedence over the system class configuration or defaults.

When you configure QoS features, and the system requests MQC objects, you can use system-defined MQC objects for 8q mode.


Note

Cisco Nexus 3400-S switches only support 8q mode.


On the Cisco Nexus 3400-S switches, a system class is uniquely identified by a qos-group value. A total of four system classes are supported. The device supports one default class which is always present on the device. Up to three additional system classes can be created by the administrator.

Default System Classes

The device provides the following system classes:

  • Drop system class

By default, the software classifies all unicast and multicast Ethernet traffic into the default drop system class. This class is identified by qos-group 0.

Licensing Requirements for Using MQC Objects

The following table shows the licensing requirements for this feature:

Product

License Requirement

Cisco NX-OS

The QoS feature does not a require license. Any feature not included in a license package is bundled with the nx-os image and is provided at no extra charge to you. For a complete explanation of the Cisco NX-OS licensing scheme, see the Cisco NX-OS Licensing Guide.

Using an MQC Object

You configure QoS and queuing policies using the MQC class-map and policy-map objects. After you configure class maps and policy maps, you can attach one policy map of each type to an interface. A QoS policy can only be applied to the ingress direction.

A policy map contains either a QoS policy or queuing policy. The policy map references the names of class maps that represent traffic classes. For each class of traffic, the device applies the policies on the interface or VLAN that you select.

A packet is matched sequentially to a class of traffic starting from the first traffic class definition. When a match is found, the policy actions for that class are applied to the packet.

The reserved class map class-default receives all traffic that is not matched in type qos policies, and the device applies the policy actions as it would for any other traffic class.

Type qos Policies

You use type qos policies to mark and to police packets.

The following figure shows the QoS policy structure with the associated MQC objects of type qos. The MQC objects are shown in bold.

Figure 1. QoS Policy Diagram Showing Type qos MQC Object Usage

Type Queuing Policies

You use type queuing policies to shape and queue packets.

The following figure shows the QoS policy structure with associated MQC objects of type queuing. The MQC objects are shown in bold.

Figure 2. QoS Policy Diagram Showing Type Queuing MQC Object Usage

System-Defined MQC Objects

When you configure QoS features, and the system requests MQC objects, you can use system-defined objects for 8q mode.


Note

Cisco Nexus 3400-S switches only support 8q mode.


System-Defined MQC Objects for 8q Mode

When you configure QoS features, and the system requests MQC objects, you can use the following system-defined objects:


Note

System-defined MQC objects for 4q mode are the default MQC objects. You must enable the following MQC objects to change to 8q mode.


  • Type qos class maps

    Table 1. System-Defined Type qos Class Maps

    Class Map Name

    Description

    class-default

    Type qos class map that is assigned to all packets that match none of the criteria of traffic classes that you define in a type qos policy map.

  • Type queuing class maps

    Table 2. System-Defined Type queuing Class Maps for 8q Mode (Egress)

    Class Map Queue Name

    Description

    c-out-8q-q-default

    Egress default queue — QoS group 0

    c-out-8q-q1

    Egress queue 1 — QoS group 1

    c-out-8q-q2

    Egress queue 2 — QoS group 2

    c-out-8q-q3

    Egress queue 3 — QoS group 3

    c-out-8q-q4

    Egress queue 4 — QoS group 4

    c-out-8q-q5

    Egress queue 5 — QoS group 5

    c-out-8q-q6

    Egress queue 6 — QoS group 6

    c-out-8q-q7

    Egress queue 7 — QoS group 7

    Table 3. System-Defined Type queuing Class Maps for 8q Mode (Ingress)

    Class Map Queue Name

    Description

    c-in-q-default

    Ingress default queue — QoS group 0

    c-in-q1

    Ingress queue 1 — QoS group 1

    c-in-q2

    Ingress queue 2 — QoS group 2

    c-in-q3

    Ingress queue 3 — QoS group 3

    c-in-q4

    Ingress queue 4 — QoS group 4

    c-in-q5

    Ingress queue 5 — QoS group 5

    c-in-q6

    Ingress queue 6 — QoS group 6

    c-in-q7

    Ingress queue 7 — QoS group 7

  • Type network-qos class maps

    Table 4. System-Defined Type network-qos Class Maps for 8q Mode

    Class Map Network-QoS Name

    Description

    c-8q-nq-default

    Network-qos class — QoS group 0

    c-8q-nq1

    Network-qos class — QoS group 1

    c-8q-nq2

    Network-qos class — QoS group 2

    c-8q-nq3

    Network-qos class — QoS group 3

    c-8q-nq4

    Network-qos class — QoS group 4

    c-8q-nq5

    Network-qos class — QoS group 5

    c-8q-nq6

    Network-qos class — QoS group 6

    c-8q-nq7

    Network-qos class — QoS group 7

  • Policy maps

    Table 5. System-Defined Queuing Policy Maps for 8q Mode

    Queuing Policy Map Name

    Description

    default-8q-out-policy

    Output queuing policy map that is attached to all module ports to which you do not apply a queuing policy map. The default configuration values are as follows:

    
    policy-map type queuing default-8q-out-policy
      class type queuing c-out-8q-q7
       priority level 1
      class type queuing c-out-8q-q6
       bandwidth remaining percent 0
      class type queuing c-out-8q-q5
       bandwidth remaining percent 0
      class type queuing c-out-8q-q4
       bandwidth remaining percent 0
      class type queuing c-out-8q-q3
       bandwidth remaining percent 0
      class type queuing c-out-8q-q2
       bandwidth remaining percent 0
      class type queuing c-out-8q-q1
       bandwidth remaining percent 0
      class type queuing c-out-8q-q-default
       bandwidth remaining percent 100

    default-8q-network-qos-policy

    Network-qos queuing policy map that is attached to all module ports to which you do not apply a queuing policy map. The default configuration values are as follows:

    
    policy-map type network-qos default-8q-nq-policy
      class type network-qos c-8q-nq7
       match qos-group 7
       mtu 1500
      class type network-qos c-8q-nq6
       match qos-group 6
       mtu 1500
      class type network-qos c-8q-nq5
       match qos-group 5
       mtu 1500
      class type network-qos c-8q-nq4
       match qos-group 4
       mtu 1500
      class type network-qos c-8q-nq3
       match qos-group 3
       mtu 1500
      class type network-qos c-8q-nq2
       match qos-group 2
       mtu 1500
      class type network-qos c-8q-nq1
       match qos-group 1
       mtu 1500
      class type network-qos c-8q-nq-default
       match qos-group 0
       mtu 1500

Changing to 8q Mode


Note

The Cisco NX-OS software operates in 8q mode by default.


Use the following guidelines to change to 8q mode:

  • Change the network-qos policy to 8q mode.

    You can either activate the default-8q-nq-policy (which is the system created 8q default network-qos policy); or you can copy it using the qos copy policy-map type network-qos command, edit it as needed, and activate it.

  • Change the queuing policy to 8q mode. (This means changing the system queuing policy and optionally any interface queuing policy.)

    Make a copy of the default-8q-out-policy (the default 8q queuing policy created by the system) using the qos copy policy-map type queuing command. Edit the copy of the default-8q-out-policy as needed and activate it at the system level and optionally at the interface level.

  • After the network-qos and queuing policies are changed to 8q mode, you can start using set qos-group action for qos-groups 4-7 to steer the traffic to queues 4-7.

Example of set qos-groups

The following is an example to set qos-groups with values 4-7.


switch(config)# policy-map p1
switch(config-pmap-qos)# class c1
switch(config-pmap-c-qos)# set qos-group 1
switch(config-pmap-c-qos)# ex
switch(config-pmap-qos)# class c2
switch(config-pmap-c-qos)# set qos-group 4
switch(config-pmap-c-qos)# ex
switch(config-pmap-qos)# class c3
switch(config-pmap-c-qos)# set qos-group 7
switch(config-pmap-c-qos)# ex
switch(config-pmap-qos)# ex
switch(config)# show policy-map p1


  Type qos policy-maps
  ====================

  policy-map type qos p1
    class  c1
      set qos-group 1
    class  c2
      set qos-group 4
    class  c3
      set qos-group 7
switch(config)# conf t
switch(config)# int ethernet 2/1
switch(config-if)# service-policy type qos input p1
switch(config-if)# show policy-map interface ethernet 2/1


Global statistics status :   enabled

Ethernet2/1

  Service-policy (qos) input:   p1
    SNMP Policy Index:  285226505

    Class-map (qos):   c1 (match-all)
      Match: dscp 10
      set qos-group 1

    Class-map (qos):   c2 (match-all)
      Match: dscp 20
      set qos-group 4

    Class-map (qos):   c3 (match-all)
      Match: dscp 30
      set qos-group 7

Configuring an MQC Object

When you specify an MQC object command, the device creates the object if it does not exist and then enters map mode.

To remove a class-map or policy-map object, use the no form of the command that you used to create the object.

Configuring or Modifying a Class Map

You can create or modify a class map. You can then reference class maps in policy maps.


Note

You cannot create a queuing class map; you must use one of the system-defined queuing class maps.


SUMMARY STEPS

  1. configure terminal
  2. class-map type qos [match-any | match-all] class-name
  3. exit
  4. class-map type queuing match-any class-name
  5. exit
  6. show class-map [type qos [ class-name]]
  7. show class-map [type queuing [ class-name]]
  8. copy running-config startup-config

DETAILED STEPS

  Command or Action Purpose
Step 1

configure terminal

Example:
switch# configure terminal
switch(config)#

Enters global configuration mode.

Step 2

class-map type qos [match-any | match-all] class-name

Example:
switch(config)# class-map type qos class1
switch(config-cmap-qos)#

Creates or accesses the class map of type qos and then enters class-map qos mode. Class-map names can contain alphabetic, hyphen, or underscore characters, are case sensitive, and can be up to 40 characters.

Step 3

exit

Example:
switch(config-cmap-qos)# exit
switch(config)#

Exits class-map qos mode and enters global configuration mode.

Step 4

class-map type queuing match-any class-name

Example:
switch(config)# class-map type queuing match-any c-out-q2
switch(config-cmap-que)#

Creates or accesses the class map of type queuing and then enters class-map queuing mode.

Step 5

exit

Example:
switch(config-cmap-que)# exit
switch(config)#

Exits class map queuing mode and enters global configuration mode.

Step 6

show class-map [type qos [ class-name]]

Example:
switch(config)# show class-map type qos

(Optional) Displays information about all configured class maps, all class maps of type qos, or a selected class map of type qos.

Step 7

show class-map [type queuing [ class-name]]

Example:
switch(config)# show class-map type queuing

(Optional) Displays information about all configured class maps, all class maps of type queuing, or a selected class map of type queuing.

Step 8

copy running-config startup-config

Example:
switch(config)# copy running-config startup-config

(Optional) Saves the running configuration to the startup configuration.

Configuring or Modifying a Policy Map

You can create or modify a policy map that you can use to define actions to perform on class maps.

SUMMARY STEPS

  1. configure terminal
  2. policy-map type qos { [match-first] policy-map-name}
  3. exit
  4. policy-map type queuing {[match-first] policy-map-name}
  5. exit
  6. show policy-map [type qos [ policy-map-name]]
  7. show policy-map [type queuing [ policy-map-name | default-out-policy]]
  8. copy running-config startup-config

DETAILED STEPS

  Command or Action Purpose
Step 1

configure terminal

Example:
switch# configure terminal
switch(config)#

Enters global configuration mode.

Step 2

policy-map type qos { [match-first] policy-map-name}

Example:
switch(config)# policy-map type qos policy1
switch(config-pmap-qos)#

Creates or accesses the policy map of type qos and then enters policy-map mode. Policy-map names can contain alphabetic, hyphen, or underscore characters, are case sensitive, and can be up to 40 characters.

Step 3

exit

Example:
switch(config-pmap)# exit
switch(config)#

Exits policy-map mode and enters global configuration mode.

Step 4

policy-map type queuing {[match-first] policy-map-name}

Example:
switch(config)# policy-map type queuing policy_queue1
switch(config-pmap-que)#

Configures the policy map of type queuing and then enters policy-map mode for the policy-map name you specify. Policy-map names can contain alphabetic, hyphen, or underscore characters, are case sensitive, and can be up to 40 characters.

Step 5

exit

Example:
switch(config-pmap)# exit
switch(config)#

Exits policy map mode and enters global configuration mode.

Step 6

show policy-map [type qos [ policy-map-name]]

Example:
switch(config)# show policy-map type qos

(Optional) Displays information about all configured policy maps, all policy maps of type qos, or a selected policy map of type qos.

Step 7

show policy-map [type queuing [ policy-map-name | default-out-policy]]

Example:
switch(config)# show policy-map type queuing

(Optional) Displays information about all configured policy maps, all policy maps of type queuing, a selected policy map of type queuing or the default output queuing policy.

Step 8

copy running-config startup-config

Example:
switch(config)# copy running-config startup-config

(Optional) Saves the running configuration to the startup configuration.

Applying Descriptions to MQC Objects

You can use the description command to add a description to a MQC object.

SUMMARY STEPS

  1. configure terminal
  2. Specify the MQC object whose description you want to set:
    • Class-map:

      class-map [type qos] [match-any | match-all] class-name
    • Policy-map:

      policy-map [type qos] [match-first] policy-map-name
  3. description string
  4. exit
  5. copy running-config startup-config

DETAILED STEPS

  Command or Action Purpose
Step 1

configure terminal

Example:

switch# configure terminal
switch(config)#

Enters global configuration mode.

Step 2

Specify the MQC object whose description you want to set:

  • Class-map:

    class-map [type qos] [match-any | match-all] class-name
  • Policy-map:

    policy-map [type qos] [match-first] policy-map-name

Example:

  • Class-map:

    switch(config-cmap)# class-map class1
    switch(config-cmap)#
  • Policy-map:

    switch(config)# policy-map policy1
    switch(config-pmap)#
  • Class-map:

    Creates or accesses the class map and then enters class-map mode. The class-map name can contain alphabetic, hyphen, or underscore characters, is case sensitive, and can be up to 40 alphanumeric characters.

  • Policy-map:

    Creates or accesses the policy map and then enters policy-map mode. The policy-map name can contain alphabetic, hyphen, or underscore characters, is case sensitive, and can be up to 40 characters.

Step 3

description string

Example:

switch(config-cmap)# description my traffic class
switch(config-cmap)#

Adds a description string to the MQC object. The description can be up to 200 alphanumeric characters.

Note 

You cannot modify the description of system-defined queuing class maps.

Step 4

exit

Example:

switch(config-cmap)# exit
switch(config)#

Exits class-map mode and enters global configuration mode.

Step 5

copy running-config startup-config

Example:

switch(config)# copy running-config startup-config

(Optional) Saves the running configuration to the startup configuration.

Verifying an MQC Object

To display MQC object configuration information, perform one of the following tasks:

Command

Purpose

show class-map [type qos [class-name]]

Displays information about all configured class maps, all class maps of type qos, or a selected class map of type qos.

show class-map [type queuing [class-name]]

Displays information about all configured class maps, all class maps of type queuing, or a selected class map of type queuing.

show policy-map [type qos [policy-map-name]]

Displays information about all configured policy maps, all policy maps of type qos, or a selected policy map of type qos.

show policy-map [type queuing [policy-map-name | default-out-policy]]

Displays information about all configured policy maps, all policy maps of type queuing, a selected policy map of type queuing, or the default output queuing policy.

Attaching and Detaching a QoS Policy Action

The software does not allow you to enable or disable QoS features with a configuration command. To enable or disable QoS features, you must attach or detach QoS policies to or from interfaces or VLANs as described in this section.

The system-defined type queuing policy maps are attached to each interface unless you specifically attach a different policy map.


Note

The device allows only one queuing policy per interface.


Policies that are defined at multiple interfaces have the following restrictions:

  • A QoS policy attached to the physical port takes effect when the port is not a member of a port channel.

  • A QoS policy attached to a port channel takes effect even when policies are attached to member ports.

  • A QoS policy attached to a VLAN is applied to all ports in that VLAN that do not have other policies specifically applied.

  • One ingress QoS policy is supported for each Layer 3 port and Layer 3 port-channel interface.

  • One ingress QoS policy is supported for each VLAN.

  • When a VLAN or port channel, or both, touches multiple forwarding engines, all policies that enforce a rate are enforced per forwarding engine.

    For example, if you configure a policer on a specific VLAN that limits the rate for the VLAN to 100 Mbps and if you configure one switch port in the VLAN on one module and another switch port in the VLAN on another module, each forwarding engine can enforce the 100-Mbps rate. In this case, you could actually have up to 200 Mbps in the VLAN that you configured to limit the rate to 100 Mbps.


Note

Default queuing policies are active, unless you configure and apply another policy.


The interface where a QoS policy is applied is summarized in the following table. Each row represents the interface levels. The entry descriptions are as follows:

  • Applied—Interface where an attached policy is applied.

  • Present—Interface where a policy is attached but not applied.

  • Not present—Interface where no policy is attached.

  • Present or not—Interface where a policy is either attached or not, but not applied.

Table 6. QoS Policy Interfaces

Port Policy

Port-Channel Policy

VLAN Policy

Applied

Not present

Present or not

Present or not

Applied

Present or not

Not present

Not present

Applied

To attach a policy map to an interface or VLAN, use the service-policy command. The policies defined in the policy map are applied to the input stream of packets on the interface.

To detach a policy map from an interface, use the no form of the service-policy command.

Configuring a Service Policy for a Layer 2 Interface

Before you begin

Ensure that the ternary content addressable memory (TCAM) is carved for port QoS.

For more details, see the Configuring QoS TCAM Carving section.

SUMMARY STEPS

  1. configure terminal
  2. interface interface slot/port
  3. switchport
  4. service-policy type {qos input | queuing output} | {qos output | queuing output} policy-map-name [no-stats]
  5. show policy-map interface interface slot/port type {qos | queuing}
  6. copy running-config startup-config

DETAILED STEPS

  Command or Action Purpose
Step 1

configure terminal

Example:

switch# configure terminal
switch(config)#

Enters global configuration mode.

Step 2

interface interface slot/port

Example:

switch(config)# interface ethernet 1/1
switch(config-if)#

Enters configuration interface mode.

Step 3

switchport

Example:

switch(config-if)# switchport

Selects the Layer 2 interface.

Step 4

service-policy type {qos input | queuing output} | {qos output | queuing output} policy-map-name [no-stats]

Example:

switch(config-if)# service-policy input policy1
switch(config-if)#

Example:

switch(config-if)# interface intf1
switch(config-if)# service-policy type qos output egressqos
switch(config-if)# exit
switch(config)#

Specifies the policy map to use as the service policy for the Layer 2 interface. There are two policy-map configuration modes:

  • qos input or qos output — qos input is the default classification mode. To set the classification mode to egress, use qos output.

  • queuing output —Queuing mode.

Note 

The output keyword specifies that this policy map should be applied to traffic transmitted from an interface. You can only apply output to a queuing policy.

Step 5

show policy-map interface interface slot/port type {qos | queuing}

Example:

switch(config)# show policy-map interface ethernet 1/1 type qos

(Optional) Displays information about policy maps that are applied to the specified interface. You can limit what the device displays to qos or queuing policies.

Step 6

copy running-config startup-config

Example:

switch(config)# copy running-config startup-config

(Optional) Saves the running configuration to the startup configuration.

Configuring a Service Policy for a Layer 3 Interface

Before you begin

Ensure that the ternary content addressable memory (TCAM) is carved for Layer 3 QoS.

For more details, see the Configuring QoS TCAM Carving section.

SUMMARY STEPS

  1. configure terminal
  2. interface interface slot/port
  3. no switchport
  4. service-policy type {qos input | queuing output} | {qos output | queuing output} policy-map-name [no-stats]
  5. show policy-map interface interface slot/port type {qos | queuing}
  6. copy running-config startup-config

DETAILED STEPS

  Command or Action Purpose
Step 1

configure terminal

Example:

switch# configure terminal
switch(config)#

Enters global configuration mode.

Step 2

interface interface slot/port

Example:

switch(config)# interface ethernet 1/1
switch(config-if)#

Enters configuration interface mode.

Step 3

no switchport

Example:

switch(config-if)# no switchport

Selects the Layer 3 interface.

Step 4

service-policy type {qos input | queuing output} | {qos output | queuing output} policy-map-name [no-stats]

Example:

switch(config-if)# service-policy input policy1
switch(config-if)#

Example:

switch(config-if)# service-policy output policy1
switch(config-if)#

Specifies the policy map to use as the service policy for the Layer 3 interface. There are two policy-map configuration modes:

  • qos input or qos output — qos input is the default classification mode. To set the classification mode to egress, use qos output.

  • queuing output —Queuing mode.

Note 

The output keyword specifies that this policy map should be applied to traffic transmitted from an interface. You can only apply output to a queuing policy.

Step 5

show policy-map interface interface slot/port type {qos | queuing}

Example:

switch(config)# show policy-map interface ethernet 1/1 type qos

(Optional) Displays information about policy maps that are applied to the specified interface. You can limit what the device displays to qos or queuing policies.

Step 6

copy running-config startup-config

Example:

switch(config)# copy running-config startup-config

(Optional) Saves the running configuration to the startup configuration.

Attaching the System Service Policy

The service-policy command specifies the system class policy map as the service policy for the system.

SUMMARY STEPS

  1. configure terminal
  2. system qos
  3. service-policy type {network-qos | queuing output} policy-map-name

DETAILED STEPS

  Command or Action Purpose
Step 1

configure terminal

Example:

switch# configure terminal
switch(config)#

Enters global configuration mode.

Step 2

system qos

Example:

switch(config)# system qos
switch(config-sys-qos)#

Enters system class configuration mode.

Step 3

service-policy type {network-qos | queuing output} policy-map-name

Example:

switch(config-sys-qos)# service-policy input default-nq-policy

Specifies the policy map to use as the service policy (default-nq-policy) for the system. There are two policy-map configuration modes:

  • network-qos—Network-wide (system qos) mode.

Note 

To restore the system to the default service policies, use the no form of the command.

  • queuing—Queuing mode (output at system qos and interface).

Note 

There is no default policy-map configuration mode. You must specify the type. The output keyword specifies that this policy map should be applied to traffic transmitted from an interface. You can only apply output to a queuing policy.

Attaching a QoS Policy Action to a VLAN

Before you begin

Ensure that the ternary content-addressable memory (TCAM) is carved for VLAN QoS.

For more details, see the QoS TCAM carving chapter.


Note

Cisco Nexus 3400-S switches do not support VLAN-based classification.


SUMMARY STEPS

  1. configure terminal
  2. vlan configuration vlan-id-list
  3. service-policy [type qos] {input} | {qos output } {policy-map-name} [no-stats]
  4. show policy-map [interface interface | vlan vlan-id] [input] [type qos | queuing] [class [type qos | queuing] class-map-name]
  5. copy running-config startup-config

DETAILED STEPS

  Command or Action Purpose
Step 1

configure terminal

Example:

switch# configure terminal
switch(config)#

Enters global configuration mode.

Step 2

vlan configuration vlan-id-list

Example:

switch(config)# vlan configuration 2
switch(config-vlan-config)#

Enters VLAN configuration mode.

Note 

vlan-id-list is a space-separated list of VLANs.

Step 3

service-policy [type qos] {input} | {qos output } {policy-map-name} [no-stats]

Example:

switch(config-vlan-config)# service-policy type qos input policy1

Example:

switch(config-if)# service-policy type qos output egressqos
switch(config-if)# exit
switch(config)#

Adds the policy map to the input packets of a VLAN.

Only one input policy can be attached to a VLAN. The example adds policy1 to the VLAN.

Label sharing only occurs when QoS policies under VLANs are configured with the no-stats option. With the no-stats option, the QoS label gets shared when the same QoS policy is applied on multiple VLANs.

Note 

When the no-stats option is configured, the ingress QoS policy-map statistics on a VLAN basis are not available because the label is shared.

Step 4

show policy-map [interface interface | vlan vlan-id] [input] [type qos | queuing] [class [type qos | queuing] class-map-name]

Example:

switch(config)# show policy-map vlan 2

(Optional) Displays information about policy maps that are applied to all interfaces or the specified interface. You can limit what the device displays to input policies, qos or queuing polices, and to a specific class.

Step 5

copy running-config startup-config

Example:

switch(config)# copy running-config startup-config

(Optional) Saves the running configuration to the startup configuration.

Session Manager Support for QoS

Session Manger supports the configuration of QoS. This feature allows you to verify the QoS configuration and confirm that the resources required by the configuration are available prior to committing them to the running configuration. For information about Session Manager, see the Cisco Nexus 3400-S Series NX-OS System Management Configuration Guide.

After you start the configuration session, do not enter any configuration commands using the configure terminal configuration mode until the configuration session is aborted or committed. Entering parallel configurations (one configuration that uses the configuration session and another using the configuration terminal configuration mode) might cause verification failures in the configuration session mode.