Configuring User Accounts and RBAC

This chapter describes how to configure user accounts and role-based access control (RBAC) on Cisco MDS 9000 devices.

This chapter includes the following sections:

Information About User Accounts and RBAC

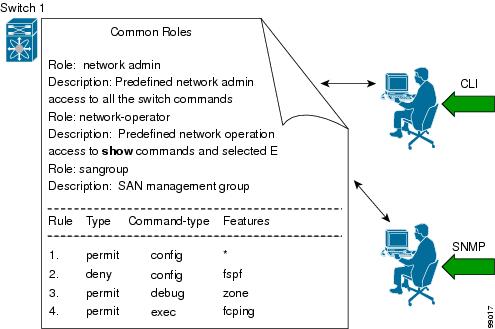
You can create and manage users accounts and assign roles that limit access to operations on the Cisco MDS 9000 devices. Role-based access control (RBAC) allows you to define the rules for an assign role that restrict the authorization that the user has to access management operations.

User authentication information, user name, user password, password expiration date, and role membership are stored in the user profile.

The tasks explained in this section enables you to create users and modify the profile of an existing user. These tasks are restricted to privileged users as determined by your administrator.

User Accounts

You can configure up to a maximum of 256 user accounts. By default, the user account does not expire unless you explicitly configure it to expire. The expire option determines the date when the user account is disabled.

When creating users, note the following guidelines:

  • The following words are reserved and cannot be used to configure users: bin, daemon, adm, lp, sync, shutdown, halt, mail, news, uucp, operator, games, gopher, ftp, nobody, nscd, mailnull, rpc, rpcuser, xfs, gdm, mtsuser, ftpuser, man, and sys.

  • User passwords are not displayed in the switch configuration file.

  • The passphrase specified in the snmp-server user command and the password specified username command are synchronized.

  • By default, the user account does not expire unless you explicitly configure it to expire. The expire option determines the date on which the user account is disabled. The date is specified in the YYYY-MM-DD format.

  • If a password is trivial (short, easy-to-decipher), your password configuration is rejected. Be sure to configure a strong password as shown in the sample configuration. Passwords are case-sensitive.

  • To issue commands with the internal keyword for troubleshooting purposes, you must have an account that is a member of the network-admin group.


Caution


Cisco MDS NX-OS supports user names that are created with alphanumeric characters or specific special characters (+ [plus], = [equal], _ [underscore], - [hyphen], \ [backslash], and . [period]) whether created remotely (using TACACS+ or RADIUS) or locally, provided that the user name starts with an alphanumeric character. Local user names cannot be created with any special characters (apart from those specified). If a nonsupported special character user name exists on an AAA server, and is entered during login, then the user is denied access.


Characteristics of Strong Passwords

A strong password has the following characteristics:

  • Is at least eight characters long

  • Does not contain many consecutive characters (such as “abcd”)

  • Does not contain many repeating characters (such as “aaabbb”)

  • Does not contain dictionary words

  • Does not contain proper names

  • Contains both uppercase and lowercase characters

  • Contains numbers

The following are examples of strong passwords:

  • If2CoM18

  • 2004AsdfLkj30

  • Cb1955S21

If a password is trivial (such as a short, easy-to-decipher password), the Cisco MDS NX-OS software will reject your password configuration, if the password-strength checking is enabled. Be sure to configure a strong password as shown in the sample configuration. Passwords are case sensitive.

The above rules for generating passwords are applicable to remote user authentication via AAA servers such as TACACS+, RADIUS or LDAP.

Checking Password Strength

You can enable password-strength checking that prevents you from creating weak passwords for user accounts.


Note


When you enable password checking, it does not check the strength of existing passwords.


To enable password strength checking, follow these steps:

Procedure


Step 1

switch# configure terminal

Enters configuration mode.

Step 2

switch(config)# password strength-check

Enables password-strength checking. The default is enabled.

You can disable password-strength checking by using the no form of this command.

Step 3

switch(config)# exit

(Optional) Exits global configuration mode.

Step 4

switch(config)# show password strength-check

(Optional) Displays the password-strength check configuration.

Step 5

switch(config)# copy running-config startup-config

(Optional) Copies the running configuration to the startup configuration.


Configuring Users

To configure a new user or to modify the profile of an existing user, follow these steps:

Procedure


Step 1

switch# configure terminal

Enters configuration mode.

Step 2

switch(config)# username usam password abcd123AAA expire 2003-05-31

Creates or updates the user account (usam) along with a password (abcd123AAA) that is set to expire on 2003-05-31.

Step 3

switch(config)# username msam password 0 abcd12AAA role network-operator

Creates or updates the user account (msam) along with a password (abcd12AAA) specified in clear text (indicated by 0). The password is limited to 64 characters.

Step 4

switch(config)# username user1 password 5 $1$UgOR6Xqb$z.HZlMk.ZGr9VH67a

Specifies an encrypted (specified by 5) password (!@*asdsfsdfjh!@df) for the user account (user1).

Note

 
If user is created with encrypted password option then corresponding SNMP user will not be created.

Step 5

switch(config)# username usam role network-admin

Adds the specified user (usam) to the network-admin role.

Step 6

switch(config)# no username usam role vsan-admin

(Optional) Deletes the specified user (usam) from the vsan-admin role.

Step 7

switch(config)# username admin sshkey ssh-rsa AAAAB3NzaC1yc2EAAAABIwAAAIEAtjIHrIt/3dDeohix6JcRSIYZ0EOdJ3l5RONWcwSgAuTUSrLk3a9hdYkzY94fhHmNGQGCjVg+8cbOxyH4Z1jcVFcrDogtQT+Q8dveqts/8XQhqkNAFeGy4u8TJ2Us3a9hdYkzY94fhHmNGQGCjVg+8cbOxyH4Z1jcVFcrDogtQT+Q8dveqts/8XQhqkNAFeGy4u8TJ2Us

Specifies the SSH key for an existing user account (admin).

Step 8

switch(config)# no username admin sshkey ssh-rsa AAAAB3NzaC1yc2EAAAABIwAAAIEAtjIHrIt/3dDeohix6JcRSIYZ0EOdJ3l5RONWcwSgAuTUSrLk3a9hdYkzY94fhHmNGQGCjVg+8cbOxyH4Z1jcVFcrDogtQT+Q8dveqts/8XQhqkNAFeGy4u8TJ2Us3a9hdYkzY94fhHmNGQGCjVg+8cbOxyH4Z1jcVFcrDogtQT+Q8dveqts/8XQhqkNAFeGy4u8TJ2Us

(Optional) Deletes the SSH key for the user account (admin).

Step 9

switch(config)# username usam ssh-cert-dn usam-dn dsa

Specifies an SSH X.509 certificate distinguished name and DSA algorithm to use for authentication for an existing user account (usam).

Step 10

switch(config)# username user1 ssh-cert-dn user1-dn rsa

Specifies an SSH X.509 certificate distinguished name and RSA algorithm to use for authentication for an existing user account (user1).

Step 11

switch(config)# no username admin ssh-cert-dn admin-dn dsa

Removes the SSH X.509 certificate distinguished name for the user account (admin).


Logging Out Users

To log out another user on the switch, use the clear user command.

Displays All Logged in Users

In the following example, the user named vsam is logged out from the switch:

switch# clear user vsam

Use the show users command to view a list of the logged in users (see the following example).

switch# show users
 
admin    pts/7        Jan 12 20:56 (10.77.202.149)
admin    pts/9        Jan 12 23:29 (user.example.com)
admin    pts/10       Jan 13 03:05 (dhcp-10-10-1-1.example.com)
admin    pts/11       Jan 13 01:53 (dhcp-10-10-2-2.example.com)

Displaying User Account Information

Displays Information for a Specified User

Use the show user-account command to display configured information about user accounts. See the following examples.

switch# show user-account user1
 
user:user1
        this user account has no expiry date
        roles:network-operator 
no password set. Local login not allowed
Remote login through RADIUS is possible
switch# show user-account 
show user-account 
user:admin
        this user account has no expiry date
        roles:network-admin 
user:usam
        expires on Sat May 31 00:00:00 2003
        roles:network-admin network-operator 
user:msam
        this user account has no expiry date
        roles:network-operator 
user:user1
        this user account has no expiry date
        roles:network-operator 
no password set. local login not allowed
Remote login through RADIUS is possible 

Role-Based Authorization

You can create and manage user accounts and assign roles that limit access to operations on the Cisco MDS 9000 device. Role-based access control (RBAC) allows you to define the rules for an assigned role that restricts the authorization that the user has to access management operations.

When you execute a command, perform command completion, or obtain context sensitive help, the switch software allows the operation to progress only if you have permission to access that command.

User Roles

User roles contain rules that define the operations allowed for the user who is assigned the role. Each user role can contain multiple rules and each user can have multiple roles. For example, if role1 users are only allowed access to configuration commands, and role2 users are only allowed access to debug commands, then users who belong to both role1 and role2, can access configuration and debug commands.


Note


If you belong to multiple roles, you can execute a union of all the commands permitted by these roles. Access to a command takes priority over being denied access to a command. For example, suppose you belong to a TechDocs group and you were denied access to configuration commands. However, you also belong to the engineering group and have access to configuration commands. In this case, you will have access to configuration commands.

The Cisco NX-OS software provides the following default user roles:

  • network-admin—Complete read-and-write access to the entire Cisco NX-OS device. However, this role does not include permission to modify the profiles of other users. To modify profiles of other users, a different role with specific permissions for user management is required.

  • network-operator—Complete read access to the entire Cisco NX-OS device excluding few privileged show sub commands.

  • server-admin—Complete read access to the entire Cisco NX-OS device and upgrade capability.

Examples of privileged show sub commands which the network-operator don't have access to are as follows:

  • accounting: show accounting configuration

  • boot: show bootvar Variables

  • consistency-checker: consistency checker

  • data-corruption: display data inconsistency errors

  • eemtest: EEM test publisher commands

  • fcdroplatency: show switch or network latency

  • hosts: show information about DNS

  • line: show the line configuration

  • locked-users: all locked users

  • port-group-monitor: show port-group-monitor information

  • port-monitor: show port-monitor information

  • pss: display pss information

  • radius-cfs: show radius cfs state

  • running-configuration: show running system information

  • security: show security information

  • startup-config: show startup system information

  • trunk: show trunk information


Tip


Any role, when created, does not allow access to the required commands immediately. The administrator must configure appropriate rules for each role to allow access to the required commands.


Configuring Roles

To create an additional role or to modify the profile for an existing role, follow these steps:


Note


Only users belonging to the network-admin role can create roles.


Procedure


Step 1

switch# config terminal

Enters configuration mode.

Step 2

switch(config)# role name techdocs

switch(config-role)#

Places you in the role submode for the specified role.

Step 3

switch(config)# no role name techdocs

(Optional) Deletes the role called techdocs.

Step 4

switch(config-role)# description Entire Tech Docs group

Assigns a description to the new role. The description is limited to one line and can contain spaces.

Step 5

switch(config-role)# no description

(Optional) Resets the description for the Tech Docs group.


Configuring Role Modification by Custom Roles

From Cisco MDS NX-OS Release 8.3(1), you can create custom roles that are equivalent to the 'admin' user with which a user can modify other users' accounts (role or password). To modify a role to become equivalent to the 'admin' user, configure the attribute-admin rule in the role.


Note


  • The attribute-admin rule is mutually exclusive with an existing rule. Remove the existing rule to configure the new attribute-admin rule.

  • The Role-distribute feature will not fail while configuring the attribute-admin command, if an unsupported software image is present in the fabric. Instead it gets accepted, and shows as an Invalid rule for the rule which is not supported.

  • The Role-distribute feature will not fail for mutually exclusive configs if an unsupported software image is present in the fabric.

  • Loading Dplug does not work for users with the attribute-admin privilege.

  • The show system internal kernel memory global detail command output under the show tech-support details fails for users with the attribute-admin privilege.


To create a custom role or modify the profile for an existing role, follow these steps:

Procedure


Step 1

switch# config terminal

Enters configuration mode.

Step 2

switch(config)# role name techdocs

switch(config-role)#

Places you in the role submode for the specified role.

Step 3

switch(config)# no role name techdocs

(Optional) Deletes the role called techdocs.

Step 4

switch(config-role)# rule rule-number attribute-admin

Assigns admin privileges to the new role.

Step 5

switch(config-role)# no rule 1 attribute-admin

(Optional) Removes the admin privileges that are assigned to a role.

Step 6

switch# show user-account user-name

(Optional) Displays configured information about user accounts.


User Roles and Rules

You can configure up to 16 rules for each role. You can assign a user role to more than one user account.

The user-specified rule number determines the order in which the rules are applied. For example, rule 1 is applied before rule 2, which is applied before rule 3, and so on. A user not belonging to the network-admin role cannot perform commands related to roles.


Note


Regardless of the read-write rule configured for a user role, some commands can be executed only through the predefined network-admin role.


For example, if user A is permitted to perform all show commands, user A cannot view the output of the show role command if user A does not belong to the network-admin role.

The rule command specifies operations that can be performed by a specific role. Each rule consists of a rule number, a rule type (permit or deny), a command type (for example, config , clear , show , exec , debug ), and an optional feature name (for example, FSPF, zone, VSAN, fcping, or interface).


Note


In this case, exec refers to all commands in the EXEC mode that are not included in the show , debug , and clear command categories.


In cases where a default role is applicable to all users, and a configured role is applicable for specific users, consider the following scenarios:
  • Same rule type (permit or deny)—If the default role and the configured role for a specific user have the same rule type, then the specific user will have access to all the rules of both the default role and the configured role.


    Note


    A deny-all statement is assumed as rule 0 so that no action is possible for a user role unless explicitly permitted.


    If the default role, say A, has the following rules:
    rule 5 permit show feature environment
    rule 4 permit show feature hardware
    rule 3 permit config feature ssh
    rule 2 permit config feature ntp
    rule 1 permit config feature tacacs+
    And, a specific user is assigned to the following role, say B, with one rule:
    rule 1 permit config feature dpvm

    The specific user will have access to the rules of both A and B.

  • Different rule type—If the default role and the configured role for a specific user have different rule types for a particular rule, then the default role will override the conflicting rule statement of the configured role.
    If the default role, say A, has the following rules:
    rule 5 permit show feature environment
    rule 4 permit show feature hardware
    rule 3 permit config feature ssh
    rule 2 permit config feature ntp
    rule 1 permit config feature tacacs+
    And, a specific user is assigned to the following role, say B, with two rules:
    rule 6 permit config feature dpvm
    rule 2 deny config feature ntp
    Rule 2 of A and B are in conflict. In this case, A overrides the conflicting rule of B, and the user is assigned with the remaining rules of A and B, including the overridden rule:
    rule 6 permit config feature dpvm
    rule 5 permit show feature environment
    rule 4 permit show feature hardware
    rule 3 permit config feature ssh
    rule 2 permit config feature ntp -----------> Overridden rule
    rule 1 permit config feature tacacs+

Modifying Profiles

To modify the profile for an existing role, follow these steps:

Procedure

Step 1

switch# configure terminal

Enters configuration mode.

Step 2

switch(config)# role name sangroup

switch(config-role)#

Places you in role configuration submode for the existing role sangroup.

Step 3

switch(config-role)# rule 1 permit config

switch(config-role)# rule 2 deny config feature fspf

switch(config-role)# rule 3 permit debug feature zone

switch(config-role)# rule 4 permit exec feature fcping

Allows users belonging to the sangroup role to perform all configuration commands except fspf config commands. They can also perform zone debug commands and the fcping EXEC mode command.

Step 4

switch(config-role)# no rule 4

Deletes rule 4, which no longer permits the sangroup to perform the fcping command.


Example

In Step 3, rule 1 is applied first, thus permitting sangroup users access to all config commands. Rule 2 is applied next, denying FSPF configuration to sangroup users. As a result, sangroup users can perform all other config commands, except fspf configuration commands.

Configuring the VSAN Policy

You can configure a role so that it only allows tasks to be performed for a selected set of VSANs. By default, the VSAN policy for any role is permit, which allows tasks to be performed for all VSANs. You can configure a role that only allows tasks to be performed for a selected set of VSANs. To selectively allow VSANs for a role, set the VSAN policy to deny, and then set the configuration to permit or the appropriate VSANs.


Note


Configuring the VSAN policy requires the ENTERPRISE_PKG license (for more information, see the Cisco MDS 9000 Family NX-OS Licensing Guide).


Note


Users configured in roles where the VSAN policy is set to deny cannot modify the configuration for E ports. They can only modify the configuration for F or FL ports (depending on whether the configured rules allow such configuration to be made). This is to prevent such users from modifying configurations that may impact the core topology of the fabric.

Tip


Roles can be used to create VSAN administrators. Depending on the configured rules, these VSAN administrators can configure MDS features (for example, zone, fcdomain, or VSAN properties) for their VSANs without affecting other VSANs. Also, if the role permits operations in multiple VSANs, then the VSAN administrators can change VSAN membership of F or FL ports among these VSANs.


Users belonging to roles in which the VSAN policy is set to deny are referred to as VSAN-restricted users.

Modifying the VSAN Policy

To modify the VSAN policy for an existing role, follow these steps:


Note


  • The VSAN enforcement is done only for non-show commands. The show commands are excluded.


Procedure

Step 1

switch# configure terminal

Enters configuration mode.

Step 2

switch(config)# role name sangroup

switch(config-role)#

Places you in role configuration submode for the sangroup role.

Step 3

switch(config)# vsan policy deny

switch(config-role-vsan)#

Changes the VSAN policy of this role to deny and places you in a submode where VSANs can be selectively permitted.

Step 4

switch(config-role)# no vsan policy deny

(Optional) Deletes the configured VSAN role policy and reverts to the factory default (permit ).

Step 5

switch(config-role-vsan)# permit vsan 10-30

Permits this role to perform the allowed commands for VSANs 10 through 30.

Step 6

switch(config-role-vsan)# no permit vsan 15-20

(Optional) Removes the permission for this role to perform commands for VSANs 15 to 20. So, the role is now permitted to perform commands for VSAN 10 to 14, and 21 to 30.


Role Distributions

Role-based configurations use the Cisco Fabric Services (CFS) infrastructure to enable efficient database management and to provide a single point of configuration for the entire fabric.

The following configurations are distributed:

  • Role names and descriptions
  • List of rules for the roles
  • VSAN policy and the list of permitted VSANs

This section includes the following topics:

About Role Databases

Role-based configurations use two databases to accept and implement configurations.

  • Configuration database—The database currently enforced by the fabric.
  • Pending database—Your subsequent configuration changes are stored in the pending database. If you modify the configuration, you need to commit or discard the pending database changes to the configuration database. The fabric remains locked during this period. Changes to the pending database are not reflected in the configuration database until you commit the changes.

Note


As soon as the customer encounters syslog"%VSHD-4-VSHD_ROLE_DATABASE_OUT_OF_SYNC", Role configuration database is found to be different between the switches during merge. Role configuration database is recommended to be identical among all switches in the fabric. Edit the configuration on one of the switches to obtain the desired role  configuration database and then commit it.

Locking the Fabric

The first action that modifies the database creates the pending database and locks the feature in the entire fabric. Once you lock the fabric, the following situations apply:

  • No other user can make any configuration changes to this feature.
  • A copy of the configuration database becomes the pending database along with the first change.

Committing Role-Based Configuration Changes

If you commit the changes made to the pending database, the configuration is committed to all the switches in the fabric. On a successful commit, the configuration change is applied throughout the fabric and the lock is released. The configuration database now contains the committed changes and the pending database is now cleared.

To commit role-based configuration changes, follow these steps:

Procedure


Step 1

switch# configure terminal

switch(config)#

Enters configuration mode.

Step 2

switch(config)# role commit

Commits the role-based configuration changes.


Discarding Role-Based Configuration Changes

If you discard (terminate) the changes made to the pending database, the configuration database remains unaffected and the lock is released.

To discard role-based configuration changes, follow these steps:

Procedure


Step 1

switch# configure terminal

switch(config)#

Enters configuration mode.

Step 2

switch(config)# role abort

Discards the role-based configuration changes and clears the pending configuration database.


Enabling Role-Based Configuration Distribution

To enable role-based configuration distribution, follow these steps:

Procedure


Step 1

switch# configure terminal

switch(config)#

Enters configuration mode.

Step 2

switch(config)# role distribute

Enables role-based configuration distribution.

Step 3

switch(config)# no role distribute

(Optional) Disables role-based configuration distribution (default).


Clearing Sessions

To forcibly clear the existing role session in the fabric, issue the clear role session command from any switch that is part of the initiated session.


Caution


Any changes in the pending database are lost when you issue this command.


switch# clear role session

Database Merge Guidelines

Fabric merge does not modify the role database on a switch. If two fabrics merge, and the fabrics have different role databases, the software generates an alert message.

  • Verify that the role database is identical on all switches in the entire fabric.
  • Be sure to edit the role database on any switch to the desired database and then commit it. This synchronizes the role databases on all the switches in the fabric.

Displaying Role-Based Information

Use the show role command to display rules configured on the switch. The rules are displayed by rule number and are based on each role. All roles are displayed if the role name is not specified. See the following example.

Displays Information for All Roles

switch# show role
 
Role: network-admin
  Description: Predefined Network Admin group. This role cannot be modified.
  Vsan policy: permit (default)
  -------------------------------------------------
  Rule    Type    Command-type    Feature
  -------------------------------------------------
  1       permit  clear           *
  2       permit  config          *
  3       permit  debug           *
  4       permit  exec            *
  5       permit  show            *
Role: network-operator
  Description: Predefined Network Operator group. This role cannot be modified.
  Vsan policy: permit (default)
  -------------------------------------------------
  Rule    Type    Command-type    Feature
  -------------------------------------------------
  1       permit  show            *(excluding show running-config, show startup-config)
  2       permit  exec            copy licenses
  3       permit  exec            dir
  4       permit  exec            ssh
  5       permit  exec            terminal
  6       permit  config          username
Role: server-admin
  Description: Predefined system role for server administrators. This role
  cannot be modified.
  Vsan policy: permit (default)
  -------------------------------------------------
  Rule    Type    Command-type    Feature
  -------------------------------------------------
  1       permit  show            *
  2       permit  exec            install
Role: priv-15
  Description: This is a system defined privilege role.
  Vsan policy: permit (default)
  -------------------------------------------------
  Rule    Type    Command-type    Feature
  -------------------------------------------------
  1       permit  show            *
  2       permit  config          *
  3       permit  clear           *
  4       permit  debug           *
  5       permit  exec            *
Role: priv-14
  Description: This is a system defined privilege role.
  Vsan policy: permit (default)
Role: priv-13
  Description: This is a system defined privilege role.
  Vsan policy: permit (default)
Role: priv-12
  Description: This is a system defined privilege role.
  Vsan policy: permit (default)
Role: priv-11
  Description: This is a system defined privilege role.
  Vsan policy: permit (default)
Role: priv-10
  Description: This is a system defined privilege role.
  Vsan policy: permit (default)
Role: priv-9
  Description: This is a system defined privilege role.
  Vsan policy: permit (default)
Role: priv-8
  Description: This is a system defined privilege role.
  Vsan policy: permit (default)
Role: priv-7
  Description: This is a system defined privilege role.
  Vsan policy: permit (default)
Role: priv-6
  Description: This is a system defined privilege role.
  Vsan policy: permit (default)
Role: priv-5
  Description: This is a system defined privilege role.
  Vsan policy: permit (default)
Role: priv-4
  Description: This is a system defined privilege role.
  Vsan policy: permit (default)
Role: priv-3
  Description: This is a system defined privilege role.
  Vsan policy: permit (default)
Role: priv-2
  Description: This is a system defined privilege role.
  Vsan policy: permit (default)
Role: priv-1
  Description: This is a system defined privilege role.
  Vsan policy: permit (default)
Role: priv-0
  Description: This is a system defined privilege role.
  Vsan policy: permit (default)
  -------------------------------------------------
  Rule    Type    Command-type    Feature
  -------------------------------------------------
  1       permit  show            *
  2       permit  exec            enable
  3       permit  exec            ssh
  4       permit  exec            ping
  5       permit  exec            telnet
  6       permit  exec            traceroute
Role: default-role
  Description: This is a system defined role and applies to all users.
  Vsan policy: permit (default)
  -------------------------------------------------
  Rule    Type    Command-type    Feature
  -------------------------------------------------
  1       permit  show            system
  2       permit  show            snmp
  3       permit  show            module
  4       permit  show            hardware
  5       permit  show            environment

Displaying Roles When Distribution is Enabled

Use the show role command to display the configuration database.

Use the show role status command to display whether distribution is enabled for role configuration, the current fabric status (locked or unlocked), and the last operation performed. See the following example.

Displays the Role Status Information

switch# show role status
Distribution: Enabled
Session State: Locked
Last operation (initiated from this switch): Distribution enable
Last operation status: Success

Use the show role pending command to display the pending role database.

The following example displays the output of the show role pending command by following this procedure:

  1. Create the role called myrole using the role name myrole command.
  2. Enter the rule 1 permit config feature fspf command.
  3. Enter the show role pending command to see the output.

Displays Information on the Pending Roles Database

switch# show role pending
 
Role: network-admin
Description: Predefined Network Admin group. This role cannot be modified
Access to all the switch commands
Role: network-operator
Description: Predefined Network Operator group. This role cannot be modified
Access to Show commands and selected Exec commands
Role: svc-admin
Description: Predefined SVC Admin group. This role cannot be modified
Access to all SAN Volume Controller commands
Role: svc-operator
Description: Predefined SVC Operator group. This role cannot be modified
Access to selected SAN Volume Controller commands
Role: TechDocs
  vsan policy: permit (default)
Role: sangroup
  Description: SAN management group
  vsan policy: deny
  Permitted vsans: 10-30
  ---------------------------------------------
  Rule    Type    Command-type      Feature
  ---------------------------------------------
    1.   permit    config                   *
    2.     deny    config                fspf
    3.   permit     debug                zone
    4.   permit      exec              fcping
Role: myrole
  vsan policy: permit (default)
  ---------------------------------------------
  Rule    Type    Command-type      Feature
  ---------------------------------------------
    1.   permit    config                fspf

Use the show role pending-diff command to display the differences between the pending and configuration role database. See the following example.

Displays the Differences Between the Two Databases


switch# show role pending-diff
    +Role: myrole
    +  vsan policy: permit (default)
    +  ---------------------------------------------
    +  Rule    Type    Command-type      Feature
    +  ---------------------------------------------
    +    1.   permit    config                fspf

Configuring Common Roles

The CLI and SNMP use common roles in all Cisco MDS 9000 Series Switches. You can use the CLI to modify a role that was created using SNMP and vice versa.

Users, passwords, and roles for all CLI and SNMP users are the same. A user configured through the CLI can access the switch using SNMP (for example, the NDFC or Device Manager) and vice versa.

Figure 1. Common Roles

A custom role user with Network-Admin privileges is restricted to modify the account of other users. However, only the Admin can modify all user accounts.

You can modify the user privileges by performing the following task.

  1. Modify role using console authentication.

    If you setup the console authentication as 'local', logon using the Local-Admin user and modify the user.

  2. Modify role using remote authentication.

    Turn off the remote authentication. Logon using the Local -Admin privileges and modify the user. Turn on the remote authentication.

  3. Modify role using LDAP/AAA.

    Create a group in LDAP/AAA and rename the group as Network-Admin. Add the required users to this group. The users of this group will now have complete Network-Admin privileges.

Each role in SNMP is the same as a role created or modified through the CLI (see the Role-Based Authorization).

Each role can be restricted to one or more VSANs as required.

You can create new roles or modify existing roles using SNMP or the CLI.

  • SNMP—Use the CISCO-COMMON-ROLES-MIB to configure or modify roles. Refer to the Cisco MDS 9000 Family MIB Quick Reference.

  • CLI—Use the role name command.

Mapping of CLI Operations to SNMP

SNMP has only three possible operations: GET, SET, and NOTIFY. The CLI has five possible operations: DEBUG, SHOW, CONFIG, CLEAR, and EXEC.


Note


NOTIFY does not have any restrictions like the syslog messages in the CLI.

The following table explains how the CLI operations are mapped to the SNMP operations.

Table 1. CLI Operation to SNMP Operation Mapping

CLI Operation

SNMP Operation

DEBUG

Ignored

SHOW

GET

CONFIG

SET

CLEAR

SET

EXEC

SET

The following example shows the privileges and rules mapping CLI operations to SNMP operations for a role named my_role.

Displays CLI Operation to SNMP Operation Mapping

switch# show role name my_role
Role:my_role
  vsan policy:permit (default)
  ---------------------------------------------
  Rule    Type    Command-type      Feature
  ---------------------------------------------
    1.   permit     clear                   *
    2.     deny     clear                 ntp
    3.   permit    config                   *
    4.     deny    config                 ntp
    5.   permit     debug                   *
    6.     deny     debug                 ntp
    7.   permit      show                   *
    8.     deny      show                 ntp
    9.   permit      exec                   *

Note


Although CONFIG is denied for NTP in rule 4, rule 9 allows the SET to NTP MIB objects because EXEC also maps to the SNMP SET operation.

Default Settings

The following table lists the default settings for all switch security features in any switch.

Table 2. Default Switch Security Settings

Parameters

Default

Roles in Cisco MDS Switches

Network operator (network-operator)

AAA configuration services

Local

Authentication port

1821

Accounting port

1813

Preshared key communication

Clear text

RADIUS server time out

1 (one) second

RADIUS server retries

Once

TACACS+

Disabled

TACACS+ servers

None configured

TACACS+ server timeout

5 seconds

AAA server distribution

Disabled

VSAN policy for roles

Permit

User account

No expiry (unless configured)

Password

None

Password-strength

Enabled

Accounting log size

250 KB

SSH service

Enabled

Telnet service

Disabled