Configuring Port Channels

This chapter provides information about port channels and how to configure the port channels.

Finding Feature Information

Your software release might not support all the features documented in this module. For the latest caveats and feature information, see the Bug Search Tool at https://tools.cisco.com/bugsearch/ and the release notes for your software release. To find information about the features documented in this module, and to see a list of the releases in which each feature is supported, see the New and Changed chapter or the Feature History table below.

Feature History for Port Channels

Feature Name

Release

Feature Information

Port channels

8.4(2)

The default port channel mode was changed from On to Active mode.

Information About Port Channels

Port Channels Overview

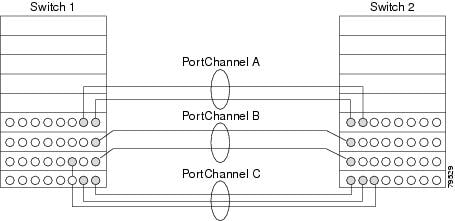
Port channels refer to the aggregation of multiple physical interfaces into one logical interface to provide higher aggregated bandwidth, load balancing, and link redundancy (see Port Channel Flexibility). Port channels can connect to interfaces across switching modules, so a failure of a switching module cannot bring down the port channel link.

Figure 1. Port Channel Flexibility


Port channels on Cisco MDS 9000 Series Multilayer Switches allow flexibility in configuration. This illustrates three possible port channel configurations:

  • Port channel A aggregates two links on two interfaces on the same switching module at each end of a connection.

  • Port channel B also aggregates two links, but each link is connected to a different switching module. If the switching module goes down, traffic is not affected.

  • Port channel C aggregates three links. Two links are on the same switching module at each end, while one is connected to a different switching module on switch 2.

E Port Channels

An E port channel refers to the aggregation of multiple E ports into one logical interface to provide higher aggregated bandwidth, load balancing, and link redundancy. Port channels can connect to interfaces across switching modules, so a failure of a switching module cannot bring down the port channel link.

A port channel has the following features and restrictions:

  • Provides a point-to-point connection over ISL (E ports) or EISL (TE ports). You can combine multiple links into a port channel.

  • Increases the aggregate bandwidth on an ISL by distributing traffic among all functional links in the channel.

  • Load balances across multiple links and maintains optimum bandwidth utilization. Load balancing is based on the source ID, destination ID, and exchange ID (OX ID).

  • Provides high availability on an ISL. If one link fails, traffic that is previously carried on this link switches to the remaining links. If a link goes down in a port channel, the upper protocol is not aware of it. To the upper protocol, the link is still there, although the bandwidth is diminished. Link failure does not affect the routing tables. Port channels may contain up to 16 physical links and may span multiple modules for added high availability.


Note

See the Cisco MDS 9000 Series NX-OS Fabric Configuration Guide for information about failover scenarios for port channels and FSPF links.

F, TF, NP, and TNP Port Channels


Note

We do not recommend using interface, fWWN, or domain-ID based zoning for devices that are connected to the edge Cisco N-Port Virtualization (NPV) switches.


F port channels provide fault tolerance and performance benefits on connections to N-Port Virtualization (NPV) switches, including Cisco UCS Fabric Interconnects (FIs). F port channels present unique challenges to ACL TCAM programming. When F ports are aggregated into a port channel, ACL TCAM programming is repeated on each member interface. Consequently, these types of port channels multiply the amount of TCAM entries needed. Because of this, it is imperative that the member interfaces are allocated as optimally as possible, and that zoning best practices are also followed. If you also consider the fact that these F port channels can contain 100+ host logins, TCAM can easily be exceeded, especially for fabric switches if best practices are not followed.

The following is a sample topology:

This example assumes that the port channel (PC) contains 8 interfaces, fc1/1-fc1/8.

In addition, the following two zones are active:


zone1
member host (host 0x010001)
member target1 (target1 0x010002)
zone2
member host (host 0x010001)
member target2 (target2 0x010003)
 

In such a scenario, the following ACL programming will be present on each member of the PC:


fc1/1(through fc1/8) (port-channel)
Entry#    Source ID     Mask         Destination ID         Mask              Action
1         010001       ffffff        010002(target1)       ffffff             Permit
2         010001       ffffff        010003(target2)       ffffff             Permit
3         000000       000000        000000                000000             Drop

The above example shows the ACL TCAM programming that will be duplicated on each member of the F port-channel. Consequently, if a lot of programming is required because of a large number of FLOGIs on the F port channel, or a large number of devices are zoned with the devices on the F port channel, TCAM can be exhausted on a forwarding engine. The following are the best practices for efficient use of TCAM with respect to F ports and F port-channels:

  • Distribute port-channel member interfaces into different forwarding engines, especially on fabric switches.

  • If TCAM usage is still too high in the case of port-channel with a large number of interfaces, then split the port-channel into two separate port-channels each with half the interfaces. This will still provide redundancy but will reduces the number of FLOGIs per individual port-channel and thus reduce TCAM usage.

  • Distribute member interfaces into different linecards on director-class switches.

  • Distribute member interfaces into forwarding engines with lower TCAM zoning region usage.

  • Use single-initiator zones, single-target zones, or Smart Zoning.

Port Channeling and Trunking

Trunking is a commonly used storage industry term. However, the Cisco NX-OS software and switches in the Cisco MDS 9000 Series Multilayer Switches implement trunking and port channeling as follows:

  • Port channeling enables several physical links to be combined into one aggregated logical link.

  • Trunking enables a link transmitting frames in the EISL format to carry (trunk) multiple VSAN traffic. For example, when trunking is operational on an E port, that E port becomes a TE port. A TE port is specific to switches in the Cisco MDS 9000 Series Multilayer Switches. An industry standard E port can link to other vendor switches and is referred to as a nontrunking interface (see Trunking Only and Port Channeling and Trunking). See Configuring Trunking for information on trunked interfaces.

Figure 2. Trunking Only


Figure 3. Port Channeling and Trunking


Port channeling and trunking are used separately across an ISL.

  • Port channeling—Interfaces can be channeled between the following sets of ports:

    • E ports and TE ports

    • F ports and NP ports

    • TF ports and TNP ports

  • Trunking—Trunking permits carrying traffic on multiple VSANs between switches.

See the Cisco MDS 9000 Series NX-OS Fabric Configuration Guide.

  • Both port channeling and trunking can be used between TE ports over EISLs.

Port Channel Modes


Note

After changing the port-channel mode, each member interface must be brought down and brought back up via the shutdown and no shutdown commands for the port-channel mode to be changed. This can be done on an individual member-by-member basis such that the port-channel remains up and fully functional.


You can configure each port channel with a channel group mode parameter. Such configuration determines the port channel protocol behavior for all member ports in this channel group. The possible values for a channel group mode are as follows:

  • On—The member ports only operate as part of a port channel or remain inactive. In this mode, the port channel protocol is not initiated. However, if a port channel protocol frame is received from a peer port, the software indicates its nonnegotiable status. This mode is backward compatible with the existing implementation of port channels in releases before Cisco MDS NX-OS Release 2.0(1b), where the channel group mode is implicitly assumed to be On. In Cisco MDS SAN-OS Releases 1.3 and earlier, the only available port channel mode was the On mode. Port channels that are configured in the On mode require you to explicitly enable and disable the port channel member ports at either end if you add or remove ports from the port channel configuration. Physically verify that the local and remote ports are connected to each other.

    However, from Cisco MDS Release NX-OS Release 8.4(1), the default port channel mode is the Active mode.

  • Active—The member ports initiate port channel protocol negotiation with the peer ports regardless of the channel group mode of the peer port. If the peer port, while configured in a channel group, does not support the port channel protocol, or responds with nonnegotiable status, it defaults to the On mode behavior in Cisco MDS Release NX-OS Release 8.3(1) and earlier releases. However, from Cisco MDS Release NX-OS Release 8.4(1), the default port channel mode is the Active mode. The Active port channel mode allows automatic recovery without explicitly enabling and disabling the port channel member ports at either end.


Note

Before Cisco MDS NX-OS Release 8.3(1), the CLI and the Device Manager create the port channel in On mode on the NPIV core switches and Active mode on the NPV switches. DCNM-SAN creates all port channels in Active mode. We recommend that you create port channels in Active mode.

From Cisco MDS NX-OS Release 8.4(1), the CLI and the Device Manager create the port channel in Active mode on the NPIV core switches.


Table 1 compares On and Active modes.

Table 1. Channel Group Configuration Differences

On Mode

Active Mode

No protocol is exchanged.

A port channel protocol negotiation is performed with the peer ports.

Moves interfaces to the suspended state if its operational values are incompatible with the port channel.

Moves interfaces to the isolated state if its operational values are incompatible with the port channel.

When you add or modify a port-channel member port configuration, you must explicitly disable (shut) and enable (no shut) the port channel member ports at either end.

When you add or modify a port channel interface, the port channel automatically recovers.

Port initialization is not synchronized.

There is synchronized startup of all ports in a channel across peer switches.

All misconfigurations are not detected as no protocol is exchanged.

Consistently detect misconfigurations using a port channel protocol.

Transitions misconfigured ports to the suspended state. You must explicitly disable (shut) and enable (no shut) the member ports at either end.

Transitions misconfigured ports to the isolated state to correct the misconfiguration. Once you correct the misconfiguration, the protocol ensures automatic recovery.

Port Channel Deletion

When you delete the port channel, the corresponding channel membership is also deleted. All interfaces in the deleted port channel convert to individual physical links. After the port channel is removed, regardless of the mode used (Active and On), the ports at either end are gracefully brought down. The ports going down gracefully indicates that no frames were lost when the interface went down (see the Graceful Shutdown).

If you delete the port channel for one port, then the individual ports within the deleted port channel retain the compatibility parameter settings (speed, mode, port VSAN, allowed VSAN, and port security). You can explicitly change those settings as required.

  • If you use the default On mode to avoid inconsistent states across switches and to maintain consistency across switches, then the ports shut down. Explicitly enable those ports again.

  • If you use the Active mode, then the port channel ports automatically recover from the deletion.

Interfaces in a Port Channel

You can add or remove a physical interface (or range of interfaces) to an existing port channel. The compatible parameters on the configuration are mapped to the port channel. Adding an interface to a port channel increases the channel size and bandwidth of the port channel. Removing an interface from a port channel decreases the channel size and bandwidth of the port channel.


Note

For information about port channel support on Generation 2 switching modules, see the Port Channel Limitations section.

Interface Addition to a Port Channel

You can add a physical interface (or range of interfaces) to an existing port channel. The compatible parameters on the configuration are mapped to the port channel. Adding an interface to a port channel increases the channel size and bandwidth of the port channel.

You can configure a port as a member of a static port channel only if the following configurations are the same in the port and the port channel:

  • Speed

  • Mode

  • Rate mode

  • Port VSAN

  • Trunking mode

  • Allowed VSAN list or VF-ID list

After the members are added, regardless of the mode (Active and On) used, the ports at either end are gracefully brought down. The ports going down gracefully indicates that no frames were lost when the interface went down.

Compatibility Check

A compatibility check ensures that the same parameter settings are used in all physical ports in the channel. Otherwise, they cannot become part of a port channel. The compatibility check is performed before a port is added to the port channel.

The check ensures that the following parameters and settings match at both ends of a port channel:

  • Capability parameters (type of interface, Gigabit Ethernet at both ends, or Fibre Channel at both ends).

  • Administrative compatibility parameters (speed, mode, rate mode, port VSAN, allowed VSAN list, and port security).


Note

Ports in shared rate mode cannot form a port channel or a trunking port channel.
  • Operational parameters (remote switch WWN and trunking mode).

A port addition procedure fails if the capability and administrative parameters on the remote switch are incompatible with the capability and administrative parameters on the local switch. If the compatibility check is successful, the interfaces are operational and the corresponding compatibility parameter settings apply to these interfaces.

Suspended and Isolated States

If the operational parameters are incompatible, the compatibility check fails and the interface is placed in a suspended or isolated state based on the configured mode:

  • An interface enters the suspended state if the interface is configured in the On mode.

  • An interface enters the isolated state if the interface is configured in the Active mode.

Forcing an Interface Addition

You can force the port configuration to be overwritten by the port channel. In this case, the interface is added to a port channel.

  • If you use the On mode to avoid inconsistent states across switches and to maintain consistency across switches, then the ports shut down. Explicitly enable those ports again.

  • If you use the Active mode, then the port channel ports automatically recover from the addition.


Note

When port channels are created from within an interface, the force option cannot be used.

After the members are forcefully added, regardless of the mode (Active and On) used, the ports at either end are gracefully brought down. The ports going down gracefully indicates that no frames were lost when the interface went down (see the Graceful Shutdown) section.

Deleting an Interface from a Port Channel

When a physical interface is deleted from the port channel, the channel membership is automatically updated. If the deleted interface is the last operational interface, then the port channel status is changed to a down state. Deleting an interface from a port channel decreases the channel size and bandwidth of the port channel.

  • If you use the On mode to avoid inconsistent states across switches and to maintain consistency across switches, then the ports shut down. Explicitly enable those ports again.

  • If you use the Active mode, then the port channel ports automatically recover from the deletion.

After the members are deleted, regardless of the mode (Active and On) used, the ports at either end are gracefully brought down. The ports going down gracefully indicates that no frames were lost when the interface went down.

Port Channel Protocols

In earlier Cisco SAN-OS releases, port channels required extra administrative tasks to support synchronization. The Cisco NX-OS software provides robust error detection and synchronization capabilities. You can manually configure channel groups or they can be automatically created. In both cases, the channel groups have the same capability and configurational parameters. Any change in configuration applied to the associated port channel interface is propagated to all members of the channel group.

A protocol to exchange port channel configurations is available in all Cisco MDS switches. This addition simplifies port channel management with incompatible ISLs. Extra autocreation mode enables ISLs with compatible parameters to automatically form channel groups without manual intervention.

The port channel protocol is enabled by default.

The port channel protocol expands the port channel functional model in Cisco MDS switches. It uses the exchange peer parameters (EPP) services to communicate across peer ports in an ISL. Each switch uses the information that is received from the peer ports along with its local configuration and operational values to decide if it has to be part of a port channel. The protocol ensures that a set of ports is eligible to be part of the same port channel. They are only eligible to be part of the same port channel if all the ports have a compatible partner.

The port channel protocol uses two subprotocols:

  • Bring-up protocol—Automatically detects misconfigurations so you can correct them. This protocol synchronizes the port channel at both ends so that all frames for a given flow (as identified by the source FC ID, destination FC ID and OX_ID) are carried over the same physical link in both directions. This helps make applications such as write acceleration, work for port channels over FCIP links.

  • Autocreation protocol—Automatically aggregates compatible ports into a port channel.

Channel Group Creation


Note

Channel groups are not supported on internal ports in the Cisco Fabric Switch for HP c-Class BladeSystem and the Cisco Fabric Switch for IBM BladeSystem.

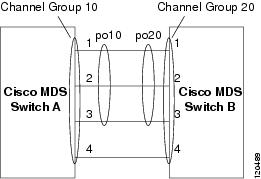
Assuming the link A1-B1 comes up first (see Autocreating Channel Groups section), that link is operational as an individual link. When the next link comes up, for example, A2-B2, the port channel protocol identifies if this link is compatible with link A1-B1 and automatically creates channel groups 10 and 20 in the respective switches. If link A3-B3 can join the channel groups (the port channels), the respective ports have compatible configurations. If link A4-B4 operates as an individual link, it is because of the incompatible configuration of the two end ports with the other member ports in this channel group.

Figure 4. Autocreating Channel Groups


The channel group numbers are selected dynamically, and as such, the administrative configuration of the ports forming the channel group at either end are applicable to the newly created channel group. The channel group number that is chosen dynamically may be different across reboots for the same set of port channels that are based on the order of ports that are initialized in the switch.

Table 1 identifies the differences between user-configured and auto-configured channel groups.

Table 2. Channel Group Configuration Differences

User-Configured Channel Group

Autocreated Channel Group

Manually configured by you.

Created automatically when compatible links come up between two compatible switches, if the channel group autocreation is enabled in all ports at both ends.

Member ports cannot participate in autocreation of channel groups. You cannot configure the autocreation feature.

None of these ports are members of a user-configured channel group.

You can form the port channel with a subset of the ports in the channel group. Incompatible ports remain in a suspended or isolated state depending on the On or Active mode configuration.

All ports that are included in the channel group participate in the port channel—No member port becomes isolated or suspended. Instead, the member port is removed from the channel group when the link is found to be incompatible.

Any administrative configuration made to the port channel is applied to all ports in the channel group, and you can save the configuration for the port channel interface.

Any administrative configuration made to the port channel is applied to all ports in the channel group, but the configurations are saved for the member ports. No configuration is saved for the port channel interface. You can explicitly convert this channel group, if necessary.

You can remove any channel group and add members to a channel group.

You cannot remove a channel group, or add or remove any of its members. The channel group is removed when no member ports exist.


Note

Autocreation is not supported as of MDS NX-OS Release 4.1(1b) and later.

Autocreation

The autocreation protocol has the following functionality:

  • When you enable the autocreation feature, you cannot configure ports as part of a port channel. These two configurations are mutually exclusive.

  • Enable the autocreation feature in both the local and peer ports to negotiate a port channel.

  • Aggregation occurs in one of two ways:

    • A port is aggregated into a compatible autocreated port channel.

    • A port is aggregated with another compatible port to form a new port channel.

  • Newly created port channels are allocated from the maximum port channel in a decreasing order based on availability. If all port channels are used up, aggregation is not allowed.

  • You cannot change the membership or delete an autocreated port channel.

  • When you disable autocreation, all member ports are removed from the autocreated port channel.

  • After you remove the last member from an autocreated port channel, the channel is automatically deleted and the number is released for reuse.

  • An autocreated port channel is not persistent through a reboot. You can configure an autocreated port channel to appear the same as a persistent port channel. After the port channel is made persistent, the autocreation feature is disabled in all member ports.

  • You can enable or disable the autocreation feature on a per-port basis or for all ports in the switch. When this you enable this configuration, the channel group mode is assumed to be active. The default for this task is disabled.

  • If you enable autocreation of channel groups for an interface, you must first disable the autocreation feature before downgrading to an earlier software version or before configuring the interface in a manually configured channel group.


Tip

When enabling autocreation in any switch in the Cisco MDS 9000 Series Multilayer Switches, we recommend that you retain at least one interconnected port between the switches without any autocreation configuration. If all ports between two switches are configured with the autocreation feature at the same time, you may face a possible traffic disruption between these two switches. The traffic disruption is because the ports are automatically disabled and reenabled when ports are added to an autocreated port channel.


Manually Configured Channel Groups

A user-configured channel group cannot be converted to an autocreated channel group. However, you can convert an autocreated channel group to a manual channel group. Once performed, this task is irreversible. The channel group number does not change, but the member ports operate according to the properties of the manually configured channel group, and the autocreation of channel group is implicitly disabled for all member ports.


Tip

If you enable persistence, be sure to enable it at both ends of the port channel.


Prerequisites for Port Channels

Before configuring a port channel, consider the following guidelines:

  • Configure the port channel across switching modules to implement redundancy on switching module reboots or upgrades.

  • Ensure that you do not connect a port channel to different sets of switches. Port channels require point-to-point connections between the same set of switches.

If you misconfigure port channels, you may receive a misconfiguration message. If you receive this message, the port channel’s physical links are disabled because error was detected.

Port channel error is detected if the following requirements are not met:

  • Connect each switch on either side of a port channel to the same number of interfaces.

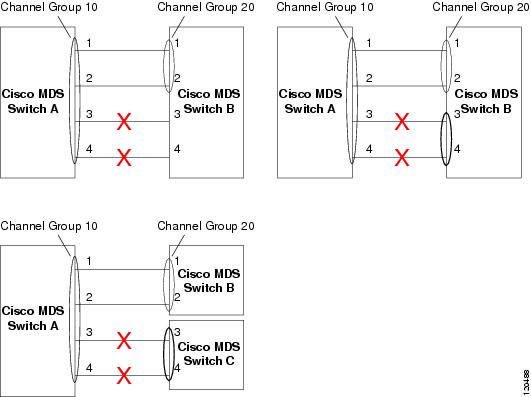
  • Connect each interface to a corresponding interface on the other side (see Misconfigured Configurations for an example of an invalid configuration).

  • You cannot change the links in a port channel after you configure the port channel. If you change the links after you configure the port channel, ensure to reconnect the links to interfaces within the port channel and reenable the links.

If all three conditions are not met, the faulty link is disabled.

Enter the show interface command for that interface to verify that the port channel is functioning as required.

Default Settings

Table 1 lists the default settings for port channels.

Table 3. Default Port Channel Parameters

Parameters

Default

Port channels

FSPF is enabled by default.

Create port channel

Administratively up.

Default port channel mode

Cisco MDS NX-OS Release 8.3(1) and earlier: On mode on non-NPV and NPIV core switches.

Cisco MDS NX-OS Release 8.4(1) and later: Active mode on non-NPV and NPIV core switches.

Active mode on NPV switches.

Autocreation

Disabled.

Guidelines and Limitations

General Guidelines and Limitations

Cisco MDS 9000 Series Multilayer switches support the following number of port channels per switch:

  • A port channel number refers to the unique identifier for each channel group. This number ranges from of 1–256.

The following table describes the results of adding a member to a port channel for various configurations.

F, TF, and NP Port Channel Limitations

The following guidelines and restrictions are applicable for F, TF, and NP port channels:

  • On the switch with feature npiv configured the ports must be in F mode.

  • On the switch with feature npv configured the ports must be in NP mode.

  • Automatic creation is not supported.

  • On mode is not supported. Only Active-Active mode is supported. By default, the mode is Active on the NPV switches.

  • Devices that are logged in through an F port channel on an MDS switch are not supported in IVR non-NAT configuration. The devices are supported only in IVR NAT configuration.

  • Port security rules are enforced only on physical pWWNs at the single link level.

  • FC-SP authenticates only the first physical FLOGI of every port channel member.

  • Since the FLOGI payload carries only the VF bits to trigger the use of a protocol after the FLOGI exchange, those bits are overridden. If the Cisco NPV switches, the core has a Cisco WWN and tries to initiate the PCP protocol.

  • The name server registration of the N ports logging in through an F port channel uses the fWWN of the port channel interface.

  • DPVM configuration is not supported.

  • You cannot configure the port channel port VSAN using DPVM.

  • The Dynamic Port VSAN Management (DPVM) database is queried only for the first physical FLOGI of each member, so that the port VSAN can be configured automatically.

  • DPVM does not bind FC_IDs to VSANs, but pWWNs to VSANs. It is queried only for the physical FLOGI.

E Port Channel Limitations

The port channel interface must be in Active mode when you configure multiple FCIP interfaces with WA.

Valid and Invalid Port Channel Examples

Port channels are created with default values. You can change the default configuration just like any other physical interface.

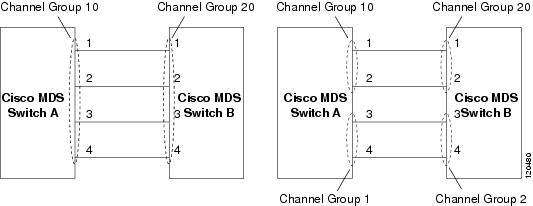
Valid Port Channel Configurations provides examples of valid port channel configurations.

Figure 5. Valid Port Channel Configurations


Misconfigured Configurations provides examples of invalid configurations. Assuming that the links are brought up in the 1, 2, 3, 4 sequence, links 3 and 4 will be operationally down because the fabric is misconfigured.

Figure 6. Misconfigured Configurations


Port Channel Best Practices

Forwarding Engines

A Cisco Multilayer Director Switch (MDS) uses a special kind of memory called Ternary Content Addressable Memory (TCAM) on its Fibre Channel modules. This special memory provides an Access Control List (ACL) type of function for Cisco MDS. The process that controls this functionality is called ACLTCAM. The E or TE ports (ISLs) and F (Fabric) ports have their own programming that is unique to their respective port types.

TCAM is allocated to individual forwarding engines and forwarding engines are assigned a group of ports. Director-class Fibre Channel modules have more TCAM space than fabric switches. The number of forwarding engines, the ports assigned to each forwarding engine, and the amount of TCAM allocated to each forwarding engine is hardware dependent.

The following example shows an output from Cisco MDS 9148S:


switch# show system internal acltcam–soc tcam–usage
TCAM Entries:
=============
                  Region1   Region2    Region3     Region4   Region5   Region6
Mod Fwd   Dir     TOP SYS  SECURITY    ZONING      BOTTOM    FCC DIS   FCC ENA
    Eng          Use/Total Use/Total  Use/Total   Use/Total Use/Total Use/Total
––– –––  –––––– –––––––––– ––––––––– –––––––––––– ––––––––– ––––––––– –––––––––
1   1    INPUT     19/407     1/407      1/2852 *    4/407     0/0       0/0
1   1    OUTPUT     0/25      0/25       0/140       0/25      0/12      1/25
1   2    INPUT     19/407     1/407      0/2852 *    4/407     0/0       0/0
1   2    OUTPUT     0/25      0/25       0/140       0/25      0/12      1/25
1   3    INPUT     19/407     1/407      0/2852 *    4/407     0/0       0/0
1   3    OUTPUT     0/25      0/25       0/140       0/25      0/12      1/25
–––––––––––––––––––––––––––––––––––––––––––––––––––
* 1024 entries are reserved for LUN Zoning purpose.

The above example indicates the following:

  • There are three forwarding engines, 1 through 3.

  • Since there are 48 ports on Cisco MDS 9148 switches, each forwarding engine handles 16 ports.

  • Each forwarding engine has 2852 entries in region 3 (the zoning region) for input. This is the main region used, and consequently, has the largest amount of available entries.

  • Forwarding engine 3 has only one entry that is currently in use out of the total 2852 in the zoning region.

The following example shows the output from Cisco MDS 9710 switch with a 2/4/8/10/16 Gbps Advanced Fibre Channel Module (DS–X9448–768K9):


F241–15–09–9710–2# show system internal acl tcam–usage
TCAM Entries:
=============
                  Region1   Region2    Region3     Region4   Region5   Region6
Mod Fwd   Dir     TOP SYS  SECURITY    ZONING      BOTTOM    FCC DIS   FCC ENA
    Eng          Use/Total Use/Total  Use/Total   Use/Total Use/Total Use/Total
––– –––  –––––– –––––––––– ––––––––– –––––––––––– ––––––––– ––––––––– –––––––––
1   0    INPUT     55/19664    0/9840     0/49136*   17/19664    0/0       0/0
1   0    OUTPUT    13/4075    0/1643     0/11467     0/4075    6/1649   21/1664
1   1    INPUT     52/19664    0/9840     2/49136*   14/19664    0/0       0/0
1   1    OUTPUT     7/4078    0/1646     0/11470     0/4078    6/1652    5/1651
1   2    INPUT     34/19664    0/9840     0/49136*   10/19664    0/0       0/0
1   2    OUTPUT     5/4078    0/1646     0/11470     0/4078    6/1652    1/1647
1   3    INPUT     34/19664    0/9840     0/49136*   10/19664    0/0       0/0
1   3    OUTPUT     5/4078    0/1646     0/11470     0/4078    6/1652    1/1647
1   4    INPUT     34/19664    0/9840     0/49136*   10/19664    0/0       0/0
1   4    OUTPUT     5/4078    0/1646     0/11470     0/4078    6/1652    1/1647
1   5    INPUT     34/19664    0/9840     0/49136*   10/19664    0/0       0/0
1   5    OUTPUT     5/4078    0/1646     0/11470     0/4078    6/1652    1/1647
...

The above example indicates the following:

  • There are six forwarding engines, 0 through 5.

  • Since there are 48 ports on a Cisco MDS DS–X9448–768K9 module, each forwarding engine handles eight ports.

  • Each forwarding engine has 49136 entries in region 3 (the zoning region) for input. This is the main region that is used, and consequently, has the largest amount of available entries.

  • Forwarding engine 2 has only two entries that are currently in use out of the total 49136 in the zoning region.


Note

The commands that are used to view TCAM usage on fabric switches are different from the ones used for director–class switches. For MDS 9148, MDS 9148S, and MDS 9250i fabric switches, use the show system internal acltcam-soc tcam-usage command. For director class switches, MDS 9396S, and 32 Gbps fabric switches, use the show system internal acl tcam-usage command.

The following table provides information about ports to forwarding engines mapping:

Table 4. Ports to Forwarding Engines Mapping

Switch or Module

Forwarding Engines

Port Ranges

Forwarding Engine Number

Zoning Region Entries

Bottom Region Entries

MDS 9132T

2

1–16

0

49136

19664

17–32

1

49136

19664

MDS 9148

3

fc1/25–36 and fc1/45–48

1

2852

407

fc1/5–12 and fc1/37–44

2

2852

407

fc1–4 and fc1/13–24

3

2852

407

MDS 9148S

3

fc1/1–16

1

2852

407

fc1/17–32

2

2852

407

fc1/33–48

3

2852

407

MDS 9148T

3

1–16

0

49136

19664

17–32

1

49136

19664

33–48

2

49136

19664

MDS 9250i

4

fc1/5–12 and eth1/1–8

1

2852

407

fc1/1–4, fc1/13–20, and fc1/37–40

2

2852

407

fc1/21–36

3

2852

407

ips1/1–2

4

2852

407

MDS 9396S

12

fc1/1–8

0

49136

19664

fc1/9–16

1

49136

19664

fc1/17–24

2

49136

19664

fc1/25–32

3

49136

19664

fc1/33–40

4

49136

19664

fc1/41–48

5

49136

19664

fc1/49–56

6

49136

19664

fc1/57–64

7

49136

19664

fc1/65–72

8

49136

19664

fc1/73–80

9

49136

19664

fc1/81–88

10

49136

19664

fc1/89–96

11

49136

19664

MDS 9396T

6

1–16

0

49136

19664

17–32

1

49136

19664

33–48

2

49136

19664

49–64

3

49136

19664

65-80

4

49136

19664

81-96

5

49136

19664

DS–X9248–48K9

1

1–48

0

27168

2680

DS–X9248–96K9

2

1–24

0

27168

2680

25–48

1

27168

2680

DS–X9224–96K9

2

1–12

0

27168

2680

13–24

1

27168

2680

DS–X9232–256K9

4

1–8

0

49136

19664

9–16

1

49136

19664

17–24

2

49136

19664

25–32

3

49136

19664

DS–X9248–256K9

4

1–12

0

49136

19664

13–24

1

49136

19664

25–36

2

49136

19664

37–48

3

49136

19664

DS–X9448–768K9

6

1–8

0

49136

19664

9–16

1

49136

19664

17–24

2

49136

19664

25–32

3

49136

19664

33–40

4

49136

19664

41–48

5

49136

19664

DS–X9334–K9

3

1–8

0

49136

19664

9–16

1

49136

19664

17–24

2

49136

19664

DS–X9648–1536K9

3

1–16

0

49136

19664

17–32

1

49136

19664

33–48

2

49136

19664

E and TE Port Channels and IVR

E port channels provide Inter Switch Links (ISLs) between fabric switches. Typically, there is minimal TCAM programming on these types of interfaces. Therefore, besides placing them into different linecards, and perhaps port groups on director-class switches, there is a little more to be done. However, when the Inter VSAN Routing (IVR) feature is being deployed, extensive TCAM programming can exist on ISLs because the IVR topology transitions from one VSAN to another. Consequently, most of the considerations that apply on F/TF port channels will be applicable here too.

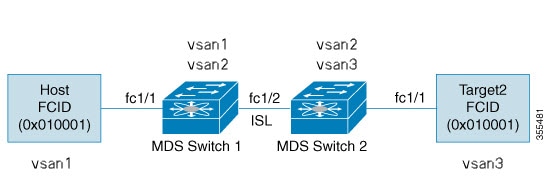
The following is an example of a topology:

In this topology:

  • Both Cisco MDS 9148S-1 and MDS 9148S-2 are in the IVR VSAN topology:


MDS9148S-1 vsan 1 and vsan 2
MDS9148S-2 vsan 2 and vsan 3
  • IVR NAT is configured.

  • VSAN 2 is the transit VSAN.


FCIDs per VSAN:
            VSAN 1  VSAN 2  VSAN 3
Host     			010001  210001  550002
Target1 			440002  360002  030001

Note

Domains 0x44 in VSAN 1, 0x21 and 0x36 in VSAN 2, and 0x55 in VSAN 3 are virtual domains created by IVR NAT.
  • The following is the IVR zoning topology:


ivr zone zone1
member host vsan 1
member target1 vsan3
  • The following is the ACL TCAM programming for the IVR zoning topology:


MDS9148S-1  fc1/1(Host) - VSAN 1
Entry# 			Source ID    				Mask      Destination ID  								Mask    Action
1      			010001(host) 				ffffff    440002(target1) 								ffffff  Permit
           - Forward to fc1/2
       - Rewrite the following information:
         VSAN to 2
         Source ID to 210001
         Destination ID to 360002
2      			000000     				000000    000000          								000000  Drop
MDS9148S-1  fc1/2(ISL) - VSAN 2
Entry# 			Source ID       					Mask      Destination ID  								Mask    Action
1      			360002(Target1) 					ffffff    210001(host)    								ffffff  Permit
       - Forward to fc1/2
       - Rewrite the following information:
         VSAN to 1
         Source ID to 440002
         Destination ID to 010001
MDS9148S-2 fc1/2(ISL) - VSAN 2
Entry# 			Source ID    				Mask      Destination ID  								Mask    Action
1      			210001(host) 				ffffff    360002(target1) 								ffffff  Permit
       - Forward to fc1/2
       - Rewrite the following information:
         VSAN to 3
         Source ID to 550002
         Destination ID to 030001
MDS9148S-2  fc1/1(Target1) - VSAN 3
Entry# 			Source ID       					Mask      Destination ID  								Mask    Action
1      			030001(Target1) 					ffffff    550002(host)    								ffffff  Permit
       - Forward to fc1/2
       - Rewrite the following information:
         VSAN to 2
         Source ID to 360002
         Destination ID to 210001
2      			000000     					000000    000000          									000000  Drop

Note

Besides the entries in this example, there are other entries that IVR adds to capture important frames such as PLOGIs, PRILIs, and ABTS.

The programming on the host and target1 ports is similar to the way it is without IVR, except that the FCIDs and VSANs are explicitly forwarded to an egress port and are rewritten to values that are appropriate for the transit VSAN (VSAN 2). These forwarding and rewrite entries are separate and are not included in the TCAM-usage values.

However, now, on the ISLs in both the switches, programming that did not exist earlier is present. When frames from Host to Target1 are received by Cisco MDS 9148S-2 fc1/2, they are rewritten to the values in VSAN 3 where the target resides. In the reverse direction, when frames from Target1 to the Host are received by Cisco MDS 9148S-1 fc1/2, they are rewritten to the values in VSAN 1 where the Host resides. Thus, for each VSAN transition on an ISL (that typically occurs across a transit VSAN) there will be TCAM programming for each device in the IVR zone set.

Consequently, most of the best practices followed for the F and TF port channels should be followed to ensure that TCAM is utilized as efficiently as possible for the following purposes:


Note

Unlike F and TF port-channels, the ACLTCAM programming on ISLs will be the same quantity regardless if the ISLs are part of a port-channel or not. If there are "n" ISLs between two MDS switches, then it doesn't matter if they are in one port-channel, two port-channels or just individual links. The ACLTCAM programming will be the same.
  • Distribute port-channel member interfaces into different forwarding engines, especially on fabric switches.

  • Distribute member interfaces into different linecards on director-class switches.

  • Distribute member interfaces into forwarding engines with lower TCAM zoning region usage.

  • Use single-initiator zones, single-target zones, or Smart Zoning.

Configuring Port Channels

Configuring Port Channels Using the Wizard Creating a Port Channel

To create a port channel, perform these steps:

Procedure


Step 1

switch# configure terminal

Enters configuration mode.

Step 2

switch(config)# interface port-channel 1

Configures the specified port channel (1) using the default ON mode.


Configuring the Port Channel Mode

Before Cisco MDS NX-OS Release 8.3(1), the CLI and the Device Manager create the port channel in On mode on the NPIV core switches and Active mode on the NPV switches. DCNM-SAN creates all port channels in Active mode. We recommend that you create port channels in Active mode.

From Cisco MDS NX-OS Release 8.4(1), the CLI and the Device Manager create the port channel in Active mode on the NPIV core switches.


Note

An F port channel is supported only on Active mode.

To configure Active mode, perform these steps:

Procedure


Step 1

switch# configure terminal

Enters configuration mode.

Step 2

switch(config)# interface port-channel 1

Configures the specified port channel (1) using the default On mode in Cisco MDS NX-OS Release 8.3(1) and earlier releases. Configures the specified port channel (1) using the default Active mode from Cisco MDS NX-OS Release 8.4(1).


Deleting Port Channels

To delete a port channel, perform these steps:

Procedure


Step 1

switch# configure terminal

Enters configuration mode.

Step 2

switch(config)# no interface port-channel 1

Deletes the specified port channel (1), its associated interface mappings, and the hardware associations for this port channel.


Adding an Interface to a Port Channel

To add an interface to a port channel, perform these steps:

Procedure


Step 1

switch# configure terminal

Enters configuration mode.

Step 2

switch(config)# interface fc1/15

Configures the specified port interface (fc1/15).

Step 3

switch(config-if)# channel-group 15

Adds physical Fibre Channel port 1/15 to channel group 15. If the channel-group 15 does not exist, it is created. The port is shut down.


Adding a Range of Ports to a Port Channel

To add range of ports to a port channel, perform these steps:

Procedure


Step 1

switch# configure terminal

Enters configuration mode.

Step 2

switch(config)# interface fc1/1 - 5

Configures the specified range of interfaces. In this example, interfaces from 1/1 to 1/5 are configured.

Step 3

switch(config-if)# channel-group 2

Adds physical interfaces 1/1, 1/2, 1/3, 1/4, and 1/5 to channel group 2. If the channel-group 2 does not exist, it is created.

If the compatibility check is successful, the interfaces are operational and the corresponding states apply to these interfaces.


What to do next


Note

By default, the CLI adds an interface normally to a port channel, while DCNM-SAN adds the interface by force, unless specified explicitly.

Forcing an Interface Addition

To force the addition of a port to a port channel, perform these steps:

Procedure


Step 1

switch# configure terminal

Enters configuration mode.

Step 2

switch(config)# interface fc1/1

Specifies the interface fc1/1.

Step 3

switch(config-if)# channel-group 1 force

Forces the addition of the physical port for interface fc1/1 to channel group 1. The port is shut down.


Deleting an Interface from a Port Channel

To delete a physical interface (or range of physical interfaces) from a port channel, perform these steps:

Procedure


Step 1

switch# configure terminal

Enters configuration mode.

Step 2

switch(config)# interface fc1/1

Enters the selected physical interface level.

Step 3

switch(config)# interface fc1/1 - 5

Enters the selected range of physical interfaces.

Step 4

switch(config-if)# no channel-group 2

Deletes the physical Fibre Channel interfaces in channel group 2.


Enabling and Configuring Autocreation

To configure automatic channel groups, perform these steps:

Procedure


Step 1

switch# configure terminal

Enters configuration mode.

Step 2

switch(config)# interface fc8/13

Enters the configuration mode for the selected interfaces.

Step 3

switch(config- if)# channel-group auto

Automatically creates the channel group for the selected interfaces.

switch(config- if)# no channel-group auto

(Optional) Disables the autocreation of channel groups for this interface, even if the system default configuration may have enabled autocreation.


Converting to Manually Configured Channel Groups

You can convert an autocreated channel group to a user-configured channel group using the port-channel channel-group-number persistent EXEC command. This command does not execute if the port channel does not exist.

Verifying Port Channel Configuration

To display the port channel configuration information, perform one of the following tasks:

Command

Purpose

show port-channel summary

Displays a summary of port channels within the switch. A one-line summary of each port channel provides the administrative state, the operational state, the number of attached and active interfaces (up), and the first operational port (FOP). The FOP is the primary operational interface that is selected in the port channel to carry control-plane traffic (no load-balancing). The FOP is the first port that comes up in a port channel and can change if the port goes down. The FOP is also identified by an asterisk (*).

show port-channel database

Cisco MDS NX-OS Release 8.3(1) and earlier: Displays the port channel that is configured in the On mode (default) and Active mode.

Cisco MDS NX-OS Release 8.4(2) and later: Displays the port channel that is configured in the On mode and Active mode (default).

show port-channel consistency

Displays the consistency status without details.

show port-channel consistency detail

Displays the consistency status with details.

show port-channel usage

Displays the port channel usage.

show port-channel compatibility-parameters

Displays the port channel compatibility.

show interface fc slot/port

Displays autocreated port channels.

show port-channel database interface port-channel number

Displays the specified port channel interface.

For detailed information about the fields in the output from these commands, refer to the Cisco MDS 9000 Series NX-OS Command Reference.

You can view specific information about existing port channels at any time from EXEC mode. The following show commands provide further details on existing port channels. You can force all screen output to go to a printer or save it to a file. See Examples Displays the Port Channel Summary to Displays the Port Channel Summary.

Examples


switch# show port-channel summary
 ------------------------------------------------------------------------------
Interface                 Total Ports        Oper Ports        First Oper Port
------------------------------------------------------------------------------
port-channel 77                2                 0                  --
port-channel 78                2                 0                  --
port-channel 79                2                 2                  fcip200

Examples


Note

This command output is applicable for Cisco MDS NX-OS Release 8.4(2) and later releases. The command output varies if you are using Cisco MDS NX-OS Release 8.4(1a) or earlier releases.


switch# show port-channel database
 
port-channel1
    Administrative channel mode is on
    Last membership update succeeded
    First operational port is fcip3
    2 ports in total, 2 ports up
    Ports:   fcip1    [up]
             fcip3    [up] *

port-channel2
    Administrative channel mode is on
    Last membership update succeeded
    First operational port is fcip5
    6 ports in total, 5 ports up
    Ports:   fcip5    [up] *
             fcip6    [up]
             fcip7    [up]
             fcip11   [up]
             fcip12   [down]
             fcip13   [up]

port-channel3
    Administrative channel mode is on
    Last membership update succeeded
    First operational port is fcip9
    3 ports in total, 3 ports up
    Ports:   fcip8    [up]
             fcip9    [up] *
             fcip10   [up]

Examples


Note

This command output is applicable for Cisco MDS NX-OS Release 8.4(2) and later releases. The command output varies if you are using Cisco MDS NX-OS Release 8.4(1a) or earlier releases.


switch# show port-channel database
 
port-channel1
    Administrative channel mode is active
    Last membership update succeeded
    First operational port is fcip3
    2 ports in total, 2 ports up
    Ports:   fcip1    [up]
             fcip3    [up] *

port-channel2
    Administrative channel mode is active
    Last membership update succeeded
    First operational port is fcip5
    6 ports in total, 5 ports up
    Ports:   fcip5    [up] *
             fcip6    [up]
             fcip7    [up]
             fcip11   [up]
             fcip12   [down]
             fcip13   [up]

port-channel3
    Administrative channel mode is active
    Last membership update succeeded
    First operational port is fcip9
    3 ports in total, 3 ports up
    Ports:   fcip8    [up]
             fcip9    [up] *
             fcip10   [up]


Examples

The show port-channel consistency command has two options: without details and with details.

switch# show port-channel consistency
Database is consistent

Examples


switch# show port-channel consistency detail
Authoritative port-channel database:
================================================
totally 3 port-channels
port-channel 77:
    2 ports, first operational port is none
    fcip1    [down]
    fcip2    [down]
port-channel 78:
    2 ports, first operational port is none
    fc2/1    [down]
    fc2/5    [down]
port-channel 79:
    2 ports, first operational port is fcip200
    fcip101  [up]
    fcip200  [up]
================================================
database 1: from module 5
================================================
totally 3 port-channels
port-channel 77:
    2 ports, first operational port is none
    fcip1    [down]
    fcip2    [down]
port-channel 78:
    2 ports, first operational port is none
    fc2/1    [down]
    fc2/5    [down]
port-channel 79:
    2 ports, first operational port is fcip200
    fcip101  [up]
    fcip200  [up]
================================================
database 2: from module 4
================================================
totally 3 port-channels
port-channel 77:
    2 ports, first operational port is none
    fcip1    [down]
    fcip2    [down]
port-channel 78:
    2 ports, first operational port is none
    fc2/1    [down]
    fc2/5    [down]
port-channel 79:
    2 ports, first operational port is fcip200
    fcip101  [up]
    fcip200  [up]
...

Examples

The show port-channel usage command displays details of the used and unused port channel numbers.

switch# show port-channel usage 
Totally 3 port-channel numbers used
===================================
Used  :   77 - 79
Unused:   1 - 76 , 80 - 256

Examples

Use the existing show commands to obtain further details on autocreated channel group attributes. Autocreated port channels are indicated explicitly to help differentiate them from the manually created port channels.

switch# show port-channel compatibility-parameters
physical port layer                 fibre channel or ethernet
    port mode                           E/AUTO only
    trunk mode
    speed
    port VSAN
    port allowed VSAN list

Examples


switch# show interface fc1/1
fc1/1 is trunking
    Hardware is Fibre Channel, FCOT is short wave laser
    Port WWN is 20:0a:00:0b:5f:3b:fe:80
    ...
    Receive data field Size is 2112
    Beacon is turned off
    Port-channel auto creation is enabled
	Belongs to port-channel 123
...

Examples


switch# show port-channel database interface port-channel 128
port-channel 128
    Administrative channel mode is active
    Operational channel mode is active
    Last membership update succeeded
    Channel is auto created
    First operational port is fc1/1
    1 ports in total, 1 ports up
    Ports:   fc1/1   [up] *

Examples


switch# show port-channel summary
------------------------------------------------------------------------------
Interface                 Total Ports        Oper Ports        First Oper Port
------------------------------------------------------------------------------
port-channel 1                 1                 0                  --
port-channel 2                 1                 1                  fc8/13
port-channel 3                 0                 0                  --
port-channel 4                 0                 0                  --
port-channel 5                 1                 1                  fc8/3
port-channel 6                 0                 0                  --
Configuration Examples for F and TF Port Channels

This example shows how to configure an F port channel in shared mode and bring up the link (not supported on the MDS 91x4 switches) between F ports on the Cisco NPIV core switches and NP ports on the Cisco NPV switches:

Procedure


Step 1

Enable the F port trunking and channeling protocol on the MDS core switch.

Example:


switch(config)# feature fport-channel-trunk

Step 2

Enable NPIV on the MDS core switch:

Example:


switch(config)# feature npiv

Step 3

Create the port channel on the MDS core switch:

Example:


switch(config)# interface port-channel 1
switch(config-if)# switchport mode F
switch(config-if)# channel mode active
switch(config-if)# switchport trunk mode off
switch(config-if)# switchport rate-mode shared
switch(config-if)# exit

Step 4

Configure the port channel member interfaces on the core switch:

Example:


switch(config)# interface fc2/1-3
switch(config-if)# shut
switch(config-if)# switchport mode F
switch(config-if)# switchport trunk mode off
switch(config-if)# switchport speed 4000
switch(config-if)# switchport rate-mode shared
switch(config-if)# channel-group 1
switch(config-if)# no shut
switch(config-if)# exit

Step 5

Create the port channel on the NPV switch:

Example:


switch(config)# interface port-channel 1
switch(config-if)# switchport mode NP
switch(config-if)# switchport rate-mode shared
switch(config-if)# exit

Step 6

Configure the port channel member interfaces on the NPV switch:

Example:


switch(config)# interface fc2/1-3
switch(config-if)# shut
switch(config-if)# switchport mode NP
switch(config-if)# switchport speed 4000
switch(config-if)# switchport rate-mode shared
switch(config-if)# switchport trunk mode off
switch(config-if)# channel-group 1
switch(config-if)# no shut
switch(config-if)# exit

Step 7

Set the administrative state of all the port-channel member interfaces in both NPIV core switch and the NPV switch to ON:

Example:


switch(config)# interface fc1/1-3
switch(config-if)# shut
switch(config-if)# >no shut
switch(config)# interface fc2/1-3
switch(config-if)# shut
switch(config-if)# >no shut


Configuration Examples for F and TF Port Channels (Dedicated Mode)


Note

The speed configuration must be the same for all member interfaces in a port channel. While configuring the channel in dedicated mode, ensure that required bandwidth is available to the ports.

This example shows how to configure channeling in dedicated mode and bring up the TF-TNP port channel link between TF ports in the NPIV core switch, and TNP ports in the Cisco NPV switch:

Procedure


Step 1

Enable the F port trunking and channeling protocol on the MDS core switch:

Example:


switch(config)# feature fport-channel-trunk

Step 2

Enable NPIV on the MDS core switch:

Example:


switch(config)# feature npiv

Step 3

Create the port channel on the MDS core switch:

Example:


switch(config)# interface port-channel 2
switch(config-if)# switchport mode F
switch(config-if)# switchport rate-mode dedicated
switch(config-if)# channel mode active
switch(config-if)# exit

Step 4

Configure the port channel member interfaces on the MDS core switch in dedicated mode:

Example:


switch(config)# interface fc1/4-6
switch(config-if)# shut
switch(config-if)# switchport mode F
switch(config-if)# switchport speed 4000
switch(config-if)# switchport rate-mode dedicated
switch(config-if)# switchport trunk mode on
switch(config-if)# channel-group 2
switch(config-if)# no shut
switch(config-if)# exit

Step 5

Create the port channel in dedicated mode on the Cisco NPV switch:

Example:


switch(config)# interface port-channel 2
switch(config-if)# switchport rate-mode dedicated
switch(config-if)# switchport mode NP
switch(config-if)# no shut
switch(config-if)# exit

Step 6

Configure the port channel member interfaces on the Cisco NPV switch in dedicated mode:

Example:


switch(config)# interface fc3/1-3
switch(config-if)# shut
switch(config-if)# switchport mode NP
switch(config-if)# switchport speed 4000
switch(config-if)# switchport rate-mode dedicated
switch(config-if)# switchport trunk mode on
switch(config-if)# channel-group 2
switch(config-if)# no shut
switch(config-if)# exit

Step 7

Set the administrative state of all the port channel member interfaces in both NPIV core switch and the Cisco NPV switch to ON:

Example:


switch(config)# interface fc1/4-6
switch(config-if)# shut
switch(config-if)# no shut
switch(config)# interface fc3/1-3
switch(config-if)# shut
switch(config-if)# no shut